İçeriğinizi sosyal medyada paylaşmaya insanları teşvik etmek, kitlenizi büyütmenin ve insanların işletmeniz hakkında heyecanlanmasını sağlamanın harika bir yoludur.
Ancak gerçek şu ki, insanlar içeriğinizi kolaylaştırmadığınız sürece paylaşmayacaklardır.
We use social share buttons on the WPBeginner blog so our readers can share our content with a simple click, so we know what we’re talking about. 🤓
Deneyimlerimize göre Pinterest, özellikle fotoğraf, infografik ve dijital sanat gibi görsel içerikler yayınlıyorsanız, WordPress sitenize trafik çekmek için harika bir platformdur.
Adding a ‘Pin It’ button to your WordPress site lets your visitors quickly share images or other visual content on their Pinterest boards. Plus, it can have lots of advantages! Think: more visitors, more comments, and more sales. 💥
Bu makalede, Pinterest ‘Pin It’ düğmesini WordPress'e nasıl ekleyeceğinizi göstereceğiz.
WordPress'e Pinterest ‘Pin It’ Düğmesi Neden Eklenir?
Pinterest, kullanıcıların panolar oluşturarak web sitesi bağlantılarını ve diğer görsel içerikleri toplamasına olanak tanıyan popüler bir sosyal medya platformudur.
Kullanıcılar içeriğinizi Pinterest panolarına eklediğinde, bu diğer insanların web sitenizi keşfetmesine yardımcı olur. Özellikle fotoğrafçılık web sitesi, moda blogu veya bol miktarda resim ve video içeren herhangi bir blog türü çalıştırıyorsanız, Pinterest özellikle önemli bir trafik kaynağıdır.
Web sitenize bir 'Pin It' düğmesi eklemek, ziyaretçileri içeriğinizi Pinterest'te paylaşmaya teşvik edebilir.

Not: Pinterest, ‘Pin It’ düğmesinin adını 2016'da resmi olarak ‘Kaydet’ olarak değiştirdi. Ancak, birçok rehber ve WordPress eklentisi hala ‘Pin It’ kullanıyor, bu yüzden bu rehberde orijinal adı kullanıyoruz. Ayrıca, kulağa daha akılda kalıcı geliyor!
Bu bağlamda, WordPress'e bir Pinterest 'Pin It' düğmesi eklemenin yollarını inceleyelim. Kullanmak istediğiniz yönteme doğrudan atlamak için aşağıdaki hızlı bağlantıları kullanın:
- Yöntem 1: Gönderilere Pinterest 'Pin It' Düğmesi Ekleme (Kolay Yol)
- Yöntem 2: Pinterest 'Pin It' Düğmesini Görsellere Ekleme (Kolay Yol)
- Yöntem 3: Özel Kısa Kod Kullanarak Pinterest 'Pin It' Düğmesi Ekleme
- Method 4: Add Pinterest 'Pin It' Button Using Code and FTP
Yöntem 1: Gönderilere Pinterest ‘Pin It’ Düğmesi Ekleme (Kolay Yol)
Pinterest düğmesini WordPress sitenize eklemenin en kolay yolu Novashare kullanmaktır. Bize göre, WordPress için en iyi sosyal medya eklentilerinden biridir.
It allows you to easily add a Pinterest button to your site, along with buttons for all the other major social networks. We’ve tested Novashare out for lots of different use cases, and we really like how easy it is to use. For more information about the plugin, see our full Novashare review.
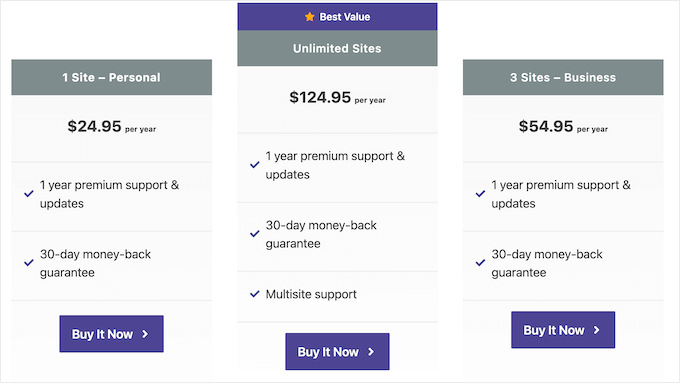
Başlamak için, Novashare web sitesini ziyaret etmeniz ve bir plan seçmeniz gerekir. Ardından, eklentiyi kurmanız ve etkinleştirmeniz gerekecektir. Yardıma ihtiyacınız olursa, WordPress eklentisi kurma hakkındaki kılavuzumuza bakın.
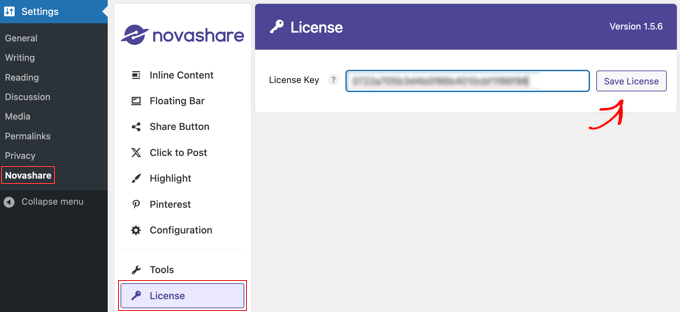
Etkinleştirdikten sonra, lisansınızı etkinleştirmek için WordPress kontrol panelinizdeki Ayarlar » Novashare sayfasına gitmelisiniz.
‘Lisans’ sekmesine tıklayın, eklentiyi satın aldığınızda size verilen lisans anahtarını yapıştırın ve ardından ‘Lisansı Kaydet’ düğmesine tıklayın.
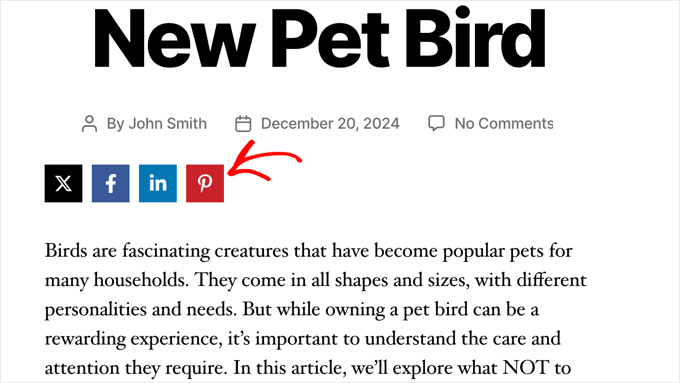
Lisansınızı etkinleştirdikten sonra, web sitenize bir Pinterest simgesi ve istediğiniz diğer sosyal paylaşım simgelerini ekleyebilirsiniz. Bu simgeleri içeriğinizle aynı hizada veya kayan bir çubuk olarak ekleyebilirsiniz.
Burada ilk seçeneği kullanacağız (ancak kayan çubuklar hakkında daha fazla bilgi için okumaya devam edin).
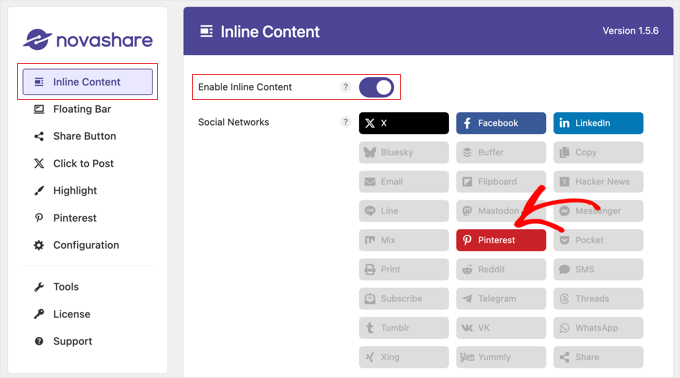
Novashare'deki 'Satır İçi İçerik' sekmesine gidin ve 'Satır İçi İçeriği Etkinleştir' seçeneğini açın. Ardından, Pinterest düğmesine tıklayarak kırmızıya dönmesini sağlayın.
Bu noktada, sosyal paylaşım düğmesi çubuğuna eklemek istediğiniz diğer sosyal ağları da etkinleştirebilirsiniz.
Bundan sonra, aşağı kaydırabilir ve düğme çubuğunu yapılandırmak için mevcut seçenekleri kullanabilirsiniz.
Düğme çubuğunu gönderilerde, sayfalarda ve daha fazlasında görüntülemek için ayarlar mevcuttur. Düğmelerin rengini ve tasarımını da özelleştirebilirsiniz.
You can even add labels to the buttons and show a count of how many times the current post has been shared on social media.
Tüm bu seçenekleri ve kayan çubukları, WordPress'e sosyal paylaşım düğmeleri ekleme kılavuzumuzda ayrıntılı olarak ele alıyoruz.
'Pin It' düğmenizi özelleştirmeyi bitirdiğinizde, sayfanın altına kaydırın. Buradaki yeni ayarları kaydetmek için 'Değişiklikleri Kaydet' düğmesine tıklayın.
Pinterest düğmesinin çalıştığını görmek için artık WordPress web sitenizi ziyaret edebilirsiniz.
Yöntem 2: Görsellere Pinterest ‘Pin It’ Düğmesi Ekleme (Kolay Yol)
Moda, fotoğrafçılık veya yemek blogu mu yönetiyorsunuz? O zaman, bu görsellerin üzerine bir Pinterest düğmesi eklemek isteyebilirsiniz. Bu, ziyaretçilerin sabitlemek istedikleri görselin üzerine gelerek içeriğinizi paylaşmalarını sağlar.
1. Yöntemde kullandığımız Novashare eklentisi, sitenizdeki herhangi bir resmin üzerine geldiğinizde bir Pinterest ‘Pin’ düğmesi de ekleyebilir.
Bir lisans satın alıp, daha önce Yöntem 1'de açıkladığımız gibi plugin'i kurduktan sonra, Ayarlar » Novashare'e gidin ve 'Pinterest' sekmesine tıklayın.
Now, toggle the ‘Enable Image Pins’ on and select the ‘Post Types’ where you want to display the button.
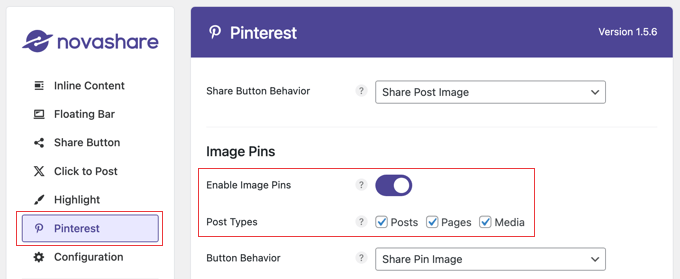
Ardından, düğme konumunu, şeklini ve rengini özelleştirebilirsiniz. Diğer varsayılan ayarlar çoğu web sitesi için iyi çalışacaktır.
İsterseniz, Pinterest düğmesini fare imlecini görüntünün üzerine getirdiğinizde değil, her zaman görüntüler üzerinde gösterebilirsiniz. Bunu yapmak için 'Her Zaman Göster' seçeneğini etkinleştirmeniz gerekecektir.
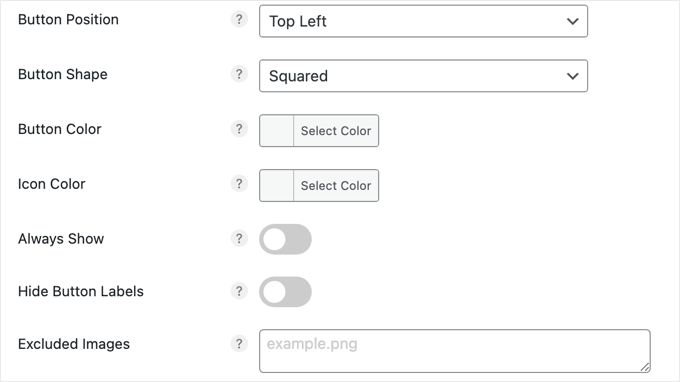
Bazı web sitesi sahiplerinin paylaşılmasını istemedikleri birkaç resim vardır. Bu durumda, dosya adlarını 'Hariç Tutulan Resimler' alanına yazabilirsiniz.
Ayarlardan memnun kaldığınızda, ‘Değişiklikleri Kaydet’ düğmesine tıkladığınızdan emin olun. Ardından, Novashare görsellerde Pin düğmesini göstermeye başlayacaktır.

Yöntem 3: Özel Kısa Kod Kullanarak Pinterest ‘Pin It’ Düğmesi Ekleme
Bazen, ‘Pin It’ düğmesinin sitenizde tam olarak nerede görüneceğini kontrol etmek isteyebilirsiniz. Örneğin, Pinterest düğmesini belirli bir reklam açılış sayfasında veya gönderi içeriğinde göstermek isteyebilirsiniz.
Bu durumda, bir seçenek düğmeyi kod kullanarak oluşturmak ve ardından özel bir kısa kod kullanarak her sayfaya veya gönderiye yerleştirmektir. Bu, 'Pin It' düğmesini farklı konumlarda gösterme özgürlüğü verir, ancak her sayfaya veya gönderiye manuel olarak eklemeniz gerekir.
WordPress'e özel kod eklemenin en kolay yolu WPCode kullanmaktır. Bu, web sitenize özel PHP, CSS, JavaScript ve daha fazlasını eklemenize olanak tanır.
Ortak markalarımızın birkaçı, kod parçacıklarını siteleri genelinde yönetmek için bu eklentiyi kullanıyor ve hepsi bize ne kadar sevdiklerini bildirdiler. Daha fazla bilgi için, tam WPCode incelememize bakın.
WPCode'u özel kısa kodlar oluşturmak için de kullanabilirsiniz, bu nedenle web sitenize bir 'Pin It' düğmesi eklemek için mükemmeldir.
Öncelikle, ücretsiz WPCode eklentisini yüklemeniz ve etkinleştirmeniz gerekecektir. Daha fazla bilgi için, bir WordPress eklentisinin nasıl kurulacağına dair adım adım kılavuzumuza bakın.
Eklenti etkinleştirildikten sonra, Kod Parçacıkları » Parçacık Ekle bölümüne gidin.
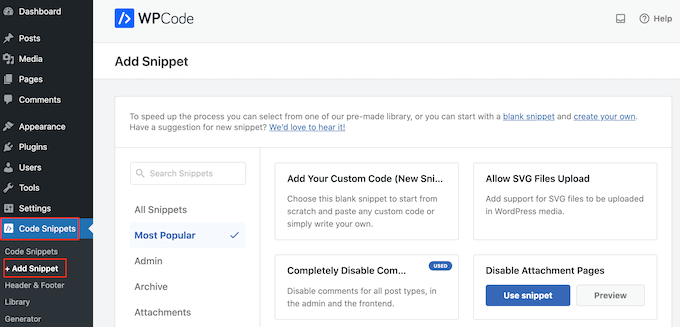
Burada, WPCode'un sitenize ekleyebileceği tüm hazır kod parçacıklarını göreceksiniz. Bunlar arasında WordPress'e sosyal paylaşım düğmeleri eklemenize ve sosyal simgelerinizi kenar çubuğunda görüntülemenize olanak tanıyan kod parçacıkları bulunur.
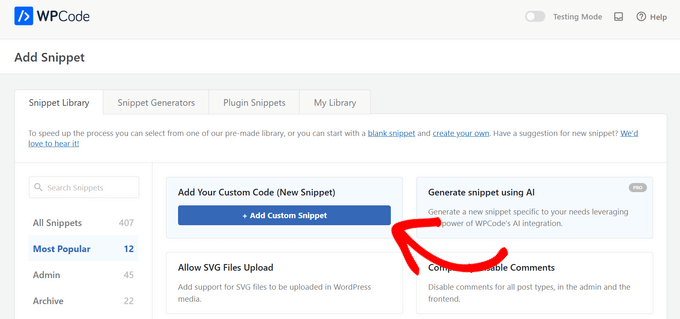
Şimdi, fare imlecini 'Özel Kodunuzu Ekleyin (Yeni Parçacık)' seçeneğinin üzerine getirmeli ve göründüğünde '+ Özel Parçacık Ekle' düğmesine tıklamalısınız.
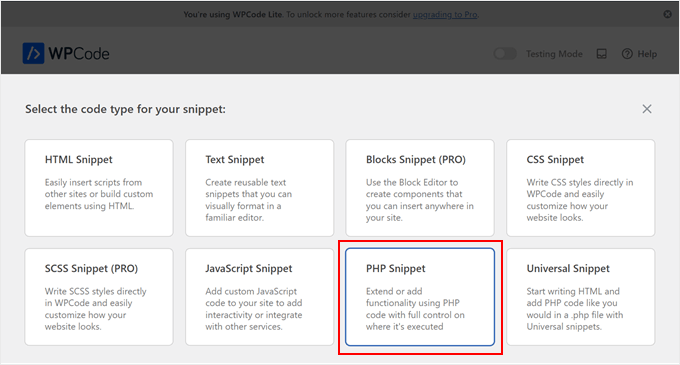
Ardından, WordPress'e PHP ekleyeceksiniz, bu nedenle kod türü olarak ‘PHP Parçacığı’nı seçmeniz gerekir.
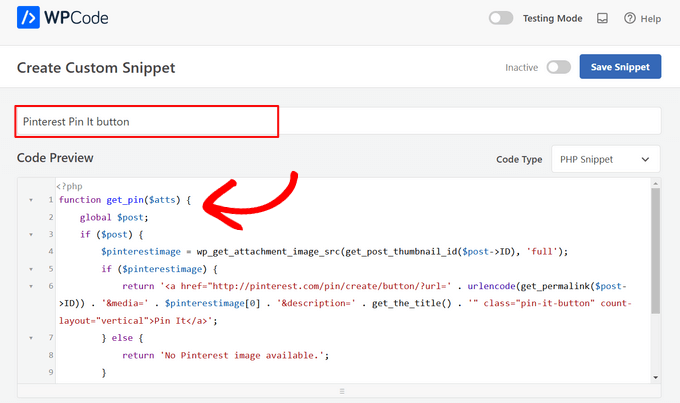
Bir sonraki ekranda, kod parçacığı için bir başlık girin.
Bu sadece referans amaçlıdır, istediğiniz herhangi bir şeyi kullanabilirsiniz. Bu eğitim için 'Pinterest Pin It Button' yazacağız.
Bu yapıldıktan sonra, şunu kod düzenleyiciye yapıştırmanız yeterlidir:
function get_pin($atts) {
    global $post;
    if ($post) {
        $pinterestimage = wp_get_attachment_image_src(get_post_thumbnail_id($post->ID), 'full');
        if ($pinterestimage) {
            return '<a href="http://pinterest.com/pin/create/button/?url=' . urlencode(get_permalink($post->ID)) . '&media=' . $pinterestimage[0] . '&description=' . get_the_title() . '" class="pin-it-button" count-layout="vertical">Pin It</a>';
        } else {
            return 'No Pinterest image available.';
        }
    } else {
        return 'No post found.';
    }
}
add_shortcode('pin', 'get_pin');
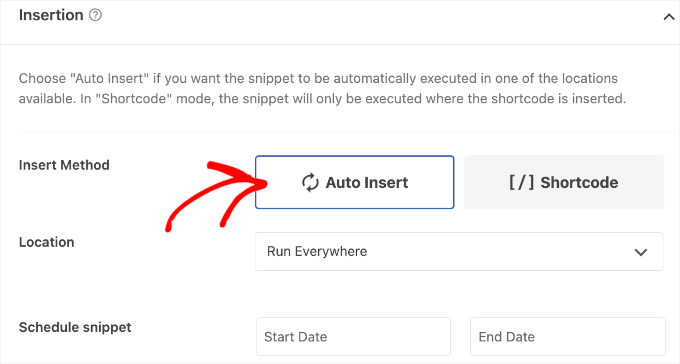
Ardından, sayfayı aşağı kaydırarak ‘Ekleme’ bölümüne gidin. Buradaki varsayılan ’Otomatik Ekleme’ yöntemini, kodun her yerde çalıştığından emin olmak için kullanmaya devam edebilirsiniz.
Henüz seçili değilse, 'Her Yerde Çalıştır'ı seçin
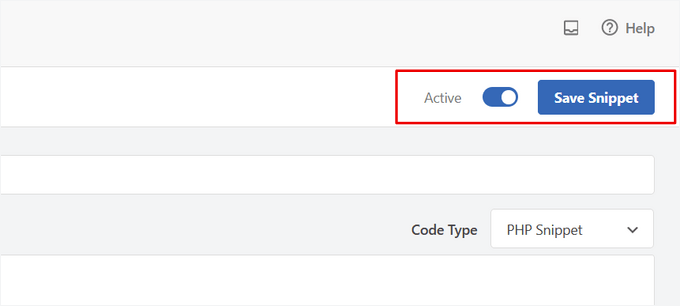
Son olarak, ekranın üst kısmına kaydırın ve ‘Devre Dışı’ kaydırıcısına tıklayarak ‘Etkin’ olarak görünmesini sağlayın.
Ardından, kod parçasını canlı hale getirmek için ‘Snippet Kaydet’ veya ‘Güncelle’ düğmesine tıklayın.
Now, you can add a ‘Pin It’ button to any WordPress page, post, or widget-ready area using the [pin] shortcode.
Kısa kodun nasıl yerleştirileceğine dair adım adım talimatlar için lütfen WordPress'e kısa kod ekleme kılavuzumuza bakın.
![WordPress gönderilerinizde [pin] kısayol kodunu kullanın WordPress gönderilerinizde [pin] kısayol kodunu kullanın](https://www.wpbeginner.com/wp-content/uploads/2019/06/pinterest-add-shortcode.png)
Bu kodu ekledikten sonra ziyaretçiler, öne çıkan bir görseli olan herhangi bir sayfada veya gönderide ‘Pin It’ düğmesini görecektir.
If the page doesn’t have a featured image, then they’ll see a ‘No Pinterest image available’ error message instead.
Tam Site Düzenleyiciyi Kullanarak Pinterest ‘Pin It’ Düğmesi Nasıl Eklenir
WordPress'in daha yeni blok etkin temalarından birini kullanıyorsanız, özel kısa kod kullanarak WordPress temanıza istediğiniz yere bir 'Pin It' düğmesi ekleyebilirsiniz.
Bu, düğmeyi her sayfaya ve gönderiye eklemenin kolay bir yoludur. Ayrıca, standart WordPress içerik düzenleyicisini kullanarak düzenleyemediğiniz alanlara, örneğin sitenizin 404 sayfa şablonunuza 'Pin It' düğmesini ekleyebilirsiniz.
Başlamak için WordPress kontrol panelinde Temalar » Düzenleyici'ye gidin.
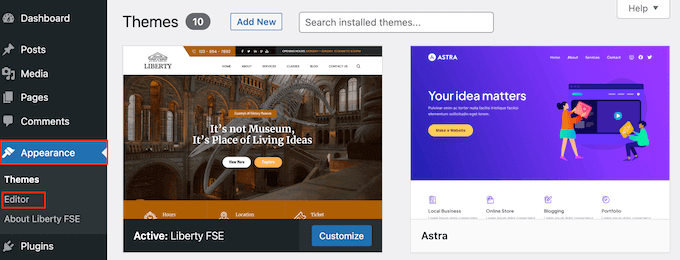
Varsayılan olarak, tam site düzenleyici temanızın ana sayfa şablonunu gösterecektir.
Farklı bir sayfaya ‘Pin It’ düğmesi eklemek için sol menüden ‘Şablon’ veya ‘Şablon Parçaları’nı seçmeniz yeterlidir.
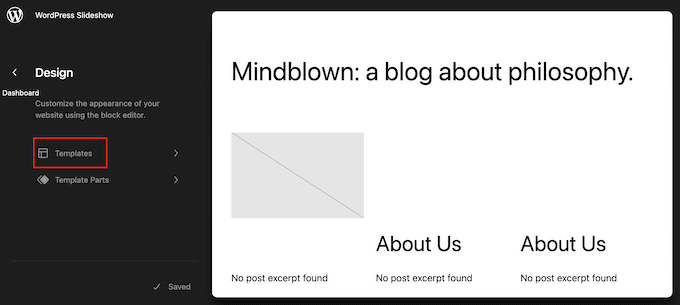
Artık düzenlemek istediğiniz şablonu seçebilirsiniz.
Bu örnekte, sitenizin Tek sayfa şablonuna bir ‘Pin It’ düğmesi eklemeyi göstereceğiz. Ancak, hangi şablonu seçerseniz seçin adımlar benzer olacaktır.
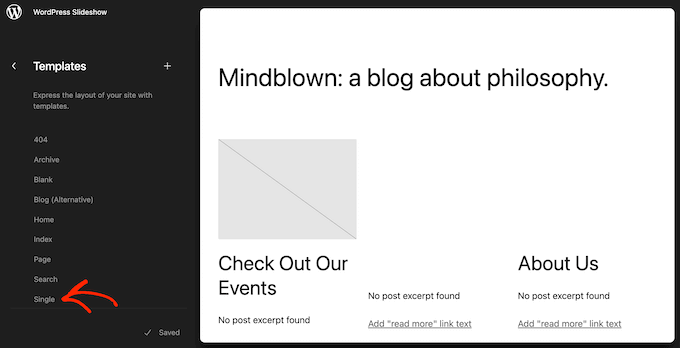
WordPress şimdi şablonun veya şablon parçasının önizlemesini gösterecektir.
To edit this template, go ahead and click on the small pencil icon.
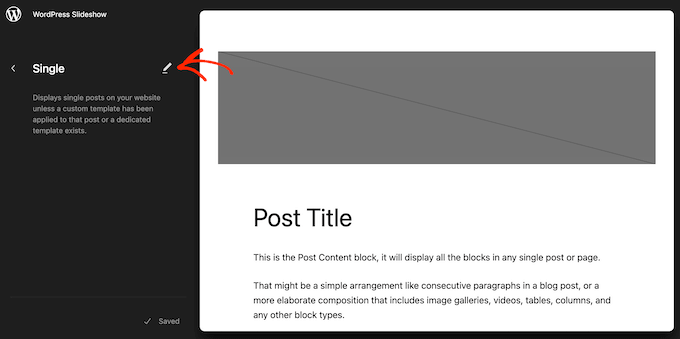
Bu işlem tamamlandıktan sonra, sol üst köşedeki mavi '+' simgesine tıklayın.
Görünen arama çubuğuna 'Kısa Kod' yazın.
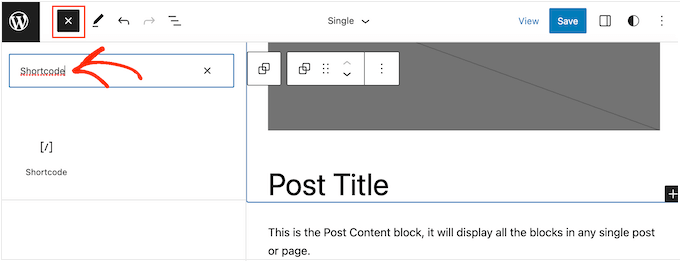
Sağ blok göründüğünde, onu şablon düzenine sürükleyip bırakın.
Artık bloğa Pin kısa kodunu yazabilirsiniz.
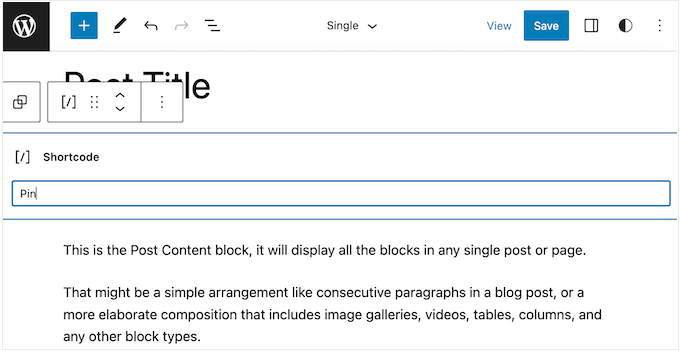
After that, simply click on ‘Save’ to make the new shortcode live.
Şimdi WordPress web sitenizi ziyaret ederseniz, 'Pin it' düğmesinin çalıştığını göreceksiniz.
Method 4: Add Pinterest ‘Pin It’ Button Using Code and FTP
Bir eklenti olmadan web sitenize bir Pinterest düğmesi eklemenin başka bir yolu da kodu doğrudan tema dosyalarınıza eklemektir. Ancak, bu yöntem yalnızca teknik kullanıcılar için uygundur.
Tema dosyalarını doğrudan düzenlemek birçok yaygın WordPress hatasına neden olabilir ve WordPress temasını güncellediğinizde tüm özel kodları kaybedersiniz. Bunu akılda tutarak, bunun yerine her zaman WPCode kullanmanızı öneririz.
Ancak, bu yöntemi kullanırsanız, öncelikle sitenizin tam bir WordPress yedeğini almanız gerekecektir. Bu, bir şeyler kazara bozulursa sitenizi geri yüklemenize yardımcı olacaktır.
Bu işlem tamamlandıktan sonra, bir FTP istemcisi kullanarak WordPress barındırma hizmetinize bağlanın ve ardından /wp-content/themes/ klasörüne gidin.
Buradan, mevcut tema klasörünüzü açmanız ve ardından footer.php dosyasını bulmanız gerekir.
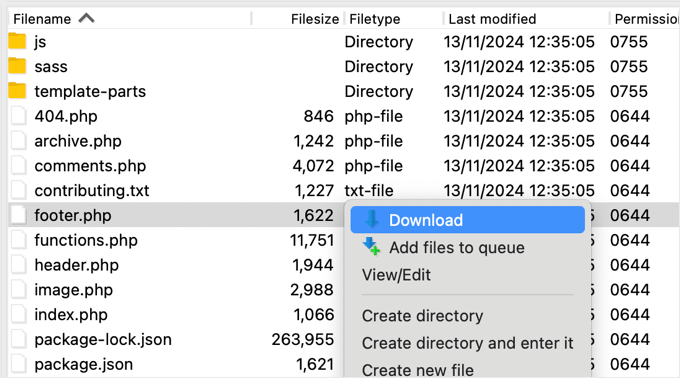
Ardından, bu dosyaya sağ tıklayın ve menüden 'İndir'i seçin. Bu, footer.php dosyasını bilgisayarınıza indirecektir.
Now, you need to open the footer.php file using a plain text editor like Notepad and paste the following script right before the </body> tag.
<script type="text/javascript">
(function() {
    window.PinIt = window.PinIt || { loaded:false };
    if (window.PinIt.loaded) return;
    window.PinIt.loaded = true;
    function async_load(){
        var s = document.createElement("script");
        s.type = "text/javascript";
        s.async = true;
        s.src = "https://assets.pinterest.com/js/pinit.js";
        var x = document.getElementsByTagName("script")[0];
        x.parentNode.insertBefore(s, x);
    }
    if (window.attachEvent)
        window.attachEvent("onload", async_load);
    else
        window.addEventListener("load", async_load, false);
})();
</script>
Bunu yaptıktan sonra, dosyayı kaydetmeniz ve ardından mevcut tema klasörüne geri yüklemeniz gerekir.
Ardından, düğmeyi eklemek istediğiniz temanızdaki şablon dosyasını bulun. Genellikle bu, single.php dosyası olacaktır, ancak WordPress temanıza bağlı olarak değişebilir. Emin değilseniz, WordPress şablon hiyerarşisine ilişkin yeni başlayanlar kılavuzumuza bakabilirsiniz.
Şablon dosyasını düzenlemek için, tema klasörünüzden indirip düzenlemek üzere açmanız yeterlidir.
'Pin It' düğmesini nerede göstermek istediğinizi seçmeniz gerekecek. Birçok web sitesi sosyal paylaşım düğmelerini doğrudan gönderi başlığının altına gösterir, ancak istediğiniz herhangi bir konumu kullanabilirsiniz.
Bir konum seçtikten sonra, aşağıdaki kodu eklemeniz yeterlidir:
<?php $pinterestimage = wp_get_attachment_image_src( get_post_thumbnail_id( $post->ID ), 'full' ); ?>
<a href="http://pinterest.com/pin/create/button/?url=<?php echo urlencode(get_permalink($post->ID)); ?>&media=<?php echo $pinterestimage[0]; ?>&description=<?php the_title(); ?>" class="pin-it-button" count-layout="vertical">Pin It</a>
Yukarıdaki kod parçacığı, gönderinin öne çıkan görselini, başlığını, açıklamasını ve URL'sini paylaşım URL parametresine ekler.
Bu kod parçacığı, tüm gönderilerinize dikey bir paylaşım düğmesi de ekleyecektir. Bunun yerine yatay bir paylaşım düğmesi görüntülemek istiyorsanız, count-layout="vertical"> bölümünü count-layout="horizontal"> olarak değiştirmeniz yeterlidir.
Hazır olduğunuzda, dosyayı kaydedin ve FTP kullanarak doğrudan temanıza geri yükleyin.
Bonus: Additional Guides About WordPress and Social Media
WordPress'i sosyal medyada nasıl kullanacağınız hakkında daha fazla bilgi edinmek ister misiniz? Bu başlangıç dostu kılavuzlara göz atın:
- Pinterest Öldü mü? Blogunuza Pinterest Trafiğini Nasıl Süper Şarj Edersiniz
- WordPress Sitenizi Pinterest'te Doğrulama (Adım Adım)
- WordPress'ten Otomatik Olarak Instagram'a Nasıl Yayınlanır
- Blogunuzu Büyütmek İçin En İyi WordPress Facebook Eklentileri
- Sosyal Medya İstatistikleri (Bloggerlar İçin Nihai Liste)
Bu makaleyi beğendiyseniz, lütfen WordPress video eğitimleri için YouTube Kanalımıza abone olun. Bizi ayrıca Twitter ve Facebook'ta da bulabilirsiniz.


Dennis Muthomi
PHP kod parçacığı için teşekkürler.
Kodu web sitemin footer.php dosyasına kopyalayıp yapıştırdım, ancak düğme yüklemeden sonra başlangıçta görünmedi.
Yeni düğmenin düzgün görüntülenmesi için önbelleğimi temizlemem gerektiğini fark ettim.
Jiří Vaněk
PHP parçacığı için teşekkürler. Bir sitede denedim ve harika çalışıyor. Eklentiler arasında bana biraz yer kazandırdınız. Aferin.
Alison
Merhaba. Yakın zamanda paylaşılan sayımlar ve Pinterest eklentisi eklentilerini ekledim. İyi çalışıyor gibi görünüyorlar, ancak birkaç yıldır güncellenmediklerini ve Wordpress sürümümle test edilmediklerini fark ettim. Yeni bir eklenti mi aramalıyım yoksa hala kullanmak için uygunlar mı?
WPBeginner Desteği
The shared count plugin was updated 2 months ago and it should still be working well, for the warnings we would recommend taking a look at our article below for why you shouldn’t be very concerned
https://www.wpbeginner.com/opinion/should-you-install-plugins-not-tested-with-your-wordpress-version/
Yönetici
Julie
I’m looking to add an individual graphic pin that I’ve custom designed to the travel blog post it belongs to (like the best things to do in Jaipur). Is that what this article is covering or is it just the literal Pinterst “Button” that looks like the Pinterst logo? Sorry to be co fixed with this technicality, but an image or two would make this much clearer what specifically the “button” you are referring to is….thank you in advance…
WPBeginner Desteği
This is for the Pinterest pin it button, the second screenshot in the article should be what you are looking for as an example.
Yönetici
Ellen
İşe yaradı!! teşekkürler
WPBeginner Desteği
Glad our guide could help
Yönetici
Kara
Eklentiyi kurduktan sonra ayarlarımda hiç görünmedi.
WPBeginner Desteği
Eklentiyi etkinleştirdiğinizden de emin olmak isteyeceksiniz.
Yönetici
Jais
Thanks. It works.
WPBeginner Desteği
You’re welcome, glad it worked for you
Yönetici
laira
Merhaba wpbeginner, kodlarınızı takip ediyorum, pinterest panolarıma resimleri yine de sabitleyecek miyim? yoksa otomatik olarak mı sabitlenecek? Bu platformda hala acemiyim. teşekkürler
WPBeginner Desteği
Düğme kullanıldığında panonuza eklenecektir.
Yönetici
Lorraine Reguly
Kod için teşekkürler. Yazar siteme ekledim. (Pinterest düğmesinin iş sitemdeki görsellerimde nasıl göründüğünü bilmiyorum ama görünüyor.)
Artık yazar sitem tamamen kuruldu!
Teşekkürler, Syed.
P.S. I just followed you on Pinterest.
WPBeginner Desteği
Merhaba Lorraine,
Bizi Pinterest'te takip ettiğiniz için teşekkürler. Bizi ayrıca Twitter ve Facebook'ta da bulabilirsiniz.
Yönetici
RB
bu işe yarıyor !! teşekkürler
ve
Merak ediyorum…
ikonu nasıl değiştirebilirim? Kodu değiştirdiğimde simge hala aynı kalıyor
Thales
Son seçeneği yaptım, kısa kodu temamın functions.php dosyasına ekledim. İşe yaradı, ancak gönderilerimi taslak olarak kaydedemiyordum. Sonra kodu kaldırdım ve çalışmıyor. Sitem hala yayında, ancak siteme giriş yapamıyorum. Şu mesaj görünüyor:
Uyarı: Üstbilgi bilgileri değiştirilemiyor – üstbilgiler zaten gönderildi (çıktı /home/peque107/public_html/wp-content/themes/himmelen/functions.php:2) /home/peque107/public_html/wp-includes/pluggable.php satır 1224'te
Lütfen yardım edin!
Emma steave
Teşekkürler. Harika
Carissa
Bu yalnızca wordpress.org blogları için mi geçerli? Bir wordpress.com blogum var ve buna bu eklentiyi ekleyip ekleyemeyeceğimden emin değilim?
Teşekkürler!
WPBeginner Desteği
Evet, WordPress.org içindir. Lütfen kendi barındırılan WordPress.org ile ücretsiz WordPress.com blogu arasındaki fark hakkındaki kılavuzumuza bakın.
Yönetici
Ruth
Bir sorunum var. Talimatları izledim ve şu hatayı aldım:
Ayrıştırma hatası: sözdizimi hatası, beklenmeyen '<' /home/cmomb/butfirstwehavecoffee.com/wp-content/themes/notepad/functions.php dosyasının 18. satırında
Şimdi ondan kurtulamıyorum. Birisi tavsiye verebilir mi? Sitem şimdi kapalı.
WPBeginner Desteği
notepad gibi bir metin düzenleyicide functions.php dosyasını açın. 18. satıra gidin. Muhtemelen orada ihtiyacınız olmayan bir <?php etiketi vardır. Onu silin ve ?> kapatma etiketini de silin.
Yönetici
Ian Harris
Öncelikle bunun için teşekkürler
Öğeyi konumlandırmakta zorlanıyorum. Her zaman div'in sol üst köşesinde gibi görünüyor.
Konumlandırılabilir mi ve ayrıca arka plan görüntüsünü kendi özel görüntünüzle değiştirebilir misiniz?
Teşekkürler
Paradise Found Around
Her zamanki gibi harika bir eğitim. Ancak, otomatik olarak gelen starboard düğmesi yerine özel bir düğme kullanmak için bunu değiştirmenin bir yolu olup olmadığını merak ediyordum.
Teşekkürler,
Mark
mark taylor
Harika bir eğitim, siteme sorunsuz bir şekilde ekledim, sonra test ettim ve çalıştı, ancak sabitledikten sonra hala 0 gösteriyor.
Mark
vrinda
Çok fazla eklenti denedim… sonsuz kaydırma ve nextgen galeri ile çalışmıyorlar…. ancak bazı değişikliklerle bu betik sorunumu çözdü.. teşekkürler
Michael
Merhaba,
'pin it' düğmesinin boyutunu değiştirebilir miyim diye sormak istiyorum? Çünkü biraz küçük görünüyordu.
Saygılarımla,
Michael
Yayın Kadrosu
Pin sayacı düzenini dikey veya yatay olarak kullanabilirsiniz. Bunun dışında, boyutu değiştiremezsiniz.
Yönetici
Jenny
Bu kod yakın zamanda çalışmayı bıraktı. Sitemde vardı ve harika çalışıyordu ve yakın zamanda görseller çalışıyor gibi görünüyor, ancak daha sonra pin panosunu görüntülemeye gittiğinizde hiçbir görsel ayarlanmamış. Diğer zamanlarda pinlemeye çalıştığınızda Pinterest sitesinden gelen 502 hatası. Fikirleriniz var mı?
Yayın Kadrosu
Muhtemelen Pinterest tarafında sunucu hataları. Bu kodu diğer sitelerimizde çalıştırıyoruz.
Yönetici
Ido Schacham
Kodda bir hata var. Pin it düğmesi için oluşturulan href, ‘url=’ içermelidir, şu anda eşittir işareti eksik.
Yayın Kadrosu
Fixed the shortcode code for that. Thanks for reporting it
Yönetici
jess
WordPress kullanıcıları için.. pin it veya başka bir sosyal medya eklemek kolaydır! Kontrol panelinden, ayarlar'a gidin, paylaşım'a tıklayın ve hepsi görünür - eklemek istediğinize tıklayın!
Yayın Kadrosu
WP.com sitelerinden bahsediyorsunuz. Bu eğitim kendi kendine barındırılan WordPress siteleri içindir. İki farklı şey.
Yönetici
Jen M
THANK YOU! I have been searching for how to do this for 2 days & downloaded something & that didn’t work, I was about to give up & then THANKFULLY read your comment. I appreciate someone making it as EASY as it really is, how come wordpress can’t do that?
Jenn K
Ooh, thanks for the tip! Exactly what I was looking for
Nick
Bunu özelleştirmenin ve pin-it düğmesi için özel bir resim seçmenin bir yolu var mı?
Yayın Kadrosu
Makaleniz için özel bir görsel demek istiyorsanız, evet yapabilirsiniz. İkinci koddaki &media etiketine bakın.
Yönetici
Husein Yuseinov
Merhaba,
Bu kodu uygulamam gerekiyor ancak header dosyasında, postthumbnail hata veriyor?!
wpbeginner
@Husein Yuseinov Küçük resim kodunu gönderi döngünüzün içinde çağırmanız gerekir. Bunu header.php dosyanızda çağırmak için global değişkeni kullanmalısınız.
https://www.wpbeginner.com/wp-themes/how-to-display-custom-fields-outside-the-loop-in-wordpress/
Husein Yuseinov
@wpbeginner Hızlı yanıt için teşekkürler, ancak ben bir kodlayıcı değilim ve söylediklerinizi anlamam benim için zor.
wpbeginner
@Husein Yuseinov Ok… so here is what you do. Add the following line above $pinterestimage line inside the PHP tags:
global $wp_query;
$postid = $wp_query->post->ID;
Then replace $post->ID with $postid and it will work. Also after the code, you may want to end wp_reset_query();
This is the best we can do. What you are asking for requires coding. If you are unable to do this, then shoot us an email. We can help you out for a small fee.
robthecomputerguy
What in the world is going on with the “animhut blog” button on thee next 3 comments?
wpbeginner
@robthecomputerguy Sanırım yorumlarımızı beğendiler ve livefyre onların profilini gösteriyor.
robthecomputerguy
@wpbeginner Ah, bu büyüleyici - bunu hiç aklıma gelmemişti - takip için teşekkürler!
FuturePocket
Bunu eklemeyi denedim… işe yaradı ancak “Pin it”e tıkladığınızda yeni bir tarayıcıda pencere açıldığında ve pin'i gönderdiğinizde, sadece yeni açılan pencereyi yeniden yükler ve pin gönderilmez. Hatalarını düzeltene kadar uygulamamaya karar verdim.
Phil Derksen
If you don’t want to mess with adding code, I created a Pin It button plugin you can try out.
http://wordpress.org/extend/plugins/pinterest-pin-it-button/
(veya eklentiler altında “pinterest pin it” araması yapın)
Jean Oram
I used the ‘follow me’ code on the Pinterest Goodies page and pasted it into the ‘text’ widget on my WordPress blog. The button now appears right after my mini bio. It works quite well.
Yayın Kadrosu
Thesis, Genesis, Headway gibi gelişmiş tema çerçeveleri için bu kodları, çerçeveye uygun kancaları kullanarak functions.php dosyası aracılığıyla eklemeniz gerekir. Mevcut tüm tema çerçevelerini kapsayamayız. Çoğu tema çerçevesi blogunda temaları nasıl özelleştireceğinize dair talimatlar bulunur.
Yönetici
wpbeginner
Yönteminiz biraz zahmetli görünüyor çünkü bunu her resim için yapmanız gerekecek.
Ruby
@wpbeginner İdeal değil ama zaten görseli yayınlamak için yapmanız gerekenlerden çok daha fazlası değil. Hala harika bir seçenek (ideal olarak eklenti) arıyorum, a) temamda çalışıyor ve b) kolay. Neyse ki, Pinterest'in popülerliği sayesinde, yakında birinin bir tane çalışır duruma getireceğinden eminim!
wpbeginner
Aksi takdirde bir dizi döndüreceği için $pinterestimage[0] değerini ayarladığınızdan emin olun. Bunun dışında hatayı neden aldığınızdan emin değilim.
merrittsgret
@wpbeginner It’s working now, thanks to the shortcode code you gave us. Thank you so much!
Şimdi CSS ile her şeyle hizalamak için… (http://ylcf.org/2012/01/tomorrow-2/) Ah, neşe.
wpbeginner
@merrittsgret Evet, bazı durumlarda !important etiketini kullanmanız gerekebilir.
dave2
Öne çıkan resimden ilk resme nasıl değiştireceğim hakkında bir fikriniz var mı?
wpbeginner
@dave2 Use a variation of this snippet:https://www.wpbeginner.com/wp-themes/how-to-set-a-default-fallback-image-for-wordpress-post-thumbnails/
animhut blog
@wpbeginner @dave2 Thank you for the tutorial ! i need that for my another photography site
Gretchen
It works, but it shows the text “array” before the Pin It button. I’m calling it via my functions.php, like so “echo $pinterestimag…..<?php;" Could that be why?
Heidi at CrockPotLadies
I cannot seem to get it to work. I put the first code in my footer.php before the closing body tag and then added the other code into my single php after my other sharing buttons provided by po.st. Yet when I look at a post on my site (http://crockpotladies.com/recipe-categories/entrees/crockpot-chicken-enchiladas/) I do not see a Pin It Button. Any suggestions?
wpbeginner
@Heidi at CrockPotLadies Düğmeyi Beslemeye Abone Ol vb. bağlantılarından sonraki satırda görebiliyoruz.
wmwebdes
Pinterest'i yeni duymaya başladım – gerçekten popülerleşiyor gibi görünüyor.
Eğitim için teşekkürler.
Ruby
Bunun için teşekkürler. Yakın zamanda benzer bir yöntem denedim ancak Wordpress.org temamla çalışmıyor gibi görünüyor, bu yüzden kendi çözümümü buldum ve buraya yayınladım: http://www.tomaytotomaaahto.com/tools-and-tutorials/how-to-turn-your-images-into-pinterest-pin-it-buttons-wordpress
YeahThatsKosher
Bu, Digg Digg veya Sociable gibi mevcut bir WP eklentisiyle nasıl entegre olur?
wpbeginner
@YeahThatsKosher Bunu sizin için geliştiricilere sormanız gerekir.