WordPress gönderilerini yayınlarken otomatik olarak özel alanlar oluşturmak, herhangi bir geliştiricinin araç setinde güçlü bir araç olabilir.
Bir düşünün: Belirli içerik türlerini her yayınladığınızda aynı özel alanları manuel olarak ayarlamak yerine, tüm süreci otomatikleştirebilirsiniz.
Bu basit numaranın WordPress web sitenize yeni özellikler eklerken zamandan tasarruf etmenize ve iş akışlarını kolaylaştırmanıza yardımcı olabileceğini düşünüyoruz.
Bu makalede, WordPress’te yazı yayınlarken özel alanları otomatik olarak nasıl ekleyeceğinizi göstereceğiz.
Neden Özel Alanları Otomatik Olarak Ekleyelim?
Özel alanlar yazılarınıza ek bilgiler eklemenizi sağlar. Bu bilgiler web sitenizde görüntülenebilir, gizli tutulabilir veya WordPress web sitenizin işlevselliğini artırmak için temalar ve eklentiler tarafından kullanılabilir.
Özel alanları kullanmanın birçok yolu vardır. Özel alanlar ipuçları, püf noktaları ve hack ‘ler kılavuzumuzda yararlı fikirlerin bir listesini bulacaksınız.
Bazen bir yazı yayınladığınızda özel bir alanın otomatik olarak oluşturulmasını istersiniz. Bu, özellikle WordPress’e işlevsellik eklediğinizde, onu basit bir blogdan daha fazlası olarak kullanabilmeniz için geçerlidir.
Bu yöntemi bir galeri web sitesi oluştururken kullandık. Galeriye gönderilen her öğe için kısa URL’leri saklamak istedik. Bu nedenle, her gönderi yayınlandığında kısa URL ‘yi saklamak için otomatik olarak özel bir alan oluşturduk.
Bu numara, WordPress’i bir sonraki seviyeye taşımak isteyen geliştiriciler için çok yararlı olabilir.
Gönderi Yayınlandığında Özel Alanları Otomatik Olarak Ekleme
Bu yöntem, temanızın functions.php dosyasına özel bir kod parçacığı eklemeyi içerir. Tema dosyalarınızı deneyimsiz kullanıcıların düzenlemesini önermiyoruz, çünkü küçük bir hata bile web sitenizi bozabilir.
Bunun yerine, bu eğitimde size WPCode eklentisini nasıl kullanacağınızı göstereceğiz.
WPCode, temanızın functions.php dosyasını düzenlemek zorunda kalmadan WordPress’e kod parçacıkları eklemeyi kolaylaştırır. Ayrıca tüm kod parçacıklarınızı tek bir merkezi ekrandan yönetebilirsiniz.
WordPress’e ilk kez kod ekliyorsanız, daha fazla ayrıntı için WordPress’te kod parçacıklarının nasıl kopyalanıp yapıştırılacağına ilişkin kılavuzumuza göz atmalısınız.
Başlamak için ücretsiz WPCode eklentisini yüklemeniz ve etkinleştirmeniz gerekir. Yardıma ihtiyacınız varsa, WordPress eklentisi yükleme hakkındaki eğitimimize bakın.
Not: WPCode’un ücretsiz sürümü WordPress’e özel kod eklemek için ihtiyacınız olan her şeye sahiptir. Zamanlanmış snippet’ler, dönüşüm pikselleri ve daha fazlası gibi daha gelişmiş özellikler için WPCode Pro‘ya yükseltebilirsiniz.
Eklenti etkinleştirildikten sonra, WordPress yönetici çubuğunuza ‘Code Snippets’ etiketli yeni bir menü öğesi eklenecektir. Üzerine tıklayın ve ardından bir sonraki ekranda ‘Yeni Ekle’ düğmesine basın.
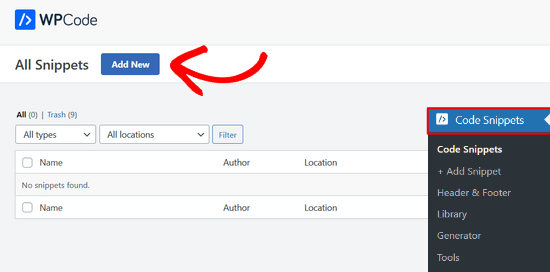
Bu sizi WPCode’un Snippet Kütüphanesine götürecektir.
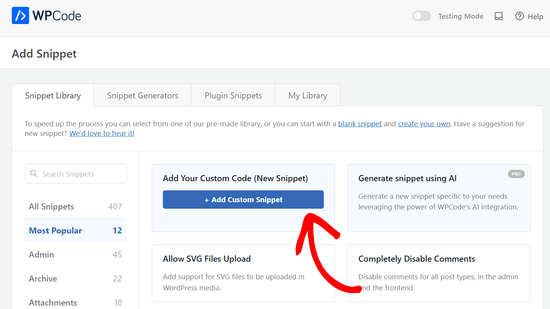
Buradan, ‘Özel Kodunuzu Ekleyin (Yeni Snippet)’ seçeneğine gidin ve altındaki ‘+ Özel Snippet Ekle’ düğmesine tıklayın.
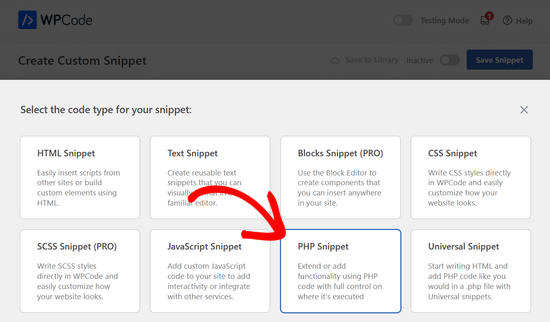
Ardından, ekranda açılan seçenekler listesinden kod türü olarak ‘PHP Snippet’i seçin.
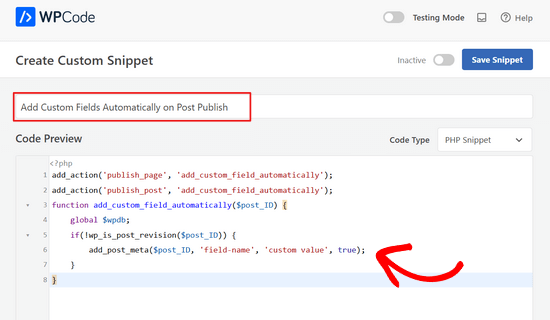
Bundan sonra, snippet’e bir başlık vermeniz ve ardından aşağıdaki kodu kopyalayıp ‘Kod Önizleme’ kutusuna yapıştırmanız gerekir.
1 2 3 4 5 6 7 8 | add_action('publish_page', 'add_custom_field_automatically');add_action('publish_post', 'add_custom_field_automatically');function add_custom_field_automatically($post_ID) { global $wpdb; if(!wp_is_post_revision($post_ID)) { add_post_meta($post_ID, 'field-name', 'custom value', true); }} |
‘field-name’ ve ‘custom value’ ifadelerini özel alan için kullanmak istediğiniz gerçek ad ve değerle değiştirmeniz gerekir.
Ardından, ‘Ekleme’ bölümüne ilerleyin. Burada, ‘Otomatik Ekle’ yöntemini seçili bırakmanız gerekecektir.

Otomatik Ekleme yöntemiyle, snippet otomatik olarak uygun konuma eklenecek ve yürütülecektir.
İşiniz bittiğinde, anahtarı ‘Etkin Değil’den ‘Etkin’e getirmeniz ve ardından ‘Snippet’i Kaydet’ düğmesine tıklamanız gerekir.
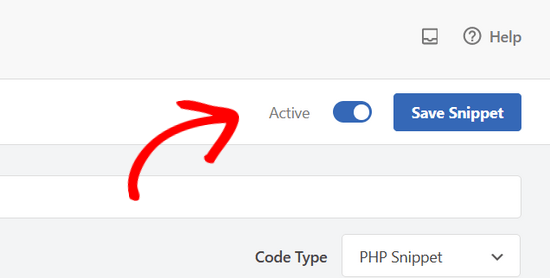
Snippet etkinleştirildikten sonra, bir gönderi yayınladığınızda özel alan oluşturulacaktır.
Umarız bu eğitim WordPress’te yazı yayınlarken özel alanları otomatik olarak nasıl ekleyeceğinizi öğrenmenize yardımcı olmuştur. Ayrıca WordPress’te özel alanları döngü dışında nasıl görüntüleyeceğinizi öğrenmek veya web sitenizi büyütmek için sahip olunması gereken WordPress eklentileri listemize göz atmak isteyebilirsiniz.
If you liked this article, then please subscribe to our YouTube Channel for WordPress video tutorials. You can also find us on Twitter and Facebook.


Sateesh Raghuwanshi
I need to add this action for custom post type named ‘ad_system’
nayan
I want to add category Id for the post in the post_meta table. How can be the function function add_custom_field_automatically($post_ID) be twicked to accomodate that?
Thanks
chris
Instead of adding the custom field at the time of creating the post, how do I display a custom field by default on the admin page?
puanthanh
it’s not adding to custom post type
Editorial Staff
If you notice, the code above doesn’t have anything related to the custom post types. It only adds to Post and Page “content type”. So you would have to specify the hook for your custom post type.
Admin
puanthanh
Thanks for the reply. Can you help me out on this code.
add_action(‘publish_page’, ‘add_custom_field_automatically’);
add_action(‘publish_post’, ‘add_custom_field_automatically’);
add_action( ‘save_post’, ‘add_custom_field_automatically’ );
function add_custom_field_automatically($post_ID) {
global $post;
if(!wp_is_post_revision($post_ID)) {
global $wpdb;
$user_id = $wpdb->get_var("SELECT post_author FROM $wpdb->posts WHERE ID = $post_ID");
$themename = $wpdb->get_var("SELECT meta_value FROM $wpdb->usermeta WHERE meta_key = ‘themeperauthor’ AND user_id = $user_id");
add_post_meta($post_ID, ‘themeperauthor’, $themename, true);
}
}
When the user meta field is changed, I want to automatically delete the custom field value and update with the new one
brian
I’ve been working on adding some hidden custom fields on post publish/update (by preceding the field name with “_”) but for some reason I have to update the post twice before the wp_postmeta entries are written to the database.
I’ve tried messing with the priority and experimenting with other action hooks (draft_to_publish, edit_post, etc) but it doesn’t seem to make a difference.
Any ideas?
Editorial Staff
are you using Otto’s trick with the transient API?
Admin
Boba
Thanks for including the source link
Editorial Staff
Thanks for providing an amazing tip
Admin
Daniel Suarez
Thanks Otto another great tip!
Piet
will this work too for custom post types?
sth like add_action(‘publish_custom-post-typ-name’, ‘add_custom_field_automatically’);
Otto
Yes, it will.
One downside to this technique that people should be aware of is that if somebody edits a published post, this hook WILL get fired again on the edit. Therefore, you need to check for the meta before adding it, or to update it, or to do whatever makes the most sense for your use-case.
If you only want to get your code fired off on the initial publish only, then you can use the transition_post_status hook. This hook works like this:
add_action('transition_post_status','example',10,3);

function example($new, $old, $post) {

// $new is the new post status ('publish')

// $old is the old post status ('draft')

// $post is the complete Post Object (so use $post->ID for the ID, etc)

}
Then, in here you can do a check for something like this:
if ($new == 'publish' && $old != 'publish')
To have your code only used when the post status actually transitions to publish from whatever it was before. This hook is fired at the same time as the {$status}_{$post-type} hooks are, so the operation of them is basically the same.
Piet
Thanks Otto, will play around with that a bit!
Editorial Staff
Thanks Otto for the clarification.
Admin
Vivek Parmar
thanks for this handy tip. previously while using custom fields i have to work manually. now this will do it automatically. thanks for saving precious time of me