WordPress'te daha fazla organizasyon gücünün kilidini açmak mı istiyorsunuz? Özel taksonomilerinize özel meta alanları eklemeyi deneyin.
Özel taksonomiler, içeriğinizi kategoriler ve etiketlerin ötesinde düzenlemenizi sağlar. Ancak bazen, onları tanımlamak için ek ayrıntılar ve alanlar eklemenin faydalı olduğunu görürüz ve özel meta alanları burada devreye girer.
Bu makalede, özel taksonomilerinize WordPress'te ek meta alanları nasıl ekleyeceğinizi göstereceğiz.

Özel Meta Alanlarını Bir Özel Taksonomiye Ne Zaman Eklemelisiniz?
WordPress web sitenizde yeni içerik oluşturduğunuzda, onu varsayılan iki taksonomi olan kategoriler ve etiketler kullanarak düzenleyebilirsiniz.
Bazı web siteleri, içeriğinizi ek yollarla sıralamanıza olanak tanıyan özel taksonomilerin kullanımından fayda sağlar.
Örneğin, kitap incelemeleri yayınlayan bir web sitesi, ziyaretçilerin ilgilendikleri incelemeleri hızlı bir şekilde bulabilmeleri için 'Konular' ve 'Yazarlar' taksonomilerini ekleyebilir.
Daha fazla bilgi için, WordPress'te özel taksonomilerin nasıl oluşturulacağına ilişkin kılavuzumuza bakın.
Her taksonominin varsayılan olarak yalnızca üç veya dört alanı vardır: ad, takma ad, üst (hiyerarşikse) ve açıklama.
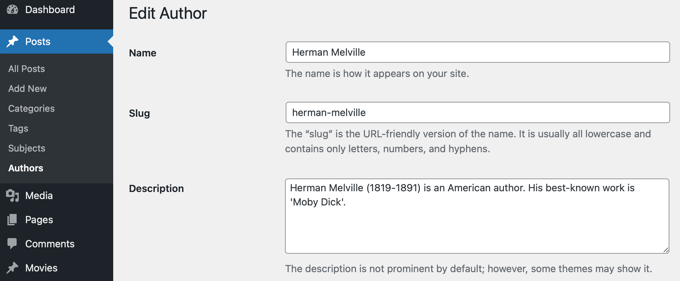
Bazen taksonomiyi daha iyi tanımlamak için ek alanlar eklemek faydalı olur. Örneğin, ‘yazarlar’ taksonomisine bir ‘doğum yılı’ alanı ekleyebilirsiniz.
Bunu göz önünde bulundurarak, WordPress'te özel taksonomilere özel meta alanları nasıl ekleyeceğiniz aşağıda açıklanmıştır.
Adım 1: WordPress'te Özel Taksonomilere Özel Meta Alanları Ekleme
Öncelikle, Advanced Custom Fields eklentisini yükleyip etkinleştirmeniz gerekir. Daha fazla bilgi için, bir WordPress eklentisinin nasıl kurulacağına dair adım adım kılavuzumuza bakın.
Ardından, Özel Alanlar » Yeni Ekle sayfasına gidin. Burada, bir veya daha fazla yeni alan içeren bir alan grubu ekleyebilirsiniz.
Alan grubuna bir başlık vermeniz istenecektir ve bu, taksonomiyi eklerken veya düzenlerken yeni alanlarla birlikte görüntülenecektir. Bu eğitimde, Yazarlar taksonomisine özel bir alan eklemek istiyoruz, bu nedenle alan grubunu ‘Yazar Detayları’ olarak adlandıracağız.
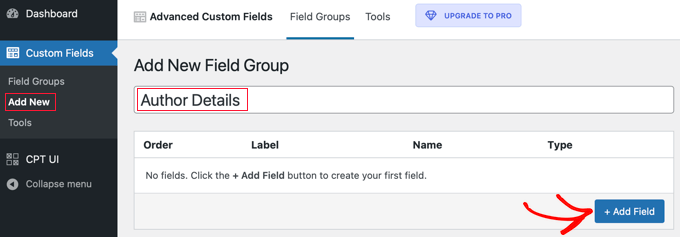
Bunu yaptıktan sonra, bir alan eklemek için ‘+ Alan Ekle’ düğmesine tıklamalısınız. Yeni alanın ayrıntılarını doldurabileceğiniz yeni bir form görünecektir.
Bir alan etiketi girdiğinizde, alan adı sizin için otomatik olarak oluşturulacaktır ve isterseniz bunu düzenleyebilirsiniz. Eğitimde daha sonra alan adını kullanmanız gerekecektir, bu yüzden onu not alın.
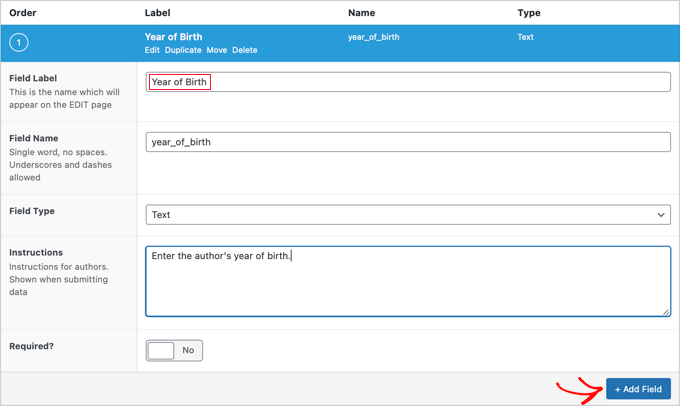
Şimdi alan için alan türü, formu dolduracak olan yazarlarınız için talimatlar ve bu alanın gerekli olup olmadığı gibi diğer ayrıntıları doldurmalısınız. Ekran görüntüsünde gösterilmeyen diğer seçenekler arasında varsayılan metin, yer tutucu metin, karakter sınırı ve daha fazlası bulunur.
İkinci bir alan eklemek isterseniz, ‘+ Alan Ekle’ düğmesine tıklayıp işlemi tekrarlamalısınız. Aksi takdirde, aşağı kaydırarak Konum bölümüne gidin.
Yeni alanın nerede görüntüleneceğini açıklayan kurallar oluşturabilirsiniz. İlk açılır menüden ‘Taxonomy’yi seçmeli ve orta alanı ‘eşittir’ olarak bırakmalısınız. Son olarak, son alan için doğru özel taksonomiyi seçin. Bu eğitimde ‘Author’ı seçeceğiz.

Bu alanı başka bir taksonomiye eklemek isterseniz, ‘Kural grubu ekle’ düğmesine tıklayabilir ve adımı tekrarlayabilirsiniz.
Şimdi sayfadaki diğer ayarları ayarlamalısınız. Varsayılan değerleri olduğu gibi bırakacağız. Bitirdiğinizde, sayfanın üst kısmına kaydırmalı ve ‘Yayınla’ düğmesine tıklamalısınız.

Tebrikler, WordPress'te özel bir taksonomiye özel bir meta alanı başarıyla eklediniz. Ancak hala yapmanız gereken bazı işler var.
Adım 2: Yeni Özel Meta Alanına Veri Ekleme
Taksonominin yeni bir alanı varken, henüz herhangi bir veri içermiyor. Şimdi bunu yapmak için biraz zaman ayırmalısınız.
Örneğimizde, her yazar için doğum yılını girmemiz gerekiyor. Bunu yapmak için Gönderiler » Yazarlar'a gitmemiz ve düzenlemek istediğimiz yazarın adına tıklamamız gerekiyor.

Bundan sonra, yeni alana veri girebiliriz. Bu durumda, o yazarın doğum yılını gireceğiz. Yeni veriyi saklamak için 'Güncelle' düğmesine tıklamayı unutmayın.
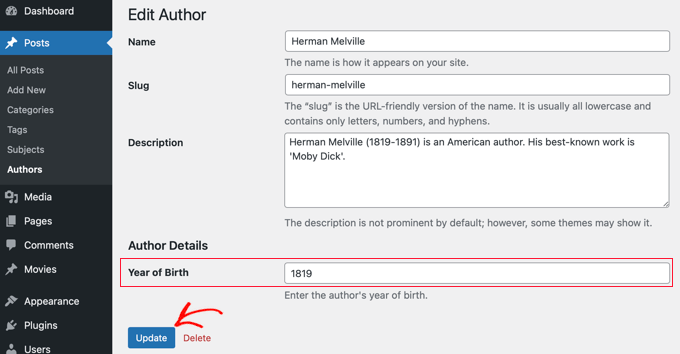
Özel taksonominize veri eklemek için web sitenizde de aynı adımları izlemelisiniz.
Bitirdiğinizde, hala gidilecek bir adım var. Özel alanı WordPress yönetici alanınıza giriş yaptığınızda görebilseniz de, web sitenizin ziyaretçileri bunu göremeyecektir. Alanı özel taksonominin arşiv sayfasına eklemeniz gerekecektir.
Adım 3: Özel Meta Alanını Taksonomi Arşiv Sayfanızda Görüntüleme
Bu adımda, tema dosyalarınıza kod eklemeniz gerekecek. Bunu daha önce yapmadıysanız, web'den kod parçacıklarını WordPress'e yapıştırma konusundaki yeni başlayanlar rehberimize bakın.
Yapmanız gereken ilk şey, temanızın klasörüne girip taksonomi arşiv dosyanızı bulmaktır. Adı taxonomy-YOURTAXONOMYNAME.php gibi olacaktır.
Örneğin, ‘authors’ adında özel bir taksonominiz varsa, taxonomy-authors.php adlı bir dosya aramanız gerekir.
Eğer o dosyayı görmüyorsanız, archive.php dosyasını arayın. Bu dosyanın bir kopyasını oluşturmanız ve yukarıda belirtildiği gibi adlandırmanız gerekecektir.
Not: Temanızda archive.php yoksa, muhtemelen bir WordPress tema iskeleti kullanıyorsunuzdur ve taksonomi arşivini manuel olarak oluşturmanız gerekecektir. Arşiv dosyaları oluşturma konusunda öğrenmek için iyi bir başlangıç noktası, WordPress'te özel arşiv sayfaları oluşturma rehberimizdir.
Şimdi aşağıdaki kodu, döngüden hemen önce taksonomi arşivine eklemeniz gerekiyor:
<?php

// get the current taxonomy term
$term = get_queried_object();

// get the taxonomy meta field
$taxonomymetafield = get_field('FIELDNAME', $term);

// display the taxonomy meta field
echo $taxonomymetafield;

?>
Yukarıda oluşturduğunuz gerçek alan adıyla ‘FIELDNAME’ yerine koymanız gerektiğini unutmayın. Hatırlarsanız, bunu not etmenizi istemiştik.
Örneğimizde, alan adı ‘year_of_birth’. Ayrıca bir açıklama ekleyeceğiz, böylece ziyaretçilerimiz alanın ne anlama geldiğini anlar. Bu nedenle, aşağıdaki kodu taksonomi arşiv dosyasına taxonomy-authors.php ekleyeceğiz:
<?php

// get the current taxonomy term
$term = get_queried_object();

// get the taxonomy meta field
$taxonomymetafield = get_field('year_of_birth', $term);

// display the taxonomy meta field
echo "Year of birth: ";
echo $taxonomymetafield;

?>
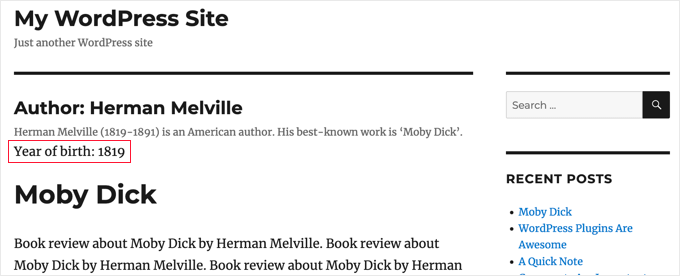
Demo sitemizde test ettiğimizde nasıl göründüğü aşağıdadır:
Bu eğitimimizin, WordPress'te özel taksonomilere özel meta alanları eklemeyi öğrenmenize yardımcı olmasını umuyoruz. Ayrıca, WordPress'te anahtar kelime ve meta açıklama eklemeyi nasıl ekleyeceğinizi öğrenmek veya iş siteleri için olmazsa olmaz WordPress eklentileri listemize göz atmak isteyebilirsiniz.
Bu makaleyi beğendiyseniz, lütfen WordPress video eğitimleri için YouTube Kanalımıza abone olun. Bizi ayrıca Twitter ve Facebook'ta da bulabilirsiniz.


Tarek Anandan
Verilerinizin görüntülenmesini sağlayamıyorsanız ve WordPress'in güncel bir sürümünü kullanıyorsanız, get_tax_meta() yerine get_term_meta() kullanın.
Subin
işte kodum:
$config = array(
‘id’ => ‘tax_meta_box’, // meta kutusu kimliği, meta kutusu başına benzersiz
‘title’ => ‘Tax Meta Box’, // meta kutusu başlığı
‘pages’ => array(‘category’), // taksonomi adı, kategorileri, post_tag ve özel taksonomileri kabul eder
‘context’ => ‘normal’, // meta kutusu nerede görünür: normal (varsayılan), gelişmiş, yan; isteğe bağlı
‘fields’ => array(), // meta alanlarının listesi (alan dizileriyle eklenebilir)
‘local_images’ => false, // Yerel veya barındırılan resimleri kullan (ekleme/kaldırma için meta kutusu resimleri)
‘use_with_theme’ => get_template_directory_uri() . ‘/Tax-Meta-Class/Tax-meta-class’
);
/*
* Meta kutunuzu başlatın
*/
$my_meta = new Tax_Meta_Class($config);
//Resim alanı
$my_meta->addImage(‘image_field’,array(‘name’=> __(‘Resmim ‘,’tax-meta’)));
$my_meta->Finish();
———————————————————————————————————————–
term_id; $saved_data = get_tax_meta($term_id,’image_field’,true); echo ”; echo $term_id; // ‘1’ yani kategori ID’sini yazar
echo $saved_data; // Hiçbir şey göstermiyor. Neden Acaba!!
exit;
?>
James Dower
Yüklenen bir resmin yolunu alma konusunda da sorun yaşıyorum. Sadece şunu yankılıyor:
Dizi
...metin alanları iyi.
Kullanıyorum:
$prefix = ‘ttp_’;
$my_meta->addImage($prefix.’logo_id’,array(‘name’=> __(‘Logo’,’tax-meta’)));
Ve taxonomy.php sayfasında:
$logo = get_tax_meta($term->term_id, ttp_logo_id);
Yardımcı olabilecek var mı lütfen? SAATLERDİR bununla uğraşıyorum!
James Dower
...ve tekrarlayıcı alanları nasıl yazdıracağımı lütfen açıklayabilecek biri var mı?!
James Dower
Bunu okutmakta zorlanan herkes için, orada tek bir kesme işareti buldum, bu benim için çalışıyor:
$data = get_tax_meta($term->term_id, ba_text_field_id);
echo $data;
siva
Merhaba Ekip, çok çok teşekkürler…..
Ketan
Merhaba,
Eklentiyi etkinleştirdim. ancak yönetici tarafında özel taksonomi alanı ekleyebileceğim yeri göremiyorum. lütfen bana cevap verin.
Teşekkürler,
Ketan.
Francisco
Thanks a lot this has been very useful!!!!
Bu kodla bir metin alanını doğru bir şekilde görüntüledim:
// Slug'a göre doğru taksonomi kimliğini al
$term = get_term_by( ‘slug’, get_query_var( ‘term’ ), get_query_var( ‘taxonomy’ ) );
//Taksonomi Meta'sını Al
$saved_data = get_tax_meta($term->term_id,'ba_text_field_id');
echo $saved_data;
ANCAK bir de resim göstermem gerekiyor, şablonumda bu php kodunu kullanıyorum:
// Slug'a göre doğru taksonomi kimliğini al
$term = get_term_by( ‘slug’, get_query_var( ‘term’ ), get_query_var( ‘taxonomy’ ) );
//Taksonomi Meta'sını Al
$saved_data = get_tax_meta($term->term_id,’ba_image_field_id’);
echo $saved_data;
But it doesn’t display anything!
Sadece tek bir kelime “array” gösteriyor
Yanlış giden ne olabilir?
David Beastall
Teşekkürler, eğitim biraz eksik gibi görünüyor.
Hemanta Chakladar
Ben de onu arıyorum.
Hemanta Chakladar
Takıldım.
WordPress kategorisinde meta veri seçeneğini görebiliyorum ancak özel taksonomimde göremiyorum. Özel taksonomime özel meta eklemek için bu seçeneği nereye ekleyebilirim? Nerede tanımlanıyor?
Marco Panichi
Bir veya daha fazla kullanıcı seçmek için birden fazla onay kutusu nasıl eklenir?
Ankur
Merhaba Marco, Bu konuda herhangi bir cevap alabildin mi? Ben de aynı işlevi arıyorum.
Joe Chow
Çok teşekkürler. Gönderi kategorisinde bir sürü alanın gösterildiğini görebiliyorum. Ancak, sadece woocommerce ürün kategorisi için kullanılacak kodu nasıl yapacağımı bilmek istiyorum.
Birisi bir ipucu verebilir mi?
Joe
Taksonomi.php sayfasında değil de özel bir sayfa şablonunda taksonomi bilgilerini nasıl alırsınız?
Jason Gateman
Bu öğretici için teşekkürler! Meta'yı özel taksonomi sayfasında değil de oluşturduğum özel gönderi sayfasında nasıl gösterebilirim?
AD
Merhaba Millet,
Kaydedilen içeriği görüntüleme konusunda sorun yaşayanlar için. Anahtarın önündeki öneki kullanın.
//Taksonomi Meta'yı Al
$saved_data = get_tax_meta($term->term_id,’text_field_id’);
echo $saved_data;
Bu ba_text_field_id olmalı (Önek ba_ olduğu varsayılarak).
Umarım bu yardımcı olur, teşekkürler.
Dan
Bu yorumu desteklemek istedim, çünkü örneğin neden çalışmadığını anlamak oldukça kafa karıştırıcı olabilir. “Tax meta class” dosyasına baktığınızda, en üstte Ohad’ın her kaydetme fonksiyonuna eklenen bir $prefix değişkeni tanımladığını göreceksiniz.
Sonucu yazdırmak için öneki dahil etmeniz gerekir. Öneki istediğiniz herhangi bir şeye ayarlayabilirsiniz, "" dahil. "ba_"nın ne anlama geldiğini bilmiyorum ama varsayılan olarak orada olan bu.
Örnek şöyle olmalı:
$saved_data = get_tax_meta($term->term_id,’ba_text_field_id’);
Chris
Çok teşekkürler! Harika çalışıyor. Kodlama konusunda bana çok zaman kazandırdınız.
Ante
Tamam, takıldım.
//Slug ile doğru taksonomi kimliğini al
$term = get_term_by( ‘slug’, get_query_var( ‘term’ ), get_query_var( ‘taxonomy’ ) );
//Taksonomi Meta'yı Al
$saved_data = get_tax_meta($term->term_id,’text_field_id’);
echo $saved_data;
Yani ‘taxonomy’ benim özel taksonomim, diyelim ki ‘project_clients’
‘text_field_id’ giriş alanının kimliğidir, bu $prefix.’text_area’…
'Term' nedir ?????
Steve
Ante,
Bununla ilgili bir ilerleme kaydettin mi??
Ben de aynı soruyu merak ediyorum – bu konuda pek çok yorumu ve sayfayı inceledim ama bir çözüm bulamadım. Cevabı bulduysanız herhangi bir yardım minnettar olurum.
Taksonomi.php dosyamıza şunu eklemek işe yaramıyor:
//Slug ile doğru taksonomi kimliğini al
$term = get_term_by( ‘slug’, get_query_var( ‘term’ ), get_query_var( ‘taxonomy’ ) );
//Taksonomi Meta'yı Al
$saved_data = get_tax_meta($term->term_id,’text_field_id’);
echo $saved_data;
fp-admin
WYSIWYG'ye ne girersem onu web sitesinin ön yüzüne eklemeye çalışıyorum. Dürüst olmak gerekirse ne yaptığımı hiç bilmiyorum ama kodum şu ana kadar şöyle:
term_id,’wysiwyg_field_id’);
?>
<a href="”>
ELiane
Merhaba,
Eklentiyi kullandım ama Taksonomi.php dosyamda kodu alamıyorum.
Alanı görüntülemek için bu kodu kullanıyorum
term_id,’text_field_id’);
echo $saved_data;
Başka bir şey yapmam gerekiyor mu?
Teşekkürler
WPBeginner Desteği
evet, yukarıda açıklandığı gibi tüm talimatları izlediyseniz, çalışması gerekir.
Yönetici
Tejas Deshmukh
Merhaba, Bu fikir için özellikle teşekkürler. Bu eklenti harika çalışıyor. Belirli Terim ekleme, düzenleme seçeneğine üç ek alan ekledim. ancak orada kategori oluşturduğumda, o terimde o üç ek alan için değer saklayamıyorum. Bu konuda herhangi bir öneriniz var mı?
alexut
Peki, verileri arşiv sayfasından nasıl alırım? Bu da yaygın bir istek olduğu için bunu da eklemelisiniz.
Kisshomaru
Harika! "Miktarlar"ı "ürünlere" eklemenin bir yolunu ararken ne kadar zaman harcadığıma dair bir fikriniz yok. Bu bir ticaret sitesi olmadığı için, bir gıda gönderisini Malzemeler taksonomisine bağlamak ve her gönderi için salatalık sayısını değiştirememek zahmetliydi.
Teşekkürler!
Mike Jackson
Merhaba – Bunu çalıştırmakta sorun yaşıyorum. Özel taksonomimde veri alanları görünüyor ancak makalenizin altındaki yapıştırdığınız php kodunu kullanarak brand-description.php'de verileri çağıramıyorum. Bir hata göstermiyor, sadece çalışmıyor.
Vaktiniz varsa bununla ilgili daha fazla açıklama yaparsanız çok memnun olurum.
Teşekkürler
Mike Jackson
Bu harika bir buluş! Birkaç haftadır bunu çözmeye çalışıyorum. Yeni alanları sütunlara nasıl ekleyeceğime dair bir fikrin var mı?
Mike Jackson
Sayfada herhangi bir çıktı alamıyorum. Bu kodu uyguladım ve alanlarda veri var ama sitede hiçbir şey görünmüyor
term_id,’textarea_field_id’);
echo $saved_data;
?>
Yayın Kadrosu
Bu kod taksonomi arşiv sayfasında çalışır. Görüntülenmiyorsa, kodun taksonomi kimliğini alamama olasılığı vardır. En azından tahmin bu olurdu.
-Syed
Yönetici
FJ
Pekala, bu kulağa hoş geliyor ve kategorilerde işe yaradı ama nedense özel bir taksonomimde işe yaramadı. Bir şeyi mi kaçırdım? Bakmadığım bir kanca var mı?
Her neyse, Ohad'ın çalışmaları hakkındaki bu aydınlatıcı bilgiler için çok teşekkürler. Nasıl kullanabileceğimi merak ederek etrafında dolaştım. Ben sadece kendi işini kendi yapan biriyim, gerçek bir geliştirici değilim, eminim zaten anlamışsınızdır.
Tekrar teşekkürler.
Yayın Kadrosu
example-usage.php dosyasının 24. satırında özel taksonominizi belirleyebilmelisiniz.
Yönetici
Ben
Açıklığa kavuşturmak gerekirse – taxonomy-fields.php dosyasının 24. satırı
‘pages’ => array(‘category’), // taksonomi adı, kategorileri, post_tag ve özel taksonomileri kabul eder
XXX'i özel taksonominizin adı neyse onunla DEĞİŞTİRİN
‘pages’ => array(‘xxxxx’), // taksonomi adı, kategorileri, post_tag ve özel taksonomileri kabul eder
Kobbe
@ Editör beni affedin, bir metin alanını nasıl çıktı alabilirim
Yayın Kadrosu
Paylaştığımız PHP kodunu kullanmanız gerekiyor. Alan adını sahip olduğunuzla değiştirdiğinizden emin olun.
Yönetici
Kobbe
Cevap için teşekkürler editör, çok memnun oldum. Bu şekilde class-usage-demo.php – http://pastebin.com/ctZPeS0w
Bunu yapıyorum ama hiçbir şey görüntülenmiyor/çıktı vermiyor. Neyi yanlış yapıyorum..? Ve mümkünse kodumu temamda herhangi bir yere görüntüleyebilir miyim…Teşekkürler
Yayın Kadrosu
Sahip olduğunuz kod yalnızca işlerin yönetim tarafını ayarlıyor. Kodu görüntülemek için makalede paylaştığımız PHP koduna bakın. Bunu taksonomi arşiv dosyanızda kullanmanız gerekiyor.
gaurav kaushik
Harika..
peki verileri nereye kaydediyor…? postmeta tablosuna mı yoksa yeni bir tablo mu oluşturuyor?
Yayın Kadrosu
Seçenekler tablosunda yapıyor.
Yönetici
Gaurav Kaushik
Bu eklentinin arka ucunu değiştirebilir miyiz..yani bir termmeta tablosu (meta_id,term_id,meta_key,meta_value) oluşturmak istiyoruz..ve taksonomi meta'sını buraya kaydetmek..veya bu eklentiyle bağlamak mı? http://wordpress.org/extend/plugins/simple-term-meta/
Jim
Harika şeyler. Bunu gelecekte blogumuzda uygulayacağım.
Michelle
Oh thanks you so much, I’ve been wondering how to identify tags as being English or Spanish for my bilingual site – this helps enormously
Jaime
Üzerinde çalıştığım bir proje için özel bir taksonomiye özel alanları kodlamayı yeni bitirdim. Esnekliği seviyorum – gelecekteki projeler için eklentiyi kesinlikle kontrol edeceğim!
Yayın Kadrosu
Evet, en iyi yanı bu. Geliştiricilerin hayatını çok kolaylaştıran bu tür kütüphanelerle karşılaşmayı seviyoruz.
Yönetici