Web sitenizin telif hakkı tarihini doğru tutmak, profesyonelliği yansıtan ve hedef kitlenize sitenizin aktif olarak korunduğunu gösteren küçük ama önemli bir ayrıntıdır. Ziyaretçilere web sitenizin güncel ve güvenilir olduğuna dair bir mesaj gönderir.
Web sitenizin altbilgisine dinamik bir telif hakkı tarihi ekleyerek, her yıl otomatik olarak güncellenmesini sağlarsınız. Bu, sitenizin güvenilirliğini artırmanın ve hedef kitleniz üzerinde olumlu bir izlenim bırakmanın kolay bir yoludur.
WPBeginner’da, tüm web sitelerimizin altbilgisinde dinamik bir telif hakkı tarihi kullanıyoruz. Yıl değiştikçe otomatik olarak güncelleniyor ve bizi birden fazla sitede manuel olarak güncelleme zahmetinden kurtarıyor.
Bu makalede, WordPress web sitenizin altbilgisine nasıl kolayca dinamik bir telif hakkı tarihi ekleyebileceğinizi göstereceğiz.

Neden WordPress Altbilgisine Dinamik Telif Hakkı Tarihi Ekleyelim?
Telif hakkı tarihi genellikle WordPress web sitenizin içeriğinin, tasarımının ve kodunun telif hakkı yasalarıyla korunduğu cari yılı veya yıl aralığını kapsar.
Web sitenizdeki telif hakkı tarihi güncel olmalıdır, ancak bunu manuel olarak güncellemek zaman alır ve bunu yapmayı unutabilirsiniz.
İşte bu noktada dinamik bir telif hakkı tarihi yardımcı olabilir. Tarihin doğru olmasını ve farklı ülkelerin telif hakkı yasalarını karşılamasını sağlamak için otomatik olarak güncellenecektir.
Aynı zamanda içeriğinizin telif hakkı ihlali ve intihalden korunmasına da yardımcı olur.
Ayrıca, güncellenmiş bir telif hakkı tarihi, arama motorlarına sitenizin bakımlı ve aktif olduğunu gösterir. Bu, arama motoru sıralamalarını iyileştirmeye ve web sitenize daha fazla trafik çekmeye yardımcı olabilir.
Bu makalede, WordPress altbilgisine nasıl kolayca dinamik bir telif hakkı tarihi ekleyebileceğinizi göstereceğiz. Kullanmak istediğiniz yönteme atlamak için aşağıdaki hızlı bağlantıları kullanabilirsiniz:
Yöntem 1: WPCode Kullanarak Dinamik Telif Hakkı Tarihi Ekleme (Önerilen)
WordPress blogunuzun başlangıcından içinde bulunduğunuz yıla kadar tüm yılları kapsayan dinamik bir telif hakkı tarihi oluşturmak istiyorsanız bu yöntem tam size göre. En eski gönderinizin ve en yeni gönderinizin yayınlanma tarihini kullanarak çalışır.
WordPress altbilginize dinamik bir telif hakkı tarihi eklemek için, birçok eğitim size temanızın functions.php dosyasına özel kod eklemenizi söyleyecektir. Ancak kodu yazarken yapacağınız en küçük bir hata web sitenizi bozabilir.
Bu yüzden piyasadaki en iyi WordPress kod parçacıkları eklentisi olan WPCode‘u kullanmanızı öneririz. Web sitenize kod eklemenin en kolay ve en güvenli yoludur.
Öncelikle WPCode eklentisini yüklemeniz ve etkinleştirmeniz gerekecektir. Daha fazla talimat için, bir WordPress eklentisinin nasıl kurulacağına ilişkin başlangıç kılavuzumuza göz atmak isteyebilirsiniz.
Not: Bu eğitim için ücretsiz WPCode eklentisini de kullanabilirsiniz. Ancak, Pro sürümüne yükseltmek size kod parçacıkları, akıllı koşullu mantık ve daha fazlasından oluşan bir bulut kütüphanesine erişim sağlayacaktır.
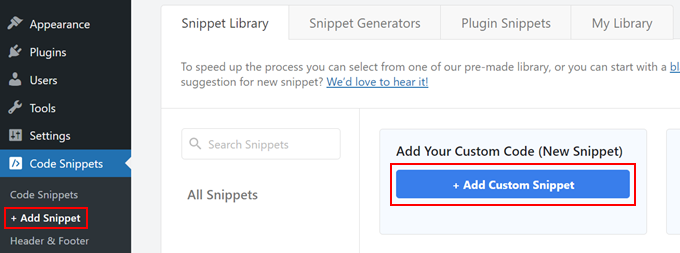
Etkinleştirmenin ardından, WordPress yönetici kenar çubuğundan Kod Parçacıkları ” + Parçacık Ekle sayfasını ziyaret etmeniz yeterlidir.
Buradan, ‘Özel Kodunuzu Ekleyin (Yeni Snippet)’ seçeneğine gidin ve altındaki ‘+ Özel Snippet Ekle’ düğmesine tıklayın.
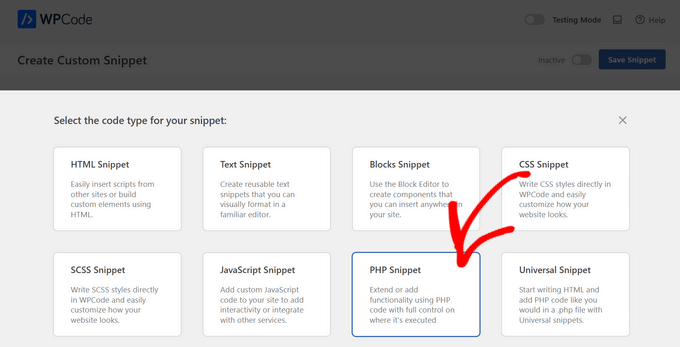
Ardından, ekranda görünen seçenekler listesinden kod türü olarak ‘PHP Snippet’i seçmeniz gerekir.
Bu sizi kod parçacığınız için bir ad yazarak başlayabileceğiniz ‘Özel Snippet Oluştur’ sayfasına yönlendirecektir.
Bu adın ön uçta görüntülenmeyeceğini ve yalnızca tanımlama amacıyla kullanıldığını unutmayın.
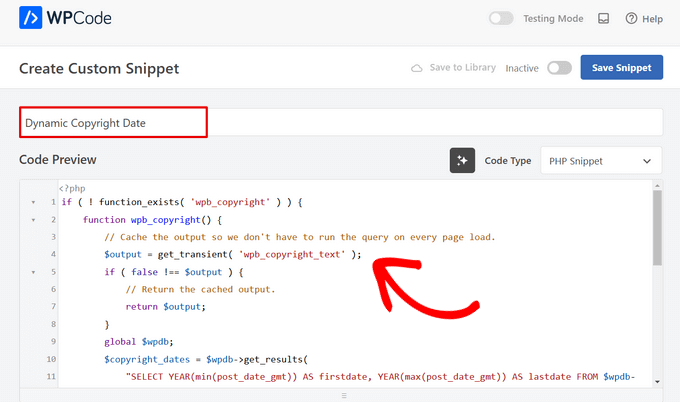
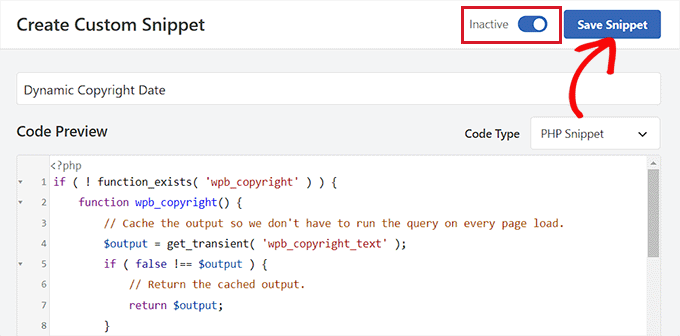
Bunu yaptıktan sonra, aşağıdaki kodu kopyalayıp ‘Kod Önizleme’ kutusuna yapıştırın:
1 2 3 4 5 6 7 8 9 10 11 12 13 14 15 16 17 18 19 20 21 22 23 24 25 26 27 | if ( ! function_exists( 'wpb_copyright' ) ) { function wpb_copyright() { // Cache the output so we don't have to run the query on every page load. $output = get_transient( 'wpb_copyright_text' ); if ( false !== $output ) { // Return the cached output. return $output; } global $wpdb; $copyright_dates = $wpdb->get_results( "SELECT YEAR(min(post_date_gmt)) AS firstdate, YEAR(max(post_date_gmt)) AS lastdate FROM $wpdb->posts WHERE post_status = 'publish'" ); $output = ''; if ( $copyright_dates ) { $output = '© ' . $copyright_dates[0]->firstdate; if ( $copyright_dates[0]->firstdate !== $copyright_dates[0]->lastdate ) { $output .= '-' . $copyright_dates[0]->lastdate; } // Set the value as a transient so we only run the query 1x per day. set_transient( 'wpb_copyright_text', $output, DAY_IN_SECONDS ); } return $output; }}echo wpb_copyright(); |
Etkinleştirildikten sonra, bu kod otomatik olarak verileri getirecek ve web sitenizdeki en eski ve en yeni gönderilere göre telif hakkı tarihinizi görüntüleyecektir.
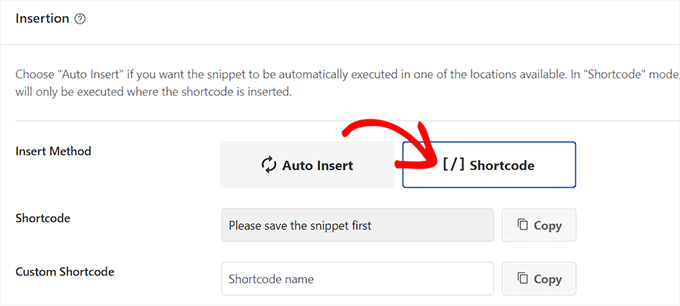
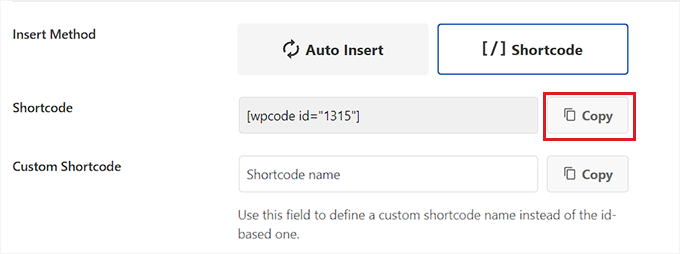
Ardından, ‘Ekleme’ bölümüne gidin ve ‘Kısa Kod’ yöntemini seçin. Bu yöntemi kullanıyoruz çünkü özellikle WordPress altbilgisine kod eklemek istiyoruz.
Son olarak, en üste geri gidin ve ‘Etkin Değil’ anahtarını ‘Etkin’ olarak değiştirin.
Bunu yaptıktan sonra, ayarlarınızı kaydetmek için ‘Snippet’i Kaydet’ düğmesine tıklamanız yeterlidir.
Şimdi, ‘Ekleme’ bölümüne geri dönmeniz ve yanındaki ‘Kopyala’ düğmesine tıklayarak kısa kodu kopyalamanız gerekir.
Kod parçacığını etkinleştirip kaydedinceye kadar kısa kodu kopyalayamayacağınızı unutmayın.
Bir Widget Kullanarak WordPress Altbilgisine Dinamik Telif Hakkı Tarihi Ekleme
Şimdi kısa kodu WordPress altbilginize eklemeniz gerekiyor. Tam site düzenleyicisi olmayan klasik bir tema kullanıyorsanız bu yöntem tam size göre.
Kısa kodu kopyaladıktan sonra, WordPress yönetici kenar çubuğundan Görünüm ” Widget ‘lar sayfasına gidin.
Buradan ‘Altbilgi’ sekmesine gidin ve sekmeyi genişletin.
Bu eğitim için Hestia Pro temasını kullanıyoruz. Kullandığınız temaya bağlı olarak, widget sayfanız biraz farklı görünebilir.
Ardından, ekranın sol üst köşesindeki ‘Blok Ekle’ (+) düğmesine tıklamanız ve Kısa Kod bloğunu aramanız gerekir.
Bulduktan sonra, bloğu ‘Altbilgi’ sekmesine ekleyin ve ardından WPCode kısa kodunu içine yapıştırın.
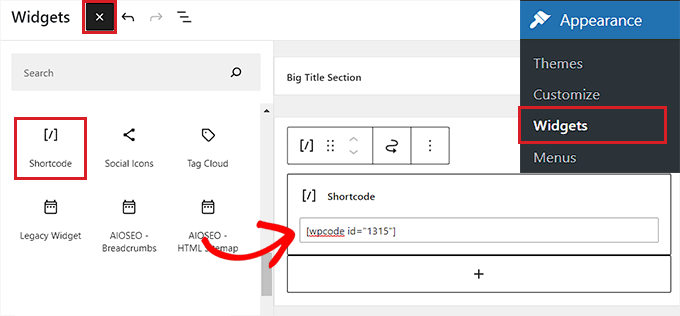
Son olarak, değişikliklerinizi kaydetmek için en üstteki ‘Güncelle’ düğmesine tıklayın.
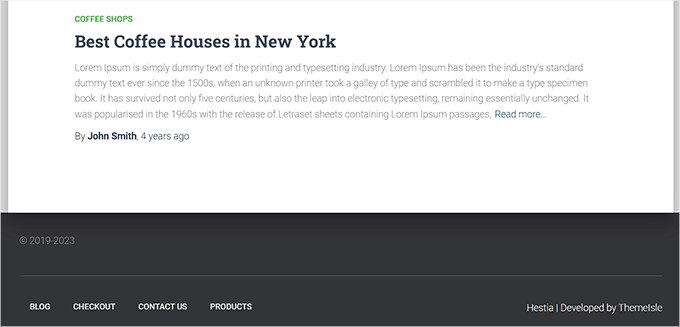
Şimdi, dinamik telif hakkı tarihini iş başında görmek için web sitenizi ziyaret edebilirsiniz.
Blok Tabanlı Temaya Dinamik Telif Hakkı Tarihi Ekleme
WordPress web sitenizde blok tabanlı bir tema kullanıyorsanız, telif hakkı kısa kodunu altbilgiye eklemek için bu yöntemi kullanabilirsiniz.
İlk olarak, WordPress panosundan Görünüm ” Editör sayfasını ziyaret etmeniz gerekir. Bu, ekranınızda tam site düzenleyicisini başlatacaktır.
Buradan, Altbilgi bölümünü seçin ve ardından ekranın sol üst köşesindeki ‘Blok Ekle’ (+) düğmesine tıklayın.
Ardından, Kısa Kod bloğunu bulup altbilgide tercih ettiğiniz alana eklemeniz yeterlidir.
Bunu yaptıktan sonra, dinamik telif hakkı tarihi kısa kodunu bloğa yapıştırın.
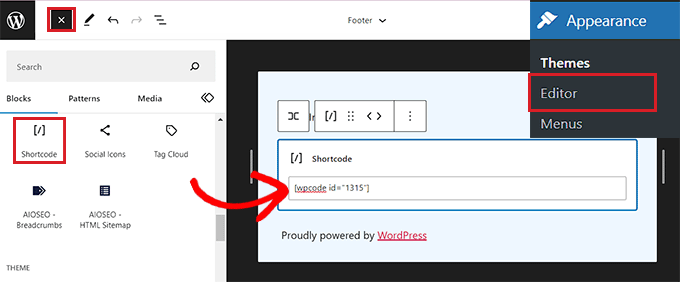
Son olarak, ayarlarınızı kaydetmek için en üstteki ‘Kaydet’ düğmesine tıklamayı unutmayın.
Artık dinamik telif hakkı tarihini kontrol etmek için web sitenizi ziyaret edebilirsiniz.

Yöntem 2: Otomatik Telif Hakkı Yılı Güncelleyicisini Kullanarak WordPress Altbilgisine Dinamik Telif Hakkı Tarihi Ekleme
Web sitenizde kod kullanmak istemiyorsanız, bu yöntem tam size göre.
İlk olarak, Smart Copyright Year eklentisini yüklemeniz ve etkinleştirmeniz gerekecektir. Ayrıntılar için WordPress eklentisi yükleme kılavuzumuza göz atabilirsiniz.
Yasal Uyarı: Bu eklentinin WordPress’in en son sürümüyle test edilmediğini unutmayın. Ancak, bu eğitim için kullandığımızda, iyi çalışıyor gibi görünüyordu. Daha fazla bilgi edinmek için güncel olmayan eklentilerin kullanımına ilişkin kılavuzumuza bakın.
Etkinleştirmenin ardından, eklenti telif hakkı tarihiniz için otomatik olarak veri getirecektir. Yine de, yalnızca geçerli yılı gösterdiğini ve sitenin kullanıldığı yıl aralığını göstermediğini unutmamalısınız.
Telif hakkı tarihini görüntülemek için şimdi web sitesi altbilgisine bir kısa kod eklemeniz gerekecek.
Klasik Temaya Dinamik Telif Hakkı Tarihi Ekleme
Tam site düzenleyicisini kullanmayan klasik bir tema kullanıyorsanız, bu yöntemi kullanabilirsiniz.
İlk olarak, WordPress yönetici kenar çubuğundan Görünüm ” Widget ‘lar sayfasını ziyaret etmelisiniz. Oraya geldiğinizde, ‘Altbilgi’ sekmesine gidin ve genişletin.
Bu eğitim için Hestia Pro temasını kullanıyoruz, bu nedenle widget’larınız kullandığınız temaya bağlı olarak biraz farklı görünebilir.
Ardından, ekranın sol üst köşesindeki ‘Blok Ekle’ (+) düğmesine tıklayın ve Kısa Kod bloğunu bulun.
Bloğu ‘Footer’ sekmesine ekleyin ve ardından telif hakkı tarihini aşağıdaki gibi görüntülemek için aşağıdaki kısa kodu kopyalayıp yapıştırın:
[yıl]
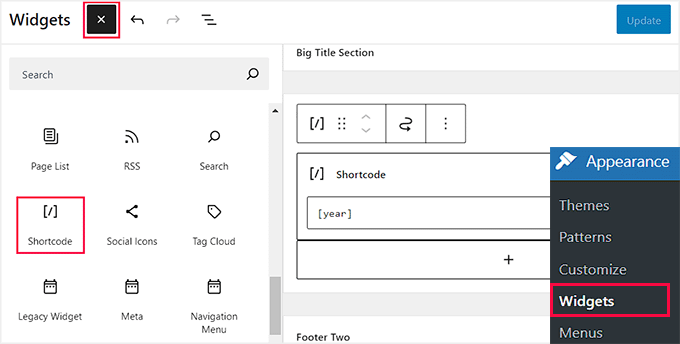
Son olarak, değişikliklerinizi kaydetmek için en üstteki ‘Güncelle’ düğmesine tıklayın.
Şimdi, dinamik telif hakkı tarihini iş başında görmek için web sitenizi ziyaret edebilirsiniz.

Blok Tabanlı Temaya Dinamik Telif Hakkı Tarihi Ekleme
Tam site düzenleyicisine sahip blok tabanlı bir tema kullanıyorsanız, dinamik telif hakkı kısa kodunu bu yöntemle ekleyebilirsiniz.
WordPress yönetici kenar çubuğundan Görünüm ” Düzenleyici sayfasına gitmelisiniz.
Buraya geldiğinizde, ‘Altbilgi’ bölümünü seçin ve ardından ekranın sol üst köşesindeki ‘Blok Ekle’ (+) düğmesine tıklayın. Ardından, Kısa Kod bloğunu bulun ve ekleyin.
Bundan sonra, web sitenizde telif hakkı tarihini görüntülemek için aşağıdaki kısa kodu bloğa ekleyin:
[yıl]
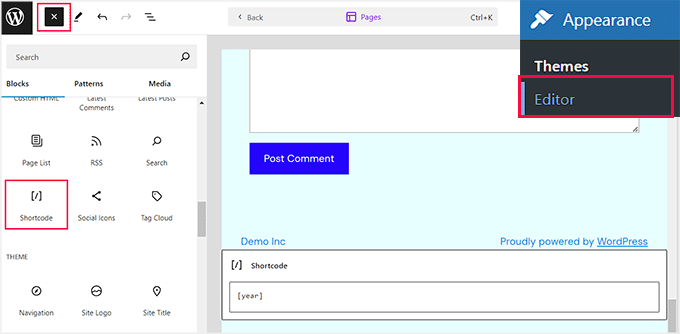
Son olarak, ayarlarınızı kaydetmek için en üstteki ‘Kaydet’ düğmesine tıklayın.
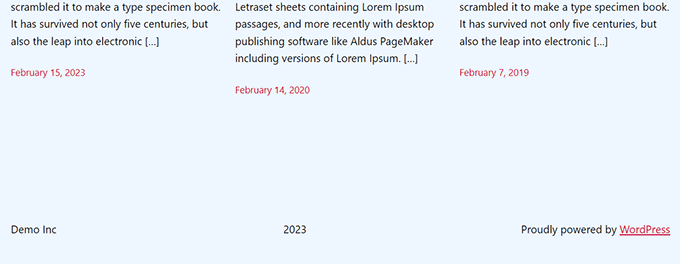
Şimdi, dinamik telif hakkı tarihini iş başında görmek için web sitenizi ziyaret edebilirsiniz.
Umarız bu makale WordPress altbilgisine dinamik telif hakkı tarihlerinin nasıl ekleneceğini öğrenmenize yardımcı olmuştur. WordPress’te dinamik içeriğin nasıl ekleneceği hakkındaki eğitimimize ve web sitesi grafikleri için en iyi Canva alternatifleri için en iyi seçimlerimize de göz atmak isteyebilirsiniz.
If you liked this article, then please subscribe to our YouTube Channel for WordPress video tutorials. You can also find us on Twitter and Facebook.


Armando
In this article, you are recommending the Auto Copyright Year Updater plugin, but according to WordPress.org, “This plugin hasn’t been tested with the latest 3 major releases of WordPress. It may no longer be maintained or supported and may have compatibility issues when used with more recent versions of WordPress.”
Do you have another recommendation? Thanks.
WPBeginner Support
For that warning we would recommend taking a look at our article below, we will take a look at the plugin and alternatives as well
https://www.wpbeginner.com/opinion/should-you-install-plugins-not-tested-with-your-wordpress-version/
Admin
Jiří Vaněk
Thank you for the article. I only had a tag for the current year on the site, but thanks to your snippet I was able to expand it to include the year the blog started. It looks much better. Good job. Thank you for this little thing, which I would not have figured out on my own, or I would have searched for it for a long time on the Internet and tried different codes.
WPBeginner Support
Glad our recommendation was helpful
Admin
Moinuddin Waheed
Thanks for the code to add for having dynamic date in the copyright.
it will eliminate the need to manually change the date.
I was looking for this and will add to my websites.
WPBeginner Support
Glad our guide could help
Admin
Yvon
I tried to do this as recommended in https://www.wpbeginner.com/glossary/functions-php/): I pasted the code as a snippet in the Code snippet plugin. But I’m not sure what to do next: “add the following code to your theme’s footer.php file where you want to display the date: ”
I guess I don’t understand how the Code snippet plugin works: where the code is added / how do I address ‘footer.php’>? I tried to just paste the code in the footer, but that didn’t work… Please help this coding-newbie?
WPBeginner Support
Plugins like the code snippet plugin are for adding code that would normally go in the functions.php of your site. For the code to place in the footer.php that would normally require editing your theme’s files. We would recommend taking a look at our guide below for some helpful information on editing your footer:
https://www.wpbeginner.com/wp-tutorials/how-to-edit-the-footer-in-wordpress/
Admin
Taariqq
Most helpful! Brings a level of credibility to my site.
Thank you!
WPBeginner Support
You’re welcome
Admin
Zee Aitch
I think we should not waste time reinventing the wheel our self, instead utilizing the available plugins like Automatic Copyrights Shortcode.
What you think?
WPBeginner Support
That plugin was not available when this post was created, we will certainly take a look at it
Admin
Def Egge
I gave this a try and, for a moment, it appeared to work.
Clearing the WP cache and reloading the page resulted in the same old “Blah … blah … blah … | Proudly powered by WordPress” footer.
I no longer see this code snippet in the functions.php file for the ComicPress theme.
Does it matter WHERE in the functions.php and footer.php files the code snippets are added? If so, it would be a great help to know that.
Thanks!
Kori
Does it have to be a child theme for this to stay in place? I’m on Twenty Seventeen, with no child theme. Do I need to worry about this being overwritten every time I get a WP udpate?
Appreciate the help so much!
karakaplan
I just want to put current year. How to do that?
Nick
You can put the current year by just calling the php date() function with a ‘Y’.
echo date(‘Y’);
Anna
Could someone assist with information on how to add a text after the year? Where in the code should this be placed?
Calvin Joseph Terlizzi
Hah! Worked on the first try. Thanks guys!
Rishabh
After i clicked save on the functions.php. I’m facing a white-screen of death. I also dowloaded the functions.php file but couldn’t find your code there. How do i solve it?
WPBeginner Support
Hey Rishabh,
You probably downloaded incorrect functions.php file. Remember, all themes installed on your website have functions.php file. You’ll need to edit the file in your current WordPress theme folder.
Admin
Sarah Andert
I am also having this problem and have no idea what you mean by “edit the file in your current WordPress theme folder”
I went into Appearance then Editor and just clicked on the right hand side where I saw “Functions.php” and pasted in the code you listed. Now none of the options under appearance will even open, including Editor, Custom CSS and Edit CSS. I have no idea what to do, please help!
WPBeginner Support
Hi Sarah,
You can undo the changes you made to the functions file using an FTP client.
Sarah Andert
Actually I think I figured it out! You mean editing the theme this way, right?
https://www.wpbeginner.com/wp-tutorials/how-to-manually-update-wordpress-using-ftp/
WPBeginner Support
Yes, this way you will be able to quickly undo changes if they break your site.
Nikhil
I need to change ” Last updated on January 5th, 2016 by Editorial Staff ” this date with current date…
So which command I have to use…. I had tried this one…
But I’m getting the same date…
WPBeginner Support
Please see our tutorial on how to display last updated date of your posts in WordPress
Admin
Amanda
Is there a way to do this using Jetpacks CSS editor?
gumusdis
Thanks! this is great, i used it on my website
I added a post for 1 year ago, like 2015 to have more than 1 year. then I realized I could simply write down 2015 in code lol..
anyway i hope you laughed..
Kyle
This is WordPress Beginner!!! Why Don’t You tell the guys where exactly to put the code on PHP file? See lots of people breaking their websites so I would rather not try.
lena woods
I added the code to functions, and it completely wiped out my website. Blank screen – when i go to login page and when i simply type in my website URL. what happened? did exactly what was said tot do above :/
WPBeginner Support
Please see our guide on troubleshooting WordPress issues.
Admin
Hamza Ahmed
Is there a way to have dynamic years in WordPress titles too?
Christina
Great share,
thanks a lot. I have searched so long how to remove the copyright in wordpress.
Greets Christina
Mark Roth
I have spent hours over several days trying to find the answer to the following need:
A blogger’s copyright info is included automatically with each post. The blogger got married and changed her last name. How to get WordPress to use old name in copyright line for posts before wedding date and new name in copyright line for posts after the wedding date?
I know get_the_date is key, but I don’t know how to write a conditional statement that says if post publication date is before October 1 2009, display maiden name, else display married name.
(Or, of course, if post publication date is after wedding date, display married name.)
I’m hoping one of you here will help me with this. Please?
Michaela
Hi, I tried to update the functions.php file, but instead I received 500 Error. What shall I do? It does not allow me to access my wordpress account to edit it back…. can you please help me?
WPBeginner Support
You can remove the code by editing your functions.php file using an FTP client.
Admin
Mirco
You can also try the Copyright Shortcodes plugin (it’s on the WordPress plugin directory).
Available shortcodes are: [copyright year=YYYY], [copy], [year], [years by=YYYY list=true/false sep=“, “]
Cheers,
Brandon Hann
This is the code I used for a long time until I realized that the year is pulled based off of GMT, so if you don’t want users in different time zones to see your site’s year change early or late, don’t use this tag…change echo date to echo date_i18n
For example, when I used the original code, I went to my website on Dec 31st, 2014 at around 6pm PST. My website was already showing the year 2015 because Pacific Standard Time is 8 hours behind GMT.
With the date_i18n change, your site will show the current year based on the visitor’s timezone instead. For those that are curious, i18n is an abbreviation of “internationalization” because there are 18 letters between the ‘I’ and the ‘N’.
shahrukh
Can you show me how you add i18n in above code
hayward
I am having trouble with adding the code to my function.php footer. Now I am getting this error message Parse error: syntax error, unexpected ‘function’ (T_FUNCTION) in /home3/hsp1990/public_html/wp-content/themes/couponpress/functions.php on line 35
Rex AZ
You should use a child theme rather than working with your parent theme. Just go over to the wordpress codex and source for child theme development. Just create a new functions.php file and a footer.php file in your child theme directory and insert the codes. You are good to go.
Chris
Hi,
how can I modify this code, so that I can have a fix “first date” of “1999”, instead of the date of the first published posting?
Thanks.
Emilio G.
type in 1999 before the code.
menj
I have used the code above, with a slight modification to the comicpress_copyright() function which I renamed to a more generic one.
jrstaples1
Nice tip! I addded this with almost zero coding knowledge. How would I add my site title after the year?
Ole
Wow. This is great. Thank you
Dominic
Something like this might be easier and less intensive.
<?php
$year = date('Y');
if ($year != 2009){
echo '© 2009 – '.$year.' YourSite.com';
} else {
echo '© 2009 YourSite.com';
}
?>
Gary
It’s worth pointing out that copyright exists for a number of years from the first time it was published. That means there’s to things to consider:
1) The visual copyright notice is not necessary under the Berne treaty – it has no standing in law whether you have it on the site or not.
2) If the site was first published in a certain year, claiming it could be actually published in a later year actually lowers any claim you may have for copyright infringement.
Also, most visual copyright notices, for what they are worth, also need to put who the copyright is to, after the year(s).
Finally, it’s typographically correct to use an “en dash” instead of the hyphen-minus character you’ve suggested.
Dave Hildebrand
Surprised this hasn’t been added to every theme writers toolbox.
I changed – to – and added in my name as per Gary’s comments.
Maverick
Little better way for this feature is to add php variable about site name (able to change in admin panel), for example:
© 2009 –
anggiaj
Great tips, problem solved, thanx
Zhu
Thanks for the tip! I implemented that in about 60 seconds
Derek Jensen
It surely does bug me when I go to a site and the copyright is out of date but yet they are publishing fresh content.
This will be a nice dummy factor for that.
As always I enjoy your guys as a WordPress resource.