WPBeginner’da, sitemizi dünyanın her yerindeki kullanıcılar için daha hızlı hale getirmek için Cloudflare’in büyük, hızlı CDN’sini kullanıyoruz. Bu, WordPress performansını önemli ölçüde artırmamıza yardımcı oldu, bu yüzden Cloudflare’i okuyucularımıza sık sık tavsiye ediyoruz.
Cloudflare piyasadaki en iyi WordPress CDN hizmetlerinden biridir. Web sitenizi hızlandıran ücretsiz bir CDN ve küçük işletme web siteleri için güçlü güvenlik özellikleri sunarlar.
Ancak Cloudflare’in ilk kurulum süreci yeni kullanıcılar için zor olabilir.
Bu kılavuzda, web sitenizin hızını artırmanıza yardımcı olmak için WordPress’te eksiksiz bir Cloudflare kurulumunda size yol göstereceğiz.
CDN Nedir?
CDN veya içerik dağıtım ağı, web sitenizin dosyalarını konumlarına göre kullanıcılara daha hızlı ulaştırmaya yardımcı olan dağıtılmış sunuculardan oluşan bir sistemdir.
Genellikle bir web barındırma hizmeti, web sitenizin ziyaretçilerine tek bir konumdan hizmet verir. Tüm kullanıcılar nerede olurlarsa olsunlar aynı sunucuya erişirler.
Bu, web sitenizin merkezi barındırma sunucusundan uzakta yaşayan kullanıcılar için içerik dağıtımında gecikmeye neden olabilir.
Bu nedenle CDN’ler dünyanın farklı yerlerinde birden fazla uç sunucu kurar.
Bu CDN sunucuları, web sitenizin kaynak sunucusundan statik içeriğin kopyalarını kaydeder ve WordPress web sitenizi ziyaret ettiklerinde kullanıcılara sunar.
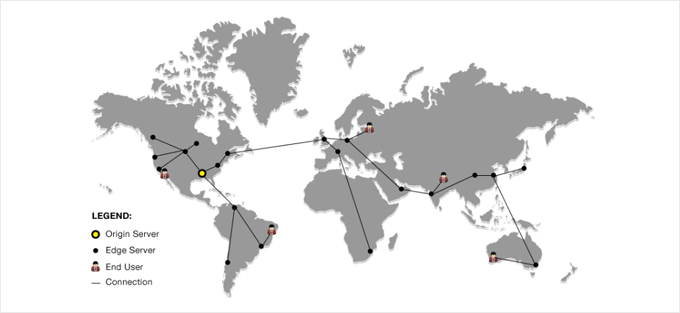
Bir kullanıcı talebi olduğunda, kullanıcının konumuna en yakın CDN sunucusu bu talebi ele alacaktır.
Örneğin, ABD’deki bir kişi İngiltere’de barındırılan bir web sitesine erişmek isterse, bu isteği İngiltere’deki ana sunucu değil, ABD’deki bir CDN sunucusu sunacaktır.
Bir CDN ile, tüm kullanıcı istekleri en yakın CDN sunucuları tarafından ele alınır. Bu da ziyaretçiler ile web sitenizin sunucusu arasındaki fiziksel mesafeyi azaltır.
Sonuç olarak bir CDN, coğrafi konumlarından bağımsız olarak tüm kullanıcılar için web sitenizin performansını ve hızını artırır.
Daha hızlı bir web sitesi kullanıcı deneyimini de iyileştirir ve web sitenize SEO sıralamasında hafif bir artış sağlayabilir. CDN kullanmak ayrıca birincil sunucunuz üzerindeki yükü azaltır ve trafik artışları sırasında çökmesini önler.
Daha fazla bilgi edinmek istiyorsanız, WordPress blogunuz için neden bir CDN’e ihtiyacınız olduğuna ilişkin kılavuzumuza bakın.
Cloudflare CDN Nedir?

Cloudflare, İnternet’teki en popüler ücretsiz CDN sağlayıcılarından biridir. Statik içeriği otomatik olarak önbelleğe alan ve dinamik içeriği hızlı bir şekilde sunan, küresel olarak dağıtılmış sunuculardan oluşan büyük bir ağdır.
Cloudflare, bir CDN hizmetinin yanı sıra bulut tabanlı bir web sitesi güvenlik duvarı ve dağıtılmış bir proxy sunucusudur. Bu, web sitenize gelen tüm trafiği izlediği ve şüpheli trafiği daha sunucunuza ulaşmadan engellediği anlamına gelir.
Küçük işletme web siteleri ve bloglar için uygun ücretsiz bir temel plan ve aylık 20 $ ‘dan başlayan ücretli planlar sunar.
Cloudflare, ücretsiz bir CDN arayan küçük işletmeler için mükemmel bir seçimdir. Ancak, Cloudflare’in tüm özelliklerinden tam olarak yararlanmak istiyorsanız, aylık 200 ABD doları olan İşletme planına ihtiyacınız olacaktır.

İlgili: WPBeginner’ın neden Sucuri’den Cloudflare’e geçtiğine dair yazımıza bakın.
Bununla birlikte, WordPress’te Cloudflare Free CDN’in nasıl kurulacağına bir göz atalım. Eğitimin farklı bölümlerine atlamak için aşağıdaki hızlı bağlantıları kullanabilirsiniz:
Cloudflare Hesabınızı Kurma
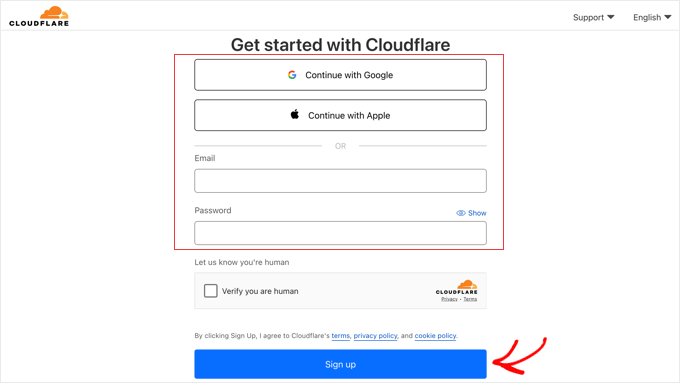
Başlamak için Cloudflare web sitesini ziyaret etmeniz ve ‘Ücretsiz başlat’ düğmesine tıklamanız gerekir.

Bir sonraki sayfada, bir Cloudflare hesabı oluşturmak için e-posta adresinizi ve şifrenizi girmeniz gerekir. Alternatif olarak, Google veya Apple kimlik bilgilerinizi kullanarak da kaydolabilirsiniz.
Sadece gerekli bilgileri girin ve ardından ‘Kaydol’ düğmesine tıklayın.
Kaydolma işlemini tamamladığınızda, web trafiğinizi Cloudflare üzerinden göndermeye başlamak için sitenizi bağlayabilirsiniz. Web sitenizi ‘Mevcut bir alan adı girin’ alanına girmeniz yeterlidir.
Yalnızca sitenizin example.com gibi alan adını yazdığınızdan emin olun. URL’nin tamamını veya herhangi bir ekstra karakter yazmanıza gerek yoktur.
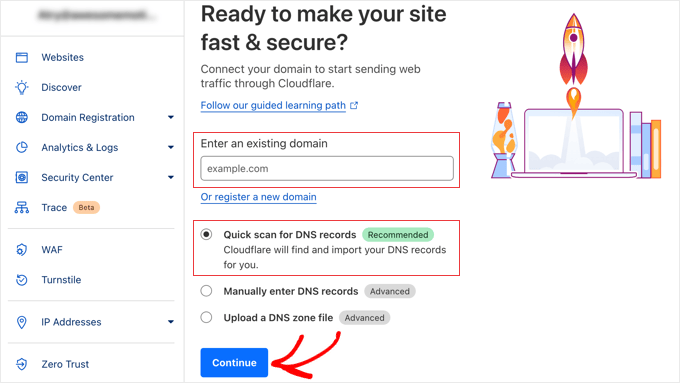
‘DNS kayıtları için hızlı tarama’ seçeneğinin seçili olduğundan emin olun ve ardından ‘Devam’ düğmesine tıklayın.
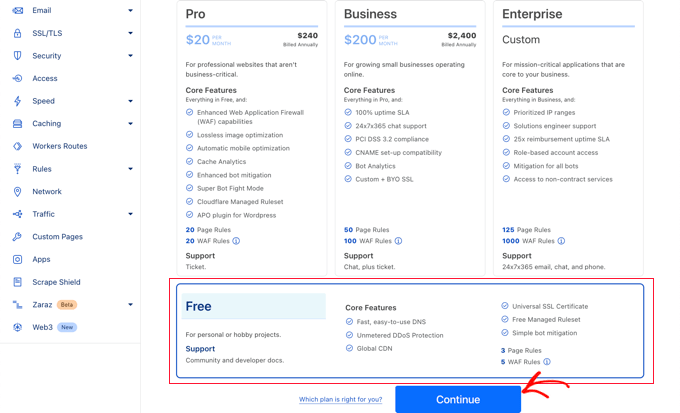
Bir sonraki ekranda, istediğiniz Cloudflare planının türünü seçmeniz istenecektir. Bu eğitim için ücretsiz Cloudflare planını seçeceğiz. Ardından, ‘Devam’ düğmesine tıklayın.
Bundan sonra, Cloudflare size sistemlerinin bulduğu tüm DNS kayıtlarının bir listesini gösterecektir. Bunlar alt alan adlarınızı da içerecektir.
Cloudflare üzerinden geçmek istediğiniz DNS kayıtları turuncu bir bulut simgesine sahip olmalıdır, Cloudflare’i atlayacak DNS kayıtları ise gri bir bulut simgesine sahip olacaktır.
Birincil alan adınızın Cloudflare üzerinde turuncu bir bulut simgesiyle etkin olduğundan emin olmak için listeyi gözden geçirmeniz gerekir. Durumu değiştirmek için ‘Proxy durumu’ geçişine tıklamanız yeterlidir.
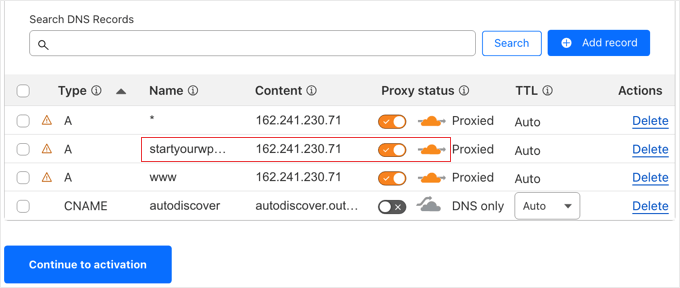
DNS kayıtlarınızı doğruladıktan sonra, ‘Etkinleştirmeye devam et’ düğmesine tıklamanız yeterlidir.
Kurulumunuzun bir sonraki adımında Cloudflare sizden ad sunucularınızı güncellemenizi isteyecektir. Ad sunucularınızı Cloudflare tarafından atanan yenileriyle değiştirmeniz istenecektir.
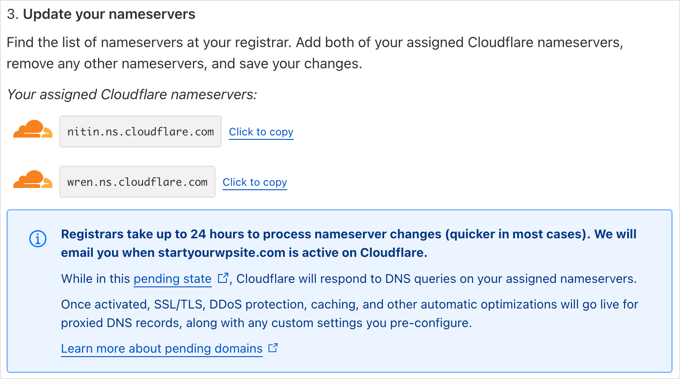
Not: Ad sunucularının değiştirilmesinin internet genelinde yayılması biraz zaman alabilir. Bu süre zarfında web siteniz bazı kullanıcılar tarafından erişilemez hale gelebilir.
Domain.com gibi alan adı kayıt kuruluş u hesabınızdan ad sunucularını değiştirebilirsiniz.
Veya web barındırma sağlayıcınızdan ücretsiz bir alan adı aldıysanız, barındırma hesabınıza giriş yaparak ad sunucularını değiştirmeniz gerekecektir.
Bu eğitimde, Bluehost kontrol panelinden ad sunucularını nasıl değiştireceğinizi göstereceğiz.
Süreç barındırma şirketleri arasında benzer olsa da, barındırma sağlayıcınızdan kontrol panelleri için her zaman ayrıntılı talimatlar isteyebilirsiniz.
Bluehost kontrol panelinize giriş yaptıktan sonra, ‘Alan Adları’ bölümüne gidin ve alan adınızın yanındaki ‘Ayarlar’ düğmesine tıklayın.

Ardından, Gelişmiş Ayarlar bölümüne ilerlemeniz ve ekranın sağındaki oka tıklayarak genişletmeniz gerekir. Bu, ad sunucuları da dahil olmak üzere web sitenizin DNS ayarlarını gösterecektir.
‘Ad Sunucuları (DNS)’nın yanında, ‘Yönet’ düğmesine tıklamalısınız.
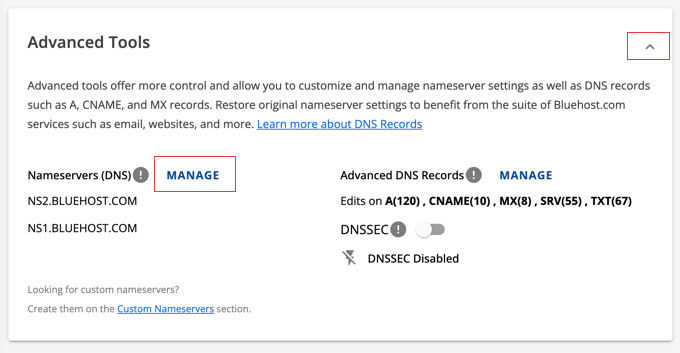
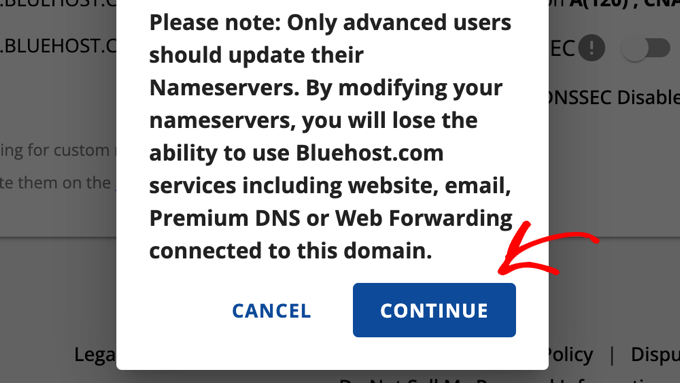
Bu, yalnızca ileri düzey kullanıcıların ad sunucularını güncellemesi gerektiğine dair bir uyarı verecektir.
Bunu onaylamak ve bir sonraki adıma geçmek için ‘Devam’ düğmesine tıklamanız gerekir.
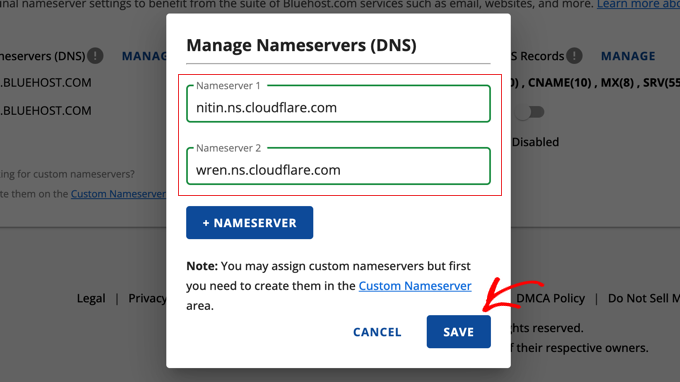
Ardından, Cloudflare tarafından sağlanan ad sunucularını girmeniz gerekir.
Ardından, ‘Kaydet’ düğmesine tıklayın.
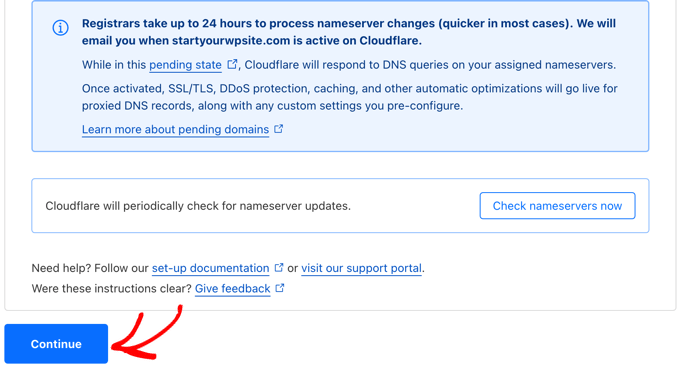
Bundan sonra, Cloudflare kurulum sayfasına geri dönmeniz ve ‘Ad sunucularını şimdi kontrol et’ düğmesine tıklamanız gerekir. Cloudflare, ad sunucularınızı periyodik olarak kontrol edecek ve aktif olduklarında size bir e-posta gönderecektir.
Bu arada, kurulumu tamamlamak için ‘Devam’ düğmesine tıklayabilirsiniz.
İşte bu kadar! Alan adı sunucularınızı güncellemek ve Cloudflare’ı etkinleştirmek birkaç dakika sürecektir.
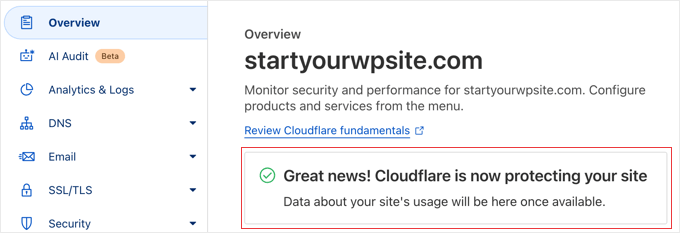
Etkinleştirildikten sonra, Cloudflare kontrol panelinizde başarı mesajını göreceksiniz.
Not: Yukarıdaki ekran görüntüleri Bluehost kontrol panelini göstermektedir. Farklı bir barındırma sağlayıcısı kullanıyorsanız ad sunucusu ayarlarınız farklı görünebilir.
Önemli Bir Cloudflare Ayarının Yapılandırılması
Cloudflare artık sitenizi korurken, hala Cloudflare web sitesindeyken önemli bir ayarı yapılandırmanız gerekir. Bu yapıldıktan sonra, kurulum işlemini bitirmek için WordPress web sitenize Cloudflare eklentisini yükleyeceksiniz.
Cloudflare’i sayfa kuralları ile yapılandırmanızı öneririz, böylece WordPress yönetici alanınız buradan geçmez. Bu, yönetici işlevselliğini etkileyebilecek olası önbelleğe alma sorunlarını önler.
Cloudflare üç ücretsiz sayfa kuralı oluşturmanıza izin verir. Daha fazla sayfa kuralı eklemek istiyorsanız, 5 ekstra kural için ayda 5 dolar ödemeniz gerekir.
Öncelikle sayfanın solundaki menüde yer alan Kurallar ” Sayfa Kuralları seçeneğine tıklamanız gerekmektedir. Sonrasında ‘Sayfa Kuralı Oluştur’ butonuna tıklayabilirsiniz.
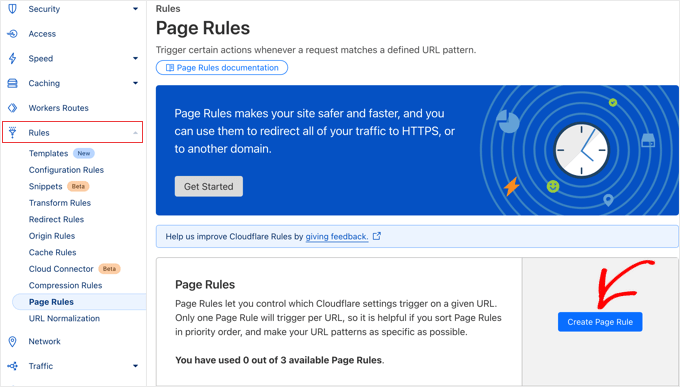
Şimdi, aşağıdaki ayarları kurala yazmanız gerekir. Ek ayarlar için yeni satırlar eklemek üzere ‘+ Ayar Ekle’ düğmesine tıklayabilirsiniz:
- Sayfa URL’si: example.com/wp-admin*
- Önbellek Seviyesi – Bypass
- Performansı Devre Dışı Bırak
- Uygulamaları Devre Dışı Bırak
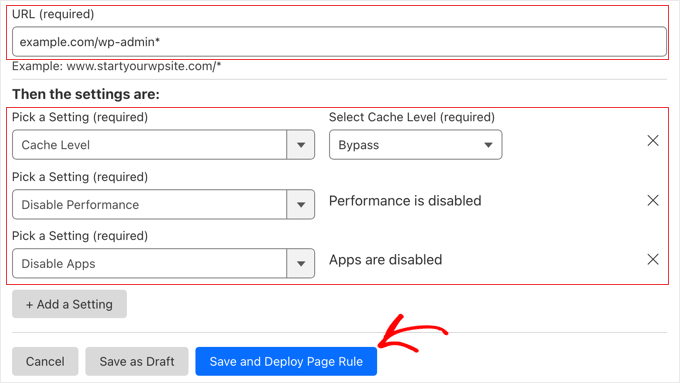
İşiniz bittiğinde, yeni kuralı eklemek için ‘Kaydet ve Dağıt’ seçeneğine tıkladığınızdan emin olun.
Bu yapıldıktan sonra, resmi Cloudflare WordPress eklentisini kullanarak Cloudflare kurulumunu tamamlayacaksınız.
WordPress için Cloudflare’i Bir Eklenti Kullanarak Optimize Etme
Cloudflare, tek tıklamayla WordPress için optimize edilmiş ayarlar için özel bir WordPress eklentisi sunar. En iyi uyumluluk ve işlevselliği sağlamak için Cloudflare özelliklerini WordPress ile sorunsuz bir şekilde entegre eder.
Eklenti, WordPress sitenizde Cloudflare’ı hızlı bir şekilde kurmanıza, web uygulaması güvenlik duvarı (WAF) kural kümeleri eklemenize, önbelleği otomatik olarak temizlemenize ve daha fazlasına olanak tanır.
Başlamak için Cloudflare eklentisini web sitenize yükleyin ve etkinleştirin. Daha fazla ayrıntı için WordPress eklentisinin nasıl kurulacağına ilişkin adım adım kılavuzumuza bakın.
Not: Bu eklenti bir süredir güncellenmemiş olsa da, test ettik ve hala doğru çalışıyor. Daha fazla bilgi için eski WordPress eklentilerini kullanmanın güvenli olup olmadığına ilişkin kılavuzumuza bakın.
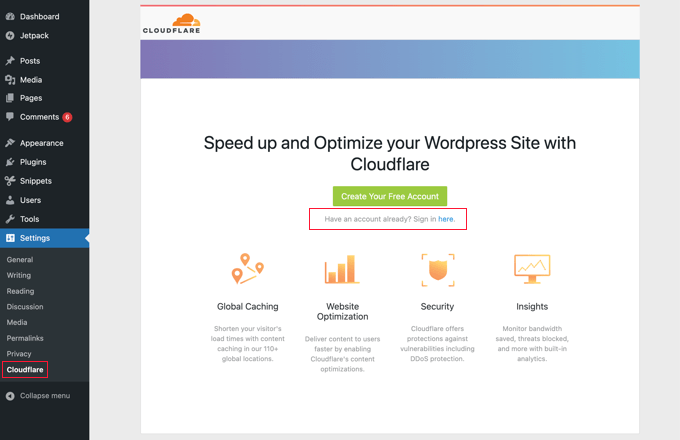
Tamamlandığında, Cloudflare ayarlarını yapılandırmak için yönetici panelinizdeki Ayarlar ” Cloud flare bölümünü ziyaret etmeniz gerekir.
Ayarlar sayfasında, bir ‘Ücretsiz Hesabınızı Oluşturun’ düğmesi ve mevcut hesaplar için bir oturum açma seçeneği göreceksiniz. ‘Burada oturum açın’ bağlantısını tıklamanız yeterlidir.
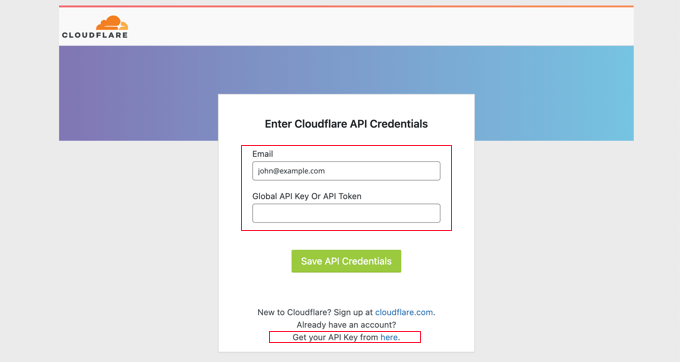
Bir sonraki ekranda Cloudflare e-postanızı ve API anahtarınızı girmeniz gerekecektir.
‘API anahtarınızı buradan alın’ bağlantısına tıklayın.
Bu, Cloudflare web sitesindeki hesap alanınız için bir açılır pencere getirecektir.
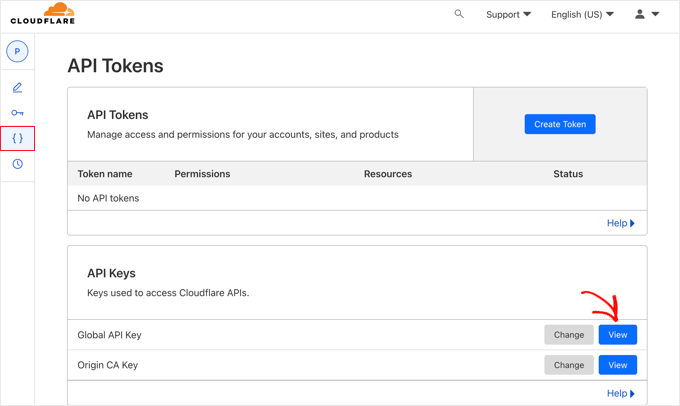
‘Profilim’ sayfanızda olduğunuzdan emin olun ve ardından sol kenar çubuğundaki ‘API Belirteçleri’ sekmesine tıklayın.
Bundan sonra, ‘Global API Anahtarı’ bölümüne gidin ve ‘Görüntüle’ düğmesine tıklayın.
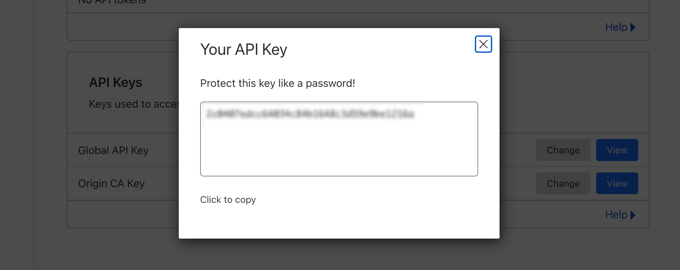
Bu bir açılır pencere açacak ve API anahtarınızı gösterecektir.
Kopyalamak için tuşun üzerine tıklamanız yeterlidir.
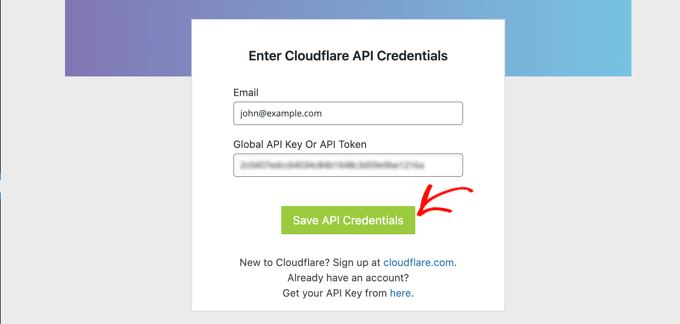
Ardından, WordPress kontrol panelinize geri dönmeniz ve e-posta adresinizi ve API anahtarınızı girmeniz gerekir.
Ardından, ‘API Kimlik Bilgilerini Kaydet’ düğmesine tıklayın.
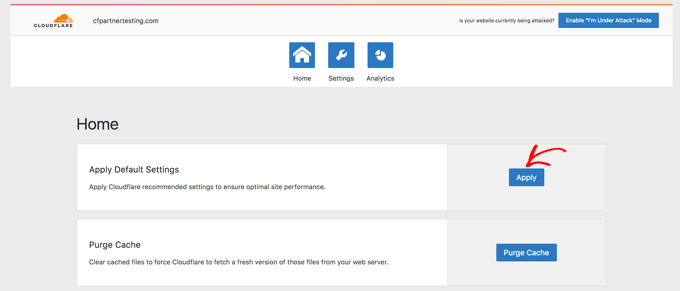
Bundan sonra, Cloudflare ayarları kontrol panelinizde görünecektir.
Buradan tek tıklamayla WordPress optimizasyonu uygulayabilir, önbelleği temizleyebilir, otomatik önbelleği etkinleştirebilir ve daha fazlasını yapabilirsiniz.
WordPress sitenizi optimize etmek için ‘Varsayılan Ayarları Uygula’nın yanındaki ‘Uygula’ düğmesine tıklayın. Bu, Cloudflare’in optimum WordPress performansı için önerdiği bazı yapılandırma değişikliklerini gerçekleştirecektir.
Ardından, ‘Ayarlar’ menü seçeneğine tıklayın.
Burada, daha fazla site optimizasyon ayarı bulacaksınız.
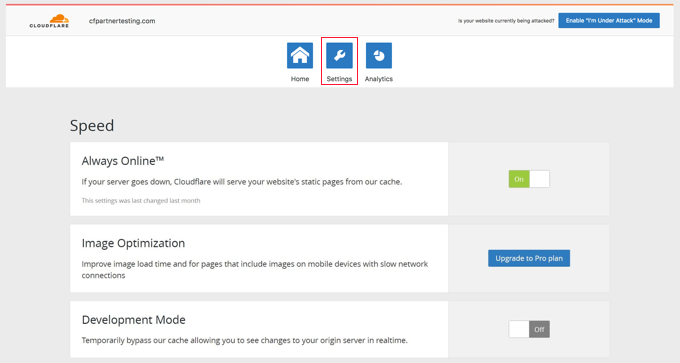
‘Güvenlik’ bölümünü bulmak için bu ekranı aşağı kaydırabilirsiniz.
Güvenlik seviyesi varsayılan olarak orta düzeydedir. Web sitenizin güvenliğini artırmak için açılır listeden ‘Yüksek’ seçeneğini belirleyebilirsiniz.
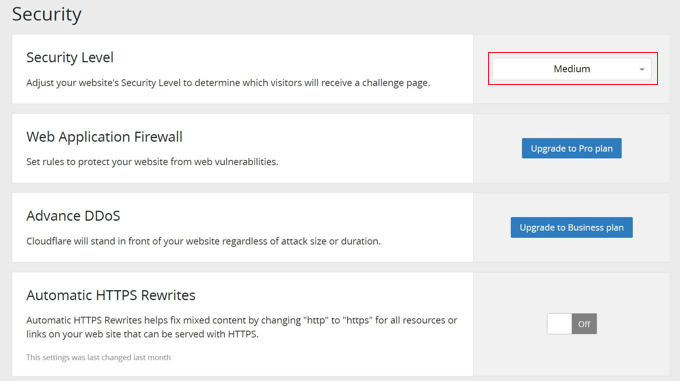
Ve işte bu kadar! İşiniz bitti.
Umarız bu makale WordPress’te Cloudflare ücretsiz CDN’i nasıl kuracağınızı öğrenmenize yardımcı olmuştur. WordPress hızını ve performansını artırmaya yönelik nihai kılavuzumuzu ve en iyi WordPress önbellek eklentileri için uzman seçimlerimizi de görmek isteyebilirsiniz.
If you liked this article, then please subscribe to our YouTube Channel for WordPress video tutorials. You can also find us on Twitter and Facebook.


Nelson
My hosting provider connected my website over Cloudflare CDN.
But main problem is with website speed.
Speed with direct access 100% and when accessed via CDN 85%. How can it be fixed?
WPBeginner Support
It would depend on the reason why it says that the speed is lower, we would recommend taking a look at our guide below for understanding and using speed tests:
https://www.wpbeginner.com/beginners-guide/how-to-properly-run-a-website-speed-test-best-tools/
Admin
Andrew Hansen
My hosting plan through Host gator says it has cloudflare installed. Is that good, or should I uninstall it through the hosting plan and manually add it so i can customize my options?
WPBeginner Support
It would depend on how Cloudflare is set up on your account, if you have access to cloudflare’s settings then you can continue to use what is on your account without worrying.
Admin
Andrew Hansen
I do not have control over settings.
WPBeginner Support
Jus to be safe, check with your host as there may be a hidden settings area for Cloudflare in the hosting settings.
Andrew Hansen
I checked the information regarding cloudflare through Hostgator. you can manage what level caching (assets only, assets and web pages, or assets and web pages extended) and you can clear the cache, but hostgator says under the cons of using it “No option to customize – Currently, you cannot customize cache settings (for example, which content gets cached, the cache timing, etc.) for the CDN.”
Jiří Vaněk
I use Cloudflare DNS along with their CDN. The integration of Cloudflare CDN into the WP Rocket plugin, which I use for caching, is fantastic. The CDN can be linked with the caching plugin, allowing for the simultaneous clearing of both the website cache and the CDN cache with a single button in WP Rocket.
WPBeginner Support
Connections like that to help simplify the process are very helpful
Admin
Ralph
I plan on making website from europe server (cheaper) to US users and this guide is godsend! Even better it is possible to do it for free. Thank you for this detailed guide. It will definitely help me setting everything up as I never really understood how to do this. Every other guide was lacking details and was too general.
WPBeginner Support
Glad to hear our guide was helpful
Admin
Salman
Hi, I use the “WPS Hide Login” plugin. While creating a page rule for the login page should I use the default login URL or the new login URL which I am using with the help of the plugin?
WPBeginner Support
If the login page is on a different URL you would want to set the page rule for the active login page that users would visit.
Admin
Neal Umphred
Thanks for another useful how-to article!
Regarding the ‘Always Use HTTPS’ option, you wrote: “Some users have reported issues when using this setting with Cloudflare.”
What are those issues?
WPBeginner Support
The errors vary between sites so we don’t have a specific list of errors to point to at the moment.
Admin
Sohil Jain
If I setup comment on my main domain wil it will be setup automatically to subdomain too? Because I don’t want cloudflare setup to apply to subdomain as I only want on main domain. So where to click so that it will not apply to subdomain
Thanks
WPBeginner Support
There is an option in Cloudflare to exclude a subdomain so you wouldn’t need to worry about that.
Admin
Evindu Shavinda
I added Cloudflare to my website today. So, I had to remove my hosting’s nameservers & replace them with Cloudflare nameservers from my domain registrar.
This is the question – 1. So, how my hosting account still works? I have removed its nameservers from the domain registrar
Aftab
Don’t worry about hosting. Cloudflare doesn’t modify or change your hosting configuration. Your site will be hosted on your current host only. The reason why cloudflare asks you to change the nameserver because it passes your site through their DNS. It routes your web traffic through the Cloudflare network. So they can proxy your traffic through their network. Cloudflare offers security, ddos protection to all the sites that are configured with their nameservers. You don’t need to spend a single penny to configure your site through network. It’s a part of the free plan. No matter how many sites you have.
Nina Cen
When I tried to add the page rules for my wordpress login page, I got message “Not Acceptable! An appropriate representation of the requested resource could not be found on this server. This error was generated by Mod_Security.”
Is anything I did wrong? Or I just need to wait for a little while to try again?
WPBeginner Support
You would want to check with your hosting company for that specific error as that normally means they have a security rule set to prevent certain things on your site.
Admin
Shyam
I s there a way to turn off the second loading screen for security verification purposes and that CAPTCHA page which you have mentioned in the Cons of Cloudflare?
WPBeginner Support
You should be able to change the settings to remove that if you wanted but you would want to check with CloudFlare for the current method.
Admin
Lou
I’m setting up Cloudflare – thanks to your article! I’ve already got W3 super cache plugin – do I need both? Are they going to confuse each other? Total newb question I know!
WPBeginner Support
They have slightly different functions and there is an integration so the two can work with each other without an issue.
Admin
Faith Nte
Thank you for this guide. It helped me reduce the time my page loads
WPBeginner Support
Glad our guide was helpful
Admin
Muntaha
What if someone mistakenly adds the wrong parameters in page rules and then deployed it. Is there any way back to change page rules after deploying it?
WPBeginner Support
You can change your settings after setting them if you need to.
Admin
bali kratom
thanks for sharing this content
WPBeginner Support
You’re welcome
Admin
Will
Probably a noob question, but I have a lot of existing video and photo files on my site. Will they all be migrated to Cloudflare’s CDN or do I have to do that manually? I followed the setup steps, but my content still takes forever to load, and when I view its URL, it’s still showing my site’s URL and path.
WPBeginner Support
You shouldn’t need to transfer your content, for the slow loading you may want to reach out to CloudFlare for them to take a look
Admin
Brooke
Thanks so much for this, helps a lot!
Just to be clear, even though I’ve added my site to cloudflare, I still need to get an SSL cert separately? Cloudflare does not supply ssl cert?
Thanks again!
WPBeginner Support
You would want to take a look again under the Configuring Most Important Cloudflare Settings section for CloudFlare’s SSL
Admin
Ibraham Aali
Admin, kindly answer these question like
After changing the DNS, who is actually will my hosting provider? The hoster OR cloudflare and all editing can be done by same cpanel?
WPBeginner Support
Your hosting provider would still be your hosting provider.
Admin
Soumya
thank you very much, I was looking for a proper step-by-step Cloudflare set up! and TA DA!! you guys are savior.
It would be great if you publish about the best of cloudflare settings, from the plugin.
WPBeginner Support
Glad you found our article helpful
Admin
Alabura
Thank you for such a great publications, it really help me set up my cloud flare account easily. Keep the good work.
WPBeginner Support
You’re welcome, glad our guide was helpful
Admin
Bryan Wagar
Very helpful information and with the pictures for verification i could confirm everything instead of guessing, thankyou very much for compiling this! It is BRILLIANT
WPBeginner Support
You’re welcome, glad our guide could be helpful
Admin
PKV
superb guide, easy to follow thanks
WPBeginner Support
Glad our guide was helpful
Admin
randhir singh
I want to know which is the best CDN ? cloud Flare or max
WPBeginner Support
Hi Randhir,
At WPBeginner, we recommend MaxCDN. However, if you want to use the free CDN, then Cloudflare can be a good solution.
Admin
anurag saxena
If i will use cloudfare free version and will change the nameserver then it means my website will run on cloudfare server then how i can edit my website? through cloudfare or my present hosting provider? pls tell me detail.
andy
The only reason I use cloudflare because you can hide where you hosting the site.
Mehmet
i am wondering..
for cloudflare, we need to point the DNS to theirs..
so how we gonna use custom email set up using our own domain (which also need to point the DNS to the email provider) ?
as far as i know, we can’t use two DNS .. (actually we can, but it is expensive)
Aqib
I am using custom email and cloudflare. Cloudflare doesn’t affect my custom email working.
Abhi
If my domain is from go daddy and hostino is from inmotion hosting and I change my domain name server to my hosting now I want to join cloudfare to it then what can I do?
andy
I try to help answer. from godaddy change nameserver to cloudflare, and from cloudflare, set up your DNS and point to your in motion hosting ip address.
Syed Shan
After Setting Our Host DNS To Cloudfare DNS, Which bandwidth and storage will be used from our local hosting plan e.g godaddy, namecheap etc or Cloudfare ?
Haydrion Rayel
The reasons why I don’t use cloudflare is because of changing the nameservers and second like in this article : it blocks some of the legitime users and that is what I really hate.
I don’t use third party websites where I don’t have full control of it. I saw a couple of times there are you human google click on pictures and it takes forever.
MaxCDN is the only option because you only have to add a cname .. but still ..
Haydrion Rayel
The reasons why I don’t use cloudflare is because of changing the nameservers and second like in this article : it blocks some of the legitime users and that is what I really hate.
I don’t use third party websites where I don’t have full control of it. I saw a couple of times there are you human google click on pictures and it takes forever.
MaxCDN is the onlly option because you only have to add a cname .. but still ..
abhishek purohit
My site is on wordpress and running on godaddy vps server with ssl certificate but it has lots of page load time, now, should I go for cdn cloud flare free account if yes than what about all static IP given with vps account , they will not useable and is vps based site need cloud flare ?
Munna Hossain
Page loading time is an important issue to get good user experience. This LoudFlare helps us to increase the page loading. Can you tell me which one is better to improve page speed, plugin or CDN?
Iain
HI
Just to let you know
I have had a joomla website working on the Free plan and SSL
Not sure if your previous post is now outdated but it is possible.
Regards
Mircea Pop
You can use the provided Cloudflare SSL but you are unable to use your own SSL on free account
koushil
bro can we use this for blogspot blog ?
King Rayhan
of course why not
Ikechukwu
This was very helpful. Thanks.
munetsi
i am actually caught in between-
which provider should i choose for my site,
between cloudfare or maxcdn
Editorial Staff
We use MaxCDN for our sites.
Admin
SOTHEA
This is truly awesome tip. Anyways, I have a question. If my website contents and domain name are hosted in different hosting companies. In this case, I need to change Name Servers to CloundFlare for both. Am I correct?
Anubhav
Did you find the solution for this as i have different hosting provider and domain name provider is different .If you know the solution then please let me know
Ummi Mental
after changing the DNS, who is actually will my hosting provider? The hoster OR cloudflare and all editing can be done by same cpanel?
Captain Asif
Really very helpful article i have setup my wordpress site with cloudflare
Joe
What minification services do you recommend that work well with Cloudfare? This is for a WordPress site that may have potentially high traffic spikes out of the blue. Thanks
bobzyouruncle
I live at the bottom of Africa (Cape Town) with none of their servers close to me am I correct in thinking that Cloud Flare will slow down my website. Most of my traffic is local. I have the same issues with CDNs none of them are close to my location, Europe is the closest. Is my thinking correct?
Damon Billian
CloudFlare would add a little latency because we currently don’t have any data centers in SA just yet (being looked at). Visitors from SA would currently hit a data center in Europe.
On the other hand, if you have visitors from a lot of other locations (EU, America, Asia, etc.), then the site would be faster for them.
munetsi
was just checking ,looks like they have servers in johannesburg.
Adesanmi Adedotun
I have heard about cloudflare but have not tried to make use of it, bout talking about the fact that my site might be down during the propagation of my name server,how long could this take?
WPBeginner Support
It varies, it can take a few hours to a full day.
Admin
Einstein
You will not experience any downtime while you switch to Cloudflare if you do it correctly.
Damon Billian
You should not have any downtime at all switching to CloudFlare’s nameservers.
Robby McCullough
I am a huge fan of CloudFlare. At my shop, we do a lot of sites for professional photographers. CF does an amazing job at making image heavy pages load in a snap!
One tip, don’t forget about CF’s developer mode when you’re making changes. I’ve bashed my head against the wall for some time when my CSS changes weren’t showing up — CF was serving a cached page!
Boby
When my website has ‘heavy load’ CloudFlare will make the users access screenshot of the website.
Abhisek
Cloudflare breaks my site’s design. I have a off-canvas menu and Cloudflare’s rocketloader and minification breaks ,y site’s design. So, I have to stick with basic W3 Total cache. Besides Cloudflare actually speeds up your site.
Damon Billian
Those features are actually optional and easy to turn off. If you’re using a minify service already, then you don’t want to turn ours on as well (something eventually will break running two minify options at the same time). Rocket Loader would have the potential to impact JavaScript and jQuery & would generally impact something like widgets.
Joe
What WordPress theme were you using? That way we can know to avoid using that theme with Cloudfare.