WordPress içeriğinizi düzenlemek kategoriler ve etiketlerle kolaydır. Ancak yıllarca WordPress siteleri oluştururken, varsayılan kategori ve etiketlerin mükemmel içerik yapısını oluşturmak için her zaman yeterli olmadığını öğrendik.
İşte burada özel taksonomiler devreye girer. Özel taksonomiler ile içeriği sıralamak ve gruplamak için kendi yöntemlerinizi oluşturabilirsiniz.
Yemek tarifi malzemelerinden emlak ilanlarına kadar her şeyi düzenlemek için kullandığımız bu araçlar; gönderilerinizin, ürünlerinizin veya diğer tüm içeriklerinizin nasıl kategorize edileceği konusunda inanılmaz bir kontrol ve esneklik sağlıyor.
Bu kılavuzda, ister bir eklenti kullanın ister manuel olarak yapmayı tercih edin, WordPress’te özel taksonomileri nasıl oluşturacağınız konusunda size yol göstereceğiz.
WordPress Taksonomisi Nedir?
WordPress taksonomisi, yazı gruplarını ve özel yazı türlerini düzenlemenin bir yoludur.
WordPress varsayılan olarak kategoriler ve etiketler adı verilen 2 taksonomi ile birlikte gelir. Bunları blog yazılarınızı düzenlemek için kullanabilirsiniz.
Ancak özel bir gönderi türü kullanıyorsanız kategoriler ve etiketler tüm içerik için uygun görünmeyebilir.
Örneğin, ‘Kitaplar’ adında özel bir gönderi türü oluşturabilir ve bunu ‘Konular’ adında özel bir taksonomi kullanarak sıralayabilirsiniz. Ardından, ‘Macera’, ‘Romantik’, ‘Korku’ gibi konu terimleri ve istediğiniz diğer kitap konularını ekleyebilirsiniz.
Bu sayede siz ve okuyucularınız kitapları her konuya göre kolayca sıralayabilir ve filtreleyebilirsiniz.
Taksonomiler hiyerarşik de olabilir, yani ‘Kurgu’ ve ‘Kurgu Dışı’ gibi ana veya üst konulara sahip olabilirsiniz. Ardından, her bir kategorinin altında alt konular veya alt başlıklar bulunur.
Örneğin, ‘Kurgu’ ana kategorisinin alt kategorileri ‘Macera’, ‘Romantik’ ve ‘Korku’ olabilir.
Artık özel bir taksonominin ne olduğunu bildiğinize göre, WordPress’te özel taksonomilerin nasıl oluşturulacağını öğrenelim.
Özel taksonomiler oluşturmak güçlü olsa da, ele alınması gereken çok şey var. Bunu düzgün bir şekilde ayarlamanıza yardımcı olmak için aşağıda kolay bir içindekiler tablosu oluşturduk:
Hazır mısınız? Hadi başlayalım!
Bir Eklenti ile Özel Taksonomiler Oluşturma (Kolay Yol)
Yapmanız gereken ilk şey Custom Post Type UI eklentisini yüklemek ve etkinleştirmektir. Ayrıntılar için WordPress eklentisi yükleme kılavuzumuza bakın.
Bu eğitimde, zaten özel bir gönderi türü oluşturduk ve adını ‘Kitaplar’ koyduk. Bu nedenle, taksonomilerinizi oluşturmaya başlamadan önce özel bir gönderi türü oluşturduğunuzdan emin olun.
Ardından, ilk taksonominizi oluşturmak için WordPress yönetici alanında CPT UI ” Taksonomi Ekle/Düzenle bölümüne gidelim.
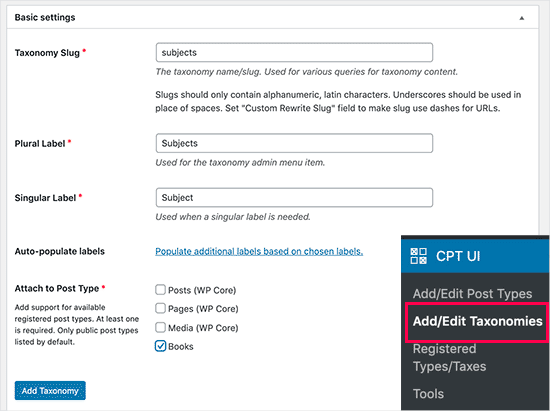
Bu ekranda aşağıdakileri yapmanız gerekecektir:
- Taksonomi slug’ınızı oluşturun (bu URL’nize girecektir)
- Çoğul etiketi oluşturun
- Tekil etiketi oluşturun
- Etiketleri otomatik doldurma
İlk adımınız, URL’de ve WordPress arama sorgularında kullanmak üzere taksonomi için bir slug oluşturmaktır. Bir slug’ın yalnızca harf ve rakam içerebileceğini ve otomatik olarak küçük harflere dönüştürüleceğini unutmayın.
Ardından, özel taksonominiz için çoğul ve tekil adları dolduracaksınız.
Buradan, ‘Seçilen etiketlere göre ek etiketleri doldur’ bağlantısına tıklama seçeneğiniz vardır. Bunu yaparsanız, eklenti geri kalan etiket alanlarını sizin için otomatik olarak dolduracaktır.
Şimdi, ‘Ek Etiketler’ bölümüne doğru aşağı kaydırabilirsiniz.
Bu alanda, gönderi türünüzün bir açıklamasını sağlayabilirsiniz.
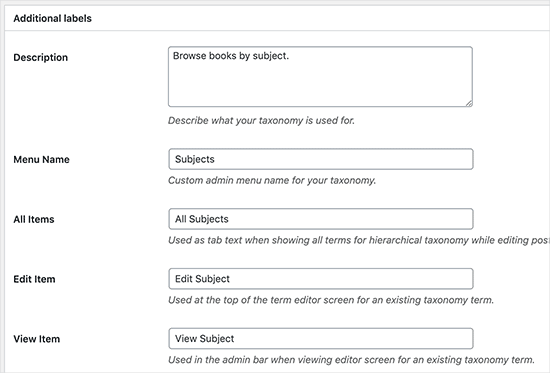
Bu etiketler, söz konusu özel taksonomi için içeriği düzenlerken ve yönetirken WordPress kontrol panelinizde kullanılır.
Sırada, ayarlar seçeneğimiz var. Bu alanda, oluşturduğunuz her taksonomi için farklı özellikler ayarlayabilirsiniz. Her seçeneğin ne işe yaradığını detaylandıran bir açıklaması vardır.
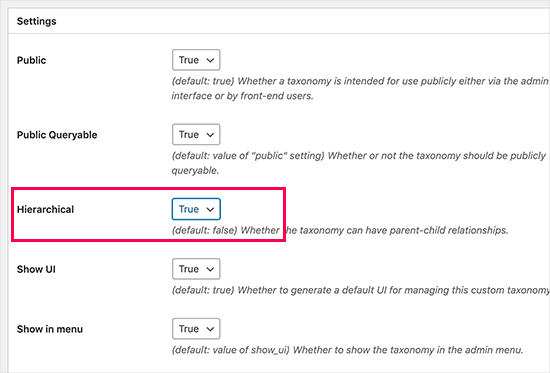
Yukarıdaki ekran görüntüsünde, bu taksonomiyi hiyerarşik hale getirmeyi seçtiğimizi göreceksiniz.
Bu, ‘Konular’ taksonomimizin alt konulara sahip olabileceği anlamına gelir. Örneğin, ‘Kurgu’ adlı bir konunun ‘Fantastik’, ‘Gerilim’, ‘Gizem’ ve daha fazlası gibi alt başlıkları olabilir.
WordPress panonuzda ekranınızın ilerleyen kısımlarında başka birçok ayar vardır, ancak bu eğitim için bunları olduğu gibi bırakabilirsiniz.
Artık özel taksonominizi kaydetmek için alttaki ‘Taksonomi Ekle’ düğmesine tıklayabilirsiniz.
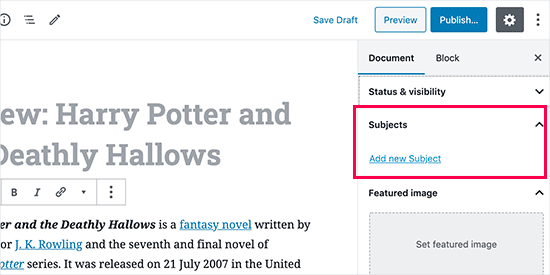
Bundan sonra, kullanmaya başlamak için WordPress içerik düzenleyicisinde bu taksonomiyle ilişkili yazı türünü düzenleyebilirsiniz.
Özel Taksonomileri Manuel Olarak Oluşturma (Kod ile)
Bu yöntem WordPress web sitenize kod eklemenizi gerektirir. Bunu daha önce yapmadıysanız, WordPress’te kod parçacıklarının nasıl kolayca ekleneceğine ilişkin kılavuzumuzu okumanızı öneririz.
WordPress dosyalarınızı doğrudan düzenlemenizi önermiyoruz çünkü en ufak bir hata tüm sitenizi bozabilir. Bu yüzden herkesin mevcut en kolay ve en güvenli kod parçacığı eklentisi olan WPCode‘u kullanmasını öneriyoruz.
Başlamak için ücretsiz WPCode eklentisini yüklemeniz ve etkinleştirmeniz gerekecektir. Ayrıntılı talimatlar için WordPress eklentisinin nasıl kurulacağına ilişkin adım adım kılavuzumuza bakın.
1. Hiyerarşik Taksonomi Oluşturma
Kategoriler gibi çalışan ve üst ve alt terimlere sahip olabilen hiyerarşik bir taksonomi ile başlayalım.
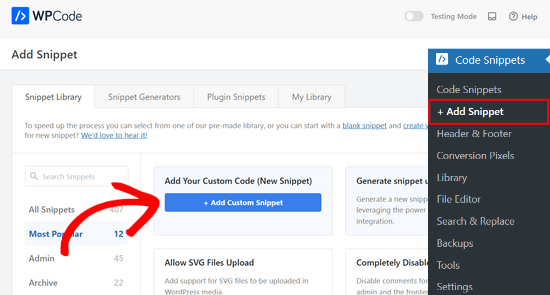
WPCode’u yükleyip etkinleştirdikten sonra, WordPress panonuzda Code Snippets ” + Add Snippet bölümüne gidebilirsiniz.
Buradan, farenizi ‘Özel Kodunuzu Ekleyin (Yeni Snippet)’ seçeneğinin üzerine getirebilir ve ‘+ Özel Snippet Ekle’ düğmesine tıklayabilirsiniz.
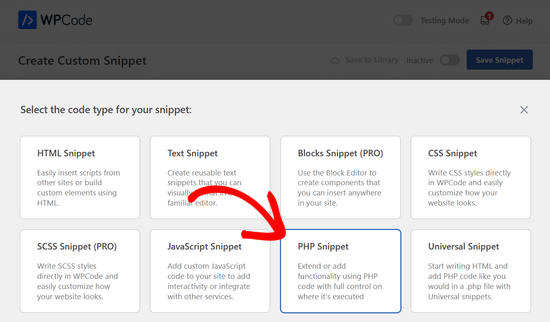
Ardından, ekranda görünen seçenekler listesinden bir kod türü seçmeniz gerekir.
Bu eğitim için ‘PHP Snippet’i seçin.
Ardından, ‘Özel Snippet Oluştur’ sayfasına yönlendirileceksiniz.
Yeni kod parçacığınıza bir ad girerek başlayın; bu ad kodun ne işe yaradığını hatırlamanıza yardımcı olacak herhangi bir şey olabilir.
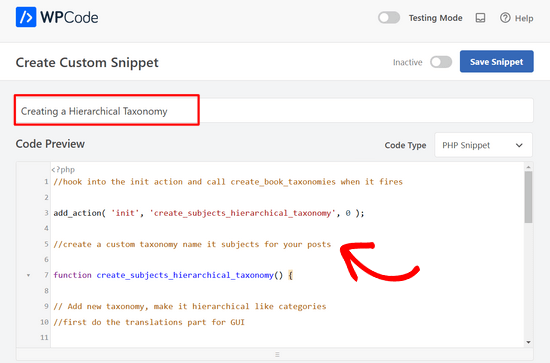
Bundan sonra, aşağıdaki kodu ‘Kod Önizleme’ alanına yapıştırmanız yeterlidir:
1 2 3 4 5 6 7 8 9 10 11 12 13 14 15 16 17 18 19 20 21 22 23 24 25 26 27 28 29 30 31 32 33 34 35 36 37 | //hook into the init action and call create_book_taxonomies when it fires add_action( 'init', 'create_subjects_hierarchical_taxonomy', 0 ); //create a custom taxonomy name it subjects for your posts function create_subjects_hierarchical_taxonomy() { // Add new taxonomy, make it hierarchical like categories//first do the translations part for GUI $labels = array( 'name' => _x( 'Subjects', 'taxonomy general name' ), 'singular_name' => _x( 'Subject', 'taxonomy singular name' ), 'search_items' => __( 'Search Subjects' ), 'all_items' => __( 'All Subjects' ), 'parent_item' => __( 'Parent Subject' ), 'parent_item_colon' => __( 'Parent Subject:' ), 'edit_item' => __( 'Edit Subject' ), 'update_item' => __( 'Update Subject' ), 'add_new_item' => __( 'Add New Subject' ), 'new_item_name' => __( 'New Subject Name' ), 'menu_name' => __( 'Subjects' ), ); // Now register the taxonomy register_taxonomy('subjects',array('books'), array( 'hierarchical' => true, 'labels' => $labels, 'show_ui' => true, 'show_in_rest' => true, 'show_admin_column' => true, 'query_var' => true, 'rewrite' => array( 'slug' => 'subject' ), )); } |
Snippet’teki taksonomi adını ve etiketlerini kendi taksonomi etiketlerinizle değiştirmeyi unutmayın. Ayrıca bu taksonominin Kitaplar gönderi türüyle ilişkilendirildiğini de fark edeceksiniz. Bunu, kullanmak istediğiniz gönderi türüyle değiştirmeniz gerekecektir.
Ardından, aşağı kaydırmak ve Ekleme kutusunda ‘Otomatik Ekle’ ve ‘Her Yerde Çalıştır’ seçeneklerinin seçili olduğundan emin olmak isteyeceksiniz.
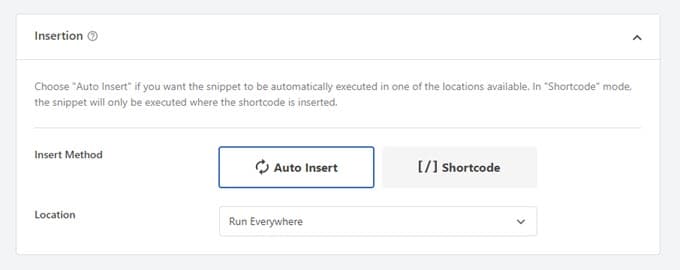
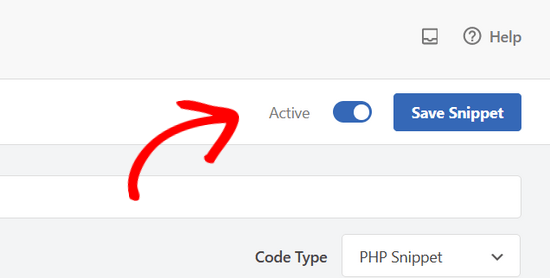
Şimdi, sayfanın en üstüne geri dönebilir ve anahtarı ‘Etkin Değil’den ‘Etkin’e geçirebilirsiniz.
Son olarak, değişikliklerinizi canlı olarak yayınlamak için devam edin ve ‘Snippet’i Kaydet’ düğmesine tıklayın.
2. Hiyerarşik Olmayan Bir Taksonomi Oluşturma
Etiketler gibi hiyerarşik olmayan özel bir taksonomi oluşturmak için WPCode kullanacak ve yukarıdaki adımların aynısını izleyeceksiniz.
Yalnızca, bunun yerine bu kodu kullanacaksınız:
1 2 3 4 5 6 7 8 9 10 11 12 13 14 15 16 17 18 19 20 21 22 23 24 25 26 27 28 29 30 31 32 33 34 35 36 37 38 39 | //hook into the init action and call create_topics_nonhierarchical_taxonomy when it fires add_action( 'init', 'create_topics_nonhierarchical_taxonomy', 0 ); function create_topics_nonhierarchical_taxonomy() { // Labels part for the GUI $labels = array( 'name' => _x( 'Topics', 'taxonomy general name' ), 'singular_name' => _x( 'Topic', 'taxonomy singular name' ), 'search_items' => __( 'Search Topics' ), 'popular_items' => __( 'Popular Topics' ), 'all_items' => __( 'All Topics' ), 'parent_item' => null, 'parent_item_colon' => null, 'edit_item' => __( 'Edit Topic' ), 'update_item' => __( 'Update Topic' ), 'add_new_item' => __( 'Add New Topic' ), 'new_item_name' => __( 'New Topic Name' ), 'separate_items_with_commas' => __( 'Separate topics with commas' ), 'add_or_remove_items' => __( 'Add or remove topics' ), 'choose_from_most_used' => __( 'Choose from the most used topics' ), 'menu_name' => __( 'Topics' ), ); // Now register the non-hierarchical taxonomy like tag register_taxonomy('topics','books',array( 'hierarchical' => false, 'labels' => $labels, 'show_ui' => true, 'show_in_rest' => true, 'show_admin_column' => true, 'update_count_callback' => '_update_post_term_count', 'query_var' => true, 'rewrite' => array( 'slug' => 'topic' ), ));} |
İki kod parçacığı arasındaki farka dikkat edin. register_taxonomy() işlevi altında, hiyerarşik bağımsız değişkeninin değeri kategori benzeri taksonomiler için true, etiket benzeri taksonomiler için false olarak ayarlanır.
Ayrıca, hiyerarşik olmayan taksonomiler için etiketler dizisinde, parent_item ve parent_item_colon bağımsız değişkenleri için null ekledik; bu, alt konulara sahip olabilecek bir üst öğe veya taksonomi oluşturmak için kullanıcı arayüzünde hiçbir şeyin gösterilmeyeceği anlamına gelir.
Yine, kendi özel taksonomi etiketlerinizi eklemek için kodu düzenlediğinizden emin olun.
Özel Taksonomileri Görüntüleme
Artık özel taksonomiler oluşturduğumuza ve birkaç terim eklediğimize göre, WordPress temanız bunları yine de göstermeyecektir.
Bunları görüntülemek için WordPress temanıza veya alt temanıza kod eklemeniz gerekir. Özellikle, bu kod terimleri görüntülemek istediğiniz şablon dosyalarına eklenmelidir.
Bu snippet’i single.php, content.php, archive. php veya index .php gibi tema dosyalarınıza manuel olarak ekleyebilirsiniz. Hangi dosyayı düzenlemeniz gerektiğini bulmak için, adım adım talimatlar için WordPress şablon hiyerarşisi kılavuzumuza bakabilirsiniz.
Ancak, doğru şekilde yapılmazsa, bu sitenizi bozabilir, bu nedenle bir kez daha ücretsiz WPCode eklentisini kullanmanızı öneririz.
Terimleri görüntülemek istediğiniz yere aşağıdaki kodu eklemeniz gerekecektir:
1 | <?php the_terms( $post->ID, 'topics', 'Topics: ', ', ', ' ' ); ?> |
Ardından, kod parçacığını WPCode’a yapıştırmak için yukarıdaki adımları takip edebilirsiniz.
Ancak Ekleme altında, ‘Konum’un yanındaki açılır menüye tıklamak ve taksonomiyi nerede görüntülemek istediğinizi seçmek istersiniz; örneğin gönderiden önce, sonra veya hatta paragraflar arasında.
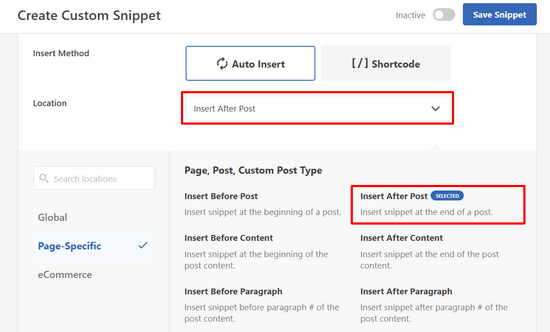
Bu eğitim için ‘Gönderiden Sonra Ekle’yi seçeceğiz.
Canlı sitenizde nasıl görüneceğini aşağıdaki resimde görebilirsiniz.
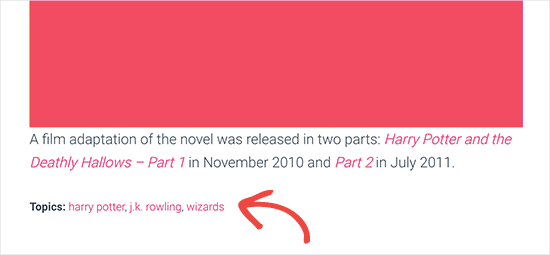
Özel Gönderiler İçin Taksonomi Ekleme
Artık özel taksonomileri nasıl oluşturacağınızı bildiğinize göre, bunları bir örnekle kullanalım.
Bir taksonomi oluşturacağız ve buna ‘Kurgu Dışı’ adını vereceğiz. ‘Kitaplar’ adında özel bir gönderi türümüz olduğundan, normal bir blog gönderisi oluşturmaya benzer.
WordPress kontrol panelinizde, bir terim veya konu eklemek için Kitaplar ” Konular bölümüne gidebilirsiniz.
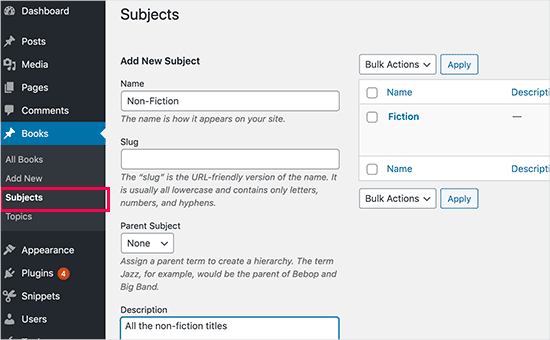
Bu ekranda 4 alan göreceksiniz:
- İsim
- Sümüklüböcek
- Ebeveyn
- Açıklama
Ad alanına, eklemek istediğiniz terimi yazacaksınız. Slug kısmını atlayabilir ve bu özel terim için bir açıklama sağlayabilirsiniz.
Son olarak, yeni taksonominizi oluşturmak için ‘Yeni Konu Ekle’ düğmesine tıklayın.
Yeni eklediğiniz terim daha sonra sağ sütunda görünmelidir.
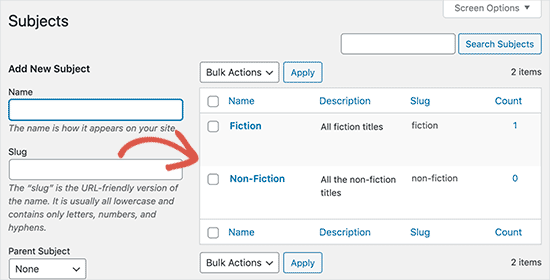
Artık blog yazılarınızda kullanabileceğiniz yeni bir teriminiz var. Terimleri, söz konusu yazı türü altında içerik düzenlerken veya yazarken doğrudan da ekleyebilirsiniz.
Bir gönderi oluşturmak için Kitaplar ” Yeni Ekle ‘ye gitmeniz yeterlidir.
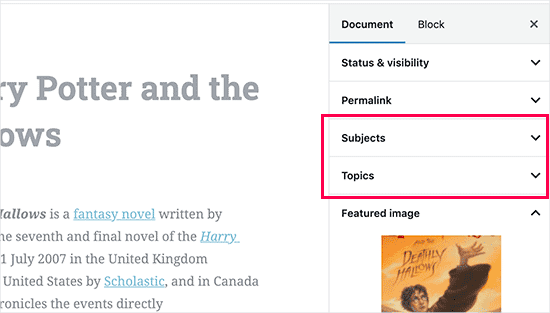
Gönderi düzenleyicide, sağ sütundan yeni terimler seçme veya oluşturma seçeneğini bulacaksınız.
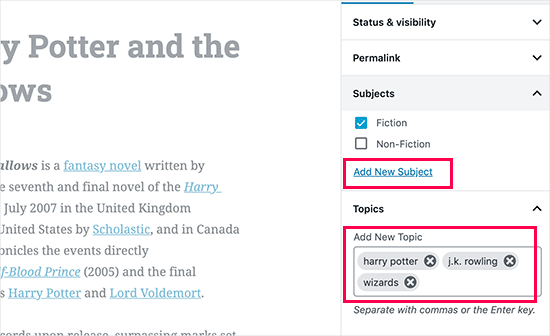
Terimleri ekledikten sonra devam edebilir ve bu içeriği yayınlayabilirsiniz.
Bu terim altında dosyalanan tüm gönderilerinize web sitenizde kendi URL’leri kullanılarak erişilebilir. Örneğin, ‘Kurgu’ konusu altında dosyalanan gönderiler aşağıdaki URL’de görünecektir:
https://example.com/subject/fiction/

Gezinti Menüsüne Özel Taksonomiler Ekleme
Artık özel taksonomiler oluşturduğunuza göre, bunları web sitenizin gezinme menüsünde görüntülemek isteyebilirsiniz.
Görünüm ” Menüler bölümüne gidin ve ekranın sol tarafında görünen özel taksonomi sekmenizin altına eklemek istediğiniz terimleri seçin.
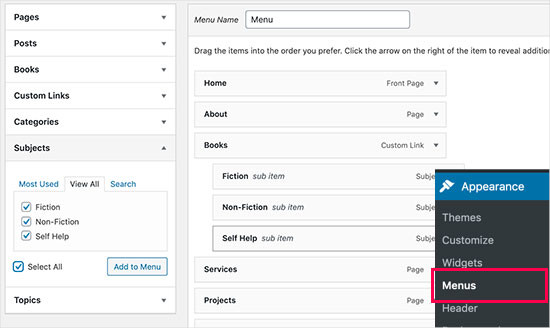
Ayarlarınızı kaydetmek için ‘Menüyü Kaydet’ düğmesine tıklamayı unutmayın.
Artık menünüzü çalışırken görmek için web sitenizi ziyaret edebilirsiniz.

Daha fazla ayrıntı için WordPress’te nasıl açılır menü oluşturulacağına ilişkin adım adım kılavuzumuza başvurabilirsiniz.
Video Eğitimi
Özel taksonomilerin nasıl oluşturulacağını izlemek ve öğrenmek isterseniz video eğitimimize göz atın:
Bonus: WordPress Taksonomilerini Daha İleriye Götürün
Özel taksonomiler birçok şey yapmanıza olanak tanır. Örneğin, bunları bir kenar çubuğu widget’ında gösterebilir veya her terim için resim simgeleri ekleyebilirsiniz.
Ayrıca özel taksonomiler oluşturabilir ve kullanıcıların tek tek terimlere abone olmalarına izin verebilirsiniz. Bu şekilde, okuyucularınız yalnızca kendileri için önemli olan belirli içeriklerle ilgili güncellemeler alacaktır.
Özel taksonomi sayfalarınızın düzenini özelleştirmek istiyorsanız SeedProd‘a göz atabilirsiniz. Herhangi bir kodlama yapmadan özel düzenler oluşturmanıza olanak tanıyan en iyi sürükle ve bırak WordPress sayfa oluşturucu ve tema oluşturucudur.
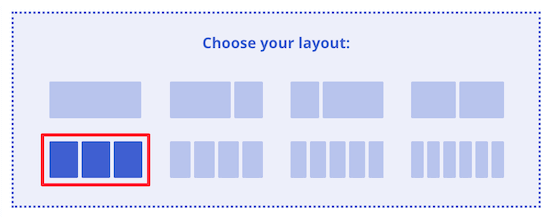
Daha fazla bilgi edinmek için WordPress’te özel bir sayfanın nasıl oluşturulacağına ilişkin makalemize göz atabilirsiniz.
Umarız bu makale WordPress’te özel taksonomilerin nasıl oluşturulacağını öğrenmenize yardımcı olmuştur. WordPress’te taksonomi görsellerinin (kategori simgeleri) nasıl ekleneceği ve WordPress kategorilerinin nasıl düzgün bir şekilde değiştirileceği, taşınacağı ve silineceği hakkındaki kılavuzlarımızı da görmek isteyebilirsiniz.
If you liked this article, then please subscribe to our YouTube Channel for WordPress video tutorials. You can also find us on Twitter and Facebook.


joe barrett
Don’t forget to add ‘show_in_rest’ => true,
if you want to use your custom items in rest api to $args
WPBeginner Support
Thanks for sharing this for those wanting to add this functionality.
Admin
Michael Morad-McCoy
I tried putting this in a site-specfic plug-in and get the following in a box at the top:
y() expects parameter 1 to be a valid callback, function ‘create_topics_hierarchical_taxonomy’ not found or invalid function name in /home2/kaibabpr/public_html/wp-includes/class-wp-hook.php on line 286
Warning: Cannot modify header information – headers already sent by (output started at /home2/kaibabpr/public_html/wp-includes/class-wp-hook.php:286) in /home2/kaibabpr/public_html/wp-admin/includes/misc.php on line 1198
as this is the first time I tried this, I’m at a loss.
WPBeginner Support
You may want to ensure your site-specific plugin is a php file after you added the code as sometimes your operating system can try to edit the file type.
Admin
Naji Boutros
Do you have a different plugin to recommend?
Ajeet singh
this is very helpful tutorial …..thnks a lot.
Suresh
Thanks for sharing this code. I used non-hierarchy code, and admin part is working fine. I have created a separate template as well like taxonomy-[taxoName]-.php But while trying to access the URL, giving HTTP error 500. I have tried multiple things, like new cache starts, permalink re-save, new .htaccess and memory increase. even then page is not working. kindly help
Rabby
WOW, Amazing and helpful details. I’ve created my custom taxonomy using manual rules. Thanks
Joseph Peter
Hi,
than you for this useful information, iam new to wordpress and i wanted to know the meaning thats i landed here, it was actually helpful.
Best Regards
Joseph Peter
Cindi Gay
I used the code for adding a tag to a custom post type. Luckily Topics is exactly the label I needed so all I needed to change was post to lesson (I am modifying the LifterLMS lesson post type).
Now I want to display the tags. I tried using the default WordPress Tag Cloud but it does not change to the newly added tag. It continues to show all my post tags even when I choose Topics
Is there a step I am missing? How do I display the new tag: Topics?
Ero
Taxonomies don’t behave exactly like default posts’ categories. They don’t appear in the URL (especially for nested taxonomies). Is there any way to set a custom taxonomy associated to a custom post type to behave like posts’ categories ?
Rangan Roy
I have used this code in my gallery custom post type for category support. It shows the name of the category but when i click on the category name it shows 404:error not found. Please help me to solve it. I want the category posts to show on my archive.php page.
Utshab Roy
I got this same problem that you are facing. The way I solved it is very easy. Go to your permalink settings and click the save button. Refresh the page. This simple step will save the issue.
Carol
This worked! Thank you so much.
Russell
Hi, I created custom meta box with new category. I can also show it to the post page. But when I click to the newly created category item it gives a 404 page. I wan it to work like tags, default category or author. So that If I click it shows all the post under that category.
Olivier
Hello,
I am new to WordPress and coding in general. This tutorial is very well explained, thank you.
However I don’t understand how to display the terms of my taxonomy on my pages.
Where do I have to go to “Add this single line of code in your single.php file within the loop” ?
Thank you for your help
Best,
Olivier
Azamat
Thank you so much for this great tutorial!
I created custom taxanomy on my website dedicated to books and now I’m able to filter books by authors!
James Angel
The trouble with some plugins is that they may not be compatible with all themes. I have found that it pays to have a qualified developer do his/her part and test and troubleshoot any Web site alteration after adding a plugin or updating WordPress to a newer version to ensure everything works as it should.
paul
Man you are a legend,
i struggled 3 days to get this, which i found in many websites, but not as clear as this.
Thanks!
WPBeginner Support
Hey Paul, glad you found it helpful. Don’t forget to follow us on Facebook for more WordPress tips and tutorials.
Admin
Rangan Roy
I have used this code in my gallery custom post type for category support. It shows the name of the category but when i click on the category name it shows 404.php page. Please help me to solve it. I want the category posts to show on my archive.php page.
Ayla
I’ve created a custom post type and a taxonomy to go with it, but when I create a custom post and add tags to it they don’t show up like normal tags do on normal posts. How do I get them to display at the bottom of the post like normal so people can click on them and find more like it?
Thank you!
-Ayla
WPBeginner Support
You will need to create a new template to display your custom post type and edit that template to show your custom taxonomy.
Admin
Giulia
Hi everybody! First of all thank you for this article!
I’ve found that “Simple Taxonomies” plugin is kind of out of date, since it hasn’t been updated since 2 years…. do you have any other plugin to suggest to create custom taxonomies?
thanks
Giulia
Mario
I’m not the author of this post, but I use “Custom Post Type UI” to create custom taxonomies. With 300k installs, I’m pretty sure this plugin is as close as you can get to industry standard.
Hope this helps!
Ryan Hall
Amazing. thank you!
Ryan
How do you disassociate the posts with the “regular” categories?
WPBeginner Support
Please see our guide on how to merge and bulk edit categories and tags in WordPress.
Admin
Sunny
Hello,
The description is not prominent by default; however, some themes may show it. But still show on front.
How to hide taxonomy description from front ?
I want to add description on taxonomy but i don’t want they show on front .
Please tell me about what i can do.
Thank You
ajax
How do one automate the population of the taxonomy value with the value in a custom field.
Charles Hall
The article is OK, but the video is very poor. The sound quality is bad, she talks way too fast, obvious things are elaborated on but the explanation of what you’re doing and why is missing, as is the other content in the lower portion of the article.
Jennifer
I am working on a WordPress website. I created categories using a plugin called “Categories Images”. One of the categories is named “Videos” so there is one folder/category that is supposed to show videos but images. The problem is, because the plugin is designed to upload images only, the YouTube videos do not show up. How can I edit the PHP files (create a custom taxonomy, edit single.php, edit taxonomy-{taxonomy-slug}.php, etc.) so that the post can show and play YouTube videos??
Jamie Wallace
If you want more control over how things are pulled from the backend to the frontend look into using the Advanced Custom Fields plugin. This is a plugin for developers (so some code is involved) but its very powerful for things like what you ask
Muhammad
Hi I have followed the manual way of creating custom taxonomy and i just used Ads/Ad instead of Topics/Topic . But i don’t see any custom taxonomy in post editor though i checked the custom taxonomy form Screen Options.
though the custom taxonomy(Ads) is showing in admin submenu under Posts.
Muhammad
Here is my code snipped in functions.php file
_x( ‘Ads’, ‘taxonomy general name’ ),
‘singular_name’ => _x( ‘Ad’, ‘taxonomy singular name’ ),
‘search_items’ => __( ‘Search Ads’ ),
‘all_items’ => __( ‘All Ads’ ),
‘parent_item’ => __( ‘Parent Ad’ ),
‘parent_item_colon’ => __( ‘Parent Ad:’ ),
‘edit_item’ => __( ‘Edit Ad’ ),
‘update_item’ => __( ‘Update Ad’ ),
‘add_new_item’ => __( ‘Add New Ad’ ),
‘new_item_name’ => __( ‘New Ad Name’ ),
‘menu_name’ => __( ‘Ads’ ),
);
// Now register the taxonomy
register_taxonomy(‘ads’,array(‘post’), array(
‘hierarchical’ => true,
‘labels’ => $labels,
‘show_ui’ => true,
‘show_admin_column’ => true,
‘query_var’ => true,
‘rewrite’ => array( ‘slug’ => ‘ad’ ),
));
}
?>
Robert Herold
How to show the number of posts on taxonomy-{taxonomy-slug}.php?
Robert Herold
How can I display my custom taxonomies list like the category list
WPBeginner Support
Please see our guide How to display custom taxonomy terms in WordPress sidebar widgets.
Admin
Robert Herold
Wow! Thanx! Superb!!!!!! :))
Abdul Rauf Bhatti
Hy Dear WPBEGINNER SUPPORT,
I have learned many things in this tutorial next time will you please elaborate functions parameter which you have used some time i got in trouble or confused with parameters.
Thanks a lot Nice tutorial 5 rating
WPBeginner Support
Thanks for the feedback, we will try to improve our code explanation in the future.
Admin
lee
Is there a way to get multiple custom taxonomy to use the same slug or same url? Please show us how if you or anyone knows.
pdepmcp
It may sound obvious, but…remember to refresh the permalink cache or you can waste some hours trying to figure out why archive pages don’t work…
Ilya
Thank you very much!!!
I wasted hours in debug mode, but cannot determine why my permalink redirects to 404 page! But after flushing “permalink cache” all works fine.
Thank you again!
winson
Hello.
How can I get a different Posts Link? I mean I want to get 2 different links after I published a New Post.
E.G:
Category Name – > Facebook (theme template A)
Topic Name – > Twitter (theme template B)
Then I submit a post to these 2 Categories. I want get 1 link for “Facebook” and 1 Link for “Twitter”.
Best Regards
foolish coder
how to create single pages / templates for taxonomies?
I mean like single.php not like category.php
Alex
Try taxonomy.php ()
WPBeginner Staff
Yes, you can do that.
fatima
what if we want to create more than 2 taxonomies, categories style (hierarchy true)
Aalaap Ghag
I’m building a site which has multiple item thumbnails, each of which leads to a page with multiple images for that item (i.e. product). Are taxonomies the way to go or should I be looking at something else?
leona
Hi This is a great tutorial. But what if I want to display a custom taxonomies as posts in my menu? for instance I have a custom post type called ‘poems’ and custom taxomies classic, modern, new wave. each poem post is assigned one of these taxonomies. In the menu I want to see a menu entitled poems with 3 subheadings (classic, modrn, new wave). Each will display only the poems tagged with one taxonomy. Is this possible?
angel1
This is great! How do I create “related posts” for the custom taxonomy?
I’m assuming I need to put a conditional php code to display related posts for the new custom taxonomy to appear only when it’s a new taxonomy post and to hide when it is a basic category/tag post since they are both sharing the same content.php file.
Any suggestions would be greatly appreciated.
SteveMTNO
I used the code above to create the custom taxonomy – everything worked great. The field was added to all of my posts, and I populated it accordingly.
I’m using the “Taxonomy Dropdown Widget” plugin – that works too.. sort of.
The dropdown is populated correctly, but when you click on one of the items to display those posts, I get a 404. However the plugin works for displaying tags.
Any ideas? I’ll be happy to post my code, just wasn’t sure if I paste it in here or somewhere and link to it here instead.
Let me know.. thanks!
SteveMTNO
Ruben
Go to Setting > Permalinks > Save Changes
(don’t need to make any changes, this just rewrites your .htaccess file so the link works)
This step should be included in the post?
David
Bad tutorial. You just expect people to copy/paste the code and don’t explain how it works.
WPBeginner Support
No, we don’t want people to just copy paste the code, we want them to study it and modify if they want.
Admin
Cletus
Hi, can you recommend a different taxonomy plugin that works?
Even a premium version, the one you’ve posted hasn’t been updated in months and the author seems to have done one.
WPBeginner Support
The plugin works great, and the author has 19 other plugins. It also has great reviews and we have personally tested and used it. However, if you would still like to try some other plugin, then you can look at GenerateWP which will allow you to generate the code for your custom taxonomy. You can then paste this code in your theme’s functions.php file or a site-specific plugin.
Admin
Dineshkumar
I am beginner using classifieds wordpress theme my taxonomy list is not working correctly
when i select country it shows correct bt when i select state it shows state list with city list when i select city i doesnot show below the parent how can i solve it without using plugin please help me
Joe
This is probably a newbie question, but I can’t find the answer anywhere. I want to display the hierarchical path of each page at the top of the page. This page for example has “WPBEGINNER» BLOG» TUTORIALS» HOW TO CREATE CUSTOM TAXONOMI…” at the top and each item is a link. I lack the web vocabulary to know what this is called. If anyone can tell me what terms to search for to figure out how to do this that would be excellent.
WPBeginner Support
Joe these are called breadcrumbs. You can add breadcrumbs to your site using Yoast’s WordPress SEO Plugin. You can also search for breadcrumbs on WordPress plugin directory to find other plugins.
Admin
Mark
I was getting 404 after manually setting up a custom taxonomy with your instructions and code. For anybody else who does, below is the solution I found on Codex.
“If your site uses custom permalinks, you will need to flush your permalink structure after making changes to your taxonomies, or else you may see a “Page Not Found” error. Your permalink structure is automatically flushed when you visit Settings > Permalinks in your WordPress dashboard. “
SteveMTNO
I was getting the same 404 issue after making the taxonomy change. Flushing the permalinks worked perfectly.. thanks!
Pepper
Hi,
thank you so much for your awesome tutorials!
Jordan
Hello, thank you for the great article.
Is there anyway to create a page for a custom taxonomy?
Right now my custom taxonomy is called “issue” and I want to display all issue 1 posts on the home page. The problem is, the link looks like this example.com/issue/1 which is fine. Except that there is no way to make wordpress register this as the home page
Thanks
WPBeginner Support
You can replace your default index template with home.php inside home.php add this line just before the loop
$query = new WP_Query( array( ‘issues’ => ‘issue 1’ ) );
Admin
Keisa
How can I display each taxonomy on separate pages?
For example//
PSDS (page)
—Vampire Diaries
——–Elena Gilberts
——–Stephen
——–Damon
——–Klaus
—Teen Wolf
——–Derek Hale
——–Scott McCall
——–Stiles Stilinski
——–Lydia Martin
How could I display each character on their own page using taxonomies?
I used “psd_categories” for the taxonomy, then I added “Teen Wolf” as a category.
I found a way to display links to the show’s page, but I have no idea on how to display all posts under each characters name…
I’m extremely new to this so please bare with me lol.
Can I send an email perhaps? >.<
WPBeginner Support
If you are using permalinks then you should automatically have separate pages for each term in a taxonomy.
For example if you create a taxonomy called characters, and mark some posts with term Stephen, then those posts will appear on
http://example.com/characters/stephen/
Admin
JNorell
The archive-{taxonomy-slug}.php template did not work for me in WordPress 3.6 .. it needs to be taxonomy-{taxonomy-slug}.php instead (see http://codex.wordpress.org/Template_Hierarchy).
Thanks for the tutorial, it was helpful!
Editorial Staff
Fixed it Thanks
Admin
Kiki
Is there a way to make the categories not hyperlinks? I just want them listed. I don’t want them to link anywhere.
Photoreview
Then consider creating custom fields instead of custom taxonomies.
Azis
thanks for the easy-to-understand tutorial
and could you help me to insert those custom taxonomies into the post class? like, for example… when we put a category named ‘tutorial’ into the post, the category would normally get inserted in the post class as ‘category-tutorial’, right? but it seems the example from this article doesn’t do that.
Once again, thanks for this great article.
P.S: I choose the manual way to create the custom taxonomies, since I prefer not to use additional plugins for my site if possible.
Robby Barnes
Hello and thanks for this information.
I am using the Responsive Child Theme on WP 3.5.1 on DreamHost.
I am building a WordPress site for a small print publication. I am trying to get my WordPress pages (not posts) to display the names of authors of articles that are on the pages. I installed the Simple Taxonomy plugin and created a custom taxonomy. I set it to work on pages and media, but not on posts. Using the widget for Simple Taxonomies I was able to have the author names show up on the right sidebar.
The custom taxonomy shows up on the Edit Page admin panel and seems to permit me to select authors to associate with a page… But, after updating the page the authors don’t appear on the HTML page.
I followed your suggestion and pasted some code into what I believe is the Loop (not sure if pages have the loop) and it didn’t change anything.
I would appreciate any suggestions for dealing with this. / Robby, Seattle, USA
Editorial Staff
The pages do have loop, and yes you would have to paste the code to make sure the taxonomy appears on the HTML page. Email us the page.php file or where you added the code. Use our contact form.
Admin
Mattia
Hi, in the code example, I am missing how you link the “topic” custom taxonomy to the “books” custom post type… Should I replace “post” with “books”?
Editorial Staff
Yes that is correct.
Admin
Arpit
How can i target categories of taxonomy?
Just like i want to execute a function when products of only Books > Fiction category is shown…