
Web sitenizdeki WordPress yorum formunun stilini değiştirmek mi istiyorsunuz? WPBeginner’da, kullanıcı etkileşimini artırmanın farklı yollarını denemek için yıllar harcadık ve iyi görünümlü, kullanıcı dostu bir yorum formunun büyük bir fark yaratabileceğini gördük.
Yorumlar, bir web sitesinde kullanıcı etkileşimi oluşturmada önemli bir rol oynar. Kullanıcıların yorum bırakmasını kolay ve görsel olarak çekici hale getirdiğinizde, web sitenizde daha fazla tartışma ve etkileşimi teşvik edersiniz.
Bu makalede, web sitenizdeki etkileşimi artırmak için WordPress yorum formunu nasıl kolayca şekillendireceğinizi göstereceğiz.

Başlamadan Önce
WordPress temaları web sitenizin görünümünü kontrol eder. Her WordPress teması, şablon dosyaları, işlev dosyaları, JavaScripts ve stil sayfaları dahil olmak üzere çeşitli dosyalarla birlikte gelir.
Stil sayfaları, WordPress temanız tarafından kullanılan tüm öğeler için CSS kurallarını içerir. Temanızın stil kurallarını geçersiz kılmak için kendi özel CSS’nizi ekleyebilirsiniz.
Bunu daha önce yapmadıysanız, yeni başlayanlar için WordPress’te özel CSS ekleme hakkındaki makalemize bakın.
CSS’nin yanı sıra, WordPress yorum formunuzun varsayılan görünümünü değiştirmek için bazı işlevler eklemeniz de gerekebilir. Bunu daha önce yapmadıysanız, lütfen WordPress’te kod kopyalama ve yapıştırma hakkındaki makalemize bakın.
Bununla birlikte, WordPress yorum formunun nasıl şekillendirileceğine bir göz atalım.
Bu oldukça kapsamlı bir kılavuz olduğundan, kolay gezinme için bir içerik tablosu oluşturduk:
- Styling WordPress Comment Form Using SeedProd Theme Builder
- Change WordPress Comments with Default CSS Classes
- Adding Social Login to WordPress Comments
- Adding Comment Policy Text in WordPress Comment Form
- Move Comment Text Field to Bottom
- Remove Website (URL) Field from WordPress Comment Form
- Add a Subscribe to Comments Checkbox in WordPress
- Add Custom Fields to WordPress Comment Form
SeedProd Tema Oluşturucu Kullanarak WordPress Yorum Formunu Şekillendirme
Bu yöntem, piyasadaki en iyi WordPress sayfa ve tema oluşturucu eklentisi olan SeedProd ‘u gerektirir.
Kodlama deneyimi olmayan yeni başlayanlar için tavsiye edilir. Ancak bu yöntemin dezavantajı, mevcut WordPress temanızı özel bir tema ile değiştirecek olmasıdır.
Öncelikle SeedProd eklentisini yüklemeniz ve etkinleştirmeniz gerekir. Daha fazla ayrıntı için, bir WordPress eklentisinin nasıl kurulacağına ilişkin adım adım kılavuzumuza bakın.
Not: Tema oluşturucu özelliğine erişmek için en az PRO planına ihtiyacınız olacaktır.
Etkinleştirmenin ardından, özel WordPress temanız için şablonlar oluşturmanız gerekecektir. SeedProd, yerleşik temalarından birini kullanarak bu şablonları kolayca oluşturmanıza olanak tanır.
Ayrıntılı talimatlar için kodlama yapmadan özel bir WordPress temasının nasıl oluşturulacağına ilişkin eğitimimize bakın.
Tema şablonlarınızı oluşturduktan sonra, Tek Gönderi şablonunun altındaki ‘Tasarımı Düzenle’ bağlantısını tıklamanız gerekir.

Bu, SeedProd tema oluşturucu arayüzünde tek gönderi önizlemesini yükleyecektir. Önizlemenin alt kısmında yorum formu bloğunu göreceksiniz.

Yorum formuna tıkladığınızda sol panelde formun özelliklerini göreceksiniz.
Buradan bir yorum notu veya gizlilik politikası ekleyebilir, ayrıca herhangi bir CSS kodu yazmadan yorum formu stilini düzenlemek için ‘Gelişmiş’ sekmesine geçebilirsiniz.

İşiniz bittiğinde, değişikliklerinizi yayınlamak için ‘Kaydet’ düğmesine tıklamayı unutmayın.
SeedProd, web sitenizdeki herhangi bir öğenin stilini kod yazmadan değiştirmeyi çok kolay hale getirir.
Ancak, bu bir tema oluşturucudur ve zaten beğendiğiniz bir WordPress teması kullanıyor olabilirsiniz. Bu durumda, aşağıdaki ipuçları WordPress’te yorum formu stillerini manuel olarak değiştirmenize yardımcı olacaktır.
WordPress’te Yorum Formu Stilini Değiştirme
Çoğu WordPress temasının içinde comments.php adında bir şablon vardır. Bu dosya blog yazılarınızdaki yorumları ve yorum formlarını görüntülemek için kullanılır. WordPress yorum formu şu fonksiyon kullanılarak oluşturulur: <?php comment_form(); ?>.
Bu işlev varsayılan olarak yorum formunuzu üç metin alanı (Ad, E-posta ve Web Sitesi), yorum metni için bir metin alanı, GDPR uyumluluğu için bir onay kutusu ve gönder düğmesi ile oluşturur.
Varsayılan CSS sınıflarını değiştirerek bu alanların her birini kolayca değiştirebilirsiniz. Aşağıda WordPress’in her yorum formuna eklediği varsayılan CSS sınıflarının bir listesi bulunmaktadır.
1 2 3 4 5 6 7 8 9 10 11 12 13 14 15 16 17 18 | #respond { }#reply-title { }#cancel-comment-reply-link { }#commentform { }#author { }#email { }#url { }#comment#submit.comment-notes { }.required { }.comment-form-author { }.comment-form-email { }.comment-form-url { }.comment-form-comment { }.comment-form-cookies-consent { }.form-allowed-tags { }.form-submit |
Sadece bu CSS sınıflarını değiştirerek WordPress yorum formunuzun görünümünü ve hissini tamamen değiştirebilirsiniz.
Devam edelim ve birkaç şeyi değiştirmeyi deneyelim, böylece bunun nasıl çalıştığına dair iyi bir fikir edinebilirsiniz.
İlk olarak, aktif form alanını vurgulayarak başlayacağız. O anda etkin olan alanı vurgulamak, formunuzu özel ihtiyaçları olan kişiler için daha erişilebilir hale getirir ve ayrıca yorum formunuzun daha küçük cihazlarda daha güzel görünmesini sağlar.
1 2 3 4 5 6 7 8 9 10 11 12 13 14 15 16 17 18 19 20 21 22 23 24 25 26 | #respond {background: #fbfbfb;padding:0 10px 0 10px;}/* Highlight active form field */#respond input[type=text], textarea { -webkit-transition: all 0.30s ease-in-out; -moz-transition: all 0.30s ease-in-out; -ms-transition: all 0.30s ease-in-out; -o-transition: all 0.30s ease-in-out; outline: none; padding: 3px 0px 3px 3px; margin: 5px 1px 3px 0px; border: 1px solid #DDDDDD;}#respond input[type=text]:focus,input[type=email]:focus,input[type=url]:focus,textarea:focus {box-shadow: 0 0 5px rgba(81, 203, 238, 1);margin: 5px 1px 3px 0px;border: 2px solid rgba(81, 203, 238, 1);} |
Değişikliklerden sonra formumuz WordPress Twenty Sixteen temasında bu şekilde görünüyordu:

Bu sınıfları kullanarak, giriş kutularının içinde metnin nasıl görüneceğine ilişkin davranışı değiştirebilirsiniz. Devam edip yazar adı ve URL alanlarının metin stilini değiştireceğiz.
1 2 3 4 5 6 7 8 9 10 11 | #author, #email {font-family: "Open Sans", "Droid Sans", Arial;font-style:italic;color:#1d1d1d;letter-spacing:.1em;} #url {color: #1d1d1d;font-family: "Luicida Console", "Courier New", "Courier", monospace;} |
Aşağıdaki ekran görüntüsüne yakından bakarsanız, ad ve e-posta alanı yazı tipinin web sitesi URL’sinden farklı olduğunu görürsünüz.

WordPress yorum formu gönder düğmesinin stilini de değiştirebilirsiniz. Varsayılan gönder düğmesini kullanmak yerine, ona biraz CSS3 gradyanı ve kutu gölgesi verelim.
1 2 3 4 5 6 7 8 9 10 11 12 13 14 15 16 17 18 19 20 21 22 23 24 25 26 27 28 29 30 31 32 33 34 | #submit {background:-moz-linear-gradient(top, #44c767 5%, #5cbf2a 100%);background:-webkit-linear-gradient(top, #44c767 5%, #5cbf2a 100%);background:-o-linear-gradient(top, #44c767 5%, #5cbf2a 100%);background:-ms-linear-gradient(top, #44c767 5%, #5cbf2a 100%);background:linear-gradient(to bottom, #44c767 5%, #5cbf2a 100%);background-color:#44c767;-moz-border-radius:28px;-webkit-border-radius:28px;border-radius:28px;border:1px solid #18ab29;display:inline-block;cursor:pointer;color:#ffffff;font-family:Arial;font-size:17px;padding:16px 31px;text-decoration:none;text-shadow:0px 1px 0px #2f6627;} #submit:hover {background:-webkit-gradient(linear, left top, left bottom, color-stop(0.05, #5cbf2a), color-stop(1, #44c767));background:-moz-linear-gradient(top, #5cbf2a 5%, #44c767 100%);background:-webkit-linear-gradient(top, #5cbf2a 5%, #44c767 100%);background:-o-linear-gradient(top, #5cbf2a 5%, #44c767 100%);background:-ms-linear-gradient(top, #5cbf2a 5%, #44c767 100%);background:linear-gradient(to bottom, #5cbf2a 5%, #44c767 100%);background-color:#5cbf2a;}#submit:active {position:relative;top:1px;} |

WordPress Yorum Formlarını Bir Sonraki Seviyeye Taşımak
Bunun çok basit olduğunu düşünüyor olabilirsiniz. Herkesin takip edebilmesi için buradan başlamalıyız.
Ancak, form alanlarını yeniden düzenleyerek, sosyal giriş, yorum abonelikleri, yorum yönergeleri, hızlı etiketler ve daha fazlasını ekleyerek WordPress yorum formunuzu bir sonraki seviyeye taşıyabilirsiniz.
WordPress Yorumlarına Sosyal Giriş Ekleme
WordPress yorumlarına sosyal girişler eklemekle başlayalım.
Yapmanız gereken ilk şey Super Socializer eklentisini kurmak ve etkinleştirmektir. Daha fazla ayrıntı için, bir WordPress eklentisinin nasıl kurulacağına ilişkin adım adım kılavuzumuza bakın.
Etkinleştirmenin ardından, Super Socializer ” Sosyal Giriş’i ziyaret etmeniz ve ardından ‘Sosyal Girişi Etkinleştir’ yazan kutuyu işaretlemeniz gerekir.

Bu, sosyal oturum açma seçenekleri panelini getirir. İlk olarak, ‘Gelişmiş Yapılandırma’ sekmesine tıklayın.
Ardından, ‘Yorum formunda etkinleştir’ kutusunun işaretli olduğundan emin olun.

Ardından, ‘Temel Yapılandırma’ sekmesine tıklayın. Burada, ‘Sosyal Ağları Seçin’ bölümündeki kutuları işaretleyerek eklemek istediğiniz sosyal ağları seçebilirsiniz.

Bunun altında, eklenti sosyal platformlarla bağlantı kurmak için API anahtarlarına ihtiyaç duyacaktır. Her platform için bunun nasıl alınacağına ilişkin talimatları görüntülemek için ‘Soru İşareti’ simgesine tıklamanız yeterlidir.

İşiniz bittiğinde, sosyal giriş ayarlarınızı kaydetmek için ‘Değişiklikleri Kaydet’ düğmesine tıklayın.
Artık web sitenizi ziyaret ederek yorum formunuzun üzerindeki sosyal giriş düğmelerini görebilirsiniz.

Yorum Formundan Önce veya Sonra Yorum Politikası Metni Ekleme
Tüm kullanıcılarımızı seviyoruz ve sitemize yorum bırakmak için birkaç dakikalarını ayırmalarını gerçekten takdir ediyoruz. Ancak, sağlıklı bir tartışma ortamı yaratmak için yorumları denetlemek önemlidir.
Tam şeffaflığa sahip olmak için bir yorum politikası sayfası oluşturduk, ancak bu bağlantıyı altbilgiye koyamazsınız.
Yorum politikamızın yorum bırakan tüm kullanıcılar için belirgin ve görünür olmasını istedik. Bu nedenle yorum politikasını WordPress yorum formumuza eklemeye karar verdik.
Bir yorum politikası sayfası eklemek istiyorsanız, yapmanız gereken ilk şey bir WordPress sayfası oluşturmak ve yorum politikanızı tanımlamaktır ( bizimkini çalabilir ve ihtiyaçlarınızı karşılayacak şekilde değiştirebilirsiniz).
Bundan sonra, aşağıdaki kodu temanızın functions.php dosyasına veya bir kod parçacığı eklentisine ekleyebilirsiniz.
1 2 3 4 5 6 | function wpbeginner_comment_text_before($arg) { $arg['comment_notes_before'] .= '<p class="comment-policy"">We are glad you have chosen to leave a comment. Please keep in mind that comments are moderated according to our <a href="http://www.example.com/comment-policy-page/">comment policy</a>.</p>'; return $arg;}add_filter('comment_form_defaults', 'wpbeginner_comment_text_before'); |
Yukarıdaki kod, notlardan önceki varsayılan yorum formunu bu metinle değiştirecektir. Ayrıca koda bir CSS sınıfı ekledik, böylece CSS kullanarak bildirimi vurgulayabiliriz. İşte kullandığımız örnek CSS:
1 2 3 4 5 6 7 8 9 | p.comment-policy { border: 1px solid #ffd499; background-color: #fff4e5; border-radius: 5px; padding: 10px; margin: 10px 0px 10px 0px; font-size: small; font-style: italic;} |
Test sitemizde bu şekilde görünüyordu:

Bağlantıyı yorum metni alanından sonra görüntülemek istiyorsanız, aşağıdaki kodu kullanın.
1 2 3 4 5 6 | function wpbeginner_comment_text_after($arg) { $arg['comment_notes_after'] .= '<p class="comment-policy"">We are glad you have chosen to leave a comment. Please keep in mind that comments are moderated according to our <a href="http://www.example.com/comment-policy-page/">comment policy</a>.</p>'; return $arg;}add_filter('comment_form_defaults', 'wpbeginner_comment_text_after'); |
URL’yi uygun şekilde değiştirmeyi unutmayın, böylece example.com yerine yorum politikası sayfanıza gider.
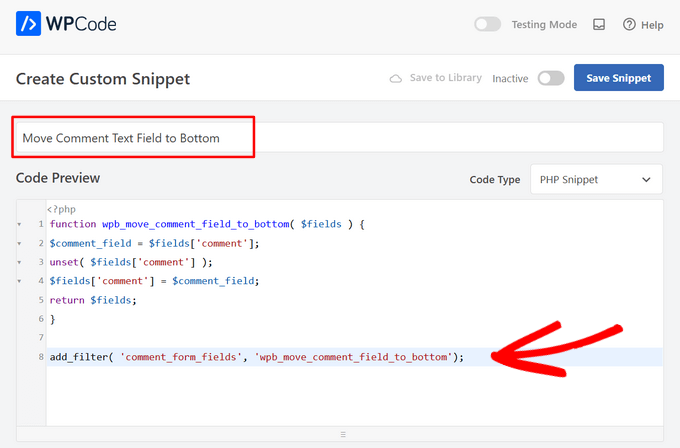
Yorum Metin Alanını Alta Taşı
WordPress yorum formu varsayılan olarak önce yorum metni alanını, ardından ad, e-posta ve web sitesi alanlarını görüntüler. Bu değişiklik WordPress 4.4’te tanıtıldı.
Bundan önce WordPress web sitelerinde önce ad, e-posta ve web sitesi alanları, ardından da yorum metin kutusu görüntüleniyordu. Kullanıcılarımızın yorum formunu bu sırada görmeye alışkın olduğunu düşündük, bu nedenle WPBeginner’da hala eski alan sırasını kullanıyoruz.
Bunu yapmak istiyorsanız, tek yapmanız gereken aşağıdaki kodu temanızın functions.php dosyasına veya bir kod parçacığı eklentisine eklemektir.
1 2 3 4 5 6 7 8 | function wpb_move_comment_field_to_bottom( $fields ) {$comment_field = $fields['comment'];unset( $fields['comment'] );$fields['comment'] = $comment_field;return $fields;}add_filter( 'comment_form_fields', 'wpb_move_comment_field_to_bottom'); |
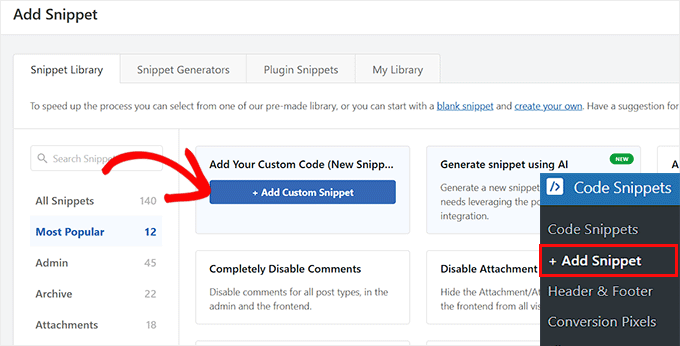
WordPress’e her zaman WPCode gibi bir kod parçacıkları eklentisi kullanarak kod eklemenizi öneririz. Bu, functions.php dosyanızı düzenlemeden özel kod eklemeyi kolaylaştırır, böylece sitenizi bozma konusunda endişelenmenize gerek kalmaz.
Başlamak için ücretsiz WPCode eklentisini yüklemeniz ve etkinleştirmeniz gerekir. Talimatlar için bir WordPress eklentisinin nasıl kurulacağına ilişkin bu kılavuza bakın.
Etkinleştirmenin ardından WordPress panosundan Code Snippets ” + Add Snippet seçeneğine gidin.
Buradan, ‘Özel Kodunuzu Ekleyin (Yeni Snippet)’ seçeneğini bulun ve altındaki ‘+ Özel Snippet Ekle’ düğmesine tıklayın.
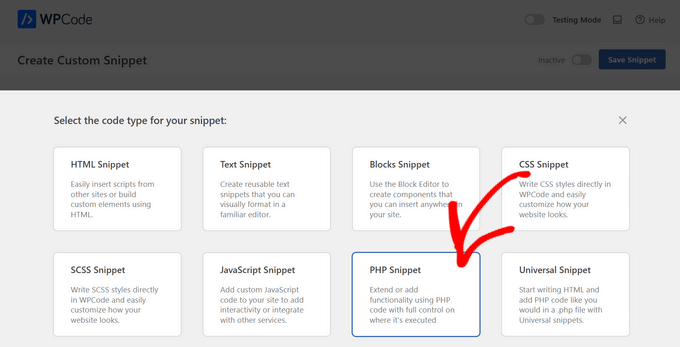
Bundan sonra, ekranda görünen seçenekler listesinden kod türü olarak ‘PHP Snippet’i seçmeniz gerekir.
Ardından, sayfanın üst kısmına snippet’iniz için bir başlık ekleyin, bu kodun ne için olduğunu hatırlamanıza yardımcı olacak herhangi bir şey olabilir.
Ardından, yukarıdaki kodu ‘Kod Önizleme’ kutusuna yapıştırın.
Son olarak, anahtarı ‘Etkin Değil’den ‘Etkin’e getirin ve ‘Snippet’i Kaydet’ düğmesine tıklayın.

Bu kod sadece yorum metin alanı alanını en alta taşır.

WordPress Yorum Formundan Web Sitesi (URL) Alanını Kaldırma
Yorum formundaki web sitesi alanı çok sayıda spamcının ilgisini çekmektedir. Bu alanı kaldırmak spam göndericileri durdurmayacak ve hatta spam yorumları azaltmayacak olsa da, sizi yanlışlıkla kötü yazar web sitesi bağlantısı içeren bir yorumu onaylamaktan kesinlikle kurtaracaktır.
Ayrıca yorum formundaki bir alanı azaltarak daha kolay ve kullanıcı dostu hale getirecektir. Bu konu hakkında daha fazla bilgi için WordPress yorum formundan web sitesi url alanını kaldırma makalemize bakın.
Yorum formundan URL alanını kaldırmak için aşağıdaki kodu functions.php dosyanıza veya bir kod parçacığı eklentisine eklemeniz yeterlidir.
1 2 3 4 5 | function wpbeginner_remove_comment_url($arg) { $arg['url'] = ''; return $arg;}add_filter('comment_form_default_fields', 'wpbeginner_remove_comment_url'); |

WPCode eklentisini kullanarak bu kodu WordPress’e güvenli bir şekilde eklemek için önceki bölümdeki adımları takip edebilirsiniz.
WordPress’te Yorumlara Abone Ol Onay Kutusu Ekleme
Kullanıcılar web sitenizde bir yorum bıraktıklarında, birisinin yorumlarına yanıt verip vermediğini görmek için o konuyu takip etmek isteyebilirler. Yorumlara abone ol onay kutusu ekleyerek, kullanıcıların gönderide yeni bir yorum göründüğünde anında bildirim almalarını sağlarsınız.
Bu onay kutusunu eklemek için yapmanız gereken ilk şey Subscribe to Comments Reloaded eklentisini yüklemek ve etkinleştirmektir. Etkinleştirmenin ardından, eklenti ayarlarını yapılandırmak için StCR ” Comment Form sayfasını ziyaret etmeniz gerekir.

Adım adım ayrıntılı talimatlar için WordPress’te kullanıcıların yorumlara abone olmasına nasıl izin vereceğinize ilişkin makalemize bakın.
WordPress Yorum Formuna Ekstra Alanlar Ekleme
WordPress yorum formunuza ekstra alanlar eklemek ister misiniz? Örneğin, kullanıcıların Twitter adreslerini ekleyebilecekleri isteğe bağlı bir alan?
WordPress Comments Fields eklentisini kurun ve etkinleştirin. Etkinleştirdikten sonra, ‘Yorum Alanları’ sayfasına gidin ve ‘Yorum Alanları’ sekmesine geçin.

Özel bir alanı sürükleyip bırakmanız ve ona bir başlık, açıklama ve veri adı vermeniz yeterlidir.
Alanları eklemeyi tamamladıktan sonra, ‘Tüm değişiklikleri kaydet’ düğmesine tıklamayı unutmayın.
Artık eylemlerdeki özel alanları görmek için yorum formunuzu görüntüleyebilirsiniz.

Özel alanlar daha sonra yorum moderasyonunda ve yorum içeriğinin altında görüntülenir.

Daha fazla ayrıntı için WordPress’te yorum formuna özel alanların nasıl ekleneceğine ilişkin eğitimimize bakın.
Umarız bu makale WordPress yorum formunu kullanıcılarınız için daha eğlenceli hale getirmeyi öğrenmenize yardımcı olmuştur. WordPress blog yazılarınıza daha fazla yorum almak için ipuçlarımızı ve WordPress için en iyi sosyal medya eklentileri uzman seçimlerimizi de görmek isteyebilirsiniz.
If you liked this article, then please subscribe to our YouTube Channel for WordPress video tutorials. You can also find us on Twitter and Facebook.
 in 2024")


tom
Great Article! thanks a lot
WPBeginner Support
You’re welcome
Admin
mobileninja
Thank you so much. It is very helpful article.
WPBeginner Support
Glad it could be helpful
Admin
Emma
Hi. Great tutorial. I wanted to refrain my users from adding their website url to the comment section, because it causes crashes for some users (no idea why). I succeeded, but now it still says the usual “remember my name, e-mail adres and website for the next time I leave a comment”. Do you know how to fix that?
WPBeginner Support
You may want to check with your theme’s support and let them know about the crashing and editing that message.
Admin
WPBeginner Support
Glad our guide could help
Admin
Deepak Bharti
Thanks for sharing this type of article. it is helpful for me and my website.
WPBeginner Support
Glad our article could be helpful
Admin
Rubel Ahmed
Hello
Nice article and I have used some of your suggestions but I found a code error that needs fixing under ‘Adding Comment Policy Text Before or After Comment Form’.
You have placed the add filter within the function or otherwise it won’t get executed, it needs to be moved outside of the function.
Rubel
WPBeginner Support
Both filters should be outside the function but we will certainly take another look and update if we can see the error
Admin
suvo
obviously like your web-site Post Thanks for Shearing. i Read your Blog every day.it very bothersome to tell the reality then again I’ll definitely come back again.Please write more about this topics.
WPBeginner Support
Glad you like our articles
Admin
ARPIT
The Information you’ve provided here is very good. Nice Tutorial. Thanks for sharing. I was looking for a long time for this.It’s really helping me get more familiar with WordPress!
WPBeginner Support
Hi Arpit,
We are glad you found the tutorial helpful.
Admin
Hồ Ngọc Thanh
I can’t find #respond { }
#reply-title { }
#cancel-comment-reply-link { }
#commentform { }
#author { }
#email { }
#url { }
#comment
#submit
in my wordpress theme?
WPBeginner Support
Your theme may have styled it differently, for finding what they are you would want to take a look at our article: https://www.wpbeginner.com/wp-tutorials/basics-of-inspect-element-with-your-wordpress-site/
The # would be for the ID of the object so if something had the ID of button then it would be #button
Admin
Chintan
How to add real-time comment preview?
Paulina
Hello, thank you for this very useful article. I am interested in adding a text before the button “submit”. In the code that you are providing here: would I need to change the words ‘wpbeginner’ to anything else that is connected to my own site?
Akramul Hasan
Hello Paulina,
You can add text or anything before Submit button by using a simple filter hook that works for comments form fields.
Hena
wow!! It’s very good
Woolker Cherenfant
Hi! Great article as usual. But I am wondering how can I change the word “says” in the comment section. I want to translate it into Haitian Creole “di”. Any help with that?
Thanks in advance.
—Woolker
Tisha
Is it possible to copy the code to blogger?. Because I want to make WordPress style comment in my Blogger blog. Thanks for your help.
Mate Hodi
Hey!
Great article! I was looking for a solution to change the “Leave a Reply” part. Do you have any idea how I may change it?
Neeraj
This is a helpful guide which gave thorough guidance to me about Comments Section Optimization.
Kevin Byrnes
Excellent article. I will be facing some of these issues as well..
JP
Hi
I love your tutorials! I still have a question though; is it popular to change the greyish background color of the entire comment form to some thing else? Perhaps even to an image instead of a solid color?
Mahesh
I’m Loving Your Tuts It is very Easy to Understand and More Useful any Where.
Thanks For Sharing Sir.
Lisa Marten
Can I put the comment box to be fill in above the list of posted comments instead of below?
WPBeginner Support
Yes you can.
Admin
SiRetu
Is there any complete tutorial? I mean start from scratch including creating comments.php file from the first time. Thanks, great tutorial as always
Luis Izquierdo
I am customizing my wp themes child theme and I was able to place the policy text above the comment form. But it only shows to logged out users. How do I get it to show to Logged in users?
Luca Morelli
Hello great tutorial: thanks!
I keep improving my knowledge about WordPress thanks to your lessons. I have a question (I don’t know much about php): I managed to add the comment policy text before the submit button, but I noticed that if I click “reply” and see your codes, the php output is inside the paragraph tag together with a class named “commentpolicy”. How did you achieve that (e.g. how to style the php output on an HTML webpage with a tag and a class, which can then be styled with CSS)?
Hopefully I explained it correctly and my question makes sense.
Again many thanks for all your tutorials.
Luca
WPBeginner Support
We are not sure what you are trying to ask. Can you please explain bit more? Thanks.
Admin
Jayanta
I have the same question. Trying to clarify a bit.
I have added your snippet to get the comment policy text before comment field. But This is only some text, no special div class is added for that text. So, I am not able to style it using css (I would like to make the text smaller, or may be put a border-box to it). Please guide us. Hope it makes sense now. Thank you so much.
Erick
How do you make comments look like this website?
gift charles
Thank you very much for this,i was looking for a long time for a way to make the built in comments look better because i prefer them to other services like facebook comments or disqus
Adnan Bashir
As you have noticed, the newest version of WP (4.4) is displaying Name and Email form below Text box, do you have any idea how to revert it to old style (Name and Email box above the Text box) ?
Thanks
WPBeginner Support
Please take a look at How to move comment text field to bottom in WordPress 4.4
Admin
Adnan Bashir
Thank you, now the Comment form is looking better
mario
Hello, great tutorial !
But I’d like to know one more thing: is it possible to add a checkbox for the privacy policy? Since wordpress system collect the ip, I want my users to check teh box before sending the message. Any suggestion ? Thank you !
WPBeginner Support
Please see our article on how to add custom fields to comments form in WordPress.
Admin
Ramon
I would like to have the input comments fields above the comments them self so my customers can leave a comment without the need to scroll all the way down the page.
Is there an easy way to accomplish this?
Thank you.
dragons
Is there any way to ad an EDIT button for the commenters? So they can fix typos and such? Also what if the site wants to allow commenters the ability to upload images in the comments? Is there a way to do that?
Rick Hellewell
Good tutorial. Used it to develop my own customized contact form
plugin, where I re-define the $args for the comment form fields.
But it turns out, while testing, that some themes create their own
‘textarea’ field, which adds to my ‘textarea’ field, resulting in two
comment text fields. Not good.
I have set my add_filter( ‘comment_form_default_fields’…. with a
higher priority (99) so that it happens later in the ‘page build’ (after
the theme does it’s comment_form_default_fields), but the duplicates
comment text boxes are still there. Also tried a priority of 8, and that
didn’t do it either.
So, can you think of a generic (works for any theme) that can
determine if the comment field has already been defined? And, if the
duplicate is found, remove the one in the theme, so I can replace it
with mine?
I understand that the problem is caused by bad coding practices on the theme, but would like to find a workaround.
Thanks….Rick…
Larisa Frolova
Thank you!
I’ve searched the forums and Google for this, but I’m still a little confused as to what to do. If I just want to change the LOCATION of the comment/reply link that appears on posts, how do I do that? It’s not that I want to make it invisible, or change the wording – I just want it to be at the bottom of a post, not at the top.
How do I go about doing that for the Twenty-Twelve theme?
Mikael
I like this layout!
lflier
Very helpful!
I’m really liking the Disqus comment system you’re now using. It’s slick and very inviting. I find myself leaving more comments on sites using Disqus.
But I’m discouraged from using it on my own site by the lack of integration with BuddyPress activity stream. So the more I can do to streamline the native WordPress comment system and make it as inviting as Disqus, the better. Thanks again for your tutorial.
Therese
Thank you so much for all this! It’s really helping me get more familiar with WordPress!
I’ve got the social media logins, I’ve got the border sorted, but now I am totally stuck in trying to find *where* to edit the font for the comment box’s individual boxes.
I can’t figure it out.
Can you please tell me where exactly to find that? You don’t specify this clearly enough in the tutorial.
WPBeginner Support
Please see how we changed fonts for #author and #url input fields in the article. To change font in the comment box you can use something like this:
#comment {font-family:arial,verdana,sans-serif;font-size:16px;}1-click Use in WordPress
Admin
JG
how do I add a required checkbox people have to tick before the form gets submitted? I have tried adding the field in via adding a field under add_filter(‘comment_form_default_fields,) while the field shows the form can still be submitted without ticking the box.
Jewel
Thank you a lot…
Bhushan
I’m trying
Ann
I read through your tutorial… and was wondering if it can be applied to a WordPress site that has a Genesis Framework and Child theme. I am using the Epic Child theme by the way. Thanks for your help.
WPBeginner Support
Yes some parts of the tutorial can be directly applied to your child theme. For CSS styling you need to over ride your childtheme’s CSS.
Admin
Jonathan
Any idea how to place those checkboxes for Subcribe to Comments and other plugins so that they appear above the Submit button? Is there a way define where wordpress would normally include those items?
WPBeginner Support
if you are using Subscribe to comments plugin then you can place
<?php show_subscription_checkbox(); ?>in your templates where you want the subscription checkbox to appear.Admin
Jeff Hilron
Im trying to figure out how to get the round avatars.
Editorial Staff
Here is a tutorial for you:
https://www.wpbeginner.com/wp-themes/how-to-display-round-gravatar-images-in-wordpress/
Admin
Ravinder
Nice Tutorial. the information you have provided here is very good. I was searching for it from a while. Thanks for sharing.
mohib
This is a wonderfull tuturial, “Click here to cancel repley” i want ot chage this name, but not found any way, would you pls help me ?
Mike Lee
Hi, your tutorial is so wonderful and i would like to ask how to make the comment form appear under the specific comment when clicking the ‘Reply’ word of that coment.
Thanks
Editorial Staff
This happens by default in the WordPress theme when you allow threaded comments. WordPress loads comment-reply.min.js. If your theme is not loading that, then you need to load it.
Admin
Jae
I have the Elegant Tonight theme on my WordPress, and I have my dashboard-settings-discussion set to: Enable threaded (nested) comments 3 levels deep. So, I should be seeing threaded comments, but I am not. WordPress doesn’t seem to be loading comment-reply.min.js. Where in my comments.php theme do I add this? And do I add exactly that, or in some other coding format? Thank you for any advice!
Editorial Staff
Hey Jae,
Elegant themes staff is better equipped to answer that question because we are not very familiar with that theme. When you pay for Elegant Themes, you also get access to their support.
Robo Ek
Helpful article once again from you. Maybe you should change your name. Even professionals would find your tutorial useful
Adrian Robertson
Another nice tutorial from you guys, time and time again when I can’t remember how to do something I end up on your site.
Great work!
Mattia
Hi guys thanks a lot. Just a question: which is the difference between and . With this last one, your adivecs don’t work!
Mattia
sorry the output deleted my question: difference between “comment_form” and “comment_template”…
Editorial Staff
No problem. So comments_template is a function that loads the template used to display comments. It loads the comments.php file by default however you can use another file if you have a customized version. The comments.php file usually contains the code to load all the comments, and it also contains the function comment_form. The commnent_form function outputs the actual comment form (name, email, website, message, submit button, etc).
Hope that helped clear things up
Admin
Mattia
It did. Thanks
Sue Kearney
I’m loving all of this juicy input, some of which I’ve shamelessly lifted from what you do. I’m about halfway done. Check it out here: http://goo.gl/8r9uO
Thanks again!
Ernice Gilbert
Hello, how do I add a reply button in the comments box just like yours to my wordpress site? It is a plugin or tweaking of code?
Thanks.
Editorial Staff
Hey Ernice,
It is not a plugin. We are using the same technique showed in this article. Instead of using background color, we are using the background image property of CSS.
Admin
Rifat Bin Sharif
In my wordpress theme, I just noticed that in comment area there is a word ”says’ but I couldn’t find it in comments.php file. How to remove this text?
Thanks
Colin Crawford
Hi Nice article and I have used some of your suggestions but I found a code error that needs fixing under ‘Adding Comment Policy Text Before or After Comment Form’.
You have placed the add filter within the function or otherwise it won’t get executed, it needs to be moved outside of the function.
Colin
Editorial Staff
Fixed it
Admin
Gaelyn
All wonderful suggestions. Now, how do you change the word “responses” to “comment” and make it more prominent. On Suffusion theme. Thanks.
Editorial Staff
Edit your comment.php file in the theme to make the change.
Admin
Umer Rock
I just want to add a Image just right on Comment Box, How i can, for example this is a screenshot of comment box : http://oi48.tinypic.com/2itrket.jpg
Editorial Staff
You could probably use the filters shown in the article and CSS to make it look like that.
Admin
Umer Rock
Ok. Thank you, let me consider again on article. well i am not expert with CSS.