Yıllar boyunca WPBeginner etiketler hakkında birçok soru aldı, bunlardan biri de WordPress’te etiketlerin daha belirgin görünmesi için stil verip vermemeniz gerektiğiydi.
Etiketler içeriğinizi konular halinde düzenlemenize yardımcı olur. WordPress blog yazılarınız için hashtag gibidirler ve kullanıcıların daha fazla içerik keşfetmesine yardımcı olurlar. Ancak deneyimlerimize göre, görsel olarak öne çıkmazlarsa gözden kaçabilirler.
Bu makalede, web sitenizde daha fazla kullanıcı etkileşimi ve sayfa görüntülemesi elde etmek için WordPress’te etiketleri nasıl kolayca şekillendireceğinizi göstereceğiz.

WordPress’te Etiketler Nasıl Görüntülenir
WordPress, kategoriler ve etiketler adı verilen iki ana taksonomi ile birlikte gelir. Kategoriler içeriğinizin ana alanları için kullanılırken, etiketler içeriği daha spesifik konulara ayırmanıza olanak tanır.
Birçok popüler WordPress teması varsayılan olarak yazılarınızın üstünde veya altında etiketleri görüntüler.

Bununla birlikte, etiketleri arşiv sayfalarında, altbilgide, kenar çubuklarında ve WordPress’te neredeyse istediğiniz her yerde görüntüleyebilirsiniz.
Yazılarınıza, sayfalarınıza ve kenar çubuğu widget’larına bir etiket bulutu eklemek için ‘Etiket Bulutu’ bloğunu eklemeniz yeterlidir.
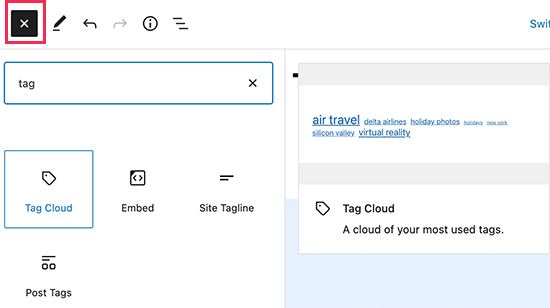
Bir etiket bulutu, her etikete gönderi sayısına göre farklı bir yazı tipi boyutu verir. Ayrıca her etiketin yanında gönderi sayısını görüntülemeyi de seçebilirsiniz.

Bunlar sadece WordPress’te bulunan varsayılan seçenekler, peki ya etiketlerinizi daha da özelleştirmek isterseniz? Size nasıl yapacağınızı göstereceğiz.
WordPress’te etiketleri nasıl kolayca şekillendirebileceğimize bir göz atalım.
WordPress’te Varsayılan Etiket Bulutunu Şekillendirme
Etiket Bulutu bloğunu bir yazıya veya sayfaya ekledikten sonra, özel CSS ekleyerek özelleştirebilirsiniz.
Etiket bulutu bloğu, stil vermek için kullanılabilecek varsayılan WordPress tarafından oluşturulmuş CSS sınıflarını otomatik olarak içerir.
WordPress sitenize özel CSS eklemek için Görünüm ” Özelleştir sayfasına gidin ve Ek CSS sekmesine geçin.
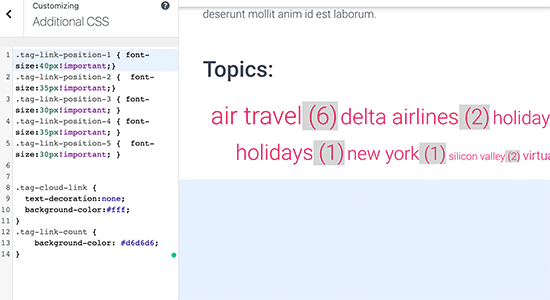
Başlangıç noktası olarak bu özel CSS kodunu ekleyerek başlayabilirsiniz.
1 2 3 4 5 6 7 8 9 10 11 12 13 14 | .tag-link-position-1 { font-size:40px!important;}.tag-link-position-2 { font-size:35px!important;}.tag-link-position-3 { font-size:30px!important; }.tag-link-position-4 { font-size:35px!important; }.tag-link-position-5 { font-size:30px!important; } .tag-cloud-link { text-decoration:none; background-color:#fff;}.tag-link-count { background-color: #d6d6d6;} |
Gördüğünüz gibi, bağlantıların konumuna göre stili ayarlamak için .tag-link-position sınıfını kullanabilirsiniz. Daha fazla gönderi içeren etiketlerin konumu daha yüksek, daha az gönderi içeren etiketlerin konumu ise daha düşüktür.
Etiket bulutu bloğunuzdaki tüm etiketlerin aynı boyutta olmasını istiyorsanız, bunun yerine aşağıdaki CSS’yi kullanabilirsiniz:
1 2 3 4 5 6 7 8 9 10 11 12 | .tag-cloud-link { font-size:16px !important;border:1px solid #d6d6d6;}.tag-cloud-link { text-decoration:none; background-color:#fff;}.tag-link-count { background-color: #d6d6d6; } |
Test sitemizde bu şekilde görünüyordu:

WordPress’te Yazı Etiketlerini Şekillendirme
Etiket bulutlarınızı şekillendirmenin yanı sıra, tek tek blog yazılarınızda görüntülenen yazı etiketlerini de şekillendirmek isteyebilirsiniz. Genellikle WordPress temanız bunları yazı başlığının veya yazı içeriğinin üstünde veya altında görüntüler.
WordPress temanız tarafından kullanılan CSS sınıflarını görüntülemek üzere Inspect aracını kullanmak için fareyi etiketlerin üzerine getirebilir ve sağ tıklayabilirsiniz.
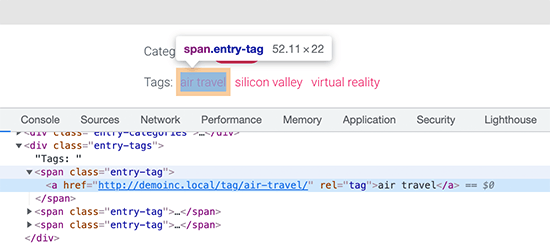
Bundan sonra, bu CSS sınıflarını özel CSS’nizde kullanabilirsiniz. Aşağıda, test temamızdaki CSS sınıflarına dayalı örnek bir kod yer almaktadır:
1 2 3 4 5 6 7 8 9 10 11 12 | .entry-tag { padding: 5px 8px;border-radius: 12px;text-transform: lowercase;background-color: #e91e63;color:#fff;}.entry-tags a { color:#fff;font-size:small;font-weight:bold;} |
Test sitemizde bu şekilde görünüyordu.

WordPress’te Özel Etiket Bulutu Oluşturma
Varsayılan etiket bulutu bloğunun kullanımı kolaydır, ancak bazı ileri düzey kullanıcılar daha fazla esnekliğe sahip olabilmek için bunu özelleştirmek isteyebilir.
Bu yöntem, etiket bulutunu çevreleyen kendi HTML ve CSS sınıflarınızı eklemenize olanak tanır. Daha sonra etiket bulutunun görünümünü kendi gereksinimlerinize göre özelleştirmek için kullanabilirsiniz.
Yapmanız gereken ilk şey, bu kodu kopyalayıp temanızın functions.php dosyasına veya bir kod parçacıkları eklentisine yapıştırmaktır:
1 2 3 4 5 6 7 8 | function wpb_tags() { $wpbtags = get_tags();foreach ($wpbtags as $tag) { $string .= '<span class="tagbox"><a class="taglink" href="'. get_tag_link($tag->term_id) .'">'. $tag->name . '</a><span class="tagcount">'. $tag->count .'</span></span>' . "\n" ;} return $string;} add_shortcode('wpbtags' , 'wpb_tags' ); |
Bu kodu WordPress için en iyi kod parçacıkları eklentisi olan WPCode ile eklemenizi öneririz. Temanızın functions.php dosyasını düzenlemeden WordPress’e kolayca özel kod eklemenizi sağlar, böylece sitenizi bozmazsınız.
Başlamak için ücretsiz WPCode eklentisini kurun ve etkinleştirin. Yardıma ihtiyacınız varsa, WordPress eklentisi yükleme hakkındaki eğitimimize bakın.
Eklenti etkinleştirildikten sonra, WordPress kontrol panelinden Code Snippets ” Snippet Ekle bölümüne gidin.
Ardından, farenizi ‘Özel Kodunuzu Ekleyin (Yeni Snippet)’ seçeneğinin üzerine getirin ve ‘Snippet kullan’ düğmesine tıklayın.
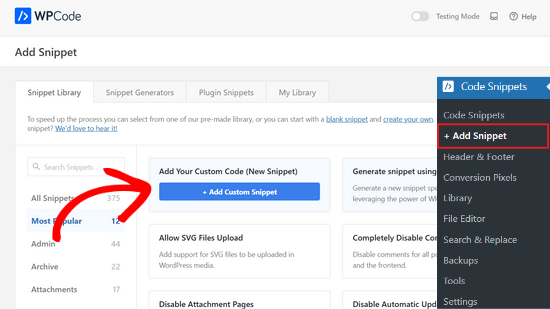
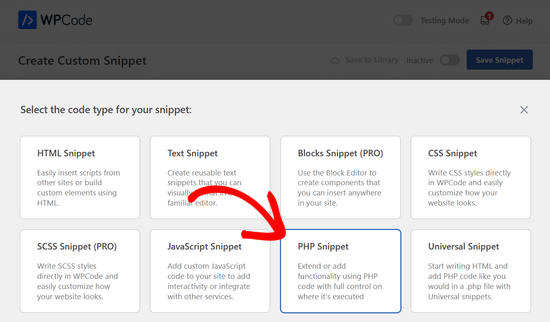
Buradan, ekranda görünen seçenekler listesinden kod türünüz olarak ‘PHP Snippet’i seçmeniz gerekir.
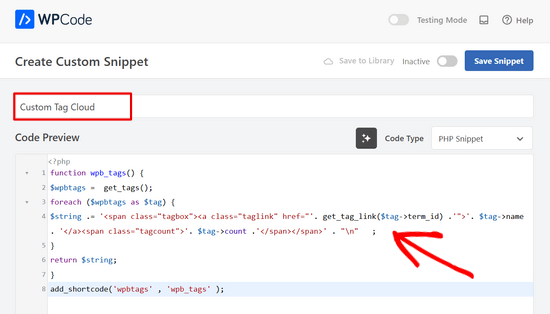
Ardından, sayfanın üst kısmına snippet için bir başlık ekleyebilirsiniz. Bu, kodun ne için olduğunu hatırlamanıza yardımcı olacak herhangi bir şey olabilir.
Ardından, yukarıdaki kodu ‘Kod Önizleme’ kutusuna yapıştırmanız yeterlidir.
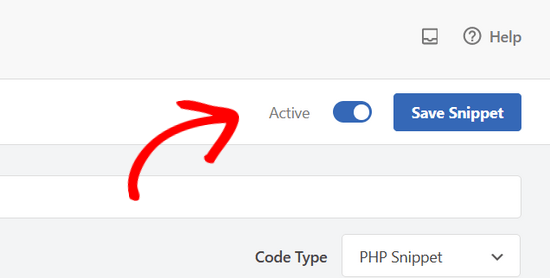
Bundan sonra yapmanız gereken tek şey anahtarı ‘Etkin Değil’den ‘Etkin’e getirmek ve ‘Snippet’i Kaydet’ düğmesine tıklamaktır.
Bu kod, tüm etiketlerinizi yanlarında gönderi sayılarıyla birlikte görüntüleyen bir kısa kod ekler.
Arşivler sayfanızda veya bir widget’ta görüntülemek için bu kısa kodu kullanmanız gerekir:
[wpbtags]
Bu kodu tek başına kullanmak sadece etiket bağlantılarını ve yanlarındaki gönderi sayısını gösterecektir. Daha iyi görünmesi için biraz CSS ekleyelim. Bu özel CSS’yi kopyalayıp web sitenize yapıştırmanız yeterlidir.
1 2 3 4 5 6 7 8 9 10 11 12 13 14 15 16 17 18 19 20 21 22 | .tagbox { background-color:#eee;border: 1px solid #ccc;margin:0px 10px 10px 0px;line-height: 200%;padding:2px 0 2px 2px; }.taglink { padding:2px;} .tagbox a, .tagbox a:visited, .tagbox a:active { text-decoration:none;} .tagcount { background-color:green;color:white;position: relative;padding:2px;} |
İhtiyaçlarınızı karşılamak için CSS’yi değiştirmekten çekinmeyin. Demo sitemizde bu şekilde görünüyordu:

Umarız bu makale WordPress’te etiketleri nasıl kolayca şekillendirebileceğinizi öğrenmenize yardımcı olmuştur. Ayrıca WordPress’te alt kategorilerinizi nasıl gizleyeceğiniz veya şekillendireceğinizle ilgili kılavuzumuzu veya kullanışlı WordPress ipuçları, püf noktaları ve hack‘lerinden oluşan bu listeyi görmek isteyebilirsiniz.
If you liked this article, then please subscribe to our YouTube Channel for WordPress video tutorials. You can also find us on Twitter and Facebook.


Dennis Muthomi
the step-by-step guide and code snippets are really helpful
QUICK QUESTION: If I apply these code snippets to style my tags and later decide to change my WordPress theme, will the tag styling change according to the new theme’s default styles, or will it stick with the customizations I made using these code snippets?
WPBeginner Comments
The CSS you added should remain, but you may still have to edit the CSS depending on how the new theme’s CSS effects the styling, and if there are any conflicts.
Dennis Muthomi
hello, thank you for the helpful clarification!
As long as I can keep the customizations with some minor tweaking, that is very useful to know.
One follow-up question – when switching themes, what would be the best way to check for and resolve any CSS conflicts that affect the tag styling?
WPBeginner Support
We do not have a specific best way we would recommend. It would be something you would need to manually check for.
Nikola
Great guide, thanks!
Would it be possible to order the tags by most used and limit the number of tags shown?
WPBeginner Support
At the moment you would need to use a plugin for that or custom code, we do not have a recommended method for that at the moment.
Admin
Jemma Pollari
Awesome, thanks. This really helped.
WPBeginner Support
Glad our guide could help
Admin
Joe Smith
This is great! Exactly what I was looking for and very classy. Just one question: If I wanted to add more space between the tags, how would i modify the css? I’ve tried changing several of the settings in the css above but none of them simply add whitespace between the tags.
WPBeginner Support
You would want to increase the padding for what you’re wanting
Admin
Ibiye Ambille
Hi, i would love to move my post tag to below the featured image
WPBeginner Support
For that, you would want to reach out to your specific theme’s support for assistance as each theme has its own location for the featured image.
Admin
Trishah
I’m trying to add a CSS class “current” to tags for a single post. The few solutions I’ve found no longer seem to work. How would I do this?
WPBeginner Support
That would vary based on your specific theme, if you reach out to your theme’s support they should be able to let you know where you can add that class for your tags.
Admin
uche Peter
My tags are listed serially.. No Border nothing nothing,,, just a text …please how do I give it a border with background color
Kingsolomon
How to i apply the css pls
Hugo
My tag cloud doesn’t come as a cloud but as a list, since after each span a line break is inserted. How can I remove these line breaks?
WPBeginner Support
Hi Hugo,
This article discusses how to style tags in different ways. If you want a tag cloud then you can use the default WordPress tag cloud widget. You can also use the template tag
<?php wp_tag_cloud(); ?>1-click Use in WordPress
Admin
bob
I get that you showed another page on how to limit tags to a certain number, but how can I do it with this example included? It doesn’t seem to work using the method linked in combination with this.
Amy Croson
I’m struggling with adding this, and I believe it’s with how my ‘Chosen’ Theme is limiting me. I’ve copied & pasted all into my php, & it is giving me errors left and right. I’m currently being told that there is an unknown “.” in this detail. Is there any way to format this without using the “.”s before .taglink, .tagbox, & .tagcount?
Val Archer
Hi – I’m looking for a way to list tags on a category-slug.php page. Do you perhaps know where I can find that tutorial?
So far I’ve created a category [sitename]/category/recipes and a category-recipes.php.
I’m tagging the recipes, e.g. Breakfast, Dinner, etc
I’d like the Tags to display in category-recipes.php like this. I don’t know what I’m doing. I’m copying from my category.php file.
Archives for the Category:
Breakfast
now it lists all the posts tagged with Breakfast something like this:
<a href="”>
by / / posted in cat_name . ‘ ‘;} ?>
Dinner
now it lists all the posts tagged with Dinner something like this:
<a href="”>
by / / posted in cat_name . ‘ ‘;} ?>
[Then at the end of all the Tags:]
</div
Please do you know where I can get help on this?
thank you! – Val
WPBeginner Support
Have you tried adding:
<?php the_tags('posted in:', '' ,'' ); ?>Admin
Magistar
Code works fine for a tag cloud. However I would like to apply this to the post tags (meaning the tags associated with a post and their count, instead of the big list).
I tried something with wp_get_post_tags but I did not really got it to work. Any suggestions?
WPBeginner Staff
You can use get_terms instead of get_tags, see this codex page:
http://codex.wordpress.org/Function_Reference/get_terms
DER KUNSTBLOG
That’s great, I’ve added your code to a site-specific plugin – but is there a possibility, to change it in a way, that the font-size vary on how often the tag is used? Any idea please? Thanks!
WPBeginner Staff
Yes it is possible, in the first piece of code you would need to replace get_tags with wp_tag_cloud function. Like this:
$wpbtags = wp_tag_cloud('smallest=15&largest=40&number=50&orderby=count&format=array');
Guest
How do you do the same thing with the custom tag cloud for Categories and Custom Taxonomies?
Terence O'Neill
Hey mate; How do I do the exact same(display with shortcode) for Categories and Custom Taxonomies? Thx for the tutorial btw. Works like a charm.