Her WordPress gönderisini benzersiz bir şekilde stilize etmek, web sitenizin öne çıkmasını sağlamanın akıllıca bir yoludur. Belirli içeriği vurgulamanıza ve tasarımı markanızın havasına uydurmanıza olanak tanır.
Bazı siteler, yapışkan gönderiler için özel arka planlar kullanır veya her kategoriye kendi stilini verir. Bu küçük değişiklikler, içeriğinizin daha düzenli ve görsel olarak çekici hissetmesine yardımcı olur.
Ancak bunu yapmak zor olabilir. Doğru araçlar ve adımlar olmadan, deneme yanılma yoluyla saatler harcayabilir veya daha kötüsü, sitenizin düzenini yanlışlıkla bozabilirsiniz.
Sizin için araştırma yaptık ve gönderileri farklı şekilde biçimlendirmek için bazı basit yöntemler bulduk.
WordPress için en iyi kod parçacığı eklentisi olan WPCode'u kullanarak, zahmetsizce gönderilerinize özel stiller ekleyebilir ve her biri için benzersiz bir görünüm oluşturabilirsiniz.

Not: Bu öğretici, WordPress'e özel CSS eklemenizi gerektirir. Ayrıca Denetleme aracını kullanabilmeniz ve temel CSS bilgisine sahip olmanız gerekir, bu nedenle tamamen yeni başlayanlar için uygun olmayabilir.
💡Hızlı Cevap: Gönderileri Farklı Şekilde Nasıl Stilleştirebilirsiniz
Tema dosyalarını düzenlemeden belirli WordPress gönderilerini stilize etmenin en güvenli yolu WPCode eklentisini kullanmaktır. Özel CSS sınıflarını güvenli bir şekilde eklemenize olanak tanır:
- Tekil Gönderiler: Belirli
.post-idsınıfını hedefleyin. - Kategoriye Göre:
.category-namesınıfını hedefleyin. - Yazara Göre: Yazar sınıfları oluşturmak için özel bir PHP parçacığı ekleyin.
- Popülerliğe Göre: Yorum sayısına göre stilize etmek için özel bir PHP parçacığı ekleyin.
Her WordPress Yazısını Farklı Şekilde Stilize Etmenin Artıları ve Eksileri
Bir WordPress blogunuz varsa, her gönderiyi farklı şekilde stilize etmek, farklı renklerin farklı içerik kategorileriyle ilişkilendirildiği benzersiz bir görsel deneyim yaratabilir.
Ancak, faydaları potansiyel dezavantajlara karşı tartmak önemlidir.
| ✅ Artıları | ❌ Eksiler |
|---|---|
| Okuyucular için benzersiz bir görsel deneyim yaratır | Düzenli bakım zaman alıcı olabilir |
| İçerik türlerini görsel olarak kategorize etmeye yardımcı olur | Tutarsız bir kullanıcı deneyimi yaratabilir |
| Dikkat çeker ve etkileşimi artırabilir | Marka kimliğini ve tutarlılığı sulandırabilir |
| Önemli gönderilerin özel olarak vurgulanmasını sağlar | Teknik bilgi gerektirir (CSS/PHP) |
Eğer yeni başlıyorsanız, her gönderiyi stilize etmek için özel CSS eklemek de zor olabilir. Bununla birlikte, en güvenli yöntemleri kullanarak her WordPress gönderisini farklı şekilde nasıl kolayca stilize edeceğinizi göstereceğiz.
İşte bu kılavuzda ele alacağımız tüm konulara hızlı bir genel bakış:
- WordPress'te Bireysel Gönderileri Stilize Etme
- Belirli Bir Kategorideki Yazılar Nasıl Stil Verilir
- Yazara Göre Gönderileri Farklı Şekilde Biçimlendirme
- Gönderileri Popülerliğe Göre Yorum Sayısına Göre Nasıl Stilleştirebilirsiniz
- Bonus: WordPress'te Her Gönderi İçin Farklı Bir Kenar Çubuğu Görüntüleyin
- WordPress'te Farklı Gönderileri Stilize Etme Hakkında Sıkça Sorulan Sorular
Başlayalım.
WordPress'te Bireysel Gönderileri Stilize Etme
WordPress adds default CSS classes to various elements on your website. Themes use a core WordPress function called post_class() to tell WordPress where to add those default CSS classes for posts.
Web sitenizi ziyaret edip tarayıcınızdaki İncele aracını kullanırsanız, her gönderi için eklenen bu sınıfları görebilirsiniz.
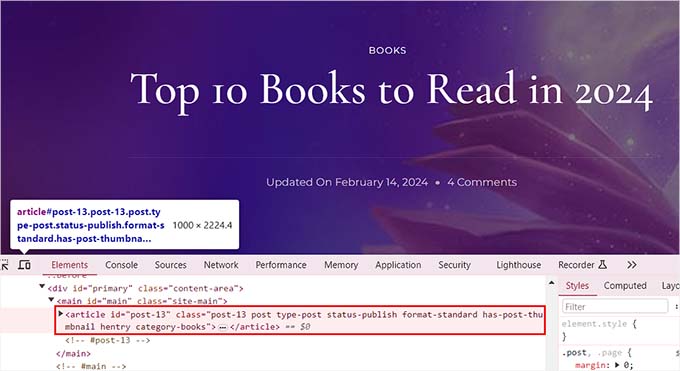
Kullanıcının hangi sayfayı görüntülediğine bağlı olarak varsayılan olarak eklenen CSS sınıfları şunlardır:
- .post-id
- .post
- .attachment
- .sticky
- .hentry (hAtom mikroformat sayfaları)
- .kategori-ID
- .kategori-adı
- .tag-name
- .format-{format-name}
- .tip-{yazı-tipi-adı}
- .has-post-thumbnail
Örnek bir çıktı şöyle görünür:
<article id="post-412" class="post-412 post type-post status-publish format-standard hentry category-news">
Her bir WordPress gönderisini bu ilgili CSS sınıflarını veya kimliklerini kullanarak farklı şekilde biçimlendirebilirsiniz. Bunu yapmak için öncelikle tek bir gönderi için gönderi kimliğini bulmanız gerekir.
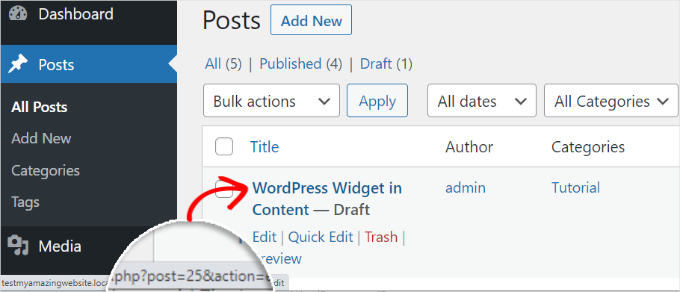
Bunun için WordPress kontrol panelinden Gönderiler » Tüm Gönderiler sayfasına gitmeniz ve fareyi bir gönderinin üzerine getirmeniz gerekir.
A post-edit URL will now appear at the bottom left corner of your screen. Here, you can find the post ID by looking at the number between ‘post=’ and ‘&action.’
Aşağıdaki örnekte, gönderi kimliği 25'tir.
Bunu yaptıktan sonra, CSS sınıfını özel kodla birlikte tema dosyalarınıza veya tema özelleştiricisine eklemelisiniz. Ancak bu riskli olabilir ve tek bir hatayla sitenizi bozabilir.
Bu yüzden bunun yerine WPCode kullanmanızı öneririz.
Kapsamlı testler sonucunda, özel kodu sitenize eklemenin en kolay ve en güvenli yolu olduğunu bulduk. Eklentiyle ilgili deneyimimiz hakkında daha fazla bilgi edinmek için WPCode incelememize bakın.
Öncelikle, ücretsiz WPCode eklentisini yüklemeniz ve etkinleştirmeniz gerekir. Ayrıntılar için, WordPress eklentisinin nasıl kurulacağına dair başlangıç kılavuzumuza bakın.
Not: Ücretsiz sürümü beğendiyseniz, WPCode Pro'ya yükseltmek deneyiminizi bir sonraki seviyeye taşıyabilir. Premium sürüm, 100'den fazla uzman tarafından incelenmiş kod parçacığına, akıllı koşullu mantığa, zamanlanmış kod değişikliklerine ve çok daha fazlasına erişim sağlar.
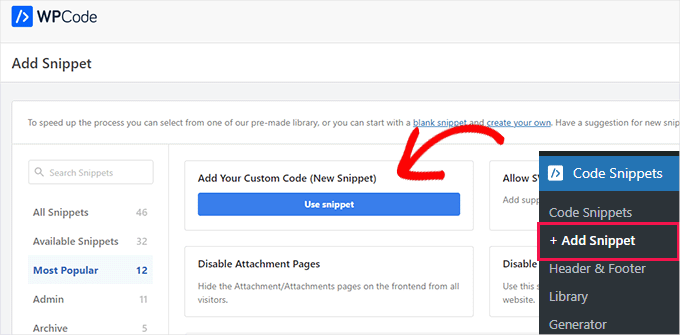
Etkinleştirdikten sonra, WordPress kontrol panelinden Kod Parçacıkları » + Parçacık Ekle sayfasını ziyaret edin. Burada, ‘Özel Kodunuzu Ekleyin (Yeni Parçacık)’ seçeneğinin altındaki ‘Parçacığı Kullan’ düğmesine tıklayın.
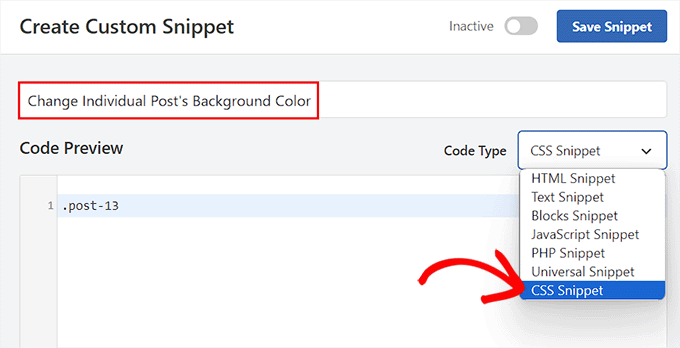
Bu sizi kod parçacığınız için bir isim eklemeye başlayabileceğiniz ‘Özel Parçacık Oluştur’ sayfasına götürecektir. Ardından, sağdaki açılır menüden kod türü olarak ‘CSS Parçacığı’nı seçelim.
Ardından, belirli gönderi kimliğinizin CSS seçicisini 'Kod Önizleme' kutusuna girin.
.post-13 { }Bundan sonra, gönderinizi stilize etmek için köşeli parantez arasına istediğiniz özel CSS kodunu ekleyebilirsiniz.
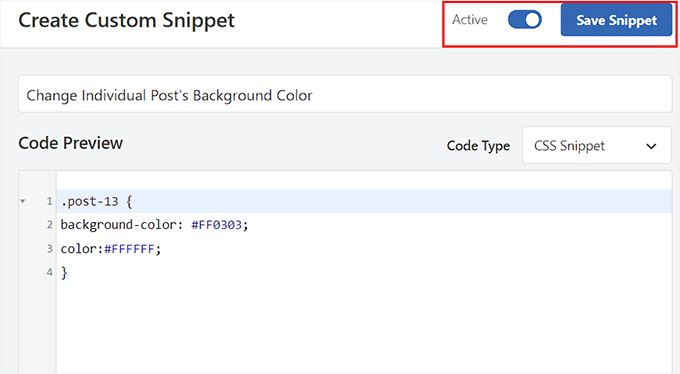
Örneğin, tek bir gönderinin arka plan rengini değiştirmek istiyorsanız, aşağıdaki özel CSS kodunu ekleyebilirsiniz. Bu kodda gönderi kimliğini kendi kimliğinizle değiştirmeniz gerektiğini unutmayın. Burası .post-13 iken, sizinki .post-23873 olabilir.
Ayrıca, arka plan renginin onaltılık kodunu istediğiniz renkte de değiştirebilirsiniz:
.post-13 {
background-color: #FF0303;
color:#FFFFFF;
}
Ardından, üstteki ‘Etkin Değil’ anahtarını ‘Etkin’ olarak değiştirin ve ayarlarınızı kaydetmek için ‘Kod Parçacığını Kaydet’ düğmesine tıklayın.
Özel CSS kodu, parçacık etkinleştirildiğinde bireysel gönderinizde otomatik olarak yürütülecektir.
Go ahead and visit your WordPress blog post to see the changes in real-time.
Metin seçimi rengini, metin rengini, dahili bağlantıların rengini ve çok daha fazlasını değiştirmek için ‘Kod Önizleme’ kutusuna başka özel CSS kod parçacıkları da ekleyebilirsiniz.

Daha fazla bilgi için, WordPress'te renkleri nasıl özelleştireceğiniz hakkındaki başlangıç kılavuzumuza bakabilirsiniz.
Belirli Bir Kategorideki Yazılar Nasıl Stil Verilir
Belirli bir kategoriye ait tüm gönderileri stilize etmek istiyorsanız, bunu WPCode ile de yapabilirsiniz.
Kod Parçacıkları » + Kod Parçacığı Ekle sayfasına gitmeli ve sağdaki açılır menüden ‘Özel Kodunuzu Ekle (Yeni Kod Parçacığı)’ seçeneğini seçmelisiniz.
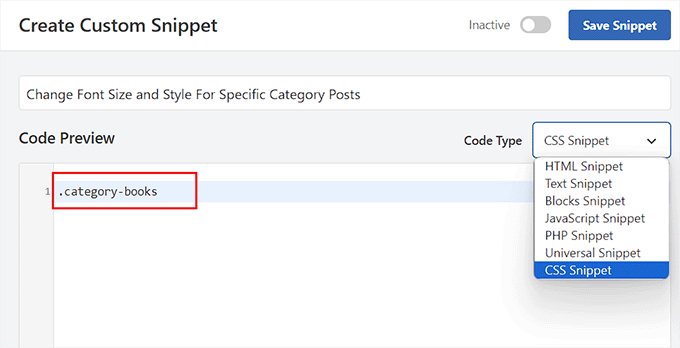
Ardından, yeni sayfada bir kod parçacığı adı ekleyin ve kod türü olarak 'CSS Snippet'i seçin. Bundan sonra, kategorinin kalıcı bağlantı başlığını tireden sonra kullanarak, şu şekilde kod önizleme kutusuna belirli bir kategorinin CSS sınıfını yazın:
.category-books { }
Bunu yaptıktan sonra, kutuya herhangi bir özel CSS parçacığı ekleyebilir ve bunu farklı kategorilerdeki tüm gönderilere uygulayabilirsiniz.
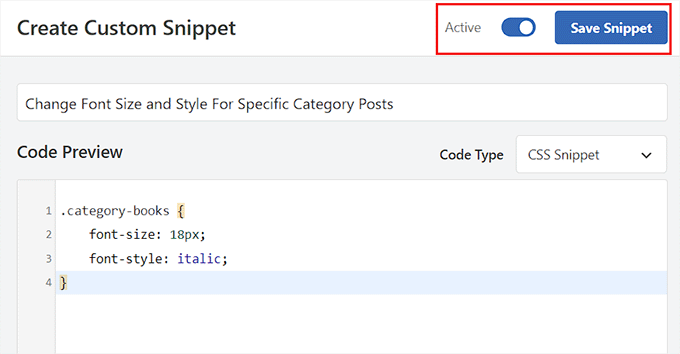
Örneğin, belirli bir kategorideki tüm gönderilerin yazı tipi boyutunu ve stilini değiştirmek istiyorsanız, aşağıdaki kod parçasını kullanabilirsiniz. Kategori adını web sitenize göre değiştirmeyi unutmayın.
category-books {
    font-size: 18px;
    font-style: italic;
}
Ardından, üstteki 'Etkin Değil' anahtarını 'Etkin' olarak değiştirmeniz gerekecek.
Bundan sonra, ayarlarınızı kaydetmek için 'Kod Parçasını Kaydet' düğmesine tıklayın.
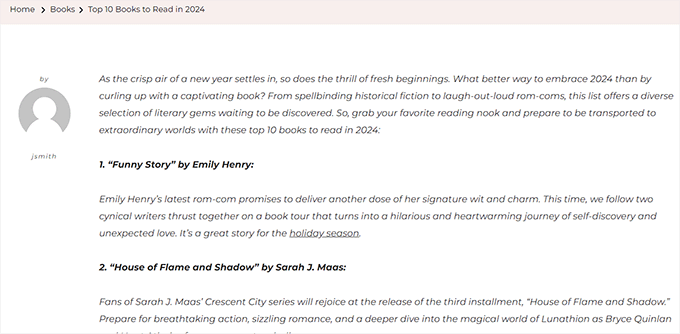
CSS kodunun uygulandığı değişiklikleri görmek için artık belirli bir kategorideki tüm gönderileri ziyaret edebilirsiniz.
This is what it looked like on our demo site:
Yazara Göre Gönderileri Farklı Şekilde Biçimlendirme
WordPress tarafından oluşturulan varsayılan CSS sınıfları, her gönderi için yazar adına göre kullanılabilir bir stil olarak her zaman yazarın adını içermez. Öncelikle yazarın adını gönderi sınıflarına eklemeniz gerekecektir.
Bunu WPCode ile yapmak için ‘Özel Kod Ekle (Yeni Kod Parçacığı)’ seçeneğini seçebilirsiniz.
Bu sizi, bir kod parçacığı adı eklemeniz ve kod türü olarak 'PHP Parçacığı'nı seçmeniz gereken 'Özel Parçacık Oluştur' sayfasına götürecektir.
Bundan sonra, aşağıdaki özel kodu 'Kod Önizleme' kutusuna eklemeniz yeterlidir:
$author = get_the_author_meta('user_nicename'); ?>
<article id="post-<?php the_ID(); ?>" <?php post_class( $author );
Son olarak, ‘Etkin Değil’ anahtarını ‘Etkin’ konumuna getirebilir ve ayarlarınızı saklamak için ‘Snippet Kaydet’ düğmesine tıklayabilirsiniz.
Şuna benzemelidir:
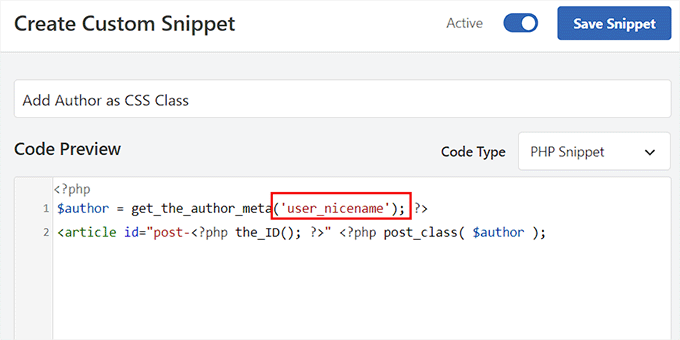
Bu kod, kullanıcının takma adını her gönderiye CSS sınıfı olarak otomatik olarak ekleyecektir. Takma ad, WordPress tarafından kullanılan URL dostu bir addır. Boşluk içermez ve tüm karakterler küçük harflidir.
Şimdi tekrar Kod Parçacıkları » + Parçacık Ekle sayfasına gitmeniz ve ‘Özel Kodunuzu Ekleyin (Yeni Parçacık)’ seçeneğini belirlemeniz gerekiyor.
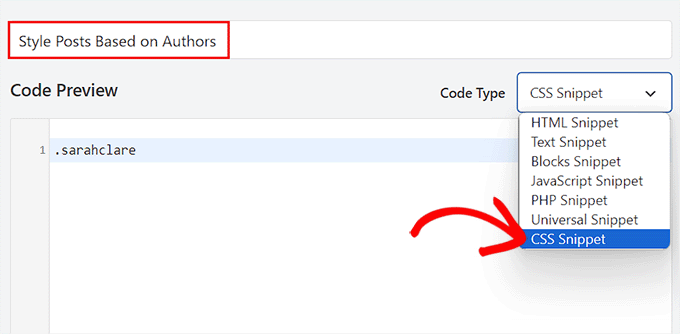
Bir sonraki ekranda, özel kodunuz için bir ad eklemek ve sağdaki açılır menüden kod türü olarak ‘CSS Kod Parçacığı’ seçmek isteyeceksiniz.
Ardından, takma adını kullanarak belirli yazarı şu şekilde 'Kod Önizleme' kutusunda hedefleyebilirsiniz:
.sarahclare
Bir sonraki adım, arka plan rengini, kenarlık boyutunu, metin rengini ve daha fazlasını değiştirmek için özel CSS kodunu eklemektir.
Bir yazarın yazılarına arka plan rengi eklemek ve içerik alanına kenarlık eklemek için aşağıdaki kodu kullanabilirsiniz.
.sarahclare {
background-color:#EEE;
border:1px solid #CCC;
}
İşiniz bittiğinde, üstteki 'Snippet Kaydet' düğmesine tıklayın.
Ardından, ‘Etkin Değil’ anahtarını ‘Etkin’ olarak değiştirmeyi unutmayın.
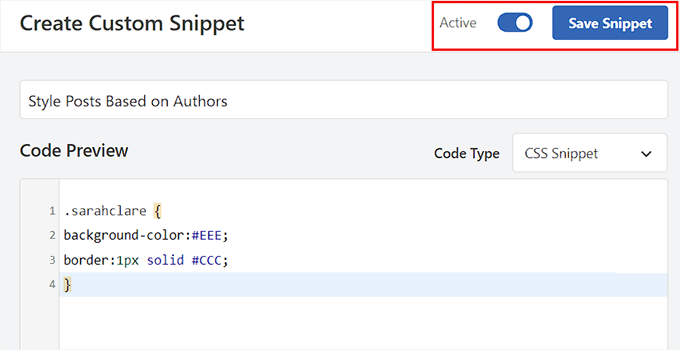
Özel kod, etkinleştirme üzerine otomatik olarak yürütülecektir.
Belirli bir yazarın gönderisini değişiklikleri görmek için artık ziyaret edebilirsiniz.

Gönderileri Popülerliğe Göre Yorum Sayısına Göre Nasıl Stilleştirebilirsiniz
Bazen yorum sayılarına dayanan popüler gönderi widget'larına sahip siteler görmüş olabilirsiniz. Bu örnekte, yorum sayısını kullanarak gönderileri farklı şekilde nasıl stilize edeceğinizi göstereceğiz.
İlk olarak, her gönderi için yorum sayısını kontrol etmemiz ve sayıya göre bir sınıf atamamız gerekiyor. Bunu yapmak için WPCode gibi bir kod parçacığı eklentisi kullanarak özel bir PHP işlevi eklemeniz gerekecektir.
WPCode'da ‘Özel Kod Oluştur’ sayfasını başlatmak için ‘Özel Kodunuzu Ekleyin (Yeni Parça)’ seçeneğini seçmeniz yeterlidir.
Burada, ‘Kod Türü’ olarak ‘PHP Kod Parçacığı’nı seçmek ve ardından aşağıdaki kodu ‘Kod Önizleme’ kutusuna kopyalayıp yapıştırmak isteyeceksiniz:
<?php
    $postid = get_the_ID();
    $total_comment_count = wp_count_comments($postid);
        $my_comment_count = $total_comment_count->approved;
    if ($my_comment_count <10) {
        $my_comment_count = 'new';
    } elseif ($my_comment_count >= 10 && $my_comment_count <20) {
        $my_comment_count = 'emerging';
    } elseif ($my_comment_count >= 20) {
        $my_comment_count = 'popular';
    }
?>
Ardından, ‘Snippet Kaydet’ düğmesine tıklayalım ve ayarlarınızı saklamak için ‘Etkin Değil’ anahtarını ‘Etkin’ konumuna getirelim.
Bu kod, görüntülenen gönderinin yorum sayısını kontrol eder ve sayıya göre bir değer atar.
Örneğin, 10'dan az yoruma sahip gönderiler new (yeni) adlı bir sınıfa sahip olur, 20'den az yoruma sahip olanlar emerging (gelişmekte olan) olarak anılır ve 20'den fazla yoruma sahip olanlar popular (popüler) olur.
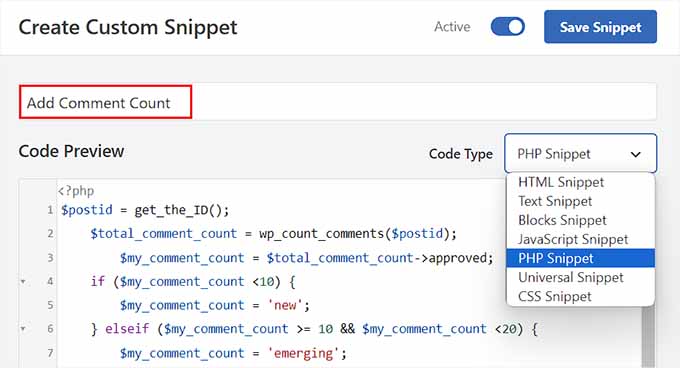
Şimdi, yorum sayısını post_class fonksiyonuna bir CSS sınıfı olarak eklemelisiniz. Bunu yapmak için, ‘Özel Kod Parçacığı Oluştur’ sayfasına tekrar girmeniz ve açılır menüden ‘PHP Kod Parçacığı’ seçeneğini seçmeniz gerekir.
Ardından, önizleme kutusuna aşağıdaki özel kodu ekleyebilirsiniz:
<article id="post-<?php the_ID(); ?>" <?php post_class( $my_comment_count ); ?>>
Bundan sonra, 'Snippet Kaydet' düğmesine tıklamanız yeterlidir.
Ardından, ‘Etkin Değil’ anahtarını ‘Etkin’ olarak değiştirebilirsiniz.
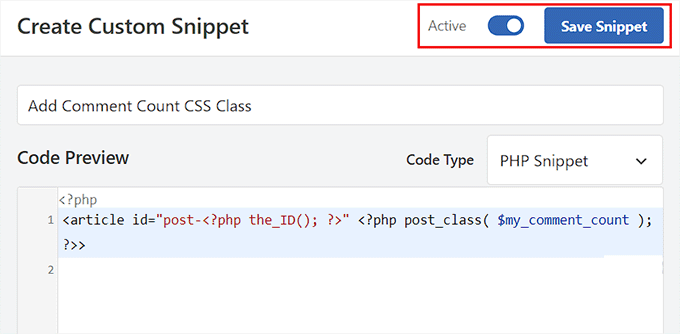
Bu, her gönderinin yorum sayısına göre tüm gönderilere new, emerging ve popular CSS sınıflarını ekleyecektir. Artık gönderilerin popülerliğine göre her gönderiyi stilize etmek için özel CSS ekleyebilirsiniz.
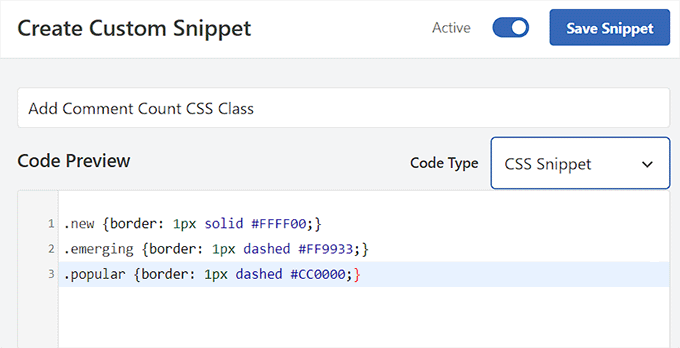
Örneğin, gönderilerdeki yorum sayısına göre gönderilere farklı kenarlık renkleri eklemek için aşağıdaki kodu kullanabilirsiniz:
.new {border: 1px solid #FFFF00;}
.emerging {border: 1px dashed #FF9933;}
.popular {border: 1px dashed #CC0000;}
İşiniz bittiğinde, ayarlarınızı saklamak için ‘Kod Parçasını Kaydet’ düğmesine tıklamayı unutmayın.
Bonus: WordPress'te Her Gönderi İçin Farklı Bir Kenar Çubuğu Görüntüleyin
Her gönderiyi farklı şekilde biçimlendirdikten sonra, her gönderi için benzersiz bir kenar çubuğu eklemek isteyebilirsiniz. Bu, kullanıcıların ilgilenebileceği makaleyle ilgili belirli içeriği sergilemenize olanak tanır.
Örneğin, bir seyahat blogunuz varsa ve Florida'da ziyaret edilecek yerler hakkında bir blog yazısı yayınladıysanız, Florida seyahat paketlerini gösteren özel bir kenar çubuğu oluşturabilirsiniz. Alternatif olarak, düzenlediğiniz bir Florida gezisi için bir kayıt formu gösterebilirsiniz.
Her gönderi için farklı bir kenar çubuğu görüntülemek üzere WordPress için en iyi sürükle ve bırak sayfa oluşturucu eklentisi olan SeedProd'u kullanabilirsiniz.
Sürükle ve bırak arayüzü, 320'den fazla hazır şablon ve e-posta pazarlama hizmetleriyle entegrasyonları ile harika bir seçimdir.
Eklenti etkinleştirildiğinde, özel bir sayfayı açılış sayfası tasarımınız olarak ve ardından kenar çubuğu olan bir düzen seçebilirsiniz.
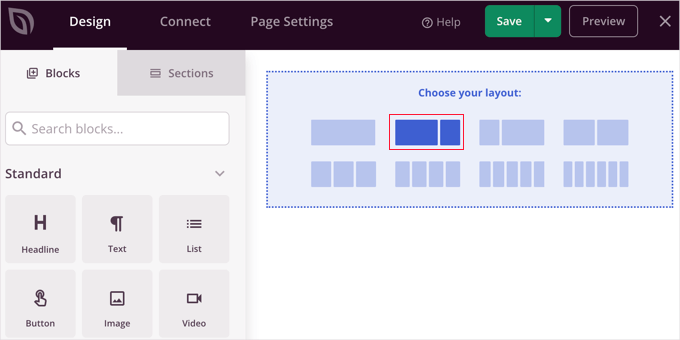
Bundan sonra, sol sütundan iletişim formları, arşivler, çekilişler, arama kutuları, yorumlar ve daha fazlası dahil olmak üzere istediğiniz blokları kolayca sürükleyip bırakabilirsiniz.
İşiniz bittiğinde, üstteki açılır menüden 'Kaydet' ve 'Yayınla' düğmelerine tıklamanız yeterlidir.
Artık bir WordPress gönderisi veya sayfası için belirli bir kenar çubuğunu başarıyla tasarladınız.
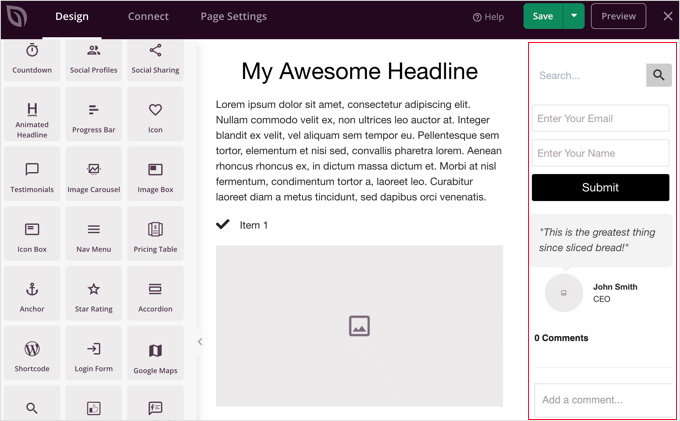
WordPress'te her gönderi ve sayfa için farklı kenar çubuğu görüntüleme hakkında öğreticimize bakmaktan çekinmeyin.
WordPress'te Farklı Gönderileri Stilize Etme Hakkında Sıkça Sorulan Sorular
İşte okuyucularımızın WordPress'te gönderileri ve diğer öğeleri stilize etme hakkında sıkça sorduğu bazı sorular:
WordPress'e nasıl stil eklenir?
Blok temalar için Tam Site Düzenleyicisini veya klasik temalar için Tema Özelleştiricisini kullanarak stiller ekleyebilirsiniz. Gelişmiş özel CSS için, tema dosyalarını düzenlemeden stilleri güvenli bir şekilde eklemek üzere WPCode gibi bir eklenti kullanmanızı öneririz.
Bir WordPress gönderisinde yazı tipi stilini nasıl değiştiririm?
Yazı tipi stilini doğrudan blok düzenleyici ayarlarından değiştirebilirsiniz. Düzenlemek istediğiniz metin bloğunu seçin, sağdaki kenar çubuğuna bakın ve boyut, görünüm ve yazı tipi ailesini ayarlamak için ‘Tipografi’ ayarlarını kullanın.
WordPress'te metin nasıl özelleştirilir?
Metni özelleştirmek için, araç çubuğunu kullanarak belirli kelimeleri vurgulayabilirsiniz. Renk veya hizalama gibi genel değişiklikler için, düzenleyici ekranının sağ tarafındaki blok ayarları panelini kullanın.
WordPress'te gönderi formatı nasıl değiştirilir?
Gönderi formatını gönderi düzenleyici kenar çubuğunun içinde değiştirebilirsiniz. Tema'nıza bağlı olarak ‘Durum ve görünürlük’ panelini (veya özel bir ‘Gönderi Formatı’ bölümünü) arayın ve açılır menüden Standart, Galeri veya Video gibi istediğiniz formatı seçin.
WordPress'i tamamen özelleştirebilir misiniz?
Evet, WordPress'in her yönünü tamamen özelleştirebilirsiniz. Açık kaynaklı bir yazılım olduğu için, tema, eklenti ve özel kod üzerinde tam kontrole sahipsiniz, bu da ihtiyacınız olan herhangi bir tasarımı veya işlevi oluşturmanıza olanak tanır.
Bu makalenin her WordPress gönderisini farklı şekilde nasıl stilize edeceğinizi öğrenmenize yardımcı olduğunu umuyoruz. Ayrıca favicon ekleme ve kar taneleri ekleme hakkındaki başlangıç kılavuzlarımıza da göz atmak isteyebilirsiniz.
Bu makaleyi beğendiyseniz, lütfen WordPress video eğitimleri için YouTube Kanalımıza abone olun. Bizi ayrıca Twitter ve Facebook'ta da bulabilirsiniz.


Rafael
Güzel makale. Sanırım bir gönderinin kategorisini kontrol etmek ve kategoriye göre web sitesinin bir bölümünün stilini değiştirmek için özel CSS yerleştirmek için böyle bir şey kullanabilirim, değil mi?
Her Kategori için Gönderi Başlığının yalnızca arka planına farklı renkler ayarlamak istiyorum.
Kany
Merhaba, harika bir makale. En son blog haberlerini özel CSS ile nasıl stilize edebilirim? Sadece en sonuncusu, bir fikriniz var mı? Teşekkürler.
WPBeginner Desteği
Temanızın CSS ile hedeflenebilecek bir şey eklemesi gerekir, şu anda bunun için önerilen bir yöntemimiz yok.
Yönetici
Les
Harika bir makale. Kategori başına varsayılan yazı tipi boyutunu ayarlamak istedim ve talimatları izleyerek Style.css dosyasına kodu ekledim ancak yeni bir gönderi eklediğimde yazı tipi eski boyuttaydı. Kodu görüyor musunuz? Neyi eksik yapıyorum?
/* Begin Additional CSS Styles */
.art-blockheader .t, .art-vmenublockheader .t {white-space: nowrap;}
.desktop .art-nav-inner{width: 1200px!important;}
.category-firstg {
font-size: 18px;
font-style: bold;
}
/* Ek CSS Stilleri Sonu */
William D
Harika bir makale, çok teşekkürler. Devamını oku düğmesinin rengi/metin rengi de benzer şekilde değiştirilebilir mi? Bir şey (muhtemelen ben yaptım) düğmelerimi çok tatsız bir şekilde değiştirdi ve onları tekrar hoş hale getirmenin bir yolunu bulmakta çok zorlanıyorum.
Sağlayabileceğiniz herhangi bir yardım için şimdiden teşekkürler!
Matus
Harika bir eğitim. Basit ve net açıklama.
Neon Emmanuel
Merhaba, bunu single.php'ye dahil edersem, mevcut gönderi başlığını geri getirir, ancak index.php'de iyi çalışır, bunun için bir öneriniz var mı?
MayMyatKhine
Merhaba, Lütfen wordpress'i kullanmak için yeni etkinliği bana gönderin.
marisa
Bu harika bir makale ama yerleştirmekte sorun yaşıyorum
ID, ‘post-class’); ?>
Tam olarak döngünün neresine koymalıyım? underscore.me'yi foundation 5 ile kullanıyorum ve yeni sınıfım görünmüyor.
Alberto Hartzet
Mükemmel!, teşekkürler. İlk ve “son” gönderiye ne dersin? Fikirlerin var mı?
Nadeem
Çok teşekkürler kardeşim..çok yardımcı oldu
RW
başka bir yer imi! harika gönderi! teşekkür ederim…
Payal
Çok bilgilendirici, teşekkürler. Bu sayfayı yer imlerine ekledim.
Benim de bir sorum var: İlk (en son) gönderiyi farklı biçimlendirmek istersem ne olur — yani indeks sayfasının en üstünde görünen gönderi farklı görünür mü?
James
Merhaba, şu anda bununla uğraşıyorum..
Gönderi döngümde bir post_class fonksiyonu yok gibi görünüyor, bu yüzden yukarıdaki kodu nereye yerleştireceğimi bulamıyorum…
Gönderiler için kullandığım döngü bu, yukarıdaki kodu nereye yerleştirmeliyim? Ya da bununla özel alanların çalışmasını nasıl sağlayabilirim?
Yayın Kadrosu
Gönderi döngünüze şuna benzer bir şey eklemeniz gerekir:
1-click Use in WordPress
Yönetici
Jon Fuller
Merhaba, WordPress temaları yapmaya oldukça yeniyim ve her gönderiyi kendi kutusunda, üst ve alt kenar boşluklarıyla ayrılmış olarak görüntülemenin bir yolunu arıyorum. Bunun nasıl mümkün olabileceğini açıklar mısınız?
Teşekkürler
Yayın Kadrosu
Varsayılan olarak her gönderi kendi div öğesinin içindedir. Yalnızca üst ve alt kenar boşluğu eklemek için CSS kullanmanız gerekir.
Yönetici
Shaun
Merak ediyorum, bu, yalnızca aynı “meta değeri” veya “meta değeri numarasına” sahip gönderilere bir CSS sınıfı eklemeye nasıl uygulanabilir?
Thanks for the great tutorial by the way!
Best
Yayın Kadrosu
Özel alanlarla nasıl yapıldığını gösterdik, ancak bu anahtara göre yapılıyor. Ancak birden fazla değere sahip aynı anahtarınız varsa, get_post_custom_values fonksiyonunu kullanmalısınız.
Yönetici
Eki
Just found this post and it is great, clear, succinct and spot on, many thanks
Jim
I would like to do something where post one gets the class “1”, post two gets “2” post three gets “3”, and then it repeats this order, so post four gets “1” again.
Herhangi bir ipucu? sadece her üç gönderide üç farklı sınıfı tekrarlıyor.
Yayın Kadrosu
Süper döngü seçeneğini kullanmanız gerekir.
Yönetici
Brit
Özellikle yapmaya çalıştığım şey, birisi bloguma geldiğinde, küçük resmin (gönderi başlığının olduğu bir daire) yalnızca en son gönderi için farklı bir renkte olmasını sağlamak. Bunu nasıl yapabileceğimi bilmiyorum. Bulduğum her şey kategori veya sıraya özel. Fikirleriniz var mı?
Yayın Kadrosu
Brit, son yöntemi kullanmanız gerekir: “Süper Döngü”. Muhtemelen tek yol budur çünkü yapacağınız tek şey ilk yazıya “ilk-yazı” gibi benzersiz bir sınıf eklemek ve ardından bunu CSS dosyanızla stilize etmektir.
Yönetici
Jayaseelan Arumugam
Çok güzel ve kullanışlı bir yazı. Özellikle Özel Alanlara Göre Gönderileri Stilize Etme şeklini beğendim. Teşekkürler.
Kathleen
Thanks for this great article! It’s exactly what I searched for and so much helpful!
dina
Süper döngüdeki 3., 6., 9. ve 12. gönderilere benzersiz bir sınıf nasıl eklerim. Teşekkürler!
vajrasar
Pekala, bu çok iyi bir parça. Söylediklerinizi anladım, ancak Genesis tarafından yönlendirilen Haber Çocuk temamda bunu nasıl uygulayacağım konusunda biraz ışık tutabilir misiniz, çünkü bunların hepsini function.php ile yapmam gerekiyor?
Kategoriye özel gönderileri farklı şekilde stilize etmek istiyorum. Bu parça için çok teşekkürler. çok bilgilendirici.
Yayın Kadrosu
Yani yalnızca gönderi sınıfı yöntemini kullanıyorsanız, Genesis'in her gönderi için Düzen ayarları altında alanı vardır. Özel bir sınıf girebilir ve bu şekilde stil verebilirsiniz. Geri kalanı, tüm kancalara ve benzeri şeylere bağlı olarak oldukça karmaşık hale gelebilir. Burada zorunlu olarak genesis'e özgü makaleler yapmıyoruz.
Yönetici
jim
Döngüde index.php ile ne demek istiyorsunuz. Hangi index.php. Benimki sizinki gibi değil. Bu, kimsenin bu temel kavramı düzgün bir şekilde açıklamadığı okuduğum 10. yazı. Peki CSS ne olacak. Son 10 yazı bunu da açıklamadı. İnternet giderek kötüleşiyor.
Yayın Kadrosu
Merhaba Jim,
Her WordPress teması işleri farklı yapar. Döngü kavramı WordPress Codex'te oldukça iyi açıklanmıştır. Basit bir google araması gerektirir: Döngü WordPress, sizi şuraya götürecektir: http://codex.wordpress.org/The_Loop
Her tema farklı olduğu için, bazıları ayrı bir loop.php dosyası kullanır, diğerleri ise index.php dosyaları bile olmayan alt temalardır. Tüm bu kavramları açıklamak gerçekten zor. Bir temaya öğreticiler koyduğumuzda, kullanıcıların WordPress temalarının nasıl çalıştığına dair adil bir bilgiye sahip olmalarını bekleriz (PHP bilmeseniz bile).
Yönetici
Haider E Karrar
Sanırım burada şablon etiketleriyle birlikte filtreleri kullanmalısınız http://codex.wordpress.org/Conditional_Tags
Örneğin
function my_post_css_filters($content) { if(is_category(…)) return ” $content “; else if (something else) ….
}
add_filter(‘the_content’, ‘my_post_css_filters’, 1) — (öncelik 1, başka neleri etkileyebileceğinden emin değilim).
Hossein
Merhaba..
Her 4 gönderiyi bir div'e nasıl sarabilirim?
gashface
Boşver, onu hallettim ama ŞİMDİ her gönderiyi farklı şekilde stilize etmiyor, sadece bulduğu ilk gönderi yazarına göre hepsini stilize ediyor?
gashface
Bir etiketi, örneğin H2'nin yazar tarafından stilize edilmesini sağlayabilir miyim? deniyorum .username h2{} örneğin ama işe yaramıyor?
gashface
Bu, yazarımı göstermiyor, sadece boş bir alan, tam kodunuzu yapıştırdım, fikirleriniz var mı? yönetici tarafından yapılan ve özel olan gönderiler, bunun bir farkı var mı?
wpbeginner
@gashface hayır, gönderinin özel veya genel olmasının bir farkı yok… Boş bir sayfa döndürüyorsa, kodu yanlış yere yapıştırıyorsunuz demektir.
gashface
Kodun döngü çağrısından önce olduğunu fark ettim, if have posts vb.den önce demek istemiştim.. oysa ondan sonra gitmesi gerekiyor, haber verdiğiniz için teşekkürler
KimeeDoherty
This was a little helpful, but I am still lost Not sure how to include the loop file in order to override the template. You started the <div> tag but not ended them, what’s inside the div? I’m lost
kristelvdakker
Bu gönderi için çok teşekkürler! Çok yardımcı oldu.
Stuart
Merhaba, fikirler için teşekkürler – özellikle süper döngü – sitemde çalıştırdığım için memnunum.
Ama merak ediyorum, tamamen PHP acemisiyim, bu yüzden kodu, gönderilerin sonraki her sayfası ilk sayfadaki 1, 2, 3 ve 4 numaralı gönderilerin aldığı stil biçimini almayacak şekilde uyarlamanın bir yolu var mı?
In other words, I only want the first four posts on the first page to look any different to the rest.
Sevgiler, Stu
Yayın Kadrosu
Evet. Yalnızca ilk sayfada görünmesi, diğerlerinde görünmemesi için is_paged() koşullu etiketini kullanabilirsiniz. Ayrıca is_home() kullanabilirsiniz... yani yalnızca ana sayfada.
Yönetici
Stuart
Harika – teşekkürler. is_paged() benim için uygun görünüyor – ama ne yazık ki, acemiliğim nedeniyle bunu koda nasıl entegre edeceğimi anlamakta zorlanıyorum.
Stuart
Sonunda başardım…
Michael
Gönderileri yayınlanma tarihlerine göre görsel olarak ayırmak için bu yaklaşımı kullanmak isteseydiniz. Bunu nasıl yapardınız? Örneğin: 1'inde yayınlanan 5 gönderiyi siyah arka planla, ardından 2'sinde yayınlanan gönderileri kırmızı arka planla stilize etmek? Şimdiden teşekkürler!
Yayın Kadrosu
Bunu yapmanın en iyi yolu süper döngü yöntemini kullanmaktır. Gönderi sınıfı değerlerini ayarlamak için sayaç değişkenini kullandığınız yer.
Yönetici
Dale
WordPress web sitemizde her yazarın adını farklı renkte renklendirmeye çalışıyorum ve aşağıdaki kodunuzu takip ettim:
Bu kod wordpress temamda bir şekilde çalışıyor ancak 'class-2'den sonra ama yazar adından önce bitiş tırnak işaretleri koyuyor, bu da sınıfın isim olmadan kapanmasına neden oluyor. Bunu yalnızca php'yi tam dizeyi görebileceğiniz gövdeye koyarak öğrendim.
Bunun neden olduğunu bilen var mı?
Dale
Gönderdiğim php'yi sildiği için üzgünüm ama yazarın adına göre gönderilerimi biçimlendirmemin sınıf çıktısı burada. Yazarın adı burada admin ve gördüğünüz gibi kapanış etiketi yazarın adı admin'den önce geliyor.
“post-395 post type-post hentry category-uncategorized class-1 class-2″admin
Bec
Harika yazı! Bu bilgiler, tasarımınıza o ekstra özel özel özellikler eklemek için harika.
Adam W. Warner
Gerçekten harika bir yazı, şapka çıkar! Ancak, tüm bu özel düzenlemeleri yaptığınız temayı yükseltme zamanı geldiğinde ne olacağını düşünmeden edemedim. Üzerine yazılmaktan kaçınmak için mümkün olduğunca functions dosyasını kullanmaya çalışıyorum.
Bu döngü düzenlemelerini bir fonksiyona dahil etmenin daha iyi olacağını düşünürüm. Thematic, Hybrid, Genesis vb. gibi Ana Temalarla, döngüyü filtrelemenin ve böylece bu değişiklikleri eklemenin mümkün (ve tavsiye edilebilir) olduğunu biliyorum.
@Ken – Eklentiniz tüm fonksiyonlara olan ihtiyacı ortadan kaldırabilir mi?
Her neyse, sadece iki kuruşum ve bu sitedeki sürekli mükemmelliğiniz için Syed ve ekibini tebrik ederim!
Azad Shaikh
Gerçekten çok kullanışlı bir gönderi. Harika fikirleriniz ve işlevselliğinizle bazı wordpress temaları yayınlamaya ne dersiniz. Büyük bir başarı olurdu.
Teşekkürler!
Ken
Your article has giving me a few ideas on how to improve my plugin, thanks for that!
Gönderi/sayfa düzenleme ekranından doğrudan üst öğeye CSS eklemek için bir eklenti (Scripts n Styles) yazdım. (Ancak yalnızca yönetici kullanıcılar bunu yapabilir.) Çözümünüz kadar sağlam değil (veya daha doğrusu aynı şeyi ele almıyor) çünkü CSS yalnızca tek görünümde görünür, listelerde (arşivlerde) değil.
I’m considering adding the functionality to include a class name into post_class, but via a meta box on the admin screen. Then, the admin would only have to add the css to his theme. (Or, perhaps a setting screen to facilitate this?)
Her neyse, Süper Döngü genel olarak temalandırma için kullanışlı görünüyor, bir sonrakine dahil etmem gerekecek!
Connor Crosby
Wow, that is a great post! Perfect timing since I am making a new Wordpress theme