Arada sırada okuyucularımızdan web sitelerini kişiselleştirmeye yönelik özel taleplerle karşılaşıyoruz. Bunlardan biri de herhangi bir sayıda yazıyı bir döngü içinde göstermekti. Bu özellik WordPress’te varsayılan olarak mevcut olmadığından, kullanıcılarımız için özel bir kod parçacığı oluşturduk.
WordPress, döngüyü kullanarak geçerli sayfada görüntülenecek her bir gönderiyi işler. Daha sonra bunları döngü etiketleri içinde belirtilen kriterlerle nasıl eşleştiklerine göre biçimlendirir.
Bu makalede, bir WordPress döngüsünde herhangi bir sayıda yazının nasıl görüntüleneceğini göstereceğiz.

WordPress Döngüsü Nedir?
Döngü, WordPress tarafından yazılarınızın her birini görüntülemek için kullanılır. WordPress temasında bir web sayfasında yazıların listesini göstermek için kullanılan PHP kodudur. WordPress kodunun önemli bir parçasıdır ve çoğu sorgunun merkezinde yer alır.
Bir WordPress döngüsünde, yazıları görüntülemek için çalışan farklı işlevler vardır. Ancak geliştiriciler şablon etiketlerini değiştirerek her bir gönderinin döngüde nasıl gösterileceğini özelleştirebilirler.
Örneğin, bir döngüdeki temel etiketler bir döngüdeki gönderinin başlığını, tarihini ve içeriğini gösterecektir. Özel etiketler ekleyebilir ve kategori, alıntı, özel alanlar, yazar adı ve daha fazlası gibi ek bilgileri görüntüleyebilirsiniz.
WordPress döngüsü ayrıca her sayfada göstereceğiniz blog yazılarının sayısını kontrol etmenizi sağlar. Bu, her döngüde görüntülenen yazı sayısını kontrol edebileceğiniz için bir yazar şablonu tasarlarken yararlı olabilir.
Bununla birlikte, bir WordPress döngüsüne herhangi bir sayıda yazının nasıl ekleneceğini görelim.
WordPress Döngüsüne İstediğiniz Sayıda Yazı Ekleme
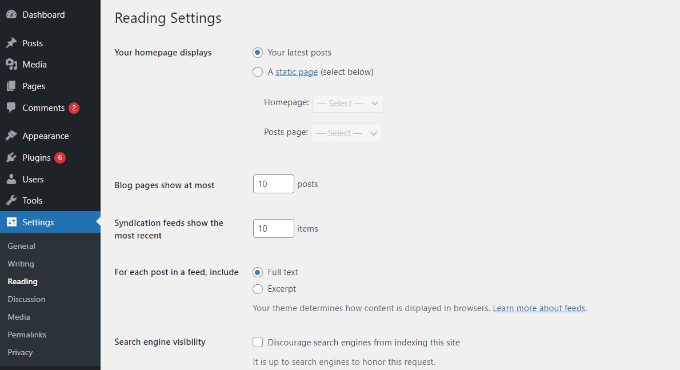
Normalde, döngüde görüntülenecek yazı sayısını WordPress yönetici panelinizden ayarlayabilirsiniz.
WordPress panosundan Ayarlar ” Okuma bölümüne gitmeniz yeterlidir. Varsayılan olarak, WordPress 10 gönderi gösterecektir.

Ancak, belirli bir WordPress for döngüsünde istediğiniz sayıda gönderiyi görüntülemenize olanak tanıyan bir Süper Döngü kullanarak bu sayıyı geçersiz kılabilirsiniz.
Bu, yazar profilleri, kenar çubukları ve daha fazlası dahil olmak üzere sayfalarınızın görüntüleme ayarlarını özelleştirmenize olanak tanır.
Öncelikle, gönderileri yerleştirmek istediğiniz bir şablon dosyası açmanız ve ardından bu döngüyü eklemeniz gerekecektir:
1 2 3 4 5 6 7 8 9 10 11 12 13 14 15 16 17 18 19 20 21 22 23 24 25 26 27 28 29 30 31 32 | <?php// if everything is in place and ready, let's start the loopif ( have_posts() ) : while ( have_posts() ) : the_post(); ?> // to display 'n' number of posts, we need to execute the loop 'n' number of times // so we define a numerical variable called '$count' and set its value to zero // with each iteration of the loop, the value of '$count' will increase by one // after the value of '$count' reaches the specified number, the loop will stop // *USER: change the 'n' to the number of posts that you would like to display <?php static $count = 0; if ( $count == "n" ) { break; } else { ?> // for CSS styling and layout purposes, we wrap the post content in a div // we then display the entire post content via the 'the_content()' function // *USER: change to '<?php the_excerpt(); ?>' to display post excerpts instead <div class="post"> <?php the_title(); ?> <?php the_content(); ?> </div> // here, we continue with the limiting of the number of displayed posts // each iteration of the loop increases the value of '$count' by one // the final two lines complete the loop and close the if statement <?php $count ++; } ?><?php endwhile; ?><?php endif; ?> |
Not: Kodun if ( $count == "n " ) kısmındaki‘n‘ değerini değiştirmeniz ve herhangi bir sayı seçmeniz gerekecektir.
Bu kodu WordPress web sitenize eklemenin kolay bir yolu WPCode eklentisini kullanmaktır. WordPress için özel kodu yönetmenize yardımcı olan en iyi kod parçacığı eklentisidir.
WPCode kullanarak, tema şablon dosyalarını manuel olarak düzenlemeniz ve bir şeyleri kırma riskini almanız gerekmez. Eklenti kodu sizin için otomatik olarak ekleyecektir.
Öncelikle, ücretsiz WPCode eklentisini yüklemeniz ve etkinleştirmeniz gerekir. Daha fazla ayrıntı için lütfen bir WordPress eklentisinin nasıl kurulacağına ilişkin kılavuzumuza bakın.
Etkinleştirmenin ardından, WordPress panonuzdan Code Snippets ” + Add Sn ippet’e gidebilirsiniz. Ardından, ‘Özel Kodunuzu Ekleyin (Yeni Snippet)’ seçeneğini seçmeniz gerekir.

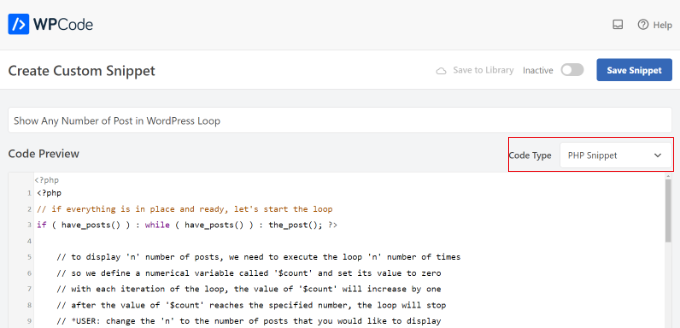
Bundan sonra, yukarıda size gösterdiğimiz WordPress döngüsü için özel kodu ‘Kod Önizleme’ alanına yapıştırmanız yeterlidir.
Ayrıca kodunuz için bir ad girmeniz ve ‘Kod Türü’nü ‘PHP Snippet’ olarak ayarlamanız gerekecektir.

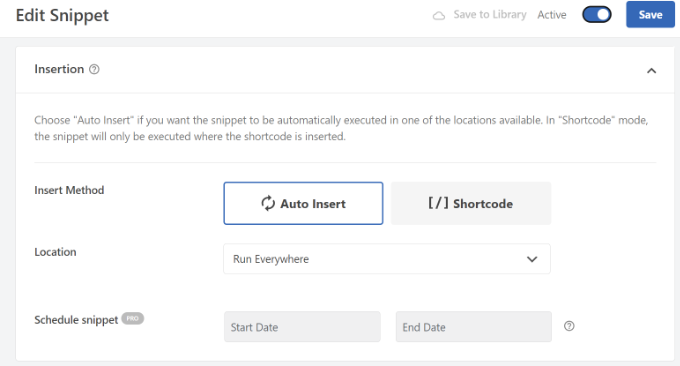
Ardından, ‘Ekleme’ bölümüne ilerleyebilir ve kodu çalıştırmak istediğiniz yeri seçebilirsiniz.
Varsayılan olarak WPCode, WordPress web sitenizin her yerinde çalışır. Ancak, konumu belirli bir sayfa olarak değiştirebilir veya kodu eklemek için bir kısa kod kullanabilirsiniz.

Bu eğitim için varsayılan ‘Otomatik Ekleme’ yöntemini kullanacağız.
İşiniz bittiğinde, kodu ‘Aktif’ hale getirmek için üstteki geçişe tıklamayı ve ardından ‘Kaydet’ düğmesine tıklamayı unutmayın. WPCode şimdi kodu WordPress blogunuza dağıtacak ve WordPress döngüsünde belirtilen sayıda gönderiyi görüntüleyecektir.
Bu makalenin bir WordPress döngüsünde istediğiniz sayıda yazıyı nasıl görüntüleyeceğinizi öğrenmenize yardımcı olduğunu umuyoruz. Ayrıca, WordPress’te yapışkan yazıları döngüden nasıl çıkaracağınıza ilişkin kılavuzumuza ve WordPress için en iyi ilgili yazı eklentileri için uzman seçimlerimize de göz atmak isteyebilirsiniz.
If you liked this article, then please subscribe to our YouTube Channel for WordPress video tutorials. You can also find us on Twitter and Facebook.


THANKGOD JONATHAN
This Super Loop concept is a game-changer! I’ve been struggling with displaying the right number of posts, and this is just what I needed.
Thank you for the helpful post.
WPBeginner Support
Glad our guide was helpful
Admin
Kevin Fonseca
Hey, thank you so much for this trick, I really needed it!!. Keep up the good work!
Uchenna
Please I need help from you guys on how to go about this. the problem is that while i have set a static front page on my Desktop view using a different theme which is Admag magazine and blog theme it appears fine and i like it but my mobile view which i used carrington theme displays nothing & when i try to call up posts on it it displays the link to the page i used on my desktop view which continues to open same link without showing any post. please who can help me find my way here. thanks in advance.
This is my site please help me. its good on desktop but cant call up posts on mobile front page.
ali
hi
How to modify loop to split posts into groups of threes?
example?
Khaled
global $wp_query;
$args = array_merge( $wp_query->query_vars, array( ‘posts_per_page’ => ‘6’ ) );
query_posts( $args );
query_posts( $args );
Inspired from here
Absarul Haque
I want to show 2 Post in Home Pages and 5 Posts in all other archive pages (Like Tag, Category and search results).
Ramon Hitzeroth
Thanks for this tutorial. Just one question though, my posts for some reason only show 50 at most on one page, if I set “n” to anything less than 50 it shows only that number of posts but anything more than 50 it stops at 50.
Holger
Thanks a lot! Perfect solution for my problem… Works great.
SHWAN NAMIQ SALEEM
Thank you very nice code i used this code in my blog to times , to show limit posts in homepage and in sidebar > the code work correctly without any problem . it is very simple code to use
Gustavo
Great! Works perfectly for me. Thanks a lot.
Kirk
It seems that, although I can alter the number of posts displayed using your method, the “number of posts setting” in the admin panel under Settings > Reading still sets the maximum.
So, for instance, if I set that number to 20 in my wp-admin panel and then within my template I set $count to equal any number OVER 20, it will still only show 20 posts. I can, however, set $count in my template to equal a number UNDER 20 and it will only show that amount of posts. So, the number in the admin panel seems to be the maximum. Is there a workaround for this? Thanks
Editorial Staff
You would have to use posts_per_page in the WP_Query variable and then set count 20.
Admin
Roy Omwell
hi team,
row #28 is missing “++”. It should be: count++
otherwise thank you, that was exactly what I was looking.
Editorial Staff
Fixed it.
Admin
AliMohammedAli
in line 28 .. you didn’t increment the $count variable !
JonPage11
Is there any button in the menu…. that make us easiest to edit number of post in wordpress?
Carik
Can not you do it through a function or get_posts query_posts?
Editorial Staff
Yes you could do that through the posts_per_page function in query_posts … this method will allow you to customize each post on the display and much more.
Admin
Bjarni
Thanks for the info, it would be good if there was a link to the code in action too
Editorial Staff
Visit any of our category pages.
Admin