Alt temalar, yeni başlayanları kafa karıştırıcı hale getiren, çok sık kullanılan WordPress terimlerinden biridir. Hatta onlardan bahsetmiş ve ne kadar karmaşık göründükleri nedeniyle oluşturmaktan vazgeçmiş olabilirsiniz.
Bunu anlıyoruz. Ancak deneyimlerimize göre, alt temalar gelecekte size çok baş ağrısından kurtarabilir. Değerli özelleştirmelerinizi korurlar, sitenizi bozmadan denemeler yapmanıza olanak tanırlar ve temanızı güncellemenizi kolaylaştırırlar.
İlgileniyorsanız, bu başlangıç dostu rehberde bir alt temanın nasıl çalıştığını, nasıl özelleştirileceğini ve nasıl değişiklikler yapılacağını ayrıntılı olarak açıkladık.
Alt Tema Nasıl Çalışır ve Neden İhtiyacınız Var?
Bir alt tema, başka bir WordPress temasının tüm özelliklerini, işlevlerini ve stillerini devralır. Bir alt tema oluşturduğunuzda, orijinal tema üst tema olarak adlandırılır.
Devralma, temanın ana stilini tanımlayan üst temanın style.css dosyasını içerir. Alt tema, kendi dosyalarını ekleyerek veya mevcut olanları değiştirerek devraldığı özellikleri geçersiz kılabilir veya genişletebilir.
Bir alt tema yüklemeden WordPress temanızı özelleştirmek mümkün olsa da, yine de bir alt temaya ihtiyaç duymanız için birkaç neden vardır:
- Alt temalar, tema güncellemeleri sırasında özelleştirmelerinizi koruyarak üzerine yazılmaktan güvenli tutar. Üst temayı doğrudan değiştirirseniz, güncellediğinizde bu değişiklikler kaybolabilir.
- Alt temalar, bir hazırlık ortamına benzer şekilde, sitenin orijinal temasını bozmadan yeni tasarımları veya özellikleri güvenle denemenize olanak tanır.
- kod yazmayı biliyorsanız, alt temalar geliştirme sürecini daha verimli hale getirebilir. Bir alt temanın dosyaları, üst temanınkinden çok daha basittir. Yalnızca üst temanın değiştirmek veya genişletmek istediğiniz kısımlarını değiştirmeye odaklanabilirsiniz.
WordPress Alt Teması Oluşturmadan Önce Ne Yapmalı
Birçok WordPress kullanıcısının teknik konulara dalma konusunda heyecanlandığını, ancak hatalar çıktığında cesaretlerinin kırıldığını gördük. Anlıyoruz. Bu yüzden bir çocuk teması oluşturmadan önce neye bulaştığınızı bilmek önemlidir.
Bu adım adım kılavuzla devam etmeden önce yapmanızı önerdiğimiz bazı şeyler şunlardır:
- Kodla çalışacağınızın farkında olun. En azından, hangi değişiklikleri yapmanız gerektiğini anlamak için HTML, CSS, PHP ve isteğe bağlı olarak JavaScript hakkında temel bir anlayışa ihtiyacınız olacaktır. Bu konuda daha fazla bilgiyi WordPress tema el kitabında okuyabilirsiniz.
- İstediğiniz web sitesi tasarımına ve özelliklerine sahip bir üst tema seçin. Mümkünse, yalnızca birkaç değişiklik yapmanız gereken bir tane bulun. Gerekirse, WordPress temalarını değiştirmeden önce yapmanız gerekenler hakkındaki kontrol listemizi takip edebilirsiniz.
- Tema geliştirme için yerel bir site veya hazırlık sitesi kullanın. Canlı sitenizde istenmeyen hatalar oluşturmak istemezsiniz.
- Web sitenizi yedekleyin önce. Eğer bu ilk seferinizse, Duplicator gibi bir yedekleme eklentisi kullanmanızı öneririz.
Mevcut temanızdan bir alt tema oluşturmanın birkaç yolu vardır. Biri manuel kodla, diğerleri ise daha başlangıç dostu olan bir eklenti gerektirir.
İlk yöntem, teknik deneyiminiz yoksa göz korkutucu görünebilir. Bununla birlikte, eklenti yöntemlerinden birini seçseniz bile, süreci ve ilgili dosyaları öğrenmek için manuel yöntemi okumanızı öneririz.
İpucu: Bir alt tema oluşturmadan temanızı özelleştirmek mi istiyorsunuz? Web sitenizi bozmadan özel kod parçacıklarıyla yeni özellikleri güvenli bir şekilde etkinleştirmek için WPCode kullanın.
Tüm bunları göz önünde bulundurarak, WordPress'te nasıl alt tema oluşturulacağına geçelim. Aşağıdaki bağlantıları kullanarak tercih ettiğiniz yönteme atlayabilirsiniz:
- Yöntem 1: Manuel Olarak Bir WordPress Alt Teması Oluşturma
- Yöntem 2: Bir Eklenti ile Klasik Bir Alt Tema Oluşturma
- Yöntem 3: Bir Eklenti ile Alt Blok Tema Oluşturma
- Ek İpucu: Temanızın Bir Alt Tema Oluşturucusu Olup Olmadığını Öğrenin
- Klasik Alt Tema Özelleştirme
- Blok Alt Temanızı Özelleştirme
- Bir Alt Tema'nın Şablon Dosyalarını Düzenleme
- Alt Temanıza Yeni İşlevsellik Nasıl Eklenir
- WordPress Alt Temanızı Sorun Giderme
Yöntem 1: Manuel Olarak Bir WordPress Alt Teması Oluşturma
İlk olarak, WordPress kurulum klasörünüzdeki /wp-content/themes/ yolunu açmanız gerekir.
Bunu, WordPress barındırma hizmetinizin dosya yöneticisini veya bir FTP istemcisini kullanarak yapabilirsiniz. İlk seçeneğin çok daha kolay olduğunu düşünüyoruz, bu yüzden onu kullanacağız.
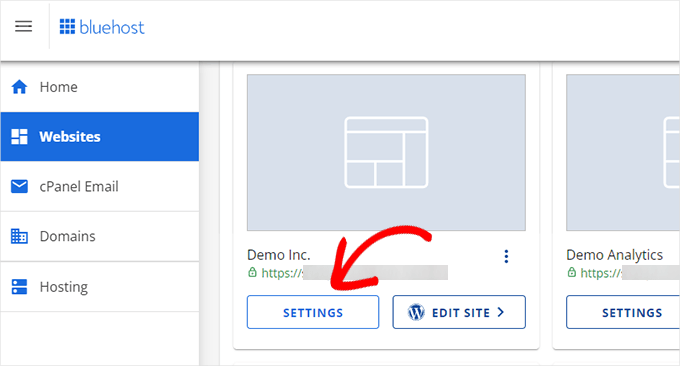
Eğer bir Bluehost müşterisiyseniz, hosting hesabınızın kontrol paneline giriş yapabilir ve ‘Web Siteleri’ sekmesine gidebilirsiniz. Ardından ‘Ayarlar’a tıklayın.
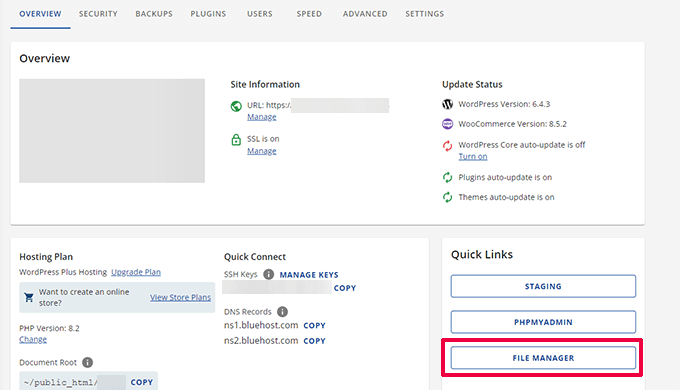
Genel Bakış sekmesinde, 'Hızlı Bağlantılar' bölümüne gidin.
Ardından 'Dosya Yöneticisi'ni seçin.
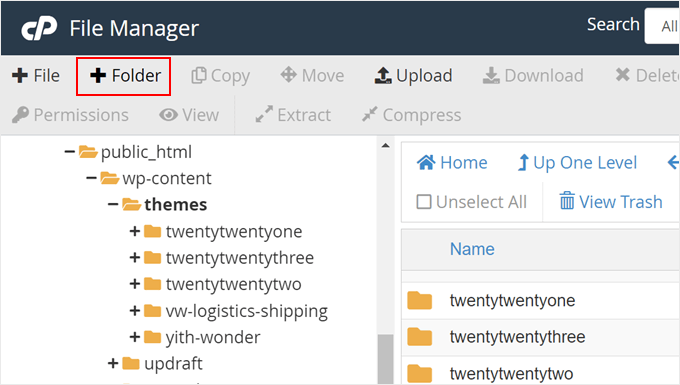
Bu aşamada, web sitenizin public_html klasörüne gitmeniz ve /wp-content/themes/ yolunu açmanız gerekir.
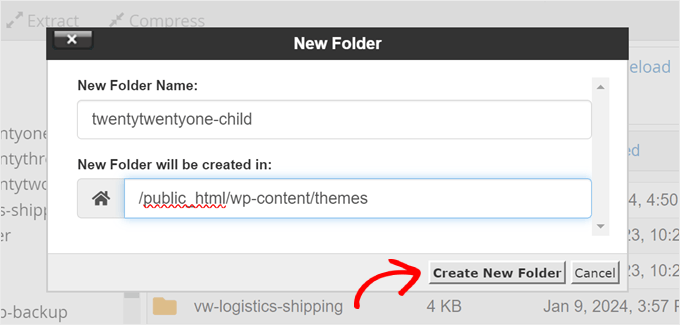
Burada, çocuk temanız için yeni bir klasör oluşturmak üzere sol üst köşedeki ‘+ Klasör’ düğmesine tıklayın.
Klasörü istediğiniz gibi adlandırabilirsiniz.
Bu eğitim için, üst tema olarak Twenty Twenty-One kullanacağımız için sadece twentytwentyone-child klasör adını kullanacağız. Tamamlandığında, 'Yeni Klasör Oluştur' düğmesine tıklayın.
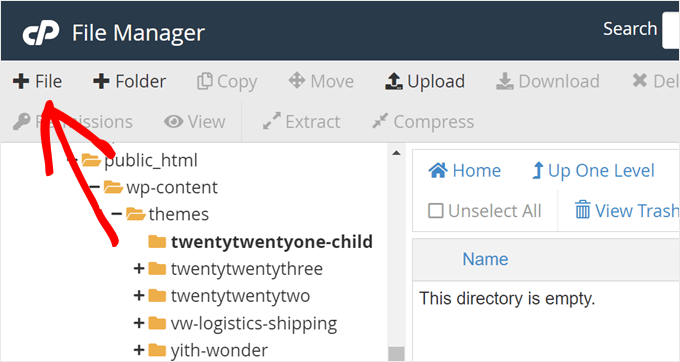
Ardından, az önce oluşturduğunuz klasörü açmalı ve alt temanız için ilk dosyayı oluşturmak üzere '+ Dosya'ya tıklamalısınız.
Bir FTP istemcisi kullanıyorsanız, Notepad gibi bir metin düzenleyici kullanabilir ve dosyayı daha sonra yükleyebilirsiniz.
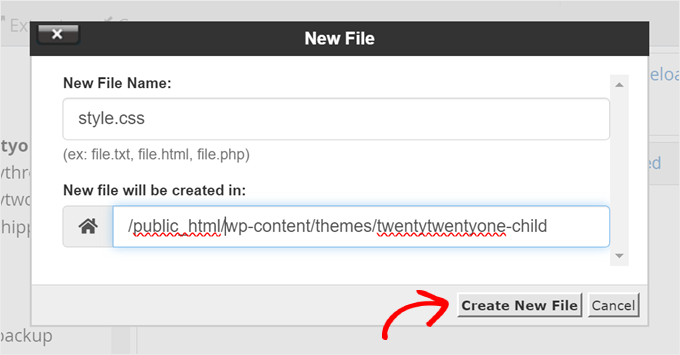
Bu dosyayı 'style.css' olarak adlandırın, çünkü bu, alt tema hakkında bilgi içerecek olan alt temanızın ana stil sayfasıdır.
Ardından, ‘Yeni Dosya Oluştur’a tıklayın.
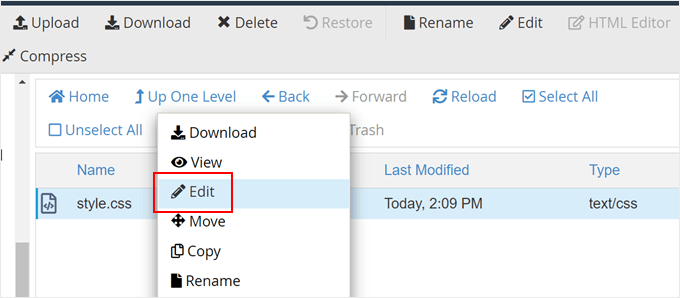
Şimdi, style.css dosyasına sağ tıklayın.
Bundan sonra, aşağıdaki ekran görüntüsündeki gibi yeni bir sekme açmak için 'Düzenle'ye tıklayın.
Bu yeni sekmede, aşağıdaki metni yapıştırabilir ve ihtiyaçlarınıza göre ayarlayabilirsiniz:
/*
Theme Name:   Twenty Twenty-One Child
Theme URI:    https://wordpress.org/themes/twentytwentyone/
Description:  Twenty Twenty-One child theme
Author:       WordPress.org
Author URI:   https://wordpress.org/
Template:     twentytwentyone
Version:      1.0.0
Text Domain:  twentytwentyonechild
*/
Bittiğinde, 'Değişiklikleri Kaydet'e tıklamanız yeterlidir.

Yapmanız gereken bir sonraki şey, ikinci bir dosya oluşturmak ve adını functions.php koymaktır. Bu dosya, üst temanın dosyalarından stil sayfalarını içe aktaracak veya kuyruğa alacaktır.
Belgeyi oluşturduktan sonra, aşağıdaki wp_enqueue kodunu ekleyin:
add_action( 'wp_enqueue_scripts', 'my_theme_enqueue_styles' );
function my_theme_enqueue_styles() {
    $parenthandle = 'twenty-twenty-one-style'; // This is 'twenty-twenty-one-style' for the Twenty Twenty-one theme.
    $theme = wp_get_theme();
    wp_enqueue_style( $parenthandle, get_template_directory_uri() . '/style.css',
        array(), // if the parent theme code has a dependency, copy it to here
        $theme->parent()->get('Version')
    );
    wp_enqueue_style( 'custom-style', get_stylesheet_uri(),
        array( $parenthandle ),
        $theme->get('Version') // this only works if you have Version in the style header
    );
}
Tamamlandığında, önceki adımda olduğu gibi dosyayı kaydedin.
Not: Bu yöntem için, alt temanızın stil sayfalarının düzgün yüklendiğinden emin olmak üzere resmi Alt Temalar ve Varlıkları Dahil Etme belgelerini okumanızı öneririz.
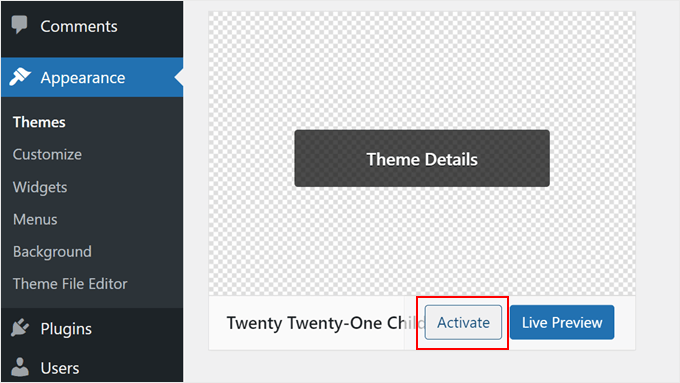
Şimdi çok temel bir alt tema oluşturdunuz. WordPress yönetici panelinizde Görünüm » Temalar bölümüne gittiğinizde, Yirmi Yirmi Bir Alt Seçeneğini görmelisiniz.
Sitenizde çocuk temasını kullanmaya başlamak için ‘Aktive Et’ düğmesine tıklayın.
Yöntem 2: Bir Eklenti ile Klasik Bir Alt Tema Oluşturma
Bu sonraki yöntem Child Theme Configurator eklentisini kullanır. Bu kullanımı kolay WordPress eklentisi, kod kullanmadan WordPress alt temalarını hızlı bir şekilde oluşturmanıza ve özelleştirmenize olanak tanır, ancak yalnızca klasik (blok olmayan) temalarla iyi çalışır.
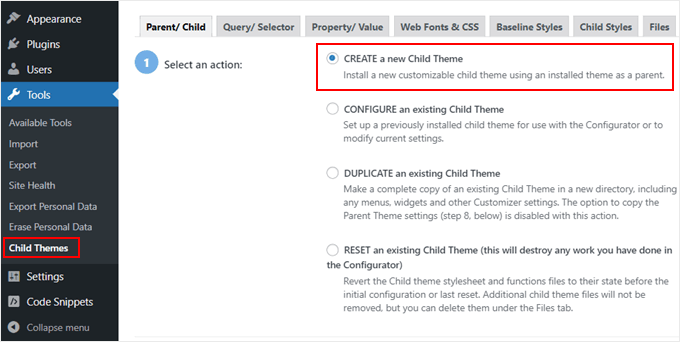
Yapmanız gereken ilk şey WordPress eklentisini yüklemek ve etkinleştirmektir. Etkinleştirdikten sonra, WordPress kontrol panelinizde Araçlar » Alt Temalar'a gitmeniz gerekir.
Üst/Çocuk sekmesinde, bir eylem seçmeniz istenecektir. Başlamak için ‘Yeni Bir Çocuk Tema OLUŞTUR’ seçeneğini seçin.
Ardından, açılır menüden bir üst tema seçin. Hestia temasını seçeceğiz.
Bundan sonra, temanın üst tema olarak kullanıma uygun olup olmadığını kontrol etmek için 'Analiz Et' düğmesine tıklayın.

Ardından, alt temanın kaydedileceği klasörün adını girmeniz istenecektir. İstediğiniz herhangi bir klasör adını kullanabilirsiniz.
Bunun altında, yeni stilleri nereye kaydedeceğinizi seçmeniz gerekir: birincil stil tablosunda mı yoksa ayrı bir stil tablosunda mı.
Birincil stil sayfası, alt temanızla birlikte gelen varsayılan stil sayfasıdır. Bu dosyaya yeni özel stiller kaydettiğinizde, alt temanızın ana stillerini doğrudan değiştirmiş olursunuz. Her değişiklik orijinal temanın stilini üzerine yazacaktır.
Ayrı seçenek, yeni bir özel stili ayrı bir stil sayfası dosyasına kaydetmenize olanak tanır. Bu, orijinal temanın stilini korumak ve üzerine yazmamak istediğinizde kullanışlıdır.
Gösterim amaçlı olarak ilk seçeneği seçeceğiz. Ancak alt tema özelleştirmelerinizle daha yaratıcı hale geldikçe, bu işlemi tekrarlayabilir ve ikinci seçeneği seçebilirsiniz.

Aşağı doğru ilerleyerek, üst temanın stil sayfasının nasıl erişileceğini seçmeniz gerekir.
Eklentinin uygun eylemleri otomatik olarak belirlemesine izin vereceği için varsayılan 'WordPress stil kuyruğunu kullan' seçeneğiyle devam edeceğiz.

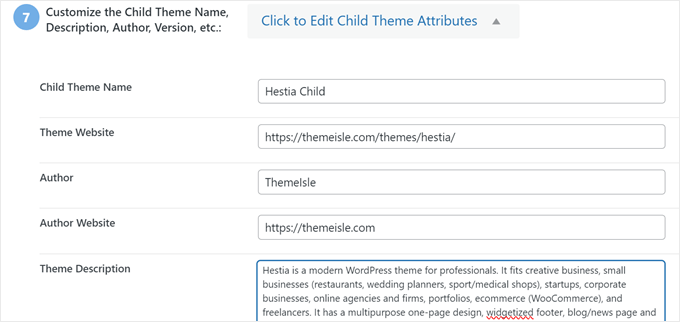
7. adıma geldiğinizde, ‘Çocuk Tema Özniteliklerini Düzenlemek İçin Tıklayın’ etiketli düğmeye tıklamanız gerekecek.
Ardından alt temanızın ayrıntılarını doldurabilirsiniz.
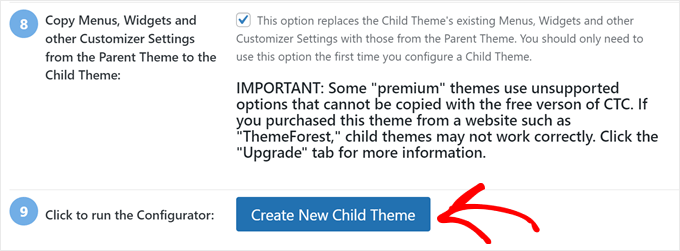
Bir alt tema manuel olarak oluşturduğunuzda, üst temanın menülerini ve widget'larını kaybedersiniz. Child Theme Configurator bunları üst temadan alt temaya kopyalayabilir. Bunu yapmak isterseniz 8. adımdaki kutuyu işaretleyin.
Son olarak, yeni alt temanızı oluşturmak için ‘Yeni Alt Tema Oluştur’ düğmesine tıklayın.
Eklenti, alt temanız için bir klasör oluşturacak ve daha sonra temayı özelleştirmek için kullanacağınız style.css ve functions.php dosyalarını ekleyecektir.
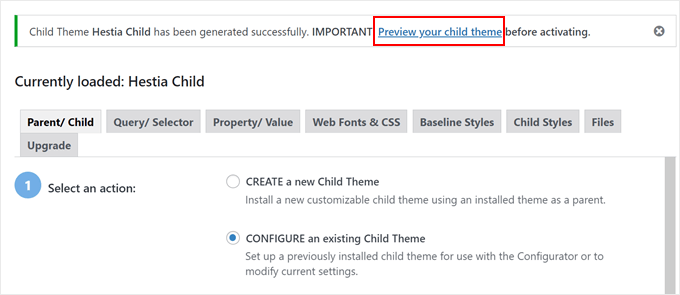
Temayı etkinleştirmeden önce, önizlemek ve iyi göründüğünden ve sitenizi bozmadığından emin olmak için ekranın üst kısmındaki bağlantıya tıklamalısınız.
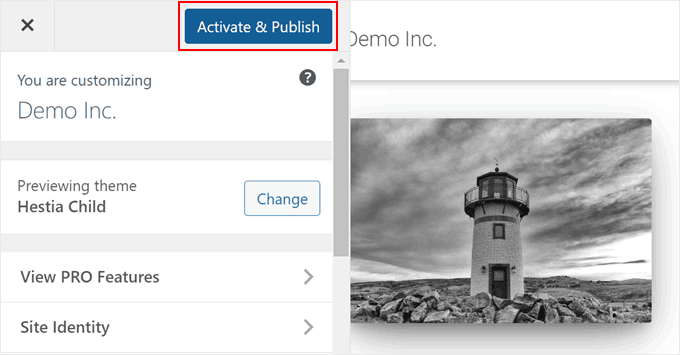
Her şey yolunda görünüyorsa, 'Aktive Et ve Yayınla' düğmesine tıklayın.
Şimdi, alt temanız yayına girecek.
Bu aşamada, alt tema ana tema ile aynı görünecek ve davranacaktır.
Yöntem 3: Bir Eklenti ile Alt Blok Tema Oluşturma
Eğer bir blok teması kullanıyorsanız, WordPress size Create Block Theme eklentisi ile kolay bir alt tema oluşturma yolu sunar.
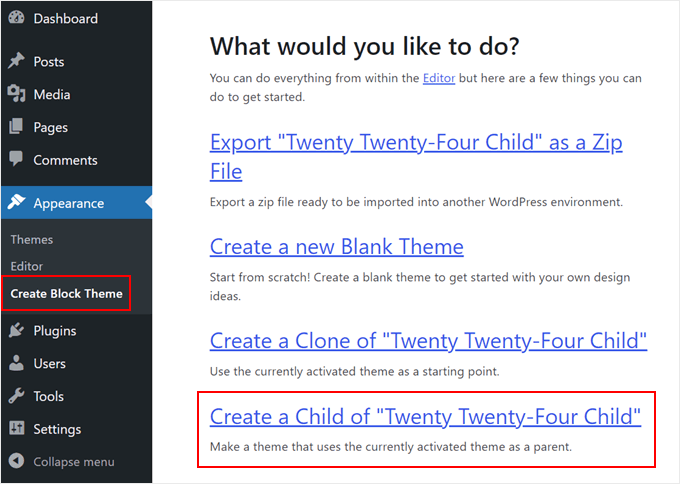
İlk olarak, WordPress eklentisini yüklemeniz ve etkinleştirmeniz gerekir. Ardından, Görünüm » Blok Tema Oluştur'a gidin.
Burada, 'Şunun bir Alt Öğesini Oluştur: [mevcut tema adı].' seçeneğini seçin.
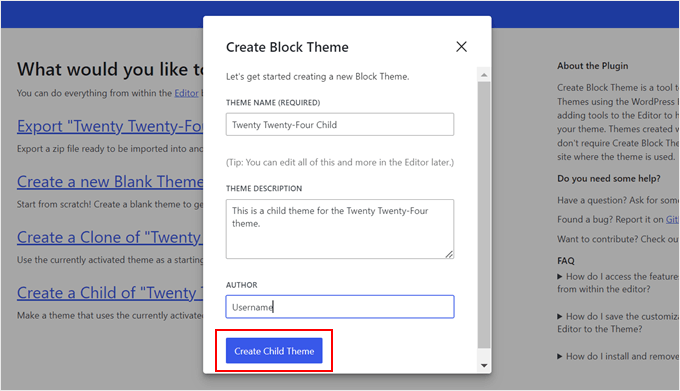
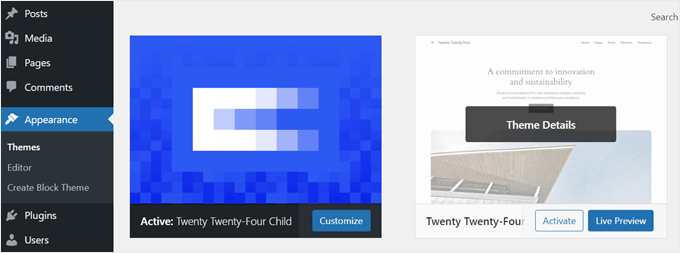
Ardından, alt temanızın bilgilerini doldurun. Bu örnekte Twenty Twenty-Four'ü kullanıyoruz, bu yüzden ona Twenty Twenty-Four Child adını vereceğiz.
Alt tema için bir açıklama ve yazar da verdik. İşiniz bittiğinde, ‘Alt Tema Oluştur’ düğmesine tıklayın.
Eklenti şimdi WordPress temasını zip dosyasını oluşturacak ve yönetici alanınıza kuracaktır.
Tamamlandığında, web siteniz bu yeni oluşturulan alt temayı otomatik olarak etkinleştirecektir. Bunu Görünüm » Temalar'a giderek doğrulayabilirsiniz.
Ek İpucu: Temanızın Bir Alt Tema Oluşturucusu Olup Olmadığını Öğrenin
Şanslıysanız, WordPress temanızda zaten bir alt tema oluşturma özelliği bulunabilir.
Örneğin, Astra kullanıyorsanız, Astra Çocuk Tema Oluşturucu web sitesine gidebilirsiniz. Ardından, çocuk tema adınızı doldurun ve 'Oluştur' düğmesine tıklayın.
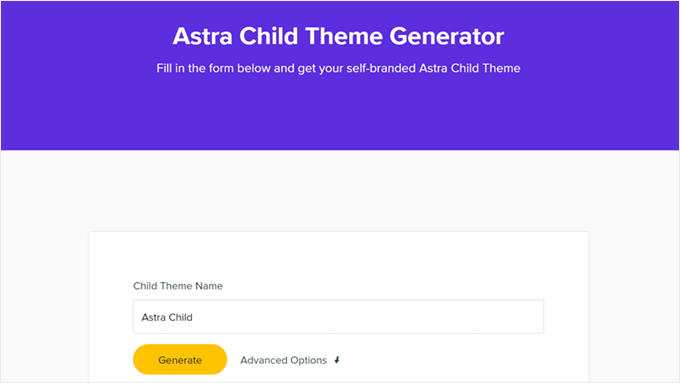
Tarayıcınız daha sonra alt temanızı bilgisayarınıza otomatik olarak indirecektir, bu da daha sonra kendiniz WordPress'e yükleyebilirsiniz.
Ayrıca, bir alt tema oluşturucusu olan bazı diğer popüler WordPress temalarını bulduk:
Klasik Alt Tema Özelleştirme
Not: Bu bölüm klasik WordPress tema kullanıcıları içindir. Bir blok tema kullanıyorsanız, bir sonraki bölüme geçin.
Teknik olarak, Tema Özelleştiriciyi kullanarak kod kullanmadan alt temanızı özelleştirebilirsiniz. Orada yaptığınız değişiklikler üst temanızı etkilemeyecektir. Henüz kodlama konusunda rahat değilseniz, Özelleştiriciyi kullanmaktan çekinmeyin.
Bununla birlikte, alt temayı kodla özelleştirmenizi de öneririz.
WordPress tema geliştirme hakkında daha fazla bilgi edinmenin yanı sıra, kod özelleştirmesi, değişikliklerin alt tema dosyalarına kaydedilmesini sağlayarak izlemeyi kolaylaştırır.
Şimdi, bir alt temayı özelleştirmenin en temel yolu, style.css dosyasına özel CSS eklemektir. Bunu yapmak için, hangi kodu özelleştirmeniz gerektiğini bilmeniz gerekir.
Mevcut kodu ana temadan kopyalayıp değiştirerek işlemi basitleştirebilirsiniz. Bu kodu Chrome veya Firefox İnceleme aracını kullanarak veya doğrudan ana temanın CSS dosyasından kopyalayarak bulabilirsiniz.
Yöntem 1: Chrome veya Firefox Denetleyicisi'nden Kod Kopyalama
Değiştirmeniz gereken CSS kodunu keşfetmenin en kolay yolu, Google Chrome ve Firefox ile gelen denetleyici araçlarını kullanmaktır. Bu araçlar, bir web sayfasının herhangi bir öğesinin arkasındaki HTML ve CSS'yi incelemenize olanak tanır.
Denetleyici aracı hakkında daha fazla bilgiyi denetim öğesinin temelleri: kendi kendine WordPress'i özelleştirme kılavuzumuzda bulabilirsiniz.
Web sayfanıza sağ tıkladığınızda ve öğeyi incele seçeneğini kullandığınızda, sayfanın HTML ve CSS'ini göreceksiniz.
Farklı HTML satırlarının üzerine fareyle geldiğinizde, denetleyici bunları üst pencerede vurgulayacaktır. Ayrıca vurgulanan öğeyle ilgili CSS kurallarını da şöyle gösterecektir:
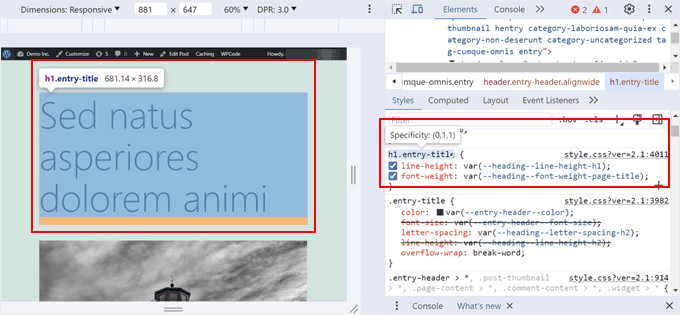
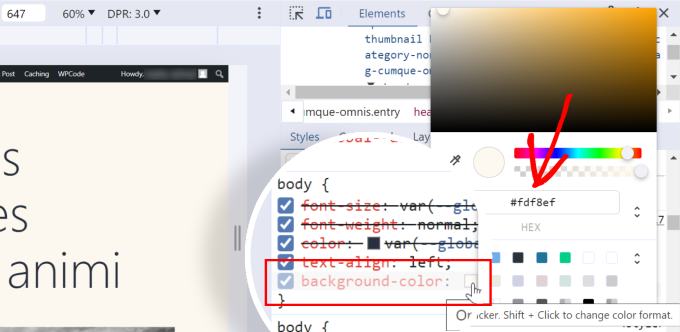
Nasıl görüneceğini görmek için CSS'yi orada düzenlemeyi deneyebilirsiniz. Örneğin, temanın gövdesinin arka plan rengini #fdf8ef olarak değiştirmeyi deneyelim. body { diyen kod satırını ve içindeki color: diyen kodu bulun.
Sadece color: yanındaki renk seçici simgesine tıklayın ve HEX kodunu uygun alana, şöyle yapın:
Şimdi, CSS kullanarak arka plan rengini nasıl değiştireceğinizi biliyorsunuz. Değişiklikleri kalıcı hale getirmek için, alt tema dizinindeki style.css dosyanızı (dosya yöneticisi veya FTP kullanarak dosya yöneticisi veya FTP) açabilirsiniz.
Ardından, aşağıdaki kodu alt tema bilgilerinin altına yapıştırın, şöyle:
/*
Theme Name:   Twenty Twenty-One Child
Theme URI:    https://wordpress.org/themes/twentytwentyone/
Description:  Twenty Twenty-One child theme
Author:       WordPress.org
Author URI:   https://wordpress.org/
Template:     twentytwentyone
Version:      1.0.0
Text Domain:  twentytwentyonechild
*/

body {
    background-color: #fdf8ef
}
WordPress yönetici paneline gidip Görünüm » Tema Dosyası Düzenleyici'yi açarsanız şöyle görünecektir:
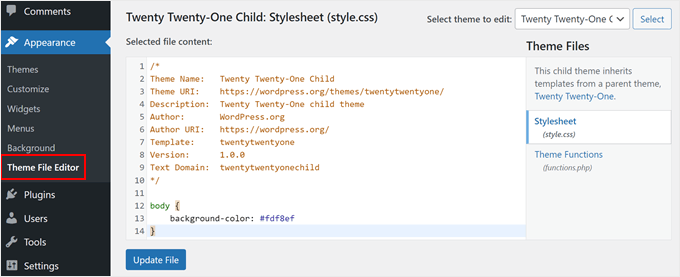
Yeni başlayan biriyseniz ve başka değişiklikler yapmak istiyorsanız, hangi kodun hangi öğeye atıfta bulunduğunu tam olarak bilmeniz için HTML ve CSS'ye aşina olmanızı öneririz. Başvurabileceğiniz çevrimiçi birçok HTML ve CSS özet tablosu bulunmaktadır.
İşte alt tema için oluşturduğumuz eksiksiz stil sayfası. Denemekten ve değiştirmekten çekinmeyin:
/*
Theme Name:   Twenty Twenty-One Child
Theme URI:    https://wordpress.org/themes/twentytwentyone/
Description:  Twenty Twenty-One child theme
Author:       WordPress.org
Author URI:   https://wordpress.org/
Template:     twentytwentyone
Version:      1.0.0
Text Domain:  twentytwentyonechild
*/

.site-title {
color: #7d7b77;
}
.site-description {
color: #aba8a2;
}
body {
background-color: #fdf8ef;
color: #7d7b77;
}
.entry-footer {
color: #aba8a2;
}
.entry-title {
color: #aba8a2;
font-weight: bold;
}
.widget-area {
color: #7d7b77;
}
Yöntem 2: Üst Tema'nın style.css Dosyasından Kod Kopyalama
Alt temanızda özelleştirmek istediğiniz birçok şey olabilir. Bu durumda, ana temanın stil.css dosyasından doğrudan bazı kodları kopyalayıp alt temanızın CSS dosyasına yapıştırmak ve ardından değiştirmek daha hızlı olabilir.
Zor kısım, bir temanın stil sayfası dosyasının yeni başlayanlar için gerçekten uzun ve göz korkutucu görünebilmesidir. Ancak, temelleri anladığınızda, aslında o kadar da zor değil.
Yirmi Yirmi Bir (Twenty Twenty-One) ana temasının stil sayfasından gerçek bir örnek kullanalım. WordPress kurulum klasörünüzdeki /wp-content/themes/twentytwentyone yoluna gitmeniz ve ardından dosya yöneticinizde, FTP'de veya Tema Dosyası Düzenleyicisinde stil.css dosyasını açmanız gerekir.
Aşağıdaki kod satırlarını göreceksiniz:
:root {
/* Colors */
--global--color-black: #000;
--global--color-dark-gray: #28303d;
--global--color-gray: #39414d;
--global--color-light-gray: #f0f0f0;
--global--color-green: #d1e4dd;
--global--color-blue: #d1dfe4;
--global--color-purple: #d1d1e4;
--global--color-red: #e4d1d1;
--global--color-orange: #e4dad1;
--global--color-yellow: #eeeadd;
--global--color-white: #fff;
--global--color-white-50: rgba(255, 255, 255, 0.5);
--global--color-white-90: rgba(255, 255, 255, 0.9);
--global--color-primary: var(--global--color-dark-gray); /* Body text color, site title, footer text color. */
--global--color-secondary: var(--global--color-gray); /* Headings */
--global--color-primary-hover: var(--global--color-primary);
--global--color-background: var(--global--color-green); /* Mint, default body background */
--global--color-border: var(--global--color-primary); /* Used for borders (separators) */
}
3 ila 15 arasındaki satırlar, tüm temanın belirli HEX kodlarında kullanacağı renk türlerini (sarı, yeşil, mor gibi) kontrol eder. Ve sonra, 'global-color-primary' veya 'global-color-secondary' gibi satırlar için, bu o temanın birincil ve ikincil renkleri anlamına gelir.
Bu kod satırlarını alt temanızın stil sayfasına kopyalayabilir ve ardından HEX kodlarını mükemmel renk şemanızı oluşturmak için değiştirebilirsiniz.
Üst temanın stil sayfasında aşağı doğru kaydırdıkça, diğer değişkenlerin de bu renk değişkenlerine sahip olabileceğini fark edeceksiniz, tıpkı burada olduğu gibi:
/* Buttons */
--button--color-text: var(--global--color-background);
Bu, tüm düğme metinlerinin --global--color-background:'de bildirilenle aynı rengi kullanacağı anlamına gelir, bu da nane yeşili (--global--color-green: #d1e4dd). --global--color-green: içindeki HEX'i değiştirirseniz, düğme metni de farklı görünecektir.
Not: Twenty Twenty-One çocuk temasını kullanıyorsanız ve herhangi bir değişiklik görmüyorsanız, stil.css dosyasını her güncellediğinizde tema dosyası bilgilerinin 'Sürüm' bölümünü (örneğin, 1.0'dan 2.0'a) güncellemeniz gerekebilir.
Alt tema özelleştirmelerinizi denemek için bu öğreticileri de takip edebilirsiniz:
- WordPress'te Metin Rengini Değiştirme
- WordPress Logonuzun Boyutunu Nasıl Değiştirirsiniz (Herhangi Bir Tema ile Çalışır)
- WordPress Temalarında Alıntı Blokları Stilini Özelleştirme
- WordPress Vücut Sınıfı 101: Tema Tasarımcıları İçin İpuçları ve Püf Noktaları
- Herhangi Bir WordPress Temasına Paralaks Efekti Nasıl Eklenir
Blok Alt Temanızı Özelleştirme
Bir alt blok tema kullanırsanız, özelleştirmelerinizin çoğu style.css yerine theme.json dosyanızda yapılacaktır.
Ancak, testlerimiz sırasında süreci karmaşık bulduk. Klasik alt temaların aksine, WordPress tema geliştirmeye yeni başlayanlar için doldurmanız gereken daha büyük bir bilgi boşluğu vardır (özellikle JSON ve CSS'nin orada nasıl işlendiği hakkında).
Bununla birlikte, Create Block Theme eklentisini kullanarak çok daha kolay bir alternatif bulduk. Bu araç, WordPress Tam Site Düzenleyicisinde yapılan herhangi bir değişikliği alt temanızın child theme.json dosyasına kaydedebilir. Bu nedenle, eklenti sizin için halledeceği için hiçbir koda dokunmanız gerekmeyecek.
Bir örnek gösterelim. İlk olarak, Görünüm » Düzenleyici'ye giderek WordPress Tam Site Düzenleyicisini açın.
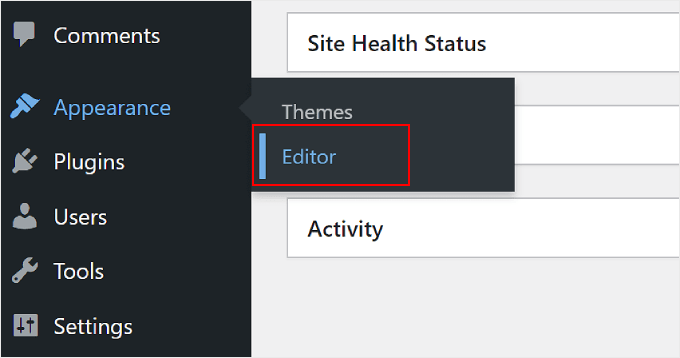
Seçebileceğiniz birkaç menü göreceksiniz.
Burada, sadece 'Stiller'i seçin.
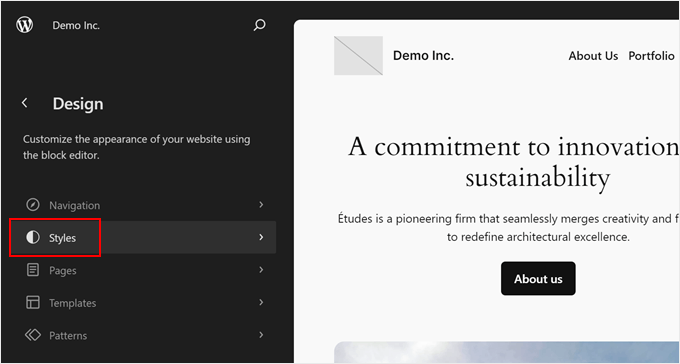
Bir sonraki sayfada, aralarından seçim yapabileceğiniz çeşitli yerleşik stil kombinasyonları göreceksiniz.
Amacımız için, tüm bunları atlayıp sadece kalem simgesine tıklayabilirsiniz.
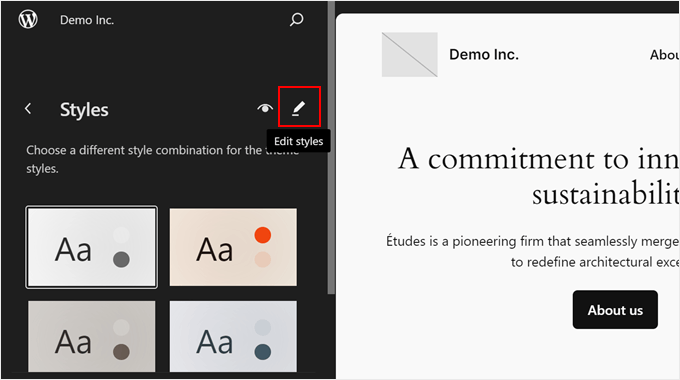
Şimdi, alt temanızın bazı bölümlerini, örneğin yazı tiplerini değiştirmeyi deneyelim.
Bu örnek için, sağ kenar çubuğundaki 'Tipografi'ye tıklayın.
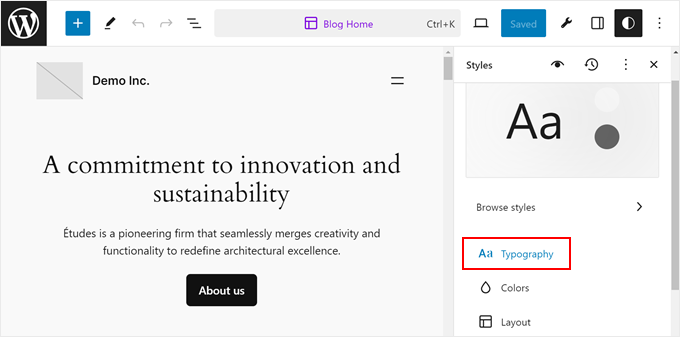
Ardından, metin, bağlantılar, başlıklar, altyazılar ve düğmeler için temanın genel yazı tiplerini değiştirmek üzere bazı seçenekler göreceksiniz.
Gösterim amacıyla 'Başlıklar'a tıklayalım.
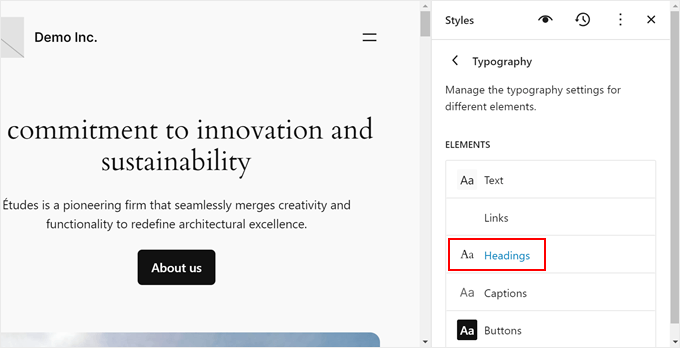
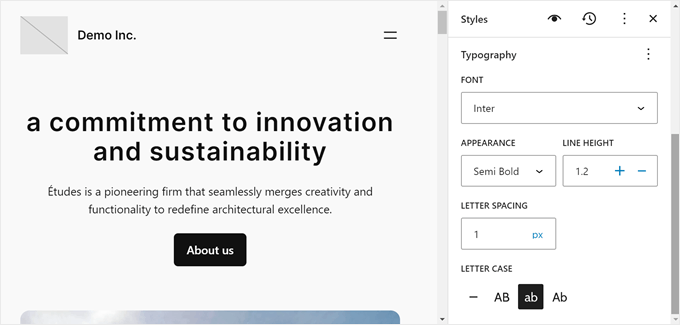
Yazı Tipi açılır menüsünde, orijinal seçimi mevcut olan herhangi bir yazı tipiyle değiştirin.
Gerekirse görünümü, satır yüksekliğini, harf aralığını ve harf büyük/küçük harf kullanımını değiştirmekten çekinmeyin.
İşiniz bittiğinde, 'Kaydet'e tıklayın. Ardından, 'Kaydet'in yanındaki Oluştur Blok Teması düğmesine (anahtar simgesi) tıklayabilirsiniz.
Ardından, 'Temayı Kaydet'e tıklayın.
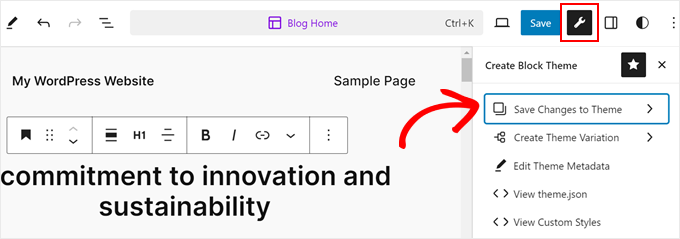
Ardından, alt temaya hangi değişikliklerin kaydedileceğini seçin.
Örnekler arasında yazı tipleri, özel stiller, şablon değişiklikleri ve daha fazlası yer alır.
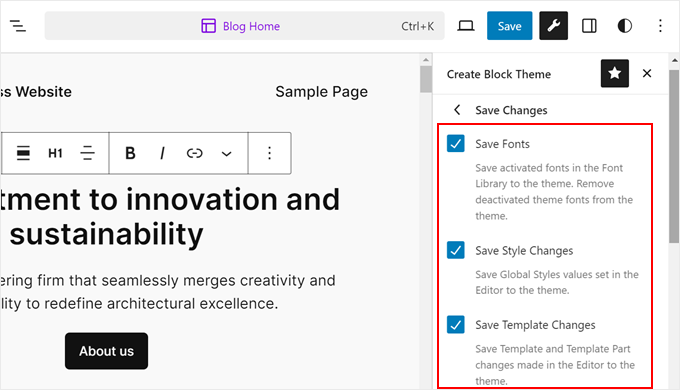
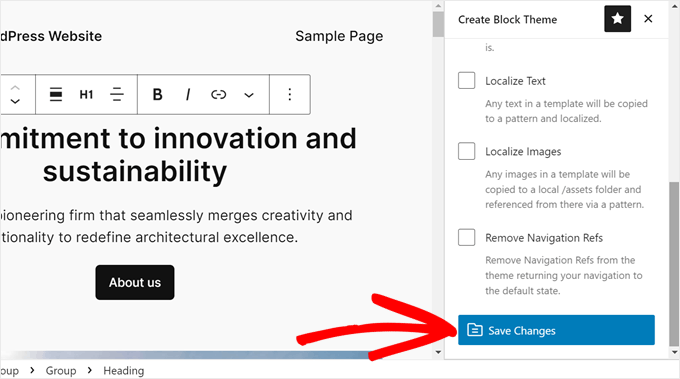
Bittiğinde, kenar çubuğunun en altına kadar kaydırın.
Ardından, ‘Değişiklikleri Kaydet’e tıklayın.
Şimdi, değişikliklerin kodda yansıdığını görebilmeniz için tema.json dosyanızı görüntüleyelim.
Bunu yapmak için Oluştur Blok Teması düğmesine tekrar tıklayın ve ‘theme.json’i görüntüle’yi seçin.
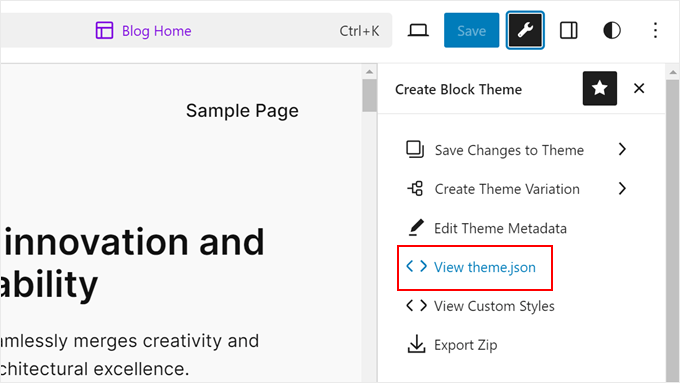
Tıkladıktan sonra, dosyanın bazı yeni kod eklemeleri içerdiğini göreceksiniz.
Bizim durumumuzda, dosya, başlık etiketlerinin Inter yazı tipini yarı kalın, 1.2 satır yüksekliği, 1 piksel satır aralığı ve küçük harfle kullanacağını belirten kod içerir.
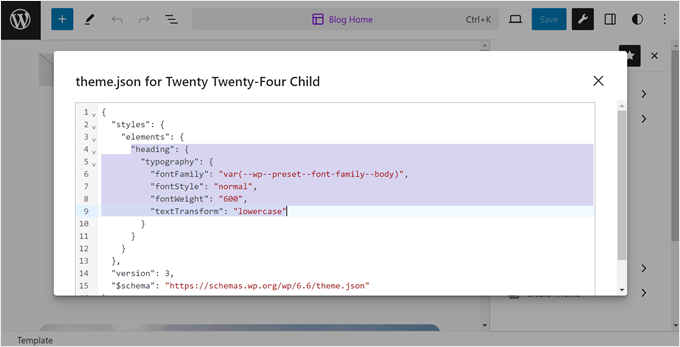
Bu nedenle, alt blok temanızı düzenlediğinizde, değişikliklerin iyi belgelendiğinden emin olmak için anahtar simgesine tıkladığınızdan ve değişikliklerinizi kaydettiğinizden emin olun.
Alt Tema Şablon Dosyalarını Düzenleme
Çoğu WordPress teması, temanın içindeki belirli bir alanın tasarımını ve düzenini kontrol eden tema dosyaları olan şablonlara sahiptir. Örneğin, altbilgi bölümü genellikle footer.php dosyası tarafından, üstbilgi ise header.php dosyası tarafından işlenir.
Her WordPress temasının farklı bir düzeni de vardır. Örneğin, Yirmi Yirmi Bir teması bir üst bilgi, içerik döngüsü, alt bilgi widget alanı ve alt bilgiye sahiptir.
Bir şablonu değiştirmek istiyorsanız, ana tema klasöründeki dosyayı bulup alt tema klasörüne kopyalamanız gerekir. Ardından, dosyayı açmalı ve istediğiniz değişiklikleri yapmalısınız.
Örneğin, Bluehost kullanıyorsanız ve üst temanız Twenty Twenty-One ise, dosya yöneticinizde /wp-content/themes/twentytwentyone konumuna gidebilirsiniz. Ardından, footer.php gibi bir şablon dosyasına sağ tıklayın ve 'Kopyala'yı seçin.
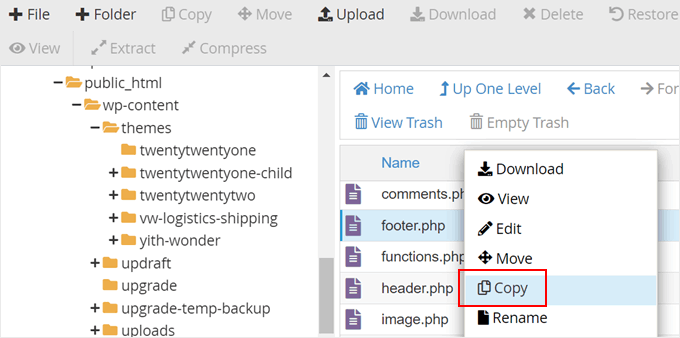
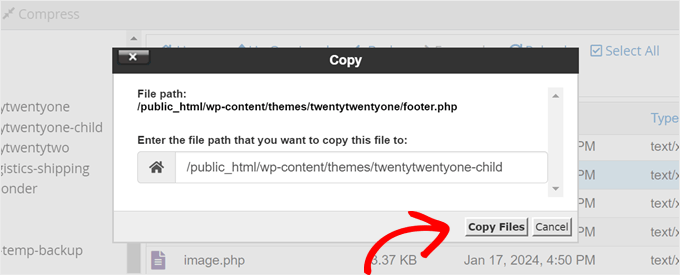
Bundan sonra, alt temanızın dosya yolunu girin.
İşiniz bittiğinde, 'Dosyaları Kopyala'ya tıklamanız yeterlidir.
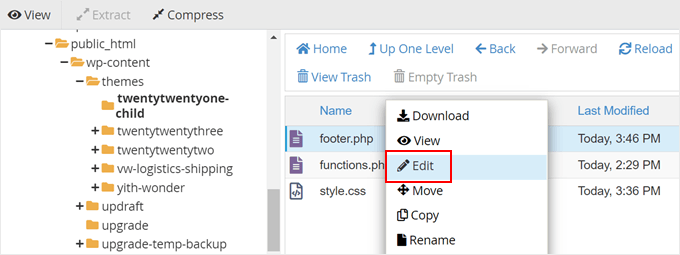
Ardından dosya yoluna yönlendirileceksiniz.
footer.php dosyasını düzenlemek için üzerine sağ tıklayıp 'Düzenle' seçeneğini seçmeniz yeterlidir.
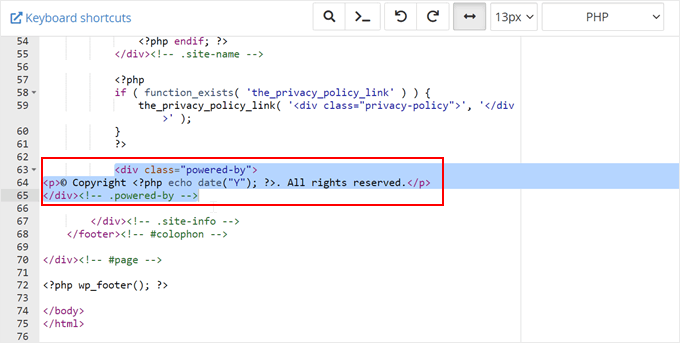
Örnek olarak, altbilgi alanındaki 'Gururla WordPress tarafından destekleniyor' bağlantısını kaldıracağız ve oraya bir telif hakkı bildirimi ekleyeceğiz.
Bunu yapmak için, <div class= "powered-by"> etiketleri arasındaki her şeyi silmelisiniz:
<div class="powered-by">
				<?php
				printf(
					/* translators: %s: WordPress. */
					esc_html__( 'Proudly powered by %s.', 'twentytwentyone' ),
					'<a href="' . esc_url( __( 'https://wordpress.org/', 'twentytwentyone' ) ) . '">WordPress</a>'
				);
				?>
			</div><!-- .powered-by -->
Ardından, aşağıdaki örnekte bu etiketlerin altına bulduğunuz kodu yapıştırmanız gerekir:
<div class="powered-by">
<p>© Copyright <?php echo date("Y"); ?>. All rights reserved.</p>
</div><!-- .powered-by -->
Metin düzenleyicide şimdi şunlara sahip olmalısınız:
Değişiklikleri resmi hale getirmek için dosyayı kaydedin.
Bundan sonra, yeni telif hakkı bildirimini görmek için web sitenizi ziyaret edin.
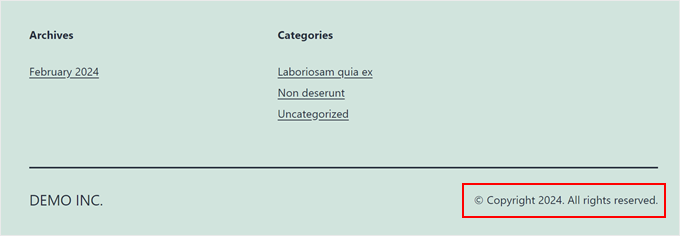
Alt Temanıza Yeni İşlevsellik Nasıl Eklenir
Bir temadaki functions.php dosyası, bir WordPress sitesine özellik eklemek veya varsayılan özellikleri değiştirmek için PHP kodu kullanır. Mevcut temanızla otomatik olarak etkinleştirilen WordPress siteniz için bir eklenti gibidir.
Birçok WordPress öğreticisinde, kod parçacıklarını kopyalayıp functions.php'ye yapıştırmanızı isteyecektir. Ancak değişikliklerinizi üst temaya eklerseniz, tema için yeni bir güncelleme yüklediğinizde bunlar üzerine yazılacaktır.
Özel kod parçacıkları eklerken bir alt tema kullanmanızı önermemizin nedeni budur. Bu eğitimde, temamıza yeni bir widget alanı ekleyeceğiz.
Bunu, bu kod parçasını alt temamızın functions.php dosyasına ekleyerek yapabiliriz. Süreci daha da güvenli hale getirmek için, doğrudan functions.php dosyasını düzenlememenizi ve hataları azaltmanızı sağlayan WPCode eklentisini kullanmanızı öneririz.
Daha fazla bilgi için özel kod parçacıkları ekleme kılavuzumuzu okuyabilirsiniz.
functions.php dosyanıza eklemeniz gereken kod şudur:
// Register Sidebars
function custom_sidebars() {

$args = array(
'id'            => 'custom_sidebar',
'name'          => __( 'Custom Widget Area', 'text_domain' ),
'description'   => __( 'A custom widget area', 'text_domain' ),
'before_title'  => '<h3 class="widget-title">',
'after_title'   => '</h3>',
'before_widget' => '<aside id="%1$s" class="widget %2$s">',
'after_widget'  => '</aside>',
);
register_sidebar( $args );

}
add_action( 'widgets_init', 'custom_sidebars' );
Dosyayı kaydettikten sonra WordPress kontrol panelinizdeki Görünüm » Widget'lar sayfasını ziyaret edebilirsiniz.
Burada, widget ekleyebileceğiniz yeni özel widget alanınızı göreceksiniz.
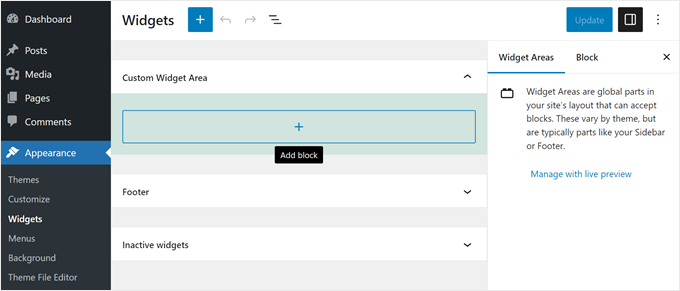
Özel kod parçacıkları kullanarak temanıza ekleyebileceğiniz pek çok başka özellik var. WordPress'in functions.php dosyası için bu son derece faydalı ipuçlarını ve yeni başlayanlar için faydalı WordPress kod parçacıklarını inceleyin.
WordPress Alt Temanızı Sorun Giderme
Daha önce hiç alt tema oluşturmadıysanız, bazı hatalar yapma olasılığınız yüksektir ve bu normaldir. Bu nedenle bir yedekleme eklentisi kullanmanızı, yerel bir site veya hazırlık ortamı oluşturmanızı ve demo siteniz için sahte içerik kullanmanızı öneririz.
Tüm bunlar söylendikten sonra, çok çabuk pes etmeyin. WordPress topluluğu çok beceriklidir, bu yüzden ne sorun yaşarsanız yaşayın, muhtemelen zaten bir çözümü vardır.
Başlangıç olarak, çözüm bulmak için en yaygın WordPress hatalarımıza göz atabilirsiniz.
Muhtemelen göreceğiniz en yaygın hatalar, kodda eksik bıraktığınız bir şeyden kaynaklanan sözdizimi hatalarıdır. Bu sorunları çözmek için yardım, WordPress'te sözdizimi hatasını bulma ve düzeltme hakkındaki hızlı kılavuzumuzda bulunacaktır.
Ek olarak, bir şeyler ters giderse her zaman yeniden başlayabilirsiniz. Örneğin, üst temanızın gerektirdiği bir şeyi yanlışlıkla sildiyseniz, dosyayı alt temanızdan silebilir ve yeniden başlayabilirsiniz.
Bu makalenin bir WordPress alt teması oluşturmayı öğrenmenize yardımcı olduğunu umuyoruz. Ayrıca en son standartlara karşı WordPress temanızı nasıl test edeceğiniz hakkındaki nihai rehberimize ve ücretsiz ve premium WordPress temaları hakkındaki karşılaştırma yazımıza göz atmak isteyebilirsiniz.
Bu makaleyi beğendiyseniz, lütfen WordPress video eğitimleri için YouTube Kanalımıza abone olun. Bizi ayrıca Twitter ve Facebook'ta da bulabilirsiniz.


Mrteesurez
Bu makale, özellikle WordPress yolculuğumuza yeni başlayanlarımız için inanılmaz derecede aydınlatıcı. İlk başladığımda, bir çocuk tema kullanmanın önemini hafife aldığımı ve bir tema güncellemesinden sonra tüm özelleştirmelerimi kaybetmekle sonuçlandığımı hatırlıyorum. Zor yoldan öğrenmek, değişiklikleri korumada bir çocuk temanın değerini takdir etmemi sağladı. Oluşturmadan önce ne yapılması gerektiğini vurguladığınız için teşekkürler - bu rehber kesinlikle birçok acemiyi benzer hayal kırıklıklarından kurtaracaktır!
Oyatogun Oluwaseun Samuel
Tema çocuğunun sunduğu esnekliği seviyorum, çünkü ana tema güncellendiğinde, tema çocuğunda yapılan değişiklikler korunur. Ayrıca, tema çocuğunu manuel olarak oluşturmayı da seviyorum çünkü bu şekilde hatalarla karşılaşabileceğime ve bunun da anlayışımı ve uzmanlığımı artıracağına inanıyorum. Hata yaparak öğreniriz.
Mrteesurez
Sana tamamen katılıyorum! Çocuk temaların sağladığı esneklik, özellikle üst tema güncellemeleri sırasında özelleştirmeleri korumak söz konusu olduğunda oyunu değiştiren bir şey. Aynı nedenle manuel olarak çocuk temaları oluşturmaktan da keyif aldım. Başlangıçta biraz göz korkutucu olsa da, koda dalmanın anlayışımı geliştirmekle kalmayıp aynı zamanda bir geliştirici olarak güvenimi de artırdığını gördüm.
Alt temalarla çalışmaya ilk başladığım zamanları hatırlıyorum, stil dosyalarını doğru şekilde yüklemeyi unutmak veya functions.php dosyasını karıştırmak gibi birkaç hata yaptım. Her hata, WordPress temalarının nasıl çalıştığını daha iyi anlamama yardımcı olan değerli bir öğrenme fırsatıydı. Ayrıca, güncellemeler sırasında özelleştirmelerimin güvende olduğunu bilmek içimi rahatlatıyor. Kesinlikle geliştirilmeye değer bir beceri! Düşüncelerinizi paylaştığınız için teşekkürler, uygulamalı öğrenmeye değer veren başkalarıyla bağlantı kurmak harika.
Chris
Çocuk temalarına pek düşünmemiştim, gerekli olmadıklarını düşünüyordum. Bu makaleyi okumadan önce, tema güncellendiğinde özelleştirilmiş fonksiyonların functions.php dosyasından kaldırıldığını fark etmemiştim. Benim için, WordPress tema deposundan bir tema kullanırsam, çocuk teması şarttır. Bu bilgilendirici makale için teşekkürler!
Dayo Olobayo
Çocuk temalar hakkındaki harika nokta. Ancak göz önünde bulundurulması gereken başka bir seçenek daha var… Bazı premium temalar, kod düzenlemelerine tamamen ihtiyaç duymayan özelleştirme panelleri sunar. Ancak, özellikle biraz kodla rahatsanız, çocuk temaları uzun vadede daha fazla esneklik sağlar.
Mrteesurez
Ben de ilk başladığımda aynı şeyi yaşadım, alt temayı hiç düşünmemiştim, daha sonra özellikle sık güncellenen ücretsiz temaya daha fazla özelleştirme eklerken ne kadar faydalı olduğunu fark ettim. Alt tema dosyası, eklenen özelleştirmeyi korumak için üst temadan önce yüklenir.
Hacala
Bu kapsamlı rehber için teşekkürler. Eklenti yöntemini kullanarak bir alt tema oluşturmak istiyorum ancak bazı konularda hala emin değilim.
WPCode eklentisindeki kodlar alt temada geçerli olacak mı? Ana tema güncellenir ancak alt tema güncellenmezse, hata oluşmasına neden olacak şekilde çakışamazlar mı?
WPBeginner Desteği
Evet, WPCode'daki kod alt temanızda görünecektir ve ana temayı güncellerseniz bir çakışma olasılığı vardır ancak bu garanti değildir.
Yönetici
Mrteesurez
İyi soru Bay Hajjalah.
Ben de ilk çocuk temaları oluşturmaya başladığımda aynı endişeleri taşıyordum. WPCode eklentisini kullanarak, kod doğru yerleştirildiği sürece hem ana hem de çocuk temalarına uygulanmalıdır. Ancak, ana tema güncellenir ve çocuk tema güncellenmezse, bir çakışma olabilir. Bir keresinde bu yüzden bir düzen sorunu yaşadım, ancak güncellemeleri bir hazırlık sitesinde test etmek hatalardan kaçınmama yardımcı oldu.
Jiří Vaněk
Yeni kurulan bir sitede ilk yaptığım şey her zaman bir çocuk temadır. WP Code'u çok kullanmaya ve sorunlardan kaçınmaya çalışsam da, bir şablonu güncellerken çocuk teması kesinlikle harika bir şeydir ve ana şablondan güncellemeden sonra kaybolan kodlarla ilgili birçok sorundan kurtarabilir.
Asad
Efendim, Ana temayı çağırmak için function.php dosyasına ne yazmalıyım?
WPBeginner Desteği
You would want to use the code from our article below the text /* enqueue scripts and style from parent theme */
Yönetici
Yogesh Sambare
Merhaba, wpbeginner Ekibi,
Bu harika rehber için teşekkürler, şimdi tema çocuk temamı yapabileceğimi düşünüyorum ve bu benim için gerçekten çok yardımcı oldu.
WPBeginner Desteği
Glad you found our guide helpful!
Yönetici
Ricardo
Satır:
“wp_get_theme()->get(‘Version’) )”
Şöyle olmalı:
“wp_get_theme()->get(‘Version’) )”
Teşekkürler!
WPBeginner Desteği
While our comments automatically changed that in your message, we see the issue, thank you for letting us know
Yönetici
Rubb
Alt temayı oluşturduktan sonra eklentiyi silebilir miyim?
WPBeginner Desteği
Currently, you can do that with the plugin
Yönetici
Eitan
Y = (“Y”) kısmına tırnak işaretleri eklemeniz gerekir, aksi takdirde bir hata alırsınız. – echo date(“Y”)
WPBeginner Desteği
Thank you for pointing out the typo
Yönetici
Bomo
Peki şimdi bir alt tema oluşturduğumuza göre, alt tema etkinleştirilmişken üst temayı nasıl güncelleriz?
WPBeginner Desteği
Ana temayı normalde yaptığınız gibi güncellersiniz. Güvenlik için, bir çakışma olabileceği ihtimaline karşı ana temayı güncellemeden önce bir yedekleme oluşturmak isteyebilirsiniz.
Yönetici
RYAD
Ancak güncellemeyi yapmadan önce üst temayı etkinleştirmeli, sonra devre dışı bırakıp alt temayı tekrar etkinleştirmeli miyiz?
WPBeginner Desteği
Hayır, temayı aktif olmadan güncelleyebilirsiniz
Mahesh Yadav
Bilmek istediğim bir şey var, eğer bir alt tema oluşturursak, yüklenmesi gereken 2 CSS dosyası olur: biri üst tema CSS'i, diğeri alt tema CSS'i. Bu, sitenin yüklenme süresini artırmaz mı ve yüklenmesi gereken bir CSS daha eklemiş olmaz mı?
WPBeginner Desteği
Yükleme süresi teknik olarak artsa da, fark edilir bir miktarda olmamalıdır.
Yönetici
Nadia Shaheen
Harika iş!
kutsanmış kalın ve harika içerik paylaşmaya devam edin.
WPBeginner Desteği
Thank you, glad you liked our content
Yönetici
Fahad
Great Work !
This site is super helpful
Keep it up !!
WPBeginner Desteği
Thank you, glad our article was helpful
Yönetici
Daniel Waduka
Alt temaları kullanmaya yeni başlıyorum ve bu makale bana çok yardımcı oldu.
Çok teşekkürler.
WPBeginner Desteği
Glad our guide could be helpful
Yönetici
Marcos Flores
Merhaba! bu makaleyi okuyorum ve işe yarıyor! ancak wordpress belgelerini de bu konuda okudum ve onlar şunu söylüyor
“Önceki yöntemin, @import kullanarak üst tema stil sayfasını içe aktarmak olduğunu unutmayın: bu artık en iyi uygulama değildir, çünkü stil sayfalarının yüklenme süresini artırır. Üst tema stil sayfasını düzgün bir şekilde dahil etmenin yöntemi, bir wp_enqueue_scripts eylemi eklemek ve alt temanızın functions.php dosyasında wp_enqueue_style() kullanmaktır.”
Her iki yöntemi de kullanmalı mıyım? veya function.php'yi kullanırsam, style.css'ye (alt temanızın klasöründe bulunan) import fonksiyonu yazmama gerek yok mu?
Khema
Talimatlarınızda functions.php oluşturma adımı eksik. dosyanın tamamını sarması gerektiğini belirtmeli. Bu durumda kullandığınız örneği ve bağladığınız makaledeki başka bir kod parçasını eklemek istemedim. Doğal olarak bu kodlar php etiketini içermiyordu.
Makale için teşekkürler. Çok çok yardımcı oldu.
rReons
Soru şu. Herhangi bir alt tema olmadan wordpress temamı kullanıyordum ve tüm değişiklikleri ona yapıyordum. Rehberiniz sayesinde bir alt tema oluşturdum ve şimdi web sitesi teması olarak onu kullanıyorum.
Sorum şu, her iki temanın da aynı değişiklikleri mi var? Ana temayı bundan sonra güncellersem, değişiklikler alt temayı da etkiler mi?
balu
Selam! wpbeginner. Wordpress resmi sitesi bunu söylüyor. Gönderiyi güncellemeniz gerekiyor. Teşekkürler!
Önceki yöntemin @import kullanarak üst tema stil sayfasını içe aktarmak olduğunu unutmayın: bu artık en iyi uygulama değildir, çünkü stil sayfalarının yüklenme süresini artırır. Üst tema stil sayfasını doğru bir şekilde kuyruğa alma yöntemi, wp_enqueue_scripts eylemi eklemek ve alt temanızın functions.php dosyasında wp_enqueue_style() kullanmaktır. Bu nedenle, alt tema dizininizde bir functions.php dosyası oluşturmanız gerekecektir. Alt temanızın functions.php dosyasının ilk satırı açılış PHP etiketi (<?php) olacaktır, sonrasında üst ve alt tema stil sayfalarınızı kuyruğa alabilirsiniz. Aşağıdaki örnek fonksiyon yalnızca Üst Tema, tüm css'yi tutmak için yalnızca bir ana style.css kullanıyorsa çalışacaktır. Alt temanız birden fazla .css dosyasına sahipse (örneğin, ie.css, style.css, main.css) o zaman Üst Tema bağımlılıklarının tümünü koruduğunuzdan emin olmanız gerekecektir.
Pat
Harika bilgi… kaydettiğim listeye girdi!! Teşekkürler!
Alfonso de Garay
Sitemde en son sürümü kurulu bir Çocuk Temam var. WP sürümü 4.7.5. WP sürümünün mevcut olduğu ve şimdi güncellemeniz gerektiği şeklinde bir bildirim aldım.
1. Güncellemeden önce sitemi tekrar yedeklemem gerekiyor mu?
2. Çocuk sürümü 1 kullanarak başka bir Çocuk Tema oluşturmam gerekiyor mu?
2. Adı, e-postayı ve URL'yi Şili sürümü 1 olarak nasıl değiştirebilirim?
WPBeginner Desteği
Merhaba Alfonso,
WordPress güncellemeleri normalde temalarınızı etkilemez, bu nedenle başka bir alt tema oluşturmanıza gerek yoktur. WordPress'i güncellemeden önce daima web sitenizi yedeklemelisiniz.
Yönetici
Lisa Bruce
Merhaba, bu videonun/gönderinin birkaç yıllık olduğunu görebiliyorum, bu yüzden partiye biraz geç kaldım ama sormak istediğim bir sorum var, umarım bana yardımcı olabilirsiniz.
WP'ye oldukça yeniyim ve çocuk temalarının önemini yeni fark ettim. Bir arkadaşım için bir site geliştiriyordum ve kullandığım temada birkaç değişiklik yaptım. Temada bir hata buldum ve tema geliştiricisiyle iletişime geçtim ve hatanın yakın zamanda bir güncellemede düzeltildiğini söylediler.
Güncelleştirmeyi yüklersem tüm özelleştirmelerimi kaybedeceğime inanıyorum. Çocuk teması oluşturmak için çok mu geç? Şimdi bunu yapıp sonra güncellemeyi yüklemek mümkün mü? Sıfırdan başlamak istemiyorum.
WPBeginner Desteği
Merhaba Lisa,
Yaptığınız değişiklikleri ve hangi dosyalara yaptığınızı biliyorsanız, önce mevcut temanızın bir yedeğini bilgisayarınıza indirin. Ardından, güncellenmiş sürümü yükleyin. Şimdi bir alt tema oluşturabilir ve ardından özelleştirilmiş sürümünüzdeki kodu alt temaya kopyalayıp yapıştırabilirsiniz.
Yönetici
Nell Yang
Bu faydalı gönderi için teşekkürler. Bir çocuğun temasını tam olarak nasıl kullanmam gerektiğini gösteren bir video arıyordum. Her tema güncellememden sonra tüm stillerimin kaybolması oldukça zaman alıcı. Her şeyi yeniden yapmak sinir bozucu. WordPress'ten belgeleri okumaya çalıştım ama çocuk temasını etkinleştirdikten sonra nasıl devam edeceğimi hala bilmiyorum. İyi iş çıkarmaya devam edin! Tekrar teşekkürler!
Tony Agee
İyi öğretici video. İzlediğim çoğu öğretici, kodu dosyaya yapıştırmanızı söylüyor ancak kodu nereye yapıştıracağınızı söylemeyi ihmal ediyorlar. Notepad++ kullanacaktım ama sanırım normal not defteri kullanabilirsiniz.
JP
Merhaba, sadece çok iyi bir yazar olduğunuzu, çok açık ve basit olduğunuzu söylemek istiyorum. WP öğrenmek için makalenizde uzun zaman geçirdim.
Teşekkürler!
Rob Brooks
Merhaba. Harika bir WP kaynağı olduğunuz için teşekkürler. WP'ye yeni başladım ve rehberliğiniz için gerçekten minnettarım. Makaleyi harfiyen takip ettim ancak sitede alt şablonu etkinleştirmeye gittiğimde “Üst tema eksik. Lütfen “Real Estate Lite” üst temasını yükleyin.” hatasını alıyorum. Gördüğünüz gibi Real Estate light adında ücretsiz bir şablon kullanıyorum. wp-content/themes dizininin ../real-estate-lite/ konumunda bulunuyor. Kodum aşağıdadır… Yanlış bir şey mi yaptım?
Theme Name: Real Estate Lite Child Theme Theme URI: http://www.example.com/ Description: Real Estate Lite child theme Author: me Author URI: http://www.example.com Template: Real Estate Lite Version: 1.0.0 */ @import url("../real-estate-lite/style.css");1-click Use in WordPress
Ayrıca, temanın ücretsiz olduğunu ve WP sürüm 4.7.2'de çalıştığını (Plesk üzerinde çalışıyor) belirteceğim. FTP sorunları olmadığı için style.css dosyasını doğrudan sunucuda oluşturdum.
Üst style.css dosyası ile functions.php dosyasında zaten önemli değişiklikler yaptım... Bunun etkileyip etkilemeyeceğinden emin değilim, ancak aynı sonuçları alıp almadığımı görmek için düzenlenmemiş bir deneme alanında test edeceğim.
Sağlayabileceğiniz herhangi bir rehberlik/yardım çok takdir edilecektir.
WPBeginner Desteği
Merhaba Rob,
Sitenizde ana temanın yüklü olması ve Şablon (Template) değerinin, stil.css dosyasında görebileceğiniz ana temanın gerçek adıyla eşleşmesi gerekir.
Yönetici
Carrie
Merhaba! Harika makale! Bu makale sayesinde istediğim sonucu elde etmek için CSS'yi nasıl düzenleyeceğimi nihayet anlamaya başlıyorum.
Basitleştirilmiş açıklama için çok teşekkürler!
Nalin
Bir alt tema oluşturdum ve alt temada "style.css" için @import kullanıyorum. Şimdi üst temanın klasöründeki başka bir css dosyasını değiştirmek istiyorum ….. /font_awesome/css/fontawesome.css
Şimdi, yeni fontawesome.css dosyamı alt temaya nereye koyacağımı ve @import komutunu nasıl kullanacağımı bilmek istiyorum.
veya alt temada daha fazla css dosyası kullanmak için başka herhangi bir işlem.
Rebecca
Yani, bilgisayarımda wp content klasörü yok. Ne yapmalıyım?
Bunu bir noktada indirmeli miydim?
WPBeginner Desteği
Merhaba Rebecca,
wp-content dosyası bilgisayarınızda değil, barındırma hesabınızda barındırılır. Sunucunuza bağlanmak için bir FTP istemcisine ihtiyacınız olacak.
Yönetici
Brad
@ import kullanmak artık en iyi uygulama değildir
SAppa
O zaman şimdi en iyi uygulama nedir? Yorumunuzu yedekleyebilmelisiniz.
Jual beli rumah
Teşekkürler
Jean-philippe
Web sitenizde birkaç saattir çok şey öğreniyorum. WordPress'te "nasıl yapılır" ile ilgili bir şeyi Google'da her aradığımda, en iyi bilginin WPbeginner'da olduğunu görüyorum. Her zaman iyi açıklanmış ve anlaşılması kolaydır. Şüphesiz bilgi için her zaman buraya döneceğim.
WPBeginner Desteği
Merhaba Jean-philippe,
Thanks for the kind words, we are glad you find WPBeginner helpful Don’t forget to join us on Twitter for more WordPress tips and tutorials.
Yönetici
Akıllı Rashed
Aradığım makale bu, teşekkürler adam.
Kevin
Bunun aptalca bir soru olacağını biliyorum. Buna çok yeniyim ve hiç becerim yok. Yerel bilgisayarımdaki wp kurulum dosyamda bir dosya, stil sayfası vb. oluşturuyorsam, bu web siteme nasıl ulaşır? Sanırım bunu mu kaçırıyorum? Web sitem üzerinde çalışmak için yaklaşık 3 farklı bilgisayar kullanıyorum ve bu yerel dosyalar hepsinde yok. Yine, gerçekten aptalca bir şeyi kaçırdığımdan eminim. Bağlantıyı göremiyorum.
WPBeginner Desteği
Bilgisayarınızda düzenlediğiniz dosyaların bir FTP istemcisi kullanarak web sitenize aktarılması gerekir. WordPress dosyalarını FTP kullanarak nasıl yükleyeceğiniz hakkındaki kılavuzumuza bakın.
Yönetici
Kevin
Tamam, anladım ve bir alt tema oluşturdum, ancak etkinleştirdiğimde, sitedeki biçimlendirme ana temadan tamamen bozuk. Yanlış ne yaptım?
Francesco
Merhaba,
Eğitimini takip ediyorum ama WordPress (4.5.3) çevrimiçi sunucumdaki yeni klasörü tanımıyor. Bunun üstesinden nasıl gelebilirim?
Teşekkürler,
F.
Muhammad Moosa
Gerçekten faydalı bir makale, takip ettim ve bir alt tema oluşturdum. Teşekkürler.
Carolina
Merhaba, eğitim için teşekkürler, çok yardımcı oldu. Ama bir sorum var. Zaten kurulmuş bir web sitesinden alt tema oluşturabilir miyim? Bir müşterim kendi web sitesini tasarladı ama alt tema oluşturmadı. Nasıl ilerlemeliyim?
WPBeginner Desteği
Mevcut temaları WordPress kodlama standartlarına ve en iyi uygulamalara uyuyorsa, bir alt tema oluşturmakta sorun yaşamamalısınız.
Yönetici
Mike
Makale ve video için çok teşekkürler. Görünüşe göre bunlar oluşturulduktan sonra WordPress, kafa karışıklığıma neden olan yeni en iyi uygulamaları kod kitabında listeledi.
“Son adım, üst ve alt tema stil sayfalarını kuyruğa eklemektir. Önceki yöntemin üst tema stil sayfasını @import kullanarak içe aktarmak olduğunu unutmayın: bu artık en iyi uygulama değildir.”
Burada ayrıntılı olarak açıkladığınız adımları mı izlemeliyim, yoksa içe aktarma işlevini atlayıp PHP dosyasını mı oluşturmalıyım, yoksa her ikisini de mi uygulamalıyım?
Temamın style.css dosyası yalnızca bir başlık içeriyor, bu nedenle bu dosyayı içe aktarmak anlamsız görünüyor ve ana.css gibi birden fazla CSS dosyası ana dosya yapısında başka yerlerde bulunuyor. Bir başlangıç olarak daha iyisini bilmediğim için bazı hedeflerime ulaşmak için ana.css dosyasında zaten değişiklikler yaptım ve ancak şimdi alt temanın gerekli olduğunu fark ettim.
Herhangi bir tavsiye çok takdir edilecektir.
Saygılarımla,
Mike
WPBeginner Desteği
En azından style.css dosyanızı içe aktarmanız gerekecek, bu ana temanızın ana dizininde olmalıdır. Diğer CSS dosyalarını otomatik olarak içe aktarmalıdır.
Yönetici
Mike
style.css dosyasında sadece başlık olsa bile mi?
Jack
style.css dosyanızda başka css stillerine içe aktarma yoksa, bunları doğrudan style.css gibi içe aktarabilirsiniz.
Olamide
İyi günler. Çocuk temasının canlı önizlemesini yaptığımda, üst temanın CSS'sinin olmadığını fark ettim. Belki de bu, kodu ekleme şeklimdeki bir hatanın sonucudur?
Eklediğim kod şudur:
/*
Tema Adı: sparkling child
Tema URI: https://www.wpbeginner.com/
Açıklama: sparkling child theme
Yazar: djetlawyer
Yazar URI: http://www.example.com
Şablon: sparkling
Sürüm: 1.0.0
*/
@import url(“../sparkling/style.css”);
Üst tema "sparkling". Herhangi bir hata varsa lütfen beni düzeltin.
Teşekkür ederim.
WPBeginner Desteği
Kod doğru.
Yönetici
lucia
Merhaba,
Yirmi on iki temamda altbilgimi etkinleştirmek için bir alt tema kurmaya çalışıyorum, ancak bunu kurmak için hangi kodu kullanacağımı bilmiyorum.
Bu web sayfasını denedim
çeşitli önerilerle ve önerinizi yirmi on üçteki gibi değiştirmeye çalıştım, ancak başaramadım.
On iki on iki için bir çocuk teması kurmak için doğru çalışan kodu verebilir misiniz?
Leigh
Bu inanılmaz derecede yardımcı oldu – özellikle kopyalamamız için verdiğiniz HTML. Daha önce bir web sitesinde renklerin değiştiğini görmek beni hiç bu kadar heyecanlandırmamıştı. Bu, bu tema için kesinlikle en iyi "nasıl yapılır" rehberi!
Bhautik Andhariya
Merhaba, gösterdiğiniz aynı örneği denedim. Ancak alt temanız üst temanın tüm stilini değiştiriyor.
Üst temasının hiçbir stiline sahip değil. Çözümü nedir? Bana yardım edebilir misiniz? WordPress'te yeniyim ve öğreniyorum.
Angelo
Merhaba!
Bose şablonunu yeni yükledim ve ayrıca onun için bir alt tema oluşturdum. Ancak, web sitemin ortasında şu hata mesajı görünüyor:
Uyarı: implode(): Geçersiz argümanlar geçildi /home/hello582/public_html/teste/wp-content/themes/bose/featured.php satır 12'de
Web sitesi oluşturma konusunda çok yeniyim, bu yüzden sorunun ne olduğu hakkında hiçbir fikrim yok. Bana yardım edebilecek var mı?
Çok teşekkürler!
WPBeginner Desteği
Destek için tema geliştiricisiyle iletişime geçin.
Yönetici
Djamila
Merhaba,
Makale için teşekkürler! Çocuk temamın şablon bölümünde 'görünmesini' sağlayamadım ve orijinal şablonun adını yanlış yazdığımı fark ettim. Büyük harf ne kadar fark yaratıyor, değil mi?
Ancak, şimdi çocuk temam olduğu için ana temayı güncelleyebildim ve bunu yaptığımda aniden çok önemli bir eklentiyle bir sorun yaşadım (şimdiye kadar yerel bir veritabanında bir inceleme blogu oluşturuyorum ve bu, şablon tasarımcılarına ait olan özetleme/derecelendirme eklentisiydi).
Ana şablonda bu eklentiyi 'yükselttiler'. Şahsen eskisi tercihim ama neyse... her neyse... incelememin altında şimdi hem eski özetleme ve derecelendirmeleri hem de yeni olanı görüyorum, bu da oldukça kötü görünüyor. Devre dışı bırakıp tekrar etkinleştirdim ama böyle kalıyor. Çok can sıkıcı ve eskisi (daha güzel) veya sadece yenisi ve olması gerektiği gibi görüneni tutmak için nereye bakacağımı bilmiyorum.
Nereden başlamalıyım? Verebileceğiniz herhangi bir yardım için teşekkürler.
WPBeginner Desteği
Eklenti desteğiyle iletişime geçin.
Yönetici
Amanda
Harika bir makale için teşekkürler!
Bir alt tema kullanırsam, yönetici panelinde gelen tema seçenekleri aracılığıyla yazı tipi boyutu, arka plan renkleri vb. gibi özelleştirmeler yapabilecek miyim, yoksa kod yolunu mu izlemem gerekecek?
Çocuk temasını etkinleştirdiysem ve stil düzenlemelerini kod yerine Görünüm sekmesini kullanarak güncelliyorsam, ilgili dosyalar çocuk teması klasöründe olmadığından, bu aslında ana temayı mı güncelliyor?
WPBeginner Desteği
Evet, alt temanız tüm bu seçenekleri devralacaktır.
Yönetici
Amanda
Thanks for your reply.
Yani Alt Temayı etkinleştirirsem ve CSS kodu yazmak yerine stil değişikliği yapmak için yönetici panelimin Görünüm sekmesindeki ayarları kullanırsam, ana tema güncellemesi veya WordPress güncellemesi yaptığımda değişikliklerim üzerine yazılmayacak mı?
Yukarıdaki senaryonun çalışması için stil sayfası, başlık, alt bilgi dosyaları vb. alt tema klasörüne kopyalamam gerekecek mi?
Laura
twentytwelve tabanlı bir alt tema oluşturmak için bu (ve diğer) adımları izledim. Karşılaştığım sorun şu ki, wordpress orijinal temadan değiştirdiğim css'in yalnızca bir kısmını görmezden geliyor ve bu beni çıldırtıyor. Örneğin, menünün arka plan rengini başarıyla değiştirdim, ancak herhangi bir şeyin metin renklerini değiştirmeme izin vermiyor. Bunu chrome'un kod denetleyicisiyle düzenleme yaklaşımınızı kullandım (bu harika çalıştı, renk değişti, kodumun doğru olduğunu gösteriyor) ve değiştirilen kodu alt temanın style.css dosyasına yapıştırdım, ancak hiç algılanmıyor gibi görünüyor. Bu konuda ne yapacağımı bilmiyorum, herhangi bir içgörü çok memnuniyetle karşılanır!
Boyet
Bu öğretici için çok teşekkür ederim. Alt temamın stil sayfası, başlık ve altlık dosyalarını düzenleme konusunda bir sorunum yok.
Sorunum şu ki, ana tema klasörümde bulunan bir dosyada bir şeyi değiştirmek istersem ne yapmalıyım, örneğin: public_html/wp-content/themes/shopera/woocommerce?
Alt temamda aynı yolu oluşturmam gerekiyor mu?
Şimdiden teşekkürler…
WPBeginner Desteği
Evet.
Yönetici
Tony Arnold
Çok yardımcı oldu ve büyük ölçüde anlaşıldı ve uygulandı.
Başlık resmimi tam genişlikte yapmaya çalışıyorum. Temam standart olarak bunu 'izin vermiyor', bu yüzden dosyayı değiştirmeli miyim?
Teşekkürler
Sohail Farooq
Bu makaleyi çok sevdim, denedim ve hemen çalıştı.
Xander
Merhaba!
Biraz takılmış gibiyim. Zaten ana temanın bazı .php dosyalarında (örneğin header.php, footer.php vb.) çocuk teması kurulu olmadan bazı değişiklikler yaptım.
Şimdi ana temanın güncellemeleri geldiği için bir çocuk tema oluşturmak istiyorum. Bu zaten değiştirilmiş dosyalarla ne yapmalıyım? Onları çocuk temanın dizinine kopyalamalı mıyım? Hangi klasörlere ihtiyacım var? Ana temanın sahip olduğu klasörlerin aynısını çocuk tema için de oluşturmalı mıyım?
Teşekkür ederim,
WPBeginner Desteği
Üst temanızın tüm klasörlerine ihtiyacınız yok. Yalnızca değişiklik yaptığınız dosyaları yeniden oluşturmanız yeterlidir. Değişiklikleri kaybetmeden temaları güncelleme hakkında bir eğitimimiz var. Temalarınızda hangi dosyaları değiştirdiğinizi ve onlara ne gibi değişiklikler yaptığınızı bulabileceğiniz bir bölümü var.
Bilgisayarınıza üst temanızın yeni bir kopyasını indirin. Eski temayı bilgisayarınıza indirin ve ardından yeni kopyayı yükleyin. Bundan sonra yeni bir alt tema oluşturun. Değişiklik yaptığınız dosyaları yeni temadan alt temanıza kopyalayın. Eski tema dosyalarında yaptığınız değişiklikleri yeni alt tema dosyalarınıza kopyalayın.
Doğru hale getirmeden önce biraz sorun giderme gerekebilir. Bu nedenle öncelikle sitenizi yedeklemenizi şiddetle tavsiye ederiz. Mümkünse önce yerel bir WordPress kurulumunda değişikliklerinizi test edin.
Yönetici
Xander
Teşekkürler. Bahsedilen eğitime bir bağlantı verebilir misiniz?
Başka bir engel var – functions.php dosyasını değiştirdim, ikisini üst ve alt temalarda nasıl uzlaştırabilirim?