Özel bir sayfa, web sitenizin geri kalanından farklı bir düzen kullanmanızı sağlar. Birçok WordPress sitesi satış sayfaları, açılış sayfaları, web semineri sayfaları ve daha fazlası için özel sayfa düzenleri kullanır.
Yıllar boyunca WPBeginner’da farklı amaçlar için çok sayıda özel sayfa oluşturduk. Bunları eklentiler ve barındırma hizmetlerinde farklı fırsatlar göstermek, kullanıcılara WordPress konusunda yardımcı olmak için Pro hizmetler sunmak, farklı ürünleri görüntülemek ve daha fazlası için kullandık.
Deneyimlerimize göre, özel sayfalar oluşturmanın birden fazla yolu var. Bazı projelerimiz için SeedProd gibi sayfa oluşturucuları kullandık. Bunun yanı sıra, sitenize özel sayfalar eklemek için blok editörünü veya tam site editörlerini de kullanabilirsiniz.
Bu makalede, WordPress’te nasıl kolayca özel bir sayfa oluşturabileceğinizi göstereceğiz.
WordPress’te Neden Özel Sayfa Oluşturulmalı?
Her yeni sayfa oluşturduğunuzda, WordPress temanız bir şablon dosyası kullanarak o sayfanın nasıl görüneceğini kontrol eder.
Bu page.php şablonu WordPress’te oluşturduğunuz tüm tek sayfaları etkiler. Ancak, her seferinde aynı tasarımı kullanmak istemeyebilirsiniz.
Açılış sayfaları genellikle büyük bir kahraman resmi veya harekete geçirici mesaj (CTA) gibi normal sayfalara kıyasla farklı içeriklere sahiptir. Bu da genellikle web sitenizin geri kalanından tamamen farklı göründükleri anlamına gelir.
Ancak, standart sayfa şablonunu kullanarak benzersiz tasarımlar oluşturmaya çalışmak çok zaman alabilir. Ayrıca page.php şablonu ile sınırlısınızdır ve tam olarak istediğiniz tasarımı oluşturamayabilirsiniz. Bu da iyi sonuçlar almayı zorlaştırabilir. Örneğin, bir satış sayfası oluşturuyorsanız, kötü sayfa tasarımı nedeniyle çok fazla dönüşüm elde edemeyebilirsiniz.
Bununla birlikte, WordPress’te tam olarak istediğiniz tasarım, düzen ve içerikle nasıl özel bir sayfa oluşturabileceğinizi görelim. Doğrudan kullanmak istediğiniz yönteme geçmek için aşağıdaki hızlı bağlantıları kullanmanız yeterlidir.
- Method 1. How to Create a Custom Page in WordPress Using the Block Editor (No Plugin Required)
- Method 2. How to Create a Custom Page Using the Full-Site Editor (Block-Based Themes Only)
- Method 3. Create a Custom Page in WordPress using SeedProd (Recommended)
- Method 4. Using Thrive Architect to Create a Custom Page in WordPress
Yöntem 1. WordPress’te Blok Düzenleyiciyi Kullanarak Özel Sayfa Oluşturma (Eklenti Gerekmez)
Blok düzenleyici, zaten aşina olduğunuz araçları kullanarak kendi şablonlarınızı tasarlamanızı kolaylaştırır.
Aynı şablonu uygulayabileceğiniz için aynı tasarımı birden fazla sayfada yeniden kullanmayı planlıyorsanız bu iyi bir seçimdir. Tamamen benzersiz bir tasarım oluşturmak istiyorsanız, diğer bir seçenek de sayfayı normal şekilde oluşturmak ve ardından Yöntem 2’de ele alacağımız tam site düzenleyicisini kullanarak düzenini düzenlemektir.
Bu yöntemlerin yalnızca ThemeIsle Hestia Pro veya Twenty Twenty-Three gibi blok tabanlı temalarla çalıştığını unutmayın. Blok tabanlı bir temanız yoksa, bunun yerine bir sayfa oluşturucu kullanmanızı öneririz.
Başlamak için herhangi bir sayfayı veya gönderiyi açmanız yeterlidir. Ardından, sağ taraftaki menüden ‘Sayfa’ sekmesini seçin ve ‘Şablon’un yanındaki metne tıklayın.
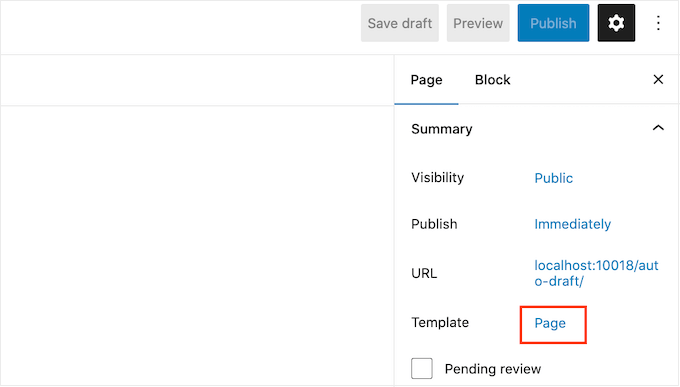
Gördüğünüz seçenekler WordPress temanıza bağlı olarak değişebilir, ancak metin genellikle ‘Sayfa’, ‘Varsayılan şablon’ veya benzerini gösterecektir.
Görüntülenen açılır pencerede ‘Şablon Ekle’ simgesine tıklayın.

Görüntülenen açılır pencerede şablonunuz için bir ad yazın ve ardından ‘Oluştur’a tıklayın.
İsim sadece referans içindir, bu yüzden istediğiniz herhangi bir şeyi kullanabilirsiniz.
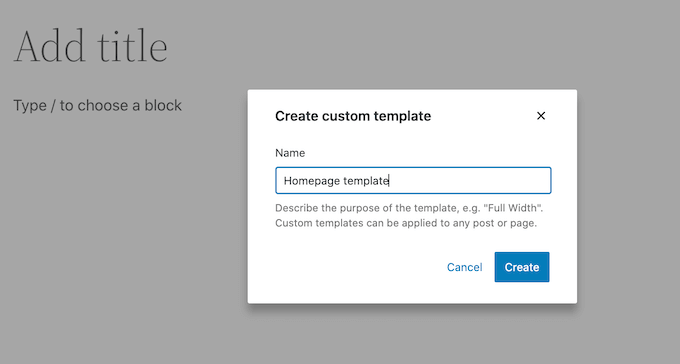
Bu, WordPress içerik editörüne benzer şekilde çalışan şablon editörünü başlatır.
Özel sayfa tasarımına blok eklemek için mavi ‘+’ düğmesine tıklamanız yeterlidir. Ardından blok eklemek için sürükleyip bırakabilirsiniz.
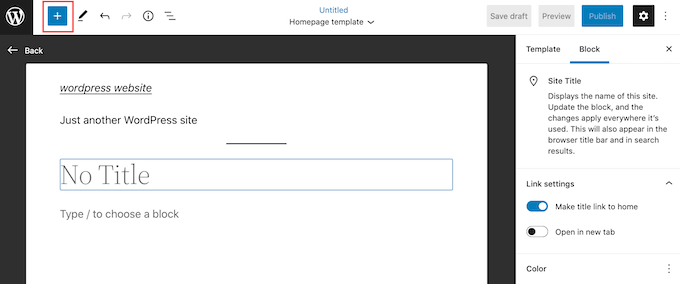
Bilinen WordPress yazı düzenleme araçlarını kullanarak bir bloğa içerik ekleyebilir veya biçimlendirmesini değiştirebilirsiniz. Örneğin, bir ‘Başlık’ bloğuna metin yazabilir, kalın biçimlendirme uygulayabilir veya metni H2’den H3’e değiştirebilirsiniz.
Kalıpları kullanarak da özel bir sayfa oluşturabilirsiniz. Kalıplar, etkinlik listesi, başlık içeren bir resim veya fiyatlandırma tablosu gibi genellikle birlikte kullanılan blok koleksiyonlarıdır.
Gördüğünüz desenler WordPress temanıza bağlı olarak değişecektir, ancak ‘Desenler’ sekmesine tıklayarak hangi desenlerin mevcut olduğunu görebilirsiniz.
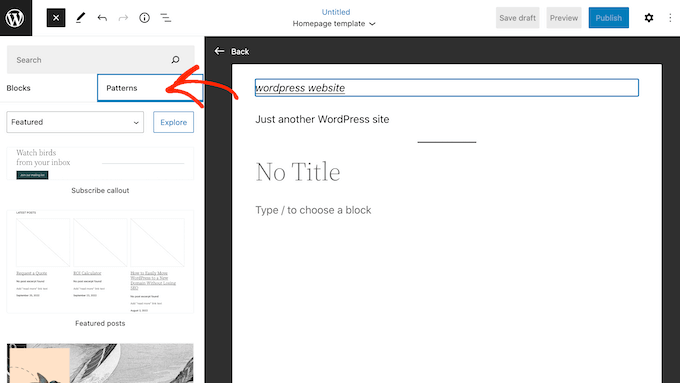
Bir blok desenini düzeninize sürükleyip bırakabilir ya da şablonun altına eklemek için desenin üzerine tıklayabilirsiniz. Şablonun görünümünden memnun olduğunuzda ‘Yayınla’ düğmesine tıklayın ve ardından ‘Kaydet’e tıklayın.
Artık bu şablonu herhangi bir sayfaya uygulayabilirsiniz. Sayfayı düzenleyicide açın ve ardından ‘Şablon’un yanındaki metne tıklayın.
Görüntülenen açılır pencerede, yeni oluşturduğunuz şablonu seçin.
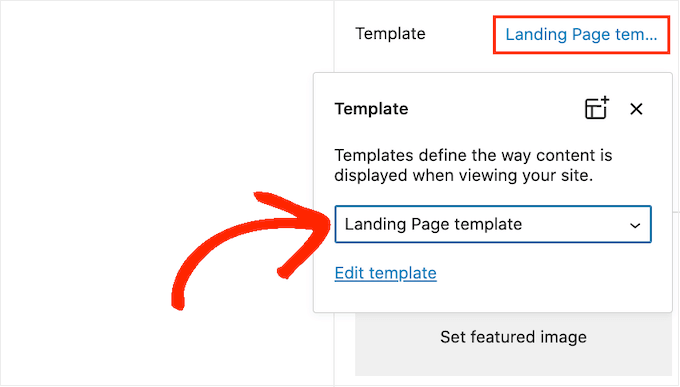
Bunu yaptıktan sonra, diğer WordPress sayfalarında olduğu gibi sayfaya içerik ekleyebilirsiniz.
Yöntem 2. Tam Site Düzenleyicisini Kullanarak Özel Sayfa Oluşturma(Yalnızca Blok Tabanlı Temalar)
Blok tabanlı bir tema kullanıyorsanız, tam site düzenleyicisini kullanarak özel bir sayfa da oluşturabilirsiniz. Bu, özel bir şablon oluşturmadan tek bir sayfanın düzenini değiştirmenize olanak tanır.
Bunu göz önünde bulundurarak, başka hiçbir sayfada tekrar kullanmayacağınız tamamen benzersiz bir tasarım oluşturmak istiyorsanız bu iyi bir seçimdir.
Başlamak için Sayfalar “ Yeni Ekle bölümüne giderek sayfayı normal şekilde oluşturmanız yeterlidir. Ardından bir başlık yazabilir, kategoriler ve etiketler ekleyebilir, öne çıkan bir görsel yükleyebilir ve istediğiniz diğer değişiklikleri yapabilirsiniz.
Temel sayfadan memnun olduğunuzda, değişikliklerinizi kaydedin ve ardından Görünüm “ Düzenleyici‘ye gidin.
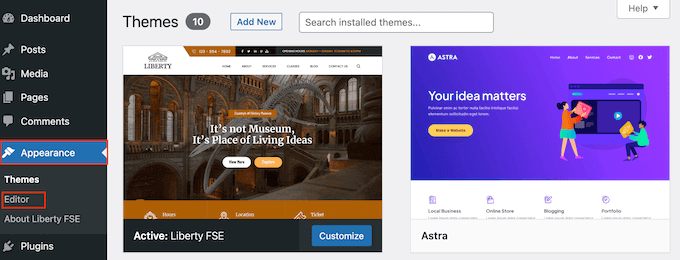
Varsayılan olarak, tam site düzenleyicisi temanızın ana şablonunu gösterir.
Sol taraftaki menüden ‘Sayfalar’a tıklayın.
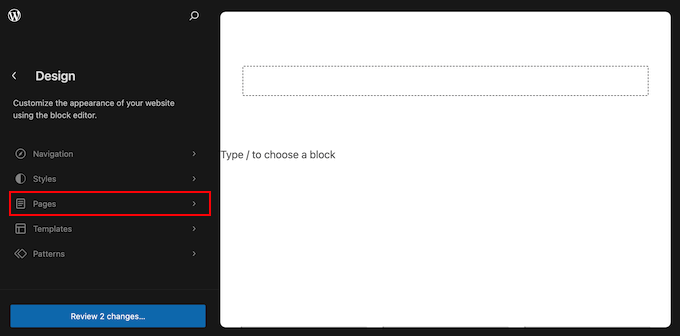
Şimdi WordPress web sitenizde oluşturduğunuz tüm sayfaları göreceksiniz.
Yeniden tasarlamak istediğiniz sayfayı bulmanız ve bir tıklama yapmanız yeterlidir.
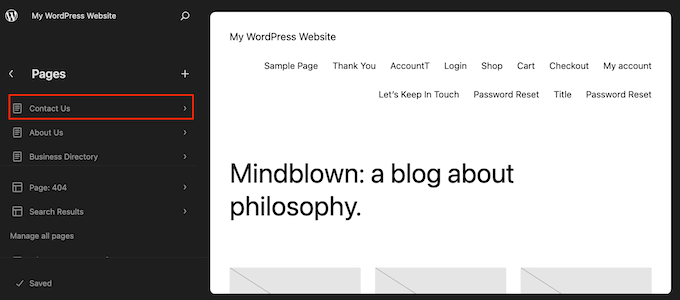
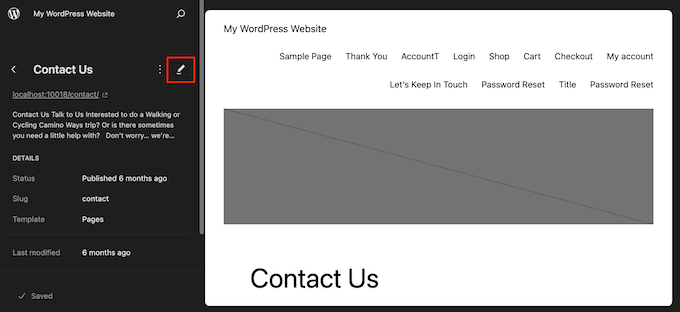
WordPress şimdi tasarımın bir önizlemesini gösterecektir.
Devam etmek ve bu şablonu düzenlemek için küçük kalem simgesine tıklayın.
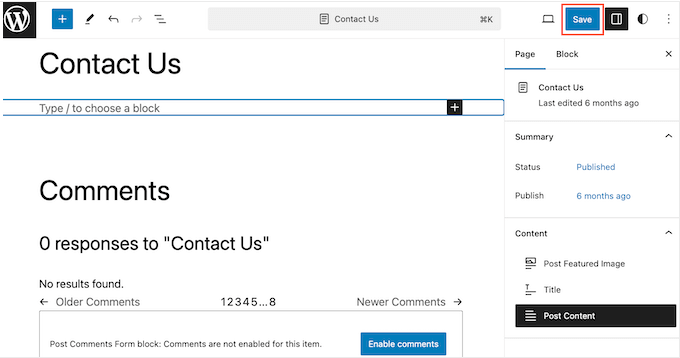
Artık tam site düzenleyici araçlarını kullanarak sayfanın düzenini düzenleyebilirsiniz. Örneğin, yeni bloklar eklemek için mavi ‘+’ düğmesine tıklayabilir veya özelleştirmek istediğiniz herhangi bir bloğu seçmek için tıklayabilirsiniz.
Yaptığınız değişikliklerden memnun olduğunuzda, ‘Kaydet’ düğmesine tıklayın.
Şimdi, web sitenizde bu sayfayı ziyaret ederseniz yeni sayfa tasarımını çalışırken göreceksiniz.
Yöntem 3. SeedProd kullanarak WordPress’te Özel Sayfa Oluşturun (Önerilen)
Geçmişte, kod yazarak özel bir sayfa oluşturuyordunuz ve bu da yeni başlayanlar için pek uygun değildi. HTML, CSS veya PHP kodunuzda bir hata yaptıysanız, bu yaygın WordPress hatalarına neden olabilir ve hatta sitenizi tamamen bozabilir.
Bunu göz önünde bulundurarak, bunun yerine bir sayfa oluşturucu kullanmanızı öneririz.
SeedProd, WordPress için en iyi sürükle ve bırak sayfa oluşturucusudur. Herhangi bir kod yazmadan özel sayfalar oluşturmanıza olanak tanıyan 350’den fazla şablonla birlikte gelir.
Daha fazla dönüşüm elde etmek için özel bir sayfa kullanıyorsanız, SeedProd dönüşüm elde etmek için zaten kullanıyor olabileceğiniz birçok popüler üçüncü taraf araçla çalışır. Buna en iyi e-posta pazarlama hizmetleri, WooCommerce, Google Analytics ve daha fazlası dahildir.
Öncelikle SeedProd’u yüklemeniz ve etkinleştirmeniz gerekir. Daha fazla ayrıntı için, bir WordPress eklentisinin nasıl kurulacağına ilişkin adım adım kılavuzumuza bakın.
Not: SeedProd ‘un bütçeniz ne olursa olsun özel sayfalar oluşturmanıza olanak tanıyan ücretsiz bir sürümü de var. Ancak, bu kılavuz için SeedProd Pro’yu kullanacağız çünkü çok daha fazla şablona sahip ve en iyi e-posta pazarlama hizmetleriyle entegre.
Eklentiyi etkinleştirdikten sonra SeedProd sizden lisans anahtarınızı isteyecektir.

Bu bilgiyi SeedProd web sitesindeki hesabınızın altında bulabilirsiniz. Anahtarı girdikten sonra ‘Anahtarı Doğrula’ butonuna tıklayın.
Özel Bir Sayfa Şablonu Seçin
Bunu yaptıktan sonra, SeedProd ” Açılış Sayfaları ‘na gidin ve ‘Yeni Açılış Sayfası Ekle’ düğmesine tıklayın.
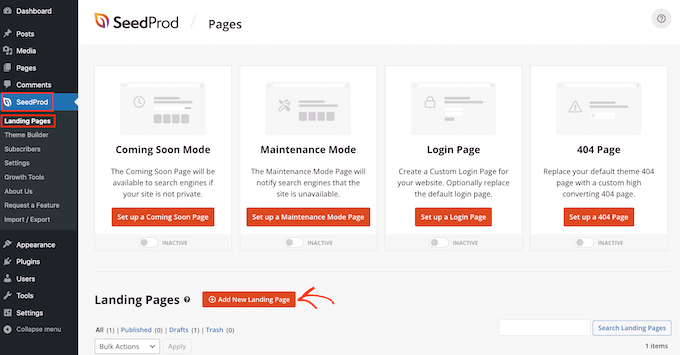
Artık özel sayfanız için bir şablon seçebilirsiniz.
SeedProd’un şablonları ‘lead’,‘squeeze‘ ve‘coming soon‘ gibi farklı kampanya türlerine göre düzenlenmiştir. Şablonları kampanya türüne göre filtrelemek için ekranın üst kısmındaki sekmelere tıklayabilirsiniz.
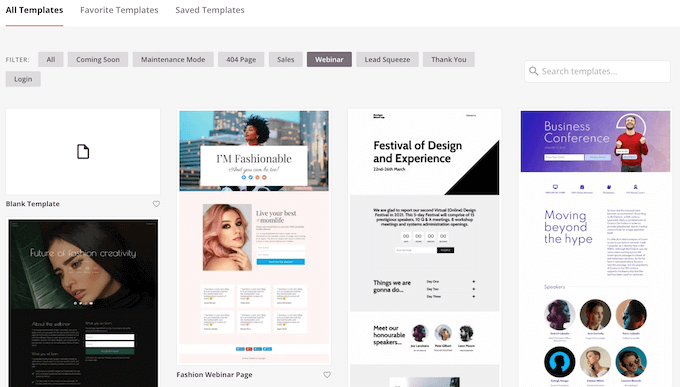
Sıfırdan başlamak istiyorsanız, SeedProd’un kullanabileceğiniz boş bir şablonu da vardır.
Herhangi bir tasarıma daha yakından bakmak için farenizi o şablonun üzerine getirin ve ardından büyüteç simgesine tıklayın.
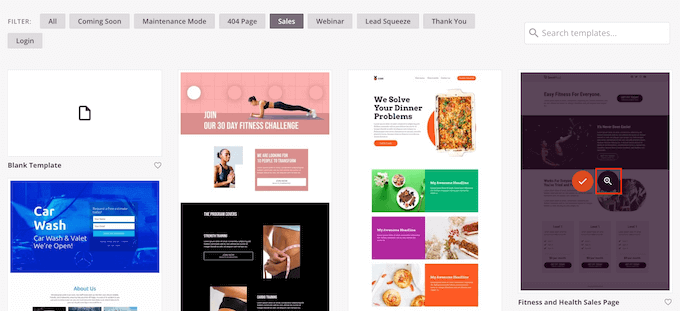
Beğendiğiniz bir tasarım bulduğunuzda ‘Bu Şablonu Seç’e tıklayın. Biz tüm görsellerimizde ‘Kurs Satış Sayfası’ şablonunu kullanıyoruz, ancak siz istediğiniz şablonu kullanabilirsiniz.
Ardından, devam edin ve özel sayfa için bir ad yazın. SeedProd sayfanın başlığına göre otomatik olarak bir URL oluşturacaktır, ancak bu URL’yi istediğiniz herhangi bir şeyle değiştirebilirsiniz.
Açıklayıcı bir URL aynı zamanda arama motorlarının sayfanın ne hakkında olduğunu anlamalarına yardımcı olarak sayfayı doğru kullanıcılara gösterebilmelerini sağlar ve bu da WordPress SEO‘nuzu geliştirir.
Özel sayfanızın alakalı arama sonuçlarında en iyi şekilde görünmesini sağlamak için URL’de eksik olan anahtar kelimeleri eklemek isteyebilirsiniz. Daha fazla ayrıntı için lütfen anahtar kelime araştırmasının nasıl yapılacağına ilişkin kılavuzumuza bakın.
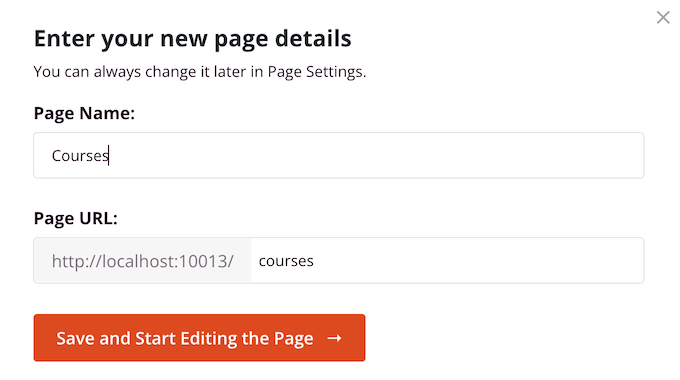
Girdiğiniz bilgilerden memnun olduğunuzda, ‘Kaydet ve Sayfayı Düzenlemeye Başla’ düğmesine tıklayın.
Özel Sayfanızı Tasarlayın
SeedProd şimdi seçtiğiniz şablonu kullanıcı dostu sürükle ve bırak editöründe açacaktır. Sağ tarafta sayfanızın canlı bir önizlemesini ve sol tarafta bazı blok ayarlarını göreceksiniz.

Bir bloğu özelleştirmek için, sayfa düzenleyicide seçmek üzere tıklamanız yeterlidir. Sol taraftaki araç çubuğu bu blok için tüm ayarları gösterecektir.
Aşağıdaki görüntüde, bir ‘Başlık’ bloğunun içindeki metni değiştiriyoruz.
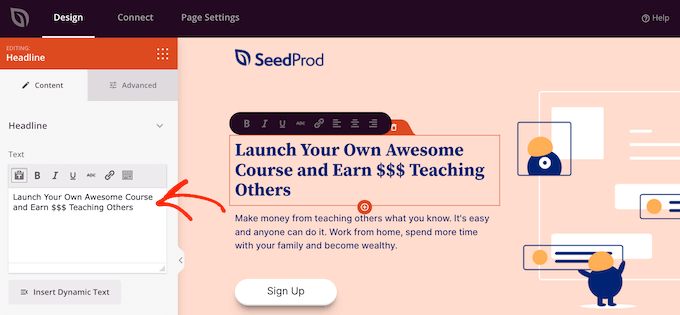
Sol taraftaki menüde yer alan ayarları kullanarak metni biçimlendirebilir, hizalamasını değiştirebilir, bağlantılar ekleyebilir ve daha fazlasını yapabilirsiniz.
SeedProd sayfa oluşturucuyu kullanarak görselleri düzenlemek de çok kolay. Herhangi bir ‘Görsel’ bloğuna tıklayın ve alternatif metin eklemek, yeni bir görsel yüklemek veya diğer değişiklikleri yapmak için ayarları kullanın.
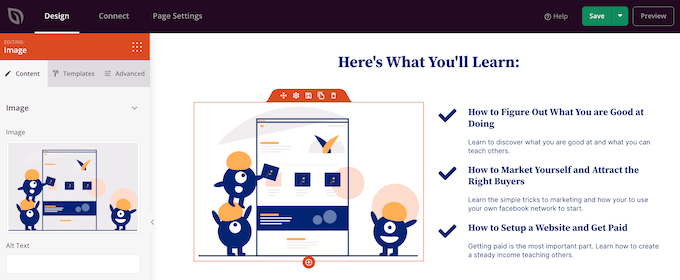
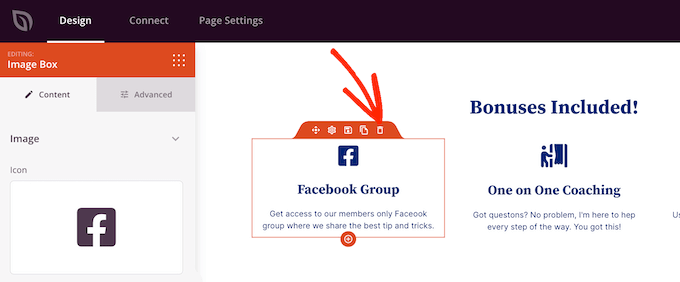
Özel sayfadan bir bloğu kaldırmak istiyorsanız, o bloğu seçmek için tıklamanız yeterlidir.
Ardından, mini araç çubuğundaki çöp kutusu simgesine tıklayın.
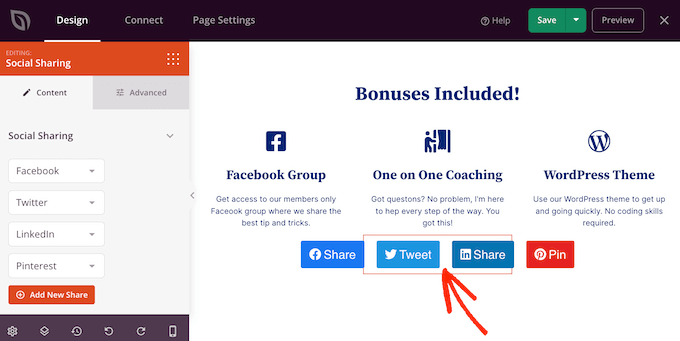
Tasarımınıza yeni bloklar eklemek için sol taraftaki menüden bir blok bulup düzenleyiciye sürüklemeniz yeterlidir.
Daha sonra bloğu seçmek için tıklayabilir ve sol taraftaki menüde istediğiniz değişiklikleri yapabilirsiniz.
SeedProd ayrıca, hızlı bir şekilde özel bir sayfa oluşturmanıza yardımcı olabilecek satırlar ve blok şablonları olan ‘Bölümler’ ile birlikte gelir. Örneğin, bir Google Reklam açılış sayfası tasarlıyorsanız, SeedProd’un hazır Kahraman, Harekete Geçirici Mesaj veya Özellikler bölümlerini kullanabilirsiniz.
Mevcut tüm bölümleri görmek için ‘Bölümler’ sekmesine tıklamanız yeterlidir.
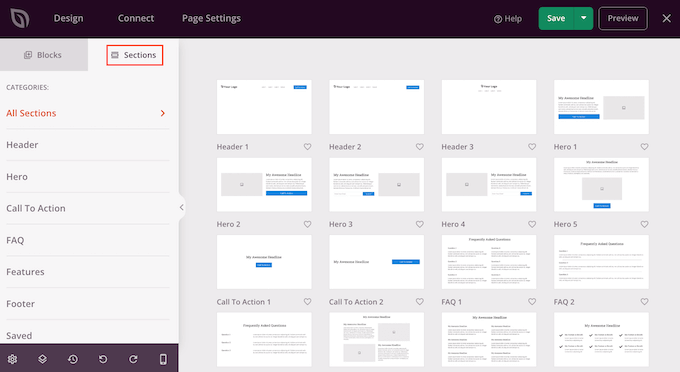
Bir bölüme daha yakından bakmak için farenizi o bölümün üzerine getirin ve ardından büyüteç simgesine tıklayın.
Tasarımınıza eklemek istediğiniz bir bölüm bulduğunuzda, fareyi üzerine getirin ve ardından küçük ‘+’ simgesine tıklayın.
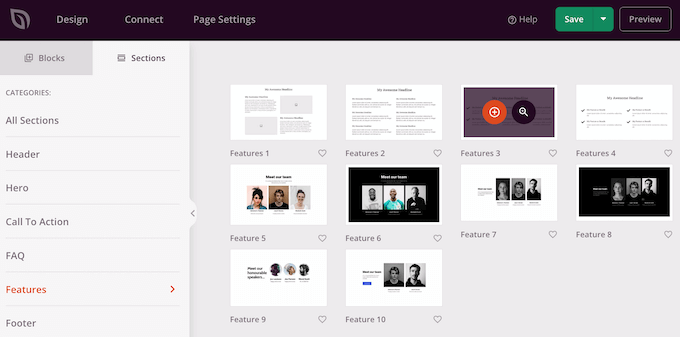
Bu, bölümü sayfanızın altına ekler. Sürükle ve bırak özelliğini kullanarak hem bölümleri hem de blokları tasarımınızda taşıyabilirsiniz.
Bir hata yaparsanız veya fikrinizi değiştirirseniz endişelenmeyin. Sol taraftaki araç çubuğunun altındaki ‘Geri Al’ düğmesine tıklayarak son değişikliğinizi geri alabilirsiniz.
Burada ayrıca bir yinele düğmesi, revizyon geçmişi, düzen navigasyonu ve genel ayarlar bulacaksınız.
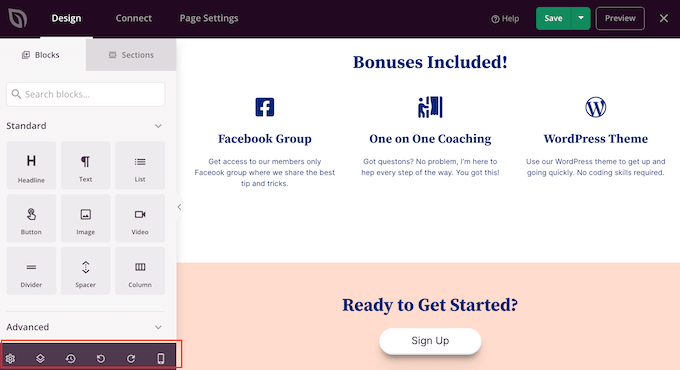
Bu ekstra düğmeler WordPress’te özel bir sayfa oluşturmayı kolaylaştırır.
Araç çubuğunun alt kısmında, özel sayfanın mobil sürümünü görüntülemenizi sağlayan bir mobil önizleme düğmesi de bulacaksınız.
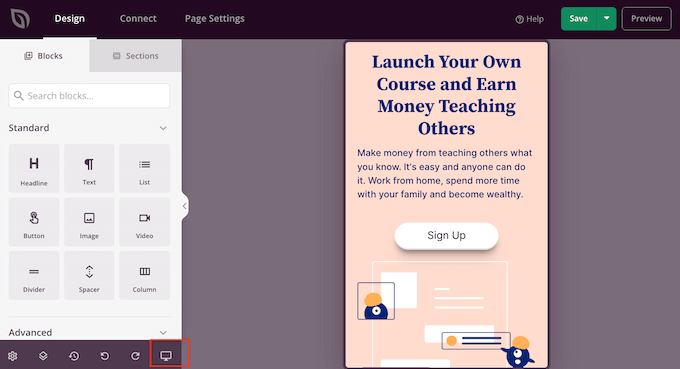
Bu, mobil cihazlarda da bilgisayarınızda olduğu kadar iyi görünen özel bir sayfa tasarlamanıza yardımcı olabilir.
Özel sayfadan memnun olduğunuzda, ‘Kaydet’in yanındaki açılır oka tıklayarak ve ardından ‘Yayınla’ seçeneğini belirleyerek sayfayı yayınlama zamanı gelmiştir.
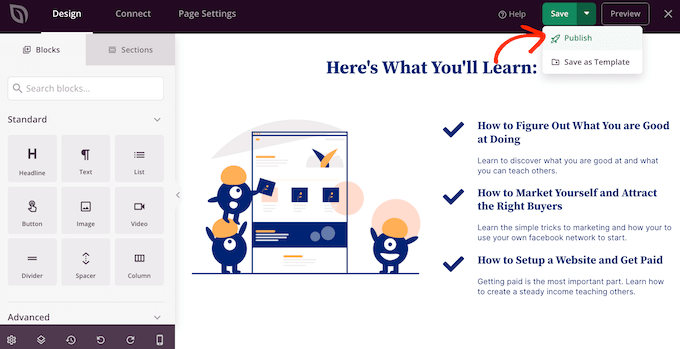
Özel sayfanız artık WordPress blogunuzda yayınlanacaktır.
Herhangi bir noktada özel sayfayı düzenlemek isterseniz, WordPress kontrol panelinizde SeedProd ” Açılış Sayfaları bölümüne gitmeniz yeterlidir. Daha sonra değiştirmek istediğiniz sayfayı bulabilir ve ‘Düzenle’ bağlantısına tıklayabilirsiniz.
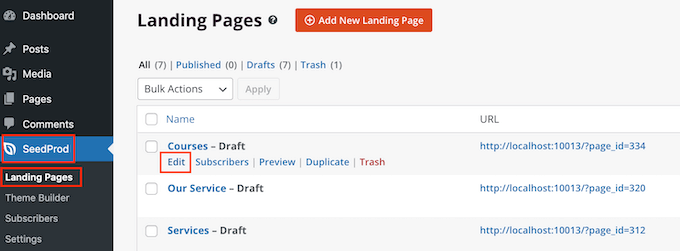
Bu, tasarımı SeedProd’un editöründe açacak ve değişikliklerinizi yapmanız için hazır hale getirecektir.
Yöntem 4. WordPress’te Özel Sayfa Oluşturmak için Thrive Architect’i Kullanma
Thrive Architect‘i kullanarak da özel bir sayfa oluşturabilirsiniz. Thrive Architect, WordPress için bir başka popüler sürükle ve bırak sayfa oluşturucusudur.
Daha fazla dönüşüm elde etmenize yardımcı olmak için tasarlanmış 300’den fazla profesyonelce tasarlanmış şablonla birlikte gelir.

Öncelikle Thrive Architect eklentisini yüklemeniz ve etkinleştirmeniz gerekir. Daha fazla ayrıntı için bir WordPress eklentisinin nasıl kurulacağına ilişkin adım adım kılavuzumuza bakın.
Etkinleştirmenin ardından, özel bir sayfa oluşturmak için WordPress yönetici panonuzdaki Sayfalar ” Yeni Ekle bölümüne gidin. Ardından, ‘Thrive Architect’i Başlat’ düğmesine tıklayın.
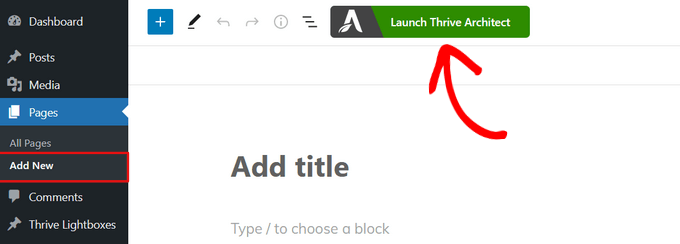
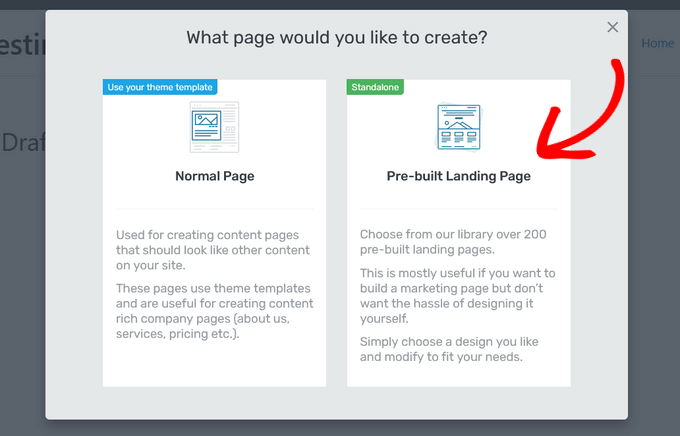
Ardından, normal bir sayfa mı yoksa önceden oluşturulmuş bir açılış sayfası mı oluşturacağınızı seçebilirsiniz.
Tüm Thrive açılış sayfası şablonlarına erişmenizi sağladığı için ‘Önceden Oluşturulmuş Açılış Sayfası’ seçeneğine tıklamanızı öneririz. Bu şablonlar tamamen özelleştirilebilir, böylece WordPress web sitenize uyacak şekilde ince ayar yapabilirsiniz.
Beğendiğiniz bir set bulduğunuzda, seçmek için tıklamanız yeterlidir.
Aşağıdaki resimde ‘Akıllı Açılış Sayfası Setleri’ni seçiyoruz.
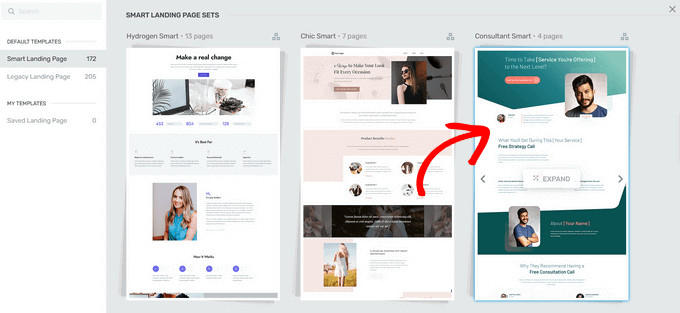
Bir sonraki ekranda, setten belirli bir şablon seçmeniz gerekir.
Üzerine tıklayarak bir şablon seçin ve ardından ‘Şablonu Uygula’ düğmesine basın.
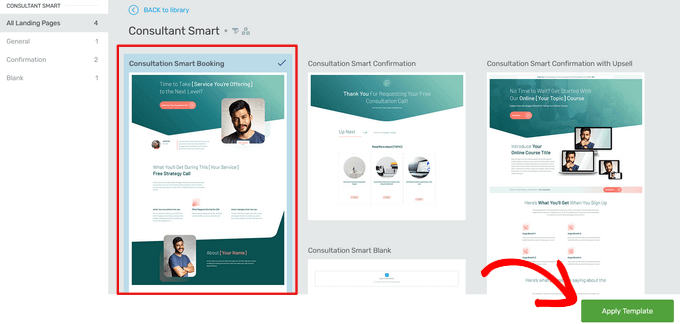
Bu, şablonu Thrive Architect Editor’da açacaktır. Buradan, sayfa şablonunu blogunuza, web sitenize veya çevrimiçi mağazanıza uyacak şekilde kolayca özelleştirebilirsiniz.
Örnek olarak, ‘Başlık’ üzerine tıklayarak ve ardından kendi özel mesajınızı yazarak başlığı değiştirebilirsiniz.
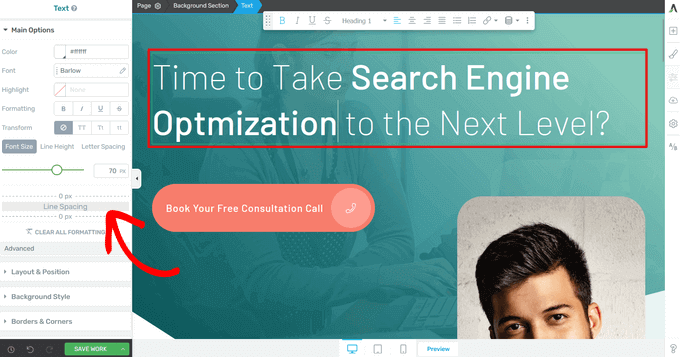
Şimdi sol taraftaki menüde tüm özelleştirme seçeneklerini göreceksiniz. Burada tipografi, yazı tipi boyutu, renk, biçimlendirme ve daha fazlasını değiştirebilirsiniz.
Sol taraftaki panelden özel sayfanız için düzen, arka plan stili, kenarlıklar, animasyonlar ve kaydırma davranışı gibi diğer ayarları da yapabilirsiniz.
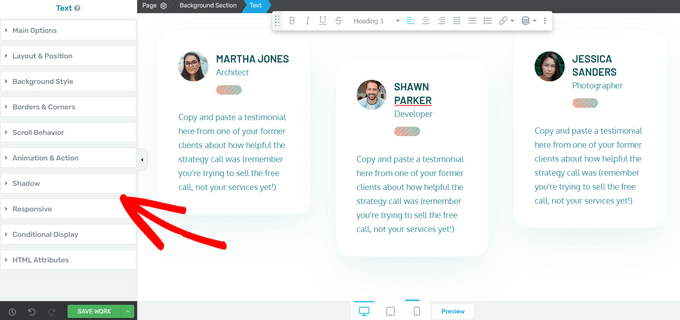
SeedProd’un bloklarına benzer şekilde Thrive Architect, özel sayfanıza ekleyebileceğiniz birçok önceden oluşturulmuş öğe ile birlikte gelir.
Sayfaya yeni bir eleman eklemek için ekranın sağ tarafındaki ‘Eleman Ekle (+)’ düğmesine tıklayın.
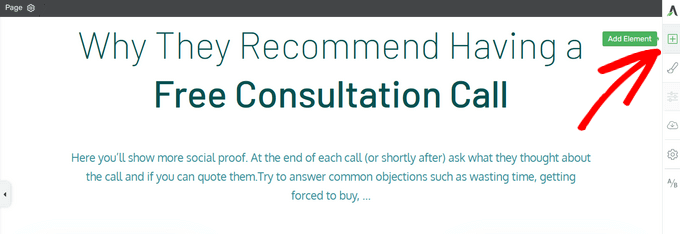
Artık resimler, düğmeler, potansiyel müşteri oluşturma formları, fiyatlandırma tabloları, geri sayım sayaçları ve daha fazlası gibi öğeler arasından seçim yapabilirsiniz.
Bir öğe eklemek için sağ taraftaki menüden sürükleyip sayfanıza bırakmanız yeterlidir.
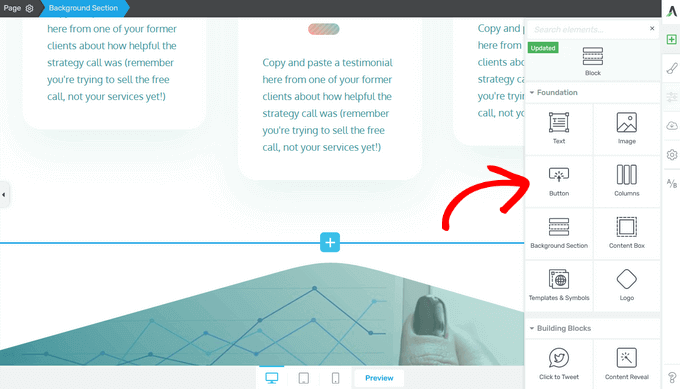
Yine, sayfanıza eklediğiniz yeni öğeleri üzerlerine tıklayarak düzenleyebilirsiniz.
Sayfanın görünümünden memnun olduğunuzda, ‘Çalışmayı Kaydet’ düğmesinin yanındaki ok (^) düğmesine tıklayın. Ardından, ‘Kaydet ve Gönderi Düzenleyiciye Dön’ seçeneğine tıklayın.
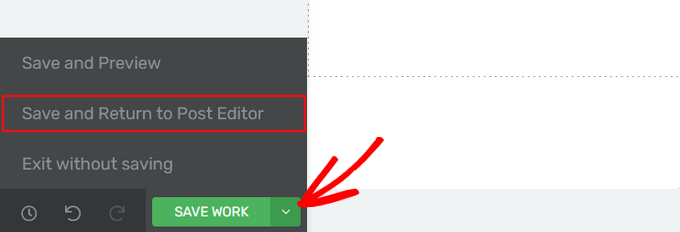
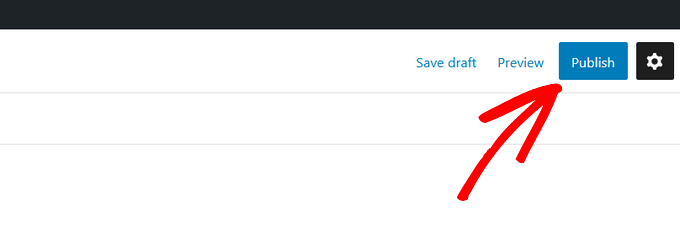
Daha sonra sayfayı taslak olarak kaydedebilir veya WordPress web sitenizde görünmesi için yayınlayabilirsiniz.
Özel sayfanız yayınlandıktan sonra, onu çalışırken görmek için sitenizi ziyaret edebilirsiniz.
Umarız bu makale WordPress’te nasıl özel sayfa oluşturacağınızı öğrenmenize yardımcı olmuştur. WordPress ile nasıl açılış sayfası oluşturulur ve WordPress‘ te yazı veya sayfa başlığı nasıl bölünür konulu rehberimize de göz atmak isteyebilirsiniz.
If you liked this article, then please subscribe to our YouTube Channel for WordPress video tutorials. You can also find us on Twitter and Facebook.


NG SHAIKH
Dear WPB Team,
I created the template named MyTemplate.php and copied it into /wp-content/themes/ directory. The template is not reflected in drop down menu of Page Attribute -> Templets. Please guide.
Is it necessary to use FTP server for this? Please guide.
Thanks.
NG SHAIKH
NG SHAIKH
Kudos to WPBeginner Team. This is an excellent article which can give guidance to a beginner from the scratch. What a help!
However, if there is further guidance as to how to remove sidebar, create and add custom sidebar and where to put PHP code or HTML.
With lot of regards and love,
NG SHAIKH
Ajay
Hi great tutorial!
One question… I am adding new HTML template files that use css and js files etc. How can I link these files in my template file? I added the files to the same directory as the other stylesheets and assets but no luck. They do not render on the new template page. Any ideas?
Thanks!
The Last One
Im confused.. i hink this site has written years ago, but if i do understand it, you cannot do custom pages anymore in wordpress unless you have some sort of subscription?
i was trying to “edit” my wordpress site but all feature was missing.
Rob
Thanks – once again – how to remove header/footer/sidebar?
Thanks
Editorial Staff
Remove get_sidebar(), get_footer(), and get_header().
This will break all the styling because your stylesheet won’t load. So you need to make sure that wp_head() and wp_footer() are added in your template.
Fore more customization help, you may want to look here:
https://codex.wordpress.org/Theme_Development
Admin
Jeff
thanks great help
Deepan
Thanks for this tutorial,this tutorial help me to understand the concept easily.Good Work keep continuing like this.
-Deepan
tony kh tan
Thank you for this tutorial. I use cPanel to add the customPage.php onto wp-content/.. and it works. Without using FTP.
Njoroge Mathu
Thanks for the great article. Tried the steps and it works perfect. Seems like the file ‘CustomPageT1.php’ has to always be uploaded into the active theme folder or if working offline with wamp save it in wamp/www/wordpress/wp-content/themes/active theme.
Amit Prasad
Great Article. Exactly what I was looking for. Keep up the good work pal!
Osvaldo
This article, pure and simple, works like charm to me!!!
Jean-Charles de Geekarts
So it works perfectly bur when I put the file in a plugin file (because it make more sense) it doesn’t work. Do you have anyidea on what to do to make it work.
Thanks anyway for all your great tutorial
Ronny
Great work, guys. Thank you very much. But one question please… How do i make this custom template pull posts from one particular category or categories? I’ve been building websites with wordpress for a while now but, this one seems knotty to me. I know there’s a plugin that does this, but I’ll rather go with the custom template method. Thanks, again…
Chadly
hey guys, is their a plugin you recommend for WP that creates great looking pages like this:
You know, the pages that have the arrows pointing to things and almost a hand drawn look about the page.
Thanks…
irfan
Sir my websites homepage is in the form of custom link in wordpress menu and is not present in all pages also.I am a totaly newbie in website development so kindly help to convet this custom link into a page.
2:kindly also help to remove read more from posts.
Thanks
Irfan
website Address:www.fishysms.com
karlonc
Does this tutorial still apply to the newest wordpress?
Also will it keep any of the attributes of the theme you are using?
WPBeginner Support
Yes, it applies on latest WordPress and will keep all attributes of the theme you are using.
Admin
Musarrof
Please give details more and write it easily with screenshot. new word-press user cant understand your reading tutorial.
WPBeginner Support
Thanks for your feedback. Please let us know which part you did not understand and we will try to explain it.
Admin
Carol H.
I didn’t understand this part…
Once you have completed editing this file save it and upload it in your theme directory (/wp-content/themes/yourthemedirectory/) where files like single.php and index.php are located.
How does one upload to one’s theme directory? (I have a wordpress.com site; does this have anything to do with this?)
WPBeginner Support
Yes, you cannot upload files on WordPress.com sites. Please take a look at our guide on the difference between WordPress.com and Self hosted WordPress.org sites.
vinay
Hi,
where do we find the pages that were created with the add-new page link in wordpress.could someone help me out to figure out the pages.Thanks in advance
terance perera
go to appearance -> editor -> then you can see page templete or page.php
Joanna Gasdogas
oops. please ignore previous note.
Thank you for these instructions.
I have followed all your instructions, I believe correctly. However when I go to my WP editor to add content to this new template, nothing shows up on the page. It remains as a completely blank page.
kuldeep
how to create a simple template in wordpress
Joanna Gasdogas
Thank you for this. I followed all the instructions. I have a blank template now. But when I go to my wp editor to add content, the content doesn’t appear in the new page.
Samsher
Hey plz upload snap shot..
Marow95
How can I change the url ?
I mean instead of “blog/?page_id=2” , I want it to be “blog/about” .
Thanks in advance
WPBeginner Staff
Check out our guide on how to create SEO friendly URL Structure in WordPress.
Asim
Checkout Permalinks at the very beginning of the page.
Kikky
hallo, thanks for the post on creating a custom template, its helped greatly. But i have some issues i need answers to, this is my first time at wordpress and on the site i’m creating, i already have a custom template as the home page and then i have another page (with the theme’s initial homepage look, which is a custom page). the challenge i’m having now is : i want the custom template page i designed to load first but the theme’s custom page keeps coming up instead. i figured there’s some sort of conflict going on since they both have thesame url …so, preeeetyyy please, how do i get through this huge problem…thanks
WPBeginner Support
Seems like you resolved your problem. In this case, you could have specifically told WordPress to use a template for a specific page. For example if you wanted to create a custom template for http://www.example.com/home-2 then you name your template file to be page-home-2.php. You can also use a page’s id in the template, like page-33.php will only work on page with 33 as the unique id.
Admin
Pol Alvarez
Hi! I have always coded my webpages from scratch but now I need to add one to a wordpress website. I mean I have good html/css and this kind of stuff but little of wordpress.
I have followed the instructions and succesfully uploaded the file. The problem is that it is not listed on the template dropdown. I am not sure whether this happens because the file I created is not valid or any other problem. My file is composed of your header
and then following it a normal webpage (opening with etc…) without any styles now external files (just to check it out).
What am I doing wrong? any help would be appreciated.
Thanks you are my last resort!
WPBeginner Support
Pol, we can provide you some tips to troubleshoot.
Please study the file page.php in your theme’s directory. Your custom page template should follow the same structure as page.php except the header part where you need to insert your own template name so that it can distinguished.
Make sure that you have uploaded your template to the right directory. It should be in /wp-content/themes/your-theme-name/ folder.
Let us know if this helped.
Admin
Ansar
I have a problem with this.when i add new page there is no option of template in page attributes. I’m using wordpress 3.8.1
And also what is the name given to the page we are newly creating
ReNet
This is Great! BUT HELP!
I created a template that pulls in a form, I currently have it with a Captcha but want to remove the captcha and use WordPress’ password protect functionality for this page so I can speedup multiple form entries.
The issue is that WordPress displays the template’s content before entering the password.
Your help would be greatly appreciated.
WPBeginner Support
ReNet, thats because the password protect functionality implements password on the contents of the post/page that is protected not on your template. So the form you want to hide should be executed inside the post. You can create a shortcode for that and add it to your post/page.
Admin
Sean
Thanks for this – who knew it could be so simple!
Troy
Ok so I think Im missing a step or two…
1) I opened up a blank text document, copied this “1” into the first line of the notepad
2) Saved it to my desktop and loaded it into the proper wp-admin//themes/mythemedirectory/
3) Got it to show up on wordpress. Then I copied and pasted my html code for my splash page that I created in dreamweaver into the text(html) portion on wordpress.
4) Saved it as a draft and when I previewed it I get a bunch of strange text.
Can you explain to me what steps am I forgetting or missing. I think its something with the other php markups? or maybe where I post my html code. Im looking to have splash page without any menus or anything else besides my splash page coding. Any help or assistance would be greatly appreciated. The information you provided has gotten me farther then any of the other blogs Ive looked at so thank you very much!
WPBeginner Support
It seems like you are trying to design a page in Dreamweaver and trying to import it in WordPress. This will not work. Because your page already has a structure and style defined by your WordPress theme.
Admin
Troy
thanks for the reply. Can I just take the html body from dreamweaver and paste it into the theme?
WPBeginner Support
No it will still have the similar effect.
Surya
You can do that but try pasting the code in notepad first and then copying it again to WordPress. This usually eliminates some unwanted things like DOM.
niharika
I have one question please……………. help me. I want to store marks of student in Mysql database and once user go to the result page he has to enter his roll no and class, then he see his result. I have done this project but I really don’t know how to go through it in wordpress i.e where to write html and php coding in wordpress.
I am using WordPress.org on my localhost.
WPBeginner Support
For that you will have to create your own custom solution using Custom Post Types, Custom Fields, and User Meta Data. If you look around you might find some WordPress plugin that already does all that.
Admin
Andrea
Thanks for the post – this was exactly what I was looking for, and so helpful!
Stuart Alsop
Thank you sooooo much for this tutorial. solved a big headache for me! Keep up the good work!
Darren
This page is fantastic! Thank you! I was messing around a little (a lot) with plugins when I did a search, came across this page, and figured this is way better than the other methods I was looking at to do something.
One thing is that in the article, it isn’t immediately obvious that the code should be put on the page before being uploaded. I mistook it as inputting the code on the ‘add a new page’ text box. Second time I tried it, I stuck the code in the text file (also, it isn’t obvious that they should choose all files, and change the text file extension to .php), and it worked like a charm. You can even add blog1 / blog2 / etc… to get multiple themes up there if you so need.
Thank you!
Tim Reeves
THANK YOU SO MUCH!!!!!!!!!!!!!!!!!!!!!!!!!! I have been trying to figure this out for 3 months now, came across your tutorial up and running with my new page template in 5 minutes.. I completely
understand some of the comments above, as when you are first starting out everything is so confusing. But when you get a grasp of things it is so easy. AGAIN YOU ARE A LIFE SAVER,SCHOLAR,AND A GENTLEMAN !!!! : )
lucas
This is suppose to be for beginners? I can’t even pass the first step “You can start out by calling WordPress header and footer”
what does it mean? whoever wrote this article has forgotten that is writing for beginners who tend to be clueless.
I tried to call header and footer but nobody answer, maybe i got the wrong number.
A screen shot will be quite useful.
Editorial Staff
I think you misunderstood the site. WPBeginner caters for beginners of all level. This article is in the Themes category, and this is for beginner theme designers. The article clearly says that you need to have HTML / CSS knowledge before you can do this.
We do have a beginners guide category – https://www.wpbeginner.com/category/beginners-guide/
Instead of being really sarcastic, sending 2 separate emails and leaving a comment, you should consider being more polite. We do not get paid to write these tutorials. It is a kind gesture for the community, and many folks have learned from our site. It would be one thing to be pissed off, if you paid for something, and you didn’t receive it. This site is entirely FREE. We try to help as many folks as we can without charging a dime.
-Syed
Founder of WPBeginner
Admin
eduardo
thaaaaannnksssssssss im a front end developer and i consider myself a wp beginner i found this article really helpful
Markus Freeman
I’ve tried this and it worked like a charm, but the there’s one problem. The Posts didnt show, only the sidebar. what could be the problem?
Thanks,
Markus
Editorial Staff
That means that there is something wrong with the code in your template.
Admin
James
I tried this too and like above only the sidebar shows. What could be wrong with the code in my template?
Joe
Try copying the WordPress hook ( if statement) from the page.php file. Then paste it into the new file.
Karla Porter Archer
Thanks for this tutorial.
I’m trying to do this in order to create the author page (https://www.wpbeginner.com/wp-tutorials/how-to-display-an-author-list-with-avatars-in-wordpress-contributors-page/).
I’m using a child theme. Does this file get added to the main theme file directory or the child theme?
Karla Porter Archer
I just tried it in the main theme and it finally showed. So I’m assuming the answer is ‘main theme’ and that I haven’t broken it
Editorial Staff
No this file has to be added in the child theme directory. While it would work in the main genesis folder, it is best practice to never modify anything in the parent theme.
Admin
Karla Porter Archer
ah – thanks — that was my original presumption, but it didn’t show the template as an option for the page, so I second-guessed myself. I obviously didn’t add it correctly then, so off to try again!
Max Garcia Jr
WITHLOVEASH31 posted a question on 10/24/2011. Could one of the Editor’s please respond. I’d really like to know. I could really use this feature. Thanks in advance!
Editorial Staff
We didn’t reply because they also commented right after that they figured it out. You have to use FTP to login and upload a new theme file.
Admin
LJSkool
Completely newbie here. I was fine right up until you got to “begin creating a custom page by opening a blank file in your text editor”. Um, yeah…. Would that be the “editor” link under “Appearances” within my site? How do I “open” this? My purpose to have a page with all my blog posts on one page. My theme does not do this. Thanks!
Editorial Staff
Hey Jackie,
Yes this article does require prior HTML/CSS knowledge. Text Editor can be Notepad, Dreamweaver, Notepad++ etc.
Admin
Ruth
this is the first help page that’s helped me without creating another set of problems.
It worked! I never built a php page before and I pasted everything in exactly
Thank you!
Taika
“Since you have already written down all the text and settings in the php file, simply name the page and leave the content area blank”
How to do that ? My WP does not allow me to leave the content blank, it requires to type something on title before it lets create/edit page name, then if I type something, name the page and remove the text leaving it blank and publish it publishes whatever I typed on title before I removed the text…any advice ? Thanks,
Taika
withloveash31
Oh never mind. I figured it out
withloveash31
I was following your guide and everything went well until this- “upload it in your theme directory (/wp-content/themes/yourthemedirectory/) where files like single.phpand index.php are located.” This might stupid but how do i upload the file to my theme directory? I did find a page under the name “Editor” where single.php, index.php etc are located, i just don’t know how to upload the file i created. Please help :S
nola
Excellent! I thought this would be a hard process. You explained it simply. I still need to work out a few things with how my theme displays the custom template, but now I’ve learned something new. Thank you!
saro.verhees
Really awesome, exactly what i was looking for. Thanks
scarab
great post. This information was just what I was looking for. It took me about 40 minutes but I built a ‘squeeze’ page just like I wanted.
I still need to do some of the header work but is minor in my opinion.
Thanks
Nina
Brilliant!
Alex Batista
How to create a custom page in WordPress and put it how default?
Editorial Staff
https://www.wpbeginner.com/wp-themes/how-to-create-a-custom-homepage-in-wordpress/
Use the page link above.
Admin
Frank
freakin phantastic blog! This may be the best project site on the web…
Marc Shaw
Hey, I read a lot of blogs on a daily basis and for the most part, people lack substance but, I just wanted to make a quick comment to say GREAT blog!…..I”ll be checking in on a regularly now….Keep up the good work!
– Marc Shaw
Missy
Hi,
I’m on here now trying to do this. Let me see if I can pull it off.
MOMO
Excellent tutorial. cheers guys.
Momo