Avrupa Birliği’nin GDPR yasası, kullanıcı verilerini depolamadan önce açık onay gerektirir ve WordPress yorum bölümünüz de bir istisna değildir.
Birçok WordPress kullanıcısı yorum bölümlerini GDPR uyumlu hale getirmeyi soruyor. Neyse ki, çok sayıda WordPress sitesinde GDPR uyumlu yorum sistemleri uyguladık ve size tam olarak nasıl yapılacağını göstereceğiz.
Bu makalede, WordPress web sitenize GDPR yorum gizliliği onay kutusunu nasıl ekleyeceğinizi göstereceğiz.
WordPress’te Neden Yorum Gizliliği Onay Kutusu Eklemelisiniz?
Genel Veri Koruma Yönetmeliği (GDPR), AB vatandaşlarına kişisel verileri üzerinde daha fazla kontrol sağlamayı amaçlamaktadır.
Bu yasa yürürlüğe girdiğinde, birçok kuruluşun veri gizliliğine yaklaşımını değiştirdi. Bu konuda daha fazla bilgi için lütfen WordPress ve GDPR uyumluluğuna ilişkin nihai kılavuzumuza bakın.
GDPR’ye uymazsanız para cezasına çarptırılabilir, hatta hapis cezası alabilirsiniz. Bu nedenle, yorum formunuz da dahil olmak üzere web sitenizi GDPR uyumlu hale getirmeniz önemlidir.
Bir yorum formu, ziyaretçilerden adları, e-posta adresleri ve isteğe bağlı olarak web sitesi URL’leri dahil olmak üzere kişisel bilgiler toplar. WordPress ayrıca bu bilgileri bir tarayıcı çerezinde saklar, böylece gelecekte yorum yazarının bilgilerini otomatik olarak doldurabilir.
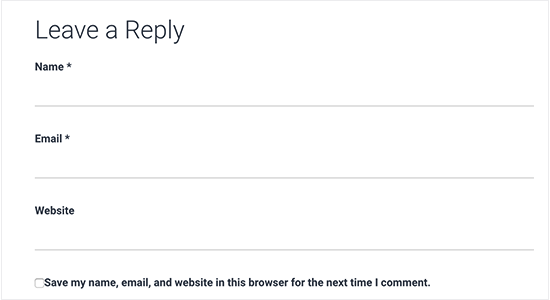
Varsayılan olarak, WordPress yorum formu bir yorum gizliliği onay kutusu gösterir.
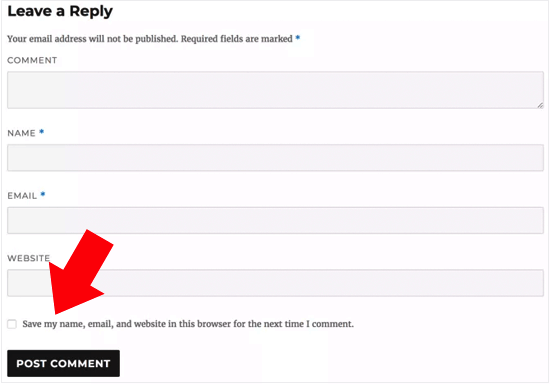
Ancak, web sitenizde bu onay kutusunu görmüyorsanız, WordPress temanız tarafından devre dışı bırakılmış olabilir.
İlgili Yazı: WordPress’te GDPR Uyumlu İletişim Formları Nasıl Oluşturulur?
WordPress’te Yorum Gizliliği Opt-in Onay Kutusu Nasıl Etkinleştirilir
Kendi yorum gizlilik kutunuzu oluşturmadan önce, temanızda bu özelliğin zaten yerleşik olup olmadığını kontrol etmek iyi bir fikirdir.
İlk olarak, hem temanızın hem de WordPress çekirdeğinizin güncel olup olmadığını Kontrol Paneli ” Güncellemeler bölümüne giderek kontrol edelim.
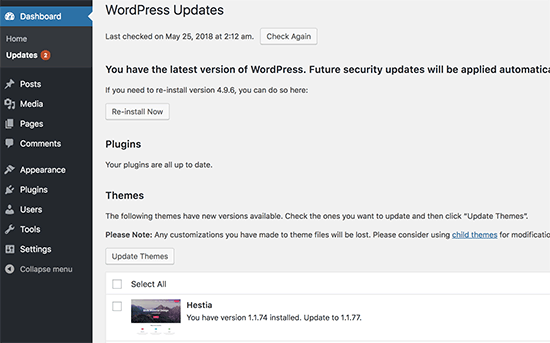
Herhangi bir güncelleme mevcutsa, devam edin ve yükleyin. Yardıma ihtiyacınız varsa, lütfen WordPress’i güvenli bir şekilde nasıl güncelleyeceğinize ilişkin kılavuzumuza bakın.
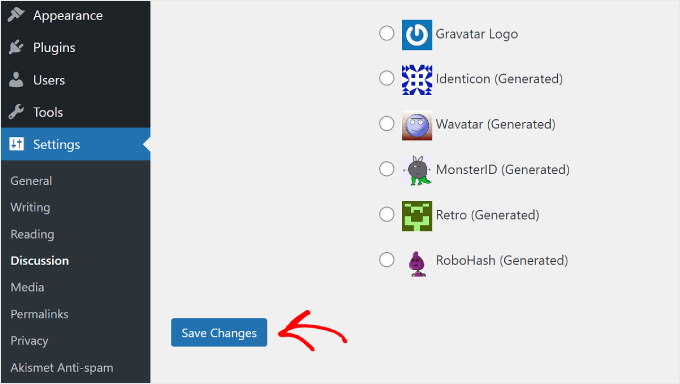
Bundan sonra, Ayarlar ” Tartışma bölümüne gidin ve ‘Diğer yorum ayarları’na ilerleyin. Burada, ‘Yorum çerezlerini göster onay kutusu….’ seçeneğinin yanındaki kutuyu işaretleyin.

Bu işlem tamamlandıktan sonra, ayarlarınızı kaydetmek için ‘Değişiklikleri Kaydet’e tıklamanız yeterlidir.
Şimdi, bu değişikliklerin eksik çerez onayı onay kutusunu ekleyip eklemediğini görmek için WordPress web sitenizi ziyaret edebilirsiniz.
Tamamen güncel olmanıza rağmen yorum gizliliği onay kutusunu göremiyorsanız bu, temanızın varsayılan WordPress yorum formunu geçersiz kıldığı anlamına gelir.
Bunu göz önünde bulundurarak, bir destek bileti açarak temanın geliştiricisinden bu sorunu çözmesini istemenizi öneririz. Tavsiye için lütfen WordPress desteğini nasıl düzgün bir şekilde isteyeceğinize ilişkin kılavuzumuza bakın.
Diğer bir seçenek de WordPress temanıza yorum gizliliği onay kutusunu kendiniz eklemektir. Bunu yapmanın birkaç farklı yolu vardır, bu nedenle kullanmak istediğiniz yönteme doğrudan atlamak için aşağıdaki hızlı bağlantıları kullanın:
Yöntem 1: Thrive Comments Yorum Formunu Kullanın (Önerilen)
Yorum gizliliği onay kutusu eklemenin en kolay yolu, mevcut yorum formunuzu Thrive Comments‘in formuyla değiştirmektir.
Thrive Comments, yorum etkileşiminizi artırmak için her türlü özellikle birlikte gelen bir WordPress yorum eklentisidir. Özelleştirilebilir bir yorum formunun yanı sıra, eklenti ayrıca şu özelliklerle birlikte gelir:
- Kullanıcıların yorumları beğenmesine ve beğenmemesine izin verin
- WordPress yorumlarını özelleştirme veya gömme
- Yorum yapankişileri yorum bıraktıktan sonra başka bir blog gönderisineyönlendirin
Bu yöntemin en kolay yöntem olmasının nedeni, onay kutusunu eklemek için tema dosyalarınızdaki kodlarla uğraşmanıza gerek olmamasıdır. Tek yapmanız gereken eklentiyi yüklemek, GDPR özelliğini etkinleştirmek ve hepsi bu kadar.
Bununla birlikte, eklentinin ücretsiz bir sürümü yoktur, bu nedenle bir yatırım gibi hissettirebilir. Thrive Comments hakkında daha fazla bilgiyi Thrive Themes incelememizde bulabilirsiniz.
İlk adım Thrive Comments’i yüklemektir. Bunu yapmak için Thrive Themes web sitesine gidebilir ve ücretli bir plan alabilirsiniz.

Ardından, hesap kontrol paneline gitmek için oturum açmanız yeterlidir.
Bu sayfada ‘Thrive Product Manager eklentisini indirin ve yükleyin’ seçeneğine tıklayın.
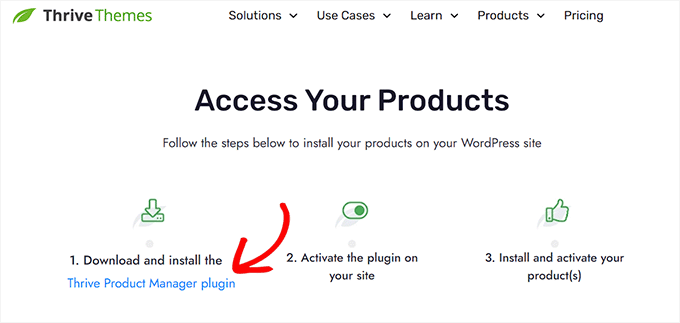
Şimdi, WordPress sitenize Thrive Product Manager eklentisini yüklemeniz yeterlidir. Daha fazla ayrıntı için WordPress eklentisi yükleme hakkındaki kılavuzumuza göz atın.
Daha sonra, WordPress yönetici alanınızdan Ürün Yöneticisi sayfasına gidin ve ‘Hesabımda oturum aç’a tıklayın.
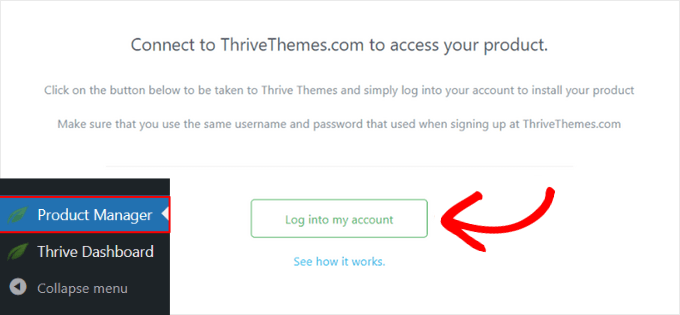
Şu anda Thrive Product Manager kontrol panelindesiniz.
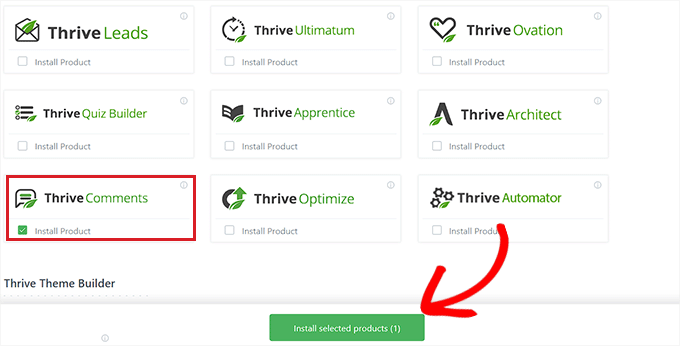
Bu aşamada devam edin ve Thrive Comments‘i seçin. Ardından ‘Seçili ürünleri yükle’ butonuna tıklayın.
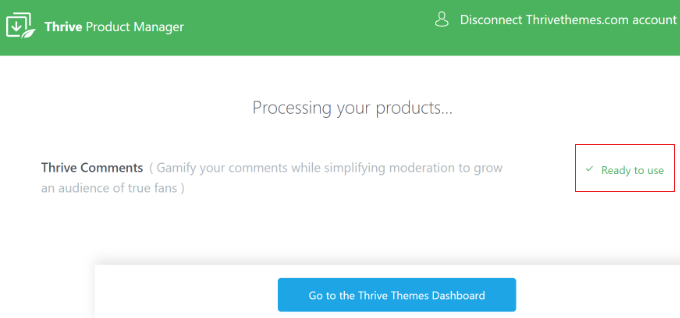
Kurulum tamamlandığında, ‘Kullanıma hazır’ yazan bir mesaj göreceksiniz.
Alttaki ‘Thrive Themes Panosuna Git’ düğmesine tıklamanız yeterlidir.
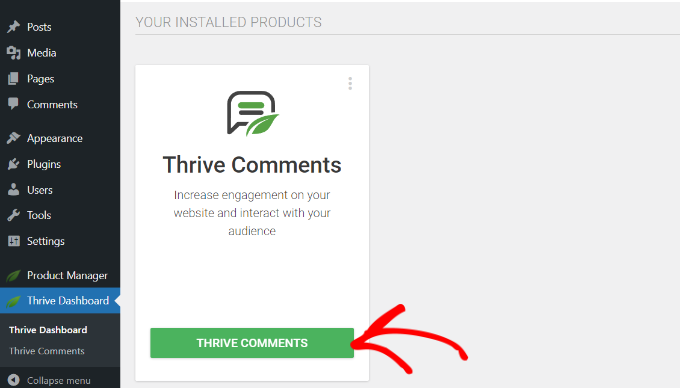
Şimdi pakette tüm yüklü eklentilerinizi göreceksiniz.
Devam edin ve eklentiyi kullanmaya başlamak için ‘Thrive Comments’ düğmesine tıklayın.
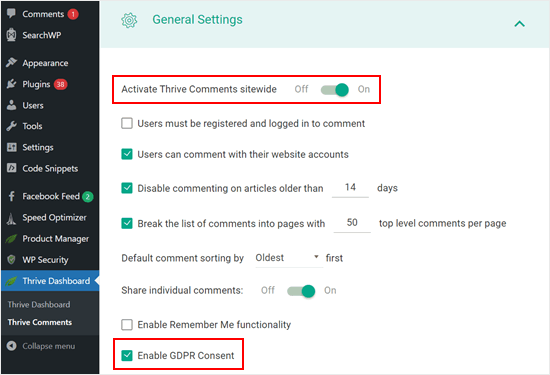
Bir sonraki sayfada, ‘Genel Ayarlar’ menüsünü açın.
Ardından, tüm web siteniz için Thrive Yorumları bölümünü etkinleştirin ve “GDPR İznini Etkinleştir” yazan kutuyu işaretleyin.
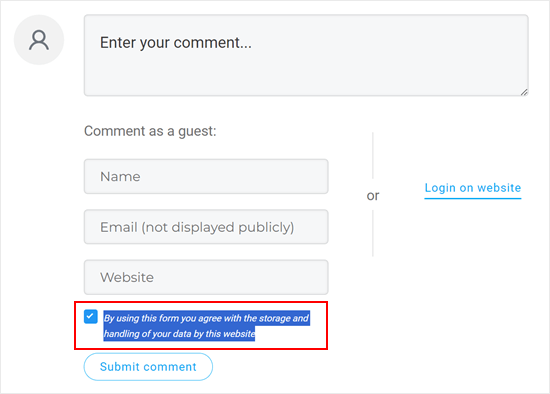
Bunu yaptıktan sonra yorum bölümünüzü önizleyebilirsiniz.
Gördüğünüz gibi, varsayılan yorum formu değiştirildi ve artık “Bu formu kullanarak verilerinizin bu web sitesi tarafından saklanmasını ve işlenmesini kabul ediyorsunuz” yazan bir onay kutusu var.
İşte bu kadar. Ayrıca, yorum bölümünüzü daha da geliştirmek için diğer Thrive Yorumları ayarlarıyla oynamaktan çekinmeyin.
Örneğin, kullanıcıların WordPress yorumlarına abone olmalarına ve yorumlarına gelen yanıtları bildirmelerine izin verebilirsiniz.
Şimdi, sadece bu onay kutusunu eklemek için ücretli bir yorum eklentisi kullanmanın aşırıya kaçmak gibi göründüğünü hissediyorsanız anlıyoruz.
Bu durumda, sonraki iki yöntemi denemenizi öneririz. Her ikisi de bazı özel kodlamalar içerir, ancak kodlama deneyiminiz olmasa bile gizlilik onay kutusunu başarıyla ekleyebilmeniz için süreç boyunca size yol göstereceğiz.
Not: Aşağıdaki eğitimleri takip etmeden önce, beklenmedik hatalara karşı web sitenizi yedeklemenizi şiddetle tavsiye ederiz. Duplicator gibi bir yedekleme eklentisi kullanabilirsiniz.
Yöntem 2: WordPress Temanıza KodlaGDPR Onay Kutusu Ekleyin
Bu yöntem çoğu WordPress teması için işe yarayacaktır. Ayrıca temanızın form stilini ve düzenini de koruyacaktır.
Öncelikle, FileZilla gibi bir FTP istemcisi kullanarak WordPress sitenize bağlanmanız gerekir veya WordPress hosting cPanel’inizin dosya yöneticisini kullanabilirsiniz. Eğer bir SiteGround müşterisiyseniz, Site Araçları panosundaki dosya yöneticisini kullanabilirsiniz.
FTP’yi ilk kez kullanıyorsanız, FTP kullanarak sitenize nasıl bağlanacağınıza ilişkin eksiksiz kılavuzumuza bakabilirsiniz.
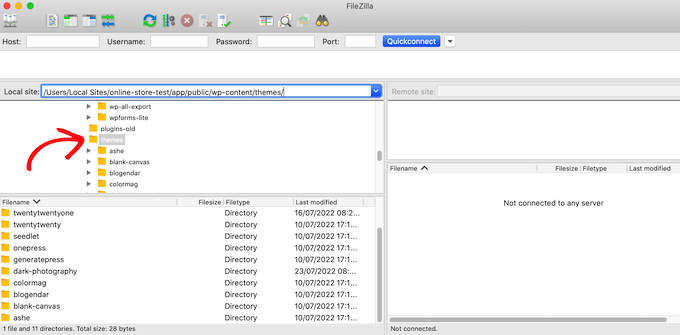
Bağlandıktan sonra /wp-content/themes/ adresine gitmeniz ve mevcut WordPress temanızın klasörünü açmanız gerekir.
Varsayılan WordPress yorum formunu geçersiz kılan kodu bulmanız gerekecektir. Normalde bunu tema klasörünüzdeki comments.php veya functions.php dosyasında bulabilirsiniz.
Bu dosyalardan birini açtıktan sonra comment_form_default_fields filtresine sahip herhangi bir kod olup olmadığına bakın. Temalar, varsayılan WordPress yorum formunu geçersiz kılmak için bu filtreyi kullanır.
Tüm yorum formu alanlarınız için satırlar olacaktır. Her tema farklıdır, ancak işte aradığınız kodun bir örneği:
1 2 3 4 5 6 7 8 9 10 11 12 13 14 15 16 17 18 19 20 21 22 23 24 25 26 27 28 29 | $comments_args = array( // change the title of send button 'label_submit'=> esc_html(__('Post Comments','themename')), // change the title of the reply section 'title_reply'=> esc_html(__('Leave a Comment','themename')), // redefine your own textarea (the comment body) 'comment_field' => ' <div class="form-group"><div class="input-field"><textarea class="materialize-textarea" type="text" rows="10" id="textarea1" name="comment" aria-required="true"></textarea></div></div>', 'fields' => apply_filters( 'comment_form_default_fields', array( 'author' =>'' . '<div><div class="input-field">' . '<input class="validate" id="name" name="author" placeholder="'. esc_attr(__('Name','themename')) .'" type="text" value="' . esc_attr( $commenter['comment_author'] ) . '" size="30"' . $aria_req . ' /></div></div>', 'email' =>'' . '<div><div class="input-field">' . '<input class="validate" id="email" name="email" placeholder="'. esc_attr(__('Email','themename')) .'" type="email" value="' . esc_attr( $commenter['comment_author_email'] ) . '" size="30"' . $aria_req . ' /></div></div>', 'url' =>'' . '<div class="form-group">'. '<div><div class="input-field"><input class="validate" placeholder="'. esc_attr(__('Website','themename')) .'" id="url" name="url" type="text" value="' . esc_attr( $commenter['comment_author_url'] ) . '" size="30" /></div></div>', ) ), ); comment_form($comments_args); ?> |
Bu kodda, comment_form_default_fields filtresinin yazar, e-posta ve URL alanlarını değiştirmek için kullanıldığını fark edeceksiniz.
Her bir alanı aşağıdaki formatı kullanarak görüntüler:
1 2 | 'fieldname' => 'HTML code to display the field','anotherfield' => 'HTML code to display the field', |
Şimdi, comment_form($comments_args); ?> satırından önce kod bloğunun sonuna doğru comment privacy opt-in onay kutusu alanını ekleyeceğiz.
Kod şu anda böyle görünmelidir, ancak kodu kopyalayıp // Şimdi yeni gizlilik onay kutusu tercih yorumumuzu ekleyeceğiz:
1 2 3 4 5 6 7 8 9 10 11 12 13 14 15 16 17 18 19 20 21 22 23 24 25 26 27 28 29 30 31 32 33 34 | $comments_args = array( // change the title of send button 'label_submit'=> esc_html(__('Post Comments','themename')), // change the title of the reply section 'title_reply'=> esc_html(__('Leave a Comment','themename')), // redefine your own textarea (the comment body) 'comment_field' => ' <div class="form-group"><div class="input-field"><textarea class="materialize-textarea" type="text" rows="10" id="textarea1" name="comment" aria-required="true"></textarea></div></div>', 'fields' => apply_filters( 'comment_form_default_fields', array( 'author' =>'' . '<div><div class="input-field">' . '<input class="validate" id="name" name="author" placeholder="'. esc_attr(__('Name','themename')) .'" type="text" value="' . esc_attr( $commenter['comment_author'] ) . '" size="30"' . $aria_req . ' /></div></div>', 'email' =>'' . '<div><div class="input-field">' . '<input class="validate" id="email" name="email" placeholder="'. esc_attr(__('Email','themename')) .'" type="email" value="' . esc_attr( $commenter['comment_author_email'] ) . '" size="30"' . $aria_req . ' /></div></div>', 'url' =>'' . '<div class="form-group">'. '<div><div class="input-field"><input class="validate" placeholder="'. esc_attr(__('Website','themename')) .'" id="url" name="url" type="text" value="' . esc_attr( $commenter['comment_author_url'] ) . '" size="30" /></div></div>', // Now we will add our new privacy checkbox opt-in 'cookies' => '<p class="comment-form-cookies-consent"><input id="wp-comment-cookies-consent" name="wp-comment-cookies-consent" type="checkbox" value="yes"' . $consent . ' />' . '<label for="wp-comment-cookies-consent">' . __( 'Save my name, email, and website in this browser for the next time I comment.' ) . '</label></p>', ) ), ); comment_form($comments_args); ?> |
Bu değişikliği yaptıktan sonra dosyayı kaydedip WordPress barındırma hesabınıza geri yüklediğinizden emin olun.
İşiniz bittiğinde, değişiklikleri yerinde görmek için WordPress blogunuzu ziyaret edebilirsiniz.
Yöntem 3: Temanızın Yorum Formunu WordPress Varsayılan Formu ile Değiştirin
Bu yöntem basitçe temanızın yorum formunu varsayılan WordPress yorum formu ile değiştirir.
Bu yöntem yorum formunun görünümünü değiştirebilir, bu nedenle formun stilini ve düzenini korumak istiyorsanız en iyi yöntem değildir. Ancak bu değişikliği yaptıktan sonra yorum formunuzu her zaman özel CSS kullanarak şekillendirebilirsiniz.
Önceki yöntemde olduğu gibi, ilk adım FTP kullanarak sunucunuza bağlanmak veya ana bilgisayarınızın dosya yöneticisini açmaktır.
Bundan sonra, comments.php dosyasını açın ve comment_form() işlevini içeren bir satır arayın. Temanızın, temanızın özel yorum formunu yüklemek için kullandığı tanımlanmış bir argümanı, işlevi veya şablonu olacaktır. comment_form satırı aşağıdaki gibi görünecektir:
1 | <?php comment_form( custom_comment_form_function() ); ?> |
Bunu aşağıdaki satırla değiştirmeniz gerekecektir:
1 | <?php comment_form(); ?> |
Bunu yaptıktan sonra değişikliklerinizi kaydedin.
Şimdi, web sitenizi ziyaret ederseniz, yorum gizliliği onay kutusuyla birlikte varsayılan WordPress yorum formunu göreceksiniz.
Bonus İpucu: MonsterInsights ve WPConsent ile GDPR Uyumluluğunu İyileştirin
Yorum gizliliği onay kutusunu etkinleştirmek, web sitenizi GDPR ile daha uyumlu hale getirmenin bir yoludur. Başka veriler topluyorsanız ve web sitenizin GDPR’ye uyduğundan emin olmak istiyorsanız MonsterInsights‘ı yüklemenizi öneririz.
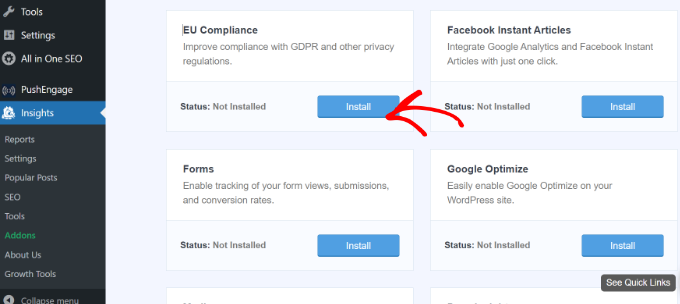
MonsterInsights, web sitenizi Google Analytics‘e bağlamayı kolaylaştıran bir eklentidir. Sadece bu da değil, takibinizi GDPR ile uyumlu hale getirmek için bir AB Uyumluluk eklentisine sahiptir.
Bu sayede MonsterInsights, kullanıcı sitenize geldiğinde bunu yapmak yerine kullanıcının etkinliklerini izlemek için onay vermesini bekler.
MonsterInsights hakkında daha fazla bilgi için MonsterInsights incelememizi okuyabilirsiniz.
GDPR uyumluluğu için bir diğer önemli araç, web sitenizin tamamında çerez onayı yönetimini gerçekleştiren WPConsent‘tir. Piyasadaki en iyi WordPress GDPR uyumluluk eklentilerinden biridir.
Bu eklenti, üçüncü taraf komut dosyalarından, temel WordPress özelliklerinden ve eklentilerden gelen çerezleri tespit etmek için tüm WordPress kurulumunuzu otomatik olarak tarar, hatta bilmediğiniz gizli çerezleri bile bulur.
Tespit edildikten sonra, açık izin verilene kadar bu komut dosyalarının kullanıcı etkinliğini izlemesini engelleyen özel bir çerez izni açılır penceresini otomatik olarak oluşturabilirsiniz.

Yorum gizliliği onay kutunuzun yanı sıra hem MonsterInsights hem de WPConsent’ı kullanmak, hem sizi hem de kullanıcılarınızı koruyan kapsamlı bir GDPR uyumluluk sistemi oluşturur.
Bu makalenin WordPress’te GDPR yorum gizliliği onay kutusunu nasıl ekleyeceğinizi öğrenmenize yardımcı olduğunu umuyoruz. Ayrıca WordPress yorumlarını denetlemeye yeni başlayanlar için kılavuzumuzu ve kullanıcıların uygunsuz WordPress yorumlarını bildirmesine nasıl izin vereceğinize ilişkin makalemizi de görmek isteyebilirsiniz.
If you liked this article, then please subscribe to our YouTube Channel for WordPress video tutorials. You can also find us on Twitter and Facebook.


Jiří Vaněk
I live in the Czech Republic, which is subject to the GDPR law and it is a rather complex and comprehensive law. As far as websites are concerned, we now have to be really very careful about how we handle the data that the user sends to the website. These guides are great because they help people better prepare their website for this law and not forget anything. Thanks for the guide, you really have to be very careful about GDPR and these guides are a great help.
Kris
What I just don’t understand or maybe I am missing something, is how to put the Privacy Policy checkbox as in what you have on your comments. Something like, “by using this form you agree to us collecting and storing data as per our privacy policy. Nobody seems to have this information – just the usual comment checkbox which is straight forward to do.
WPBeginner Support
If I understand what you’re looking to do, you can change the text by editing the text on line 29 in our code above that currently has ‘Save my name, email, and website in this browser for the next time I comment.’ when replacing, ensure you keep the single quotes.
Admin
Stephen Ho
Thank!
mike carpenter
Got this working and checked that the cookie was being created as expected, but when I browse away from the blog page and then return to it, I expected the form values to be pre-populated with the values stored in the cookie, but this doesn’t happen and the fields are left blank! I think I assumed that the line $commenter = wp_get_current_commenter(); and subsequent lines esc_attr( $commenter[‘comment_author_url’] ) etc. would retrieve the stored field values from the cookie. Have I missed something, or am I msundersatding the way the checkbox is supposed to work?
Sefket
Do you have one for contact forms?
WPBeginner Support
Hi Sefket,
Please see our article on how to create GDPR compliant forms in WordPress.
Admin
Tara
I normally find great info on your site, but I have to speak up and say in this case, this is not accurate to be ready for GDPR, you need get consent to save their data for the comment/email/name/ip etc in your website database, whether or not they choose to save their details in a cookie for faster commenting at a later time.
I used css to hide this checkmark and installed a GDPR plugin, unfortunately now that plugin is not prompting people that they have to checkmark to leave their comment, so now we are losing comments. What’s also frustrating is that it appears for all users with no option to show only for EU. Another frustration is that with hiding the wordpress added checkmark, now the users do not see “your comment is awaiting moderation”.
parijatak ayurveda
Thanks for the sharing of information.
Mirko
What if I don’t want the commenters to store a cookie with their personal data at all? Is there a way to deactivate the whole process and to hide this cookie consent for good?
Uphoria
What if the code is there in my theme already? It’s still not showing up, but it has each of the fields there.
Peter
Thx for the guide,
but everything described doesn’t seem to be possible, if it’s a wordpress.com page (free/no plan).
There is no updating and there is nothing in the settings to add an opt-in check box or any other specific code. The only thing in the settings, that implies a possibility to achieve GDPR-compliance is to add a short info, that data will be provided to and stored at automaticc with a link to their privacy disclaimer. Furthermore, plug-ins and access via ftp can not be used.
—
Any suggestions on how to include an opt-in check box for users who only use the free wordpress.com solution?
Or is it not even needed due to the fact that user access to the web space is only possible via the rather limited wordpress configuration page – or due to any other means?
WPBeginner Support
Hi Peter,
Please reach out to WordPress.com support, they will be able to help you better.
Admin
Bryan
Hello, I was able to add this in my theme and it works, but there is one problem. I check consent box. Next time, my name and email are filled in, but I have to check consent box again. In default WP theme, if I check remember name, email fields box once, next time it comes checked by default. Is there problem with my theme or this code can be improved?
Jim
Hey there! Great instruction! I am trying to get some sites GDPR compliant as well.
I was wondering about Genesis websites, I couldn’t find this code in either comments.php OR functions.php so I first tried loading the code from Method 1 in via Simple Hooks after the comment form then I used the code you gave to Mateja in my functions.php. Both gave me a checkbox but… is it supposed to do anything else? Is there somewhere that I can see whether a commenter has checked this box? Thanks in advance for any help.
Jim
Elisa
Unfortunately I cannot apply any of the mentioned solutions as none of the CSS can be found. Contacted the comoany I got my theme from, hope they can help.
Alexander
Hi,
I was not helped by Method 1 and Method 2.
I could not find the code I needed to edit.
I’m using the “publisher” (themeforest) template.
Can you tell me how to configure the “publisher” template?
Thank you
WPBeginner Support
Hi Alexander,
Unfortunately, it is not possible for us to come up with a solution for each theme as they use different methods. It would be best to contact your theme developer for support.
Admin
Samantha
I also got the “Undefined variable: consent” message when I tried to do this, although the checkbox appeared along with the message.
Vicdayo
What if I’m using facebook comment system on my blog?
Mateja
Hi, I disabled the Jetpack comment form and now I can see the checkbox. All good. BUT, I don’t like how the text looks like….save my name, address and so on…..I would like to insert my own text with a link to the privacy policy,,,,,….is that possible? and how I do that? Thank you
WPBeginner Support
Hi Mateja,
You can try this code in your theme’s functions.php file. You’ll be able to change the label text for the consent checkbox.
functionwpb_comments_privacy($arg) {$arg['cookies'] ='<p class="comment-form-cookies-consent"><input id="wp-comment-cookies-consent" name="wp-comment-cookies-consent" type="checkbox" value="yes"'.$consent.' />'.'<label for="wp-comment-cookies-consent">'. __('Save my name, email, and website in this browser for the next time I comment.') .'</label></p>';return$arg;}add_filter('comment_form_default_fields','wpb_comments_privacy');1-click Use in WordPress
Admin
Inayatali
Thank you so much.
WPBeginner Support
You’re welcome
Kamran Khan
Thank you sir. I have applied the 1st method. Its working but after inserting the code some of the code elements also shown with the checkbox and message which I manually removed. Is it OK? Now its working fine but the checkbox is showing above the message and not inline. How I can inline both the checkbox and the message.
WPBeginner Support
Hi Kamran,
No, there is probably something missing in the code. Most likely a quote or a php start or end tag. Carefully review the code to make sure that all quotes are closed and code is properly formatted.
For styling you will need to use custom CSS to adjust the field.
Admin
Carey
Ok, I am ignorant about adding code. I am using the K2 theme, which does not seem to have the updated comments form. I installed Code Snippets, but I don’t understand – does it just know where to put the snippet? I looked at the comments code in the theme files, but it doesn’t look anything like your example here. In fact it has 189 lines of code for comments. Do I just add your “new privacy checkbox optin” code to snippets and click activate and it inserts it in the correct place? So confused…
WPBeginner Support
Hi Carey,
If you find editing theme files difficult, then ask your theme author to release an update.
Admin
Brian Sanderson
Hi! I do not have the above code in your article, as is, but i do have the following code in the comments.php file. The code includes the 4 fields;
Could you please advise how my code could be edited? Thanks in advance.
WPBeginner Support
Hi Brian,
It depends on rest of the code in your theme. Unfortunately, we cannot cover all the possible ways in which a theme may display a comment form. You will need to reach out to your theme author for support.
Admin
Mark Corder
Thanks for this – I know it was quick work on your part too!
Thomas
I tried using this and got the following notice in place of the checkbox:
Undefined variable: consent
So you didn’t define it? How do I do that?
Mark Corder
Huh… It’s working for me. I just need to get the checkbox and label lined-up to match the rest of my form…
Thomas
Just so everyone knows I opened up comments-template.php file from the wp-includes folder and found this:
$consent = empty( $commenter[‘comment_author_email’] ) ? ” : ‘ checked=”checked”‘;
Adding this to the above defines the consent and in doing so will remove the notice if you have debug turned on.
You have to add it before the $comments_args = array. This all depends on how you have your template configured.
Hope it helps.