Okurlarımızdan biri bize WordPress’te özel tek yazı şablonlarının nasıl oluşturulacağını sordu.
WPBeginner’da, birçok web sitesi sahibinin bloglarını tek tek gönderiler için benzersiz düzenlerle geliştirmesine yardımcı olduk. Özel tekli gönderi şablonları, blog gönderileriniz için farklı tasarımlar kullanmanıza olanak tanıyarak her birine farklı bir görünüm kazandırır. Birçok WordPress teması birkaç sayfa şablonu sunar, ancak gerekirse kendiniz de oluşturabilirsiniz.
Bu makalede, WordPress’te kolayca özel tek yazı şablonları oluşturmak için birden fazla yöntem göstereceğiz, böylece ihtiyaçlarınıza en uygun olanı seçebilirsiniz.

Özel Bir Tekli Gönderi Şablonuna Ne Zaman İhtiyacınız Olur?
Bazen WordPress web sitenizdeki belirli yazılar için farklı bir görünüm ve his isteyebilirsiniz. Örneğin, öne çıkan makaleler veya belirli bir kategorideki hikayeler için farklı bir düzen kullanmak isteyebilirsiniz.
WordPress’te özel bir tek yazı şablonuna ihtiyaç duyduğunuz yer burasıdır.
WordPress varsayılan olarak WordPress şablon hiyerarşisine dayalı tekli yazı şablonunu kullanır. Tüm temalar bir single.php şablonuyla birlikte gelir ve bu şablon varsayılan olarak tüm tekli yazılarınız için kullanılır.
Bazı temalar, kullanabileceğiniz ek şablonlar veya düzen seçenekleri de içerebilir.
Bu, özel bir sayfa şablonu oluşturmaya çok benzer. Çoğu WordPress teması, WordPress’te bir yazıyı veya sayfayı düzenlerken kullanabileceğiniz sayfa şablonlarıyla birlikte gelir.
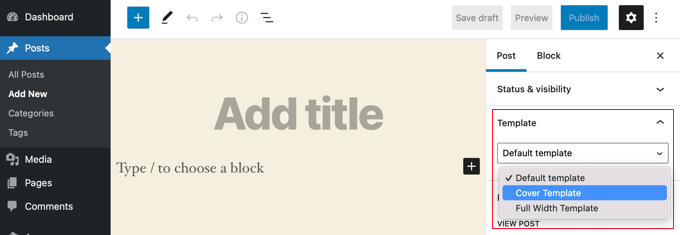
Bunu söyledikten sonra, WordPress’te özel tekli yazı şablonlarının nasıl kolayca oluşturulacağına bir göz atalım. Size birden fazla yöntem göstereceğiz, böylece sizin için en uygun olanı kullanabilirsiniz.
- Blok düzenleyiciyi kullanarak tek gönderi şablonları oluşturma
- SeedProd kullanarak özel tekli gönderi şablonları oluşturma
- Tekli gönderi düzenleri oluşturmak için tema ayarlarını kullanma
- Kod ile manuel olarak özel tekli gönderi şablonları oluşturma
- Kategoriye göre özel tekli gönderi şablonları oluşturma
- Belirli yazarlar için özel tekli gönderi şablonları oluşturma
Blok Düzenleyiciyi Kullanarak Tek Gönderi Şablonları Oluşturma
Bu yöntem gerçek anlamda bir gönderi şablonu oluşturmaz ve esneklik açısından sınırlıdır. Ancak, kendi tekli gönderi düzenlerinizi kaydetmenin ve daha sonra bunları yeniden kullanmanın en kolay yoludur.
Varsayılan WordPress blok editörü, blokları kaydetmenize ve yeniden kullanmanıza olanak tanıyan yerleşik bir özellikle birlikte gelir. Bu tür yeniden kullanılabilir bloklardan biri de grup bloğudur.
Grup bloğu, birkaç bloğu ve tüm gönderi düzenini tek bir gruba koymanıza olanak tanır. Daha sonra bu grup bloğunu kaydedebilir ve diğer gönderilerinizde yeniden kullanabilirsiniz.
Özel gönderi şablonlarınızı kaydetmek için grup bloğunu nasıl kullanacağınıza bir göz atalım.
İlk olarak, WordPress’te yeni bir yazı oluşturmanız gerekir. Bundan sonra, içerik alanına bir grup bloğu eklemeniz yeterlidir.
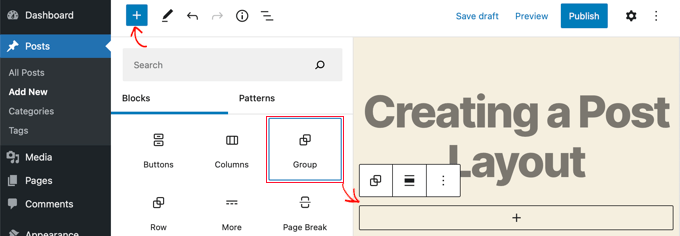
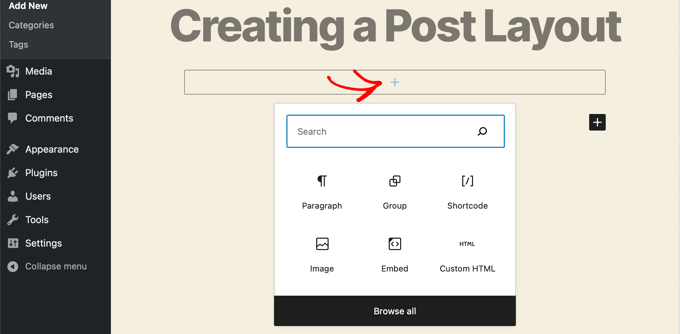
Artık WordPress blogunuz için tek bir yazı düzeni oluşturmak üzere grup bloğuna bloklar eklemeye başlayabilirsiniz.
Sütunlar, medya ve metin, kapak resimleri ve daha fazlası dahil olmak üzere istediğiniz blokları ekleyebilirsiniz.
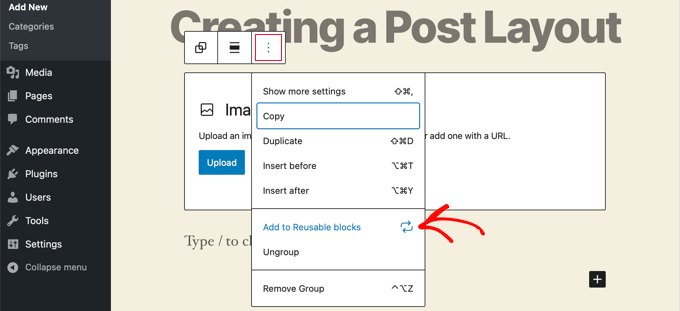
Oluşturduğunuz düzenden memnun olduğunuzda, farenizi yukarı kaldırmanız ve grup bloğunu seçmeniz gerekir.
Üç noktalı menü simgesine tıklamanız ve ardından ‘Yeniden Kullanılabilir bloklara ekle’ seçeneğini seçmeniz yeterlidir.
Ardından, yeniden kullanılabilir blok için bir ad vermeniz ve ardından Kaydet düğmesine tıklamanız gerekir. WordPress şimdi yeniden kullanılabilir bloğunuzu, grup bloğunun içindeki tüm bloklar da dahil olmak üzere kaydedecektir.
Daha sonra web sitenizdeki mevcut herhangi bir gönderiyi düzenleyebilir veya yeni bir tane oluşturabilirsiniz. Yazı düzenleme ekranında, yeni blok ekle düğmesine tıklayın ve ‘Yeniden Kullanılabilir’ sekmesi altında kayıtlı bloğunuzu arayın.
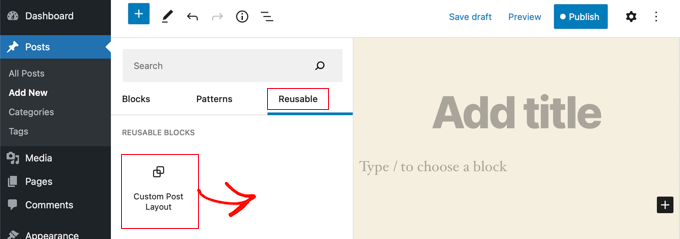
Bloğu yazınıza eklediğinizde WordPress tüm grup bloğunuzu tüm bloklar ve ayarlarla birlikte kaydettiğiniz şekilde yükleyecektir.
Bu yöntem, özel düzenlerinizi kaydetmenize olanak tanır. Ancak, temanızın tekli gönderileri işleme şeklini değiştirmenize izin vermez.
Daha fazla esneklik istiyorsanız, bir sonraki adımı okumaya devam edin.
SeedProd Kullanarak Özel Tek Yazı Şablonları Oluşturma
Özel bir tek yazı şablonu oluşturmanın en kolay yolu SeedProd kullanmaktır. En iyi WordPress web sitesi oluşturucu eklentisidir ve herhangi bir kod yazmadan güzel web sitesi düzenleri ve özel şablonlar oluşturabilir.
Özel tek yazı şablonları da dahil olmak üzere tamamen özel bir WordPress teması oluşturmak için SeedProd’un sürükle ve bırak oluşturucusunu kullanabilirsiniz.
Yapmanız gereken ilk şey SeedProd eklentisini kurmak ve etkinleştirmektir. Daha fazla ayrıntı için, WordPress eklentisi yükleme hakkındaki adım adım kılavuzumuza bakın.
Etkinleştirmenin ardından lisans anahtarınızı girmeniz gerekir. Bu bilgiyi SeedProd web sitesindeki hesabınızın altında bulabilirsiniz.

Bundan sonra sıra özel bir WordPress teması oluşturmaya geliyor. Bu göründüğünden çok daha basittir.
Özel WordPress Teması Oluşturma
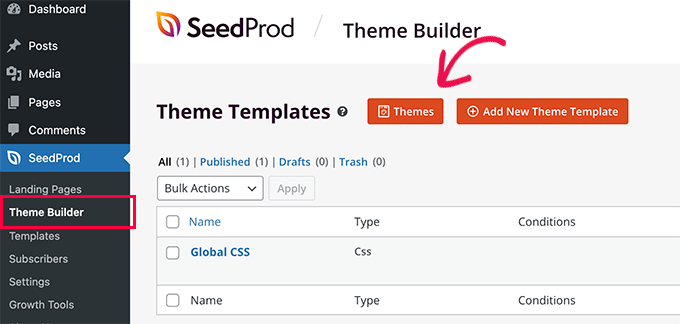
İlk olarak, SeedProd ” Tema Oluşturucu sayfasına gitmeniz gerekiyor. Burada, SeedProd’un hazır temalarından birini başlangıç noktası olarak kullanacaksınız. Bu, mevcut WordPress temanızı yeni, özel bir tasarımla değiştirecektir.
Bunu ‘Temalar’ düğmesine tıklayarak yapabilirsiniz.
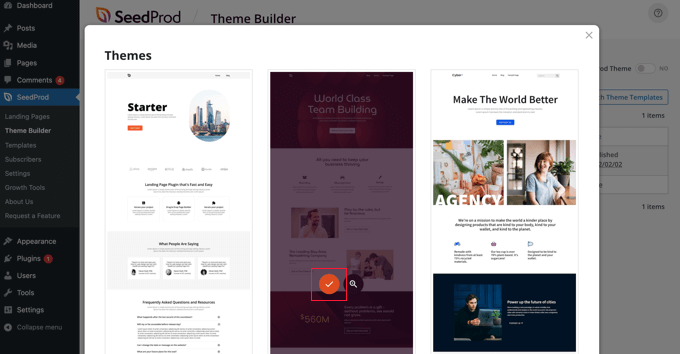
Farklı web sitesi türleri için profesyonel olarak tasarlanmış temaların bir listesi gösterilecektir. Örneğin, ‘Modern İşletme’, ‘Pazarlama Ajansı’ ve ‘Mortgage Broker Teması’ adlı şablonlar vardır.
Seçeneklere bir göz atın ve onay işareti simgesine tıklayarak ihtiyaçlarınıza en uygun olanı seçin.
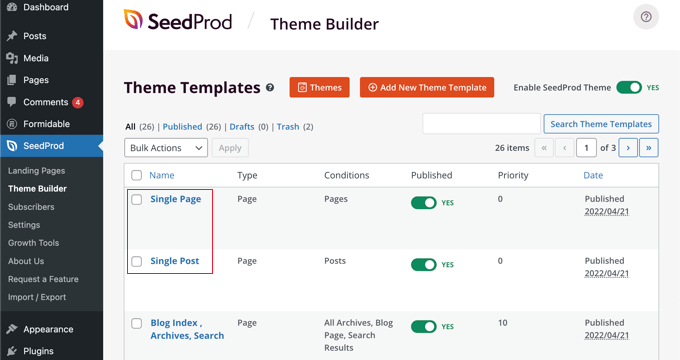
Bir tema seçtikten sonra SeedProd, biri tek sayfalar ve diğeri tek gönderiler için olmak üzere ihtiyacınız olan tüm tema şablonlarını oluşturacaktır.
Her şablon, özelleştirmesi kolay çekici düzenler ve yer tutucu içeriklerle birlikte gelir.
SeedProd ile bir tema oluşturma hakkında daha fazla bilgi edinmek için, herhangi bir kod olmadan kolayca özel bir WordPress temasının nasıl oluşturulacağına ilişkin kılavuzumuza bakın.
Varsayılan Tek Gönderi Şablonunu Özelleştirme
SeedProd, sürükle ve bırak sayfa oluşturucu kullanarak varsayılan ‘Tek Yazı’ şablonunu özelleştirmeyi kolaylaştırır.
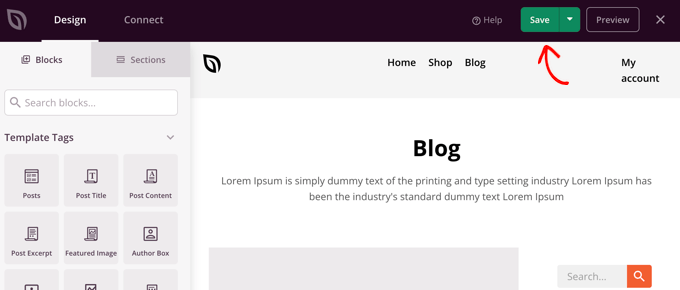
Şablonun altında bulunan ‘Tasarımı Düzenle’ bağlantısına tıklamanız yeterlidir. Bu, gönderi şablonunuzu SeedProd’un görsel düzenleyicisinde açacaktır.

SeedProd’un görsel editörü 2 sütunlu bir düzene sahiptir. Sol tarafta, tasarımınıza ekleyebileceğiniz bloklar ve bölümler bulacaksınız.
Sağ tarafta, değişikliklerinizi gerçek zamanlı olarak görebileceğiniz şablonun bir önizlemesi yer almaktadır.
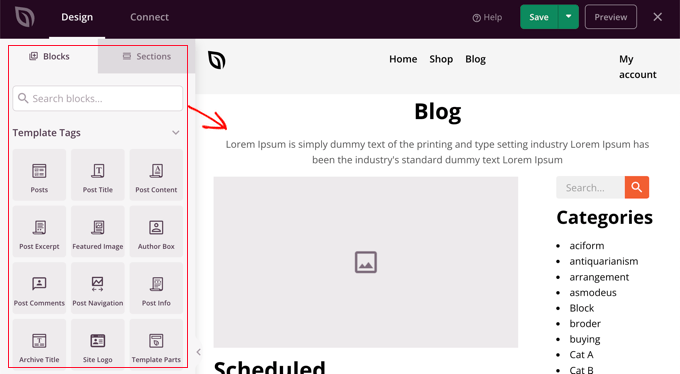
Gönderi şablonunuzun düzenini özelleştirmek de kolaydır. Ayarlarını sol sütunda görmek için herhangi bir bloğa tıklamanız yeterlidir.
Örneğin, yazı başlığına tıklarsanız, ayarlarını görebilirsiniz. Artık hizalamayı, yazı tipi boyutunu, başlık düzeyini ve daha fazlasını değiştirebilirsiniz.
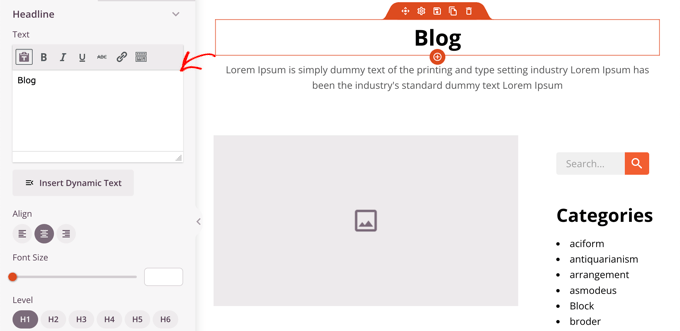
Gelişmiş sekmesine tıklayarak yazı tipi renklerini, aralıkları ve diğer stilleri değiştirebilirsiniz.
Ek blokları sol sütundan önizleme sütununa sürükleyerek ekleyebilirsiniz. SeedProd, yazı başlıkları, öne çıkan görseller, yorumlar ve daha fazlası gibi dinamik içerikleri çekmek için şablon etiketlerini kullanır. Bu, her bir gönderiyi ayrı ayrı düzenlemek zorunda kalmadan şablona içerik eklemenizi sağlar.
Örneğin, gönderi içeriğinizin sonuna bir Gönderiler bloğu ekleyebilirsiniz. Bu, ziyaretçilerinizin mevcut gönderiyi bitirdiklerinde okumak isteyebilecekleri son gönderileri gösterecektir. Bu blok, bu şablonu kullanan tüm gönderilerde otomatik olarak gösterilecektir.
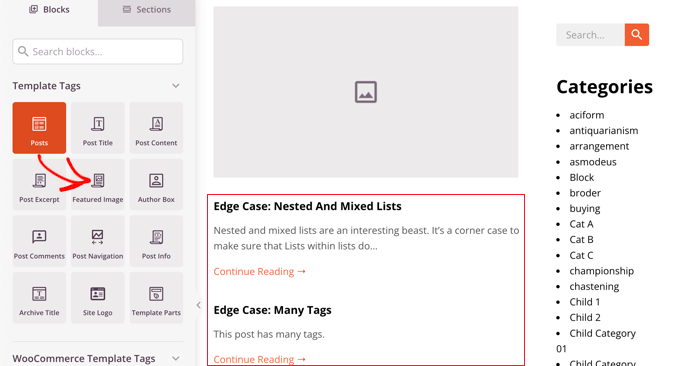
Ardından, gösterilen içeriği özelleştirmek için Yazılar bloğunun ayarlarını değiştirebilirsiniz.
Örneğin, belirli kategorilerdeki içeriği görüntüleyebilir, iki sütunlu bir düzen kullanabilir ve gösterilen gönderi sayısını değiştirebilirsiniz.
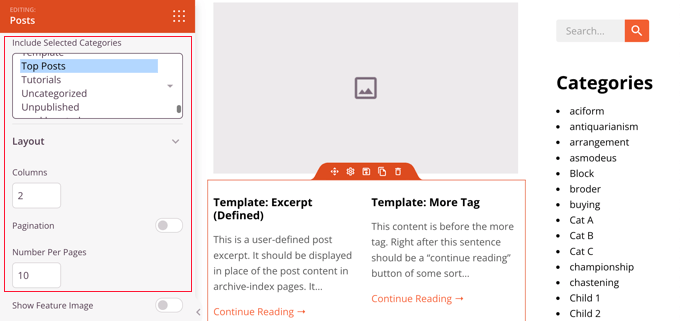
Farklı blokları deneyerek ve ayarlarını keşfederek zaman geçirmekten çekinmeyin.
Gönderi şablonunuz olarak kullanmak istediğiniz bir şey oluşturduktan sonra, sağ üst köşedeki yeşil ‘Kaydet’ düğmesine tıklayarak kaydetme zamanı gelmiştir. Bundan sonra, ‘X’ kapat simgesine tıklayarak SeedProd görsel düzenleyicisini kapatabilirsiniz.
WordPress temanızın geri kalanını da aynı şekilde özelleştirebilirsiniz. Ancak biraz yardıma ihtiyacınız varsa, SeedProd ile özel bir WordPress temasının nasıl oluşturulacağına ilişkin adım adım kılavuzumuza geri dönün.
Her şeyin nasıl göründüğünden memnun olduğunuzda, ‘SeedProd Temasını Etkinleştir’ anahtarının açık konuma getirildiğinden emin olun. WordPress siteniz artık SeedProd temanızı ve özel tek posta şablonunuzu kullanacaktır.

Özel Tekli Gönderi Düzenleri Oluşturmak için Tema Ayarlarını Kullanma
Birçok popüler WordPress teması, tek gönderi şablonunuzun görünümünü özelleştirmek için yerleşik ayarlarla birlikte gelir.
Temanız bu ayarları destekliyorsa, bunları düzenleme sonrası ekranında bulabilirsiniz. Mevcut seçenekler kullandığınız temaya bağlı olarak değişebilir.
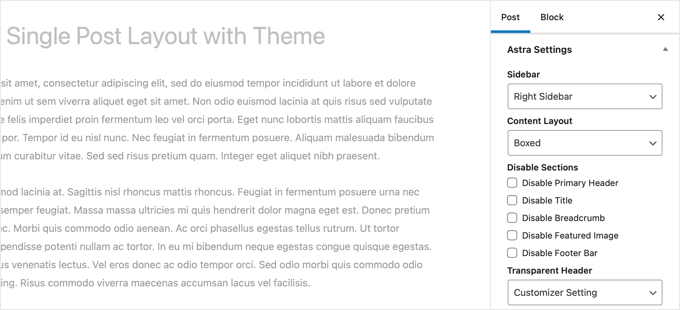
Örneğin, Astra teması tek bir gönderiyi düzenlerken özelleştirme seçenekleri sunar. Bu seçenekleri kullanarak kenar çubuklarını değiştirebilir, üstbilgileri, başlıkları, menüleri ve daha fazlasını gizleyebilirsiniz.
Öte yandan, en iyi WordPress temalarının çoğu, kullanabileceğiniz kullanıma hazır şablonlarla birlikte gelir.
Temanız tekli gönderi şablonları içeriyorsa, bir gönderiyi düzenlerken bunları ‘Şablon’ veya ‘Gönderi Özellikleri’ paneli altında bulabilirsiniz.
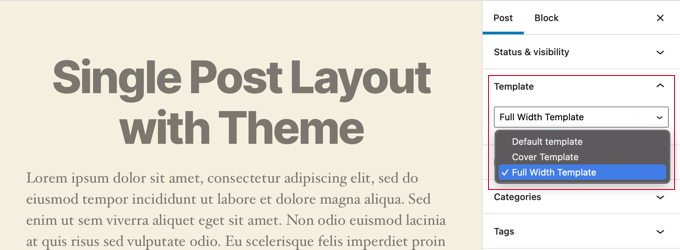
Bu şablonlar, yapılandırma gerektirmeden kullanabileceğiniz eksiksiz düzenlerdir.
Kod ile Özel Tekli Gönderi Şablonlarını Manuel Olarak Oluşturma
Bu yöntem tema dosyalarını düzenlemenizi, kodu kopyalayıp yapıştırmanızı ve isteğe bağlı olarak özel CSS eklemenizi gerektirdiğinden biraz ileri düzeydir. Bunu daha önce yapmadıysanız, WordPress’te kod kopyalama ve yapıştırma hakkındaki eğitimimize göz atın.
Öncelikle, bilgisayarınızda Not Defteri gibi bir düz metin editörü açmanız ve aşağıdaki kodu içine yapıştırmanız gerekir:
1 2 3 4 5 6 7 | <?php/* * Template Name: Featured Article * Template Post Type: post, page, product */ get_header(); ?> |
Bu kod, ‘Öne Çıkan Makale’ adında yeni bir şablon tanımlar ve bunu gönderi, sayfa ve ürün gönderi türleri için kullanılabilir hale getirir.
Bu dosyayı masaüstünüze wpb-single-post.php olarak kaydetmelisiniz. Ardından, şablonu WordPress sitenize eklemeniz gerekir. Bunu yapmak için, dosyayı mevcut tema klasörünüze yüklemek üzere bir FTP istemcisi kullanmanız gerekir.
Şimdi, WordPress yönetici alanınıza giriş yapabilir ve bir yazı oluşturabilir veya düzenleyebilirsiniz. Yazı düzenleme ekranında biraz aşağı kaydırdığınızda, şablonu seçme seçeneği içeren yeni bir ‘Şablon’ paneli veya ‘Yazı Özellikleri’ meta kutusu göreceksiniz.
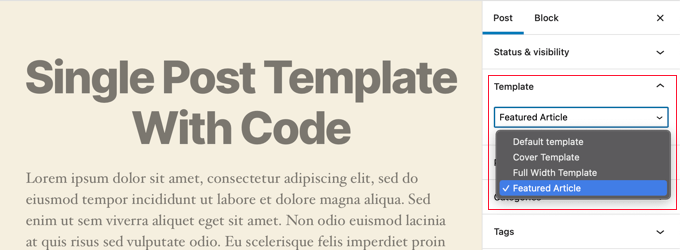
‘Öne Çıkan Makale’ özel şablonunuzun orada listelendiğini göreceksiniz.
Şu anda, şablonunuz aslında boştur, bu nedenle onu seçtiğinizde sadece beyaz bir ekran görüntülenecektir.
Hadi bunu düzeltelim.
Bunu yapmanın en kolay yolu, temanızın single.php dosyasındaki kodu kopyalamak ve başlangıç noktası olarak kullanmaktır. single.php dosyasını açmanız ve get_header() satırından sonraki her şeyi kopyalamanız gerekir.
Ardından, bu kodu wpb-single-post.php dosyanızın sonuna yapıştırmanız gerekir. Şimdi bu dosyayı kaydedebilir ve sunucunuza geri yükleyebilirsiniz.
Ancak bu, mevcut tekli gönderi şablonunuzla tamamen aynı görünecektir. Artık özel tek yazı şablonunuzda değişiklik yapmaya başlayabilirsiniz.
Kendi özel CSS sınıflarınızı ekleyebilir, kenar çubuklarını kaldırabilir, tam genişlikte bir şablon oluşturabilir veya istediğiniz her şeyi yapabilirsiniz.
Kategoriye Göre Özel Tekli Gönderi Şablonları Oluşturma
Kategorilere göre özel bir tekli gönderi şablonu kullanmak ister misiniz? Örneğin, seyahat kategorisindeki gönderilere fotoğraf kategorisindeki gönderilerden farklı bir düzen verebilirsiniz.
Bunu SeedProd Tema Oluşturucuyu veya kodu kullanarak yapabilirsiniz.
SeedProd Kullanarak Kategoriye Göre Özel Tek Yazı Şablonları Oluşturma
Daha önce, SeedProd Tema Oluşturucunun varsayılan tek yazı şablonunun nasıl özelleştirileceğini ele almıştık. Ancak bununla bitmiyor. SeedProd ile, her gönderi kategorisi için farklı bir düzen gibi istediğiniz kadar özel gönderi şablonu ekleyebilirsiniz.
Yeni bir tekli gönderi şablonu eklemek için orijinal gönderi şablonunun altındaki ‘Çoğalt’ bağlantısını tıklamanız yeterlidir. ‘Tekli Gönderi – Kopyala’ adında yeni bir şablon oluşturulacak ve tema şablonları sayfasının en üstüne eklenecektir.
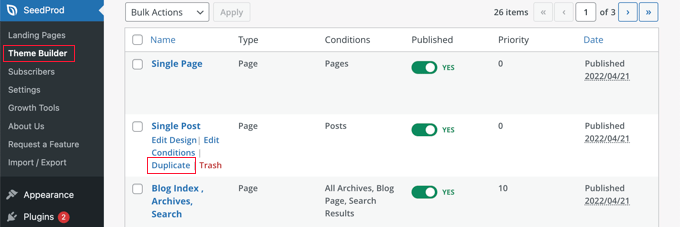
Yeni şablonu, daha önce varsayılan Tekli Gönderi şablonunu özelleştirdiğiniz şekilde özelleştirebilirsiniz. Basitçe şablonun ‘Tasarımı Düzenle’ bağlantısına tıklayın ve SeedProd’un görsel düzenleyicisini kullanarak istediğiniz değişiklikleri yapın.
Şablonu özelleştirmeyi bitirdiğinizde, SeedProd’un hangi gönderilerin bu şablonu kullanması gerektiğini bilmesi için bazı koşullar eklemeniz gerekecektir. Bu durumda, tek bir kategorideki gönderileri görüntülerken görüntülenmesini istiyoruz.

Bunu, şablonun ‘Koşulları Düzenle’ bağlantısına tıklayarak yapabilirsiniz; yeni bir pencere açılacaktır.
Burada şablona bir ad ve öncelik verebilirsiniz. Varsayılan Tek Gönderi şablonunun önceliği 0’dır, bu nedenle eşleşen kategorilerde görüntülenmesi için bu şablona daha yüksek bir öncelik verdiğinizden emin olun.
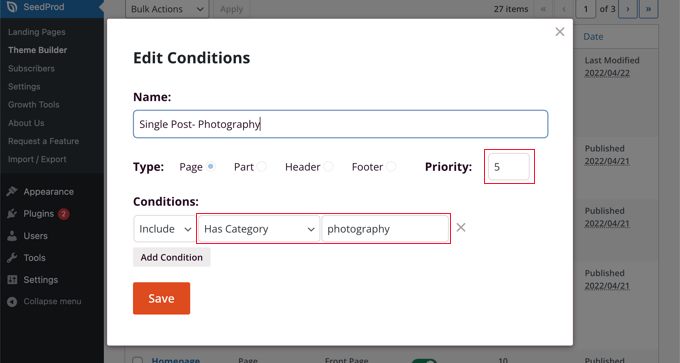
‘Koşullar’ altında, ikinci açılır menüden ‘Kategorisi Var’ı seçin, ardından son alana kategorinin adını yazın. Örneğin, yalnızca fotoğrafçılık kategorisindeki gönderilerin bu düzeni kullanmasını istiyorsanız, ‘fotoğrafçılık’ yazın.
İşiniz bittiğinde, ‘Kaydet’ düğmesine tıklayın ve artık bu şablon eşleşen kategorideki tüm gönderiler için kullanılacaktır.
Bu, WordPress’te birden fazla özel yazı şablonu oluşturmanın en kolay yoludur. Herhangi bir kod bilgisi gerektirmez ve yanlışlıkla herhangi bir tema dosyasını karıştırmaz.
Kod Kullanarak Kategoriye Göre Özel Tekli Gönderi Şablonları Oluşturma
Bu, tema dosyalarına kod ekleme konusunda rahat olanlar için başka bir yöntemdir.
Öncelikle, bu kodu temanızın functions.php dosyasına veya bir kod parçacıkları eklentisine eklemeniz gerekir.
1 2 3 4 5 6 7 8 9 10 11 12 13 14 15 16 17 18 19 20 21 22 23 24 25 26 27 28 29 30 | /** Define a constant path to our single template folder*/define(SINGLE_PATH, TEMPLATEPATH . '/single'); /*** Filter the single_template with our custom function*/add_filter('single_template', 'my_single_template'); /*** Single template function which will choose our template*/function my_single_template($single) {global $wp_query, $post; /*** Checks for single template by category* Check by category slug and ID*/foreach((array)get_the_category() as $cat) : if(file_exists(SINGLE_PATH . '/single-cat-' . $cat->slug . '.php'))return SINGLE_PATH . '/single-cat-' . $cat->slug . '.php'; elseif(file_exists(SINGLE_PATH . '/single-cat-' . $cat->term_id . '.php'))return SINGLE_PATH . '/single-cat-' . $cat->term_id . '.php'; endforeach;} |
Bu kod ilk olarak WordPress’in tek bir yazı isteyip istemediğini kontrol eder. Eğer öyleyse, WordPress’e şablonu WordPress temanızın /single/ klasöründe aramasını söyler.
Şimdi, bu kod tarafından tanımlanan şablon dosyalarını eklemeniz gerekir.
Bir FTP istemcisi veya cPanel ‘deki Dosya Yöneticisini kullanarak WordPress hostinginize bağlanın ve /wp-content/themes/your-theme-folder/ adresine gidin.
Mevcut tema klasörünüzün içinde ‘single’ adında yeni bir klasör oluşturmanız gerekir. Ardından, bu klasörü açmanız ve yeni bir dosya oluşturmanız gerekir. Devam edin ve bu dosyaya single-cat-{category-slug} adını verin. category-slug} yerine gerçek kategori slug’ınızı yazın.
Örneğin, ‘Haberler’ adında bir kategoriniz varsa, single-cat-news.php dosyasını oluşturacaksınız. ‘Seyahat İpuçları’ adında bir kategoriniz varsa, single-cat-travel-tips.php şablonunu oluşturun ve bu şekilde devam edin.
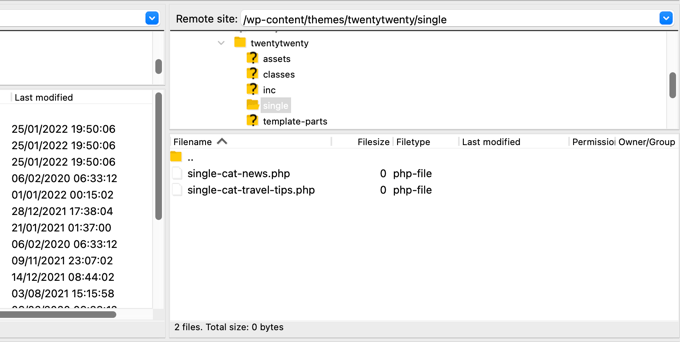
Şimdi, bu şablon dosyaları tamamen boş olacaktır. Başlangıç noktası olarak, single.php dosyanızın içeriğini tema klasörünüzden kopyalayabilir ve bu şablonların her birinin içine yapıştırabilirsiniz. Bundan sonra, istediğiniz değişiklikleri yapmak için bu şablonları düzenlemeniz gerekecektir.
İşiniz bittiğinde, web sitenize gidebilir ve bir gönderiyi görüntüleyebilirsiniz. Bu yazının bulunduğu kategori için oluşturduğunuz şablonu kullanacaktır.
Şimdi, iki kategoride dosyalanmış bir gönderiniz olduğunu varsayalım: Haberler ve Seyahat İpuçları. WordPress otomatik olarak ‘Haberler’ şablonunu gösterecektir çünkü alfabetik sıralamada ilk sırada görünmektedir.
Öte yandan, bir kategoride bir gönderi açtıysanız ve bu kategori için bir şablon oluşturmadıysanız, WordPress temanızın varsayılan single.php şablonuna geri dönecektir.
Belirli Yazarlar için Özel Tek Yazı Şablonları Oluşturma
Belirli bir yazar tarafından yazılan gönderilerin web sitenizde farklı görünmesini istediğinizi varsayalım. Bunu, kategoriler için gösterdiğimiz tekniğin aynısını izleyerek kod kullanarak yapabilirsiniz.
Öncelikle, bu kodu temanızın functions.php dosyasına veya bir kod parçacıkları eklentisine eklemeniz gerekir.
1 2 3 4 5 6 7 8 9 10 11 12 13 14 15 16 17 18 19 20 21 22 23 24 25 26 27 28 29 | /*** Define a constant path to our single template folder*/define(SINGLE_PATH, TEMPLATEPATH . '/single'); /*** Filter the single_template with our custom function*/add_filter('single_template', 'my_single_author_template'); /*** Single template function which will choose our template*/function my_single_author_template($single) {global $wp_query, $post; /*** Checks for single template by author* Check by user nicename and ID*/$curauth = get_userdata($wp_query->post->post_author); if(file_exists(SINGLE_PATH . '/single-author-' . $curauth->user_nicename . '.php'))return SINGLE_PATH . '/single-author-' . $curauth->user_nicename . '.php'; elseif(file_exists(SINGLE_PATH . '/single-author-' . $curauth->ID . '.php'))return SINGLE_PATH . '/single-author-' . $curauth->ID . '.php'; } |
Ardından, cPanel’de FTP veya cPanel dosya yöneticisini kullanarak web sitenize bağlanmalı ve ardından /wp-content/themes/your-theme-folder/ adresine gitmelisiniz. Eğer içinde /single/ adında bir klasör oluşturmadıysanız, devam edin ve şimdi oluşturun.
Bu klasörün içinde, şablon adında yazarın kullanıcı adını kullanarak bir şablon oluşturmanız gerekir. Örneğin, single-author-johnsmith.php.
Bu şablon boş olacaktır, bu nedenle temanızın single.php şablonunun içeriğini kopyalayıp yapıştırabilir ve başlangıç noktası olarak kullanabilirsiniz.
Artık belirli bir yazar tarafından oluşturulan bir gönderiyi görüntülemek için web sitenizi ziyaret edebilirsiniz. Oluşturduğunuz şablonu kullanacaktır.
Umarız bu makale WordPress’te özel tekli yazı şablonlarının nasıl oluşturulacağını öğrenmenize yardımcı olmuştur. Ayrıca WordPress sitenizin ziyaretçilerini nasıl takip edeceğinizi öğrenmek veya sitenizi büyütmek için mutlaka sahip olmanız gereken WordPress eklentileri listemizi görmek isteyebilirsiniz.
If you liked this article, then please subscribe to our YouTube Channel for WordPress video tutorials. You can also find us on Twitter and Facebook.


allah ditta
i want to create a post template like wpbeginer is it possible?
WPBeginner Support
If there is part of our design you like you could recreate that on your site.
Admin
Jasmine
I am getting this message when I try to use the code:
Warning: call_user_func_array() expects parameter 1 to be a valid callback, function ‘my_single_template’ not found or invalid function name.
Any ideas as to why?
WPBeginner Support
You would want to ensure you properly copied the entire code, we have a guide that may be able to assist below:
https://www.wpbeginner.com/beginners-guide/beginners-guide-to-pasting-snippets-from-the-web-into-wordpress/
Admin
Iulian
All good but it breaks the default single.php.
In other words this “On the other hand, if you filed a post in a category and didn’t create a template for that category, then WordPress will fallback to the default single.php template of your theme.” is not working.
Any solution?
WPBeginner Support
You may need to reach out to your theme’s support to ensure there isn’t a different template that you are running into. For understanding what we mean you may want to take a look at our article below:
https://www.wpbeginner.com/wp-themes/wordpress-template-hierarchy-explained/
Admin
Thomas
Hi, I am trying to follow the step:
Open the single.php file and then copy everything after the get_header() line.
Under:
Manually Creating Custom Single Post Templates in WordPress
However, I don’t have any “get_header()” function in that file.
WPBeginner Support
Your specific theme may have some unique coding, we would recommend reaching out to the support for your specific theme and they should be able to assist.
Admin
bob
Thanks for this. All my auto generated files (author, not found etc) are using my site template then putting a white section with white text on thepage. its also starting at the top of the page (so its white text on a white background mostly hidden behind a page header)
I believe your article will help me sort this mess out.
Thank you
WPBeginner Support
Our article should help and if you reach out to your theme’s support they may be able to assist as well
Admin
Jojo
I cannot find the template option in Beaver Builder.
WPBeginner Support
The templates should still be found under the top right section in the content panel
Admin
John
Am I correct in thinking that once you create a custom post template php file, for it to work as a template, you still need to code the php file, as there is no way to save a new post as a template. Is this correct?
Thank you for your help.
WPBeginner Support
That is correct, for changing the template unless you are using a page builder there is not a method to set it up without coding.
Admin
Ali Jahani
Hi
wpbeginner is veryyyyyyyyyy good
thanks for publish best article
WPBeginner Support
Glad you like our content
Admin
Gregory
This is a awesome tutorial about WP custom post page.
Thanks about your help.
WPBeginner Support
You’re welcome, glad you found our tutorial helpful
Admin
Haripal Reddy
Hello Author,
I followed the steps as you mentioned. I have CPT albums. single-albums.php copied same code to other file wpb-single-albums.php and added template code like /*
* Template Name: custom template
* Template Post Type: albums
*/
and changed some required changes. But after selecting this template in edit post but it displays default one (single-albums.php) page.
How can i fix this please help
WPBeginner Support
You may want to check the current working template to ensure you have the post type correct
Admin
Alice
Thanks for your great post. I have 2 questions: Are single post templates the same with custom post type templates? If the are different, can you show me how to create a custom post type template?
WPBeginner Support
They can be different if you want but if you create on specifically for the post type, otherwise WordPress will default to the post template. You would want to take a look at our article here: https://www.wpbeginner.com/wp-themes/wordpress-template-hierarchy-explained/
Admin
aziz
hello
than you for the post
i did everything and worked like i wanted.
but i had a small problem
after adding the code to function.php single.php stopped showing data
is there anything i can do?
WPBeginner Support
You would need to create the folder as we explain after the code in the article
Admin
Binesh
Hi, Thanks for your Tutorial…
As per your tutorial I have created a custom Post type. But now I am facing an issue with comment. While submitting the comment it redirected to search…
Pls suggest a solution for this..
Thanks in Advance
WPBeginner Support
If its redirecting you to a 404 page, you would want to take a look at our troubleshooting article here: https://www.wpbeginner.com/wp-tutorials/how-to-fix-wordpress-posts-returning-404-error/
Admin
Mike
Hello.
I’m using this & enjoying it greatly!
However, I’m finding the following warning in my error logs around this code:
[warn] mod_fcgid: stderr: PHP Warning: Use of undefined constant SINGLE_PATH – assumed ‘SINGLE_PATH’ (this will throw an Error in a future version of PHP)
Any thoughts on how to fix that?
Your snippet starts with “define(SINGLE_PATH,…” so I’m not sure what else to do here.
WPBeginner Support
That error is saying it wants SINGLE_PATH to be surrounded by single quotes (”) which you can do for that warning
Admin
Jojo
So I followed your steps and its working for the new category slug single page but not for the default single.php.
How can I get this to work? Perhaps the default single.php path is wrong?
Thanks!
WPBeginner Support
If you wanted to edit the default single.php file then you would first want to create a child theme: https://www.wpbeginner.com/wp-themes/how-to-create-a-wordpress-child-theme-video/
and then you could edit your single.php file without worrying about the changes being removed when you create your own single.php.
Admin
Jagdish
I’m one of your silent readers, thoroughly love your blog <3
WPBeginner Support
Thank you, glad you’ve been enjoying our content
Admin
Hil
Hi,
I am overthinking this but…if I want every blog post to look the same, do I just create the Layout (I use Divi theme), use the above first method (make a new version of single.php named properly) and choose that every time I want to create a post? That simple?
Also, to add the custom CSS, do you add to the php file, and how? Where within it do you add it? How should it look? That’s the part that I haven’t yet found any reference on how to do. Can you do an example based on just having every blog post look one way?
Thank
WPBeginner Support
Blog posts should use the single.php by default and look the same that way but you can create a custom post template if you wanted to modify the look. For custom CSS you would want to take a look at our article here: https://www.wpbeginner.com/plugins/how-to-easily-add-custom-css-to-your-wordpress-site/
Admin
Malgorzata
Hi, thanks dfor great tutoriasl. It is working amazing but not for new categories, which doesnt have special template. Unfortunatley it is not getting the code from default single.php file. I will appreciate some help how to make it work.
Christopher Krohn
Fantastic tutorial. Thanks!
STEVE
Hi, Thanks for the tutorial!
I have a question. How would we apply custom CSS that would only effect the Posts pages?
Thanks
TRAVIS
What if you want to make your new template the default for everything. So that anytime a post is created it is automatically selected as the default template?
Jarrod
Just put the code for the template you want to create into single.php.
Jae
I bet there are plugins that you can use to do the job without the hassle of coding and child themes. It would’ve been great if you’d researched and shared that in this post too.
Mahbub
@JAY why not u done that on ur own?
peyman
I use your method but I can’t set custom css for this posts.
for example in function.php when I check is_page_template(‘single-cat-news’) the statement not getting true and my custom css for this kind of post not running. what should I do in this case?
Bikram
True.
I’m also having this problem. The full-width template works well for post and pages but when it comes to custom post type, the CSS codes don’t work and goes back to normal page size without a sidebar.
I’m having a hard time finding a solution to that problem.
Mike
Need some additional help with this…
Following the instructions on this page (along with the small modifications noted within my comments on 12/2/17 and 12/12/17), I’ve been able to get this working reliably.
HOWEVER, I’ve run into the issue where using this method to call a custom template does not seem to get registered with the call of body_class classes.
For example, if I set a custom template on a page (where I’m using WordPress’ “Template” drop-down within the “Page Attributes” sidebar in the editing view – then the body_classes that are output would include that template name.
Such as:
<body class="page-template-my_custom_template page page-id-2..."But, using this method, the body classes just return:
<body class="page-template-default page page-id-2..."Any idea on how to ensure the body classes reflect a custom single post template?
Mike
Here’s the answer (for my theme, at least – your experience may vary).
Adding the following to [b]functions.php[/b] did the trick for me:
add_filter('body_class','add_category_to_single');function add_category_to_single($classes) {if (is_single() ) {global $post;foreach((get_the_category($post->ID)) as $category) {// add category slug to the $classes array, starting with 'category-'...$classes[] = "category-$category->category_nicename";}}// return the $classes arrayreturn $classes;}Dzungx Corn
I created a single-cat-news.php file for “News”. My “News” category has two child: “Camera” and “Smartphone”. The post in “Smartphone” display in single-cat-news.php (S after N in alphabet), but the post in “Camera” display in default single.php (C before N in alphabet). I want post in “Camera” display in single-cat-news.php, what must I do? I selected both “News” and “Camera” for my post.
Sarmad Gardezi
Im viewing your Blog from last 2 years. I explored whole web to find this but i got the correct working code from here i just love your Blog keep it up
Mike
When using this approach to specify a custom post template for a single post within a specific category, I was finding that WordPress was NOT defaulting back to single.php in instances where a single-cat-WHATEVER.php file didn’t exist for a specific category.
I fixed this by adding the following line before the end of the function:
elsereturn SINGLE_PATH . '/single.php';
So that, this code:
/**
* Checks for single template by category
* Check by category slug and ID
*/
foreach((array)get_the_category() as $cat) :
if(file_exists(SINGLE_PATH . '/single-cat-' . $cat->slug . '.php'))
return SINGLE_PATH . '/single-cat-' . $cat->slug . '.php';
elseif(file_exists(SINGLE_PATH . '/single-cat-' . $cat->term_id . '.php'))
return SINGLE_PATH . '/single-cat-' . $cat->term_id . '.php';
endforeach;
}
Became this:
/**
* Checks for single template by category
* Check by category slug and ID
*/
foreach((array)get_the_category() as $cat) :
if(file_exists(SINGLE_PATH . '/single-cat-' . $cat->slug . '.php'))
return SINGLE_PATH . '/single-cat-' . $cat->slug . '.php';
elseif(file_exists(SINGLE_PATH . '/single-cat-' . $cat->term_id . '.php'))
return SINGLE_PATH . '/single-cat-' . $cat->term_id . '.php';
else

return SINGLE_PATH . '/single.php';
endforeach;

}
Does this seem like the right approach? Or, is there something else that I may have done to break the default functionality?
Mike
Thank you for this clear ‘how to.’
One note: for those of us using a CHILD THEME, I’ve found that changing…
define(SINGLE_PATH, TEMPLATEPATH . ‘/single’);
to:
define(SINGLE_PATH, get_stylesheet_directory() . ‘/single’);
(within the “Define a constant path to our single template folder” section) ensures that child theme’s directory is checked for single templates instead of the parent theme’s directory.
This may also be the reason that it’s not working for some of the other commenters above.
Good luck, everyone!
Stephanie Lewis
Thank you so much for your help! I was wondering why it kept pointing me back to the parent theme instead of the child theme.
Ashley
I cannot get this to work for me, the template never shows in the post editor even after clearing my cache.
Olayinka
Thank you for this article.
I will want to know how I can further customise the layout of this single custom post template, like placing an image in the post before the content and in the footer.
oussama
Hi,
I need to change the order of 3 things in the post page which they are in the bottom of the article:
1-a pagination plugin.
2-an ad.
3-social share icons.
I want to make them in the following order (vertically):
1-the ad
2-the social share icons
3-the pagination plugin
How can I do that please?
Linda Holiner
Thank you for your great tutorials. I am having trouble with this one. I added the code to my functions.php but I’m not getting the single post template. Do I need to make a call to the function or does WordPress do that? Is there some way I can debug the function?
I just want posts of a particular category to display differently when you link to them.
Taufiq Mahmud
I wanted to make a custom post page where registered user of my site can able to post without using wordpress’s default post.php
Pierrick
Hi! Thank you for this tutorial, but I’m quite new to web design and I started creating a whole wordpress theme. Everything works fine on my website, but I am trying to make it possible to add pages that all use a template I created, (like the page of a product in a catalogue) but I have no idea how to do that. I first tried to do so by creating a page template in which I put loops that display the content of an article or a page, such as its title, its text and the values of some custom fields. To do so I used a query_posts, but it requires to put the post’s or page’s id with “page_id=” or “p=”, which means the template is for one specific page, and I would have to create a template for each new page I add to this catalogue , and precising the id of the page/post manually in it, while what I wanted was to create a single template for all the pages of the catalogue…
So while doing my research to find a solution, I found your article, and I tried to create a post using the new single post template, but no matter which template I select in the list, when I go to the url of the post it displays my home page… I’m probably doing everything wrong, and I’m not even sure I understood what a single post is and if it’s really what I need… I would really appreciate it if you could give me some clues on what I should do to solve my problem, or if there’s some tutorial somewhere that could help me…
Thank you,
Pierrick.
WPBeginner Support
Hi Pierrick,
We are not sure we understand your problem completely. However, if you just want to create a template to be used by any page then custom page template is the right approach. Since you want users to be able to see any page, this means you don’t need to use query_posts, your loop will begin with the standard
<?phpif( have_posts() ) :while( have_posts() ) : the_post(); ?>//// Post Content here//}// end while}// end if?>1-click Use in WordPress
Admin
alex
Hi,
I have a local setup with WP 3.7.x and Template Post Type: post, page, product is not available.
How can i create seperate caterory php files for each post category???
single-{slug}.php
category-{slug}.php
all doesn’t seem to work
Any tips?
Mark
I have set this up to work with categories, however when I select a post that does not have a category it fails to pick up the default template and does not display the post. I suspect my theme may be at fault. How would I hard code the single.php in the parent directory as the default to use if no category template exists ?
Works perfectly if I copy the single.php into the /single/single-cat-name.php file but I don’t want 40+ duplicate files.
Eric Besso
first copy single.php to the /single folder
then include this code right before the endforeach;
else
return SINGLE_PATH . ‘/single.php’;
Garikai Dzoma
This has been a great help to me.
Lyssie
This is exactly what I was looking for, thank you for spelling this out so simply! It leaves me with a question though: I removed my sidebar but now there’s just an empty space where it used to be. How can I stretch the main content section to cover the entire space? Thanks again!
WPBeginner Support
Hi Lyssie,
That’s because your theme has defined content area width relative to the sidebar. You need to use inspect tool to find out which CSS class your conntent-area uses and then adjust by adding custom CSS to make it full width.
.page-template-full-width .content-area {width:100%;margin:0px;border:0px;padding:0px;}.page-template-full-width .site {margin:0px;}1-click Use in WordPress
Please see our guide on how to create full width page in wordpress
Admin
Lyssie
Thanks for the fast response! This was very helpful! Now, if I see:
div id=”primary” class=”content-area”>
when I use the inspect tool, which is the class my content area uses?
Lyssie
Oops, that didn’t come out right.
div id=”primary” class=”content-area”
main id=”main” class=”site-main” role=”main”
article id=”post-4773″ class=”post-4773 post type-post status-draft format-standard hentry category-travel-2″
div id=”featured-image”
/div
WPBeginner Support
Hi Lyssie,
Your theme uses content-area class to define the content block’s width. You should be able to see its width when using the inspect tool.
Joe Yee
That’s a great article and should helps a no-coder person like me. Customization of template would be something scary that you might break the theme altogether. Do you recommend make the custom template on a child theme or is it okay to do it right on the theme. Thanks a bunch.
WPBeginner Support
Hi Joe,
You will not be changing any of your theme’s existing files. Instead, you will be creating a new file. If anything goes wrong you can simply delete the template and your site will be back to normal.
Yes creating a child theme is the recommended best practice.
Admin
Danielle
When I put the file in my child theme, I see it in the drop down box but it doesn’t actually apply.