WordPress e-postalarınızın neden gelen kutularına ulaşmadığını mı merak ediyorsunuz? Yalnız değilsiniz!
Birçok web sitesi sahibi bu sorunla karşı karşıyadır çünkü çoğu web barındırıcısı varsayılan PHP posta işlevini kısıtlayarak e-postaların kaybolmasına veya spam’e düşmesine neden olur.
E-postalarınızın düzgün bir şekilde teslim edilmesini sağlayan güvenilir ve ücretsiz bir çözüm olan Gmail SMTP sunucusunu kullanarak bu sorunu kolayca çözebilirsiniz. Biz de kullandık ve blog yazarları, küçük işletmeler ve sorunsuz e-posta göndermek isteyen herkes için harika bir seçim olduğunu gördük.
Bu kılavuzda, e-postalarınızın her seferinde gelen kutularına ulaşması için WordPress’te Gmail SMTP’yi tam olarak nasıl kuracağınızı göstereceğiz. ✅
WordPress E-postaları için Neden ve Ne Zaman Gmail SMTP Sunucusuna İhtiyacınız Var?
WordPress siteniz yeni kullanıcı kaydı, kayıp şifre sıfırlama, otomatik güncellemeler ve iletişim formlarınızdan gelen bildirimleri size bildirmek için e-posta gönderir.
WordPress varsayılan olarak e-posta bildirimleri göndermek için PHP mail işlevini kullanır. Ancak, bu işlev çeşitli nedenlerden dolayı beklendiği gibi çalışmaz.
Çoğu WordPress barındırma şirketi, kötüye kullanımı ve spam’i önlemek için bu işlevin kullanımını kısıtlar.
Popüler e-posta hizmet sağlayıcılarındaki spam filtreleri, gelen e-postaların gerçek posta sunucularından gönderilip gönderilmediğini kontrol eder. Bazen, varsayılan WordPress e-postaları bu kontrolden geçemeyebilir ve spam klasörüne bile girmeyebilir.
SMTP (Basit Posta Aktarım Protokolü) e-posta göndermek için endüstri standardıdır. PHP posta işlevinden farklı olarak SMTP, e-posta teslim edilebilirliğini artıran uygun kimlik doğrulama kullanır.
Gmail, WordPress sitenizden e-posta göndermek için kullanabileceğiniz bir SMTP hizmeti sağlar. Sadece kendinize ve sitenizdeki birkaç kullanıcıya WordPress bildirim e-postaları göndermek istiyorsanız sunucuları en iyi seçenektir.
Ancak, bülten e-postaları göndermek veya çevrimiçi bir mağazaya sahip olmak istiyorsanız.
O halde Constant Contact, Brevo (eski adıyla Sendinblue) veya Mailgun gibi bir toplu e-posta hizmeti sağlayıcısı kullanmalısınız.
WordPress için Ücretsiz ve Ücretli Gmail SMTP Hizmeti
WordPress e-postaları göndermek için ücretsiz Gmail hesabınızı kullanabilirsiniz. Ancak, daha iyi teslim edilebilirlik için ücretli Google Workspace’i kullanmanızı öneririz.
Google Workspace ile name@yoursite.com gibi kendi profesyonel markalı e-posta adresinize sahip olursunuz .
Google Workspace, alan adınıza MX kayıtları eklemenizi gerektirir. Bu, e-postalarınızın alan adınızdan geliyor gibi görüneceği anlamına gelir, bu da orijinalliği artırmaya ve daha iyi teslim edilebilirlik sağlamaya yardımcı olur.
Yazılı talimatları tercih ediyorsanız, okumaya devam edin. İşte bu kılavuzda ele alacağımız tüm yöntemlere hızlı bir genel bakış:
Hazır mısınız? Hadi başlayalım.
Gmail SMTP Sunucusu Kullanarak WordPress E-postaları Nasıl Gönderilir
Google Workspace‘i kullanmaya karar verirseniz, öncelikle alan adınızı Google Apps ile çalışacak şekilde ayarlamanız gerekir. Google Workspace ile profesyonel bir e-posta adresinin nasıl kurulacağına dair adım adım bir eğitimimiz var.
Talimatların geri kalanı ücretli veya ücretsiz bir Gmail hesabı kullanıyor olmanız fark etmeksizin aynıdır.
Şimdi, WP Mail SMTP piyasadaki en iyi WordPress SMTP eklentisidir. WordPress e-postalarını daha yüksek teslim edilebilirlikle göndermek için herhangi bir SMTP sunucusunu kolayca kullanmanıza olanak tanır.
📌 Not: WP Mail SMTP’yi sitemizde kendimiz kullanıyoruz ve tüm e-postalarımızın spam klasörüne değil, kullanıcıların gelen kutularına ulaşmasını sağlamaya nasıl yardımcı olduğunu gördük. Özellikleri hakkında bilgi için tam WP Mail SMTP incelememize bakın!
Öyleyse, WP Mail SMTP eklentisini kuralım ve etkinleştirelim. Daha fazla ayrıntı için, bir WordPress eklentisinin nasıl kurulacağına ilişkin adım adım kılavuzumuza bakın.
Ücretsiz bir sürüm olsa da, premium desteğe, daha fazla postaya ve uzmanlarından biri tarafından kurulan beyaz bir eldivene erişmenizi sağlayan WP Mail SMTP Pro adlı ücretli sürümü satın almanızı öneririz.
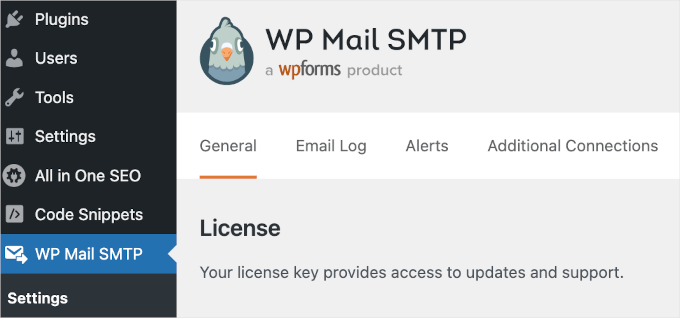
Etkinleştirmenin ardından, eklenti ayarlarını yapılandırmak için Ayarlar ” WP Mail SMTP bölümünü ziyaret etmeniz gerekir. Ardından, lisans anahtarınızı girin ve ‘Anahtarı Doğrula’ düğmesine tıklayın. Anahtarı WP Mail SMTP hesap alanınızda bulabilirsiniz.
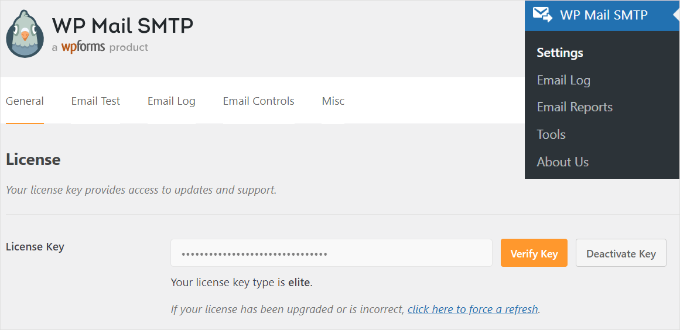
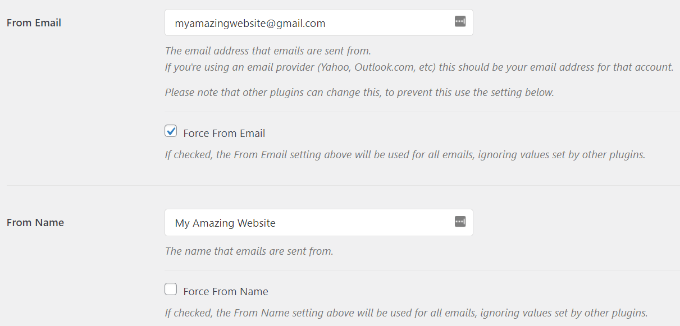
‘Genel’ ayarlar sekmesi altında, ‘E-postadan Gelen’ alanında Gmail e-posta adresinizi kullandığınızdan emin olmanız gerekir.
Ardından, gönderenin adını girmeniz gerekir.
WP Mail SMTP eklentisi, WordPress sitenizi Gmail sunucularına bağlamak için 3 yol sunar:
- İlk yöntem, en kolay ve en acemi dostu olan tek tıklamayla yüklemeyi kullanır, ancak yalnızca premium eklenti kullanıcıları için kullanılabilir.
- İkinci yöntem OAuth Kimlik Doğrulamasını kullanır. Bu yöntem güvenlidir ve premium bir eklenti gerektirmez.
- Üçüncü yöntem ise Gmail SMTP ayarlarını manuel olarak yapılandırmaktır. Genel olarak, daha az güvenli olduğu için bu yöntemi önermiyoruz.
Bunu aklımızda tutarak, WordPress’i e-posta göndermek için Gmail SMTP’yi kullanacak şekilde ayarlayalım.
Yöntem 1: Tek Tıkla Yükleme Kullanarak WordPress E-postaları Göndermek için Gmail’i Kurma
Bu yöntem herkes için en hızlı ve en kolay olanıdır, yani zamandan ve kafa karışıklığından tasarruf etmenize yardımcı olabilir.
WP Mail SMTP eklentisini kurup etkinleştirdikten sonra WP Mail SMTP ” Ayarlar bölümüne gidelim ve ‘Genel’ sekmesinde olduğunuzdan emin olalım.
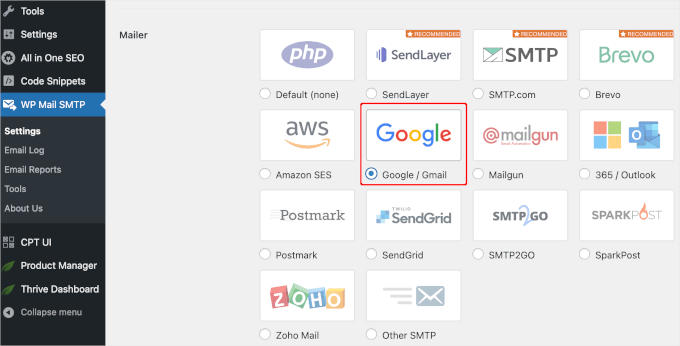
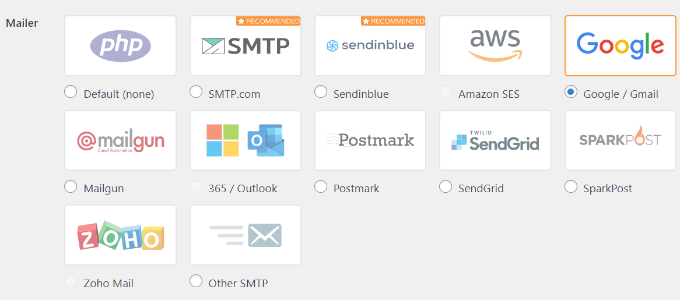
Ardından, ‘Mailer’ bölümü altında ‘Google / Gmail’i seçmeniz gerekecektir.
Bu, ‘Tek Tıkla Kurulum’ seçeneğini kullanmanızı sağlayacaktır.
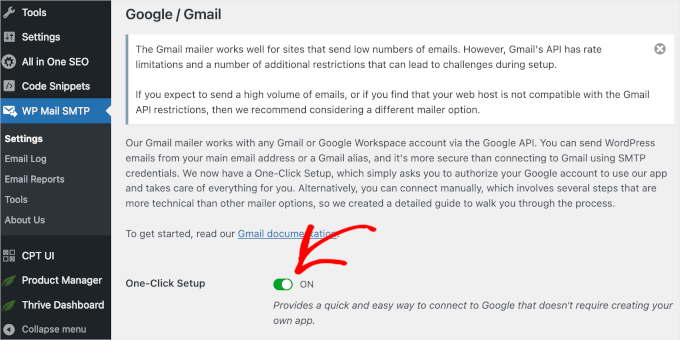
Bunu yaptıktan sonra, bir sonraki adım Google hesabınızı yetkilendirmektir.
Ekranınızda ‘Mailer’ın altında bir ‘Google / Gmail’ bölümü göreceksiniz. Devam edin ve tek tıklamayla yükleme özelliğini açmak için düğmeye tıklayın.
Ardından, yetkilendirme işlemine devam etmek için önce değişiklikleri kaydetmeniz gerektiğini söyleyen bir bildirim görebilirsiniz.
Şimdi ‘Ayarları Kaydet’ düğmesine tıklayalım.
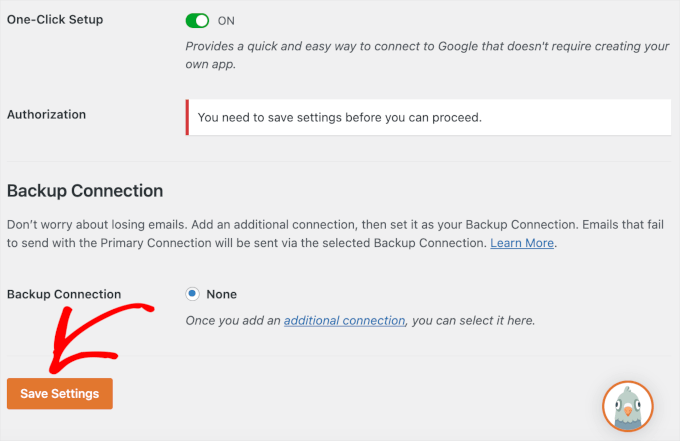
Bundan sonra işleme devam edebilmeniz gerekir.
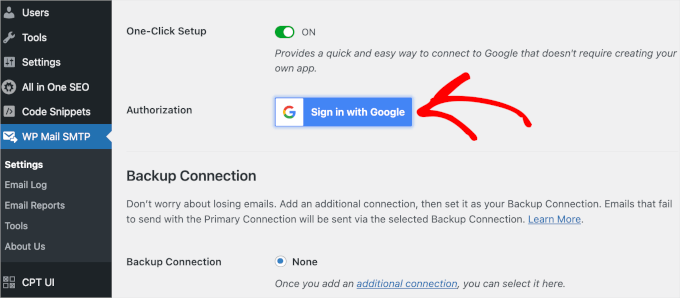
Google Hesabınızda oturum açmanız istenecektir. ‘Google’da Oturum Aç’ düğmesine tıklayın ve bir hesap seçin.
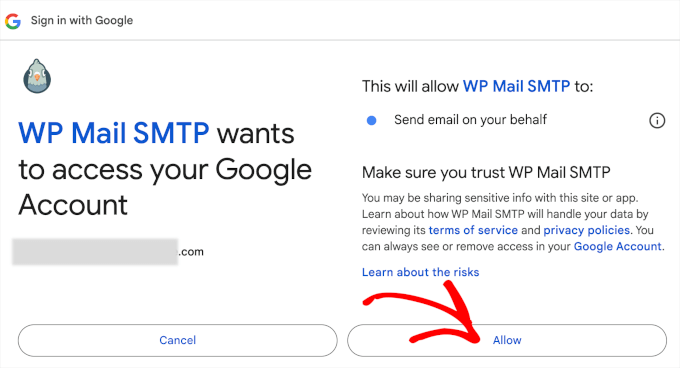
Ardından Google, WP Mail SMTP’nin sizin adınıza e-posta göndermesi için izninizi isteyecektir.
Devam etmek için ‘İzin Ver’ seçeneğine tıklayabilirsiniz.
Düğmeye tıkladıktan sonra, WordPress yönetici alanınızdaki WP Mail SMTP’nin ‘Genel’ sekmesine geri yönlendirileceksiniz.
Buradan, kurduğunuz Gmail hesabının başarıyla bağlandığını görmek için ‘Yetkilendirme’ bölümüne ilerlemek isteyeceksiniz.
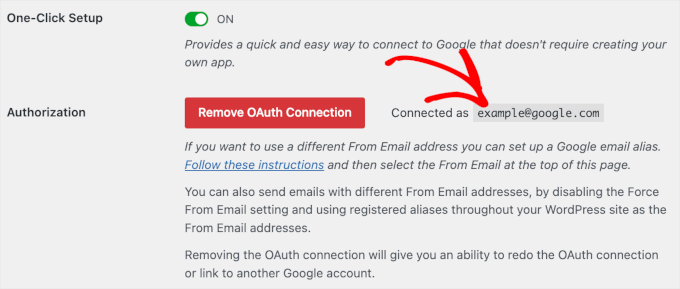
İşte bu kadar! Tek Tıkla Kurulum yöntemini kullanarak Gmail hesabınızı WP Mail SMTP’ye başarıyla bağladınız!
Yöntem 2: OAuth Protokolünü Kullanarak WordPress E-postaları Göndermek için Gmail’i Kurma
WP Mail SMTP eklentisinin ücretsiz bir sürümünü kullanıyorsanız bu yöntem harika bir seçenektir. Güvenlidir ve bir kez kurduğunuzda bir daha asla yapmak zorunda kalmazsınız.
Posta göndericiniz olarak ‘Google/Gmail’i seçerek başlamanız gerekir.
Ardından, aşağı kaydırdığınızda doldurmanız gereken üç alan göreceksiniz.
Oradayken ‘Müşteri Kimliği’, ‘Müşteri Sırrı’ ve ‘Yetkili Yönlendirme URI‘ alanlarını doldurmanız yeterlidir.
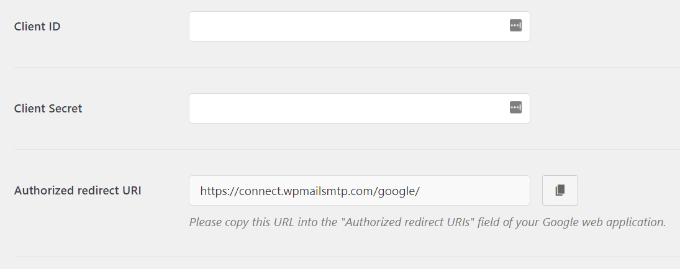
Bu alanları ayarlayalım.
Bir Uygulama Oluşturma ve Gmail için API Anahtarları Oluşturma
Başlamak için Google Cloud Platform web sitesini ziyaret edin ve ardından en üstteki ‘İlk Projem’ seçeneğine tıklayın.
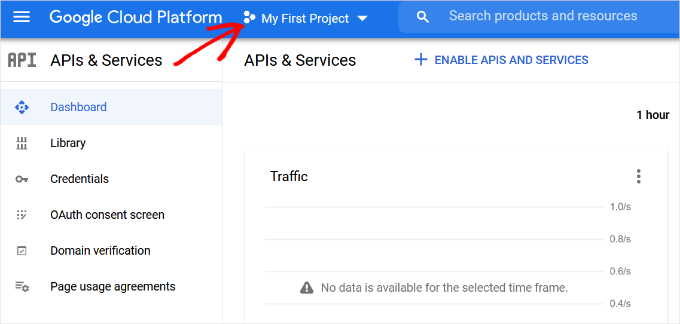
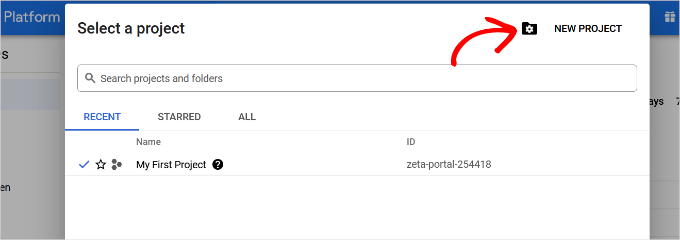
Projelerinizi seçebileceğiniz küçük bir açılır pencere açılacaktır.
Devam edin ve ‘Yeni Proje’ seçeneğine tıklayın.
Bir sonraki ekranda, projeniz için bir ad vermeniz istenecektir.
Gelecekte kolayca tanıyabilmeniz için akılda kalıcı bir isim vermenizi öneririz.
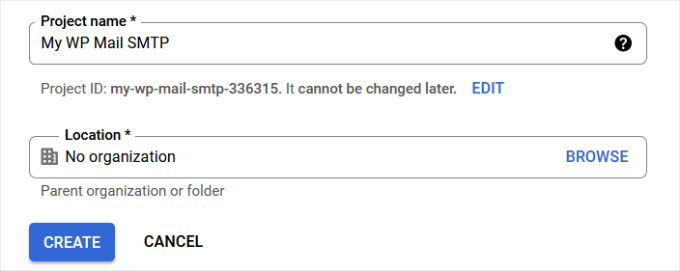
Bundan sonra, devam etmek için ‘Oluştur’ düğmesine tıklayalım.
Geliştirici konsolu şimdi projenizi oluşturacak ve sizi kontrol paneline götürecektir.
Google, geliştiricilere API’lerinin ve hizmetlerinin çoğuna erişim sunar. Bu proje için ihtiyaç duyacağınız API’leri etkinleştirmeniz gerekir.
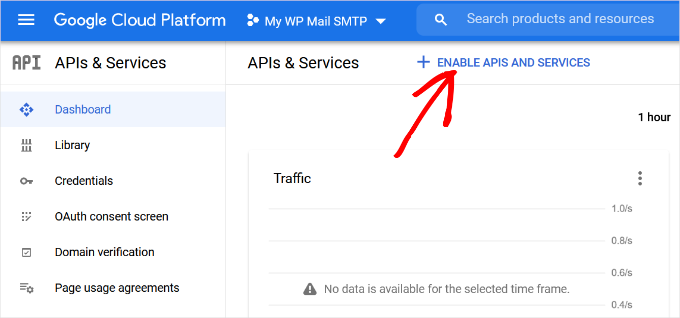
Devam etmek için ‘API’leri ve Hizmetleri Etkinleştir’ düğmesine tıklamanız yeterlidir.
Bu sizi API kütüphane sayfasına götürecektir.
Buradan, Gmail API’sini hızlı bir şekilde bulmak için arama kutusuna Gmail yazabilir ve seçmek için tıklayabilirsiniz.

Şimdi API’ye genel bir bakış ve neler yapabileceğini göreceksiniz.
Devam etmek için ‘Etkinleştir’ düğmesine tıklamanız yeterlidir.
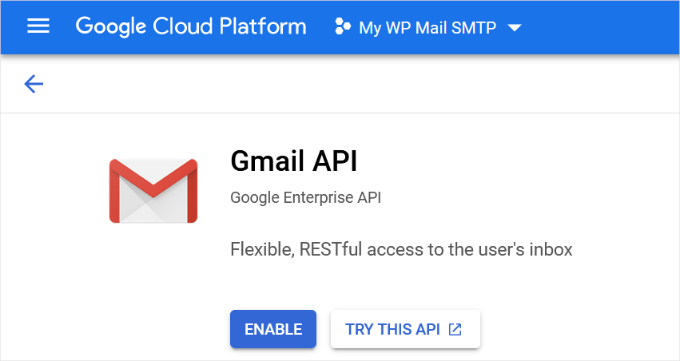
Artık API’niz etkinleştirildiğine göre, bir sonraki adım WP Mail SMTP eklenti ayarlarınızda kullanabileceğiniz kimlik bilgilerini oluşturmaktır.
Devam etmek için ‘+ Kimlik Bilgileri Oluştur’ düğmesine tıklamak ve açılır menüden ‘Seçmeme yardım et’ seçeneğini seçmek isteyeceksiniz.
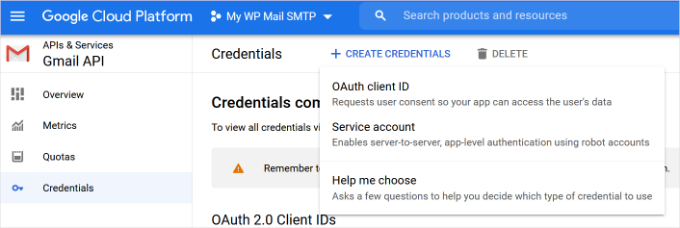
Bir sonraki ekranda size hangi API’yi kullanmak istediğinizi soracaktır.
Devam edin ve “Hangi API’yi kullanıyorsunuz?” için açılır menüden “Gmail API “yi seçin.
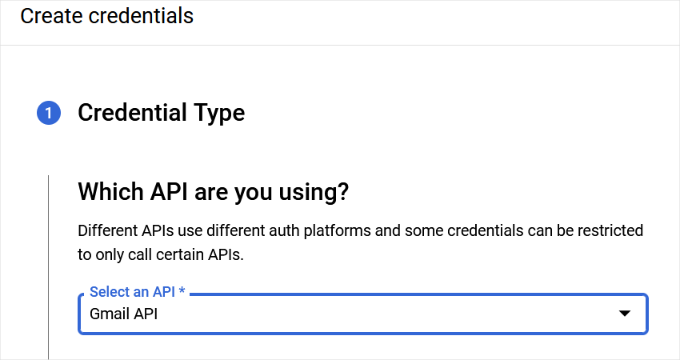
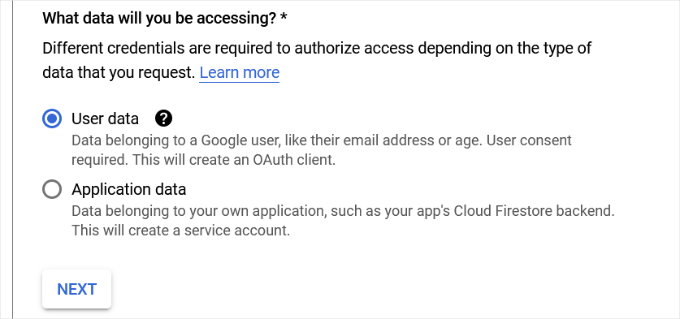
Bundan sonra, “Hangi verilere erişeceksiniz?” alanı için “Kullanıcı verileri “ni seçeceksiniz.
Bu işlem tamamlandıktan sonra, devam edin ve ‘İleri’ düğmesine tıklayın.
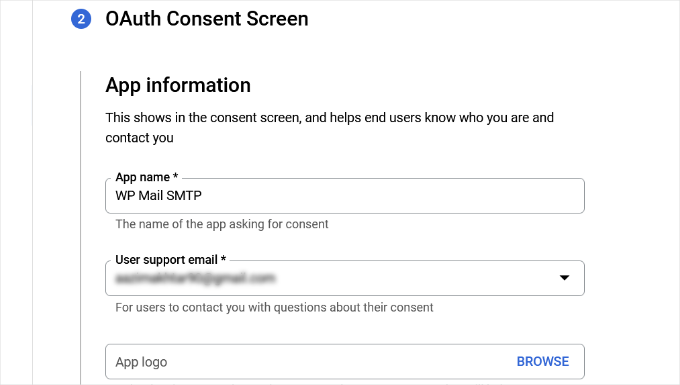
Şimdi, uygulamanızın bilgilerini girmeniz gerekecek.
Uygulamanız için bir ad vererek, sağladığınız e-posta adresini seçerek ve isterseniz bir uygulama logosu ekleyerek başlayabilirsiniz.
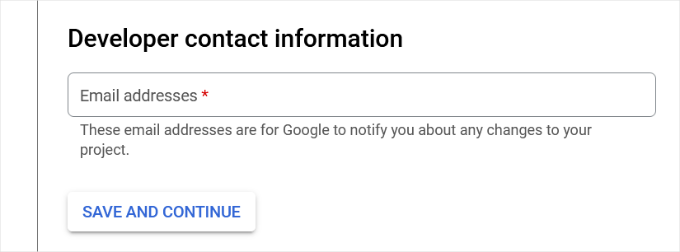
Buradan aşağı kaydırmanız ve bir geliştiricinin iletişim bilgilerini girmeniz gerekir.
E-posta adresini girdikten sonra ‘Kaydet ve Devam Et’ düğmesine tıklamanız yeterlidir.
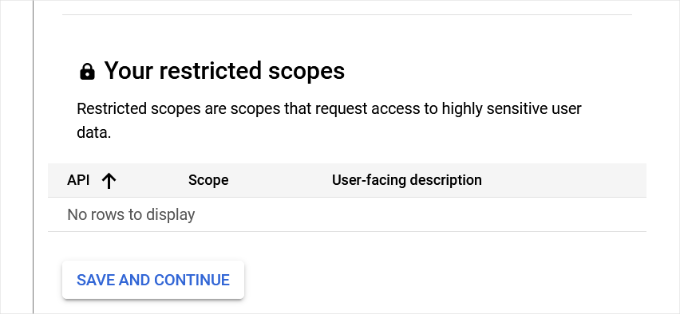
Bir sonraki ekranda, Gmail API için ‘Kapsamları’ yapılandırabilirsiniz. Bu isteğe bağlı bir adımdır ve şimdilik bunu atlayabilirsiniz.
Sayfanın en altına inin ve ‘Kaydet ve Devam Et’ düğmesine tıklayın.
Ardından, devam edin ve ‘OAuth İstemci Kimliği’ bölümü için ayrıntıları girin.
Açılır menüden ‘Uygulama türü’ olarak ‘Web Uygulaması’nı seçerek başlayabilir ve ardından bir ad girebilirsiniz.
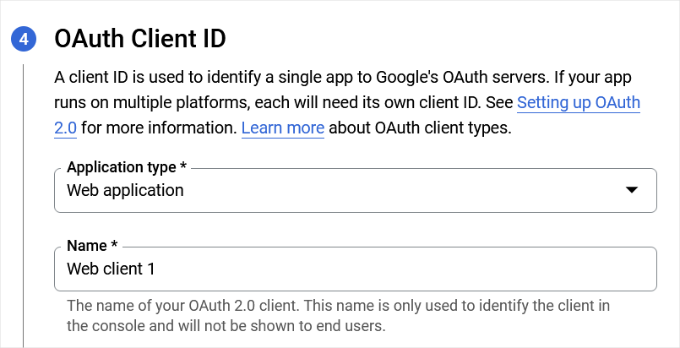
Aşağı kaydırdığınızda, ‘Yetkili JavaScript’ kökenleri için seçenekler göreceksiniz. Bunu atlayabilir ve ‘Yetkili yönlendirme URI’ları’na gidebilirsiniz.
Devam edin ve ‘Yetkili yönlendirme URI’ları’ altındaki ‘+ URL Ekle’ düğmesine tıklayın ve ‘URI’lar’ alanına https://connect.wpmailsmtp.com/google/ adresini girin.
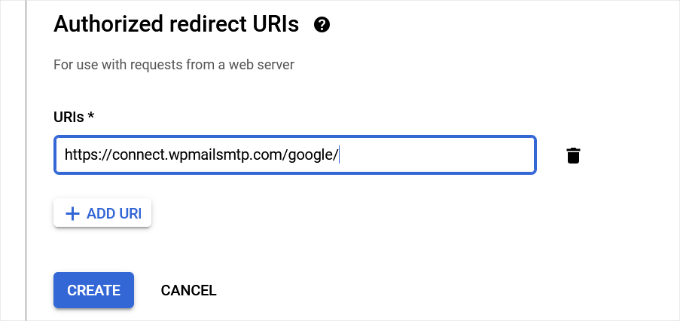
URL’yi girdikten sonra ‘Oluştur’ düğmesine tıklamanız yeterlidir.
Ardından, ‘Kimlik Bilgileriniz’ alanı altında kimlik bilgilerinizi göreceksiniz.
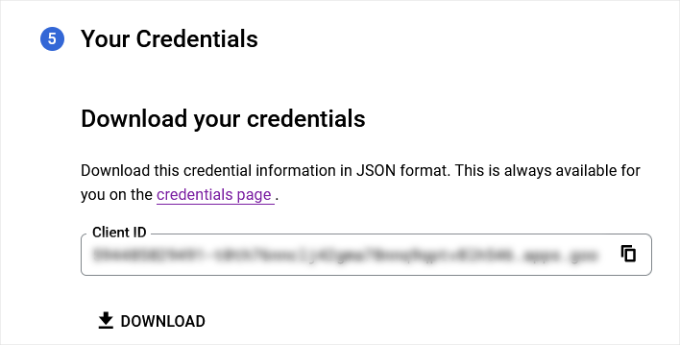
Devam etmek için en alttaki ‘Bitti’ düğmesine tıklayın.
Şimdi projenizin kimlik bilgileri sayfasına yönlendirileceksiniz.
Bu sayfada, son oluşturulan kimlik bilgilerinizin burada listelendiğini görebilirsiniz. Devam etmek için kimlik bilgilerinizin yanındaki düzenle simgesine tıklamanız gerekir.
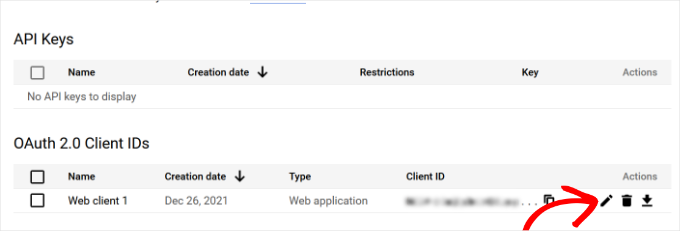
Bu sizi, müşteri sırrınızı ve müşteri kimliğinizi görebileceğiniz kimlik bilgilerini düzenleme sayfasına götürecektir.
Tek yapmanız gereken anahtarı kopyalayıp eklentinizin ayarlar sayfasına yapıştırmaktır.
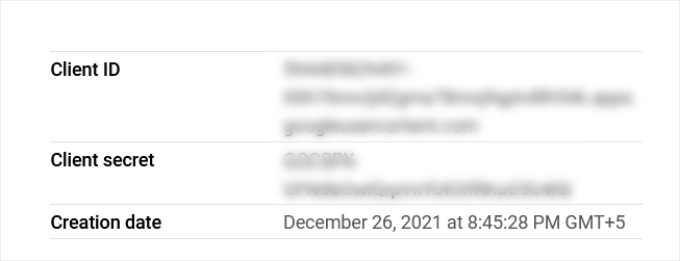
İşiniz bittiğinde, WordPress yönetici alanınızdaki eklentinin ayarlar sayfasına dönebilirsiniz.
Artık hem istemci kimliğiniz hem de istemci gizli anahtarlarınız olduğuna göre, devam etmek için ‘Ayarları Kaydet’ düğmesine tıklamanız gerekir.
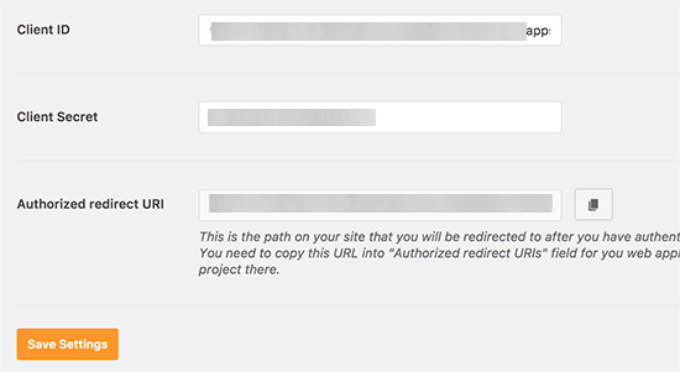
Eklenti şimdi ayarlarınızı kaydedecek ve sayfayı yeniden yükleyecektir.
Bundan sonra, ayarlar sayfasının en altına inmeniz ve ‘Eklentinin Google hesabınızı kullanarak e-posta göndermesine izin ver’ düğmesine tıklamanız gerekir.
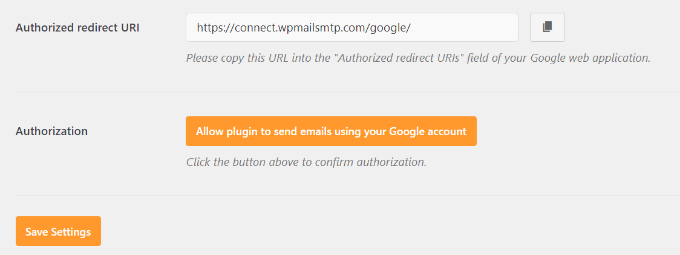
Bu sizi Google hesabınıza götürecektir.
Ardından, web sitesine sizin adınıza e-posta göndermesi için izin vermeniz istenecektir.
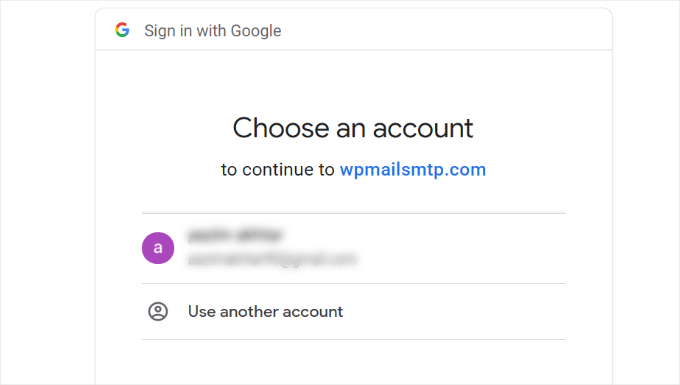
Gmail hesabınızı seçmeniz ve Google API projenizi bağlamak için izin vermeniz yeterlidir.
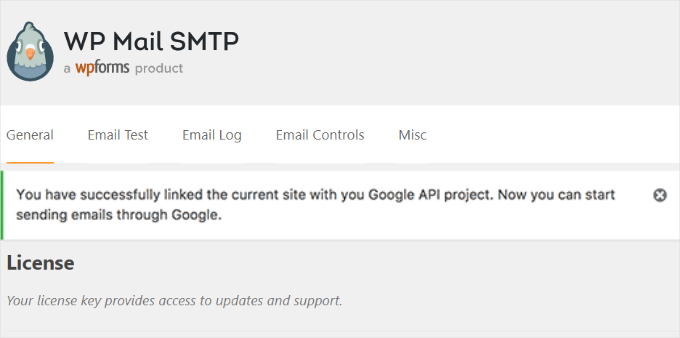
Bundan sonra, bir başarı mesajı göreceğiniz web sitenize geri yönlendirileceksiniz.
Yöntem 3: SMTP Göndericisi olarak Gmail SMTP’yi Kurma
Bu yöntem, WordPress e-postalarınızı göndermek için Gmail’in SMTP sunucularına manuel olarak bağlanmanızı sağlar.
İlk olarak, eklenti ayarlarını yapılandırmak için WordPress yönetici alanınızdan Ayarlar ” WP Mail SMTP bölümüne gitmek isteyeceksiniz.
Buradan, ‘E-postadan’ alanına kullanmak istediğiniz Gmail adresini ve ‘Addan’ alanına adınızı girerek başlayabilirsiniz.

Ardından, posta göndericiniz olarak ‘Diğer SMTP’yi seçelim.
Ayrıca, dönüş yolunun yanındaki kutuyu işaretlemek isteyeceksiniz.
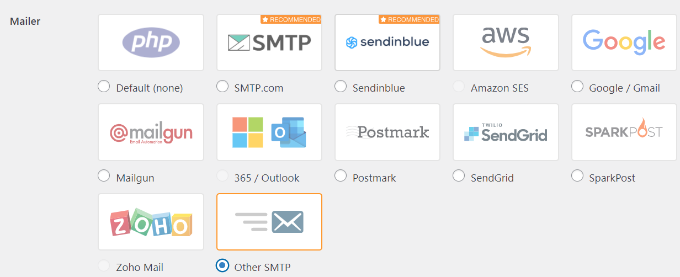
Bundan sonra, ‘Diğer SMTP’ bölümüne ilerleyebilirsiniz.
Gmail’in SMTP sunucularına bağlanmak için daha fazla ayar yapılandıracağınız yer burasıdır.
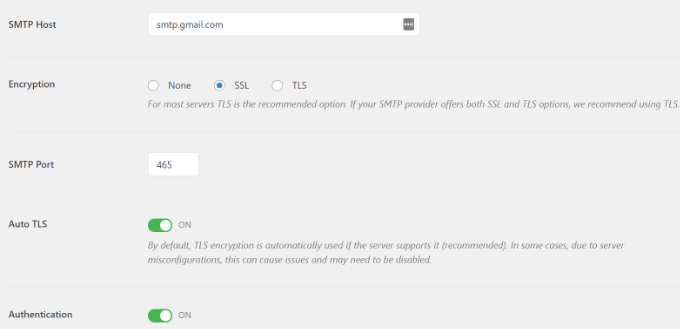
İşte eklenti ayarlarına eklemeniz gereken tam yapılandırma:
- SMTP Ana Bilgisayarı: smtp.gmail.com
- Şifreleme: SSL şifrelemesini kullanın
- SMTP Bağlantı Noktası: 465 (SSL şifrelemesini seçtiğinizde bu otomatik olarak görünmelidir)
- Otomatik TLS: TLS’yi kapatın
- Kimlik Doğrulama: Kimlik doğrulamayı aç
- SMTP Kullanıcı Adı: Tam Gmail adresiniz, örneğin john.smith@yourdomain.com veya john.smith@gmail.com
- SMTP Şifresi: Gmail hesabınızın şifresi
İşiniz bittiğinde, devam edin ve ayarlarınızı kaydetmek için ‘Değişiklikleri Kaydet’ düğmesine tıklayın.
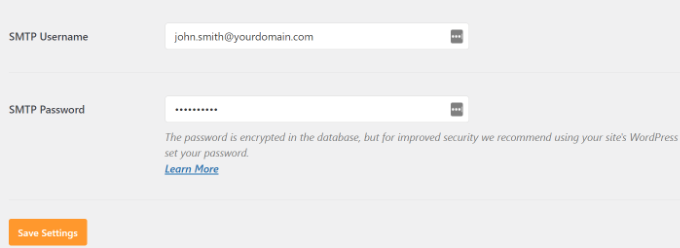
Hepsi bu; Gmail SMTP sunucularını kullanmak için WP Mail SMTP’yi başarıyla ayarladınız.
WP Mail SMTP Ayarlarınızı Test Etme
WP Mail SMTP eklentisi, e-posta ayarlarınızı test etmenize olanak tanır, böylece her şeyin düzgün çalıştığından emin olabilirsiniz.
Ayarlar ” WP Mail SMTP bölümüne gitmeniz ve ‘E-posta Testi’ sekmesine tıklamanız gerekir.
Bundan sonra, ‘Gönderilecek Kişi’ alanına erişebileceğiniz bir e-posta adresi girin ve ardından ‘E-posta Gönder’ düğmesine tıklayın.
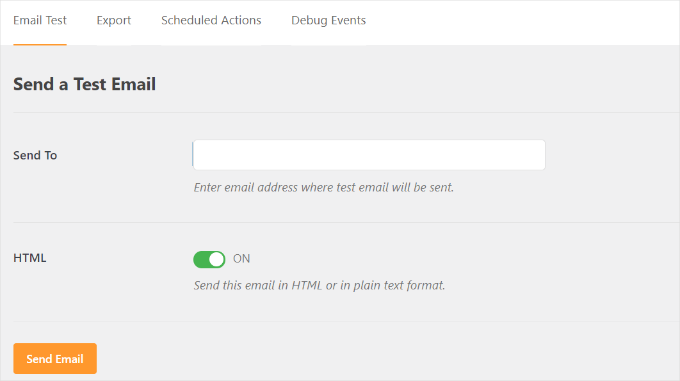
Daha sonra bir başarı mesajı görmelisiniz.
Emin olmak için gelen kutunuzu kontrol ederek ‘WP Mail SMTP: Test Email to…’ konu satırına sahip bir mesaj görebilirsiniz.
Hepsi bu kadar; WordPress sitenizi Gmail SMTP sunucularını kullanarak e-posta gönderecek şekilde başarıyla ayarladınız.
WP Mail SMTP Pro ile Daha Fazlasını Alın
Daha fazla işlevsellik istiyorsanız, WP Mail SMTP Pro‘yu denemelisiniz. Eklentinin Pro sürümü ile bağlantı kurabilirsiniz:
- Google Çalışma Alanı/Gmail
- Amazon SES
- Mailgun
- Office 365 / Outlook.com
- SendGrid
- Ve daha fazlası
Ayrıca e-posta günlükleri, WordPress sitenizin hangi bildirimi göndereceğini ince ayarlama veya kontrol etme yeteneği ve daha fazlası gibi ek özelliklere de sahip olursunuz.
Gmail SMTP Çalışmıyor Sorunlarını Giderme
Kullanıcıların Gmail SMTP’yi belirli paylaşımlı hosting yapılandırmalarıyla kullanırken birkaç sorunla karşılaştığını gördük.
Gmail SMTP sorununu çözmek için aşağıdaki adımları uygulayabilirsiniz:
İlk olarak, cPanel hesabınıza giriş yapmanız gerekecektir. Buradan, e-posta hesapları sayfasında ‘+ Oluştur’ düğmesini bulmak isteyeceksiniz.

Google Apps e-posta adresinizle eşleşen bir e-posta hesabı oluşturmanız yeterlidir.
E-posta hesabını oluşturarak, barındırma sunucunuzun e-posta göndermesi gereken bir e-posta adresinden haberdar olmasını sağlarsınız. Bu adım, Gmail’in SMTP sunucusunu kullanmayı planlasanız bile sunucuyu bu sunucu üzerinden e-posta gönderdiğinize ikna etmek için geçici bir çözümdür.
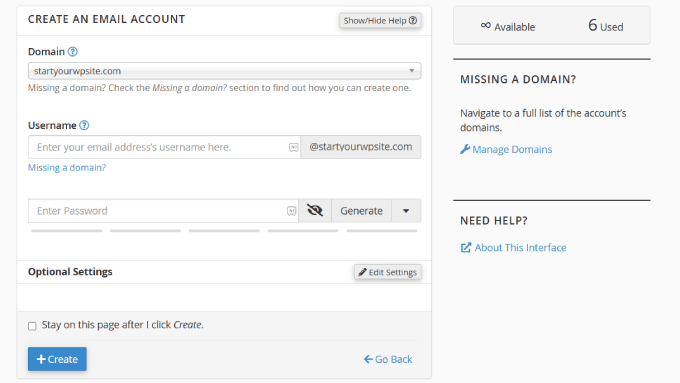
Bu garip görünebilir çünkü sunucunuzu e-postalar için kullanmıyorsunuz. Temel olarak sunucunuzu, e-postayı sunucu üzerinden gönderdiğinize inanması için kandırır.
cPanel hesabınızdan MX Kayıtlarına gidelim ve MX yönlendirmesini otomatikten uzağa değiştirelim. Her host artık özel bir cPanel arayüzüne sahip olduğu için bunu bulmanın biraz zor olabileceğini unutmayın.
Ardından, MX’in yanında ‘E-posta Yönlendirme’ yazan küçük bir bağlantı aramanız gerekir: Uzak Posta Değiştirici.
Bundan sonra, WordPress sitenize tekrar giriş yapabilir ve bir test e-postası gönderebilirsiniz. Daha fazla ayrıntı için, barındırma hizmetinize bağlı olarak WordPress siteniz için MX kayıtlarını nasıl değiştireceğinize ilişkin kılavuzumuzu takip edebilirsiniz.
Video Eğitimi
🎥 WordPress’te Gmail SMTP’yi hızlı bir şekilde kurmak ve e-postalarınızın güvenilir bir şekilde teslim edilmesini sağlamak için aşağıdaki adım adım video eğitimimizi izleyin.
Sadece oynat tuşuna basın ve takip edin!
Umarız bu makale Gmail SMTP sunucusunu kullanarak WordPress’te nasıl e-posta göndereceğinizi öğrenmenize yardımcı olmuştur. WordPress formunun çalışmadığı durumlar için uzman sorun giderme ipuçlarımızı ve WordPress form girişlerini CSV ve Excel’e aktarma kılavuzumuzu da görmek isteyebilirsiniz.
If you liked this article, then please subscribe to our YouTube Channel for WordPress video tutorials. You can also find us on Twitter and Facebook.


Jiří Vaněk
Amazing guide. Thanks. Setting up Gmail SMTP always gives me a headache because it takes so long. It’s incomparable to the traditional SMTP setup for a private domain email, where you enter the SMTP server, login, password, and port, and it’s done. Thanks a lot.
WPBeginner Support
You’re welcome, glad our guide was helpful
Admin
Mallory Moore
After completing all the steps it re-directed me to my WordPress site but it went to a page that said not found to there was no success msg so I can’t test as it still says unauthorized.
WPBeginner Support
For that specific error message, you would want to take a look at our article below:
https://www.wpbeginner.com/wp-tutorials/how-to-fix-the-401-error-in-wordpress-solutions/
Admin
Vaskar
I want to send newsletters/mail to my website subscribers. I want to send mail to my website subscribers from my gsuite business mail address. Can you suggest to me that what I have to do now?
WPBeginner Support
For creating a newsletter, we would recommend taking a look at our article below:
https://www.wpbeginner.com/beginners-guide/how-to-create-an-email-newsletter/
Admin
AJ
This was a tremendous help! Thank you so much!
WPBeginner Support
Glad you found our content helpful
Admin
Lennon
Can we use a forwarding email address to set this up or do we have to have a Gmail account?
WPBeginner Support
For other methods, you would want to take a look at our other article below:
https://www.wpbeginner.com/plugins/how-to-set-up-wp-mail-smtp-with-any-host-ultimate-guide/
Admin
Peter
Hi
When setting up Oauth consent screen, Internal and External options are present. Only external option is available to Gmail users. Is this the correct one to choose?
Thanks!
WPBeginner Support
It sounds like that would be correct, for questions about the plugin we would recommend reaching out to the plugin’s support for assistance
Admin
Gordon Barker
No where can I find where to set the email “to field” please could you explain how to set this field?
WPBeginner Support
You would want to check with the settings for your form plugin for setting the to location
Admin
Jairo Paredes
Excellent!!!!
Thanks a lot….
WPBeginner Support
You’re welcome
Admin
Ruxandra
Awesome! Thanks!
WPBeginner Support
You’re welcome
Admin
Vivek
Hi,
My emails are automatically deleting, i’ve not set any filters or any other things. What might be the issue?
WPBeginner Support
You would want to reach out to who you are using for your emails to ensure there isn’t an issue on thier end.
Admin
Vijay
OAuth Consent Screen is mandatory during this process.
Anyway, your explanation is best.
Thanks.
WPBeginner Support
Glad our guide could be helpful
Admin
Dalton
I followed the steps to set up the email and it works, but how do I send emails to my email list now?
WPBeginner Support
If you’re attempting to create a newsletter then we would recommend going through our guide here:
https://www.wpbeginner.com/beginners-guide/how-to-create-an-email-newsletter/
Admin
Dusan
With this I get the 2000 limit in a 24 hour period as it uses only 1 email address. Is there a way to use this as the smtp relay that allows 10,000 emails to send per 24 hour period. Or any way to add in multiple emails to send from?
WPBeginner Support
We do not have a recommended method to remove that limitation. For sending that many emails we would recommend looking at email marketing services such as the ones from our article here: https://www.wpbeginner.com/showcase/best-email-marketing-services/
Admin
Nauval
Is it still usefull in 2020?
WPBeginner Support
Yes
Admin
Dan Martin
I just used this for my site and it worked. Seriously this was a life saver. I had spent several hours troubleshooting and the video solved the whole problem in like 5 minutes. Thanks.
WPBeginner Support
Glad our guide could help
Admin
Luigi
How can I send emails configured with WP MAIL SMTP (I use gmail) customized with the site’s domain? I need to differentiate emails depending on the type of email my site sends.
WPBeginner Support
It would depend on what plugin/tools you are using to send the emails as WP Mail SMTP is for changing how WordPress sends the emails not for users sending emails.
Admin
Austin Blair
Just wanted to say THANK YOU! I was totally struggling to get my contact form to send emails correctly until I came across your post. I used the first method and it worked like a charm. However there was a step (probably recently introduced) where I had to set up a consent form? Took me to a different screen not featured in the video, but was relatively straight forward. Thanks again!
WPBeginner Support
Thank you for letting us know and glad our article could help
Admin
Bobby Zopfan
First method (configuring inside GCloud) seemed too long to me.
So adapted the 2nd method (don’t agree with you that 2nd method is more difficult). 2nd method has just 3-4 steps.
But it didn’t work. SMTP couldn’t authenticate me. Although my ID/pW is fully correct.
WPBeginner Support
If you reach out to the plugin’s support with your specifics they should be able to help you find the problem
Admin
Daniel
Thanks again for the awesome tutorial, the forms work fine now! I have a question: I’d like to change the From Name in the plugin settings, but it’s impossible. I’ve tried to reintstall the plugin, all my settings were still saved tho. Is there any way I could change the From Name of the email now?
WPBeginner Support
You would want to reach out to the plugin’s support for how to set that up but for the moment, if you set it to the default method it should allow you to change those settings.
Admin
Afam
Hello there,
I’m really tired with this issue of CF7 not able to send mails to gmail from my site. It seems everyone has this issue.
I followed your instructions to the letter and got to the point I’m supposed to allow plugin to send emails using my google account, an error appears telling me of a URI mismatch. What’s that? I copied and pasted the uri as you said. What did I do wrong. Please help me, have not been sleeping because of this.
Thanks.
WPBeginner Support
Hi Afam,
You may not have saved the redirect URI when creating the app, follow the steps again and make sure that you copy the exact URL from plugin’s settings page to enter in your app.
Admin
Sarah
Hello,
I have followed the instructions you provided, than you! I got all the way to the “allow plugin to send emails….” for gmail and when i click on that button it gives me the message that the app hasn’t been verified.
I have tried multiple fixes but it is still isn’t working.
I am using bluehost and WP mail stmp.
Any suggestions?
Thank you
Jorge Zamudio
your really save my day man !! hope you are doing well. Thank you
Raphael
Don’t work for me. I’m using Google Cloud and Cloudflare and when i try to send a test email give me a error:
“Could not authenticate your SMTP account.”
WPBeginner Support
Hi Raphael,
Check your mailer settings, SMTP information, username and password.
Admin
Mohd Tariq Khan
My client use g suite for email, I have created WordPress page website with contact form 7 plugin. I have analyzed contact form was not sending email from website to Gmail.
Therefore, I have used ‘WP Mail SMTP’ plugin and create gmail API, Now email is working.
But I am facing one issue, when submit contact us form email receive in gmail but all email recived from title is ‘me’.
Therefore, every time show like I have to send email to myself.
I want in email ‘Sender name’ appear at from.
Please help me.
WPBeginner Support
Hi Mohd Tariq Khan,
This could happen if you are sending and receiving email on the same address.
For example, if you are using john.smith@example.com in WP Mail SMTP and sending contact form messages to john.smith@example.com then Gmail would show sender name as ‘me’.
Hope this helped.
Admin
jood
i think the key is create a same name account in bluehost within email , so as to trick host , the problem is the email will be taken as spam .
raja
hi.. i have tried to send mail using wp-mail-smtp on wordpress BY gmail as per tutorial..
when i try to OAUTH 2 in gmail on wordpress,, it shows error.
—————————
Not Acceptable!
An appropriate representation of the requested resource could not be found on this server. This error was generated by Mod_Security.
—————————–
i have contacted hosting hostgator support.. Mod_security settings cant be whitelisted, as it may will leave the website vulnerable.
please advise how to send mails
Angela Andrieux
Thank you for the thorough instructions! This site has saved me so many times. I really appreciate the great content!
Sushant
Great Article, this worked for me, thanks a ton guys!
mostafa
thanks a lot for this tutorial . i have this problem for an week and the issue has solved with this tutorial.
Leonardo Assennato
Hello,
I setup an email address to send the emails and it worked.
But I need to change the email account.
I already tried the Method 2, but it doesn’t work on my server.
I already unnistalled and re-install the plugin but all the data are stored.
Can anybody help me?
Linda
Thanks so much. This was a huge help!
Pankaj Chauhan
Thank you so much! This was so helpful for me.
Imrana
thankyou for this amazing tutorial
Ahmad fatah
is this tutor works with free gmail account?
thanks for great tutorial you make..
i search anything about wp and your site in top of google..just wow
Kevin
I just went through this and got the following message after trying to send a test email:
Connection: opening to smtp.gmail.com:587, timeout=300, options=array ()
Connection: Failed to connect to server. Error number 2. “Error notice: stream_socket_client(): unable to connect to smtp.gmail.com:587 (Network is unreachable)
SMTP ERROR: Failed to connect to server: Network is unreachable (101)
SMTP connect() failed.
Pawan Negi
Hi please help me when i click on grant permission button it show me that error.
400. That’s an error.
Error: invalid_scope
You don’t have permission to access some scopes. Your project is trying to access scopes that need to go through the verification process. {invalid = [https://mail.google.com/]} If you need to use one of these scopes, submit a verification request.
Learn more
Request Details
client_id=940707600009-5f3lstctsc081s72c27h4hhmf5212a7p.apps.googleusercontent.com
That’s all we know.
Amanda
I got . . .
Fatal error: Cannot redeclare class phpmailerException in /home/content/04/11965204/html/sofp/wp-includes/class-phpmailer.php on line 4040
I can’t seem to get this fixed no matter what solve I try. There doesn’t appear to be a contact form in our future
Google Search didn’t help with this error code. I can’t imagine that I’m the first one to get it . . .
Laura Hart
I loved how helpful this was, unfortunately I still can’t make the “grant access” button appear! Any idea why that would happen? Googling isn’t working.
Thank you!
David
Hi, I used this tutorial last year to install and configure the Gmail SMTP plugin. Until very recently, the Gmail SMTP plugin in conjunction with my website’s contact form worked perfectly. But I tested my website’s contact form today, and I got the following fatal-error message:
Fatal error: Uncaught exception ‘Google_Auth_Exception’ with message ‘Error refreshing the OAuth2 token, message: ‘{ “error” : “invalid_grant” }”
I don’t have a clue what that means. I get the same fatal-error message when I use the plugin to send a test message at Gmail SMTP plugin>Settings>Test email.
I haven’t changed any of the plugin settings since I first installed it a year ago, and I haven’t done anything new with my Google Console account either. I’m using the most recent version of the Gmail SMTP plugin, and also the newest version of WordPress.
Any ideas or suggestions?
Thanks!
WPBeginner Support
Hey David,
It seems like your Oauth2 token has expired. Try following the tutorial again from the beginning to set it up again.
Admin
Ehsan
Thank U very much – one of my problem was this “my emails goes to spam folder”
with this service(Method 1) Now It’s great – of course after 14 days you must pay for that but still it’s prefect
I have question;
Can I send 100 Emails like newsletter for my customer is it OK for Google!?
I afraid my Emails after it goes to spam folder again
Sharon
I did everything as described, but the contact form on my website still does not work.
Adondriel
Hey, add a thing at the end for the troubleshooting thing: “Check with your website host and verify that they do not block outgoing requests by default.” I know 1. GoDaddy does this, and won’t let you unblock. and 2. Namecheap also blocks by default but you just gotta contact support, give em your info and ask em to unblock port 587 and boom, it’ll all work again.
Lucas
You save my life!
Tks!
adam
i keep getting a Error: redirect_uri_mismatch when i press ‘grant permission’. It’s driving me nuts as I can’t work out what is wrong? Everything seems to match.
Adam
Grzegorz
Same here. i get redirect_uri_mismatch
Macky
This video has been a fantastic help.
I’m a complete WordPress beginner.The step-by step instructions are very easy to follow. Now my emails are working perfectly!! Plus I also learnt how to insert headers & footers with ease.
Thanks once again!!
WPBeginner Support
Hi Macky,
We are glad you found the video helpful. You may also want to subscribe to our YouTube Channel for WordPress video tutorials.
Admin
Fabio
Your tutorial saved my site! Thank you very much mate!
Maggie Z
A follow-up question – because of the login conflict issue, I was also considering using WP Mail SMTP. However, many users on the support forum for that plugin express concern that the password for the email account is visible on the admin page in plain text.
I have a firewall set up that prevents non-admins from getting in to the back end, so is there any real security concern regarding the password showing in plain text? Any advice much appreciated!!!
Maggie Z
After troubleshooting quite a bit, I finally relented and went with WP Mail SMTP, which requires the “allow less secure apps” solution – a tech support person at G Suite told me that it was safe, and it seems like the only way to go for my particular setup. Appears to be working now. Thanks for the incredibly clear instructions!!! I am now a firm fan of this site.
Maggie Zellner
The video is fantastic, and the plugin installed perfectly. Unfortunately I didn’t realize until after I went through the whole process (because I didn’t read the documentation on the plugin carefully), the Gmail SMTP plugin eliminates the need for users to log in, and therefore it interfered with the login process that we have instituted for paid members on our website (which we manage through a plugin called PaidMembershipsPro).
Is there any way to disable that aspect of this plugin, so I can send all email via our Gmail account, but can still have users log in and out?
Eric
Great article! However, I am unclear on something when using WordPress for sending newsletters. What is the difference between those mass emailing service providers (mailgun & Sendgrid) and using Google Apps for work SMTP?
Can’t we use Google Apps for work to send newsletters just as well?
WPBeginner Support
with Google Apps for Work, you can only send an email to 500 recipients max (for paid business accounts). You cannot use it for newsletters.
Admin
Eric
Thanks so much for your response! With Google Apps for Work only limiting to 500 recipients, then I suppose it would work if we sent it to 500 or less people.
My next question, is it max to send all at one time or per day? If we throttle it to only send out a few per minute, do you know if it would allow it to send thousands within a few hours?
Heather
Thank you so much! This was so helpful!