Localhost’taki bir WordPress kurulumundan e-posta göndermeniz mi gerekiyor?
WordPress’i localhost’tan kendi bilgisayarınızda çalıştırmak, yeni bir site, eklenti veya tema geliştirirken veya test ederken kullanışlıdır. Ancak, localhost’ta WordPress e-postası kurmak zordur çünkü siteniz çevrimdışıdır, bu nedenle e-posta varsayılan olarak etkin değildir.
Bu makalede, localhost’tan WordPress e-postalarını nasıl alacağınızı göstereceğiz.

WordPress’i Neden Localhost’ta Çalıştırmalısınız?
WordPress web sitenizde büyük değişiklikler yapmadan önce, bu değişiklikleri kullanıcılarınızın görmediği farklı bir sitede test etmek iyi bir fikirdir.
Hazırlama sitesi, canlı web sitenizin, değişiklikleri canlı hale getirmeden önce test etmek için kullanılan bir klonudur. Hazırlama siteleri hataları yakalamanıza yardımcı olur, böylece canlı web sitenizi bozmazsınız.
Birçok kullanıcı WordPress hazırlık sitelerini Windows veya Mac bilgisayarlarına yerel olarak kurar. Site test edildikten sonra, bu değişiklikleri localhost’tan canlı sunucuya yüklemeleri yeterlidir.
Ancak, localhost WordPress kurulumunda e-posta kurmak zor olabilir ve WordPress e-posta göndermeye çalıştığında ‘Could not instantiate mail function’ hata mesajını görebilirsiniz. Bunun nedeni, e-postanın WAMP ve MAMP sunucu yığınlarında varsayılan olarak etkinleştirilmemiş olmasıdır.
Bununla birlikte, WordPress e-postalarının localhost’tan nasıl alınacağına bir göz atalım.
Localhost’tan WordPress E-postaları Nasıl Alınır?
Yapmanız gereken ilk şey, yerel sunucunuzdaki WordPress kurulumuna WP Mail SMTP eklentisini yüklemek ve etkinleştirmektir. Daha fazla ayrıntı için, bir WordPress eklentisinin nasıl kurulacağına ilişkin adım adım kılavuzumuza bakın.
WP Mail SMTP, WordPress’teki varsayılan e-posta gönderme işlevini devralır, böylece e-postalarınız bunun yerine bir SMTP sağlayıcısı aracılığıyla yönlendirilir. Bu, internette yayında olmasa bile hazırlık sitenizden e-posta bildirimleri alacağınız anlamına gelir.
WP Mail SMTP eklentisini kullanma hakkında daha fazla bilgi için WP Mail SMTP incelememize göz atabilirsiniz.
WP Mail SMTP’yi Kurma
Eklenti etkinleştirildikten sonra, WP Mail SMTP Kurulum Sihirbazı otomatik olarak başlayacaktır.
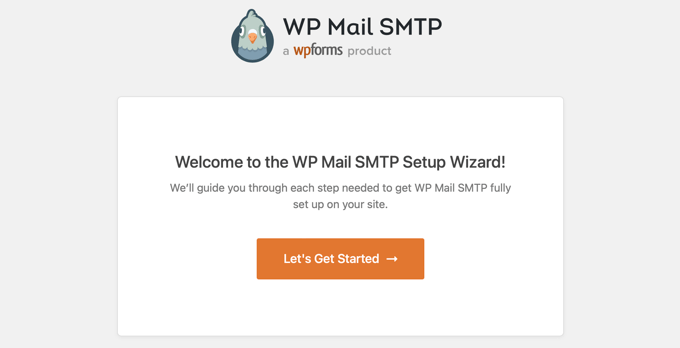
Yapmanız gereken ilk şey bir SMTP hizmet sağlayıcısı seçmektir.
Bir sağlayıcı seçme konusunda yardım almak için yüksek e-posta teslim edilebilirliğine sahip en iyi SMTP hizmet sağlayıcıları hakkındaki kılavuzumuza bakabilirsiniz. Emin değilseniz, Sendinblue çoğu WordPress sitesi için iyi bir seçimdir.
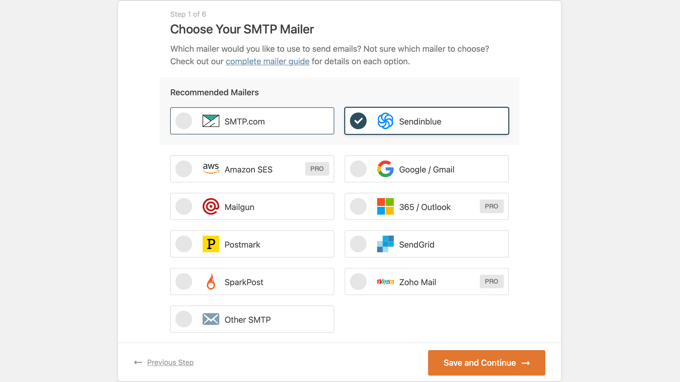
WP Mail SMTP sihirbazını adım adım takip etmeye devam edin. Yardıma ihtiyacınız varsa, WP Mail SMTP’yi Sendinblue, Gmail, Microsoft Outlook veya Amazon SES ile nasıl kuracağınızla ilgili kılavuzlarımızı takip edebilirsiniz.
Not: SMTP posta hizmetiniz olarak Amazon SES, Microsoft Outlook veya Soho Mail kullanmak istiyorsanız, bir WP Mail SMTP Pro lisansı satın almanız gerekecektir.
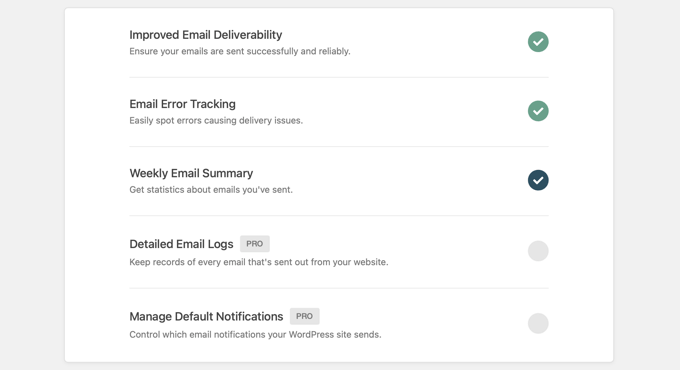
Kurulum sırasında, e-posta teslim edilebilirliği ve hata takibi otomatik olarak etkinleştirilecektir. Pro sürümü kullanıcıları ayrıca e-posta günlüğünü açabilir ve varsayılan bildirimleri yönetebilir.
Test E-postası Gönderme
WP Mail SMTP kurulumunu tamamladıktan sonra, eklentinin doğru yapılandırıldığından emin olmak için bir test e-postası gönderebilirsiniz.
Bunu yapmak için, yönetici menünüzdeki WP Mail SMTP ” Araçlar bölümüne gitmeniz gerekir; burada ‘E-posta Testi’ sayfasını göreceksiniz. Varsayılan olarak, test e-postası sitenizin yönetici e-posta adresine gönderilecektir, ancak bunu ‘Gönder’ alanına farklı bir e-posta adresi yazarak değiştirebilirsiniz.
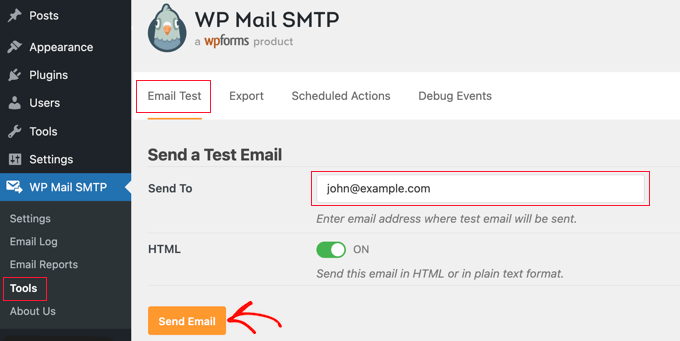
‘HTML’ ayarını ‘Açık’ konumda tutmanızı ve ardından ‘E-posta Gönder’ düğmesine tıklamanızı öneririz. WordPress girdiğiniz adrese bir test e-postası göndermeye çalışacaktır.
E-posta yapılandırmanızla ilgili sorunlar varsa, sorunu açıklayan bir mesaj ve sorunu çözmek için atabileceğiniz bazı adımlar görürsünüz.
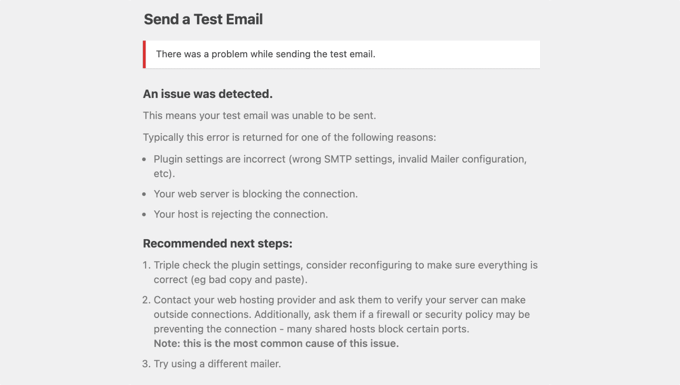
Sorunları gidermek için adımları izledikten sonra, WordPress e-postanızın artık çalıştığını onaylamak için başka bir test e-postası göndermelisiniz.
WP SMTP Posta yapılandırmanız doğruysa, gelen kutunuzda bir e-posta bulmalısınız.
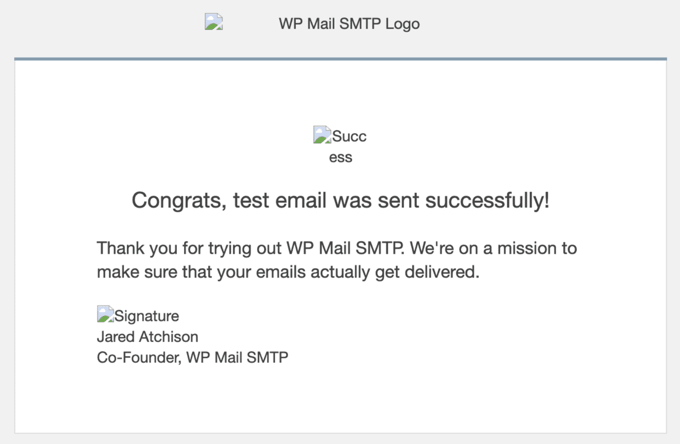
Test e-postasında bozuk görüntüler olduğunu fark edeceksiniz ve localhost’tan e-posta gönderirken bu tamamen normaldir. Bunun nedeni, görüntülerin normalde internetten yüklenmesi, ancak localhost web sitenizin çevrimiçi olmamasıdır.
Test e-postası başarılı olsa bile, WP Mail SMTP, DMARC, DKIM veya SPF kayıtlarınızda teslim edilebilirlik sorunlarına neden olabilecek bir sorun tespit etmiş olabilir. DNS kayıtlarınızı doğru şekilde yapılandırmanıza yardımcı olacak adım adım kılavuzların bağlantılarını göreceksiniz.
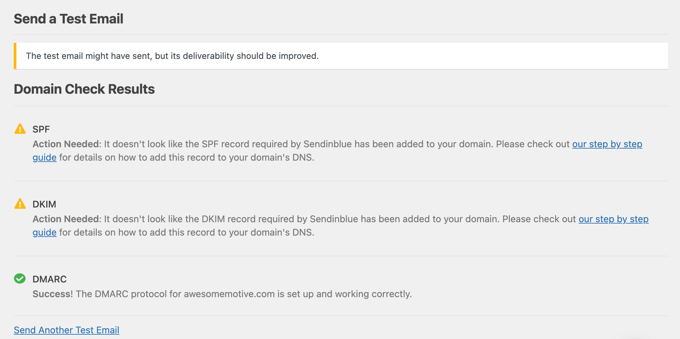
WordPress’ten nasıl test e-postası gönderileceğine ilişkin kılavuzdan daha fazla bilgi edinebilirsiniz.
Sorunları çözmeyi tamamladıktan sonra, her şeyin artık düzgün çalıştığından emin olmak için bir test e-postası daha göndermelisiniz.
WordPress E-posta Bildirimlerini Devre Dışı Bırakma – Profesyonel Kullanıcılar
Şimdi, localhost’tan WordPress e-postaları almaya başlayacaksınız. Bu, eklenti güncellemeleri, tema güncellemeleri ve çekirdek güncellemeleri hakkında bildirim e-postalarını içerecektir. Ayrıca site yöneticisi değişiklikleri, parola sıfırlamaları, yeni kullanıcı kayıtları ve daha fazlası hakkında e-postalar alacaksınız.
Çok fazla e-posta aldığınızı düşünebilirsiniz. Ya da web sitenizi geliştirirken ve test ederken belirli e-posta bildirimlerini devre dışı bırakmak isteyebilirsiniz.
WP SMTP Mail Pro kullanıcıları hangi e-postaların localhost tarafından gönderileceğini kontrol edebilir. WP Mail SMTP ” Ayarlar bölümüne gitmeniz gerekir. Bir kez orada, sayfanın üst kısmındaki ‘E-posta Kontrolleri’ sekmesine tıklamalısınız. Burada, almak istemediğiniz e-postaları devre dışı bırakabilirsiniz.
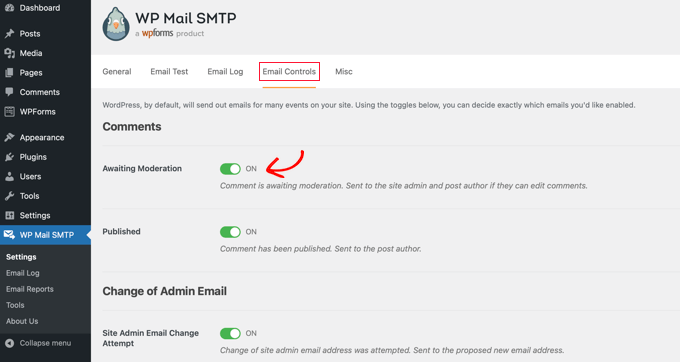
Örneğin, denetlenmeyi bekleyen yorumlar hakkında e-posta almak istemiyorsanız, ayarı kapalı konuma getirmeniz yeterlidir.
Umarız bu eğitim localhost’tan WordPress e-postalarını nasıl alacağınızı öğrenmenize yardımcı olmuştur. Ayrıca nasıl ücretsiz e-posta alanı alacağınızı öğrenmek veya yaygın WordPress hataları ve bunların nasıl düzeltileceği listemize göz atmak isteyebilirsiniz.
If you liked this article, then please subscribe to our YouTube Channel for WordPress video tutorials. You can also find us on Twitter and Facebook.


Geoff
This post is WAY out of date. You now need to set up an API and OAuth on Google. The WP Forms website has full details, but allow 15-20 minutes to do so.
WPBeginner Support
The post was last updated in 2014, thank you for letting us know we should look into updating this post
Admin
Gerard Chartier
I have just tried this out and it does still work but you have to set “Allow less secure apps: ON” in your Google account, which is not recommended.
WPBeginner Support
Thank you for sharing that this still works and how to get it to work.
Prashant Sontale
I installed the plugin but I cant see the options such as those iin Mailer and also cant view the option of SMTP Host, Port, Authentication, Username, Password, etc. In mailer I haveoptions such as PHP, Google, Maligun, Sendgrid, Other SMTP. If I click on Google, they ask Client ID and Client Secret.
What to do?
Carla
That is to send… smtp… not to recieve the email on wordpress… POP3
swarna
my email is not working
Barka Piy Ndahi
Thanks for the tutorial.
I have xampp and i tried above. It showed test message sent, though below i saw: 2017-10-20 13:06:18 SMTP Error: Could not connect to SMTP host.
And i didnt see in my yahoo box.
Please can you help me make this to work.
Thank you.
Ashan Rupasinghe
That’s Worked. Thanks.
sudhakar
Hi i did the same but i have did not get any email for contact form and product enquiry form think that in localhost mail system does not works or there is an idea means please help me
Vivekraj
Hi new user registration mail contact us mail are working but woocommerce order mail and all not sending to the customers.
mukesh
i m mukesh
this is too good
surati
not work so work for me thnq…
Maksym
Works very good! Thank you
Steve
You have to go into your Google account and turn on the feature “Sign In & Security > Connected Apps & Sites > Allow Less Secure Apps > ON”.
Warren
Hi Steve
What’s the navigation to get to the sign in and security > connected apps etc? Loads of tabs on the top once in settings, each with multitude of options.
Thanks,
Shashank Chattopadhyaya
From your Google account:
[Settings -> Accounts and Import -> Other Google Account settings -> Sign-in & security -> Connected apps & sites -> Allow less secure apps (turn ON)]
Sharon
Same here. Otherwise gmail would authenticate because of the “Less secured application”
saurabh
awesome..blowsome.. worked!!
make sure your gmail has access to third party apps to send email.nothing else is needed than this video. good work . loved it.
Pam Marshall
Just what I needed to do my testing.
Roger Moore
I worked well after I enable access to less secure apps in my gmail account. Thanks
Chetan Buddh
array (size=18)
‘authenticate’ => string ‘SMTP Error: Could not authenticate.’ (length=35)
‘connect_host’ => string ‘SMTP Error: Could not connect to SMTP host.’ (length=43)
‘data_not_accepted’ => string ‘SMTP Error: data not accepted.’ (length=30)
’empty_message’ => string ‘Message body empty’ (length=18)
‘encoding’ => string ‘Unknown encoding: ‘ (length=18)
‘execute’ => string ‘Could not execute: ‘ (length=19)
‘file_access’ => string ‘Could not access file: ‘ (length=23)
‘file_open’ => string ‘File Error: Could not open file: ‘ (length=33)
‘from_failed’ => string ‘The following From address failed: ‘ (length=35)
‘instantiate’ => string ‘Could not instantiate mail function.’ (length=36)
‘invalid_address’ => string ‘Invalid address’ (length=15)
‘mailer_not_supported’ => string ‘ mailer is not supported.’ (length=25)
‘provide_address’ => string ‘You must provide at least one recipient email address.’ (length=54)
‘recipients_failed’ => string ‘SMTP Error: The following recipients failed: ‘ (length=45)
‘signing’ => string ‘Signing Error: ‘ (length=15)
‘smtp_connect_failed’ => string ‘SMTP connect() failed.’ (length=22)
‘smtp_error’ => string ‘SMTP server error: ‘ (length=19)
‘variable_set’ => string ‘Cannot set or reset variable: ‘ (length=30)
this error come what can i do now?
i can’t understand.
plz help me guyz.
Dan Canetti
Hi,
Looks as though it’s failed to Authenticate. Try ensuring your Email and Password are entered correctly.
Gabriel Hernández
Thanks! Works!=)
I will save this great website.
Daniel
Works! Thamks for the manual. Google asks to ‘Enable access for less secure apps’ in Gmail, but for testing purposes I see no problem..
deepika
It shows ‘Test message sent’ but I didn’t get any mail.
CarolineElisa
Thanks for this suggestion, but I can only get it to work if I ‘Enable access for less secure apps’ in Gmail, which Google does not recommend. Any other tips?
Marty
Tried this, no luck Any other suggestion? Thanks!
Marty
Hi! Thank you for a great article. I’m trying it all out, but still get an error when sending the test email: SMTP -> ERROR: Failed to connect to server: Operation timed out (60). So I did as suggested, added extension=php_openssl.dll. But nothing seems to work Anyone have another idea? Thanks!
Jesse Brownstein
After sending the test email, the browser loads infinitely without any indication of success/failure. How can I fix?
jam
Thanks very much for sharing your knowledge
Joker
This suggestion should work, But if you got error saying “Failed to connect to server: Unable to find the socket transport “ssl” ” ,
Then Please do the following
1. Edit your php.ini from your installed php folder
2. Search for extension=php_openssl.dll
3. The initial will look like this ;extension=php_openssl.dll
Remove the ‘;’ and it will look like this extension=php_openssl.dll
If you can’t find the extension=php_openssl.dll, add this line extension=php_openssl.dll.
4.Then restart your Xampp or LAMP or APACHE server (depends upon which of these you’re using).
Syed
Nice article. Helped me. Works for me. Thanks.
Komalchand
I used your setting for localhost but it din’t works where it works for my test server. so ur suggestion will be helpful for me. Thanks
Easy
sory if my question sounds sily bt which inbox am I to check?. am on a local machine without an internet service. or do I need internet to receive the mail?
WPBeginner Support
yes you will need an internet connection to receive email.
Admin
Bhargav
I didnt get email. Please help me.
WPBeginner Support
Make sure that you have correctly entered Gmail SMTP settings.
Admin
Cristian Nebunu
This is actually really helpfull. I needed to test some custom features and now i know how.
adolf witzeling
Very helpful. Thanks for sharing.