WordPress gönderilerini bir ızgara düzeninde mi görüntülemek istiyorsunuz?
Izgara düzeni, WordPress’te yazılarınızı görüntülerken size daha fazla esneklik sağlar. Bu, özel sayfalar oluştururken yardımcı olabilir.
Bu makalede, WordPress yazılarınızı sitenizin herhangi bir yerinde bir ızgara düzeninde nasıl kolayca görüntüleyebileceğinizi göstereceğiz.
WordPress için Izgara Düzenine Ne Zaman İhtiyaç Duyarsınız?
Her WordPress teması, blog yazılarının geleneksel dikey düzenini destekler ve bu, çoğu web sitesi türü için iyi çalışır. Ancak bu düzen, özellikle çok sayıda yazınız varsa çok fazla yer kaplayabilir.
Siteniz için özel bir ana sayfa oluşturuyorsanız, son gönderilerinizi görüntülemek için ızgara düzenini kullanmak isteyebilirsiniz.
Bu, ana sayfanıza başka öğeler eklemek için size daha fazla alan sağlayacaktır.
Ayrıca, gönderi ızgaranız öne çıkan görsellerinizi vurgulayarak görsel olarak çekici ve tıklanabilir olmasını sağlar. Gönderi ızgarasını yaratıcı portföyünüzü ve diğer özel içerik türlerini göstermek için de kullanabilirsiniz.
Birçok dergi teması ve fotoğraf teması, gönderileri görüntülemek için zaten ızgara tabanlı düzeni kullanır. Ancak temanız bu işlevi desteklemiyorsa eklemeniz gerekir.
Bununla birlikte, WordPress yazılarınızı bir ızgara düzeninde nasıl görüntüleyeceğinizi gösterelim. Kullanmak istediğiniz yönteme doğrudan atlamak için aşağıdaki hızlı bağlantıları kullanmanız yeterlidir.
- WordPress blok düzenleyicisi ile ızgara düzeni oluşturma
- Post Grid eklentisi ile bir ızgara düzeni oluşturun
- SeedProd sayfa oluşturucuyu kullanarak bir ızgara düzeni oluşturma
- WordPress’e kod ekleyerek ızgara düzeni oluşturma
Video Eğitimi
Yazılı talimatları tercih ediyorsanız, okumaya devam edin.
Yöntem 1. Blok Düzenleyici ile WordPress Gönderi Izgara Düzeni Oluşturma
Bu yöntem, WordPress blok düzenleyicisini kullanarak yazılarınızı ve küçük resimlerinizi bir yazı ızgarası düzeninde görüntülemenizi sağlar. Kendi ızgaranızı oluşturmanıza olanak tanıyan yerleşik bir yazı ızgarası bloğu vardır.
Bunu yapmak için, düzenlemek istediğiniz sayfayı açın, ardından ‘Artı’ blok ekle düğmesine tıklayın ve ‘Sorgu Döngüsü’nü arayın, ardından eklemek için bloğa tıklayın.
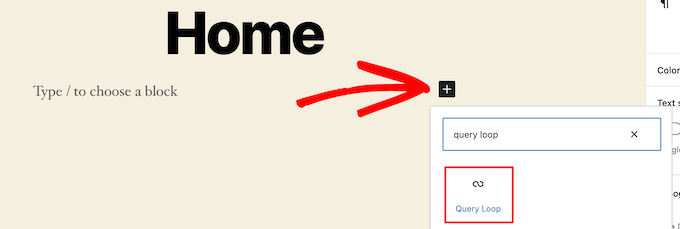
Bu blok, gönderi döngüsünü sayfanıza ekler.
Ardından, bir yazı ızgarası oluşturmak için bloğun üst kısmındaki ‘Boş Başlat’ seçeneğine tıklayın.

Bu, gönderi kılavuzunuzla görüntülemek istediğiniz bilgi türüne bağlı olarak birkaç farklı seçenek sunar.
Biz ‘Resim, Tarih ve Başlık’ seçeneğini seçeceğiz, ancak siz istediğinizi seçebilirsiniz.

Bundan sonra, resmin üzerine gelin ve ‘Izgara Görünümü’ seçeneğini seçin.
Bu, listenizi bir yazı ızgarasına dönüştürür.

Ardından, görüntülemek istediğiniz bilgileri özelleştirebilirsiniz.
İlk olarak, bloğun altındaki sayfalandırmayı sileceğiz. Bunu yapmak için üzerine tıklamanız ve ‘Üç Nokta’ seçenekler menüsüne tıklamanız yeterlidir.
Ardından, ‘Sayfalandırmayı Kaldır’a tıklayın.

Bu, öğeyi bloktan otomatik olarak kaldıracaktır.
Aynı şekilde gönderilerdeki tarihleri silebilir veya ziyaretçileriniz için daha fazla gönderi bilgisi bırakabilirsiniz.
Ardından, hem gönderi küçük resmine hem de gönderi başlığına bağlantılar ekleyeceğiz.
Gönderinizin küçük resmine tıklamanız ve sağ taraftaki seçenekler panelinde ‘Gönderiye Bağlantı’ geçişini açmanız yeterlidir.

Ardından, aynı şeyi gönderi başlığınız için de yapın.
İşiniz bittiğinde, gönderi kılavuzunuzu canlı hale getirmek için ‘Güncelle’ veya ‘Yayınla’ düğmesine tıklayın.
Şimdi, yeni WordPress yazı kılavuzunuzu görmek için WordPress web sitenizi ziyaret edebilirsiniz.

Bu bloğu herhangi bir sayfaya veya yazıya ekleyebilirsiniz. Bunu blog arşiv sayfanız olarak kullanmak isterseniz, WordPress’te blog yazıları için ayrı bir sayfanın nasıl oluşturulacağına ilişkin kılavuzumuza bakabilirsiniz.
Yöntem 2. Post Grid Eklentisi ile WordPress Post Grid Düzeni Oluşturun
Bu yöntem, web sitenizin herhangi bir yerine ekleyebileceğiniz özelleştirilebilir bir yazı ızgarası eklemek için basit bir yol sunar.
Yapmanız gereken ilk şey Post Grid eklentisini yüklemek ve etkinleştirmektir. Daha fazla ayrıntı için WordPress eklentisi yükleme kılavuzumuza bakın.
Etkinleştirmenin ardından, ilk gönderi kılavuzunuzu oluşturmak için Gönderi Kılavuzu ” Yeni Ekle ‘yi ziyaret etmeniz gerekir.
Ardından, gönderi kılavuzunuza bir başlık verin. Bu, sayfanızda herhangi bir yerde görünmeyecektir, sadece hatırlamanıza yardımcı olmak içindir.

Bunun altında, birden fazla sekme ile farklı bölümlere ayrılmış yazı ızgarası ayarlarını bulacaksınız.
İlk olarak, ‘Gönderi Sorgula’ sekmesine tıklamanız gerekir. Burada, ‘Gönderi türleri’ kutusunda görüntülemek istediğiniz gönderi türlerini tanımlayacaksınız.
Varsayılan olarak yalnızca gönderileri görüntüler, ancak sayfalar ve hatta özel gönderi türleri ekleyebilirsiniz.

Bundan sonra, ‘Düzenler’ sekmesine tıklamanız gerekir.
Ardından, ‘Düzen oluştur’ düğmesine tıklayın. Bu yeni bir pencerede açılacaktır.

Düzeninizi adlandırmanız gerekir. Ardından, ‘Genel’ seçeneğine tıklayın ve bir etiket listesi açılacaktır.
Bu etiketler, gönderi kılavuzunuzda görüntülenecek bilgilerdir.

‘Bağlantı içeren küçük resim’ seçeneğini ve ‘Bağlantı içeren yazı başlığı’ seçeneğini seçeceğiz.
Ardından, düzeninizi kaydetmek için ‘Yayınla’ veya ‘Güncelle’ye tıklayın.

Şimdi, önceki sekmedeki orijinal gönderi ızgarası düzenleyicisine geri dönün ve seçebileceğiniz yeni bir düzen seçeneği olacaktır.
Ekranın alt kısmındaki ‘Öğe düzenleri’ bölümünde yeni düzene tıklamanız yeterlidir.

Ardından, ‘Öğe stili’ sekmesine tıklayın. Burada ızgaranızın boyutunu ayarlayabilirsiniz.
Varsayılan ayarlar çoğu site için çalışmalıdır, ancak çalışmazsa, bunları buradan değiştirebilirsiniz.

İşiniz bittiğinde, sayfanın üst kısmındaki ‘Yayınla’ düğmesine tıklayın ve gridiniz WordPress blogunuza eklenmeye hazır olacaktır.
Şimdi, ‘Kısa Kod’ sekmesine tıklamanız ve ardından ‘Gönderi Izgarası Kısa Kodu’ kutusundaki kısa kodu kopyalamanız gerekir.

Bundan sonra, gönderi listenizi görüntülemek istediğiniz sayfayı açın ve ‘Artı’ blok ekle düğmesine tıklayın.
Ardından, ‘Kısa kod’ için arama yapın ve ‘Kısa kod’ bloğunu seçin.

Ardından, daha önce kopyaladığınız kısa kodu kutuya yapıştırın.
Ardından, ‘Güncelle’ veya ‘Yayınla’ düğmesine tıklayın.

Şimdi, WordPress yazı ızgarası düzeninizi canlı olarak görmek için sayfanızı görüntüleyebilirsiniz.

Yöntem 3. SeedProd Sayfa Oluşturucu Eklentisi ile WordPress Gönderi Izgara Düzeni Oluşturma
Yazı ızgarası düzeni oluşturmanın bir başka yolu da SeedProd sayfa oluşturucu eklentisini kullanmaktır. Piyasada 1 milyondan fazla web sitesi tarafından kullanılan en iyi sürükle ve bırak WordPress sayfa oluşturucusudur.
SeedProd, herhangi bir kod yazmadan kolayca özel sayfalar ve hatta tamamen özel WordPress temaları oluşturmanıza yardımcı olur. Eklentiyi 404 sayfaları, çok yakında sayfaları, açılış sayfaları ve daha fazlası gibi istediğiniz her türlü sayfayı oluşturmak için kullanabilirsiniz.
Daha fazla bilgi edinmek için WordPress’te özel sayfa oluşturma hakkındaki kılavuzumuza bakın.
SeedProd oluşturucuda, sayfanızı özelleştirirken, sayfanın herhangi bir yerindeki artı ‘Bölüm Ekle’ düğmesine tıklamanız yeterlidir.
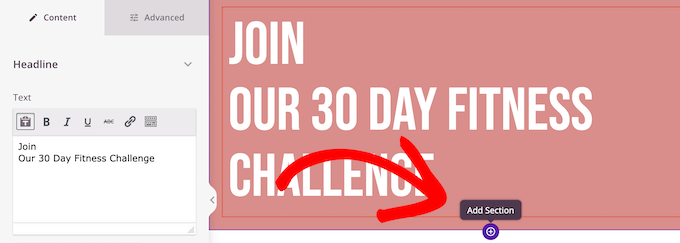
Bu, yeni bir blok eklemek için bir seçenek getirecektir.
Ardından, ‘Gönderiler’ bloğunu sayfanıza sürükleyin; otomatik olarak sayfanıza bir gönderi listesi ekleyecektir.

Şimdi, sol taraftaki seçenekler panelini kullanarak bu bloğu özelleştirebilirsiniz.
İlk olarak, ‘Düzen’ bölümüne gidin. Burada blog yazısı ızgaranız için sütun sayısını ayarlayabilir ve ‘Özellik Resmini Göster’ ve ‘Başlığı Göster’ geçişlerini açabilirsiniz.
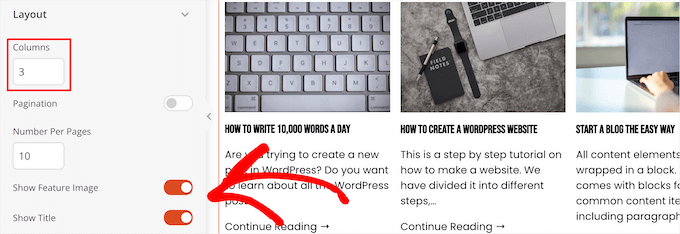
Ardından, ‘Alıntı Göster’ geçişine ve ‘Daha Fazla Oku Göster’ geçişlerine gidin ve basit bir blog yazısı ızgara düzeni oluşturmak için bunları kapatın.

Renk düzenini, metni ve daha fazlasını özelleştirmek istiyorsanız, sol sütunun üst kısmındaki ‘Gelişmiş’ sekmesine tıklayın.
Ardından, ‘Metin’ açılır menüsüne tıklayın ve değişikliklerinizi yapın.

Sayfa ve blog yazısı ızgara düzeninizi istediğiniz kadar özelleştirmeye devam edebilirsiniz.
İşiniz bittiğinde, ‘Kaydet’ düğmesine tıklayın ve değişikliklerinizi canlı hale getirmek için sayfanın üst kısmındaki ‘Yayınla’ açılır menüsünü seçin.
Artık yeni gönderi kılavuzunuzu web sitenizde görüntüleyebilirsiniz.

Yöntem 4. WordPress’e Kod Ekleyerek WordPress Gönderi Izgara Düzeni Oluşturma
Bu yöntem, WordPress’e nasıl kod ekleneceği konusunda temel bir anlayış gerektirir. Bunu daha önce yapmadıysanız, WordPress’te kod kopyalama ve yapıştırma hakkındaki kılavuzumuza bakın.
Kod eklemeden önce, yazı ızgaranız için kullanacağınız yeni bir resim boyutu oluşturmanız gerekir. Daha fazla bilgi edinmek için WordPress’te ek görsel boyutlarının nasıl oluşturulacağına ilişkin kılavuzumuza bakın.
Ardından, kod parçacığını ekleyeceğiniz doğru WordPress tema dosyasını bulmanız gerekir. Örneğin, bunu single.php dosyanıza ekleyebilirsiniz, böylece tüm yazılarınızın altında görünür.
Ayrıca özel bir sayfa şablonu oluşturabilir ve blog yazısı ızgara düzeninizi küçük resimlerle görüntülemek için kullanabilirsiniz.
Daha fazla bilgi edinmek için doğru tema şablonu dosyasını bulmanıza yardımcı olacak WordPress şablon hiyerarşisi hile sayfamıza bakın.
Bunu yaptıktan sonra WordPress’e kod eklemeye başlayabilirsiniz. Kod parçacığı oldukça uzun olduğu için bölüm bölüm inceleyeceğiz.
İlk olarak, aşağıdaki kod parçacığını tema şablon dosyanıza ekleyin.
1 2 3 4 5 6 7 8 9 10 11 12 | <?php$counter = 1; //start counter $grids = 2; //Grids per row global $query_string; //Need this to make pagination work /*Setting up our custom query (In here we are setting it to show 12 posts per page and eliminate all sticky posts*/query_posts($query_string . '&caller_get_posts=1&posts_per_page=12'); if(have_posts()) : while(have_posts()) : the_post();?> |
Bu kod parçacığı yazı döngüsü sorgusunu ayarlar. İsterseniz sayfa başına daha fazla gönderi görüntülemek için ‘posts_per_page’ değişkenini değiştirebilirsiniz.
Ardından, aşağıdaki kod parçacığını tema şablon dosyanıza ekleyin.
1 2 3 4 5 6 7 8 9 10 11 12 13 14 15 16 17 18 19 20 21 22 23 24 25 | <?php//Show the left hand side columnif($counter == 1) :?> <div class="griditemleft"> <div class="postimage"> <a href="<?php the_permalink(); ?>" title="<?php the_title_attribute(); ?>"><?php the_post_thumbnail('category-thumbnail'); ?></a> </div> <h2><a href="<?php the_permalink(); ?>" title="<?php the_title_attribute(); ?>"><?php the_title(); ?></a></h2> </div><?php//Show the right hand side columnelseif($counter == $grids) :?><div class="griditemright"> <div class="postimage"> <a href="<?php the_permalink(); ?>" title="<?php the_title_attribute(); ?>"><?php the_post_thumbnail('category-thumbnail'); ?></a> </div> <h2><a href="<?php the_permalink(); ?>" title="<?php the_title_attribute(); ?>"><?php the_title(); ?></a></h2> </div><div class="clear"></div><?php$counter = 0;endif;?> |
Bu kod parçacığı yazılarımız için iki sütun oluşturur ve başlık ile yazı resmini görüntüler. Ayrıca daha sonra nasıl şekillendireceğinizi göstereceğimiz bir CSS sınıfı oluşturur.
Ayrıca ‘postimage’ ifadesine de atıfta bulunur, bu nedenle bunu daha önce oluşturduğunuz görüntü boyutunun adıyla değiştirmeniz gerekir.
Bundan sonra, sonuna aşağıdaki kod parçacığını ekleyin.
1 2 3 4 5 6 | <?php$counter++;endwhile;//Post Navigation code goes hereendif;?> |
Bu kod parçacığı sadece döngüyü kapatır. Ayrıca yazı navigasyonu ekleme seçeneği de sunar, ancak çoğu web sitesi sahibi bunun için farklı bir eklenti kullanır, bu nedenle kod çakışmalarını önlemek için eklemedik.
İşte son kod parçacığı tamamen böyle görünüyor.
1 2 3 4 5 6 7 8 9 10 11 12 13 14 15 16 17 18 19 20 21 22 23 24 25 26 27 28 29 30 31 32 33 34 35 36 37 38 39 40 41 42 43 44 45 46 47 | <div id="gridcontainer"><?php$counter = 1; //start counter $grids = 2; //Grids per row global $query_string; //Need this to make pagination work /*Setting up our custom query (In here we are setting it to show 12 posts per page and eliminate all sticky posts) */query_posts($query_string . '&caller_get_posts=1&posts_per_page=12'); if(have_posts()) : while(have_posts()) : the_post(); ?><?php//Show the left hand side columnif($counter == 1) :?> <div class="griditemleft"> <div class="postimage"> <a href="<?php the_permalink(); ?>" title="<?php the_title_attribute(); ?>"><?php the_post_thumbnail('category-thumbnail'); ?></a> </div> <h2><a href="<?php the_permalink(); ?>" title="<?php the_title_attribute(); ?>"><?php the_title(); ?></a></h2> </div><?php//Show the right hand side columnelseif($counter == $grids) :?><div class="griditemright"> <div class="postimage"> <a href="<?php the_permalink(); ?>" title="<?php the_title_attribute(); ?>"><?php the_post_thumbnail('category-thumbnail'); ?></a> </div> <h2><a href="<?php the_permalink(); ?>" title="<?php the_title_attribute(); ?>"><?php the_title(); ?></a></h2> </div><div class="clear"></div><?php$counter = 0;endif;?><?php$counter++;endwhile;//Pagination can go here if you want it.endif;?></div> |
Şimdi, yazı ızgaranızın güzel bir şekilde görüntülendiğinden emin olmak için aşağıdaki CSS’yi sitenize eklemeniz gerekir.
Bunu daha önce yapmadıysanız, WordPress sitenize nasıl kolayca özel CSS ekleyebileceğinize ilişkin kılavuzumuza bakın.
1 2 3 4 5 6 7 8 9 10 11 12 13 14 15 16 17 18 19 20 | #gridcontainer{ margin: 20px 0; width: 100%; }#gridcontainer h2 a{ color: #77787a; font-size: 13px;}#gridcontainer .griditemleft{ float: left; width: 278px; margin: 0 40px 40px 0;}#gridcontainer .griditemright{ float: left; width: 278px;}#gridcontainer .postimage{ margin: 0 0 10px 0;} |
Yazı döngünüzün farklı öğelerini nasıl değiştirdiklerini görmek için farklı CSS seçicilerini değiştirebilirsiniz.
Umarız bu makale WordPress yazılarınızı ızgara düzeninde nasıl görüntüleyeceğinizi öğrenmenize yardımcı olmuştur. Ayrıca, en iyi web tasarım yazılımının nasıl seç ileceğine ilişkin kılavuzumuzu ve küçük işletmeler için en iyi canlı sohbet yazılımı uzman seçimlerimizi görmek isteyebilirsiniz.
If you liked this article, then please subscribe to our YouTube Channel for WordPress video tutorials. You can also find us on Twitter and Facebook.


Rachel
I tried to do this under ‘posts’ for my blog that has already been created. It didn’t work.
WPBeginner Support
You would want to ensure you have multiple blog posts published live on your site for them to be visible as the most common reason for that issue.
Admin
julie
Hi
I have tried this on my static homepage but it is not working.
Do I just add the one shortcode or both ( ie the php code also?)
using make theme.
do i just add it to the page as a paragraph and shortcode?
thanks
julie
WPBeginner Support
You should only need to add the shortcode to the page, if you reach out to the plugin’s support they should be able to let you know why it is not displaying properly
Admin
Paige
Is there a way to customize the thumbnails? I have mine set to the featured image, however some are different sizes and are cut off in the wrong areas.
WPBeginner Support
In the layout settings, you should be able to customize the display of the featured iamges
Admin
Lisa
I’m following all the steps to set this grid up on my homepage but it’s not displaying. I created a page, added the short code, and under settings–>reading I set my homepage to static with that page. What am I doing wrong?
p.s. I purchased a child theme (Foodie Pro), could that be my issue? Thanks!
WPBeginner Support
There may be a page template that could be causing a display issue, if you reach out to Post Grid’s support they should be able to help have it display properly
Admin
Jess
This was GREAT!!! Thankyou! I was able to apply this for my main blog page however I also have navigation for the different categories within my blog. How can I make it so that each of these category pages also displays as a grid?
Lu
I installed this plugin but my WordPress site have been automatically updated to Gutenberg and now a box appears in all my WordPress Post pages, covering the content so I can’t see it! The only way I can get rid of it is to de-install Post Grid. Anyone have any other ideas so I can use the Post Grid? Thanks for any help! L
Robert
I have the page set up but I have 5 posts that I did before that are not showing up on the new Post Grid.
How do I get the posts to show up on the grid?
Travenjo
Can anyone help me to have page grid and (not post grid) for my pages. How ro customize?
Hector
I’m using the Twenty Fourteen theme and this only gave me one option for layout instead of what you are showing and the one they let me use is a double but it just doesn’t work even the pagination got stuck on me so I don’t know what to do,is there a better plugin for my theme?
Aurangzaib
What a simple solution, i understand WP and PHP on a good level and this is the smartest and easiest solution to make a grid of posts and fetch them up from the DB, although the need is pretty rare if you are willing to make a different page for any purpose otherwise there are themes that have built-in support of many kinds of grids designs i customized and designed a bit on my web there at simspk.com, also keeping simple and clean content is the simplest way to achieve better ranks, Great post bro, keep them up!
Daniel Grove
What about for blog category pages? They just get listed vertically in my theme and it looks lame and wastes so much space! I want it to grid them just like the home blog page does.
Jess
Meeeee tooooo!!!!! Following to see if there is a response…..
WPBeginner Support
Hey Daniel and Jess,
The plugin’s premium version claims to have the option to create post grid for category archive pages. We didn’t test the premium version for the article. Please check the plugin website to learn more before buying.
Admin
Lori
I have the Dara theme with the Premium plan, and I am VERY NEW. Unfortunately, I just realized that plug-ins are only available with the Business plan, which I cannot afford to invest in at this time since it would triple my cost. Dara has a grid page option, but it only allows child pages to be displayed – I want POSTS to display from a specific category. Looks like I would have to create a static child page every time I want new content to appear in this Premium plan Dara grid page option, right??
WPBeginner Support
Hi Lori,
You can start with a self-hosted WordPress.org website which allows you to install plugins out of the box.
Admin
Carl
This is great but is this same process possible WITHOUT installing a plugin. How do you shows 10 different category separately? How select images for grid?
Brianna
This is awesome! Is there a way to edit from two across ( 2 columns) to three or four? When I change the settings to 20 posts a page, I am getting 2 columns and 10 rows.
Dale Kevin
Hi, I followed all the steps but it doesnt work. The page where I posted the shortcode of postgrid doesnt show up as my how page. Whats wrong? Maybe the Php code is needed?
I need you guidance. Thank you. I appreciate you response
Mr Thanh
Hi, that’s great plugin.
But i can’t creat a grid with three colums, only two colums.
How can i?
Holly
Hi,
I’ve used this plugin on all the sites i’ve created, i love it its so easy to use but im having a problem with the layout a little bit. Im using Layout 1 with 4 Columns and for some reason a row splits into two different rows, how do i stop this from happening?
Dee
Hello there. This was very helpful thank you. It works fine on the front page of my blog but wouldn’t work in the categories. Whenever a category is clicked in the header, the page shows the theme grid and not the Post Grid. How do I go about this? What page do I copy the code into please?
Thank you
DEE
Can anyone help with this please
Liah
My current theme doesn’t have the grid layout for the blog section. I’ve download the plugin and it works great but when I upload a new blog post does it automatically update the grid to include the latest post? Thank you for the super helpful video!
WPBeginner Support
Hi Liah,
Yes it will automatically update the grid.
Admin
Leanne
I’m trying to make the blog section of my site look nicer here – is there a way to automatically style the current blog posts in a grid rather than creating a new page and adding shortcode or editing php files?
WPBeginner Support
Hey Leanne,
You’d need to look for a WordPress theme that automatically displays your blog posts in a grid layout.
Admin
Joseph
Hi Thank you for the nice Article. Is there any way to make the same without plugin. If so how could i ?
Thanks
leighton
I want to use this but i am confused, I follow it but I dont see anything, I copy the shortcode but still nothing, do I have to upload images and text? can someone help?
Shahid
Great Article, just wanted to know if we can add post excerpt length in this plugin?
mike
This is cool for pages only. What if my posts belong under categories only. How do I add the shortcode to category archive. Thanks
Henry
This is just fine for pages! Still can’t figure how it works for posts! Someone help pls.
Dave Parks
I finally found “Taxonomy” setting on the plugin homepage – available if you buy the premium.
Which means the freebee is of zero value.
Dave Parks
The only category setting I see is
“Exclude by post ID
you can exclude post by ID, comma(,) separated”
With all due respect to the creator of this plugin, there’s no way I’m going input all the IDs I do not want to appear. The list is too long, and it will grow as I develop this site.
So is there some place to put in the one ID that I want to appear?
Tina Davidson
Hi – I finally have my blog up and running – yay! But want to add a store element to it. A “Shop Now” page. Do you think this its the best type of plug-in to use or is the one more efficient for a store set-up? Thanks so much! Tina
hasan
thanks for good knowledge
my website has two kinds of contents : post and pages.
can i add my new pages on homepage automatically without using widgets?
thanks again
Karthik
hi thanks for kind info,
please help me how to filter post by categories
hasan
thank you for good knowledge
i use a theme support magazine template on my site but it includes only posts .
how can i use this template for pages also not only posts ?
thanks again
WPBeginner Support
Please contact theme developer they will be able to help you better.
Admin
anil singh
thanks who do not know php and how to cutomize homepage this article will be helpful. i have one question which i searched all the web but not find any article. quetion is how can custmize homepage with category list without showing post area in homepage please make article for it . you can see example on freejobalert.in
judit
Will this pluggin work on wordpress.com?
WPBeginner Support
Please see our guide on the difference between self hosted WordPress.org vs free WordPress.com blog.
Admin
Tonia
Hi – i see an image in your blog article, does this support featured content image ?
natalie james
Thank you so much for this article, it is as though you were reading my mind and my wish list for my blog. I was easily able to follow your step by step instructions until the very end. Im not sure how to put my query correctly, I think what Im trying to say is that I would like the grid page to be my landing page of my blog. At the moment it is inside a post with a post heading. You do mention at the end that I can past the code into my themes file but unfortunately I dont know where that is. Hope this makes sense and I look forward to your reply.
thanks
Natalie
Paul Wandason
Hi Natalie,
I maybe wrong here – but I think you need to create a *page* with the grid on it, then if you go to “settings” then “reading” in the wordpress admin dashboard, you can set “Front page displays” to a static page, and select the page you’ve just created with the grid on it under the “front page” drop down menu.
Hope this helps, and good luck!
Paul