Yıllardır WPBeginner’ın video portalını işletiyoruz ve milyonlarca kullanıcıya ücretsiz WordPress video eğitimleri sunuyoruz.
Yeni başlayanların WordPress öğrenmesine yardımcı olmak için basit bir yol olarak başlayan şey, düzinelerce kursla tam teşekküllü bir akademiye dönüştü. Bir site kurmaktan gelişmiş eklentilerde ustalaşmaya kadar her şeyi kapsıyoruz.
Kendi üyelik platformumuzu yöneterek neyin işe yarayıp neyin yaramadığını tam olarak öğrendik. Bu sayede başarılı bir WordPress üyelik sitesi oluşturmanın en iyi yolunu biliyoruz.
En iyi kısmı mı? Bunu gerçekleştirmek için ileri teknoloji becerilerine veya büyük bir bütçeye ihtiyacınız yok. Bunu kolaylaştırmak için mükemmel araç kombinasyonunu bulduk.
Bu nihai kılavuzda, bir WordPress üyelik sitesinin nasıl oluşturulacağını adım adım göstereceğiz. Hadi başlayalım. 🙌

Neden Bir Üyelik Web Sitesi Kurmanız Gerekiyor?
Bir üyelik web sitesi kurmak, insanların değer verdikleri bir şey etrafında bir araya geldikleri kendi topluluğunuzu oluşturmak gibidir. Uzmanlığınızı paylaşmanın, kitlenizle daha derin bir bağ kurmanın ve istikrarlı bir gelir kaynağı yaratmanın bir yoludur.
Diyelim ki egzersiz planları hazırlayan bir fitness koçusunuz. Bir üyelik sitesi ile bu planları doğrudan en sadık müşterilerinizle paylaşabilirsiniz.
Dolayısıyla, premium içerik makaleleri, üyelere özel forumlar veya canlı Soru-Cevap oturumları gibi avantajlarla, üyelere başka hiçbir yerde bulamayacakları bir şey sunabilirsiniz. Bu ayrıcalık duygusu, insanların katılımını sağlayabilir ve size ve markanıza daha güçlü bir bağlılık oluşturabilir.
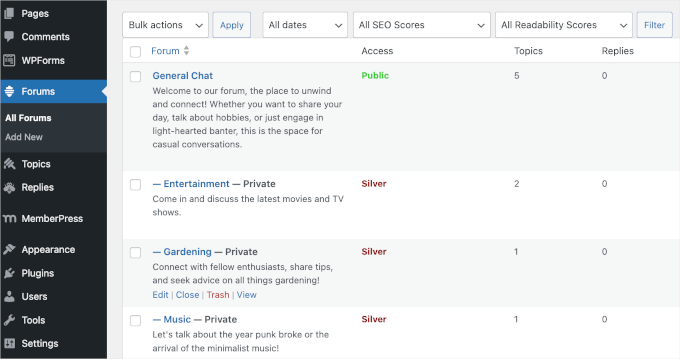
Bir üyelik web sitesi ayrıca içeriğiniz ve kazançlarınız üzerinde daha fazla kontrol sahibi olmanızı sağlar. Sosyal medya algoritmalarına veya tutarsız reklam gelirlerine bel bağlamanın aksine, kuralları siz belirler ve kazandıklarınızın daha fazlasını elinizde tutarsınız.
Başlamak zaman ve çaba gerektirse de, doğru araçlar sitenizi internetten para kazanmanın ölçeklenebilir ve ödüllendirici bir yoluna dönüştürebilir.
WordPress Üyelik Sitesi Açmak İçin Nelere İhtiyacınız Var?
Kendi üyelik sitenizi oluşturmak için kullanıcıları, üyelikleri, ödemeleri ve daha fazlasını yönetmek için özelliklere sahip bir platforma ihtiyacınız olacaktır.
İyi haber şu ki, 10 yıl öncesinin aksine, bugünlerde bir web sitesi yapmak oldukça kolay.
Tüm platformlar ve web sitesi kurucuları arasında WordPress, herkesin kendi üyelik web sitesini kurmasını ve çok az veya hiç teknik beceri olmadan satışa başlamasını çok kolaylaştırır.
Başlamak için aşağıdaki üç şeye ihtiyacınız olacak:
- Bir alan adı. Bu, web sitenizin adresi olacaktır (Örneğin, wpbeginner.com).
- Bir web barındırma hesabı. Bu, web sitesi dosyalarınızın depolandığı yerdir.
- Bir üyelik eklentisi. Bu, normal web sitenizi bir üyelik platformuna dönüştürecektir.
WordPress ile 30 dakikadan kısa bir sürede tamamen işlevsel bir üyelik web sitesi kurabilirsiniz ve sürecin her adımında size yol göstereceğiz.
WordPress ile güçlü bir üyelik web sitesi oluşturmanıza yardımcı olacak adımları aşağıda bulabilirsiniz:
- Step 1: Getting Started With a WordPress Membership Site
- Step 2: Choosing a WordPress Membership Plugin
- Step 3: Setting Up Your WordPress Membership Website
- Step 4: Add a Payment Method
- Step 5: Creating Membership Levels
- Step 6: Restrict Access to Membership Plans
- Step 7: Adding Members-Only Content
- Step 8: Create a Pricing Page
- Step 9: Add Sign-up and User Login Forms
- Step 10: Customizing Membership Email Templates
- Step 11: Viewing Reports to Grow Your Membership Website
- 🔗 Bonus Resources: Taking Your Membership Site to the Next Level
- Further Reading: Essential WordPress Guides
- Frequently Asked Questions
Hazır mısınız? Hadi başlayalım.
💡 İçeriden İpucu: Bir üyelik web sitesi açıyor ancak teknik kurulumdan bunalmış mı hissediyorsunuz? WPBeginner Pro Services yardımcı olabilir!
Uzman ekibimiz sizin için kolayca ve uygun maliyetle özel bir üyelik sitesi oluşturabilir. Üyelik işlevselliğinden tasarım ve SEO’ya kadar her şeyi biz halledeceğiz.
Adım 1: WordPress Üyelik Sitesine Başlarken
Bir üyelik sitesi oluşturmak için doğru WordPress platformunu kullandığınızdan emin olmalısınız. Evet, iki tür WordPress vardır.
İhtiyacınız olan tüm özelliklere ve araçlara sınırsız erişim sağladığından, kendi kendine barındırılan WordPress.org sürümünü kullanmanızı öneririz. Daha fazla bilgi edinmek için WordPress.com ve WordPress.org karşılaştırmamızın tamamına bakın.
Kendi kendine barındırılan bir WordPress sitesi için bir WordPress barındırma hesabına, alan adına ve bir SSL sertifikasına ihtiyacınız olacaktır.
Tipik olarak, bir alan adı yaklaşık 14,99 $ / yıl, web barındırma yaklaşık 7,99 $ / ay ve bir SSL sertifikası yaklaşık 69,99 $ / yıl tutarındadır.
Yeni başlıyorsanız, bu başlangıç maliyetleri hızla artabilir.
Neyse ki bunu düzeltmenin bir yolu var.
Resmi olarak önerilen bir WordPress barındırma sağlayıcısı ve dünyanın en büyük barındırma şirketlerinden biri oldukları için Bluehost ‘u kullanmanızı şiddetle tavsiye ediyoruz.

Okuyucularımıza ücretsiz bir alan adı, bir SSL sertifikası ve web barındırmada cömert bir indirim vermeyi kabul ettiler.
Temel olarak, yukarıdakilerin hepsine ayda 1,99 $ gibi düşük bir fiyata sahip olabilirsiniz.
✏️ Not: WPBeginner’da tam şeffaflığa inanıyoruz. Yönlendirme bağlantımızı kullanarak Bluehost ‘a kaydolursanız, size hiçbir ekstra ücret ödemeden küçük bir komisyon kazanacağız (aslında, paradan tasarruf edecek ve ücretsiz bir alan adı + SSL sertifikası alacaksınız).
Bu komisyonu herhangi bir WordPress barındırma hizmetini önermek için alabiliriz, ancak biz yalnızca kişisel olarak kullandığımız ve okuyucularımıza değer katacağına inandığımız ürünleri öneriyoruz.
Hosting için kaydolduktan ve alan adınızı ayarladıktan sonra, sıra WordPress’i yüklemeye gelir. Bluehost ile WordPress önceden yüklenmiş olarak gelir.
Diğer WordPress barındırma şirketlerinin çoğu tek tıkla WordPress yükleme seçeneği sunar. Farklı bir barındırma sağlayıcısı kullanıyorsanız, tüm büyük barındırma sağlayıcılarını kapsayan WordPress yükleme kılavuzumuza bakın.
Bundan sonra, blogunuzu oluşturmayı bitirmeniz gerekir. Ayrıntılı talimatlar için adım adım WordPress blogu açma kılavuzuna göz atın ve kısa sürede çalışmaya başlayın.
Adım 2: Bir WordPress Üyelik Eklentisi Seçme
Kullanabileceğiniz çok sayıda ücretsiz ve ücretli WordPress üyelik eklentisi vardır. Ancak, her birinin artıları ve eksileri vardır. Daha fazla bilgi edinmek için en iyi WordPress üyelik eklentileri karşılaştırmamıza göz atın.
Doğru WordPress üyelik eklentisini seçmek için ne tür bir üyelik web sitesi oluşturmak istediğinize ve hangi işlevselliğe ihtiyacınız olduğuna karar vermeniz gerekir.
WordPress sitenizde sadece kullanıcı kaydına izin vermek istiyorsanız, WPForms‘u kullanabilirsiniz.
WordPress için 6 milyondan fazla web sitesi tarafından kullanılan en iyi WordPress kullanıcı kayıt eklentilerinden ve iletişim formu eklentilerinden biridir.
WPBeginner’da, iletişim formumuz ve kullanıcı yıllık anketimiz de dahil olmak üzere çeşitli çevrimiçi formları görüntülemek için WPForms’a güveniyoruz. WPForms incelememizin tamamında form oluşturucu hakkında daha fazla bilgi edinebilirsiniz!
Bu eklenti ile kolayca bir kullanıcı kayıt formu ve giriş sayfası oluşturabilir ve hatta kullanıcıların WordPress yönetici alanına erişmeden makale göndermelerine izin verebilirsiniz. Ayrıca, üyelik yazılımına benzer şekilde yinelenen abonelik ödemelerini kabul etmenizi sağlar.
Öte yandan, çevrimiçi kurslara ve yalnızca üyelere özel içeriklere abonelik satmak istiyorsanız Thrive Apprentice gibi bir üyelik eklentisi kullanabilirsiniz.

Tek tek kursları, kurs paketlerini ve kurs / dijital ürün kombinasyonlarını ödeme yapmayan üyelerden korumanıza olanak tanır. Ayrıca, görsel oluşturucu sayesinde çevrimiçi kurslar oluşturmak kolaydır.
Thrive Apprentice incelememizin tamamında görebileceğiniz tüm özellikleri hakkında bilgi edinmek için kapsamlı bir şekilde test ettik.
Özel içerik, premium haber bültenleri, çevrimiçi kurslar veya dijital indirmeler için abonelik satmak için MemberPress gibi daha güçlü bir WordPress üyelik eklentisine ihtiyacınız olacak.
MemberPress, girişimcilerin 1.000.000.000 doların üzerinde gelir elde etmesine yardımcı olan hepsi bir arada bir üyelik eklentisidir. Biz de video kurs web sitemizi oluşturmak için kullanıyoruz ve özelliklerini keşfetmek için kapsamlı MemberPress incelememize bakabilirsiniz.
Ödemeleri kabul etmenize, üyelik seviyeleri eklemenize, geçitli içerik oluşturmanıza, farklı üyelik seviyelerine göre erişimi kısıtlamanıza, çevrimiçi kurslar oluşturmanıza, yalnızca üyelere özel etkinlikler düzenlemenize ve daha fazlasına olanak tanıyan gelişmiş üyelik özellikleriyle birlikte gelir.
Bunu aklımızda tutarak, WordPress üyelik web sitenizi kurmaya başlayalım.
Adım 3: WordPress Üyelik Web Sitenizi Kurma
Yukarıda bahsettiğimiz tüm özelliklere sahip olduğu ve hatta kendi video sitemizi güçlendirmek için kullandığımız için eklenti olarak MemberPress ‘i seçiyoruz. Ayrıca, işletmenizin büyümesi için gerekli olan üçüncü taraf eklentilerle de mükemmel bir şekilde çalışır.
Yapmanız gereken ilk şey MemberPress eklentisini kurmak ve etkinleştirmek. Daha fazla ayrıntı için, bir WordPress eklentisinin nasıl kurulacağına ilişkin adım adım kılavuzumuza bakın.
Etkinleştirmenin ardından, MemberPress ” Ayarlar sayfasına gitmeniz ve lisans anahtarınızı girmek için ‘Lisans’ menü seçeneğine tıklamanız gerekir. Bu bilgiyi MemberPress web sitesindeki hesabınızda bulabilirsiniz.

Lisans anahtarınızı kopyalayıp yapıştırın ve ardından ‘Lisans Anahtarını Etkinleştir’ düğmesine tıklayın.
Bu ekranda, eklenti ayarlarını da yapılandıracaksınız.
Adım 4: Bir Ödeme Yöntemi Ekleyin
Kurmanız gereken ilk şey bir ödeme ağ geçididir çünkü üyelik sitenizde ödemeleri kabul etmenize olanak tanır.
Bunu, ‘Ödemeler’ sekmesini seçip ardından ‘Ödeme Yöntemi Ekle’ düğmesine tıklayarak yapabilirsiniz.

Bu, bir ödeme yöntemi seçebileceğiniz ve farklı ödeme işlemcilerini bağlayabileceğiniz bir açılır menü getirir.
MemberPress, PayPal (Standart, Express ve Pro), Stripe ve Authorize.net gibi popüler ödeme ağ geçitlerini destekler.
‘Ağ Geçidi’ açılır menüsünden bir ödeme yöntemi seçmeniz ve gerekli kimlik bilgilerini sağlamanız gerekir.

Başka bir ödeme yöntemi eklemek için ‘Ödeme Yöntemi Ekle’ düğmesine tıklayarak birden fazla ödeme yöntemi de ekleyebilirsiniz.
Genellikle 2 seçenek kullanırız: Kredi kartları için Stripe ve ikincil bir seçenek olarak PayPal çünkü bazı kullanıcılar kredi kartı bilgilerini vermek yerine PayPal ‘ı tercih ediyor.
Ayarlarınızı kaydetmek için sayfanın altındaki ‘Seçenekleri Güncelle’ düğmesine tıklamayı unutmayın.
Adım 5: Üyelik Seviyelerinin Oluşturulması
Bir sonraki adım, kullanıcılarınızın satın alabileceği üyelik seviyeleri oluşturmaktır. Her üyelik seviyesi farklı fiyatlandırma planlarına, avantajlara ve erişime sahip olabilir. Hatta ücretsiz bir üyelik planınız bile olabilir.
Bir üyelik seviyesi oluşturmak için, MemberPress ” Üyelik ler sayfasına gitmeniz ve üstteki ‘Yeni Ekle’ düğmesine tıklamanız gerekir.

Sonraki sayfada, bu üyelik planı için bir başlık girin ve ardından gönderi düzenleyicisinde plan ayrıntılarını girin.
Bu plan için fiyatlandırmayı ve sürenin dolmasını ‘Üyelik Koşulları’ bölümünden ayarlamanız gerekecektir.

MemberPress ayrıca faturalandırma türünü ‘Yinelenen’ olarak ayarlayarak yinelenen ödemeleri kabul etmenize olanak tanır.
Yukarıdaki örnekte, yıllık bir üyelik planı oluşturduk.
🧑💻 Uzman İpucu: Yeni üyelerin ücretli bir plana geçmeden önce deneyebilecekleri ücretsiz bir plan da oluşturabilirsiniz.
Bundan sonra, yazı düzenleyicinin altındaki üyelik seçenekleri meta kutusuna gitmeniz gerekir. Bu, söz konusu plan için izinleri ve üyelik seçeneklerini özelleştirebileceğiniz yerdir.

Ardından, ‘Fiyat Kutusu’ menü sekmesine tıklayın.
Burada, başlık ve plan avantajları gibi fiyatlandırma sayfasında görünecek bilgileri ekleyebilirsiniz.
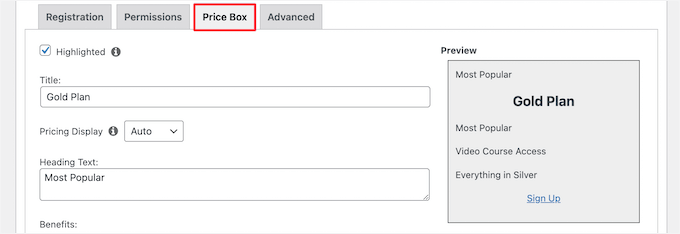
Yeni üyelik planından memnun kaldığınızda, kullanıma sunmak için ‘Yayınla’ düğmesine tıklayabilirsiniz.
Devam edin ve ihtiyacınız olduğu kadar üyelik planı oluşturmak için bu işlemi tekrarlayın.
Adım 6: Üyelik Planlarına Erişimi Kısıtlayın
Bir sonraki adım, web sitenizdeki farklı üyelik planları için hangi içeriğin mevcut olacağını seçmektir. MemberPress, ‘Kurallar’ kullanarak erişimi kontrol etmenize izin vererek içerik kısıtlamasını çok kolaylaştırır.
MemberPress ” Kurallar sayfasını ziyaret ederek ve üstteki Yeni Ekle düğmesine tıklayarak kuralları ayarlayabilirsiniz.

Kural düzenleme sayfası, farklı koşullar seçmenize ve bunları bir üyelik planıyla ilişkilendirmenize olanak tanır.
Hangi tür içeriğin hangi kullanıcılar tarafından kullanılabileceğini seçebilirsiniz.
Örneğin, belirli bir etiket veya kategoriyle eşleşen tüm içeriğin yalnızca Silver abonelik planına sahip üyeler tarafından kullanılabilmesini seçebilirsiniz.
Bu kılavuzda, ‘Premium’ kategorisine sahip içerikleri tüm ücretli üyelik planları için kullanılabilir hale getirdik.
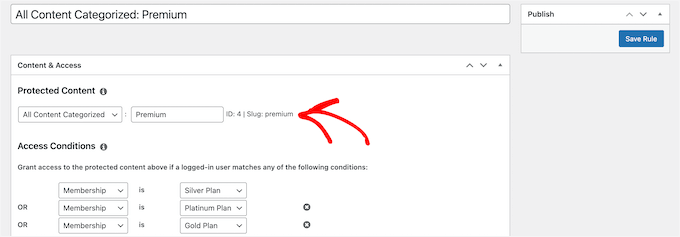
Daha spesifik kurallar da oluşturabilirsiniz. Örneğin, tek bir gönderi veya sayfa, alt sayfalar veya belirli bir URL.
Kural düzenleyicinin altında, damla içeriği ve süre sonu seçeneklerini göreceksiniz.
Damla içerik, içeriği bir kerede vermek yerine kullanıcılara kademeli olarak yayınlamanıza olanak tanır. Sona erme seçeneği, içeriği belirli bir süre sonra kullanılamaz hale getirir.
Daha fazla bilgi edinmek için WordPress sitenize otomatik olarak nasıl içerik ekleyebileceğinize ilişkin kılavuzumuza göz atın.
Emin değilseniz, bunları işaretlemeden bırakmalısınız.
Memnun kaldığınızda, kural ayarlarınızı kaydetmek için devam edin ve ‘Kuralı Kaydet’ düğmesine tıklayın. Ardından, gerektiğinde daha fazla kural oluşturmak için işlemi tekrarlayın.
Adım 7: Yalnızca Üyelere Özel İçerik Ekleme
MemberPress, Kuralları kullanarak yalnızca üyelere özel içerik oluşturmayı çok kolaylaştırır.
Yukarıdaki örnekte, ‘Premium’ kategorisindeki tüm içeriği kısıtlayan bir kural oluşturduk.
Şimdi tek yapmamız gereken ücretli içeriğimizi oluşturmak ve ‘Premium’ kategorisine eklemek.

MemberPress ayrıca yazı editörünün altına bir ‘MemberPress Yetkisiz Erişim’ meta kutusu ekler.
Bu, oturumu kapatmış kullanıcıların (üye olmayanlar) bu içeriğe ulaştıklarında ne göreceklerini seçmenize olanak tanır.

Genel varsayılan ayarları kullanabilir veya alıntılar, bir giriş formu veya özel bir mesaj gösterebilirsiniz.
Sadece üyelere özel içerik ekledikten sonra, devam edip ‘Yayınla’ veya ‘Güncelle’ düğmesine tıklayabilirsiniz.
Artık yalnızca doğru üyelik seviyesine sahip kullanıcılar içeriğinizi görüntüleyebilecek.
Adım 8: Bir Fiyatlandırma Sayfası Oluşturun
Bu, kullanıcılarınızın bir üyelik planına kaydolmak istediklerinde görecekleri sayfadır. Bu sayfada kullanıcılar bir üyelik planı seçebilir ve ardından ödeme sayfasına geçebilir.
Web sitenizin kısıtlı veya ücretli alanlarına erişmeye çalışan kullanıcılar da bu sayfaya yönlendirilecektir.
Bunu, MemberPress ” Gruplar sayfasına gidip en üstteki ‘Yeni Ekle’ düğmesine tıklayarak yapılandırabilirsiniz.

İlk olarak, grup planı sayfası için bir başlık girin. Bu aynı zamanda kullanıcıların göreceği planlar sayfasının başlığı olacaktır.
Ardından, ‘Grup Seçenekleri’ meta kutusuna gidin ve sayfada görüntülemek istediğiniz üyelikleri ekleyin.
Birden fazla üyelik eklemek için ‘Artı’ düğmesine tıklamanız yeterlidir.

Fiyatlandırma tablosu için bir tema da seçebilirsiniz. MemberPress, aralarından seçim yapabileceğiniz birkaç hazır şablonla birlikte gelir.
‘Fiyatlandırma Sayfası Teması’ açılır menüsünden bir şablon seçmeniz yeterlidir.

Üyelik fiyatlandırma tablonuzu tamamen özelleştirmek için özel CSS de ekleyebilirsiniz.
Memnun kaldığınızda, planınızı herkese açık hale getirmek için ‘Yayınla’ düğmesine tıklayın.
Fiyatlandırma sayfanızı önizlemek için, yayınladıktan sonra ‘Grubu Görüntüle’ bağlantısına tıklayın.
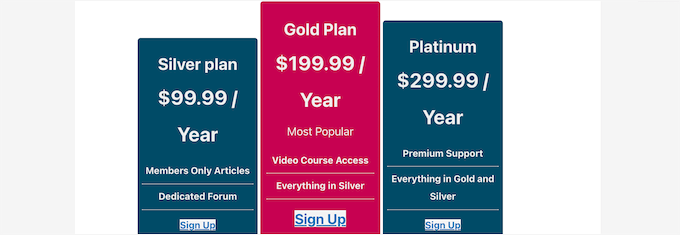
Kullanıcıları Fiyatlandırma Sayfasına Yönlendirin
Artık fiyatlandırma sayfamız hazır olduğuna göre, bir sonraki adım yetkisiz kullanıcıları fiyatlandırma sayfasına yönlendirmektir.
Bunu yapmak için öncelikle MemberPress ” Gruplar sayfasını ziyaret etmeniz ve bir önceki adımda oluşturduğunuz grubun yanındaki URL’yi kopyalamanız gerekir.

Bundan sonra, MemberPress ” Ayarlar sayfasına gidin.
Buradan ‘Sayfalar’ menü sekmesine geçin.

Ardından, ‘Yetkisiz Erişim’ bölümüne ilerleyin.
‘Yetkisiz ziyaretçileri belirli bir URL’ye yönlendir’ seçeneğinin yanındaki kutuyu işaretlemeniz ve ardından daha önce kopyaladığınız grup URL’sini yapıştırmanız gerekir.

Ayarlarınızı kaydetmek için ‘Seçenekleri Güncelle’ düğmesine tıklayın.
Artık yetkisiz kullanıcılar sadece üyelere özel bir alana erişmeye çalıştıklarında fiyatlandırma planları sayfasına yönlendirilecekler.
Adım 9: Kayıt ve Kullanıcı Giriş Formlarını Ekleyin
Artık her şeyi ayarladığınıza göre, kullanıcılarınızın web sitenizde müşteri portalını kolayca bulmalarına izin vermenin zamanı geldi.
Öncelikle, üyelerin hesaplarında oturum açabilmeleri için bir kullanıcı oturum açma formu eklemeniz gerekir.
Bunu yapmak için Görünüm ” Widget ‘lar bölümüne gidin ve ‘+’ blok ekle simgesine tıklayın.

Ardından, ‘MemberPress login’ için arama yapın ve ardından bloğa tıklayın.
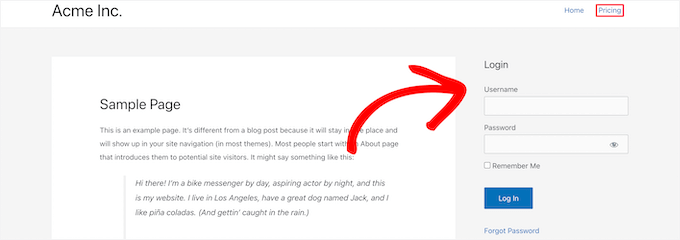
Bu, üyelik giriş formunu otomatik olarak kenar çubuğunuza ekleyecektir.

Değişikliklerinizi kaydetmek ve giriş formunuzu canlı hale getirmek için ‘Güncelle’ düğmesine tıkladığınızdan emin olun.
Giriş widget’ını sitenizin herhangi bir widget alanına ekleyebilirsiniz. Daha fazla ayrıntı için WordPress’te widget ekleme ve kullanma kılavuzumuza bakın.

Ardından, yeni kullanıcıların bir plan seçip kaydolabilmesi için navigasyon menüsüne fiyatlandırma sayfası bağlantısını ekleyeceksiniz. Bu, Fiyatlandırma bağlantısını ana sayfa da dahil olmak üzere web sitenizin her yerinde görüntülemenizi sağlayacaktır.
Bunu WordPress yöneticinizdeki Görünüm ” Menüler sayfasını ziyaret ederek yapabilirsiniz. Sol sütundan, genişletmek için ‘Özel Bağlantılar’ sekmesine tıklamanız gerekir.
Ardından, fiyatlandırma sayfanızın URL’sini girin ve ‘Bağlantı Metni’ kutusuna metin girin.
Ardından, ‘Menüye ekle’ düğmesine tıklayın.

Fiyatlandırma planı sayfası artık sağ sütunda görünecektir.
Menüdeki konumunu yeniden düzenlemek için sürükleyip bırakabilirsiniz. Ayrıca düzenleyebilir ve bağlantı metnini değiştirebilirsiniz.
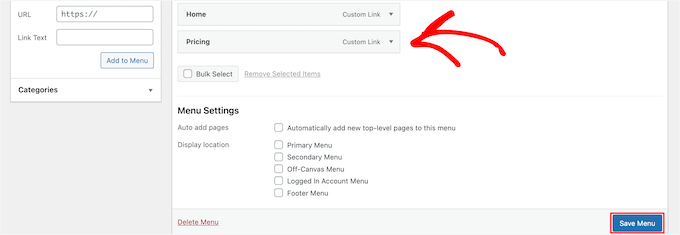
Değişikliklerinizi kaydetmek için ‘Menüyü Kaydet’ düğmesine tıklamayı unutmayın.
Menüler hakkında daha fazla bilgi edinmek için WordPress’te navigasyon menüsü ekleme kılavuzumuza bakın.
Artık WordPress yönetici alanından çıkış yapabilir ve giriş formunuzu ve kayıt bağlantınızı çalışırken görmek için web sitenizi ziyaret edebilirsiniz.
✏️ Not: Birçok üyelik web sitesi, planları için açılış sayfaları oluşturmak için SeedProd gibi sayfa oluşturucu eklentileri kullanır. Fiyatlandırma tabloları, referanslar ve sosyal kanıt gibi özellikleriyle üyelik ürünleri için çarpıcı sayfalar tasarlamayı kolaylaştırır.
İş ortağı markalarımızdan bazıları tüm web sitelerini SeedProd ile oluşturdu ve sonuçlardan çok memnun kaldılar. SeedProd incelememizin tamamında eklenti hakkında daha fazla bilgi edinin.
Adım 10: Üyelik E-posta Şablonlarını Özelleştirme
WordPress üyelik eklentiniz üyelere çeşitli e-posta bildirimleri gönderecektir. MemberPress, WordPress kontrol panelinden çıkmadan bu e-postaları kolayca düzenlemenize ve markanızı içerecek değişiklikler yapmanıza olanak tanır.
Basitçe MemberPress ” Ayarlar sayfasına gidin ve ‘E-postalar’ sekmesine tıklayın. Buradan, MemberPress tarafından gönderilen e-posta bildirimlerini yönetebilirsiniz.
MemberPress tarafından üyelere ve Yöneticilere gönderilen tüm e-posta bildirimlerini göreceksiniz.
Bu bildirimlerden herhangi birini özelleştirmek için ‘Düzenle’ düğmesine tıklayabilirsiniz.

E-posta mesajını temel biçimlendirme seçenekleriyle düzenlemek için basit bir metin düzenleyici kullanabilirsiniz.
Ayrıca adlar, kullanıcı adları, üyelik seviyeleri ve daha fazlası gibi dinamik öğeler eklemek için kullanabileceğiniz akıllı etiketler de vardır.

Kendinize birkaç test bildirimi göndermek için ‘Test Gönder’ düğmesine tıkladığınızdan emin olun. Bu, MemberPress’in e-posta bildirimleri gönderebilmesini sağlayacaktır.
E-posta bildirimleri almakta sorun yaşıyorsanız, WordPress’in e-posta göndermeme sorununu nasıl çözeceğinize ilişkin kılavuzumuza bakın.
Adım 11: Üyelik Web Sitenizi Büyütmek için Raporları Görüntüleme
Herhangi bir işi büyütmek için, bilinçli kararlar almak için verilere ihtiyacınız olacaktır. MemberPress, üyelik web sitenizin nasıl çalıştığını görmek için yerleşik raporlarla birlikte gelir.
Basitçe MemberPress ” Raporlar sayfasına gidin. Buradan raporları aylık, yıllık veya tüm zamanların verilerine göre sıralayabilirsiniz.
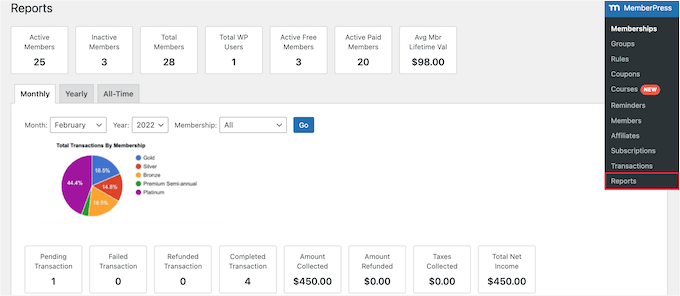
Size aktif, inaktif, ücretsiz, ücretli ve toplam üye sayısını gösterecektir. Ayrıca size ortalama üyenin yaşam boyu değerini ve diğer verileri de gösterecektir.
Daha fazla grafik görmek için aşağı kaydırabilir ve işlemleri görüntülemek için bir tarihe tıklayabilirsiniz.
Ancak, bir üyelik web sitesinin başarısını değerlendirmek için en önemli ölçüt kullanıcı etkileşimidir.
İşte bu noktada Google Analytics’e ihtiyacınız olacak. Kullanıcılarınızın nereden geldiğini ve web sitenizdeyken ne yaptıklarını görmenizi sağlar.
WordPress için en iyi analiz çözümü olanMonsterInsights, kullanıcı ve üye katılımınızı izlemeyi kolaylaştıran eksiksiz bir MemberPress entegrasyonu sunar.
Web sitemizde kullanıyoruz ve formlar, düğmeler ve pazarlama kampanyaları için dönüşüm izlemeyi takdir ediyoruz. Ayrıca ziyaretçi demografisi, en çok ziyaret edilen sayfalar ve hemen çıkma oranları hakkında ayrıntılı istatistiklere sahip.
Araç hakkında daha fazla bilgi için derinlemesine MonsterInsight incelememize göz atın!
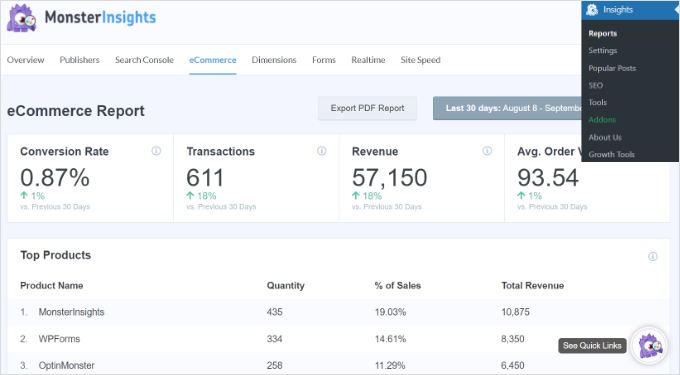
Ayrıntılı talimatlar için Google Analytics ile WordPress’te kullanıcı etkileşiminin nasıl izleneceğine ilişkin kılavuzumuza bakabilirsiniz.
🔗 Bonus Kaynaklar: Üyelik Sitenizi Bir Sonraki Seviyeye Taşımak
MemberPress güçlü bir WordPress üyelik eklentisidir. Podcast üyelikleri, video üyelikleri, kupon özelleştirmeleri, çevrimiçi topluluklar ve grup üyelikleri gibi özelliklerle kolayca başarılı bir üyelik sitesi oluşturmanıza olanak tanır.
Üyelik sitenize sosyal medya ağı yetenekleri eklemek için BuddyPress ile birlikte de kullanabilirsiniz.
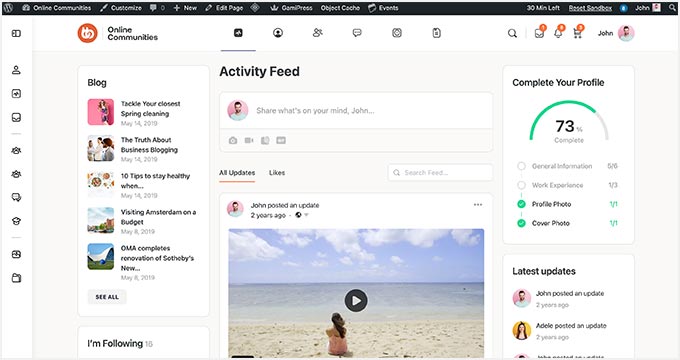
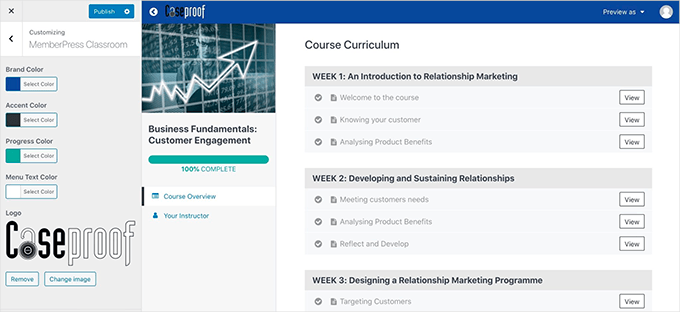
Dahası, öğretmenler ve eğitimciler üyeliklerle çevrimiçi kurslar sunabilir.
MemberPress, WordPress blok düzenleyicisine dayalı bir oluşturucu ile kurs oluşturmayı basitleştiren Kurslar eklentisiyle birlikte gelir. Bu, bölümleri ayarlamayı, dersleri düzenlemeyi ve kurslarınızı yönetmeyi kolaylaştırır.
Ayrıca öğrencilerin öğrenme deneyimini artırmak için daha fazla eklenti içerir:
- Sınavlar – Öğrencilerin bilgilerini test etmek ve kendi kendine öğrenmeyi teşvik etmek için sınavlar oluşturun.
- Ödevler – Öğrencilerin incelenmek üzere görevler ve projeler göndermesine izin verin.
- Not Defteri – Öğrenci ilerlemesini takip edin ve notları verimli bir şekilde yönetin.
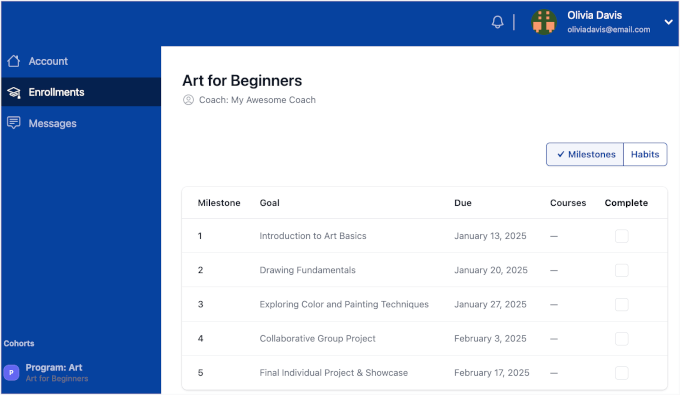
Bunun da ötesinde, CoachKit eklentisi var.
Sınırsız koçluk programlarına, müşterileri motive etmek için kilometre taşı takibine, aramaları veya danışma oturumlarını planlamak için takvim eklentisi entegrasyonlarına ve daha fazlasına izin verir!
Koçluk programları sunmanın yanı sıra, kohort sistemleri ile WordPress grup öğrenimi oluşturmak için bu eklentiyi kullanabilirsiniz.
🚨 Alternatif: Çevrimiçi kursunuz için başka seçenekler mi arıyorsunuz? WordPress için en iyi LMS eklentilerinden oluşan özenle seçilmiş listemize göz atın. Önerilerimiz gerçek dünya deneyimi ve kapsamlı testlerle desteklenmektedir!
Daha Fazla Okuma: Temel WordPress Kılavuzları
WordPress üyelik sitenizi daha etkili bir şekilde büyütmek ve yönetmek için bazı yararlı kaynakları burada bulabilirsiniz:
🔧 Temel WordPress eklentileri – Tüm işletme web siteleri için sahip olunması gereken WordPress eklentilerini uzmanlarımız seçti.
🌐 WordPress SEO kılavuzu – Trafiğinizi artırmak ve arama motoru sıralamalarını iyileştirmek için en iyi SEO uygulamalarına yönelik nihai kılavuz.
WordPress Hız ve Performans – WordPress’in nasıl hızlandırılacağı ve performansının nasıl artırılacağı hakkında nihai kılavuz.
🛡️ WordPress Güvenlik Kılavuzu – Bu adım adım kılavuz, WordPress web sitenizin güvenliğini artırmanıza yardımcı olacaktır.
🎨 En İyi Üyelik Sitesi Temaları – Üyelik siteniz için mükemmel olan en iyi WordPress temalarının bir listesi.
🚫 Yaygın WordPress hataları – Yaygın WordPress hatalarının nihai listesi ve bunların nasıl düzeltileceği.
📨 E-posta Pazarlama 101 – WordPress’te bir e-posta listesi oluşturmaya ve bunun üyelik programınız için neden faydalı olduğuna dair adım adım bir kılavuz.
Sıkça Sorulan Sorular
Bitirmeden önce, kullanıcılarımız tarafından üyelik web sitesi oluşturma hakkında en sık sorulan sorulardan bazılarını burada bulabilirsiniz:
1. WordPress ile bir üyelik web sitesi yapabilir miyim?
Evet, MemberPress gibi bir WordPress üyelik eklentisi kullanarak WordPress ile bir üyelik web sitesi oluşturabilirsiniz.
Bu, ödeme ağ geçitleri, abonelik seviyeleri, üyelik grupları ve daha fazlası dahil olmak üzere bir üyelik sitesi oluşturmak için gerekli tüm işlevleri eklemenize olanak tanır.
2. WooCommerce kullanarak bir üyelik web sitesi yapabilir miyim?
Evet, WooCommerce kullanarak bir üyelik web sitesi oluşturabilirsiniz. Ancak, WooCommerce üyelik özelliklerinden yoksundur ve bu özellikleri eklemek için MemberPress gibi bir üyelik eklentisine ihtiyacınız olacaktır.
Birçok üyelik web sitesi, ödemeleri kabul etmek ve abonelik planlarını ürün olarak görüntülemek için WooCommerce’i kullanırken, içeriği kısıtlamak, üyelik planları oluşturmak ve daha fazlası için MemberPress’i kullanır.
3. Üyelik web siteleri para kazandırır mı ve kârlı mıdır?
Evet, üyelik web siteleri para kazandırır ve binlerce işletme tarafından başarıyla kullanılan karlı bir çevrimiçi iş modelidir. Sadece geçen yıl, MemberPress müşterileri 1 milyar dolardan fazla abonelik sattı.
4. Bir üyelik web sitesi oluşturmak için en iyi platform hangisidir?
MemberPress ile WordPress, bir üyelik web sitesi oluşturmak için en iyi platformdur. Kullanımı kolaydır, düşük maliyetlidir, daha az teknik beceri gerektirir ve en son pazarlama ve dönüşüm optimizasyon araçlarına erişim sunarken birden fazla ödeme seçeneğine sahiptir.
Umarız bu makale WordPress üyelik web sitenizi nasıl kuracağınızı öğrenmenize yardımcı olmuştur. Ayrıca göz atmanız gereken en iyi üyelik sitesi örnekleri listemizi ve en iyi WordPress üyelik eklentileri uzman seçimimizi görmek isteyebilirsiniz.
If you liked this article, then please subscribe to our YouTube Channel for WordPress video tutorials. You can also find us on Twitter and Facebook.


Toni Odugbesan
Thank you for the article very insightful. What is the best way to enable the members of the member portal to monitor their used and unused member benefits?
WPBeginner Support
It would depend on the plugin you’re using and the benefits, we would recommend reaching out to the support for the plugin you use and they can help you set up something for tracking benefits.
Admin
Caroline
Thank you for your resource. In Step 9 about 1/2 way down, it says, ‘enter URL for the pricing page’. Where would I find this please? Also do you have instructions for a Free Membership? I am doing one for a sample to help promote my main Membership. Thank you.
WPBeginner Support
You would want to take a look at step 8 for creating the pricing page and finding its URL. For a free membership option, you can see the price for a membership to $0 on your site
Admin
Giulia
Great read,
A question, is there an option for users to contact each other once they pay the membership?
WPBeginner Support
For having users message each other, you would want to look into a social media plugin like BuddyPress that we cover in our guide below:
https://www.wpbeginner.com/plugins/how-to-turn-your-wordpress-site-into-a-social-network/
Admin
John
Thanks this but I want to ask can I add any other payment gateway apart from the one’s you listed above?
Jorge
Amazing article. I would like to ask if it is possible to have your custom database connected to the membership plugins.
WPBeginner Support
You would need to reach out to the support for the membership plugin you are planning to use for what connection options are available.
Admin
Abel
Do memberpress accept square payment?
By the way amazing article.
WPBeginner Support
You would want to reach out to the plugin’s support for their current integrations or if they have plans to add an integration.
Admin
Dev
Can I add signup fee in memberpress with monthly recurring plan ?
WPBeginner Support
There is the option in MemberPress to enable recurring payments.
Admin
Desmond
What if I don’t want to make the whole of my site a membership site but I want to sell a course as just a part of what I do?
WPBeginner Support
You would want to take a look at LMS plugins for that, we have a few we would recommend below:
https://www.wpbeginner.com/plugins/best-wordpress-lms-plugins-compared/
Admin
Camila
Hey!
Would this WP subscription website have a mobile version?
Lmk please
WPBeginner Support
If your theme is responsive there would be a mobile view
Admin
Karin Mainwaring
I’d never have thought, when I tasked myself with building a website, that I would fall in love with it.
I had a vague idea of how “Memberships” could be useful. But I had no formed concept (nor indeed how to begin expressing aforesaid vague concept) until I stumbled into WPBeginners.
This article has really helped.
Thank you.
WPBeginner Support
Glad our article was helpful
Admin
MIya
Hello,
I was wondering if when using a website builder in WordPress, is one able to use any other WordPress plugin?
WPBeginner Support
You can still use other plugins when using a page builder plugin
Admin
Akib Kazi
I have used this article in many different ways and it has been very helpful. I am making decent income and an really pleased with the results. Thank You WPbeginner.
WPBeginner Support
Glad our guide was helpful
Admin
Adelani Daniel
Please with this plugin can I have in each members account a rewarding section that anytime dey click a news that will be rewarded with some amount or points?
WPBeginner Support
The closest recommendation we have at the moment would be our guide here: https://www.wpbeginner.com/plugins/add-points-system-ignite-user-engagement/
Admin
Bill
I just purchased a hosting package through your affiliate link with BlueHost. I had already purchased my domain through GoDaddy a day or two ago. I am completely unable to find a way to map that domain over to my WordPress site – any help?? The tutorial on WordPress doesn’t work because there’s no option for “domain” under the “manage” tab on the left…any help??
WPBeginner Support
You would want to reach out to GoDaddy for their current methods to change your nameservers
Admin
Zach
Should I build my website on wordpress.org first, before adding these plugins and going through the membership process?
WPBeginner Support
Yes, you would want your WordPress.org site before adding these plugins.
Admin
Yao
Very good poste!! Thank you so much!!
WPBeginner Support
You’re welcome
Admin
Hossein shekofteh
Hi there.
How can I add other methods of payment in this plugin. I want add some Iranian payment to it?
WPBeginner Support
You would want to reach out to the plugin’s support and they will let you know if there is a built-in method or the way to add a custom method.
Admin
Yogeswarachary
Thanks for your support sir, really it’s a helpful article for me.great job and best team.thankyou sir.
WPBeginner Support
You’re welcome
Admin
Cory Hall
Great article. I am interested in migrating to a WP membership site from another subscription based web platform, and I would like to know what I can use for a temporary domain name until the WP site is all done and ready. Also, what is the easiest way to migrate all the members and their recurring payments to the WP platform. I use Stripe with the other platform.
Thanks in advance for your help.
WPBeginner Support
You would want to reach out to your host if they have a temporary domain or you could use a local installation: https://www.wpbeginner.com/how-to-install-wordpress/#installlocal
You would want to reach out to the support for the membership plugin you are planning to use for what options they have available to import users
Admin
debay
You can also use the subdomain of you present site to install the WordPress before going live
ril
im looking for membership plugin that will prevent non login/registered user to access the all site url and the source url of iframe. hope to get recommendation here. thank you
WPBeginner Support
It would depend on what you mean, you may want to look into s2members for having multiple membership levels and you could prevent right clicks for hiding the url of your iframe.
Admin
Luis Restrepo Silva
Great article. Very clear and well explained. Good job!
WPBeginner Support
Thank you
Admin
Esdon
Hello WPBeginner team, thanks a lot for this vivid description, everything has been highlighted to details. Awesome! Looking forward to setting up my membership website with a lot of ease. Regards.
Yezmin
Thank you! Great article!
Gerardo
Hi, great article, thanks for sharing. Just wanted to know if these plugins allow the members to sell their own digital goods (ex: mp3 files) , like a small stores inside my website, with their own links and nice page, under my domain. Thanks!!
Erik
This is similar to my question.
I want to make a membership site.
The members should have the possibility to make their own presentation site at a special area of the external site.
A bit like soundCloud.com
What kind of plugin do I need to set this up in WordPress?
Best wishes,
Erik
Joseph
Thanks for the write-up.
Please, how can I get a membership plugin that can accept payment gateways from Nigeria, since PayPal and other major payment gateways are not active in our country? I really need it urgently for my website.
Thanks.
WPBeginner Support
Hi Joseph,
You will need to find a WordPress plugin that lets you accept payments using a payment service available in your country. You can then manually verify a payment, and invite a user to create a membership account.
Admin
Bala Selvam
Hey for the Pricing Plan part I was not able to get that page to work, it isn’t showing anything and I tried everything that you showed in this article is there anything that I was missing?
Or could you go over that real quick with the just the written steps?
Josh Anozie
Thank you for this wonderful information, I am glad to see this! My question is this : if I want the members of my site to each a referral link which they can use to bring in new members and they will get commission for that, how can I achieve this?
I look forward to seeing your reply!
Thanks Again.
WPBeginner Support
Hi Josh,
You can do that by running your own affiliate program.
Admin
Starchitect
Please how can this be done and can it be done with WordPress.org
And also the site that allows coupons and members can have their own account
Please reply
WPBeginner Support
Hi,
Yes it can be done using WordPress.org. See our article on how to build a membership website using WordPress.
Joseph
Hi Josh, I am from Nigeria and I want to set up a membership website that can accept a payment gateway from Nigeria. Please, how can I do it? Which plugin do you recommend and, which one are you using? Thanks.
Josh Anozie
Hi Joseph,
That’s what am working bro, once I get it, I will let you know here.
Polunio
Thanks for this. I have learn a lot from this site.
Just a question, if i want to add membership site on my existing blog, it will not affect my existing content if i installed the membership plugins?
or much better if i purchase new domain and link to my current website?
Thanks in advance and more power.
WPBeginner Support
Hi Polunio,
No, it will not affect your existing content. It is up to you to decide, depending on your business goals and how you want to manage your membership website.
Admin
Johnnyboy Lamarre
It would be nice if you made a Vid of the ( membership Article ) above. Its much more easy when you can see it being done .
Best of luck.
WPBeginner Support
Hello,
Thank you for the feedback. We will soon add the video version of it. Meanwhile, you can subscribe to our YouTube Channel for more WordPress video tutorials.
Admin
Rahat Hameed
Don’t You Have A Video Version For This Article? If You have, please link me to that.
Thanks