Siteye özgü bir eklenti, temanıza bağlı kalmadan WordPress web sitenize kolayca kod parçacıkları eklemenizi sağlar. Sitenizi geliştirmek için özel kod kullanmanıza ve temanız güncellendiğinde her şeyi yeniden yapmak zorunda kalmaktan endişe etmemenize olanak tanır.
WPBeginner’da, geçmişte sitemize kısa kodlar, yeni yazı türleri ve diğer özellikler eklemek için siteye özel birçok eklenti oluşturduk. Ayrıca, müşterilerimizin siteye özel eklentiler kullanmaya başlamalarına da yardımcı olduk.
Bu makalede, siteye özel bir WordPress eklentisinin nasıl oluşturulacağını ve bunun neden önemli olduğunu açıklayacağız.

Siteye Özel WordPress Eklentisi Nedir?
Siteye özel bir WordPress eklentisi, temaya bağlı olmayan tüm özelleştirme parçacıklarını eklemek için kullanabileceğiniz bağımsız bir eklentidir.
Web siteniz üzerinde çalışırken, genellikle temanızın functions.php dosyasına veya siteye özel bir eklentiye kod eklemenizi isteyen WordPress eğitimleri bulacaksınız.
WordPress siteye özel bir eklenti ile birlikte gelmez. Kendi eklentinizi oluşturmanız ve ardından yükleyip etkinleştirmeniz gerekecektir.
Neden Siteye Özel Bir WordPress Eklentisi Oluşturmalısınız?
Daha önce de belirttiğimiz gibi, temanızın functions.php dosyasına veya siteye özel bir eklentiye ekleyebileceğiniz bazı kodları gösteren eğitimlere sık sık rastlayacaksınız.
Bu özel kodlar, web sitenizi geliştirmek için yeni gönderi türleri, taksonomiler, kısa kodlar ve tonlarca hack eklemek için kullanılabilir.
Özel kodu temanızın işlevler dosyasına eklerseniz, temanızı güncellediğinizde veya değiştirdiğinizde kaybolacaktır.
Bir alt tema oluşturabilir ve kodunuzu kaydetmek için alt temanın işlevler dosyasını kullanabilirsiniz. Ancak tema değiştirdiğinizde kodunuz yine de kaybolacaktır.
Siteye özgü bir WordPress eklentisi, WordPress web sitenize kolayca özel kod parçacıkları eklemenize ve bunların temadan bağımsız olmasını sağlamanıza olanak tanır. Bağımsız bir WordPress eklentisidir, yani temanıza bağlı değildir ve temanızı güncellemekte veya değiştirmekte özgürsünüz.
Bununla birlikte, siteye özgü bir eklenti kullanarak özel kodun nasıl kolayca eklenebileceğine bir göz atalım. Bunu yapmanın iki yolunu göstereceğiz ve sizin için en uygun yöntemi seçebilirsiniz (ipucu: Yöntem #2 yeni başlayanlar için daha kolaydır).
Yöntem 1: Siteye Özel WordPress Eklentisini Manuel Olarak Oluşturun
Bunun yeni başlayanlar için biraz inekçe gelebileceğini biliyoruz, ancak sizin için mümkün olduğunca basit hale getirmeye çalışacağız.
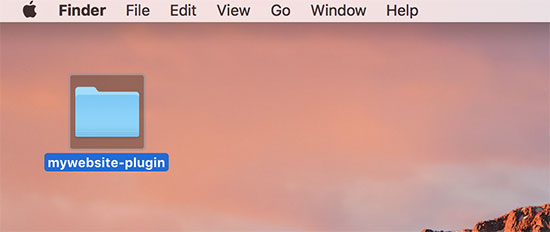
İlk olarak, masaüstünüzde yeni bir klasör oluşturmanız ve web sitenizin adını vermeniz gerekir. Örneğin: mywebsite-plugin.
Şimdi, bilgisayarınızda Notepad veya TextEdit gibi bir düz metin düzenleyicisi açın.
Yeni bir dosya oluşturmanız ve masaüstünüzdeki eklenti klasörüne mywebsite-plugin.php olarak kaydetmeniz gerekir.
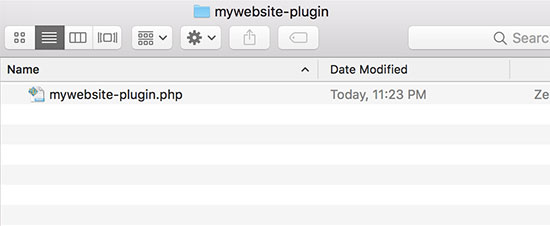
WordPress’in onu bir eklenti olarak tanıyabilmesi için eklenti dosyanızın belirli bir başlık koduna ihtiyacı vardır. Devam edin ve aşağıdaki kodu mywebsite-plugin.php dosyanıza ekleyin:
1 2 3 4 5 6 7 8 9 | <?php/*Plugin Name: Site Plugin for example.comDescription: Site specific code changes for example.com*//* Start Adding Functions Below this Line *//* Stop Adding Functions Below this Line */?> |
example.com adresini kendi alan adınızla değiştirebilirsiniz. Bunu yaptıktan sonra sitenize özel eklentiniz hazırdır.
Sitenize özel eklentinizi web sitenize yüklemenin iki yolu vardır. WordPress yönetici paneliniz üzerinden yükleyebilir ya da FTP kullanabilirsiniz.
1. WordPress Yönetici Alanından Siteye Özel Eklenti Yükleyin (Önerilen)
Bu yöntem daha kolaydır ve tüm kullanıcılar için önerilir.
Öncelikle, sitenize özel eklenti klasörünüzün zip dosyasını oluşturmanız gerekir.
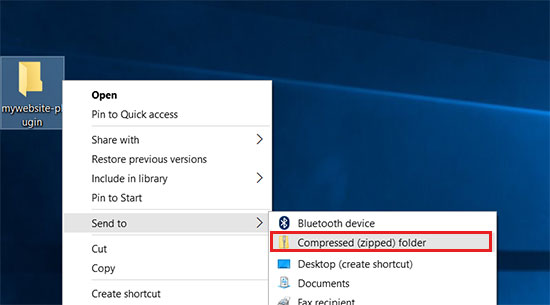
Windows kullanıcıları eklenti klasörüne sağ tıklayıp “Sıkıştırılmış (zip) klasörüne gönder” seçeneğini seçebilirler.
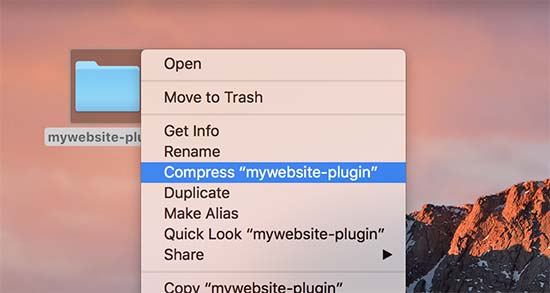
Mac kullanıcılarının sağ tıklaması gerekir.
Ardından, “Mywebsite-plugin’i sıkıştır “ı seçin.
Eklentinin zip dosyasını aldıktan sonra, WordPress yönetici alanınızdaki Eklentiler ” Yeni Ekle sayfasına gidin.
Ardından üstteki ‘Eklenti Yükle’ düğmesine tıklayın.
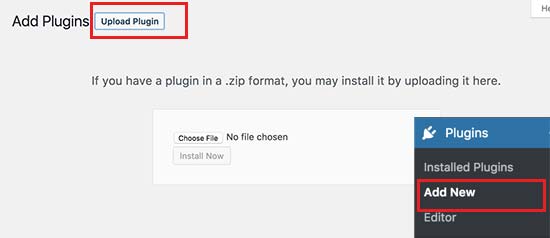
Ardından, daha önce oluşturduğunuz zip dosyasını seçmek için ‘Dosya Seç’ düğmesine tıklayın ve ardından ‘Şimdi Yükle’ düğmesine tıklayın.
WordPress şimdi eklentiyi sizin için yükleyecek ve kuracaktır. Yüklendikten sonra, sitenize özel eklentinizi kullanmaya başlamak için ‘Eklentiyi Etkinleştir’ düğmesine tıklamanız gerekir.
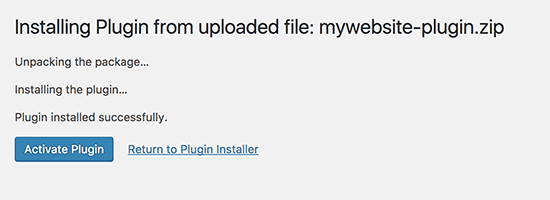
2. Sitenize Özel WordPress Eklentisini FTP ile Yükleyin
Bu yöntem için bir zip dosyası oluşturmanıza gerek yoktur. Eklentiyi FTP aracılığıyla yükleyeceksiniz.
Öncelikle, bir FTP istemcisi kullanarak web sitenize bağlanmanız gerekecektir.
Bağlandıktan sonra, uzak site sütununun altındaki /wp-content/plugins/ klasörüne gidin. Ardından, sitenize özgü eklenti klasörünüzü seçmeniz ve web sitenize yüklemeniz gerekir.
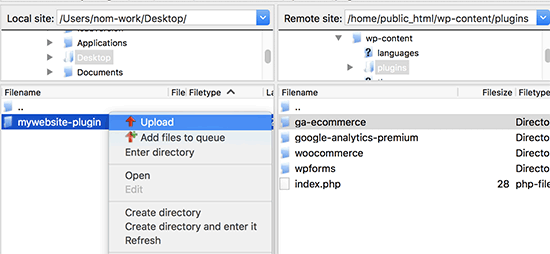
FTP istemciniz şimdi sitenize özel eklenti klasörünüzü WordPress web sitenize aktaracaktır. Bu, eklentiyi web sitenize yükleyecektir.
Ancak, eklentiyi kullanmaya başlamak için yine de etkinleştirmeniz gerekecektir. Bunu WordPress yönetici alanınızdaki ‘Eklentiler’ sayfasına giderek ve ardından sitenize özgü eklentinin altındaki ‘Etkinleştir’ bağlantısına tıklayarak yapabilirsiniz.

Hepsi bu kadar. Sitenize özel eklentiniz artık kullanıma hazır.
Sitenize Özel Eklentinize Özel Kod Parçacıkları Ekleme
Eklentinizi düzenlemenin ve ona özel kod parçacıkları eklemenin iki yolu vardır.
İlk yöntem WordPress yönetici alanı üzerinden yapmaktır. Eklentiler ” Editör sayfasına gidebilirsiniz.
Bir uyarı mesajı göreceksiniz ve devam etmek için ‘Anlıyorum’ düğmesine tıklamanız gerekecek. Alternatif olarak, dosyaları düzenlemek için daha güvenli bir yol istiyorsanız, aşağıdaki ikinci yönteme geçin.
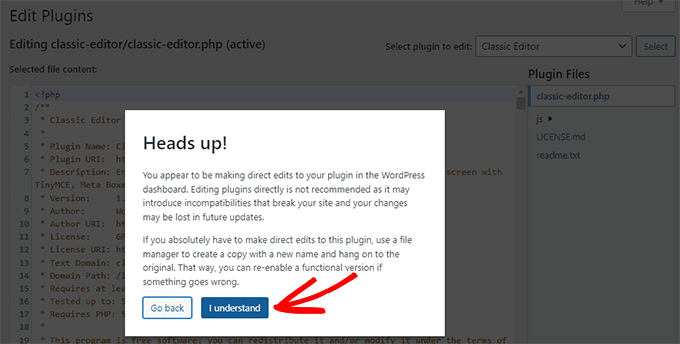
Ardından, ‘Düzenlenecek eklentiyi seçin’ etiketli açılır menüden sitenize özel eklentinizi seçmeniz gerekir.
Editör eklenti dosyanızı yükleyecek ve siz de bu dosyaya kod parçacıkları ekleyebileceksiniz.
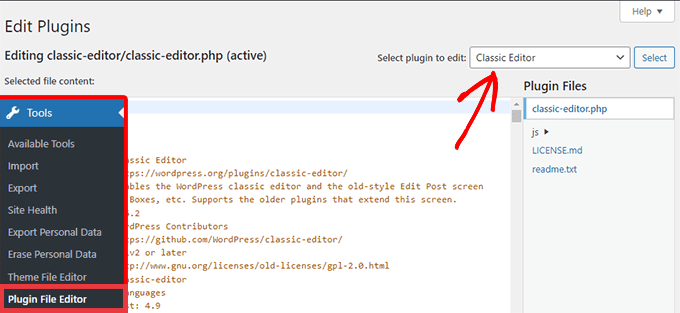
İşiniz bittiğinde, değişikliklerinizi kaydetmek için ‘Dosyayı Güncelle’ düğmesine tıklayın.
Kodunuzda eksik bir şey varsa veya web sitenizi bozma potansiyeline sahipse, eklenti editörü değişikliklerinizi otomatik olarak geri alacaktır.
Ancak, editör başarısız olursa ve beyaz ölüm ekranını görürseniz, eklenti dosyanızı düzenlemek ve bu değişiklikleri geri almak için FTP’yi kullanabilirsiniz.
İkinci yöntem ise FTP kullanarak eklenti dosyasını doğrudan düzenlemektir. FTP istemcinizi kullanarak eklenti klasörüne gitmeniz yeterlidir. Eklenti dosyasına sağ tıklayın ve ardından ‘Görüntüle/Düzenle’yi seçin.
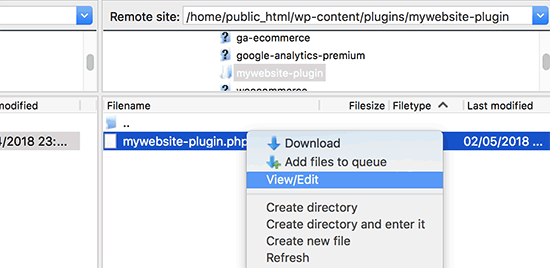
Ayrıca eklenti dosyasını bilgisayarınıza indirebilir, düzenleyebilir ve ardından geri yükleyebilirsiniz.
Yöntem 2: WPCode Kullanarak Özel Kod Ekleme (Önerilen)
Bu yöntem çok daha basittir ve WPCode kullanarak WordPress’teki bireysel kod parçacıklarınızı yönetmeniz için size daha iyi bir yol sunar.
Yapmanız gereken ilk şey web sitenize ücretsiz WPCode eklentisini yüklemek ve etkinleştirmektir. Daha fazla ayrıntı için, WordPress eklentisinin nasıl kurulacağına ilişkin adım adım kılavuzumuza bakın.
İlgili Yazı: Daha fazla bilgi için WPCode hakkındaki tam incelememize göz atın.
Etkinleştirmenin ardından, eklenti WordPress yönetici menünüze ‘Code Snippets’ etiketli yeni bir menü öğesi ekleyecektir. Üzerine tıkladığınızda sizi tüm özel kodlarınızı yönetebileceğiniz bir sayfaya götürecektir.
İlk kod parçacığınızı eklemek için ‘Yeni Ekle’ düğmesine tıklayın.
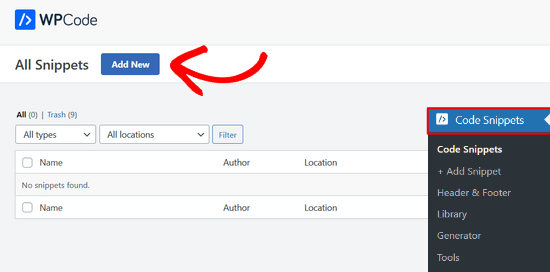
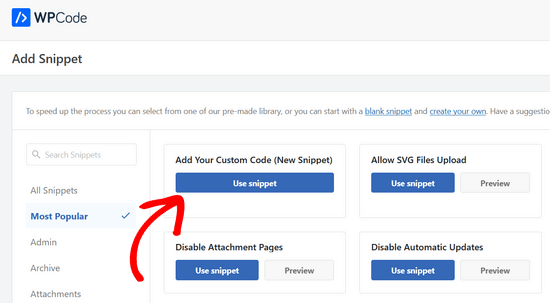
Bu sizi ‘Snippet Ekle’ sayfasına götürecektir. Burada, önceden hazırlanmış kitaplıktan bir kod parçacığı seçebilir veya özel kodunuzu ekleyebilirsiniz.
Özel kod eklemek için ‘Özel Kodunuzu Ekleyin (Yeni Snippet)’ seçeneğine gidin ve ‘Snippet kullan’ düğmesine tıklayın.
Şimdi, özel kod parçacığınız için bir başlık girebilirsiniz. Bu, kodu tanımlamanıza yardımcı olacak herhangi bir şey olabilir.
Bundan sonra, devam edebilir ve kod parçacığınızı kod kutusuna yapıştırabilirsiniz. Ayrıca sağdaki ‘Kod Türü’ açılır listesinden ‘PHP Snippet’ türünü seçmeniz gerekir.
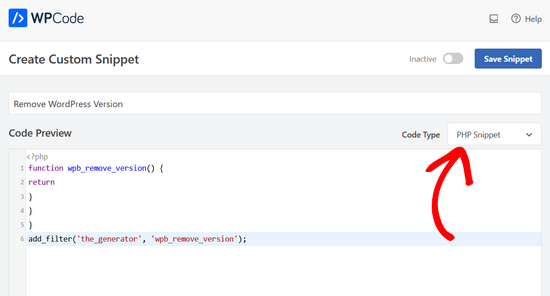
Ayrıca ‘Temel bilgiler’ bölümüne kod için notlar ekleyebilirsiniz.
Bu alanı, bu kodun ne işe yaradığını, nerede bulduğunuzu ve neden web sitenize eklediğinizi yazmak için kullanmalısınız. Bu, “gelecekteki sizin”, “geçmişteki sizin” bu kodu neden eklediğinizi hatırlamanıza yardımcı olacaktır.
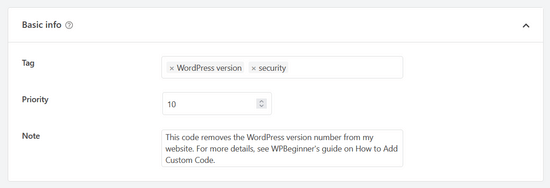
Kod parçacıklarınıza etiket atama seçeneğiniz de vardır; bu, kod parçacıklarını konuya ve işlevselliğe göre düzenlemeye yardımcı olabilir.
Eklenti ayrıca kod parçacığını nasıl çalıştırmak istediğinizi seçmenize de olanak tanır. ‘Ekleme’ bölümünde, kodu sitenize otomatik olarak eklemek ve çalıştırmak için ‘Otomatik Ekleme’ yöntemini seçebilirsiniz.
Yönetici alanı, ön uç veya her yerde seçeneklerinden birini seçebilirsiniz. Emin değilseniz, varsayılan ‘Her Yerde Çalıştır’ seçeneğini koruyun.

Ya da ‘Kısa Kod’ yöntemini seçebilirsiniz. Bu yöntemde snippet otomatik olarak eklenmez. Parçacığı kaydettiğinizde, sitenizin herhangi bir yerine manuel olarak ekleyebileceğiniz bir kısa kod alırsınız.
Ayrıca, bir dizi kurala göre otomatik eklenen snippet’leri göstermek veya gizlemek için ‘Akıllı Koşullu Mantık’ bölümünü kullanabilirsiniz.
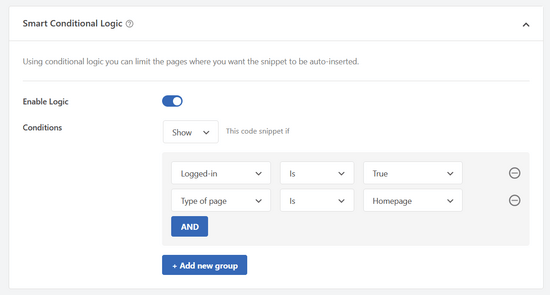
Örneğin, kod parçacıklarını yalnızca oturum açmış kullanıcılar için yükleyebilir, PHP kod parçacıklarını yalnızca belirli sayfa URL’lerine yükleyebilir, kod parçacıklarını sayfa türüne göre gösterebilir ve daha fazlasını yapabilirsiniz.
Son olarak, anahtarı ‘Etkin Değil’den ‘Etkin’e getirebilir ve ardından ‘Snippet’i Kaydet’ düğmesine tıklayabilirsiniz.
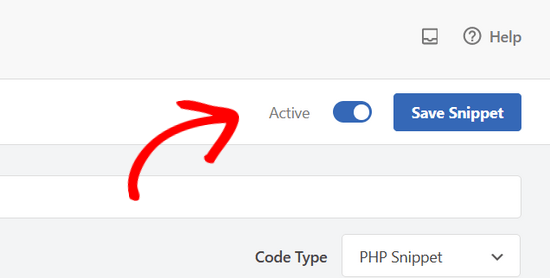
Kod parçacığını etkinleştirmeden kaydetmek istiyorsanız, yalnızca ‘Kod Parçacığını Kaydet’ düğmesine tıklayabilirsiniz.
Bir kod parçacığını kaydettikten ve etkinleştirdikten sonra, seçtiğiniz ekleme yöntemi buysa, web sitenizde otomatik olarak etkili hale gelecektir.
Daha fazla ayrıntı için WordPress’te özel kod parçacıklarının nasıl kolayca ekleneceğine ilişkin kılavuzumuza bakın.
Umarız bu makale siteye özel bir WordPress eklentisinin neden ve nasıl oluşturulacağını öğrenmenize yardımcı olmuştur. Sitenize özel eklentinizi en iyi şekilde kullanmak için yararlı işlev dosyası ipuçları ve en çok aranan WordPress hack ‘leri listemizi de görmek isteyebilirsiniz.
If you liked this article, then please subscribe to our YouTube Channel for WordPress video tutorials. You can also find us on Twitter and Facebook.


BSubra
Is it possible to add code snippets like Google Analytics Code, Adsense code in Site Specific Pliugin. Or only possible to add codes we generally put in functions.php file.
I mean, is it possible to add codes in site-specific plugin what we generally put in Header.php file.
WPBeginner Support
You can do that if you would like, you can also use the insert headers and footers plugin.
Admin
Bola Oussou
hi
Thanks for this tuto
however is there a way to make this plugging(not to be visible) not in plugging list and also in a specific folder (not wp-content folder) ?
Thanls
Tor-Bjorn Fjellner
Actually yes, there is:
Instead of placing the plugin in …/wp-content/plugins/ you put it in …/wp-content/mu-plugins/ (You may have to create that directory, if it’s not there yet.
Plugins that are placed in mu-plugins are ALWAYS run, so the only way to deactivate a MU plugin (MU currently is construed as “must use”) is to delete it (or remain the directly mu-plugins to something else…).
Judith
Hi I tried to do the Site-specific plugin, but it is not working, I get this message “The package could not be installed. No valid plugins were found.
Plugin installation failed.”
What do I do?
WPBeginner Support
Hi Judith,
This usually means that the plugin header information is incorrect. You can try again and make sure that your plugin header is exactly in the format displayed in the tutorial.
Admin
Jonathan Manheim
I get this same error. I have tried maybe 10 times. Uploaded through admin and on FTP. Cannot get it to upload. I am using TextEditor to paste the code. Notice several things you don’t mention in the post that I wonder could be an issue. First, won’t let me save the file as .php. I have to save it as .php.rtf OR .rtf then go back and rename the file after it is saved.
Second, not sure what you mean by making sure the format for the plugin header is exactly the same. Should the line number be in there? If so, I can’t get that to work. If I copy and paste with the line numbers, the green vertical line doesn’t show up and there is no space between the line numbers and the code. Or am I supposed to just copy the code (without the line numbers)? Either way, I’ve tried everything I can with my current Textedit application and it will not work.
Any ideas? I can send you screen shots of exactly what I have if you would like
WPBeginner Support
Hi Jonathan,
You will need to save file as .php. Please use a different text editor on Windows you can use Notepad or download Notepad++. On Mac, you can use TextEdit or download and install TextWrangler.
You don’t need to copy and paste line numbers.
Kacper
In my case the issue was that the file had Unicode encoding. Changing it to ANSI fixed the issue.
Ikram
Hi,
Good day!
Would like to know how to set a white paper in my blog post article to download it with add email address from the visitor.
Thanks, Ikram
WPBeginner Support
Hi Ikram,
You can do that with the pro version of WPForms. You will need at least Plus plan for that. After users enter their email address and click submit you can redirect them to the download page.
Admin
Alain Fradette
Great info! Thanks so much. I have been using WordPress for years and this little gem made it so much easier!
Abhijeet
I have edited some code in Style.css . Will it be overwritten if i update a theme?
is it possible to create style css file in this site specific plugin?
LFreitas
Yes, they will.
You should create a child theme and put your modifications there instead of in the original theme.
Read more: https://www.wpbeginner.com/glossary/child-theme/
dave
White screen on publishing pages.
The code works to show child pages on a parent page using the shortcode however I am getting white screen. Anyone know why?
Tommy
The plugin generated 3 characters of unexpected output during activation. If you notice “headers already sent” messages, problems with syndication feeds or other issues, try deactivating or removing this plugin.
Saurin
I believe best approach to add custom code to site is child theme. No matter if we need to customize theme or not. I mad a practice to always use child theme even if there is no customization. This habit saved my time & effort many times. I dont think it is good to create extra plugin for such customization.
I believe in minimum use of plugin no matter how simple you created one.
Jason
Which is better, site-specific plugin or Child Theme? or both?
I need to create a custom post type to add some major functionality to my site so is the plugin better or the child theme and its functions.php?
Thanks!
Josh
The thing is, is that you’re creating the plug-in yourself, using the functions the same exact way. So the answer to your question would be that neither is better, because you should be using them WITH each other.
Josh
Think of the site-specific plug-ins as functions that are independent of your theme.
Vickey
How would I create a create a new plugin directory in Azure? I have WordPress running on Azure using MS SQL Server, which I activated using Project NAMI.
vishal
not working on multisite with publisher theme can you help me this is my site and also tell me how can i remove featured image inside the post not from front page latest post
Nadia Khan
Hi there,
You WP Beginners are rock. and I want to thank you for your Struggles for us.
Now come to the point. I have installed an theme and in that theme, there is an function that is showing wp toolbar for guests, I have tried so many times to find this function in theme files to remove this, but i can’t. So please help me to remove that toolbar, that is showing to every visitor with wordpress logo and wordpress’s own link to their website. Screen Shot is attached.
Manuel
Does something like this work for plugins too? Im finding that I am making a few changes to plugins that I add to my site….many times deleting certain lines of code I dont want. I’m assuming that after I update that plugin, all my changes will be erased. How can I avoid this?
Elizabeth
Hi, thanks for the post. I’m getting an error when I activate the plugin for some reason:
Parse error: syntax error, unexpected ‘*’, expecting identifier (T_STRING) on line 9
Any ideas what I’ve done wrong?
Thanks!
WPBeginner Support
Hi Elizabeth,
There is an unexpected asterisk sign in the code on line 9 which is blocking the php script. Edit the file again and copy the code exactly as it is shown above. Make sure that you don’t copy line numbers in the code click on the Copy button at the top right corner of the code snippet box
.
Admin
Steven Denger
I tried naming the new folder as you did in the example but I got an error that said something in the way of you cannot use a name like this. This Instruction may be helpful to some – but it is very difficult and confusing to me and does not help at all. As I said – you need to explain this down to the fine details or otherwise these tutorals will not help. The name of this site is wp BEGINNER – and that is what I am. You project these tutorals to the more experienced.
I guess I will have to start going elswhere to get beginners instructiions because, most of time, wp beginner is not helpful – it is more like a techs only club.
Steven Denger
How do you get to the /wp-content/plugins/yoursitename-plugin/ in wordpress and upload a file there? I am lost on the first line of instruction. You guys always assume that we know these things in your instructions but they are not clear enough.
I went to cpanel and opened up the wpcontent > plugins – and it shows a list of plugins – but I am lost from this point. How do I go about uploading a file in here? I am a beginner – and you guys seem to always explain things like your instructing experienced techs. I am not but I go to WP Beginner to try to learn. It is usually difficult to follow your instructions and I end up having to go somewhere else in google search to find things explained down to a beginners level.
If you want to be more helpful try breaking things down a little more simple.
Manuel
Hey Steven,
I know the feeling! I’m far from a expert with wordpress and I pretty much live on google searches and this site trying to learn. I know a little bit and was able to get this to work. Send me your email and I’ll send you the steps with screenshots. I havent tested putting actual code into the plugin so we’ll see if that works….but I was able to see the newly created plugin on my admin page
Steven Denger
thank you manuel
NiceRazer
Hello, can you please tell me how to do that to? I’ve tried finding posts that would help me with this same prob but still didnt found it.
JoAnn Chateau
Thank you for the great advice and simple how-to instructions. I easily created a Site-Specific WordPress Plugin for my site and enabled shortcodes for widgets. Now I have less worry when changing themes, and I didn’t need to install another plugin. Again, thanks!
george
hi i followed the instruction on how to make a site plugin for my site. ive uploaded it but cant see it in my list of plugins.
any ideas why?
Dawn
I cannot find where the folders live in the plug in directory. I tried searching for: /wp-content/plugins/yoursitename-plugin/ (with my site name).
Kara
Never mind, I figured it out and got it activated. My hosting server was acting up, must have timed out or something…cheers!
Kara
I followed your instructions but i don’t know how to activate it. It doesn’t show in my list of plugind in my wp-admin. Can you help?
Sheyejinkazama
Thank you. Thank you so so much.
Molly
How do you get the plugin to “Network Activate” on a multi-site?