WPBeginner aracılığıyla her gün web sitesi sahiplerinin yavaş yüklenen sayfalarını düzeltmelerine yardımcı oluyoruz. Ve neredeyse her zaman, en büyük suçlu aynı çıkıyor: değerli bant genişliğini ve sunucu kaynaklarını tüketen optimize edilmemiş görüntüler.
Buradaki zorluk yalnızca görselleri küçültmek değil, aynı zamanda onları pikselli bir karmaşaya dönüştürmeden bunu yapmaktır. Sayısız web sitesi sahibinin bu sorunu çözmesine yardımcı olduktan sonra, yükleme sürelerini önemli ölçüde iyileştirirken kaliteyi koruyan görüntü optimizasyonu için kusursuz bir sistem geliştirdik.
Bu kılavuzda, görselleri optimize etmek için denenmiş ve test edilmiş sürecimizde size yol göstereceğiz. Bunlar, her ay milyonlarca ziyaretçiye hizmet veren kendi sitelerimizde kullandığımız tekniklerin aynısıdır ve teknik uzmanlığınız ne olursa olsun işe yarar.
Bu, web için görüntü optimizasyonuna ilişkin kapsamlı bir kılavuz olduğundan, takip etmesi kolay bir içindekiler tablosu oluşturduk:
- What Is Image Optimization?
- What Are the Benefits of Image Optimization?
- How to Save and Optimize Images for Web Performance
- Best Image Optimization Tools and Programs
- Best Image Optimization Plugins for WordPress
- Final Thoughts and Best Practices for Image Optimization
- Expert Guides on Improving WordPress Performance
1. Görüntü Optimizasyonu Nedir?
Görüntü optimizasyonu, genel görüntü kalitesini düşürmeden görüntüleri mümkün olan en küçük dosya boyutunda kaydetme ve sunma işlemidir.
Süreç kulağa karmaşık gelse de, aslında bugünlerde oldukça kolay. Görüntü kalitesinde gözle görülür bir kayıp olmadan görüntüleri otomatik olarak %80’e kadar sıkıştırmak için birçok görüntü optimizasyon eklentisi ve aracından birini kullanabilirsiniz.
İşte optimize edilmiş ve edilmemiş görsellere bir örnek:
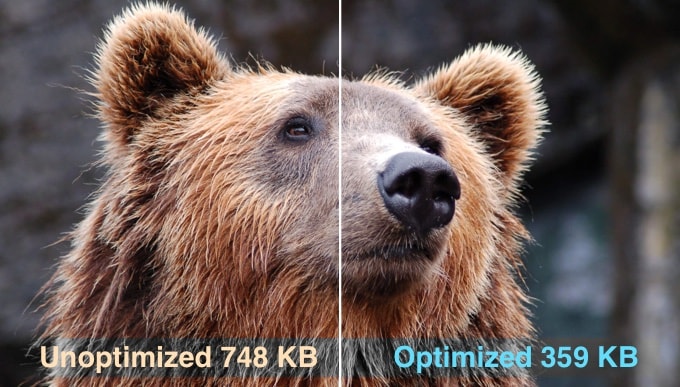
Gördüğünüz gibi, doğru şekilde optimize edildiğinde, aynı görüntü kalitede herhangi bir kayıp olmadan orijinalinden %80’e kadar daha küçük olabilir. Bu örnekte görüntü %52 daha küçüktür.
Görüntü Optimizasyonu Nasıl Çalışır?
Basit bir ifadeyle, görüntü optimizasyonu sıkıştırma teknolojisini kullanarak çalışır.
Sıkıştırma ‘kayıplı’ veya ‘kayıpsız’ olabilir.
Kayıpsız sıkıştırma, görüntü kalitesinde hiçbir kayıp olmadan toplam dosya boyutunu azaltır. Kayıplı sıkıştırma ile kalitede küçük bir kayıp olabilir, ancak ideal olarak ziyaretçileriniz tarafından fark edilmeyecektir.
Görselleri Optimize Etmek Ne Anlama Geliyor?
WordPress barındırma desteğinizden veya bir hız testi aracından görüntüleri optimize etmek için bir öneri almış ve ne yapmanız gerektiğini merak ediyor olabilirsiniz.
Resimlerinizi web için optimize ederek dosya boyutunu küçültmeniz gerekecektir. Bunu nasıl yapacağınızı adım adım göstereceğiz.
2. Görüntü Optimizasyonunun Faydaları Nelerdir?
Görsellerinizi optimize etmenin birçok faydası olsa da, bilmeniz gereken en önemli faydalar şunlardır:
- Daha yüksek web sitesi hızı
- Geliştirilmiş SEO sıralamaları
- Satış ve potansiyel müşteriler için daha yüksek bir genel dönüşüm oranı
- Daha az depolama ve bant genişliği (barındırma ve CDN maliyetlerini azaltabilir)
- Daha hızlı web sitesi yedeklemeleri (yedekleme depolama maliyetini azaltabilir)
Görüntüler, videolardan sonra bir web sayfasındaki en ağır ikinci öğedir. HTTP arşivine göre, görüntüler ortalama bir web sayfasının toplam ağırlığının %42‘sini oluşturmaktadır.
Hızlı web sitelerinin arama motorlarında (SEO) daha üst sıralarda yer aldığını ve daha iyi dönüşümler sağladığını bildiğimizden, görüntü optimizasyonu, çevrimiçi ortamda başarılı olmak isteyen her işletme web sitesinin yapması gereken bir şeydir.
Şimdi görüntü optimizasyonunun gerçekten ne kadar büyük bir fark yaratabileceğini merak ediyor olabilirsiniz.
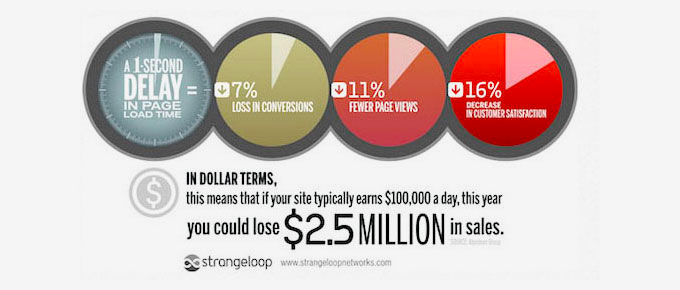
Bir Strangeloop araştırmasına göre, web sitesi yükleme süresindeki bir saniyelik gecikme, satışların %7’sine, sayfa görüntülemelerinin %11’ine ve müşteri memnuniyetinin %16’sına mal olabilir.
Bunlar web sitenizi hızlandırmak için yeterli nedenler değilse, Google gibi arama motorlarının da daha hızlı yüklenen web sitelerine ayrıcalıklı SEO muamelesi yaptığını bilmelisiniz.
Bu, görsellerinizi web için optimize ederek hem web sitesi hızını artır abileceğiniz hem de WordPress SEO sıralamalarını yükseltebileceğiniz anlamına gelir.
Video Eğitimi
Yazılı talimatları tercih ediyorsanız, okumaya devam edin.
3. Web Performansı için Görseller Nasıl Kaydedilir ve Optimize Edilir
Web performansı için başarılı görüntü optimizasyonunun anahtarı, en küçük dosya boyutu ile kabul edilebilir görüntü kalitesi arasındaki mükemmel dengeyi bulmaktır.
Görüntü optimizasyonunda büyük rol oynayan üç şey şunlardır:
- Görüntü dosyası formatı (JPEG vs. PNG vs. GIF)
- Sıkıştırma (daha yüksek sıkıştırma = daha küçük dosya boyutu)
- Görüntü boyutları (yükseklik ve genişlik)
Üçünün doğru kombinasyonunu seçerek görüntü boyutunuzu %80’e kadar küçültebilirsiniz.
Şimdi bunların her birine daha ayrıntılı bir şekilde göz atalım.
1. Görüntü Dosyası Formatı
Çoğu web sitesi sahibi için gerçekten önemli olan üç resim dosyası biçimi JPEG, PNG ve GIF’tir. Doğru dosya türünü seçmek, görüntü optimizasyonunda önemli bir rol oynar.
İşleri basit tutmak için, çok renkli fotoğraflar veya görüntüler için JPEG’leri, basit veya şeffaf görüntüler için PNG’leri ve yalnızca animasyonlu görüntüler için GIF’leri kullanmak istersiniz.
Her dosya türü arasındaki farkı bilmeyenler için:
- PNG görüntü formatı sıkıştırılmamıştır, bu da daha yüksek kaliteli bir görüntü olduğu anlamına gelir. Dezavantajı ise dosya boyutlarının çok daha büyük olmasıdır.
- Öte yandan JPEG, önemli ölçüde daha küçük bir dosya boyutu sağlamak için görüntü kalitesini biraz düşüren sıkıştırılmış bir dosya formatıdır.
- GIF ise kayıpsız sıkıştırma ile birlikte yalnızca 256 renk kullanır, bu da onu animasyonlu görüntüler için en iyi seçim haline getirir.
WPBeginner’da görüntünün türüne göre her üç görüntü formatını da kullanıyoruz. Birçok web sitesi de artık yaygın olarak desteklenen WebP formatını kullanıyor.
Görüntü formatları hakkında daha fazla bilgi için WebP vs. PNG vs. JPEG: WordPress için en iyi görüntü formatı nedir başlıklı kılavuzumuza bakın.
2. Sıkıştırma
Bir sonraki şey, görüntü optimizasyonunda büyük bir rol oynayan görüntü sıkıştırmadır.
Farklı görüntü sıkıştırma türleri ve seviyeleri mevcuttur. Her biri için ayarlar görüntü sıkıştırma aracınıza bağlı olarak değişecektir.
Adobe Photoshop, ON1 Photo, GIMP, Affinity Photo ve diğerleri gibi çoğu görüntü düzenleme aracının yerleşik görüntü sıkıştırma özellikleri vardır.
Görüntüleri normal olarak da kaydedebilir ve daha kolay görüntü sıkıştırma için TinyPNG veya JPEGmini gibi bir web aracı kullanabilirsiniz.
Biraz manuel çaba gerektirse de, bu iki yöntem görüntüleri WordPress’e yüklemeden önce sıkıştırmanıza olanak tanır ve WPBeginner’da yaptığımız da budur.
Ayrıca Optimole ve EWWW Image Optimizer gibi görüntüleri ilk yüklediğinizde otomatik olarak sıkıştırabilen birkaç popüler WordPress eklentisi de vardır. Bu kullanışlı bir özelliktir ve birçok yeni başlayan ve hatta büyük şirket bu görüntü optimizasyon eklentilerini kullanmayı tercih etmektedir.
WordPress eklentilerini kullanma hakkında daha fazla bilgiyi yazının ilerleyen bölümlerinde paylaşacağız.
3. Görüntü Boyutları
Normalde, telefonunuzdan veya dijital kameranızdan bir fotoğrafı içe aktardığınızda, çok yüksek bir çözünürlüğe ve büyük dosya boyutlarına (yükseklik ve genişlik) sahiptir.
Tipik olarak bu fotoğraflar 300 DPI çözünürlüğe ve 2000 pikselden başlayan boyutlara ve daha fazlasına sahiptir. Yüksek kaliteli fotoğraflar baskı veya masaüstü yayıncılık için çok uygun olsa da, büyük boyutları onları web siteleri için uygunsuz hale getirir.
Görüntü boyutlarını daha makul bir düzeye indirmek görüntü dosyası boyutunu önemli ölçüde azaltabilir. Bilgisayarınızdaki görüntü düzenleme yazılımını kullanarak görüntüleri yeniden boyutlandırabilirsiniz.
Örneğin, 300 DPI çözünürlüğe ve 4900×3200 piksel görüntü boyutlarına sahip bir fotoğrafı optimize ettik. Orijinal dosya boyutu 1,8 MB idi.
Daha yüksek sıkıştırma için JPEG formatını seçtik ve boyutları 1200×795 piksel olarak değiştirdik. Dosya boyutu sadece 103 KB’a düşürüldü. Bu, orijinal dosya boyutundan %94 daha küçük.
Artık görsel optimizasyonundaki üç önemli faktörü bildiğinize göre, web sitesi sahipleri için çeşitli görsel optimizasyon araçlarına bir göz atalım.
4. En İyi Görüntü Optimizasyon Araçları ve Programları
Daha önce de belirttiğimiz gibi, çoğu görüntü düzenleme yazılımı görüntü optimizasyonu ve sıkıştırma ayarlarıyla birlikte gelir.
Görüntü düzenleme yazılımının dışında, görüntüleri web için optimize etmek için kullanabileceğiniz birkaç güçlü ücretsiz görüntü optimizasyon aracı da vardır (sadece birkaç tıklama ile).
Özellikle mükemmeliyetçi biriyseniz, görselleri WordPress’e yüklemeden önce optimize etmek için bu araçları kullanmanızı öneririz.
Bu yöntem WordPress barındırma hesabınızda disk alanından tasarruf etmenize yardımcı olur ve her görüntüyü manuel olarak incelediğiniz için en iyi kalitede en hızlı görüntüyü garanti eder.
Adobe Photoshop
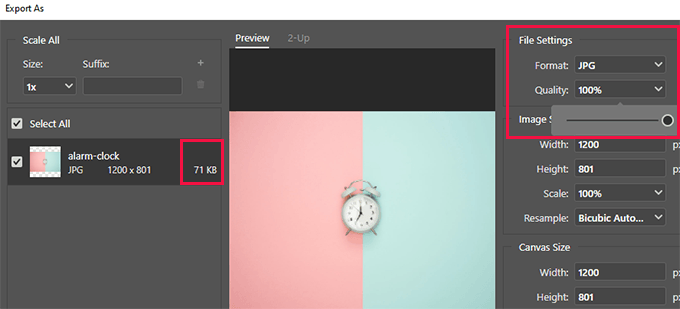
Adobe Photoshop, görüntüleri web için daha küçük bir dosya boyutuyla dışa aktarmanıza olanak tanıyan birinci sınıf bir görüntü düzenleme uygulamasıdır.
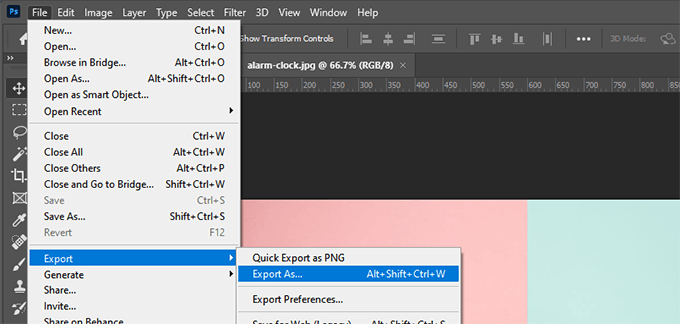
Dışa aktarma iletişim kutusunu kullanarak, size en küçük dosya boyutunu veren bir görüntü dosyası formatı (JPG, PNG, GIF) seçebilirsiniz.
Dosya boyutunu daha da azaltmak için görüntü kalitesini, renkleri ve diğer seçenekleri de azaltabilirsiniz.
GIMP
GIMP, Adobe Photoshop’a ücretsiz ve açık kaynaklı bir alternatiftir. Görüntülerinizi web için optimize etmek için kullanılabilir. Dezavantajı ise kullanımının bu listedeki diğer bazı çözümler kadar kolay olmamasıdır.
Öncelikle, resminizi GIMP’te açmanız ve ardından Dosya ” Farklı Dışa Aktar… seçeneğini seçmeniz gerekir. Bu, dosyanıza yeni bir ad verebileceğiniz Görüntüyü Dışa Aktar iletişim kutusunu getirecektir. Ardından, ‘Dışa Aktar’ düğmesine tıklamanız gerekir.
Şimdi görüntü dışa aktarma seçeneklerini göreceksiniz. JPEG dosyaları için, sıkıştırma seviyesini seçmek ve dosya boyutunu azaltmak için ‘Kalite’ kaydırıcısını kullanabilirsiniz.
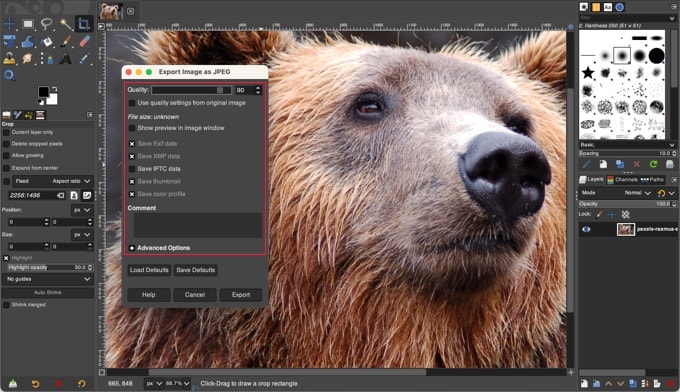
Son olarak, optimize edilmiş görüntü dosyasını kaydetmek için ‘Dışa Aktar’ düğmesine tıklamalısınız.
TinyPNG
TinyPNG, PNG ve JPEG dosyalarınızın boyutunu azaltmak için akıllı bir kayıplı sıkıştırma tekniği kullanan ücretsiz bir web uygulamasıdır. Tek yapmanız gereken web sitelerine gitmek ve basit sürükle ve bırak yöntemini kullanarak resimlerinizi yüklemek.
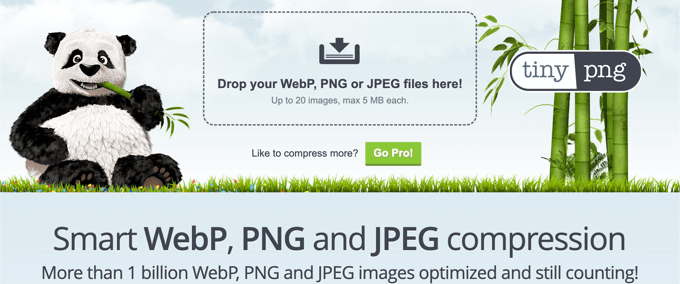
Görüntüyü sıkıştıracak ve size bir indirme bağlantısı verecektir.
Ayrıca Adobe Photoshop için bir uzantıya sahipler, ki bu bizim görüntü düzenleme sürecimizin bir parçası olarak kullandığımız şey çünkü TinyPNG’ye Photoshop içinden erişmenizi sağlıyor.
Geliştiriciler için, görüntüleri otomatik olarak dönüştürmek için bir API’leri var. Ek olarak, yeni başlayanlar için, bunu sizin için yapacak bir WordPress eklentileri var. Bu konu hakkında daha sonra konuşacağız.
JPEGmini
JPEGmini, algılanan kalitelerini etkilemeden görüntülerin boyutunu önemli ölçüde azaltan kayıpsız bir sıkıştırma teknolojisi kullanır. Ayrıca orijinal görüntünün ve sıkıştırılmış görüntünün kalitesini karşılaştırabilirsiniz.
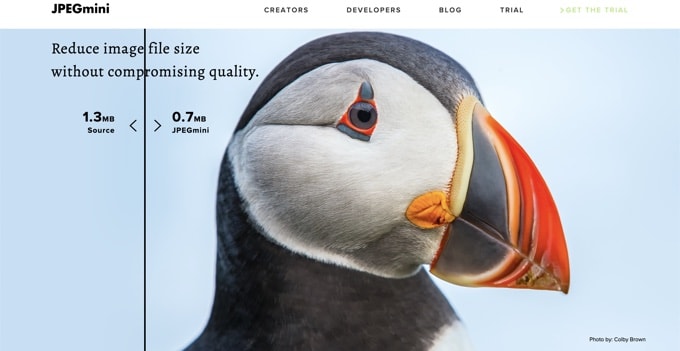
Web sürümünü ücretsiz olarak kullanabilir veya programı bilgisayarınız için satın alabilirsiniz. Ayrıca sunucunuz için süreci otomatikleştirmek için ücretli bir API’ye de sahipler.
ImageOptim
ImageOptim, en iyi sıkıştırma parametrelerini bularak ve gereksiz renk profillerini kaldırarak görüntüleri herhangi bir kalite kaybı olmadan sıkıştırmanızı sağlayan bir Mac yardımcı programıdır.
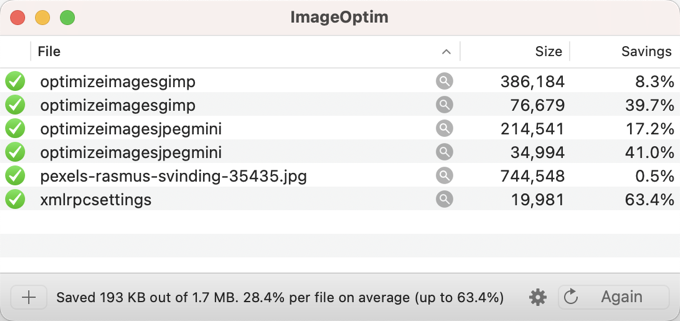
Buna bir Windows alternatifi Trimage‘dir.
5. WordPress için En İyi Görüntü Optimizasyon Eklentileri
Resimlerinizi optimize etmenin en iyi yolunun WordPress’e yüklemeden önce bunu yapmak olduğuna inanıyoruz. Ancak, çok yazarlı bir site işletiyorsanız veya otomatik bir çözüme ihtiyacınız varsa, bir WordPress resim sıkıştırma eklentisi deneyebilirsiniz.
İşte en iyi WordPress görüntü sıkıştırma eklentileri listemiz:
- Optimole, ThemeIsle‘ın arkasındaki ekip tarafından geliştirilen popüler bir eklenti
- EWWW Görüntü İyileştirici
- JPEG, PNG ve WebP Görüntü Sıkıştırma, yukarıda bahsedilen TinyPNG ekibinin bir eklentisi
- Imagify, popüler WP Rocket ekibinin bir eklentisi
- ShortPixel Görüntü İyileştirici
- Smush
- reSmush.it
- Envira Gallery, yerleşik görüntü sıkıştırma özelliğine sahip bir WordPress galeri eklentisidir
Bu WordPress resim optimizasyon eklentileri web sitenizi hızlandırmanıza yardımcı olacaktır.
6. Görüntü Optimizasyonu için Son Düşünceler ve En İyi Uygulamalar
Görüntüleri web için optimize edilmiş şekilde kaydetmiyorsanız, şimdi bunu yapmaya başlamanız gerekir. Site hızınızda büyük bir fark yaratacak ve kullanıcılarınız bunun için size teşekkür edecektir.
Daha hızlı web siteleri SEO için harikadır ve muhtemelen arama motoru sıralamalarınızda bir artış göreceksiniz.
Görüntü optimizasyonunun dışında, web sitenizi hızlandırmanıza önemli ölçüde yardımcı olacak iki şey, bir WordPress önbellek eklentisi kullanmak ve bir WordPress CDN kullanmaktır.
WPBeginner’da WP Rocket kullanıyoruz çünkü hem güçlü önbelleğe alma hem de tembel yükleme ve WebP desteği dahil olmak üzere görüntü optimizasyon özelliklerini tek bir çözümde birleştiriyor.
Alternatif olarak, yönetilen bir WordPress barındırma şirketi kullanabilirsiniz, çünkü genellikle platformun bir parçası olarak hem önbelleğe alma hem de CDN sunarlar.
WordPress Performansını Artırmaya Yönelik Uzman Kılavuzları
Umarız bu makale WordPress’te görsellerinizi nasıl optimize edeceğinizi öğrenmenize yardımcı olmuştur. WordPress performansını artırmayla ilgili diğer bazı makaleleri de görmek isteyebilirsiniz:
- WordPress Hızını ve Performansını Artırmak için Nihai Kılavuz
- WooCommerce Performansı Nasıl Hızlandırılır
- Web Sitesi Hızını Artırmak için WordPress Medyası Nasıl Boşaltılır?
- Web Sitenizi Hızlandırmak için En İyi WordPress Önbellek Eklentileri
- WordPress için Core Web Vitals Nasıl Optimize Edilir (Nihai Kılavuz)
- WordPress’te İlk Bayta Kadar Geçen Süre (TTFB) Nasıl Azaltılır – Uzman İpuçları
- WordPress Site Performansını İyileştirmek için GTmetrix Eklentisi Nasıl Kullanılır?
- En Hızlı WordPress Hosting (Performans Testleri)
- WordPress Sitenizde Ölçmeniz Gereken Önemli Metrikler
- Web Sitesi Hız Testi Nasıl Doğru Şekilde Yapılır?
- WordPress Web Sitesi Stres Testi Nasıl Yapılır?
If you liked this article, then please subscribe to our YouTube Channel for WordPress video tutorials. You can also find us on Twitter and Facebook.


Diane Talbotier
Hi, does resizing mean changing the size of the images as they are shown on the website, or resizing the size of the file , please?
And how do I know what is the optimal size?
WPBeginner Support
It would depend on what you mean, for compression in this guide, it is the size for the file. You can also reduce the width and height of an image if it is too large. Your specific theme would determine the specific image size you want to use.
Admin
Terri
You mentioned in your optimise example that your original photo was 300dpi, then you optimised it to a smaller file size. But you did not say what the target dpi was. Is it 72 for web? Or higher? Thanks for the informative article.
WPBeginner Support
That would depend on your personal preference and how large you are wanting/needing the images to be.
Admin
Romel
thanks a lot it cleared a lot of doubts.
WPBeginner Support
Glad our article was helpful
Admin
Odenyi Emmanuel Chidera
What I like most about wpbeginner is how they will give you information on what to implement on your own site but also tell you what they are using on their own site. It really helps me decide faster. Learning from a master is always easier. Thanks.
WPBeginner Support
You’re welcome, glad you like our content
Admin
Luz Manalo-Cruz
I’ve compressed images via TinyPNG and tried to replace the heavier images on my site with these (ie. I deleted the heavy photos and uploaded the compressed ones). However the media library is still uploading the old heavier images. Does that mean that I can’t replace the old images already uploaded? Will it only upload the compressed images that have not been uploaded at all?
WPBeginner Support
If you are replacing the heavier images, you would want to ensure you don’t have caching on your site that is showing the old image and when you upload the new image that you are uploading the correct image.
Admin
Giovanna
Thanks for the informative article, Syed.
Moving forward I am going to make sure to always use optimized images. Do you recommend I go back to already published posts and replace my images with optimized ones?
WPBeginner Support
If possible we would recommend updating your older images, the plugins we recommended should handle that for you
Admin
Percy Young
Thank you for your post. many nice tools. I wonder if theres any thing to be done to rezize images that have been previously uploaded, and how to delete images the worpress is not using any more.
WPBeginner Support
If you need to generate new images you could follow our guide here:
https://www.wpbeginner.com/plugins/regenerate-thumbnails-new-image-sizes-wordpress/
For removing the extra images there are media cleanup plugins that you are able to use
Admin
WPBeginner Support
Glad you’ll use our recommendations
Admin
Dr Amandeep Sandhu
Thanks for sharing such ideas….!
WPBeginner Support
You’re welcome, thanks for reading our articles
Admin
İbrahim BOZKURT
I’m a WordPress developer. I am writing from Turkey.
Very difficult to find quality WordPress resources.
I discovered you. I didn’t know English but learned English. Thanks to you everything.
WPBeginner Support
Thank you for reading our articles and congratulations on learning a new language
Admin
Felipe Adan Lerma
Hi, it seems maybe WordPress has incorporated some of this into its current image upload process, at least in the Premium bracket?
I ask cause I now get the option to choose the actual size or something larger or smaller?
Or is that process not an optimization / reduction in size of the image?
Thanks so much! Very important useful topic.
Adan
WPBeginner Support
It sounds like you may be talking about WordPress.com and they have custom plugins setup for sites on their service
Admin
Felipe Adan Lerma
Ahhh, yes, I forget the two WP’s differ, sorry. I’m still trying to figure out how to work where I am w/WP & it’s definitely via their .com sites. Thank so much then, WP – Adan
WPBeginner Support
No worries, should it help we have our article listing the differences here:
https://www.wpbeginner.com/beginners-guide/self-hosted-wordpress-org-vs-free-wordpress-com-infograph/
Anna
Very helpful info!! I was just researching how to do this when your email came through! Saved em time and effort and had just the advice I was looking for.
WPBeginner Support
Glad our guide and newsletter could be helpful
Admin
Lindsay
When saving on photoshop what width do you suggest for optimum web performance?
My theme is saving 1600×1050 for optimum header but what should I do for the body images. Theme designer doesn’t have a recommendation.
WPBeginner Support
If you’re going through the other steps in this article then the image size would be what would fit your content’s dimensions best so WordPress wouldn’t need to resize the image.
Admin
edccde
Please update that youtube video.First of all Jpegmini isn’t a web app and it is a software which i have to install in my pc.
WPBeginner Support
Thank you for letting us know about the video, we’ll certainly look into updating the video
Admin
Jackie
Is there way to compress images already uploaded to wordpress? Or do I need to compress all my images and then reupload into WP? THanks in advance for the advices.
Irina
Hi,
Need an advice: I need to upload Low res and Hi-res images (1200pix at 300dpi) so my customers can download them. I have no questions about LR image optimization. How can I save hi-res images? The size is up to 2 MB. I have hundreds of thousands of images…
Ratan Kumar
This post is awesome and really add value to my site. However, I recently tried to save images from flipkart but it saved in very low pixel format. Wondering if you can help me to figure out on how to do that.
Ray
I already bulk uploaded 1500 product images that were connected to image urls I found on the internet.
Now that I have those 1500 images already in my Media Library, how can I go back and resize and compress them?
Also, I’m confused about whether resizing means changing the size of the images as they are shown on the website, or resizing the size of the file.
Thanks!
Sara Lewis
what about the plugin ewww image optimizer?
WPBeginner Support
Hey Sara,
Yes its a good alternative. However, for better results we would still recommend optimizing images in your image editing program before uploading to WordPress.
Admin
Donna
I will be travelling to a place where internet connectivity is limited and expensive. So, I want to reduce the file size of my photos before I go online to upload them to my blog. Can someone please recommend for me what resolution and dpi would be good to use? The app I am planning to use asks for three measurements:
resolution – from 200 to 2048
DPI – from 72×72 to 300×300
jpeg quality (compression level) – from 0.00 to 1.00
Carrie
In the video she changes her pic. I understand the screen in PS. But you have not explained what should the width and height be in pixels for WP the limit is 2mb. What would be a good standard for sliders, etc for a wp site?
Carrie
Sorry for being the dunce in the corner, but could someone please clarify one thing? I installed the WP Smush it plugin and have been slowly working through all the photos I’ve uploaded to my site for the last 2 years. I’m doing 50 at a time, the free limit. However, now that I have the plugin, for future photo uploads, does having it mean I don’t have to use any other program to resize my photos before uploading them to my WP site? If I have an 8 MB photo and upload it to my site, the plugin does everything for me? I just want to confirm that the original photo is not still uploaded and saved to my host server, SiteGround. My site is wicked slow, I’ve run tons of diagnostics, and I still can’t figure out why except that everything points to my photos. Thanks!
Tony Squibb
Hi Carrie, I’m defo not an expert in any way but I do have experience with WP Smush it and yes, future uploads should be auto ‘smushed’. There is a little notification in the media gallery as you do so.
To check the causes of your slow site you can use GTmetrix and then open the waterfall page where it will show the times of the individual pages items loading. Once you know what is the problem you can then address it.
I hope that helps from one ‘dunce’ to another
Carrie
Hi Tony,
Thanks for weighing in! Unfortunately I uninstalled WP Smush and tried EWWW Image Optimizer along with the Thumbnail Regerate plugin (based on another bloggers suggestion) and royally messed up the photos on my site. I’m a newb with regards to how to manage my files through the FTP on my web host, so I ended up deleting a bunch of images (as in hundreds) and re-uploading them after resizing them manually in an image program. Turns out that too was a bad idea. Now I have a bunch of error messages when I render my site in my Google Console because when Google crawls my site, those files are now gone or moved. AGH! I’m on the verge of simply paying someone to revamp my site or quitting altogether. But I really appreciate that you took the time to leave a helpful comment.
Happy New Year! May 2017 be better than 2016.
Jeff
hi
Best Image Optimization Plugins for WordPress Site Which is?
Gagan
I was thinking what if i upload my Images to Google Blogger and use them on my wordpress Site by “Insert From URL” option?
Any suggestion if this is a Good Idea or no?
Thanks in advance
Zimbrul
I came back here as I’m looking for plugins that upload a large image as a optimised image straight to WordPress. I’m sure I’ve seen this somewhere here at WP Beginner but I cannot find it.
WPBeginner Support
Please take a look at Optimizing images with WP Smush pros, cons, and alternatives.
Admin
Jack
Photoshop is definitely the best one, for online services, kraken.io and resizeimage.net are good alternatives to tinypng.
tanveer
is xnview a good option for compressing images?
WPBeginner Support
We haven’t tried it.
Admin
Larry Aldrich
Someone mentioned RIOT in an earlier comment. It is my go-to app for minimizing images BEFORE you upload them. The compression rate is close to phenomenal. Sorry MAC users, but it’s only available for Windows.
Martin
Hello WPBeginner,
I would be very interested in the Windows version of Trimage you have apparently seen.
On the Trimage homepage you just see a link asking for help with the windows port…
Greg
I have got used to using Fireworks even though I have CS3
Zimbrul
Me too. I use CSS4 and still go to Fireworks for image optimisation.
Marianne P.
I just checked out the Trimage site and did not see the Windows version – just various *nix versions. Please point me in the right direction. Thanks so much – really great article!
Corinna
I was wondering if there was any way of reducing the size of the images already uploaded to a site? I have changed the way I upload them so in future all my images will be smaller. But I thought maybe it would be useful to change the size of those already uploaded.
Julie Anglesey
I would also like to know how to reduce the size of images already uploaded.
Zimbrul
It’s (or was) Smush-It.
Samiullah Khan
Search the web too much to find good solution to optimize images; but most of them most of them doesn’t let’s see tools mentioned in this post work or not
Graham
The article defines PNG as an uncompressed file format, but as far as I know, standard PNGs use lossless compression.
And I think it would be helpful to mention why you might choose one format over another for continuous tone images (eg. a photo) vs. limited palette images (eg. a logo).
Rob Dewing
Why no mention of Photoshop Elements, the cut down home use version of Photoshop? It does 90+% of the things full phat Photoshop will do, including ‘save for web’ image compression, all for less than $100.
Ines
Would you recommend to use Flickr to upload your images and then copy the HTML code to your wordpress site? What would you suggest for travel blogs that contain lots of pictures? Thanks.
WPBeginner Support
You can add flickr photos in WordPress by simply pasting the photo URL in a post. Normally we would not recommend it, because people will be viewing and finding your photos on Flickr and may never even get a chance to visit your website. However, if you feel that building a community around your photos on flickr is more useful for you, then sure go ahead.
Admin
Benjamin
You could add kraken.io to your list. It does the same thing as Jpegmini but also works with PNG images.
Aurel
I am using RIOT, which is free, very fast and exelent program.
Debra Torres
I’ve been using the Yahoo Smush it tool at: http://www.smushit.com/ysmush.it/
Would you recommend this one? Or are the others you mentioned better?
WPBeginner Support
Smushit is a great tool too. But try other tools we mentioned and compare the results.
Admin
James DiGioia
There is WordPress plugin for Smush.it:
http://wordpress.org/plugins/wp-smushit/
This makes it easier to compress images using Smush.it without having to prep them beforehand.
Youri van Dijk
I was about to mention that plugin as well. I generally do save my images optimized myself, but for clients that are not very familiar with these tools installing the plugin is a huge benefit.
John Mauldin
Your article is VERY timely. Just encountered the need to reduce hundreds of photos for a kitchen and bath showroom. Bought JPEGmini since I could only do 20 photos a day in the free version but $19.99 is nothing for the ability to drag and drop entire folders into the program and have it zip them in seconds/minutes. Thanks so much for the help!
Haseeb
Isn’t there any automated way of doing this on wordpress? How about ‘WP Smush.it’ ?
Editorial Staff
You can automate the process with some tools that we mentioned or using this plugin:
http://wordpress.org/plugins/ewww-image-optimizer-cloud/
But why create more server load when this can be resolved by educating the user.
Admin
Marlene
Great article, however I was under the impression that any images with text on them should be saved as PNG files for best sharpness….?
Editorial Staff
PNG will definitely have a higher quality, but most folks won’t be able to tell the difference unless you put them side-by-side. If you can speed up your site with a non-noticeable difference, then why not
Admin
Adam W. Warner
Great article, and an important subject many WordPress admins miss.
[Link Removed]
Lynn
Lightroom has a number of presets for exporting to Facebook and Web – do those compress the photo files sufficiently or should I still turn to Photoshop?
Editorial Staff
Not sure about lightroom and how it exports image. You can run a side-by-side test.
Admin
Graham
Lightroom will do pretty much the same job as Photoshop when exporting photos to JPEGs.
Bill Wells
Lightroom is the go-to for photographers; it allows you to optimise your photos in batches and then will export the batch to your preferred pixel size and compression in a number of formats, including jpeg. It also automatically adds your copyright message to the batch if you want.
I don’t know about batch-processing in Photoshop but I use it for major image manipulation only.
I guess if you’re doing graphics or heavy manipulation, use Photoshop but if you’re using lots of photos and just want them to look their best, use Lightroom.
Scott Wyden Kivowitz
I’m a big advocate for many of the products you mentioned. Now I get to add this link to my resources for whenever customers ask me this exact question. Thanks Syed.
Editorial Staff
You’re very welcome Scott.
Admin
Dave Kulas
If you are taking the pictures yourself for your website …. set your camera to take a picture at 800 x 600 and at less resolution. Some camera have a Good – Better – Best resolution setting … use the “GOOD” setting. . You should get an image that will load quickly.
If you already have some images … take a look at for FREE … http://www.getpaint.net ….. I have been using it for years. I take the HUGE photos given to me by clients … then RE-SIZE them to 800 x 600. Then I use the built in compression tool to compress the image.
Steven Alig
I would not recommend taking low resolution photos.
You will want to take your original photos at higher resolutions just in case you want to use them for something else. Plus if you take photos at a higher resolution, you will have the ability to crop in on an area if desired.
If the photos are a lower resolution, you will not have that option and will be stuck with what you have taken as the original.
Mark Pridham
I have to agree with Steven on this. I highly recommend taking high resolution images in your camera. You then have a large file that you can work with, It very easy to reduce file size from a hi-res image, but impossible to go the other way. By taking hi-res images, you also have the option of using them for print work if the need arises, Generally, I end up with the large, raw image, a cropped and retouched print image, and a smaller image for web-based work.
Michael Maye
I would agree too about taking full high resolution photos. Then resize down and compress for uploading to your website. You will always have the original high res photo for other uses.
Zimbrul
I usually use Fireworks and then Tiny PNG if required.
Editorial Staff
Yup that’s a good combination
Admin
Geoffrey Gordon
Great article Syed.
However I really think that fireworks is the king when it comes to optimising images for the web and its a whole lot cheaper than Photoshop.
Editorial Staff
Thanks Geoffrey. Yup I know Photoshop is expensive which is why I mentioned other free tools as well. GIMP and Fireworks both has this functionality.
Admin
paul
So I’ll just follow the options as seen on the image in this article’s Photoshop section and it’s all good?
Editorial Staff
Yup, if you do that, then you will have probably one of the best performance results. However depending on an image, some might not look as good, so in those cases we try the Very High. Do it on case by case basis, but most images would be fine.
Admin
Andrew Brown
You discuss using Photoshop, which is way beyond most bloggers needs or price – why do you not refer to Lightroom, which also has an excellent image export option, including an option to restrict the max file size, as well as save by dimension or using a set dpi.
Once some one knows the comp screens work at 72dpi, the rest becomes much easier, and it becomes amazing as to how easy it is to have a web template amongst the export options without needing any real in depth knowledge of what needs to be done.
Editorial Staff
Andrew,
Yes we understand that Photoshop is expensive which is why we mentioned several other free options. Just updated the article now to add a link to GIMP right below photoshop.
As for Lightroom, didn’t mention it because we don’t use it. Same reason why Fireworks was left out.
Admin