
Hızlı bir WordPress web sitesi ziyaretçilerinizi mutlu eder ve sitenizin daha iyi sıralanmasına yardımcı olur. Bunun nedeni, Google gibi arama motorlarının artık site hızını önemli bir sıralama faktörü olarak görmesidir.
WP Super Cache, web sayfalarınızın statik HTML dosyalarını oluşturan popüler bir eklentidir. Bu, sunucunuzun çok çalışmak zorunda kalmayacağı ve sitenizin ziyaretçiler için daha hızlı yükleneceği anlamına gelir.
Web performansı uzmanları olarak, WP Super Cache gibi araçların web sitelerini nasıl önemli ölçüde hızlandırdığını, SEO’yu nasıl artırdığını ve web sitesi ziyaretçileri için kullanıcı deneyimini nasıl geliştirdiğini gördük.
Bu makalede, WordPress sitenize WP Super Cache’i yükleme ve ayarlama konusunda size rehberlik edeceğiz. Her adımı net bir şekilde açıklayacağız, böylece teknoloji meraklısı olmasanız bile takip edebilirsiniz. Sonunda, ziyaretçilerin ve arama motorlarının takdir edeceği daha hızlı bir web sitesine sahip olacaksınız.
WP Super Cache Nedir ve Neden Kullanmalısınız?
WP Super Cache en popüler ve en iyi WordPress önbellekleme eklentilerinden biridir. Ücretsiz bir araçtır ve bir milyondan fazla aktif kuruluma sahiptir.
WP Super Cache, sitenizdeki her sayfanın önbellek kopyasını statik bir HTML dosyası şeklinde oluşturur. Bu şekilde, birisi sitenizi ziyaret ettiğinde, tüm web sitesini sıfırdan oluşturmak yerine kopyalanan sürüm hızlı bir şekilde sunulur.
Sonuç olarak, WordPress sitenizin hızı ve performansı önemli ölçüde artar. Önbellek eklentisi, ziyaretçilerinizin sayfanın açılmasını beklemek zorunda kalmamasını sağlamak için sahne arkasındaki birçok adımı atlar.
Bu, web sitenizin ziyaretçilerinin deneyimini iyileştirecektir. Hızlı yüklenen bir site, insanları siteyi daha sık ziyaret etmeye teşvik eder ve kullanıcılar yayınlarınızda ve sayfalarınızda daha fazla zaman geçirdikçe daha fazla etkileşim ve dönüşüm sağlar.
Bunun yanı sıra, hızlı yüklenen bir web sitesi ile WordPress SEO ve arama motoru sıralamalarınızda da bir artış görebilirsiniz. Bunun nedeni, Google’ın web sitesi hızını bir sıralama faktörü olarak kullanması nedeniyle daha hızlı web sitelerine önemli bir avantaj sağlamasıdır.
Şimdi, web sitenize WP Super Cache kurmaya hazır mısınız? Hadi başlayalım!
WP Super Cache’i Kurmak – Kolay Yol
Yapmanız gereken ilk şey WP Super Cache eklentisini web sitenize kurmak ve etkinleştirmektir. Daha fazla detay için WordPress eklentisi nasıl kurulur rehberimizi takip edebilirsiniz.
Etkinleştirmenin ardından WP Super Cache, şu anda web sitenizde önbelleğe almanın etkinleştirilmediğini size bildirecektir.
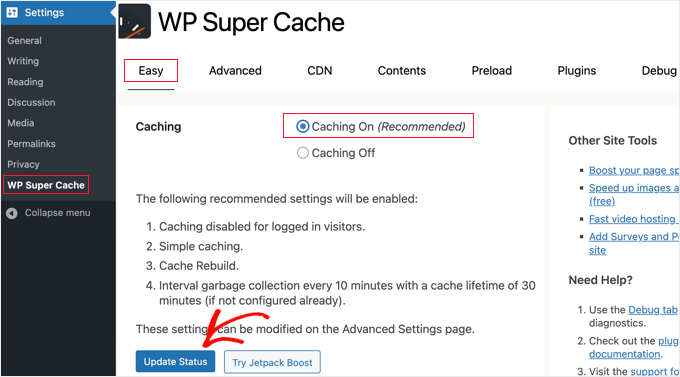
Önbelleği etkinleştirmek için Ayarlar ” WP Super Cache bölümüne gidin. Ardından, ‘Kolay’ sekmesinin altında, devam edin ve ‘Önbellekleme Açık’ seçeneğine tıklayın. Bunu yaptıktan sonra, ‘Durumu Güncelle’ düğmesine tıklayın.
Önbelleği açtıktan sonra, ‘Önbellek Test Cihazı’ bölümüne gitmeniz gerekecektir.
Oraya vardığınızda, çalışıp çalışmadığını kontrol etmek için ‘Önbelleği Test Et’ düğmesine tıklamalısınız.
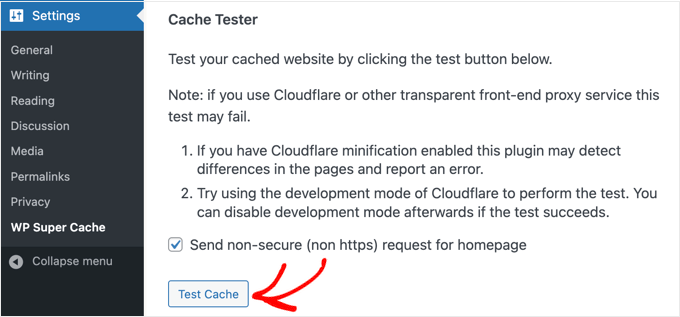
WP Super Cache WordPress sitenizi iki kez getirecek ve her iki sayfanın zaman damgalarını karşılaştıracaktır. Her iki zaman damgası da eşleşiyorsa, önbelleğe alma işlemi sitenizde çalışıyor demektir.
WP Super Cache Gelişmiş Kurulumu
WP Super Cache, tonlarca gelişmiş seçenekle birlikte gelen güçlü bir WordPress eklentisidir. Bu seçenekler sitenizin performansını daha da artırabilir ve eklentinin sitenizi nasıl önbelleğe alacağı konusunda size daha fazla kontrol sağlayabilir.
Önbelleğe Almayı Etkinleştir
WP Super Cache’i gelişmiş seçeneklerle kurmak için, WP Super Cache eklenti ayarlarındaki ‘Gelişmiş’ sekmesine gidin. Ardından, ‘Önbelleğe Almayı Etkinleştir’ onay kutusunu tıklayın.
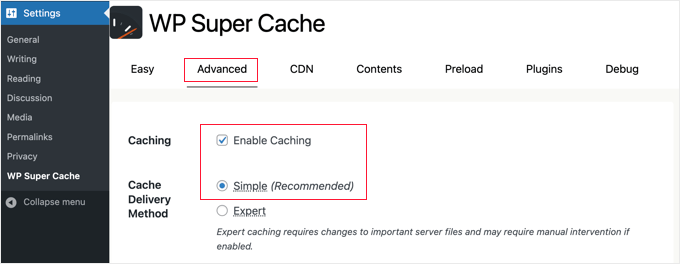
Önbelleğe almanın altında, ‘Önbellek Teslim Yöntemi’ için seçenekler göreceksiniz. Yeni başlayan biriyseniz ve sunucu dosyalarınızı düzenlemeye aşina değilseniz ‘Basit’ seçeneğini kullanmanızı öneririz.
Önbelleğe alma seçeneğinizi seçtikten sonra, ‘Durumu Güncelle’ düğmesine tıkladığınızdan emin olun.
WP Super Cache’te Sıkıştırmayı Etkinleştirin
Sıkıştırma, WP Super Cache’in önbelleğe alınmış dosyaları sıkıştırılmış dosyalar olarak sunmasını sağlayarak yükleme süresini iyileştirir. Bu dosyalar daha küçüktür ve tarayıcılar tarafından daha hızlı indirilebilir.
Sıkıştırmayı etkinleştirmek için, ‘Gelişmiş’ ayarlar sekmesindeki ‘Çeşitli’ bölümüne gidin ve ‘Sayfaları sıkıştırarak ziyaretçilere daha hızlı sunulmalarını sağlayın’ yazan kutuyu işaretleyin.
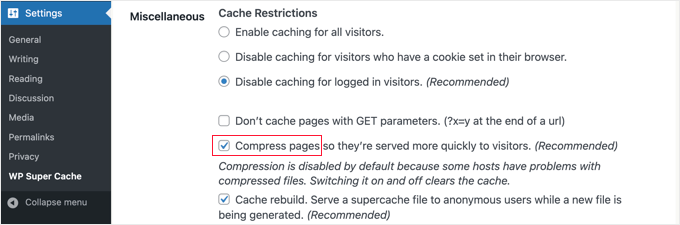
Değişikliklerinizi kaydetmek için bir kez daha ‘Durumu Güncelle’ düğmesine tıklayın.
Dinamik Önbelleğe Almayı Etkinleştir
Önbelleğe alma sırasında bir web sayfasının belirli bölümlerini dinamik tutmak istiyorsanız, WP Super Cache bunun için bir seçenek sunar.
Dinamik önbelleğe almayı etkinleştirmek, özellikle sık değişen içerik içeren sayfalarınız varsa, belirli durumlarda yararlıdır. Örneğin, dinamik önbelleğe almaya izin vererek reklam içeren sayfaları hızlandırabilirsiniz.
Bu seçeneği etkinleştirmek için ‘Gelişmiş’ bölümüne gidebilir ve ‘Dinamik önbelleğe almayı etkinleştir’ onay kutusunu tıklayabilirsiniz.
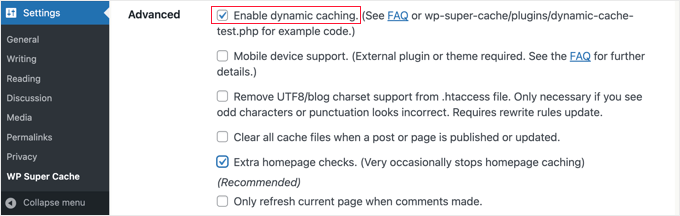
İşiniz bittiğinde değişikliklerinizi kaydettiğinizden emin olun.
Son Kullanma Süresi ve Çöp Toplamayı Ayarlama
WP Super Cache ayrıca önbelleğe alınan sayfaları sunucunuzdan silmek için son kullanma süresini ve sıklığını ayarlamanıza olanak tanır.
Başlamak için, yapılandırmak üzere ‘Gelişmiş’ sekmesi altındaki ‘Son Kullanma Süresi ve Çöp Toplama’ bölümüne kaydırmanız yeterlidir.
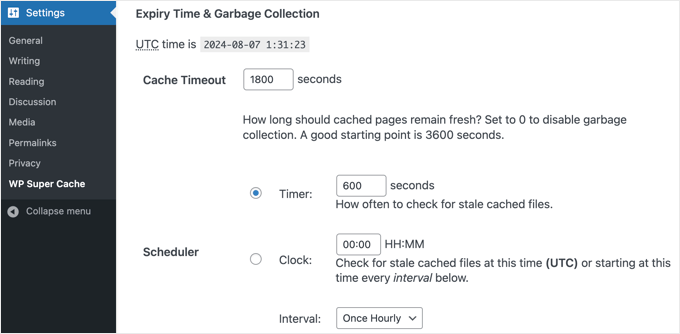
‘Önbellek Zaman Aşımı’ eklentiye önbelleğe alınan sayfayı kaldırmasını ve yeni bir önbellekleme yapmasını söyler. Eklenti bunu varsayılan olarak 1800 saniyeye ayarlayacaktır, bu da yüksek trafikli bir web sitesi için harikadır.
Ancak, çok fazla trafik almayan yeni bir web siteniz varsa, 3600 saniye iyi bir başlangıç noktasıdır.
Bunun dışında, eklentinin önbelleğe alınmış eski dosyaları kontrol etmesi ve kaldırması için bir zaman planlayabilirsiniz.
Seçimlerinizi yapmayı bitirdiğinizde, değişikliklerinizi kaydetmek için ‘Son Kullanma Tarihini Değiştir’ düğmesine tıklamanız gerekecektir.
Önbelleğe Alınmasını İstemediğiniz Sayfaları Belirtin
Varsayılan olarak, eklenti sitenizdeki tüm sayfaları önbelleğe alacaktır. Bu, önbellek dosyalarınızın boyutunu artırabilir ve daha fazla kaynak kullanabilir. Ancak WP Super Cache, önbelleğe alınmasını istemediğiniz sayfaları seçmenize olanak tanır.
Bu özelliği kullanmak için ‘Gelişmiş’ sekmesindeki ‘Reddedilen URL Dizeleri’ bölümüne gidebilirsiniz. Metin kutusuna, devam edin ve eklentinin önbelleğe almasını istemediğiniz sayfaların URL dizesini girin.
Örneğin, bir e-ticaret mağazanız varsa, ziyaretçilerin sık ziyaret etmediği sayfaları hariç tutabilir ve sunucu kaynaklarından tasarruf edebilirsiniz. Bunlar ödeme sayfası, hesap sayfası ve teşekkür sayfası olabilir.
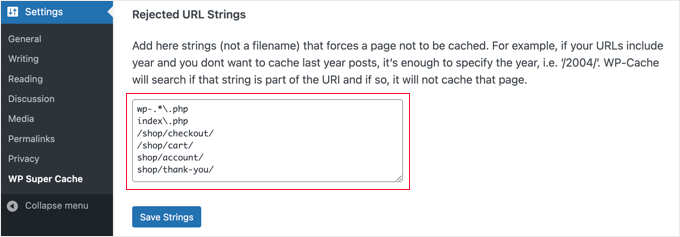
İşiniz bittiğinde, ‘Dizeleri Kaydet’ düğmesine tıklamayı unutmayın.
WP Super Cache’i CDN’inizle Çalışacak Şekilde Ayarlama
Web sitenizi hızlandırmak için bir İçerik Dağıtım Ağı (CDN) hizmeti de kullanıyorsanız, WP Super Cache’i onunla çalışacak şekilde yapılandırabilirsiniz. Aksi takdirde, bu bölümü güvenle atlayabilirsiniz.
CDN, farklı coğrafi konumlara dağıtılmış sunuculardan oluşan bir ağdır ve ziyaretçilerinize hızlı bir şekilde içerik ulaştırmanıza yardımcı olur. Daha fazla ayrıntı için neden bir CDN’e ihtiyacınız olduğuna dair bilgi grafiğimize göz atın.
İpucu: Kurulumu kolay ve ücretsiz bir CDN sağlayıcısı olduğu için Cloudflare kullanmanızı öneririz. WordPress sitenizde Cloudflare’in ücretsiz CDN’ini nasıl kuracağınıza ilişkin eğitimimize bakın.
WP Super Cache’i CDN’inizle çalışacak şekilde ayarlamak için, devam edin ve ayarlarınızdaki CDN sekmesine tıklayın. Ardından, ‘CDN Desteğini Etkinleştir’ seçeneğinin yanındaki kutuyu işaretleyin.
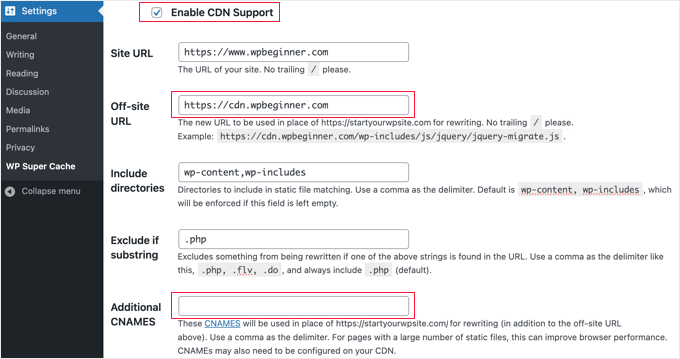
Ardından, ‘Site Dışı URL’nizi’ girmeniz gerekir. Bu, dosyalarınızın CDN’de depolandığı URL olan CDN’inizin ‘çekme bölgesi’dir.
Buradaki ayar CDN hizmetinize bağlıdır, ancak burada bazı ipuçları verilmiştir:
- Cloudflare kullanıyorsanız, bu alanı boş bırakmalısınız. WP Super Cache, Cloudflare’i otomatik olarak algılayacak ve onunla çalışacaktır.
- Farklı bir CDN hizmeti kullanıyorsanız, https://cdn.wpbeginner.com gibi bir şey girmelisiniz
.‘wpbeginner.com’ yerine web sitenizin alan adını yazdığınızdan emin olun. - Şüpheniz varsa, CDN hizmetinizde oturum açabilir ve ‘alan adı’, ‘CDN alan adı’ veya ‘CDN URL’ için hesap panosu ayarınızı kontrol edebilirsiniz.
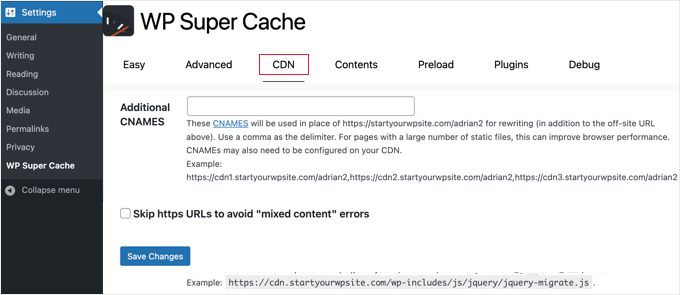
CDN’nizin birden fazla URL’si olduğunu biliyorsanız, bunları ‘Ek CNAMES’ alanına girebilirsiniz: http://cdn1.wpbeginner.com, http://cdn2.wpbeginner.com, http://cdn3.wpbeginner.com. Aksi takdirde, bu alanı boş bırakmalısınız.
Diğer ayarları varsayılan olarak bırakabilirsiniz. Son olarak, ‘Karışık içerik’ hatalarını önlemek için https URL’lerini atla’ yazan kutuyu işaretleyin ve ardından ‘Değişiklikleri Kaydet’ düğmesine tıklayın.
Artık web siteniz bir CDN’den statik içerik sunmaya hazırdır.
WP Super Cache ile Statik Bir Site Sunma
WP Super Cache’deki ön yükleme modu, tüm yazılarınız ve sayfalarınız için süper önbellek statik dosyaları oluşturmanıza ve statik bir web sitesi sunmanıza olanak tanır. Bu şekilde, birisi sitenizi ziyaret ettiğinde içeriğiniz hızlı bir şekilde yüklenecektir.
Süper önbellek statik dosyası, sunucu kaynaklarını korumaya, artık güncellenmeyen eski bir siteyi sunmaya ve yalnızca statik içerik sunarak site hızını artırmaya yardımcı olur.
Başlamak için WP Super Cache eklentisindeki ‘Ön Yükleme’ sekmesine gidin. Ardından, önceden yüklenmiş önbellek dosyalarının yenilenme zamanını ayarlayabilirsiniz.
Varsayılan olarak, eklenti bunu 600 dakikaya ayarlayacaktır, ancak her gün birden fazla makale yayınlıyorsanız süreyi azaltabilirsiniz.
WordPress sitenizin tamamını önceden yüklemenin biraz zaman aldığını ve sunucunuzun kaynaklarını çok fazla tükettiğini unutmayın. Önbelleği manuel olarak yenilemediğiniz sürece statik dosyalarınızın süresinin dolmasını istemiyorsanız 0 olarak bırakabilirsiniz.
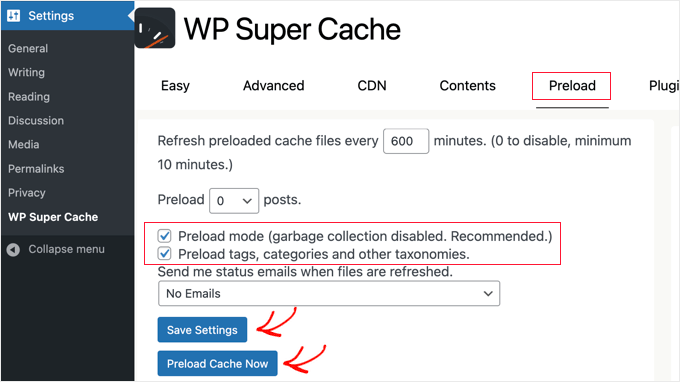
Bundan sonra, ‘Ön yükleme modu (çöp toplama devre dışı. Önerilen)’ kutularını işaretlediğinizden emin olun. Web sitenizdeki farklı etiketler, kategoriler ve diğer taksonomiler için ön yüklemeleri de etkinleştirebilirsiniz.
Eklenti ayrıca dosyalarınız her yenilendiğinde e-posta uyarıları almak için bir seçenek sunar. Varsayılan olarak, ‘E-posta Yok’ ayarını kullanacaktır, ancak açılır menüden bir seçenek seçerek bunu değiştirebilirsiniz.
İşiniz bittiğinde, devam edin ve ayarlarınızı kaydedin ve ardından ‘Önbelleği Şimdi Yükle’ düğmesine tıklayın.
WordPress Önbelleğe Alma Hakkında Uzman Kılavuzları
Umarız bu kılavuz WordPress blogunuzda WP Super Cache’i kurmanıza yardımcı olmuştur. WordPress önbelleğe alma ile ilgili diğer bazı makaleleri görmek isteyebilirsiniz:
- WordPress’te Leverage Browser Caching Uyarısı Nasıl Kolayca Düzeltilir
- WordPress’te Önbelleğinizi Nasıl Temizlersiniz (Adım Adım)
- Web Sitenizi Hızlandırmak için En İyi WordPress Önbellek Eklentileri
- LiteSpeed Cache vs WP Rocket – Hangisi Daha İyi?
- WordPress’te WP Rocket Nasıl Düzgün Kurulur ve Ayarlanır
- Yeni Başlayanlar İçin W3 Total Cache Nasıl Kurulur ve Ayarlanır
- WordPress Hızını ve Performansını Artırmak için Nihai Kılavuz
- WooCommerce Performansı Nasıl Hızlandırılır
If you liked this article, then please subscribe to our YouTube Channel for WordPress video tutorials. You can also find us on Twitter and Facebook.

 in 2024")


Anze
Hey; I have a question – so preload mode enabled does not deletes old cached files – but does that means then when preloaded files are refreshed, the old ones are deleted and replaced, or does it just adding files, which would mean space on server would eventually run out?
WPBeginner Support
When the page is preloaded a new time, the old preloaded version would be deleted and replaced.
Yönetici
James Omeke
Thanks so much . This was very helpful.
I got my website up and running now
WPBeginner Support
You’re welcome, glad our guide was helpful!
Yönetici
Mike Royden
Plug in installed, but can’t get past this;
Permalink Structure Error
A custom url or permalink structure is required for this plugin to work correctly. Please go to the Permalinks Options Page to configure your permalinks.
I have gone to the Permalinks Options Page to configure your permalinks, but can’t see where I’m going wrong. Going round in circles, please help. Thanks
WPBeginner Support
You would want to ensure your permalinks are not set to plain for that error. We recommend using the Post name structure.
Yönetici
Mike Royden
Sorted! Many thanks for your advice and taking the time to reply. Cheers.
Katherine
I’m trying to set up this plug in to get the best results, and I’m not tech-savvy at all. Your Wp advanced cache set up section is not the same as the current plugin advanced options.
WPBeginner Support
Thank you for letting us know, we will be sure to take a look into this and update our article when able.
Yönetici
Simon
I was able to speed up my homepage significantly but unfortunately it only worked for the homepage. The subpages like i.e. ‘Services’ are still really slow.
What could be the problem?
WPBeginner Support
You would want to run a speed test for that using our guide below to figure that out:
https://www.wpbeginner.com/beginners-guide/how-to-properly-run-a-website-speed-test-best-tools/
Yönetici
Rainey
Unable to activate the plugin. I get a warning message that a .php file already exists and I should manually delete it before using the plugin. Since I am not a techie I do not know where to go to delete the file. If you could put language in your update to the tutorial to guide us would be really helpful.
WPBeginner Support
For that error, you may want to follow our guide below:
https://www.wpbeginner.com/wp-tutorials/how-to-fix-destination-folder-already-exists-error-in-wordpress/
Yönetici
Paul
This post is dated. When will this post be updated? Would like to know the current status of WP Super Cache?
WPBeginner Support
Thank you for letting us know, we do not have a specific date that content will be updated but we will take a look into updating this article
Yönetici
Nic
Is there a way to export settings once you get done?
WPBeginner Support
At the moment WP Super Cache does not have a built-in option to export settings.
Yönetici
ShoaiB
Thank you for this Awesome Guide.
I’m using WP Super Cache (Version 1.7.0 ). In the above tutorial, many features are not included. plz, Update Post.
WPBeginner Support
Thank you for your request, we will look into updating the post
Yönetici
Christopher
not as easy as described…
A custom url or permalink structure is required for this plugin to work correctly. Please go to the Permalinks Options Page to configure your permalinks.
WPBeginner Support
Thank you for reminding us of that, we’ll be sure to look into updating the article for clarification.
Yönetici
Ana
Hello Support!
Thank you for all your work, I’m a complete newbie and without you, I don’t know how I’d manage.
I’m confused as regards what off-site URLs and CNames are, so I’m unable to fill in that in the form. Do I have to refer to somewhere on my page to find out or do I just create it my indicating something?
Just in case it affects somehow I’d like to inform that I run a multisite.
Thank you so much & hope you can help me,
Ana
WPBeginner Support
Hi Ana,
The off site URL is the URL of your CDN location and CNames are different pullzones you have created on your CDN server. If you are not using a CDN, then you don’t need to make any changes to these settings.
Yönetici
krishna
can i use this plugin for testing in localhost ??
i installed this plugin in localhost and in “Cache Contents” nothing cached
displaying this …
WP-Cache (0KB)
0 Cached Pages
0 Expired Pages
WP-Super-Cache (0KB)
0 Cached Pages
0 Expired Pages
is it because i can’t use cache plugin in localhost or some other issue ?
Hardik
There is nothing called MOD_REWRITE. Everything from that step seems completely different. Please update the tutorial.
Mike
No matter what settings I use Pingdom still gives me an F and says “The following cacheable resources have a short freshness lifetime. Specify an expiration at least one week in the future for the following resources:” and I see and “expiration not specified” message in the details. Am I missing a setting?
Akshay
Hi Team ,
Thanks for the amazing article .
I have installed WP Super Cache with cloudflare (newbie blogger).
Can you please help me, how can I integrate cloudflare with WP super cache .
I did not found any articles or vidoes for the same .
I thought of installing WP Total , but it has not releasedthe update for recent wordpress version 4.8.1
Thank You
Sumaiya
Hi, I wanted to speed up my site. I used this guide and customized the settings as you shown. But before installing this plugin I tested my site speed it was 4.20 sec. But after installing I check it was 6.78 sec. Why is it like this? please guide me well.
WPBeginner Support
Hi Sumaiya,
Please test it again. If the result persists, then deactivate the plugin.
Yönetici
Rajeev jaiswal
hello sir, I’m trying to integrate js and CSS code elements in twenty-seventeen WordPress theme. I use enqueue methods but it does not work, so suggest me to all about.
Sara
I just downloaded WP Super Cache and the “Advanced” Page doesn’t have the same setup (or some of the same options!) as your screenshot and instructions. Are those dates, or did I somehow end up with an older version of the plugin?
Carrie
Same here, my settings are different.
Abner
Hi guys – Thanks for sharing this. I am using wp super cache and my wordpress is 4.0.1. At first, i don’t have any problem. Until recently, having a problem. My post did not appear on my website. I tried to put the caching off and my post appear. After that, I put the caching on again. My workaround was after posting article to my website, I will put my caching off to appear the post in my website, then after a few minutes, I will put the caching to on.
Few weeks doing that, and now, when I put the caching on, my post will disappear again to my website. As of now, my caching is still off.
Thanks and hope you can help me.
WPBeginner Support
Hi Abner,
Seems like WP Super Cache is not clearing the cache when you publish new content. Please see our article on how to clear cache in WordPress.
Yönetici
Mark Layton
Hello Support,
Thank You for your help with this issue while trying to install WP Super Cache.
Here is a copy of issue :
Warning! Could not update /var/www/website/wp-config.php! WPCACHEHOME must be set in config file.
Warning! /var/www/website/wp-content/advanced-cache.php does not exist or cannot be updated.
1. If it already exists, please delete the file first.
2. Make /var/www/website/wp-content writable using the chmod command through your ftp or server software. (chmod 777 /var/www/website/wp-content) and refresh this page. This is only a temporary measure and you’ll have to make it read only afterwards again. (Change 777 to 755 in the previous command)
3. Refresh this page to update /var/www/website/wp-content/advanced-cache.php
If that doesn’t work, make sure the file /var/www/website/wp-content/advanced-cache.php doesn’t exist:
1. Open /var/www/website/wp-content/plugins/wp-super-cache/advanced-cache.php$wp_cache_file in a text editor.
2. Change the text CACHEHOME to /var/www/website/wp-content/plugins/wp-super-cache/
3. Save the file and copy it to /var/www/website/wp-content/advanced-cache.php and refresh this page.
Cannot continue… fix previous problems and retry.
Already use your Envira Gallery and WP Forms and those are fantastic.
Should I just use W3 Total Cache instead?
Thank You so much for your help.
Mark Layton
WPBeginner Support
Hey Mark,
You can try following the instructions shown in WP Super Cache. If you find them too complicated, then you can try W3 Total Cache. Good luck
Yönetici
sheikave Jhurreea
Initially my website was loading for under 8 seconds which is pretty bad. But using your tutorial I was able get 90/100 for desktop performance.
But the mobile platform it remained 74/100. Could you suggest some resources where I could look up too or what is your suggestion.
WPBeginner Support
Hey Sheikave,
Congrats! That’s impressive. You may also want to see our guide on how to fix render-blocking JavaScript and CSS in WordPress.
Yönetici