WordPress yönetici alanında temel resim düzenlemeyi nasıl yapacağınızı öğrenmek ister misiniz?
WordPress, herhangi bir görüntü düzenleyicinin yardımı olmadan görüntü boyutunu kırpmanıza, döndürmenize, çevirmenize ve ölçeklendirmenize olanak tanır. Bu özellikler, ana bilgisayarınızdan uzakta olduğunuzda ve hareket halindeyken resim yüklerken kullanışlıdır.
Bu makalede, WordPress’i görüntüleri kırpmanıza, döndürmenize, ölçeklendirmenize ve çevirmenize olanak tanıyan temel bir görüntü düzenleyici olarak nasıl kolayca kullanabileceğinizi göstereceğiz.
Temel Görüntü Düzenleme için Neden WordPress Kullanılmalı?
Yerleşik WordPress resim editörü, WordPress blogunuz için resimleri düzenlemenin süper kullanışlı bir yoludur. Herhangi bir ek yazılım veya WordPress eklentisi kullanmanıza bile gerek kalmayacak.
Görüntü düzenleyici ayrıca kullanıcıların farklı araçlar arasında gidip gelmek zorunda kalmadan basit düzeltmeler ve ayarlamalar yapmasına olanak tanıyarak çok zaman kazandırır.
WordPress ile resimlerinizi medya kütüphanesinden kolayca kırpabilir, döndürebilir, ölçeklendirebilir, boyutlarını değiştirebilir ve çevirebilirsiniz.
Örneğin, aşırı arka planı kaldırmak için bir görüntüyü kırpmak istiyorsanız, bunun için pahalı bir araç satın almak yerine WordPress görüntü düzenleyicisiyle bunu kolayca yapabilirsiniz.
Bunu söyledikten sonra, WordPress sitenizde temel resim düzenlemeyi nasıl kolayca yapabileceğinizi adım adım görelim.
Video Eğitimi
Videoyu beğenmediyseniz veya daha fazla talimata ihtiyacınız varsa, okumaya devam edin.
WordPress’te Temel Resim Düzenleme Nasıl Yapılır?
İlk olarak, WordPress medya kitaplığınıza bir görsel yüklemeniz gerekecektir.
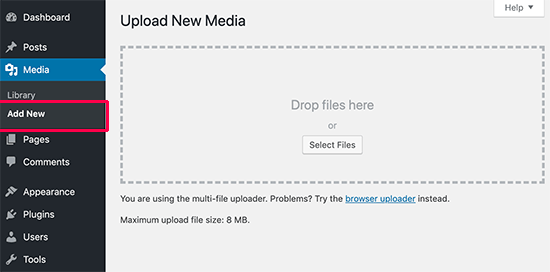
Bir yazı yazarken blok editörünü kullanarak veya WordPress yönetici kenar çubuğundan Medya ” Yeni Ekle sayfasını ziyaret ederek kolayca bir resim yükleyebilirsiniz.
Buradan, ‘Dosya Seç’ düğmesine tıklayın ve bilgisayarınızdan bir resim dosyası yükleyin.
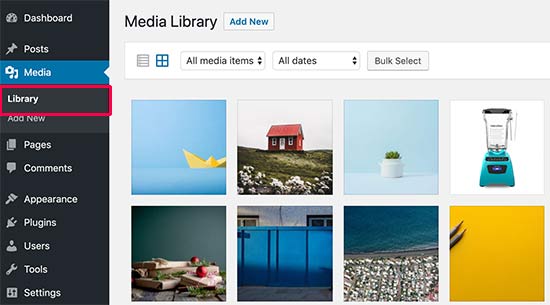
Bunu yaptıktan sonra, WordPress yönetici panosundan Medya ” Kitap lık sayfasına gidin.
Burada, WordPress web sitenize yüklediğiniz tüm resimler ekranda görüntülenecektir.
Şimdi, az önce yüklediğiniz resmi bulmanız ve üzerine tıklamanız gerekir.
Bu, görüntüyü bir açılır pencerede açacaktır. Şimdi sağ tarafta görüntü ayrıntılarını ve sol tarafta bir görüntü önizlemesini göreceksiniz.
Buradan, resmi yerleşik WordPress resim düzenleyicisi ile açmanın iki yolu vardır.
İlk seçenek, görüntü önizlemesinin altındaki ‘Görüntüyü düzenle’ düğmesine tıklamaktır. Bu, açılır pencerenin içinde görüntü düzenleyiciyi açacaktır. İkinci seçenek ise ‘Daha fazla ayrıntı düzenle’ bağlantısına tıklamaktır.
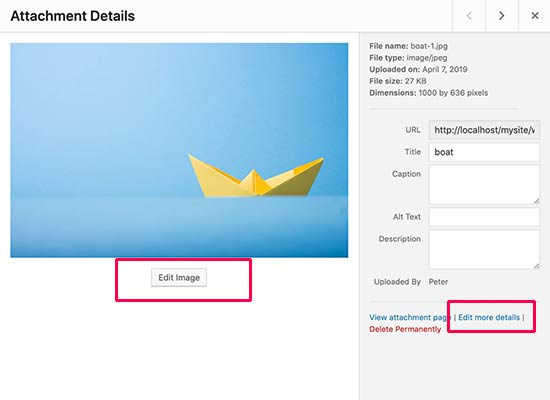
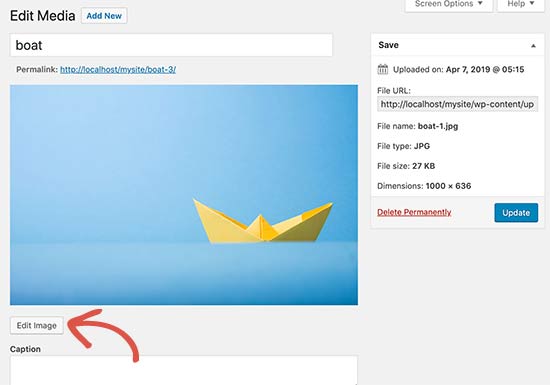
Bu bağlantıya tıkladığınızda sizi Medyayı Düzenle sayfasına yönlendirecektir.
Buradan, temel görüntü düzenleme araçlarını açmak için ‘Görüntüyü Düzenle’ düğmesine tıklamanız gerekir.
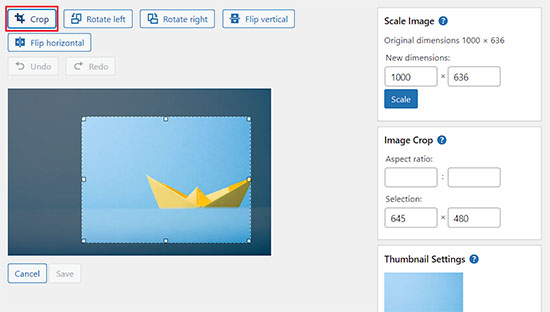
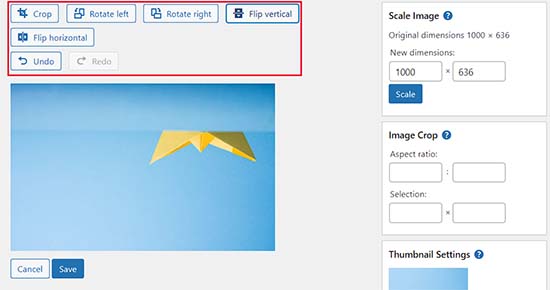
Bunu yaptığınızda, resminizin üstünde bazı düğmeler içeren bir araç çubuğu göreceksiniz. Sağ sütunda, görüntüyü yeniden boyutlandırmak için bir dizi seçenek de göreceksiniz.
Artık görüntüleri isteğinize göre döndürmek, çevirmek veya kırpmak için üstteki düğmeleri kolayca kullanabilirsiniz.
Örneğin, ‘Kırp’ düğmesine tıkladığınızda, orijinal görüntüden kırpılacak belirli alanı seçebilirsiniz.

Bunun dışında, görüntüleri saat yönünde ve saat yönünün tersine döndürmek için ‘Sola Döndür’ veya ‘Sağa Döndür’ düğmelerini kullanabilirsiniz.
Hatta farklı düğmeler kullanarak resimlerinizi isteğinize göre yatay veya dikey olarak çevirebilirsiniz.
Ayrıca, beğenmediğiniz değişiklikleri geri almak için Geri Al/Yinele düğmelerini kullanabilir veya geri almak için yineleyebilirsiniz.
Ardından, resminizi ölçeklendirmek istiyorsanız, tercih ettiğiniz resim boyutlarını sol sütundaki ‘Resmi Ölçeklendir’ meta kutusuna kolayca ekleyebilirsiniz.
Görüntü oranlarınızı korumak için bir görüntüyü kırpmadan önce bu seçeneği kullanmanızı öneririz.
WordPress’in yalnızca bir görseli küçültmenize izin verdiğini unutmayın. Bu, resimlerinizi olduklarından daha büyük yapamayacağınız anlamına gelir.
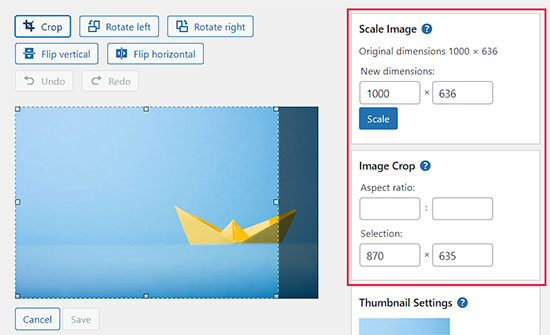
Bundan sonra, görüntünüz için belirli bir en boy oranını olduğu gibi tutmak istiyorsanız ‘En boy oranı’ seçeneğini de kullanabilirsiniz. Bu özellik yalnızca bir görüntüyü kırparken çalışır.
Ardından, sol sütundaki ‘Küçük Resim Ayarları’ bölümüne giderek bu değişiklikleri tüm resim boyutlarına mı, yalnızca küçük resme mi yoksa küçük resim hariç tüm resim boyutlarına mı uygulamak istediğinizi seçebilirsiniz.
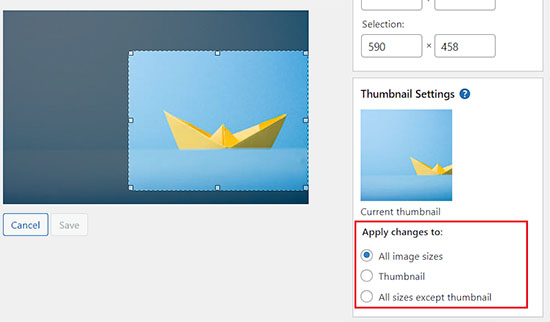
Yaptığınız değişikliklerden memnun olduğunuzda, değişikliklerinizi kaydetmek için ‘Kaydet’ düğmesine tıklamayı unutmayın.
WordPress şimdi değişikliklerinizi resme uygulayacak ve sunucunuzda yeni bir kopyasını oluşturacaktır.
Düzenlemeden Sonra Orijinal Görüntü Nasıl Geri Yüklenir
Düzenlenen görüntüden memnun değilseniz, orijinal sürüme kolayca geri dönebilirsiniz.
Görsel için Medyayı Düzenle sayfasını bir kez daha açın ve bu kez ‘Orijinal görseli geri yükle’ etiketli yeni bir meta kutusu göreceksiniz.

Devam edin ve meta kutusunu genişletmek için tıklayın. Bundan sonra, ‘Görüntüyü geri yükle’ düğmesine tıklayın.
WordPress şimdi orijinal resminizi geri yükleyecek ve siz de onu tekrar düzenleyebilecek veya olduğu gibi bırakabileceksiniz.
Bonus: WordPress’te Öne Çıkan Görselleri Toplu Düzenleme
Blog yazılarınıza eklediğiniz görselleri düzenlemenin yanı sıra, WordPress sitenizdeki öne çıkan görsel leri de toplu olarak düzenleyebilirsiniz.
Bunlar, gönderilerinizde küçük resim olarak kullanılan resimlerdir.

Örneğin, tüm görsellerinizi SEO için optimize etmek istiyorsanız veya web sitenizi yeniden markalaştırıyorsanız ve öne çıkan görsellerinizin bunları yansıtmasını istiyorsanız, her bir görseli düzenlemek enerjinizin ve zamanınızın çoğunu tüketecektir.
Ancak bu özellikli görselleri toplu olarak düzenleyerek tüm görsellerin uyumlu bir görünüme sahip olmasını sağlayabilir, zamandan tasarruf edebilir ve süreci kolaylaştırabilirsiniz.
Hızlı Öne Çıkan Görselleri kullanarak bunu kolayca yapabilirsiniz. Ayrıntılar için bir WordPress eklentisinin nasıl kurulacağına ilişkin eğitimimize bakın.
Etkinleştirmenin ardından, WordPress kontrol panelinden Öne Çıkan Görseller ” Genel Bakış sayfasını ziyaret edin ve ‘Seçili görseli yeni bir öne çıkan görsel olarak ayarla’ seçeneğini seçin.
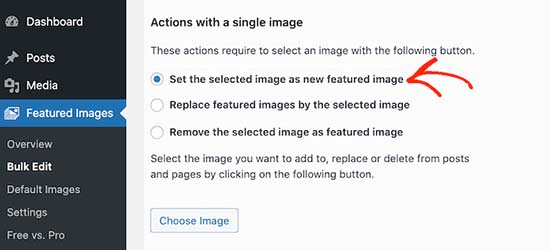
Bunu yaptıktan sonra, toplu düzenleme işlemi sırasında öne çıkan görsel olarak kullanmak istediğiniz görseli yüklemeniz yeterlidir. Daha sonra bu görseli düzenleyebilir ve değişikliklerin yalnızca belirli görsellere uygulanması için filtreler ekleyebilirsiniz.
Ayrıntılar için WordPress’te öne çıkan görsellerin toplu olarak nasıl düzenleneceğine ilişkin eğitimimize bakın.
Umarız bu makale WordPress yönetici alanında temel resim düzenleme işlemlerini nasıl yapacağınızı öğrenmenize yardımcı olmuştur. WordPress yazılarında blok yüksekliğinin ve genişliğinin nasıl değiştirileceğine ilişkin yeni başlayanlar için rehberimize ve fotoğrafçılar için en iyi WordPress temalarına ilişkin uzman seçimlerimize de göz atmak isteyebilirsiniz.
If you liked this article, then please subscribe to our YouTube Channel for WordPress video tutorials. You can also find us on Twitter and Facebook.


Jiří Vaněk
Is it possible to crop an image into a circle in wordpress, or do I need a plugin for that? I’m talking about a photo of a team member, where the face should be like a picture in the wheel. Can wp do it, or do I have to edit the image externally and upload the already cropped ones?
WPBeginner Support
To have the image in a circle it would normally be best to use an image editor to have it display how you want. Otherwise you would normally use CSS instead of image editing for what you want to achieve.
Admin
Jiří Vaněk
I understand, the CSS method didn’t occur to me, that’s why I solved it externally. CSS will be much faster for multiple images. Thank you for the advice.
Mrteesurez
You can use page builder like Seedprod or elementor to create a circular images, even these page builder usually has default template for team that already showed the images in circular form or that can be easily customized.
Jiří Vaněk
Hi Mrteesurez,
thank you for the advice. I use Elementor a lot so I will look into this feature. Because I need to create a portfolio of employees on one website, and circular images look much more elegant to me. I’ll definitely look into it.
Patrick
I am a web designer, I have over 100 installs of wordpress over many different servers and NOT ONE of those installs does wordpress crop an image.
Its so frustrating to have to load photos in photoshop just to make a tiny change and then upload.
WPBeginner Support
You may want to ensure you don’t have a specific theme or plugin across those sites that would be preventing you from using the crop tool
Admin
TimGS
I am using wordpress 4.9.5 on an IPad mini. When I go to scale an image all the selections work until I press the scale button; the image is cropped but I only get about 1/2 the width of the original crop selection. Anyone see this problem?
Justin
Thanks for sharing! Just used the crop tool. Very handy!!
Steven Denger
This does not work at all and is not in the least bit helpful. WordPress is the most horrid place to try to work with images. My featured images in my posts list pages are all cut – cropped out and only show a partial photo. I have tried all kinds of plugins that wp beginner has suggested and none of them work at all. I use the Awaken theme and the author will not respond to fix his worthless theme. The site that I am working on will have to be deleted because of wordpress being such a horrid cms to work with.
TimGS
A year later, I am experiencing your problem on an iPad mini….but not on a PC
Zohaib
Cropping function doesn’t work anymore.
Any plugin that can do image cropping in media library?
Peter Willianson
I dont get that menu when i click edit image.. i am using bluehost.. i cant do anything to the images that are loading rotated 90 degrees.. fyi they not rotated when loaded to other sites.. this is specific to wordpress bluehost
amy
There is no edit button on my end. Looks like I’m not the only one.
Linda Strader
Does this work with the free version? I see NO options to edit photos, and all the ones I uploaded are rotated the wrong way.
Ra.
Does nt work, anymore. It is just not there.
Matteo
Hi,
when you scale an image from the media library, does it automatically reduce the quality of the image in every post/page where it was previously published or is it necessary to load it again in each single page to speed up the site?
Cheers
mike cooper
Anyone had the issue when you rotate an image you get the following. ‘Could not load the preview image. Please reload the page and try again.’??
I have GD and ImageMagick installed..
flip works ok just not rotate and crop.
Craig Canapari
I just discovered this yesterday. However, it seems to scale it on the fly as GTMetrix said that scaling images (that I had scaled using the tools above) was slowing down my page loading. I turned off Photon to be sure it wasn’t a cached image and also cleared my cache.
Jason
I must admit, the editing of photographs is not very clear. I thought I had it all sorted and when I published it the image was huge and you only saw our eyes. I understand that the scale image has to be adjusted, but come on guys, we are all not up to speed with stuff like that. We want idiot proof editing and there are plenty on the market that do such. please have a look at it or you will lose this customer very quickly
Ron Strilaeff
I’ve played with that edit feature, but cannot figure out how to get it to lock the aspect ratio. Let’s say I want a contributor to upload an image and then crop the part to show as the thumbnail before saving it. The numbers under “Image Crop -> Aspect Ratio” don’t seem to do anything and sometimes won’t let me enter any values. What are they for anyways?
Ed Power
This crop does not work when I try to save the crop as thumbnail only – I want to show a cropped image as a thumbnail in a gallery page, and then show the full version when launched in the lightbox. Is this possible
IgorPureta
Thanks for the good post. So far I figured out what you have written. What I can’t manage is following:
My featured image is 960×332 to fit into home page slider. When I crop the picture I want to save cropped part as thumbnail so I can include it in the post. That is all managed by WP itself. What I didn’t mange is to change thumbnail from default crop to the crop I selected. No matter how many times I have cropped, saved, deleted or whatever is possible I can’t complete it. Could you please, explain it. Thank you!
KreativTheme
I already use a few times this feature, but today I learned a few more tricks. Thanks a lot for the great tut …
Roderick Dunne
Nice feature – never noticed it.
One thing to ponder: Does it save an updated version of the file which is then referenced (i.e. if the edited pic is in a post)?
I’d just be concerned that page load times could be increased if an inserted image in a WP post needs to be dynamically cropped/edited for correct display on each users page request.
Otto
@Roderick Dunne The final result replaces the existing image. It doesn’t need to perform those operations every time.
AnTo
Well, it’s nice but if more functions can be provided for photo editing that would be amazing! However, it might consumes more web space or usage if it goes!
petebocken
Crop has never worked for me. The Save button never works. It’s always grayed out. Actually in your post screenshot, the save button is also grayed out. Anyone else get crop to work?
Otto
@petebocken The save button is greyed out because the selection is still being made. Make your selection, then click the “Crop” button in the upper right to confirm the selection. Then it will perform the crop and you can save the result.
BarryFuchs
@Otto@petebocken
I had been confused by this, too, and though that crop either didn’t work on my installation or only worked for certain file types (ie jpg but not png). The process of selecting first and clicking “Crop” second seems opposite of other programs that I’ve used, such as Acrobat and Picasa. But, at least I know how to do it now!
Chris Howard
Yeah, it’s ridiculous that I have google to find out how to do something that should be intuitive
Otto
@petebocken Sorry, I meant upper left, of course.
Brad Dalton
Only used it once but will probably have another go next time. Prefer using MS picture manager but nice tutorial. Pics look good
dunfalach
@tonyjalicea When I see WP, my first thought is Wordperfect. #youmightbeanoldnerdif
tonyjalicea
@dunfalach Well that’s a blast from the past.
Moe_NYC
@tonyjalicea Whoa. How did I miss that? I had no clue. You think you know someone. WordPress, she’s so sexy!
tonyjalicea
@Moe_NYC Indeed!
itravelwithlove
@wpbeginner how to upload 2 or more photos at once in a New Post? Pls reply.
wpbeginner
@itravelwithlove Just drag two photos or as many you want at once in the drag drop media uploader.
itravelwithlove
@wpbeginner that’s what I do, but after that, I still need to upload it in my post one by one.
wpbeginner
@itravelwithlove You mean insert it in your post one by one.. Yes because most of the time you insert images at different spots.
wpbeginner
@itravelwithlove if you want to add all images one after another perhaps in a gallery format then u can do this: http://t.co/JOVHrsVQ
itravelwithlove
@wpbeginner I was able to try that too. Thank you for the help!☺