
WordPress sitenize bir iletişim formu eklemek, ziyaretçilerinizle etkili iletişim kurmanın anahtarıdır. Örneğin, bir iletişim formu müşterilerin ürün ve hizmetlerinizle ilgili soru veya geri bildirimleriyle size ulaşmasını sağlayabilir.
Bununla birlikte, WordPress yerleşik bir iletişim formu aracına sahip değildir, bu da kodlamaya aşina değilseniz sinir bozucu olabilir.
Neyse ki, herhangi bir teknik beceri gerektirmeden iletişim formları eklemenin basit bir yolu var. Doğru araçlarla web sitenizin ihtiyaçlarına uygun bir formu kolayca oluşturabilirsiniz. Bu, e-postanızı manuel olarak paylaşma sorununu çözer, bu da spam ve cevapsız sorulara yol açabilir.
Popüler araçları araştırdıktan sonra, WPForms kullanarak bir iletişim formu oluşturmanın en kolay yaklaşım olduğunu gördük. Bu kılavuzda, her adımda size yol göstererek hızlı bir şekilde işlevsel ve çekici bir iletişim formu oluşturmanızı sağlayacağız.
")
Neden WordPress İletişim Formuna İhtiyacınız Var?
Neden bir iletişim formuna ihtiyacınız olduğunu merak edebilirsiniz; insanların bana e-posta gönderebilmesi için e-posta adresimi web siteme ekleyemez miyim?
Bu, yeni başlayanlar için çok yaygın bir sorudur çünkü bir iletişim formu eklemenin kodlama bilgisi gerektirdiğinden korkarlar.
Neyse ki, sıfır kodlama bilgisiyle WordPress web sitenize bir iletişim formu eklemek için bir WordPress eklentisi kullanabilirsiniz.
Aşağıda, bir iletişim formunun e-posta adresinizi bir sayfaya yapıştırmaktan daha iyi olmasının en önemli 3 nedeni yer almaktadır.
- SpamKoruması – Spam botları düzenli olarak mailto: e-posta adresi etiketi için web sitelerini tarar. E-posta adresinizi web sitesinde yayınladığınızda, çok sayıda spam e-posta almaya başlayacaksınız. Öte yandan, iletişim formunuz iletişim formu spam’lerini engelleyebilir ve neredeyse tüm spam e-postaları durdurabilir.
- Tutarlı Bilgi – E-posta gönderirken, insanlar her zaman ihtiyacınız olan tüm bilgileri size göndermezler. Bir iletişim formu ile kullanıcıya telefon numarası, bütçe, proje ayrıntıları ve daha fazlası gibi tam olarak hangi bilgileri istediğinizi söyleyebilirsiniz.
- Zaman Kazandırır – İletişim formları hayal edebileceğinizden çok daha fazla şekilde zaman kazanmanıza yardımcı olur. Tutarlı bilgilerin yanı sıra, kullanıcıya atması gereken sonraki adımları söylemek için form onaylarını da kullanabilirsiniz. Örneğin, size birden fazla soru göndermemeleri için bir video izleyebilir veya yanıt almak için 24 saate kadar bekleyebilirsiniz.
Bunu akılda tutarak, WordPress’te nasıl kolayca bir iletişim formu oluşturacağınızı adım adım göstereceğiz. İşte bu kılavuzda inceleyeceğimiz tüm adımlar:
- Step 1. Choosing the Best WordPress Contact Form Plugin
- Step 2. Install a Contact Form Plugin on WordPress
- Step 3. Create a Contact Form in WordPress
- Step 4. Configuring WordPress Form Notification and Confirmations
- Step 5. Adding WordPress Contact Form on a Page
- Step 6. Adding WordPress Contact Form in a Sidebar
- Bonus Tip: Taking Your WordPress Contact Form to the Next Level
- Video Tutorial
Hemen başlayalım!
1. Adım En İyi WordPress İletişim Formu Eklentisini Seçme
Yapmanız gereken ilk şey bir WordPress iletişim formu eklentisi seçmektir.
Aralarından seçim yapabileceğiniz birkaç ücretsiz ve ücretli WordPress iletişim formu eklentisi olsa da, sitemizde WPForms kullanıyoruz ve bunun piyasadaki en iyi seçenek olduğuna inanıyoruz.
Aşağıda WPForms’un en iyisi olduğunu düşünmemizin üç nedeni yer almaktadır:
- Mevcut en acemi dostu iletişim formu eklentisidir. Sadece birkaç tıklamayla kolayca bir iletişim formu oluşturmak için sürükle ve bırak oluşturucuyu kullanabilirsiniz.
- WPForms Lite %100 ücretsizdir ve basit bir iletişim formu oluşturmak için kullanabilirsiniz (6 milyondan fazla site kullanıyor).
- Daha güçlü özellikler için hazır olduğunuzda, WPForms Pro‘ya yükseltebilirsiniz.
Daha fazla bilgi edinmek için detaylı WPForms incelememize bakabilirsiniz.
Artık iletişim formu eklentisine karar verdiğimize göre, devam edelim ve sitenize yükleyelim.
Adım 2. WordPress’e İletişim Formu Eklentisi Kurun
Bu eğitimde, ücretsiz ve kullanımı kolay olduğu için WPForms Lite kullanacağız.
WordPress panonuza giriş yaparak ve Eklentiler ” Yeni Ekle bölümüne giderek bu eklentiyi sitenize yükleyebilirsiniz.
Ardından, arama alanına ‘WPForms’ yazın ve ‘Şimdi Yükle’ düğmesine tıklayın.
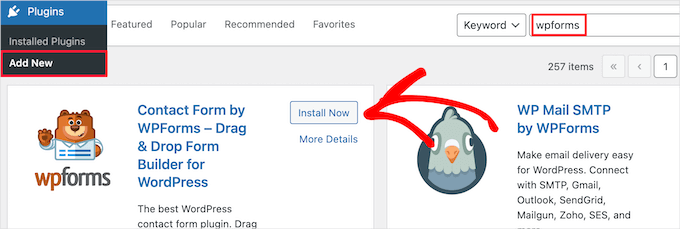
Bu, eklentiyi sitenize otomatik olarak yükleyecektir.
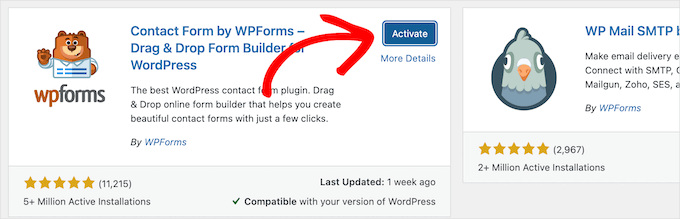
Ardından, ‘Etkinleştir’ düğmesine tıklayarak eklentiyi etkinleştirmeniz gerekir.
Eklentiler menüsünü göremiyorsanız veya daha ayrıntılı talimatlar istiyorsanız, WordPress eklentisi yükleme kılavuzumuza göz atabilirsiniz.
Adım 3. WordPress’te İletişim Formu Oluşturun
Artık WPForms’u etkinleştirdiğinize göre, WordPress’te bir iletişim formu oluşturmaya hazırsınız.
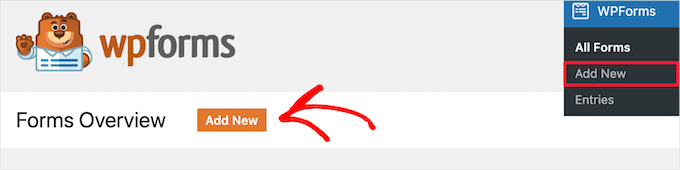
Bunu yapmak için, WordPress yönetici panelinizde WPForms ” Tüm Formlar bölümüne gidin ve ardından ‘Yeni Ekle’ düğmesine tıklayın.
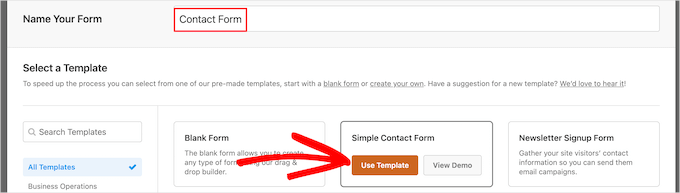
Bu, WPForms sürükle ve bırak form oluşturucu şablon kitaplığını açacaktır. İletişim formunuza bir ad vererek başlayın ve ardından iletişim formu şablonunuzu seçin.
Bir şablon seçmek için üzerine gelmeniz ve ‘Şablonu Kullan’ düğmesine tıklamanız yeterlidir.
WPForms Lite, aralarından seçim yapabileceğiniz 20’den fazla ücretsiz form şablonuyla birlikte gelir. Bunları istediğiniz her tür iletişim formunu oluşturmak için kullanabilirsiniz.
Bu örnek için, devam edeceğiz ve ‘Basit İletişim Formu’ şablonunu seçeceğiz. Otomatik olarak Ad, E-posta ve Mesaj alanlarını ekleyecektir.
Düzenlemek için form alanlarından herhangi birine tıklayabilirsiniz.
Bir form alanına tıkladığınızda, sol tarafta değişiklik yapabileceğiniz bir ‘Alan Seçenekleri’ paneli açılacaktır.
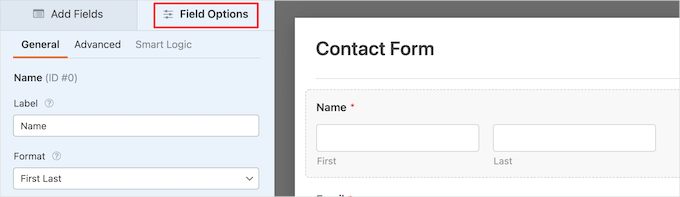
Sıralamayı değiştirmek için alanları sürükleyip bırakmak üzere farenizi de kullanabilirsiniz.
İşte bir örnek:

Yeni bir alan eklemek istiyorsanız, sol kenar çubuğundaki mevcut alanlardan birini seçmeniz yeterlidir.
Formunuzun üzerine sürükleyebilir veya üzerine tıklayabilirsiniz; otomatik olarak formunuza eklenecektir.

Formunuzu özelleştirmeyi tamamladığınızda, ‘Kaydet’ düğmesine tıkladığınızdan emin olmak isteyeceksiniz.
Adım 4. WordPress Form Bildirimi ve Onaylarını Yapılandırma
Artık iletişim formunuzu oluşturduğunuza göre, form bildirimi ve form onayı seçeneklerini doğru şekilde yapılandırmanız önemlidir.
Form onayı, web sitesi ziyaretçinizin formu gönderdikten sonra gördüğü şeydir. Bu basit bir teşekkür mesajı, indirilebilir PDF’leri yüklediğiniz bir sayfa veya istediğiniz herhangi bir şey olabilir.
Form bildirimi, birisi WordPress blogunuzdaki iletişim formunu gönderdikten sonra aldığınız e-postadır.
Onay mesajını özelleştirmek için, form oluşturucunun içindeki ‘Ayarlar’ sekmesine ve ardından ‘Onaylar’ sekmesine tıklayalım.
Zaten varsayılan bir teşekkür mesajı var.
Ancak, isterseniz bunu ‘Onay Mesajı’ kutusunda özelleştirebilirsiniz.

Başarılı bir form gönderiminden sonra bir mesaj göstermek yerine kullanıcıları yeniden yönlendirmek istiyorsanız, ‘Onay Türü’ açılır menüsünden ‘URL’ye Git’i seçin.
Ardından, kullanıcıları yönlendirmek istediğiniz URL’yi de gireceksiniz.

Burada herhangi bir değişiklik yaparsanız, ‘Kaydet’ düğmesine tıkladığınızdan emin olun.
Bundan sonra, form bildirim ayarlarının doğru olduğundan emin olabilirsiniz. Aynı ‘Ayarlar’ menüsünden ‘Bildirimler’ sekmesine tıklamanız yeterlidir.
WPForms’un en iyi yanı, varsayılan ayarların yeni başlayanlar için ideal olmasıdır. Bildirim ayarlarına gittiğinizde, tüm alanlar dinamik olarak önceden doldurulacaktır.

Bildirimler, varsayılan olarak, sitenizi oluştururken ayarladığınız yönetici e-postasına gönderilir.
Özel bir e-posta adresine göndermek istiyorsanız, bunu değiştirebilirsiniz. Bildirimi birden fazla e-postaya göndermek istiyorsanız, her bir e-posta adresini virgülle ayırmanız yeterlidir.
‘E-posta Konu Satırı’ form adınızla önceden doldurulur. ‘Gönderen Adı’ alanı otomatik olarak kullanıcınızın adı ile doldurulur.

Form sorgusuna yanıt verdiğinizde, kullanıcınızın iletişim formunu doldurmak için kullandığı e-posta adresine gidecektir.
Burada değişiklik yaparsanız ‘Kaydet’ düğmesine tıklamayı unutmayın.
Form e-postanızı birden fazla kişiye veya farklı departmanlara göndermek istiyorsanız, birden fazla alıcısı olan bir iletişim formunun nasıl oluşturulacağına ilişkin kılavuzumuza göz atmak isteyebilirsiniz.
Form e-postalarını almakta sorun yaşıyorsanız, WordPress’in e-posta göndermeme sorunlarını nasıl çözeceğinize ilişkin kılavuzumuza bakabilirsiniz.
Adım 5. Sayfaya WordPress İletişim Formu Ekleme
Artık WordPress iletişim formunuzu yapılandırdığınıza göre, bunu bir sayfaya eklemenin zamanı geldi.
Bunu mevcut bir iletişim sayfasına ekleyebilir veya WordPress’te yeni bir sayfa oluşturabilirsiniz.
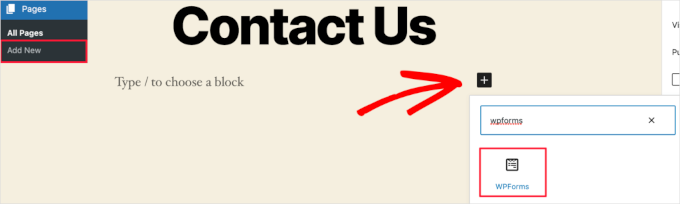
Yeni bir iletişim formu sayfası oluşturmak istiyorsanız Sayfalar ” Yeni Ekle ‘ye gidin ve ardından sayfanıza bir ad verin.
Formu bir sayfaya eklemek için WPForms bloğunu kullanacağız. Basitçe ‘Plus’ blok ekle düğmesine tıklayın ve ‘WPForms’u arayın.
Ardından, ‘WPForms’ bloğuna tıklayabilirsiniz.
WPForms bloğu artık sayfanızın içerik alanında görünecektir.
Daha önce oluşturduğunuz formu seçmek için açılır menüye tıklamanız gerekir.

WPForms, iletişim formu önizlemenizi düzenleyicinin içine yükleyecektir. Şimdi formunuzu kaydetmek için ‘Yayınla’ veya ‘Güncelle’ düğmesine tıklayabilirsiniz.
Daha fazla ayrıntı için WordPress’e form yerleştirme hakkındaki kılavuzumuzu incelemek isteyebilirsiniz.
Şimdi, formu çalışırken görmek için web sitenizi ziyaret edebilirsiniz. İşte örnek bir WordPress iletişim sayfasında formun nasıl göründüğü:

Sayfaya yalnızca iletişim formunu eklemek istediyseniz, burada işiniz bitti. Tebrikler.
Bununla birlikte, WPForms ayrıca bir WordPress iletişim formu kısa kodu ile birlikte gelir. Bunu WPForms ” Tüm Formlar ‘ı ziyaret ederek ve ardından kısa kodu formunuzun yanına kopyalayarak kullanabilirsiniz.

Ardından, tek yapmanız gereken eklemek istediğiniz sayfayı açmak ve ‘Artı’ blok ekle düğmesine tıklamak ve ‘Kısa kod’u aramaktır.
Ardından, ‘Kısa kod’ bloğuna tıklayalım.

Ardından, yukarıda kopyaladığınız kısa kodu kutuya yapıştırın.
Bundan sonra, ‘Güncelle’ veya ‘Yayınla’ya tıklayabilirsiniz ve iletişim formunuz tıpkı yukarıdaki gibi web sitenizde yayınlanacaktır.

Kısa kodlar hakkında daha fazla bilgi edinmek için WordPress’te kısa kod ekleme hakkındaki nihai kılavuzumuzu görmek isteyeceksiniz.
Adım 6. Kenar Çubuğuna WordPress İletişim Formu Ekleme
WPForms ayrıca, iletişim formunuzu bir kenar çubuğuna veya WordPress temanızdaki diğer widget’a hazır alanlara eklemek için kullanabileceğiniz bir WordPress iletişim formu widget’ı ile birlikte gelir.
Bunu yapmak için Görünüm ” Widget ‘lar bölümüne gitmeniz ve ardından formunuzu eklemek istediğiniz widget alanındaki ‘Artı’ blok ekle simgesine tıklamanız gerekir.

Ardından, ‘WPForms’ için arama yapalım.
Ardından, kenar çubuğunuza eklemek için ‘WPForms’ bloğuna tıklayabilirsiniz.

Bundan sonra, açılır menüden iletişim formunuzu seçmeniz gerekir.
Bu, formunuzun önizlemesini otomatik olarak yükleyecektir.

Ardından, değişikliklerinizi kaydetmek için ‘Güncelle’ düğmesine tıklayalım.
Artık sitenizi ziyaret ederek iletişim formunuzu kenar çubuğunuzda veya başka bir widget alanında canlı olarak görebilirsiniz.

Widget’lar hakkında daha fazla bilgi edinmek için WordPress’te widget ekleme ve kullanma kılavuzumuza bakın.
Bonus İpucu: WordPress İletişim Formunuzu Bir Sonraki Seviyeye Taşıyın
WPForms Pro, basit iletişim formları oluşturmanın yanı sıra, ihtiyacınız olan her tür WordPress formunu hızlı bir şekilde oluşturmak için kullanabileceğiniz 2.000’den fazla önceden hazırlanmış form şablonuyla birlikte gelir.
Koşullu mantık, anketler ve anketler, elektronik imza toplama, form terk etme, coğrafi konum verileri, özelleştirilebilir kupon kodları ve çok daha fazlası gibi güçlü özellikler vardır.
Ayrıca, Stripe, PayPal, Authorize.net ve Square aracılığıyla çevrimiçi ödemeleri kolayca kabul etmenizi sağlar. WPForms’un ücretsiz sürümü bile Stripe ödemelerini toplamanıza izin verir.
İş akışınızı kolaylaştırmanıza yardımcı olmak için Google E-Tablolar, HubSpot ve daha fazlası gibi binlerce pazarlama ve işletme aracıyla entegre olduğundan bahsetmiyorum bile.
WPForms ayrıca, yüksek maliyetler olmadan sitenize etkileşimli formlar eklemenize olanak tanıyan form açılış sayfaları, konuşma formları, potansiyel müşteri formları ve hesap makinesi formları gibi form özelleştirme araçları da eklemiştir.

Daha fazla ipucu için WordPress’te nasıl daha etkileşimli formlar oluşturabileceğinize dair rehberimize göz atabilirsiniz.
İletişim formu hataları mı yaşıyorsunuz? Bırakın WPBeginner Pro Services bunları çözsün! İletişim formu hatalarını hızla gidermek ve düzeltmek için uygun fiyatlı Acil WordPress Desteği sunuyoruz. Zamandan tasarruf edin, içiniz rahat etsin ve müşterilerinizin size ulaşabilmesini sağlayın. WordPress Destek Hizmetlerini bugün planlayın!
Video Eğitimi
Eğer izleyerek öğreniyorsanız, video eğitimimiz hoşunuza gidecektir:
Umarız bu makale WordPress’te basit bir iletişim formu oluşturmanıza yardımcı olmuştur. Ayrıca en iyi çevrimiçi form oluşturuculara ilişkin uzman seçimlerimizi veya WordPress formlarını kullanmaya yönelik nihai kılavuzumuzu görmek isteyebilirsiniz.
If you liked this article, then please subscribe to our YouTube Channel for WordPress video tutorials. You can also find us on Twitter and Facebook.


Shamli
Hi, I’ve done all the steps as mentioned above, but I cannot see the Contact page when I preview.
Please help me to solve.
Thank you.
WPBeginner Support
Hi Shamli,
You need to edit the page, insert the form, and then click on the preview button. Your contact form will only appear on the page where you insert the form.
Admin
Brenda
HI – We are using this contact form and it’s fine but I would like to add Captcha and, more importantly, some text that can be overwritten in the message box. There is a local company with a very similar name so we are constantly receiving messages which relate to this other company. We want to have some text, that has to be overwritten, to reiterate what our company is to try and reduce these messages. Is this possible?
Brenda Donovan
I redid the form and rechecked the add recaptcha on the confirmation settings and it worked this time. I had done it before but somehow didn’t take.
now on to the mail problem. thanks
safi
sir how can i know which email system notify or receive message i did everything but don,t which i will receive the email from client i am beginner with wp
WPBeginner Support
Hi Safi,
Please see how to fix WordPress not sending emails issue
Admin
Yamin Kamboh
Thank you, was really helpful.
Sarah Zubair
So how do I access the library of media (if I’ve an option of attaching some files in my WP forms) then where do they all get stored?
WPBeginner Support
Hi Sarah,
By default, the user-uploaded files are stored in the WPForms folder inside the Uploads directory of your site.
If you’d prefer to upload the files to the WordPress Media Library, click on the File Upload field in the form builder. Then, under Advanced Options, check the box next to Store file in WordPress Media Library.
For more details see this guide.
Admin
marypeter
This is truly helpful. I can say it is my first time to leave a review in any website. The information you have provided has prompted me to do this. Thank you a thousand times!!
Eston
Hi
how do i set it up that i recieve emails in Gmail, and be able to reply to customers right there in Gmail.com?
WPBeginner Support
Hi Eston,
You can go to settings section of any form and click on the confirmation tab. From here you can add any email address where you want to be notified.
Admin
Cathy
I found this very helpful in setting up, however, after completion I ran a test, so did a friend of mine, I cannot figure out why we are not receiving the email tests sent from the web site? Although I’ve gone through the steps a second time to be sure all was correctly set up, I am not receiving messages from the web site, I hope you can assist with constructive suggestions to aid in problem solving, much appreciate the assistance…
Lori Jo
I am very new, easily confused! Regarding the assigned admin email address in my WP blog site, can that actually be used to receive messages from the contact form? I think the address looks more professional and it would be nice to have all site messages responding back to the actual site instead of an outside email like my Gmail. I did a test and I could not find the reply, installed Flamingo and I did see it but there is no reply option like regular email.
Please let me know, thanks!
Ron Isaac
Thanks, this was a great help to me!
Yoshi
I’m looking to build my own contact form plugin because the contact forms in the market I’ve tried slow down my site. Is this the best alternative?
Srinivas Goud
What is the easiest way to add products in wp
Shirley
Thank you so much! Your help saved my hours of banging my head against the wall.
Eslam Tolba
Hi,
Is there a way to add onClick code for the submit button for WpForms lite?
Thanks
gigi
hi, i have key in my email address in the notification but i’m yet to get any notification from my email even though i have done few testing.. how do i solve this matter? please guide, thanks
Al Kadam
I have contact form plugin installed but customization is very limited and the code is too long and complicated. Now I plan to copy a simpler .php code and install it myself. is it better to do it this way? is there security issue accessing the .php file from the page where the contact form is placed?
Ashley
Hi, I have tried several different forms and this keeps happening. Whenever I go to the contact page, under the title it says “>contact”. I can remove the word “contact” by removing the page title, but that little carrot ( > ) is still there. how do I get rid of that? Thanks.
Joe Tittiger
The mail does not arrive from this form.
Is there a video on how WP handles email so that I can fix this?
Keith
Thanks guys, a real easy process that let me set up my first contact form in like 10 minutes; tested and works
Dave
Hello. I’ve had wpforms set up for a couple weeks and have tried to send to it from two other email accounts, from two separate login locations….but I’ve yet to receive an email to my admin email account. Please help.
WPBeginner Support
Hi Dave,
Please take a look at our guide on how to fix WordPress not sending email issue. If that doesn’t help, then please contact WPForms support and they’ll be able to help you fix it.
Admin
olx
Hello
i tried inserting form after creating it but on the add page the form did not insert. my wordpress seems to be limited and cant add and form. please help
pratima Shrivastav
Hi,
I have created the Wp form as mentioned but when I test it out I am receiving any email notifications. i have turned on the notifications by clicking on email Notification section of the form. Am I missing any other settings? Please guide me to this
WPBeginner Support
Hi Pratima,
Please see our article on fixing WordPress not sending email issue.
Admin
Yvonne
I have set up the form, just like it was explained, but it isn’t showing up on the page I told to add the form.
Rodrigo
Hello, is it possible to use html / css in forms construction?
WPBeginner Support
Hi Rodrigo,
Yes, you can add HTML and custom CSS with WPForms.
Admin
david
Can I export this contact form to an Excel file?
Rebecca Yurkanin
WP forms is super easy to set up, but DOES NOT work. I tried several times to send an email to myself. It worked once! The other 20 times did not. I went back and tried to change things around. It still did nothing. I am familiar with shortcodes, so that wasn’t the problem. And never saw a recaptcha. And wpforms doesn’t even have a contact form to fill out so I can contact them! What a joke!
WPBeginner Support
Hi Rebecca,
To fix the email issue, please take a look at our guide on how to fix WordPress not sending email issue.
If you are using the free version of the plugin, then you can ask for support on the plugin’s support page on WordPress.org. If you are using the paid version of the plugin then you can contact support on plugin’s website.
Hope this helps.
Admin
Brenda
My blog isn’t even launched yet. I have a Coming Soon Page. I have been working on getting a Contact Form to appear for what seems like hours. I had added a new Contact Page on my menu. I saved the code on my Contact Page. Published. And, The Contact Form is not showing up when I live preview Contact on my primary menu. I’m following your tutorial. This seems so easy, and yet…not so much! Does this work with Genesis child? I’ve tried WPForms and Contact Form. I don’t know what I’m doing wrong. Since I’m a newbie, I’m having trouble with menu + page connection and menu category drop downs. This blog setup is more difficult than I thought. Any advice?
zelda zerafa
When I go on SETTINGS it looks different to your video.
I get 3 tabs : General, Integrations and System Info as follows:
General > Form Styling/ Email/Re Captcha/Validations
Integrations > Integrate Constant Contact with WP forms
System info
I have no idea what to fill in for Validations and Email.
Under validations there are also two mysterious fields : Number and Confirm Value
Please help!
WPBeginner Support
Hey Zelda,
The screen you are viewing is for the plugin settings. Click on WPForms » All Forms and then edit a form or go to WPForms » Add New to launch the WPForms’ form builder interface. There you will see a screen like the screenshot above with a Settings tab. These settings are specific to the form you are creating.
Admin
MAINUDDIN
When i instal wpforms another page not working only wpforms page is showing
WPBeginner Support
Hi,
Can you please share the link of your website? You can also contact WPForms support.
Admin
Maciej
Hi,
Is it possible to add a simple text to the form like: “The file must be max 2mb”?
Saumya
Please help me to resolve the issue of email,i am not getting e-mail notification.
Myri
Is this setup (Form plugin) recommended for creating a form with ~500 entries per month where users upload images + complete payments. Eg. Now I am using contact form 7 plus cc7 paypal addon to create a “submit your images + pay” type form. Is this sustainable or is it better to use a professional form builder service?
Catherine O
Thanks for this. Easy to follow!
Dock
excellent blog, very rich in content and correctly thought out, personally I found
here much interesting and useful…..Well! let know my friend as well.
Heather Pooley
I followed this tutorial and I got the contact form working. But when I tried to send a test email through it to my blog email address from my personal one, it didn’t get to me. Any advice on how I can fix this?
WPBeginner Support
Hi Heather,
Please see our guide on how to fix WordPress not sending email issue.
Admin
Prats
Unable to add contact form as sidebar. Already created form using WPforms, added to WordPress widgets (Appearance-widgets) but unable to see the form on page (But getting the title form the form on the sidebar widget area). Tried several times, so frustrated, Can you help ?
FYI, I am using live composure and beaver page builder to design page.
Thanks in advance
WPBeginner Support
Hi,
Try adding a form to a post or page to see if it appears correctly there.
Admin
Kathy Broyles
Hi! created the form and linked the page – works great! but… when i do a test and hit submit, I get this:
how do I fix that?
thanks,
Kathy
Kathy Broyles
think I’ve got it!
WPBeginner Support
Hi Kathy,
You are seeing this error because you have set an invalid email as the from email address in your form settings. You can fix it by adding a valid email address.
Admin
Calli Jacobs
Hello,
For some reason, the shortcode doesn’t work, and the “add form” button doesn’t, either. It just gives me the shortcode in both “text” and “visual.” What am I doing wrong?
Asking you because I used the suggested plugin.
WPBeginner Support
Try to deactivate all other WordPress plugins on your site and then test. If it works, then probably a plugin on your site is causing the conflict.
Admin
Roxanne
Thank you, this was super helpful!
Joe Andrews
How long does it take for the wpforms contact me plugin to work? I set it up on my wordpress site and the submit appears to work and the reply message appeared as expected. I have tested it 3 times (now an hour later on the last one) and have yet to receive any of the notices. I tried it first to the admin, and then changed it to my regular email. 0-3 have been received. I have checked the spam folder.
WPBeginner Support
Hi Joe,
If you are using the PRO version of WPForms, then you can go to WPForms » Entries to confirm that the message you submitted using contact form was actually submitted.
In most cases it is the problem with how your WordPress hosting provider handles emails generated from WordPress. Please take a look at our guide on how to fix WordPress not sending email issue.
Admin
Ediwin
Thanks for sharing.
stephen thomas
how do I use the same form but know what page it has come from automatically. I want to design a simple form and have custom made a few for every page I place it on. I’d rather it just emailed me and somewhere tells me ‘came from contact us page’ or ‘enquiry came from price list page’
Kevin
Hello thanks for the post. Is there away to change the font color? The font is black and our web page, thus you can’t see the words.
Thanks
WPBeginner Support
Hi Kevin,
Please see this guide to learn how to change colors and style your form.
Admin
The Mayflower
This is awesome information. Thank you so so much.
Neil Hanes
I’m brand new to blogging and this guide is fantastic! Thank you. I have a couple of follow up queries:
– If I fill in a custom email address, can I respond to the inquiry through my website? If so, how?
– Is there any way to change the font of the form to be more in line with my website theme? I’m thinking maybe I just want to unbold the title and field headings.
Thanks
Neil
WPBeginner Support
You can respond to emails using an email service. Yes you can use custom CSS to adjust fonts and styles.
Admin
Alicia
After building up the contact form, (yes, i did add the email address for notification) do not receive any notification. I had trouble with Contact Form 7 so I am now trying WPForms and it shows the same problem! How to make WPForms work? Thx.
WPBeginner Support
Please see our guide on how to fix WordPress not sending email issue.
Admin
Saher
From:domain name [mailto:info@domain name]
Sent: Sunday, May 15, 2016 4:53 AM
To: info@domain name
Subject: Contact from domain name
Name : XYZ
Email :]xyz@gmail.com
Message :This is testing email
Hi ,
when I used short code of contact form & send testing email to check I got email with 1st paragraph . I don’t need this info can you help how can I stop it ?
WPBeginner Support
We are not sure we understand your question. The first part is added by your email client. It shows you where this email message is coming from.
Admin
Harsha
I installed. I filled info in the form to test it and clicked “sumbit”. It said “Thank you, will be in touch with you” And nowhere it appeared in the mail. Where to see that info???
WPBeginner Support
Please see Step 4: Configuring Form Notification and Confirmations in the article. By default the plugin will send email to the admin address provided in WordPress settings, you can add more email addresses in the notifications.
If you still don’t receive email, then please take a look at our guide on how to fix WordPress not sending email issue.
Admin
Harsha
I have set up email using go daddy C panel. Is it same for WordPress also? Or Do I have to setup a different admin email id in WordPress? Please guide me.
However I have included all email ids in the notification settings separated by commas (Cpannel id & personal gmail id)
But nowhere I received any mail regarding the info I filled in the contact form for testing purpose.
Also, I went through the link “how to fix WordPress not sending email issue” and installed Gmail SMTP it didn’t work either. I tried troubleshooting by configuring port with 587 (with TLS encryption), 465 (with SSL encryption). 25 with TLS first and then SSL. Nothing worked.
Lesley Jackson
Hi,
This all looks very useful but when I want to use some of this I can’t seem to find it on my admin site. I wanted to create a contact form but can’t find any way to add a new plug in. Are these tips and suggestions just for people who have a self hosted WordPress blog?
WPBeginner Support
Yes, these are just for people using self hosted WordPress blog. Please see our guide on the difference between self hosted WordPress.org vs free WordPress.com blog.
Admin
jo dewberry
Thank you so much. I am new to blogging and your step by step information was easy to understand and I installed my Contact plug in first time.
WPBeginner Support
Glad you found it helpful.
Admin
Jayne Bodell
Thanks for the information. I installed the form, easy peasy.