
Facebook, yaklaşık 3 milyar aktif kullanıcısıyla dünyanın en büyük sosyal medya sitelerinden biridir. Blog yazılarınızı Facebook’ta paylaşarak sitenize daha fazla ziyaretçi çekebilir ve daha fazla sayfa görüntülenmesi elde edebilirsiniz.
WPBeginner’da sosyal medyanın gücünü anlıyor ve ürünlerimizi, hizmetlerimizi ve yeni makalelerimizi Facebook’ta sürekli olarak tanıtıyoruz. Bu, trafik çekmemize, etkileşimi artırmamıza ve işimizin büyümesini desteklememize yardımcı oluyor.
Bu makalede, her yeni WordPress blog yazısı yayınladığınızda otomatik olarak Facebook’a nasıl gönderi göndereceğinizi göstereceğiz.
WordPress Yazılarını Neden Otomatik Olarak Facebook’ta Paylaşmalısınız?
Hedef kitlenizle iletişim halinde kalmanın e-posta listesi oluşturmak ve düzenli e-posta bülteni göndermek gibi pek çok yolu vardır. Yine de Facebook gibi sosyal medya sitelerinin devasa kullanıcı tabanını görmezden gelemezsiniz.
En büyük sosyal medya sitesi olan Facebook, WordPress web siteniz için büyük bir trafik kaynağı olabilir.
Güçlü bir takipçi kitlesi oluşturmak için Facebook kitlenizle etkileşim içinde olmanız önemlidir. Bu, yorumları yanıtlamak, içerik paylaşmak ve Facebook’ta düzenli güncellemeler yayınlamak anlamına gelir.
Bu çok zor olabilir, bu nedenle başlamanıza yardımcı olmak için WordPress için eksiksiz bir sosyal medya hile sayfası hazırladık. Ayrıca sosyal medya faaliyetlerinizi otomatikleştirerek zamandan ve emekten tasarruf edebilirsiniz.
Bununla birlikte, her yeni WordPress gönderisi yayınladığınızda Facebook’a nasıl otomatik olarak gönderi gönderebileceğinizi görelim.
İki farklı yöntem paylaşacağız, tercih ettiğiniz yönteme doğrudan atlamak için aşağıdaki hızlı bağlantıları kullanabilirsiniz:
Yöntem 1: Uncanny Automator Kullanarak WordPress’ten Facebook’a Otomatik Olarak Gönderi Gönderme (Yeni Gönderiler)
Facebook’a otomatik olarak gönderi göndermenin en iyi yolu Uncanny Automator kullanmaktır. Piyasadaki en iyi WordPress otomasyon eklentisidir ve size zaman kazandıracak, daha iyi bir kullanıcı deneyimi sağlayacak ve işinizi büyütecek güçlü iş akışları oluşturmanıza olanak tanır.
Daha da iyisi, Google Drive, Slack, Asana, Facebook ve daha fazlası dahil olmak üzere 185’ten fazla eklenti, uygulama ve hizmetle entegre olur.

Bu kılavuzda, Uncanny Automator’ın Pro sürümünü kullanacağız.
Not: Facebook’ta kullanmanız için size 1.000 kredi veren ücretsiz bir Uncanny Automator ek lentisi de vardır, böylece satın almadan önce eklentiyi deneyebilirsiniz. Bu kredileri kullandıktan sonra, Facebook’a otomatik olarak göndermeye devam etmek için bir Pro hesaba veya daha yüksek bir hesaba yükseltmeniz gerekecektir.
Ücretsiz eklentiyi kullanıyorsanız adımlar çoğunlukla aynı olacaktır.
İlk olarak, Uncanny Automator eklentisini yüklemeniz ve etkinleştirmeniz gerekir. Daha fazla ayrıntı için, bir WordPress eklentisinin nasıl kurulacağına ilişkin adım adım kılavuzumuza bakın.
Etkinleştirmenin ardından, Uncanny Automator’ın ücretsiz sürümünü de yüklemeniz istenecektir. Eklentinin bu hafif sürümü Pro plan için temel olarak kullanılır.
Etkinleştirmenin ardından Automator ” Ayarlar sayfasını ziyaret edin ve lisans anahtarınızı ‘Uncanny Automator Pro lisans anahtarı’ alanına girin.

Bu bilgileri Uncanny Automator web sitesindeki hesabınızda bulabilirsiniz.
Bu işlem tamamlandıktan sonra, ‘Lisansı etkinleştir’ düğmesine tıklayın.
Facebook Sayfanızı Uncanny Automator’a Bağlama
Facebook için otomatik bir iş akışı oluşturmadan önce, Facebook sayfanızı Uncanny Automator’a bağlamanız gerekir.
Bu bağlantıyı yapmak için Automator ” Uygulama Entegrasyonları sayfasını ziyaret edin ve sol sütundan ‘Facebook Sayfaları’ sekmesine geçin.
Burada, ‘Facebook hesabını bağla’yı seçin.

Bu düğmeye tıkladıktan sonra, Facebook hesabınıza giriş yapabileceğiniz bir açılır pencere görünecektir. İki faktörlü kimlik doğrulamayı etkinleştirdiyseniz, Facebook’u Uncanny Automator’a bağlamak için bu ek kontrolü de geçmeniz gerekecektir.
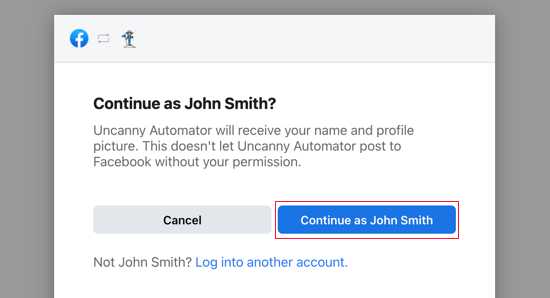
Giriş yaptıktan sonra Facebook, Uncanny Automator’a adınıza ve profil resminize erişim izni vermek isteyip istemediğinizi soracaktır. Bunu yapmaktan memnunsanız, ‘Farklı devam et’ düğmesine tıklayın.
Ardından, Uncanny Automator’ın Facebook’ta gönderi paylaşmasına izin vermek isteyip istemediğiniz sorulacaktır.
Devam edebilir ve ‘Devam’a tıklayabilirsiniz.

Bunu yaptıktan sonra, Uncanny Automator kontrol paneline geri yönlendirileceksiniz.
Şimdi Facebook hesabınıza bağlı olan tüm sayfaları göreceksiniz. Bunlar Uncanny Automator’ın otomatik olarak gönderi yapabileceği sayfalardır.

Uncanny Automator’dan Facebook’a Otomatik Olarak Gönderi Gönderme
Şimdi, her yeni WordPress blog yazısı yayınladığınızda otomatik olarak bir Facebook durumu yayınlayacak bir tarif oluşturmaya hazırsınız.
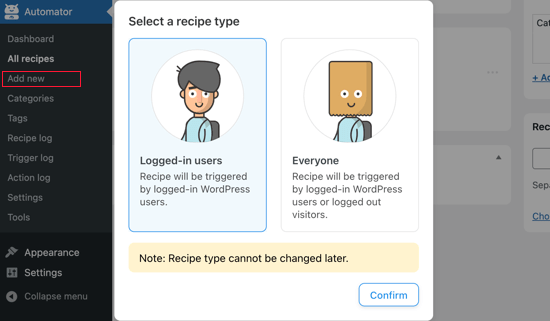
WordPress panonuzda Automator ” Yeni ekle bölümüne gitmeniz yeterlidir
Şimdi ‘Oturum açmış’ bir tarif mi yoksa ‘Herkes’ tarifi mi oluşturacağınızı seçebilirsiniz. Bu tarif için devam edin ve ‘Oturum açmış kullanıcılar’ı seçin ve ardından ‘Onayla’ düğmesine tıklayın.
Ardından, ‘Başlık’ alanına yazarak tarife bir isim verebilirsiniz.
Bu sadece referans içindir, bu yüzden istediğiniz her şeyi kullanabilirsiniz.

Bundan sonra, eylemi tetikleyecek koşulu tanımlamalısınız.
Her WordPress blogu yayınladığımızda Facebook’ta yayınlamak istiyoruz, bu nedenle ‘Bir entegrasyon seçin’ altındaki ‘WordPress’e tıklayın.

Şimdi WordPress web sitenizde kullanabileceğiniz tüm tetikleyicileri göreceksiniz.
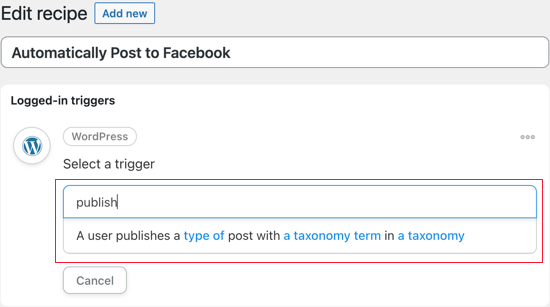
‘Yayınla’ ifadesini aramalı ve ‘Bir kullanıcı bir taksonomide taksonomi terimi içeren bir gönderi türü yayınlar’ adlı tetikleyiciyi seçmelisiniz.
Bu örnekte, Facebook’u yalnızca bir sayfa değil, bir gönderi yayınladığımızda güncellemek istiyoruz. Bunu göz önünde bulundurarak, ‘Gönderi Türü’ açılır menüsünü açın ve ‘Gönderi’yi seçin.
Daha sonra ‘Taksonomi’ ayarlarını değiştirerek belirli bir kategoriden veya etiketten gönderileri paylaşıp paylaşmayacağınıza karar verebilirsiniz.
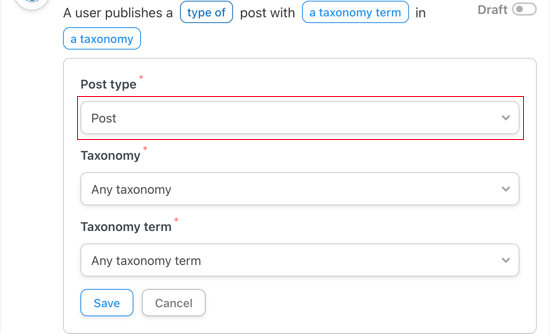
Değişikliklerinizi kaydetmek için ‘Kaydet’e tıklamayı unutmayın.
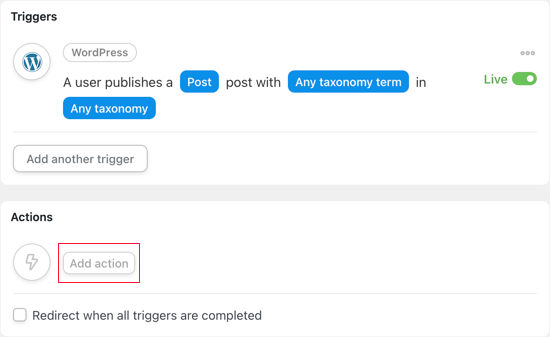
Ardından, Uncanny Automator’ın her gönderi yayınladığınızda gerçekleştireceği eylemi seçmeniz gerekecek. ‘Eylem ekle’ düğmesine tıklayarak başlayın.
Uncanny Automator artık kullanabileceğiniz tüm entegrasyonları gösterecek. Örneğin, WordPress’te yeni bir gönderi yayınladığınızda otomatik olarak tweet atmanızı sağlayan bir entegrasyon var.
Facebook’ta yayınlamak istediğimiz için, devam edin ve ‘Facebook Sayfaları’ düğmesine tıklayın.

Şimdi tüm farklı Facebook eylemlerini göreceksiniz.
Gönderilerinizde öne çıkan bir görsel varsa, ‘Gönderiyi görselle yayınla’ seçeneğini seçmek iyi bir fikirdir. Ancak, Facebook gönderilerinize bir görsel eklemek istemiyorsanız, bunun yerine ‘Gönderiyi bir Facebook sayfasında yayınla’ seçeneğini belirleyebilirsiniz.

Birden fazla Facebook sayfanız varsa, ‘Facebook Sayfası’ açılır menüsünü kullanarak gönderi yapmak istediğinizi seçin.
Bundan sonra, göndermek istediğiniz durumu ‘Mesaj’ kutusuna yazarak oluşturabilirsiniz.
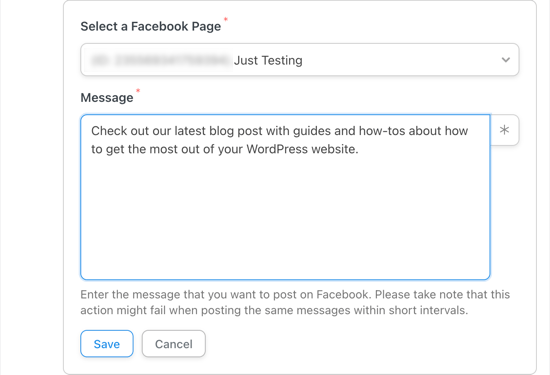
Durumu yazarken, belirteçleri kullanarak mesaja gönderi başlığını ve URL’yi eklemeniz gerekecektir. Uncanny Automator durumunuzu yayınladığında, bu belirteçleri gönderideki gerçek bilgilerle değiştirecektir.
Bir belirteç eklemek için ‘*’ düğmesine tıklayın.

Ardından, ‘Bir kullanıcı bir Gönderi yayınlıyor…’ seçeneğinin yanındaki oka tıklayın.
Bu size gönderi için tüm farklı simgeleri gösterir.

Facebook durumunuza herhangi bir belirteç ekleyebilirsiniz.
Ancak, insanların blog gönderisini ziyaret edebilmesi için genellikle ‘Gönderi Başlığı’ ve ‘Gönderi URL’si’ seçmek isteyeceksiniz.

Eyleminiz olarak ‘Görsel içeren bir gönderi yayınla’yı seçtiyseniz, Uncanny Automator’a bu görseli nerede bulabileceğini bildirmeniz gerekecektir.
‘Resim URL’si veya Ortam kitaplığı Kimliği’ alanını bulun ve ‘*’ düğmesine tıklayın.

Ardından, ‘Bir kullanıcı bir gönderi yayınlıyor…’ tetikleyicisini genişletmek için tıklayın.
Burada, ‘Öne çıkan görsel URL’sini gönder’ seçeneğine tıklayın.

Eylemin nasıl ayarlandığından memnun olduğunuzda, ‘Kaydet’e tıklamayı unutmayın.
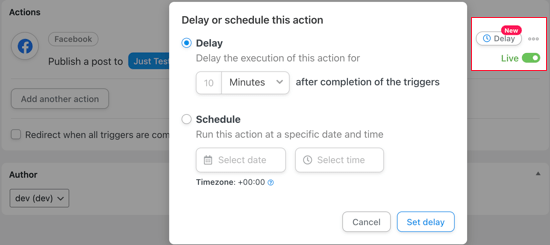
Bu noktada, Uncanny Automator’ın blogu yayınladığınız anda Facebook’a göndermemesi için bir gecikme eklemek isteyebilirsiniz.
Bunu yapmak için, farenizi ‘Gönderiyi şurada yayınla…’ eyleminin üzerine getirin ve göründüğünde ‘Ertele’ seçeneğine tıklayın.

Şimdi, Uncanny Automator eyleminin bir gecikmeden sonra mı yoksa belirli bir tarih veya saatte mi tetikleneceğini seçebilirsiniz.
Bu, hedef kitlenizin çevrimiçi olma olasılığının en yüksek olduğu zamanlarda Facebook’ta yayın yapmanıza olanak tanır.
Artık tetikleyiciyi ve eylemi ayarladığınıza göre, tarifi yayınlamanın zamanı geldi.
Bunu yapmak için, ‘Taslak’ anahtarını tıklayarak ‘Canlı’yı göstermesini sağlayın.
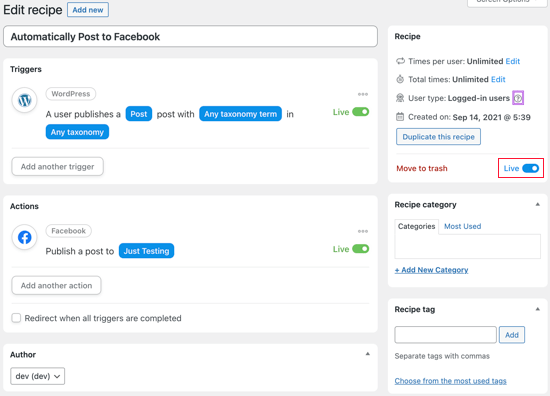
Tarif yayınlandıktan sonra, Uncanny Automator her gönderi yayınladığınızda yeni bir Facebook durumu yayınlayacaktır.
Test sitemizde yeni bir blog yazısı yayınladık ve yazı Facebook sayfamızda bu şekilde göründü.

Facebook durumunda doğru küçük resim görünmüyorsa, WordPress’te yanlış Facebook küçük resmi sorununu nasıl çözeceğinize ilişkin kılavuzumuza bakabilirsiniz.
Video Eğitimi
Daha çok görsel öğrenen biriyseniz, WordPress’ten Facebook’a otomatik olarak nasıl gönderi yapılacağına ilişkin YouTube eğitimimize göz atmak isteyebilirsiniz:
Yöntem 2: ClickSocial Kullanarak WordPress’ten Facebook’a Otomatik Olarak Gönderi Gönderme (Tüm Gönderiler)
WordPress’ten Facebook’a otomatik olarak gönderi göndermenin bir başka yolu da ClickSocial kullanmaktır. Piyasadaki en iyi sosyal medya zamanlayıcısı ve posteri.
ClickSocial’ı doğrudan WordPress kontrol panelinden Facebook, Instagram ve Twitter için sosyal medya gönderileri oluşturmak ve planlamak için kullanabilirsiniz.
ClickSocial ile, eski WordPress gönderilerini otomatik olarak Facebook’ta düzenli olarak paylaşmak için canlandırma kampanyaları da ayarlayabilirsiniz.
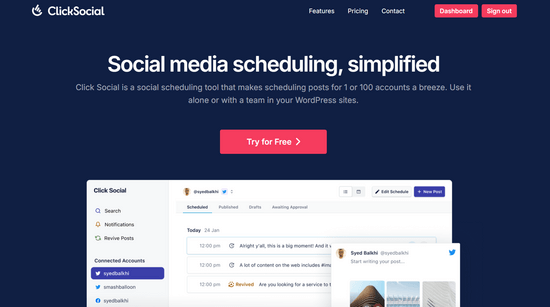
Başlamak için ClickSocial web sitesini ziyaret edin ve bir hesap için kaydolun.
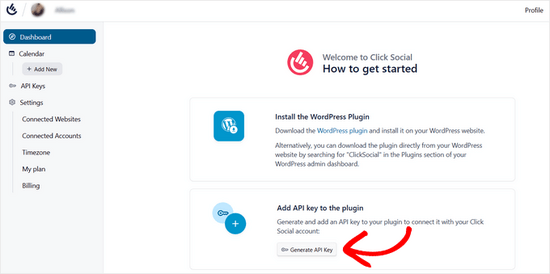
Bir hesabınız olduğunda, ücretsiz ClickSocial eklentisini yüklemeniz ve etkinleştirmeniz gerekir. Yardıma ihtiyacınız varsa, WordPress eklentisi yükleme hakkındaki eğitimimize bakın.
Eklentiyi etkinleştirdikten sonra, ClickSocial web sitesindeki kontrol panelinize geri dönün. Buradan, ‘API Anahtarı Oluştur’ düğmesine tıklamanız gerekir.
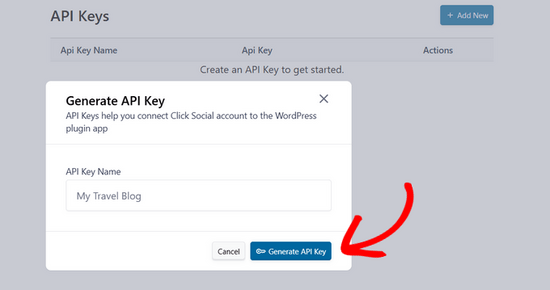
Bir sonraki sayfada, ‘Yeni Ekle’ düğmesine tıklayın.
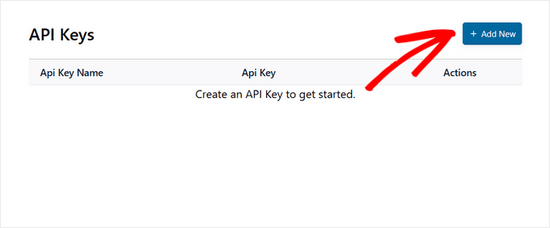
Bu, API anahtarınız için, örneğin web sitenizin adı gibi bir ad girebileceğiniz bir açılır pencere açacaktır. Ardından, ‘API Anahtarı Oluştur’a tıklayın.
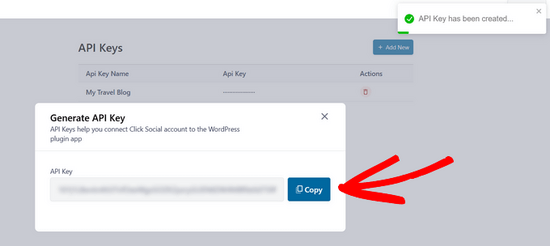
API anahtarınız şimdi oluşturulacaktır. WordPress sitenize bağlanmak için gerekli olduğundan bu anahtarı güvende tutmayı unutmayın.
Devam edin ve ‘Kopyala’ düğmesine tıklayın ve web sitenize geri dönün.
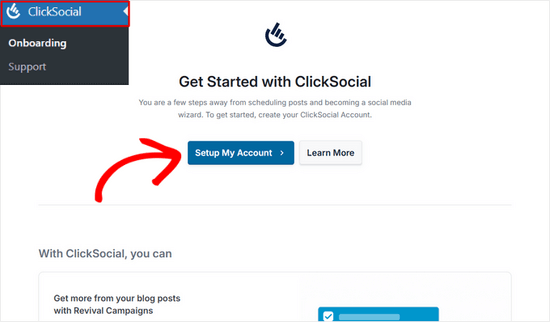
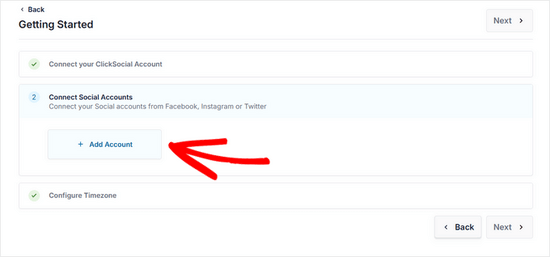
Ardından, WordPress panosundan ClickSocial menü öğesine gidin. Ardından, ‘Hesabımı Kur’ düğmesine tıklayın.
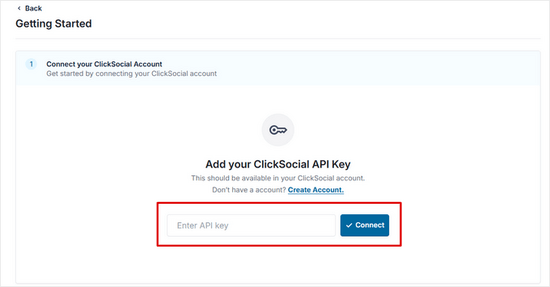
Şimdi, kopyaladığınız API anahtarını alana yapıştırın ve ‘Bağlan’ düğmesine tıklayın.
Facebook Sayfanızı ClickSocial’a Bağlama
Web siteniz ClickSocial’a bağlandıktan sonra, Facebook hesabınızı bağlamaya başlayabilirsiniz.
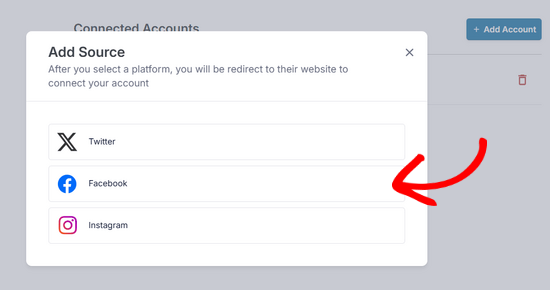
Bunu yapmak için ‘Hesap Ekle’ düğmesine tıklayın.
ClickSocial Facebook, Instagram ve Twitter’a bağlanmanızı sağlar. Bu eğitimde, bağlanmak için Facebook seçeneğini seçeceğiz.
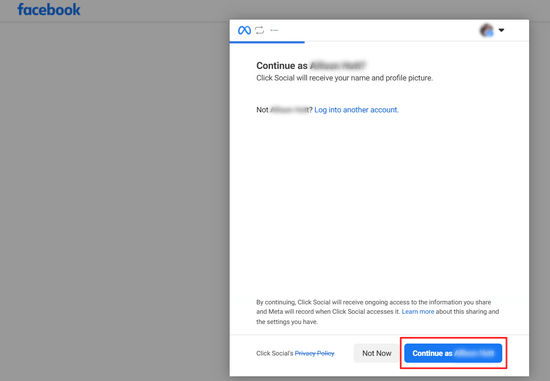
Daha sonra Facebook’a yönlendirileceksiniz.
Öncelikle profilinizi seçmeniz ve ‘Devam Et’ butonuna tıklamanız gerekmektedir.
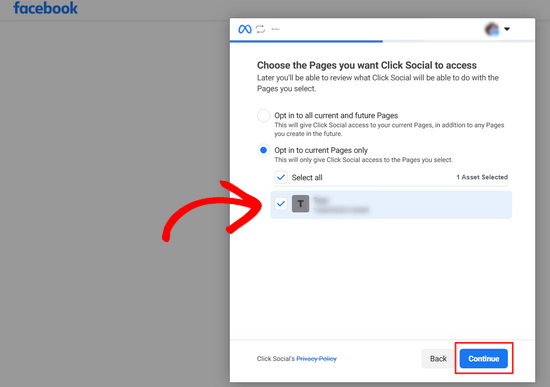
Ardından, ClickSocial’ın gönderi yapmasını istediğiniz Facebook sayfasını seçmeniz ve ‘Devam Et’e tıklamanız gerekir.
Bundan sonra, Facebook’a bağladığınız İşletmeyi de seçmeniz gerekecektir. Ardından, ‘Devam Et’ düğmesine tıklayın.

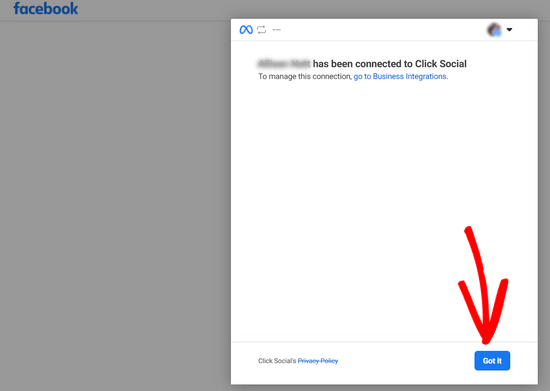
Ardından, ClickSocial için erişim isteklerini inceleyebilirsiniz. Bunlar, ClickSocial’ın WordPress gönderilerinizi Facebook’ta otomatik olarak paylaşmak için sahip olduğu izinlerdir. Devam etmek için ‘Kaydet’e tıklayın.
Son olarak, ‘Anladım’ düğmesine tıklayın ve web sitenize geri yönlendirileceksiniz.
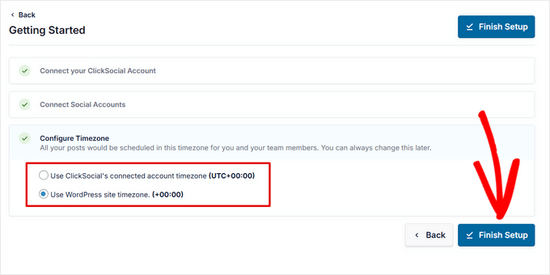
WordPress’ten Facebook’a otomatik gönderi planlamadan önce ClickSocial’ı kurmak için son bir adım daha var.
Gönderilerinizin zamanlanacağı saat dilimini seçmeniz gerekir. Bu eğitim için WordPress web sitesiyle aynı zaman dilimini seçeceğiz.
Bundan sonra, ‘Kurulumu Bitir’ düğmesine basın.
ClickSocial’da Canlandırma Gönderilerini Ayarlama
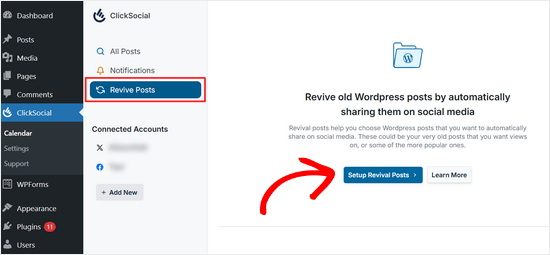
Artık ClickSocial kurulduğuna ve Facebook hesabınızı bağladığınıza göre, WordPress gönderilerini otomatik olarak Facebook’ta paylaşmak için bir canlandırma kampanyası oluşturabilirsiniz.
İlk olarak, ClickSocial kontrol panelinden ‘Gönderileri Canlandır’ sekmesine gidin ve ‘Canlandırma Gönderilerini Ayarla’ düğmesine tıklayın.
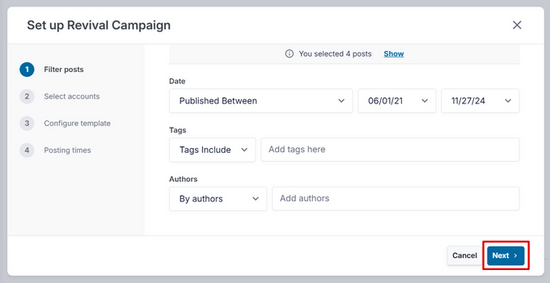
Sosyal medyada hangi gönderileri otomatik olarak paylaşmak istediğinize karar vermek için filtreler ayarlayarak başlayın.
Yayın tarihine, etiketlere ve yazarlara göre filtreleme yapabilirsiniz. Filtrelerinizi seçtikten sonra ‘İleri’ düğmesine tıklayın.
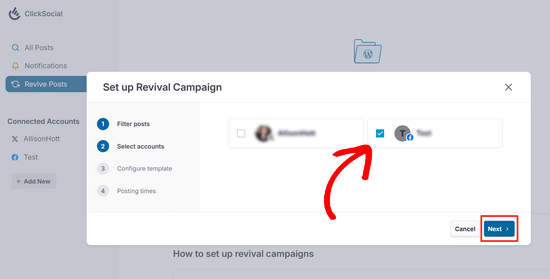
Ardından, gönderi yapmak istediğiniz sosyal medya hesaplarını seçin. Bağladıysanız birden fazla hesap seçebilirsiniz, ancak bu eğitim için sadece Facebook seçeneğini seçeceğiz.
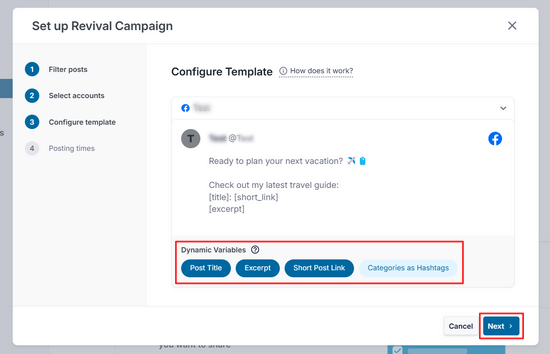
Artık bir Facebook gönderi şablonu oluşturabilirsiniz.
Manuel olarak metin ekleyebileceğiniz gibi gönderi başlığı, alıntı, kısa gönderi bağlantısı ve kategoriler gibi dinamik içerikleri hashtag olarak da ekleyebilirsiniz.
Şablondan memnun olduğunuzda, ‘İleri’ düğmesine tıklayın.
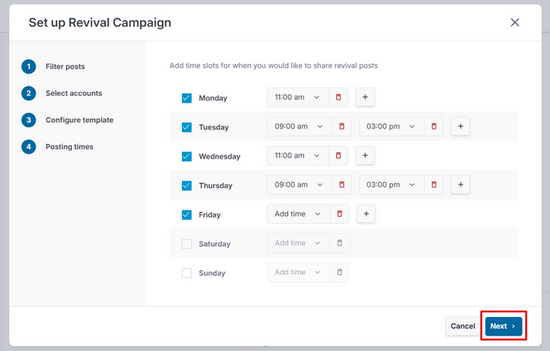
Son olarak, Facebook gönderilerinizin paylaşılmasını istediğiniz gün ve saatleri seçebilirsiniz. ‘+ Ekle’ simgesine tıklayarak günde birden fazla gönderi zamanı ekleyebilirsiniz.
Gönderme zamanlarınızı seçtikten sonra ‘İleri’ düğmesine tıklayın.
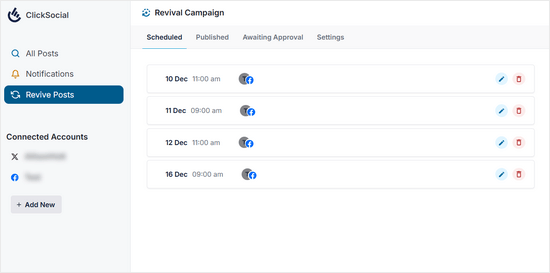
Bu kadar.
Şimdi, ‘Zamanlanmış’ sekmesinden blog yazılarınızın seçtiğiniz günlerde otomatik olarak paylaşılacağını görebilirsiniz.
Bonus: WordPress’te Özel Bir Facebook Akışı Oluşturun
WordPress’ten Facebook’a gönderi yapmanın yanı sıra, tüm Facebook akışınızı web sitenize de yerleştirebilirsiniz. Bu, ziyaretçilerin sitenizden ayrılmak zorunda kalmadan Facebook gönderilerinizi görüntülemesine olanak tanıyacak ve kullanıcı deneyimini artıracaktır.
Ayrıca, kullanıcıları Facebook sayfanıza göz atmaya teşvik edebilir ve daha fazla takipçi kazanmanızı sağlayabilir.
Facebook akışınızı yerleştirmek için Smash Balloon Facebook Feed eklentisini yüklemeniz ve etkinleştirmeniz gerekecektir. Etkinleştirdikten sonra, Facebook Beslemesi ” Tüm Bes lemeler’e gidin ve ardından ‘Yeni Ekle’ye tıklayın.

Bu sizi, besleme türü olarak ‘Zaman Çizelgesi’ni seçmeniz ve ‘İleri’ düğmesine tıklamanız gereken başka bir ekrana götürecektir.
Daha sonra Facebook hesabınızı Smash Balloon ile bağlamanız gerekecektir. Bu konuda daha fazla bilgi için Facebook grup akışını WordPress’e nasıl yerleştireceğinizi anlatan eğitimimize bakabilirsiniz.

Bu işlem tamamlandıktan sonra, Smash Balloon’un görsel düzenleyicisinde Facebook akışınızı kolayca özelleştirebilirsiniz. Burada arka plan rengini değiştirebilir, bir düzen seçebilir, farklı düğmeler ekleyebilir ve çok daha fazlasını yapabilirsiniz.
Ardından, ayarlarınızı kaydetmek için üstteki ‘Kaydet’ düğmesine tıklayın.

Şimdi blok düzenleyiciyi açın ve menüden ‘Facebook Feed’ bloğunu ekleyin. Ardından, blok içindeki açılır menüden yeni oluşturduğunuz Facebook beslemesini seçin.
Son olarak, ayarlarınızı kaydetmek için ‘Güncelle’ veya ‘Yayınla’ düğmesine tıklayın. Daha fazla bilgi için WordPress’te özel bir Facebook akışının nasıl oluşturulacağına ilişkin eğitimimize bakın.

Umarız bu eğitim WordPress’ten Facebook’a otomatik olarak nasıl gönderi yapacağınızı öğrenmenize yardımcı olmuştur. Ayrıca WordPress’e nasıl Facebook videosu yerleştireceğinizi öğrenmek ve blogunuzu büyütmek için en iyi WordPress Facebook eklentileri için uzman seçimlerimizi görmek isteyebilirsiniz.
If you liked this article, then please subscribe to our YouTube Channel for WordPress video tutorials. You can also find us on Twitter and Facebook.


")
 in 2024")
Jiří Vaněk
This will save me a relatively large amount of time with the number of articles. I manually posted articles to Facebook after they were published.
WPBeginner Support
Glad we could help simplify the process for you
Admin
Terje Pettersen
Hi. I want to enable all my users to be able, in an easy way, so that all new WordPress blogs automatically be posted on their own private facebook wall. Is that possible?
WPBeginner Support
We do not have a method we would recommend for that at the moment as there would not be an easy way for your users to disable the automated sharing. For the time being, you would want to take a look at plugins to add a share button to your posts.
Admin
G
Thanks for sharing. This has been helpful.
WPBeginner Support
Glad the guide was helpful
Admin
Beth Younker
Thanks for the info, however you fail to mention that some of these options may come at a price. For example, with WordPress you can no longer use plug-ins unless you upgrade to a business account. I find that really frustrating, as I used to be able to easily link to my FB page, but now I can’t unless I pay more money? Thanks a lot.
WPBeginner Support
For the cost of WordPress, our guides are for WordPress.org not, WordPress.com which would be part of the confusion. You can see our guide below on the differences between the two:
https://www.wpbeginner.com/beginners-guide/self-hosted-wordpress-org-vs-free-wordpress-com-infograph/
Admin
morgan kane
Does any of this methods auto-post to facebook GROUPS?
WPBeginner Support
These are for Facebook pages, Facebook limits automation for their groups at the moment.
Admin
Eduardo Rivera
Hi guys, great info as always! You should really update the 3rd option, the graph API has been deprecated and now Facebook uses another method, very intuitive and self explanatory.
WPBeginner Support
Thank you for letting us know, we will look into updating our article as soon as we are able.
Admin
ebenezer
I cant find new applet from the drop-down menu when I clicked on my username
WPBeginner Support
They may have changed their interface since this article was last updated you should still be able to use their search feature at the top of the page to find an applet.
Admin
Darlington
Please, I seem not to find your Facebook group again. Or has it been closed down?
WPBeginner Support
Our Facebook group is still active. If you visit our Facebook page and go to the groups tab on the side, you should be able to see the group there
Admin
Amanda
I found the process for Buffer much easier than described in this post. You just need to sign up for Buffer and connect your social media account(s) there, then install the WP to Buffer plugin, then hit the “Authorize” button in the plugin settings. That’s it. No access token, no callback URL, no creating an app. That is all automated with the Authorize button now, I suppose.
WPBeginner Support
Thank you for letting us know, the plugin’s authors likely updated their method to authorize since the last update of this article
Admin
M kose
I just want to learn, does this method automatically post our wordpress posts as we publish?
WPBeginner Support
Yes
Admin
Anthony
Thanks a million for the tips
Marius
This post is out-of-date after FB removed publishing to profile timeline from their API.
WPBeginner Support
Thank you for letting us know, we’ll be sure to take a look at this article
Admin
Daniel
Hi,
I tried using IFTTT but it kept telling me invalid WordPress URL. after numerous crosschecks i could see that the URL is correct.
Please, what can i do about this?
WPBeginner Support
Hi Daniel,
Make sure XML-RPC is enabled on your website. It is a WordPress feature that allows third-party services like IFTTT to connect. Some WordPress security plugins may disable it. See your security plugin settings.
Admin
Charlie
Can I use the ITTT method to link WordPress to more than one of my facebook pages??
WPBeginner Support
Hey Charlie,
Yes, you can do that.
Admin
Mariano
How can I include the post updates on ifttt? Because when is new post the notification send normal. But when is a post update it don’t send anything.
waynedpj
i am also looking for a way to update the corresponding Facebook post when an update is made to the original post on WordPress. unfortunately most options seem to only allow new posts as triggers. did you ever find a solution?
thanks.
Kylie
When I follow the steps for AccessPress Facebook Autopost (which I’ve successfully used before), and I click the box ‘Public’ to make the review public, I now get a dialogue box that asks for a Privacy Policy URL. I’ve only found sites for privacy policy URL development that cost. Is there something general that can be added for free?
Stefan
There’s now an option in WordPress for “Privacy policy”. You can find it in the administrator panel in the “Settings” submenu and than “Privacy”.
Joe
I was able to use IFTTT to share my post to Facebook. But the new issue with this, is that Facebook shows description of website, instead of the post description.
Facebook also used another image thumbnail, instead of the image I used for the post. Please how can I resolve this??
Francois
This didn’t work. When I click authorize I get this error below, even after I added my domain and page where I do my posts to the App Domain.
Can’t Load URL: The domain of this URL isn’t included in the app’s domains. To be able to load this URL, add all domains and subdomains of your app to the App Domains field in your app settings.
Samuel
Is there a way that when someone comments on our post that we share to facebook, it displays on our site.
I know we can have a facebook comment plugin that allows users to comment on post using their facebook account.
What i don’t know is, If we share our post to facebook, and someone comments on that post on facebook, how can we display that comment on our site
Nikhil
Hi. is there any plugin that uploads the posts automatically to different fb pages according to different categories . for eg: if a particular post is of category tech then it should be shared on fb tech page and if its category is of health that post should be shared on fb page corresponding to it
Sue
I have gone through the setup and posted my blog, but it’s not showing up on f.b. Just wondering what I did wrong, or is there a delay to it posting. I posted about 10 minutes ago. Thanks!
Ed
If it’s your very first post using IFTTT it will take UP TO an hour. This is stated in small print on the applet.
teslim
i am trying to use the facebook App method by i am finding it difficult to authorize my account, facebook says (Can’t Load URL: The domain of this URL isn’t included in the app’s domains. To be able to load this URL, add all domains and subdomains of your app to the App Domains field in your app settings.). please help soonest thanks..
Daniel
How do you change the post on Facebook that says…
“John Doe published an article on WordPress”
so that ‘WordPress” says something else, like your site’s URL or name?
Karen
Hello. I followed the directions to the “T” using the WordPress Plug-In method and see absolutely no postings to my FB page. I even updated a post (thinking any previous posts may not appear), and that didn’t work either. I went to my timeline and feed areas of my FB page and don’t see anything.
Please assist or I will have no other option but to deactivate this plug-in and start over.
Thank you.
isah
hey nice article i just tried this now on my site using the IFTTT method and it works like a charm. thanks for the tip
naresh
Thank a lot for creating such a very useful post.
JM Koh
Thanks for the tutorial. Does anyone know of a way to post to both the FB profile and FB page (that is joined to 1 FB account as required by FB)? Noted that the IFTTT method requires you to choose to post either to the profile or page, which is the same as Jetpack. Thanks!
Miso
Hi,
on plugin there is now an error and the account can not be authorized.
Someone told me that giving admin credentials to website is not so good idea,
so the user which posts website can not be administrator.
Sandra K
Do any of these methods work for Facebook Groups? I’m the administrator for a Closed Facebook Group and I want automate postings news and events on our website to our Facebook Group. Is that do-able?
Lori
So what is the BEST one to choose?
WPBeginner Support
IFTTT is the easiest and fastest.
Admin
Marc
However, IFTTT posts a link, not the entire post text including image, right?
WPBeginner Support
Yes, Facebook does the rest and automatically fetches a thumbnail, post title, and a short description of your post. Users will still have to visit your website to read the complete article.
iostar
Hi! I am using Zapier to post automatically on facebook and another social media based on RSS technology.
Hope it helps.
Claudio
When I try and enter my hosted wordpress info, it prompts me that I need to enable XML-RPC under my wordpress “Settings/Writing”, but I don’t see a checkbox for this.
Tâm Hoàng
Thanks
Sufyan
thank u so much for this wonderful tutorial
Pankaj Dhawan
People talk about using Buffer more and it is very famous. Never used any such technique since I am not getting enough time so I suppose IFTTT for someone like me would be ideal.
I wasnt aware of this before so, thank you for sharing this useful info.