WordPress sitenizi Google Search Console’a (eski adıyla Google Web Yöneticisi Araçları) eklemek SEO için önemli bir adımdır çünkü web sitesi sahiplerinin Google arama sonuçlarındaki sıralamalarını izlemelerine ve sıralamalarını etkileyebilecek sorunları keşfetmelerine yardımcı olan temel araçlar sağlar.
GSC, WPBeginner ekibinin en önemli araçlarından biridir. Kullanıcıların aradığı anahtar kelimeleri belirlemek, hataları saptamak ve arama motoru sonuç sayfalarındaki (SERP’ler) sıralamamızı anlamak için kullanıyoruz. Bu, SEO’muzu iyileştirme ve trafiğimizi artırma konusunda veriye dayalı kararlar almamızı sağlıyor.
Google Search Console’daki bilgileri düzenli olarak inceleyerek, sitenizin iyi optimize edildiğinden ve Google’ın en iyi uygulamalarıyla uyumlu olduğundan emin olabilirsiniz.
Bu kılavuz size WordPress sitenizi Google Search Console’a nasıl kolayca ekleyeceğinizi ve doğrulayacağınızı gösterecek, böylece arama görünürlüğünüzü artırmak için güçlü özelliklerini kullanabilirsiniz.
Google Search Console nedir?
Google Search Console, web sitesi sahiplerinin web sitelerinin Google arama sonuçlarındaki varlığını izlemelerine yardımcı olmak için Google tarafından sunulan ücretsiz bir araçtır.
Web sitenizin arama performansını etkileyebilecek site hataları, güvenlik sorunları ve dizin oluşturma sorunları hakkında sizi güncel tutmanın yanı sıra arama sıralamalarını izlemenize yardımcı olur.
WordPress SEO konusunda ciddiyseniz, ilk günden itibaren Google web yöneticisi araçlarına eklemeniz gerekir.
Bu nedenle, sitenizi Google Search Console’a nasıl kolayca ekleyebileceğinize bir göz atalım.
Video Eğitimi
Yazılı talimatları tercih ediyorsanız, okumaya devam edin.
WordPress Sitenizi Google Search Console’a Ekleme
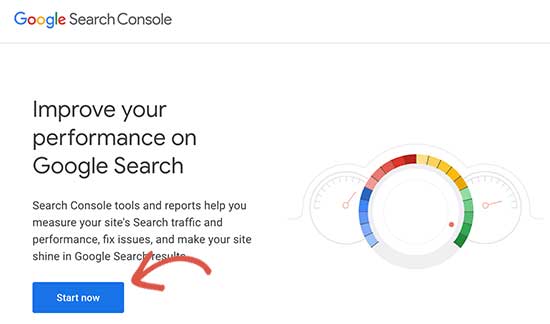
İlk olarak, Google Search Console web sitesini ziyaret etmeniz ve ‘Şimdi Başla’ düğmesine tıklamanız gerekir.
Ardından, Google / Gmail hesabınızla oturum açmanız gerekir.
Giriş yaptıktan sonra, web sitenizin URL’sini girmeniz istenecektir.
Site doğrulaması için iki yöntem vardır: alan adı veya URL öneki. Daha esnek olduğu için URL öneki yöntemini öneriyoruz.
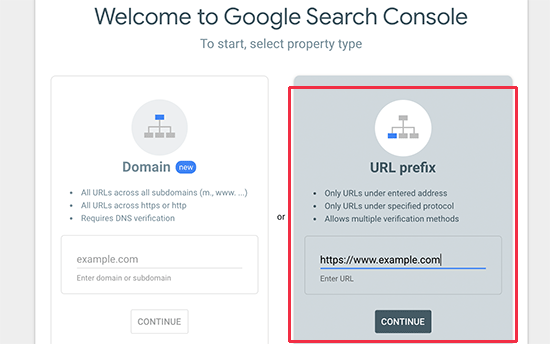
Google’ın HTTP ve HTTPS’yi iki farklı protokol olarak değerlendirdiğini unutmayın. Ayrıca https://www.example.com ve https://example.com sitelerini de iki farklı web sitesi olarak değerlendirir.
WordPress tarafından kullanılan doğru web sitesi URL’sini girmeniz gerekir.
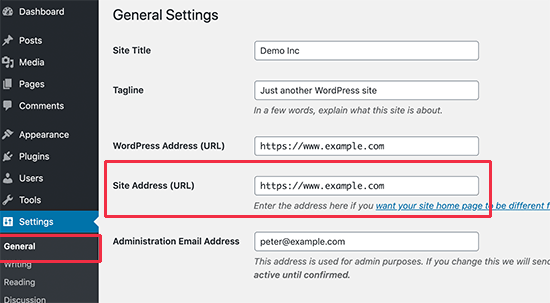
Emin değilseniz, girmeniz gereken tam URL’yi bulmanın kolay bir yolu vardır. WordPress yönetici alanınızda oturum açın ve Ayarlar ” Genel sayfasına gidin.
Orada site adresi alanında web sitenizin URL’sini göreceksiniz.
Google web yöneticisi araçları kurulum sihirbazına doğru web sitesi adresinizi girdikten sonra, bir sonraki adıma geçmek için ‘Devam Et’ düğmesine tıklayın.
Şimdi, web sitenizin sahipliğini doğrulamanız istenecektir. Bunu yapmanın birkaç yolu var, ancak biz HTML etiketi yöntemini göstereceğiz çünkü en kolayı bu.
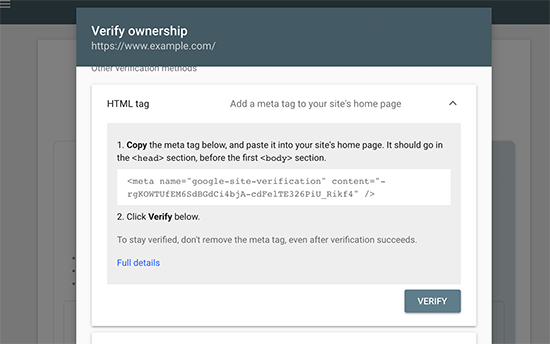
HTML etiketini genişletmek için üzerine tıklayın ve ardından içindeki kodu kopyalayın.
Şimdi, Google’ın web sitesinin sahibi olduğunuzu doğrulayabilmesi için bu Google site doğrulama meta etiketini WordPress’e eklemeniz gerekir.
Çoğu WordPress eğitimi, WordPress temanızdaki header.php dosyasını düzenlemeniz ve kodu <body> etiketinin hemen üzerine eklemeniz için size yol gösterecektir.
Ancak bu yöntemi önermiyoruz çünkü temanızı günceller veya değiştirirseniz HTML etiketi kaybolacaktır.
Google, HTML etiketini periyodik olarak kontrol eder ve doğrulama etiketini bulamazsa arama konsolundaki site verilerine erişiminizi devre dışı bırakır.
Google’ın web sitesi sahipliğinizi her zaman doğrulayabilmesini nasıl sağlayacağınız aşağıda açıklanmıştır.
Öncelikle All in One SEO eklentisini yüklemeniz ve etkinleştirmeniz gerekir. Daha fazla ayrıntı için, bir WordPress eklentisinin nasıl kurulacağına ilişkin adım adım kılavuzumuza bakın.
Etkinleştirmenin ardından All in One SEO ” Genel Ayarlar ” Web Yöneticisi Araçları sayfasına gidin ve “Google Search Console” seçeneğine tıklayın.
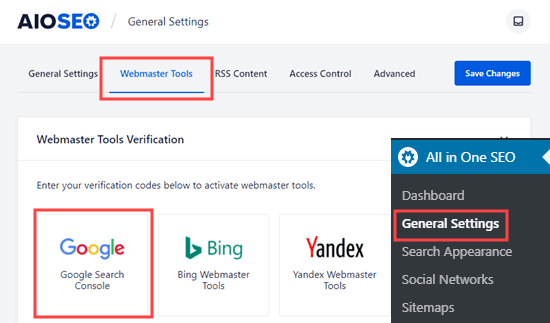
Ardından Google Search Console’dan kopyaladığınız kodu “Google Doğrulama Kodu” kutusuna yapıştırın.
Değişikliklerinizi kaydetmek için ‘Değişiklikleri Kaydet’ düğmesine tıklamayı unutmayın.
Artık Google Search Console ayarlarına geri dönebilir ve ‘Doğrula’ düğmesine tıklayabilirsiniz.
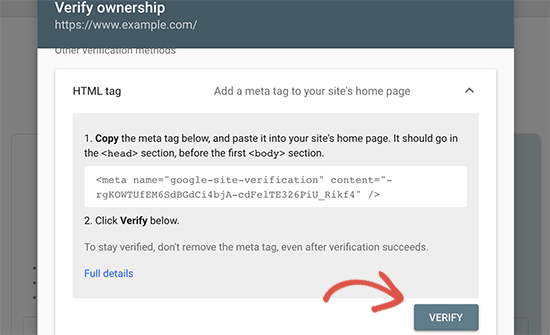
Google Search Console artık web sitenizin kodunda HTML etiketini arayacak ve size bir başarı mesajı gösterecektir.
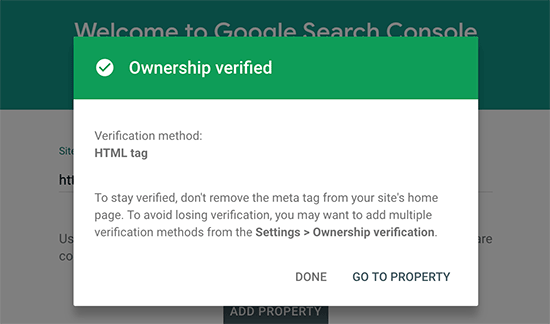
Not: Bir başarı mesajı görmüyorsanız, WordPress önbelleğinizi temizlemeniz gerekir. Bu, Google’ın web sitenizin en son sürümünü alabilmesini sağlayacaktır.
Hepsi bu kadar. Sitenizi Google Search Console’a (Web Yöneticisi Araçları) başarıyla eklediniz. Artık Google Search Console kontrol panelinizi ziyaret etmek için ‘Özelliğe Git’ bağlantısına tıklayabilirsiniz.
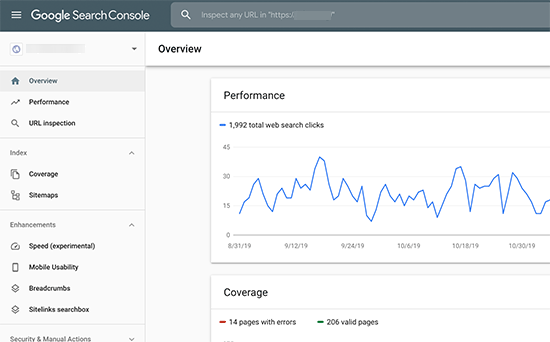
Buradan web sitenizin performans raporlarını ve dizin kapsamını görebilirsiniz.
Bunu yapmadan önce, Google’a web siteniz hakkında biraz daha bilgi verelim. Bu, Google’ın web sitenizi biraz daha verimli bir şekilde taramasına yardımcı olacaktır.
Google Search Console’a XML Site Haritası Ekleme
XML site haritası, tüm web sitesi içeriğinizi XML formatında listeleyen bir dosyadır, böylece Google gibi arama motorları içeriğinizi kolayca bulabilir ve dizine ekleyebilir.
İyi haber şu ki, yukarıdaki adımlarda All in One SEO eklentisini yüklediyseniz, sitenize zaten otomatik olarak bir XML site haritası eklemişsinizdir.
Site haritanızı görmek için All in One SEO ” Site Haritaları bölümüne gidin. Buradan, site haritasının sizin için otomatik olarak etkinleştirildiğini görebilirsiniz.
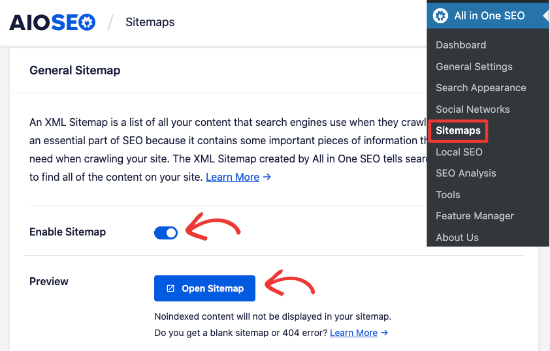
Ardından, XML site haritası bağlantısını almanız gerekir. ‘Site Haritasını Aç’ düğmesine tıkladığınızda XML site haritanıza bir bağlantı göreceksiniz.
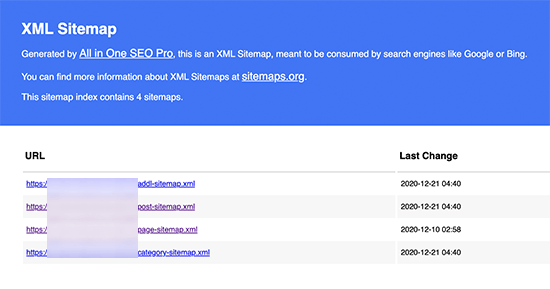
Buradan, URL’yi tarayıcınızın adres çubuğundan kopyalayabilirsiniz.
Alternatif olarak, web sitenizin adresinin sonuna sitemap.xml ekleyerek XML site haritanıza doğrudan erişebilirsiniz. Örneğin:
https://www.example.com/sitemap.xml
Artık XML site haritanız hazır olduğuna göre, Google’ın onu hızlı bir şekilde bulmasına yardımcı olalım.
Google Search Console kontrol paneline geçin ve sol sütundan Site Haritaları menüsüne tıklayın.
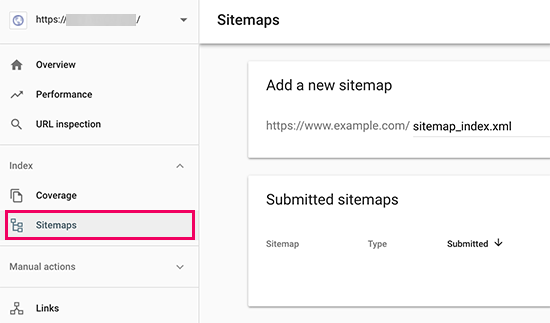
Bundan sonra, site haritanızın URL’sinin son kısmını ‘Yeni site haritası ekle’ bölümünün altına eklemeniz ve Gönder düğmesine tıklamanız gerekir.
Google artık site haritanızın URL’sini Google Search Console’a ekleyecektir.
AIOSEO ayrıca video site haritası, haber site haritası ve RSS site haritası gibi rekabet avantajı elde etmenize ve SEO’da daha üst sıralarda yer almanıza yardımcı olan diğer birçok site haritasıyla birlikte gelir.
Bu site haritalarını gönderme süreci yukarıdaki ile aynıdır.
Hepsi bu kadar, web sitenizi Google Search Console’a başarıyla eklediniz.
AIOSEO ile WordPress İçinde Google Search Console Verilerini Görüntüleyin
Bir sonraki adım, işletmenizi büyütmek için Google Search Console’daki bilgi hazinesini nasıl kullanacağınızı öğrenmektir.
Yeni başlayanlar için Google Search Console verilerinden en iyi şekilde nasıl yararlanabileceğinizi gösteren eksiksiz bir Google Search Console kılavuzumuz var.
Ancak AIOSEO Arama İstatistikleri eklentisini kullanarak bu önemli verilerin çoğunu doğrudan WordPress kontrol panelinizden de kolayca görüntüleyebilirsiniz.
AIOSEO’nun Arama İstatistikleri ile anahtar kelimelerinizi takip edebilir, en iyi performans gösteren içeriklerinizi görüntüleyebilir, değerli arama istatistiklerini keşfedebilir ve daha fazlasını WordPress içinde yapabilirsiniz. Bu, aradığınız verileri bulmak için WordPress’ten Google Search Console’a geçerek zaman kaybetmek zorunda kalmayacağınız anlamına gelir.
Arama İstatistikleri Google Search Console’a bağlandıktan sonra, WordPress panonuzdan AIOSEO menüsündeki ‘Arama İstatistikleri’ne tıklamanız yeterlidir.
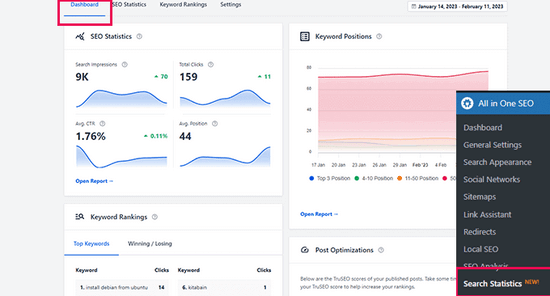
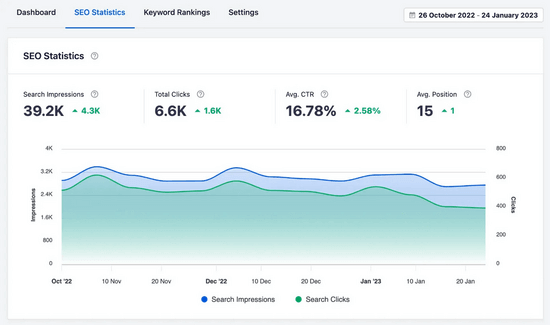
Bu sizi Arama İstatistikleri kontrol paneline götürecektir. Buradan, tüm içeriğinizin arama gösterimleri, toplam tıklamaları, ortalama tıklama oranı (TO) ve ortalama konumu gibi SEO İstatistiklerini görebilirsiniz.
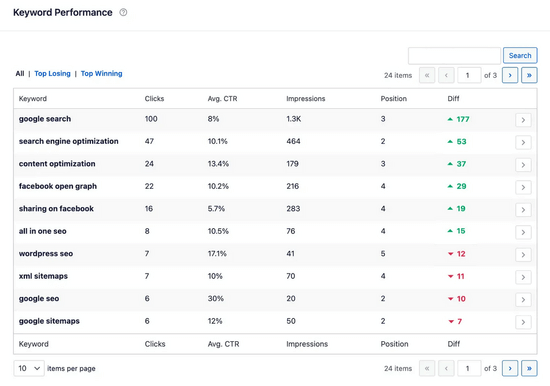
Web sitenizin içeriğinin Google arama sonuçlarında hangi anahtar kelimeler için sıralandığını görmek için Anahtar Kelime Performansı raporunu da kullanabilirsiniz. ‘En Çok Kazananlar’ ve ‘En Çok Kaybedenler’ sekmelerine tıklayarak, hangi anahtar kelimelerin en büyük konum değişikliklerini gördüğünü görebilirsiniz.
Buna ek olarak, güçlü İçerik Sıralaması raporu ile içerik bozulmalarını ve önemli içerik performansı trendlerini kolayca tespit edebilirsiniz.
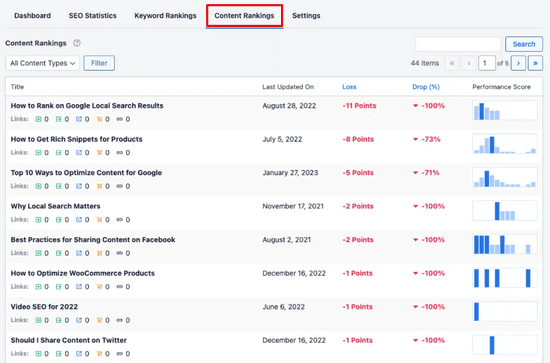
Size bir URL’nin en son güncellendiği tarihi, içeriğinizin çürüme oranıyla ilgili ayrıntıları ve diğer temel SEO ve içerik pazarlama ölçümlerini gösterecektir.
AIOSEO’nun yerleşik SEO önerilerini kullanarak, sıralamanızı yeniden yükseltmek için çürüyen içeriğinizi kolayca optimize edebilirsiniz.
Ayrıca sitenizdeki kullanıcı deneyimini (UX) iyileştirmek için yararlı raporlar, SEO’nuzu olumsuz etkileyen sorunları gidermek için ipuçları ve daha fazlasını elde edeceksiniz.
Google Search Console ve WordPress SSS
Binlerce okuyucumuzun web sitelerini Google Search Console’a eklemelerine ve doğrulamalarına yardımcı olduğumuzdan, aklınıza gelebilecek hemen hemen her soruyu gördük. İşte en sık sorulan sorulardan bazılarının yanıtları.
1. WordPress bloguma bir Google HTML doğrulama dosyasını nasıl yükleyebilirim?
Google Search Console, web sitesi sahipliğini doğrulamak için birkaç farklı yol sunar. Bu makalede, Google site doğrulama meta etiketini kullanmak olan en kolay yöntemi ele aldık. Ancak, bazı web sitesi sahipleri site sahipliğini doğrulamak için HTML dosyasını yüklemeyi tercih ediyor.
Google arama konsolu HTML doğrulama dosyasını WordPress’e yüklemek için WordPress hosting cPanel’inize giriş yapmanız veya FTP kullanarak hosting hesabınıza bağlanmanız gerekecektir.
Ardından, HTML doğrulama dosyasını web sitenizin /public_html/ klasörünün içine yüklemeniz gerekir. Bu, /wp-admin/, /wp-content/ gibi diğer WordPress klasörlerini göreceğiniz kök dizindir.
2. WordPress için bir Google Site doğrulama eklentisi kullanmalı mıyım?
Google site doğrulamasında size yardımcı olmak için özel olarak tasarlanmış birçok WordPress eklentisi vardır. Ancak, Bing, Yandex, Pinterest gibi diğer web yöneticisi araçlarında ve platformlarında sahipliği doğrulamanız gerekeceğinden bunları kullanmanıza gerek yoktur.
All in One SEO eklentisini kullanmak çok daha iyidir çünkü tüm platformlar için site doğrulaması eklemenize olanak tanır (tek bir eklentide). Ayrıca, daha iyi sıralama yapmanıza ve daha fazla trafik almanıza yardımcı olacak bir ton başka WordPress SEO özelliğine de sahiptir.
3. Google Search Console’un güçlü bir kullanıcısı nasıl olabilirim?
Google Search Console, işletmenizi büyütmek için kullanabileceğiniz pek çok faydalı bilgiye sahiptir. Güçlü bir kullanıcı olmak için kullanabileceğiniz nihai Google Search Console kılavuzunu oluşturduk.
4. Sorunlarla karşılaşıyorum, iletişime geçebileceğim bir Google Search Console telefon numarası var mı?
Hayır, iletişime geçebileceğiniz bir Google Search Console telefon numarası yoktur. Google Search Console ile ilgili sorun yaşıyorsanız, çevrimiçi destek merkezini kullanabilirsiniz. WordPress ile ilgili özel sorularınız için her zaman ücretsiz WordPress yardım grubumuza katılarak sorularınızı sorabilirsiniz.
Bu makalenin WordPress sitenizi Google Search Console’a nasıl kolayca ekleyebileceğinizi öğrenmenize yardımcı olduğunu umuyoruz. Web sitenize nasıl daha fazla trafik çekebileceğinize ilişkin kılavuzumuzu ve web sitesi trafiğini artırmak için Google Search Console’u kullanmaya ilişkin ipuçları listemizi de görmek isteyebilirsiniz.
If you liked this article, then please subscribe to our YouTube Channel for WordPress video tutorials. You can also find us on Twitter and Facebook.


Mai Taup
I’ve been frequenting your site because it has been really helpful in building my blog. I just can’t seem to verify it thru google search console. I tried all the alternatives listed in this page. What am I doing wrong? HELP!
WPBeginner Support
Hi Mai Taup,
Do you see an error when trying to verify your blog? Make sure that you have added the correct address of your website in Google Search Console. Google treats https and http, www and non-www URLs differently.
Admin
Mai Taup
Thank you! Thank you! I have finally verified my site. awesome tips.
Chrissie Barclay
Thanks very much – your step-by-step description was so easy to follow & it worked a treat!
Mondakranta
Thank you! Inserting the meta tag via the insert header plugin worked for me. Grateful
Fareeha
It was helpful .. I had been messing up for long and this article solved my problems in a minute .. keep up the good work
Rebecca
it keeps telling me “we were unable to verify your property” Any thoughts on what i am doing wrong? thanks!
Jennifer
I keep getting an error when I follow the tips in this video. It says – “The Google XML Sitemaps plugin might cause issues when used in conjunction with Yoast SEO.” Any idea what I should do now?
alex
I used the insert headers footers and copied and pasted the code over and it still wouldn’t verify the site.
Jared
What led me to this video was I initially watched your video on how to install Google maps to wordpress with your provided plugin. The result was Javascript console prohibiting complete map loading.
I have done everything stated in this video tutorial, but I “do not receive the green check mark” allocating Google found my tag? Could one of these be why:
1. Domain was on another platform and I recently brought it over to Dreamhost (2 days ago)
2. New platform, theme, and wordpress are still under construction – could this hinder the tag from being found?
3. Google is stating verification failed, unable to connect to the server – Why is server not allowing connection?
Great to the point videos, Thanks for your time.
WPBeginner Support
Hi Jared,
If your website is in maintenance mode and not publicly accessible, then Google webmaster tools cannot verify the tag.
Admin
Ashley
Thank you! This is the issue I was having, so I’m glad someone asked and you responded!
John
Excellent video. I struggled for a couple of hours before I found your short, informative, step by step instruction. Bravo.
swetha
if we have verified our analytics account with insert header and footer plugin, how to verify with web masters ??
Tina Whitfield
What about setting up different versions of the website name on google’s search console?
i.e.
http://www.wpbeginner.com
wpbeginner.com
https:// etc etc etc
What is the purpose of that and how do you do it>
WPBeginner Support
Hi Tina,
Google considers them different websites. You will need to pick one to submit to Google webmaster tools.
Admin
Melody Burgess
Thanks! Very helpful video.
Ernest
I just verified by site with the plugin from WpBeginner
Elena
Thank you for an excellent tutorial! After struggling to figure the domain verification process for some time, this tutorial helped me to resolve the issue in minutes! Thank you!
Stephen
I am trying to verify the https versions of my site via ftp but cannot find those versions to upload the HTML verification file to. Any ideas where to find them?
Lena
Hello,
none of those methods worked for my website, I have followed the steps in the video and but it says it can not find the verification meta tag. Also uploading the html file did not work. What should I do now?
Thank you!
Prathmesh
Thank you very much for sharing such an important info especially the “Insert Headers and Footers Plugin” which is going to help me a lot. Is it OK to uninstall and delete “Insert Headers and Footers Plugin” after including meta tag in the header?
Eagerly waiting for reply…
Thanks again………
WPBeginner Support
Hi Prathmesh,
You will need to keep the plugin installed. Uninstalling the plugin will disable the code you added into header or footer using the plugin’s settings.
Admin
Prathmesh
Thanks.
That helped…
Kader
This is really helpful and I would hope my blog gets visitors too.
Diane
I was going around and around trying to get this to work and couldn’t.
I’m so happy I finally got the “green checkmark” after following your instructions. Thx a bunch
Sandra
Thanks for this video. Was going round in circles tying to verify my site and all done now. Thanks
Mahmud
After submit xml I got a messege “Improve the search presence of https://example.com“. There are a option named “Add all your website versions”. Do you have any instruction about this?
Arif wali
I have removed a plugin of wpbeginners from my WordPress site mistakenly I want to add that plugin again but It says that “Installation failed: Destination folder already exists” what to at this stage ?
WPBeginner Support
Hi Arif,
You will need to first connect to your website using File Manager in cPanel or an FTP client. Next, you need to locate /wp-content/plugins/ folder. Inside it you will need to locate the plugin you are trying to install and then delete it. After that you will be able to install the plugin normally from your WordPress admin area.
Admin
Arif wali
Thank you for your Kind support
Rajdeep Kaur
Hi i just wanted to say thanks i was trying to do the webmaster tool thing for my website and i had no idea how to do that i know somewhat but coding is not so much of my thing like where to put what code and i was having trouble knowing how to upload the html file but this meta thing was easy to do thank you helped me do it i was struggling with this and i asked someone for help and they made it seem like its impossible for me to do cuz usually ppl dont tell others and help but this helped me alot thanks i was struggling for a year asking for help now i just google and found ur site and it helped thank you so much really also can u let us know like a checklist to make sure points to apply for google adsense please plzzzz thanks
Michael
Dear Sirs,
can anyone help me with the recommended method ie. HTML file upload process step by step. Its vaguely explained. All other methods are explained in detail. please explain this method too in detail
Thanks
regards
Michael
Vladimir
Thank you. Very simple
Joe Brancatelli
Thank You, your recommended plugin made adding the meta tag very simple to the header. I believe this plugin should be with googles instructions and a lot more people will find this easier to insert meta tags. I failed the first time on all the other methods
john
thanks a lot, your article was very informative, easily instructed and understandable. i appreciate your help wordpress.
Beth
Can NOT thank you enough for this! Have been struggling all day trying to find a simple fix and this was so easy!!!
Asifiwe
This was really helpful. Thank you so much.
shabnam hasan
the tutorial is really great but i think i have messed it up somewhere.In my search traffic it is showing 0 ,even though the site is open in my phone . Can you suggest some way how to get the correct data.Also i have received plenty of comments on my blog still it shows 0 users from beginning.My website is :
kerry-anne Simpson
WOW thank you so much for the video tutorial. It was super simple to do, now I have the green light thanks again I love your tutorials
Zakir Hussain
The tutorial is really helpful and much easy to understand.
Manpreet Kaur
Hi,
I am trying to verify my website but failed many times. I have followed all the steps that are listed above but not working for my website. I tried submitting html tag code in google search console in Yoast SEO. Please help me. Thanks
Hil
Hi, The tutorial is really nice.
I use the sitemaps plugin (Better WordPress Google XML Sitemaps) on my wordpress site to send my sitemaps to Bing and google. Do I still need to use Google webmastertools for sitemaps
WPBeginner Support
Hello,
You can continue using that plugin. However, if you want to use Yoast SEO to submit sitemaps, then you should stop using your old plugin.
Admin
Karen Chase-Smith
After agonizing over “countless” foreign instructions on the web on how to verify as owner of my website, I stumbled across this tutorial. It took me a few minutes to understand what I was typing in my search engine to add a new plug-in, but after that, I was finally able to verify my Blog. The only suggestion I could make is that it the visuals could be a little more clearer.
Thank you so much for your help!
Tasha
I am SO grateful for WP Beginner. This tutorial helped me immensely. Thanks!
Varonette
Thank you so much. I have been trying so long to verify my website and I couldn’t until I visited your website. Thank you again.
Irma
Thank you so much! I was really stumped, as my several attempts were not working. Thanks to your video I got the green check mark on the first try!
Akshata
i did verified my site long before but have not added meta values to the webmaster tools. Can you please help me in finding the meta values. Where can get it with verifying again?
Fiona Sorg
Thank you for uploading and sharing this info. for me it’s very helpfull as a starter of wordpress sites. Without this kind of help it makes it mor difficult. Again thank you keep up the good job.
Thais Rodriguez
Hello all!
I am setting up Yoast Seo. I have done the process to add my website to Google Webmaster and it’s works ok. But when I go to put the authorization code to authenticate, it says “no profiles found”.
Please, some help will be appreciated.
Ipsita
thanks a lot..really helped me this article
Susan Perloff
This is wonderful. I have had a site for more than 10 years, paying various consultants thousands of dollars along the way. But no decent SEO. This looks like a way to go. I am stuck at 1 minute 50 seconds of the video. Then the voice goes too fast and the picture is too fuzzy for me to follow.
I have inserted the plugin but do not know how to capture the “metadata” that goes on a subsequent page. Can someone help?
C.Sern
Hi,
i am actually facing a problem.
I am helping my cousin with his website.
His website is actually
However, when i search for “brboss”, his website does not show up.
Can you please help with this problem
p.s. i already register in google webmaster
Thank you.
Trina
Thank you.. The video really helped me setup my site.
Rachel Neill
Hello,
Thank you for such an informative tutorial. I opted to verify my site via signing into Bluehost but have just read somewhere that says
‘When your site has been verified by Search Console, do not remove the verification code from your site. If the code is removed, it will cause your site to become unverified.’
Because I didn’t upload a code, do I still need to do so?
Or have they got one from Bluehost?
I’m also a bit confused on how to add ‘site versions’ in the next step,
Thankyou!
WPBeginner Support
Hey Rachel,
Yes you need to add the verification code again.
Admin
mohamed hassouna
Hello,
First of all you are awesome I really learned a lot from your site which is beginners frindly
I am newbie ti all this and I already started to take action but
When I came to verifing my site in google webmaster always get the same message every time that they cant find the meta tag though I tried many other ways for verification like the domain name and google analytic
I thought may be because I haven’t puplished my site yet but I already verified my google analytic account ,I am confused and don’t know what to do I even tried webmaster help but no good ,I am kindda frustrated but I really want to continuo because I still have the passion and feel I am heading forward so please help me with this issue
One more thing excuse me for my bad english
Thank you
Tessa
Hi,
just to say a BIIIIIIIG THANK YOU!
I first went down the route of FTC, but had no idea what I was doing, still don’t.
Your video was so simple. Love this plugin.
I got failed messages at first, but I think I must’ve put in my URL wrong somehow. When I started from scratch, it worked a treat. I am now verified and very happy.
Thanks again.
Kristel Miley
I followed all the steps and even repeated the process three times, but every time Google Webmaster said that my verification failed. Is there something I can do to fix this?
Thanks!
Lesley
As always very helpful. Once you insert the code into the header, can I deactivate the plugin or does it need to remain active?