Web’deki kod parçacıklarını WordPress’e nasıl yapıştıracağınızı öğrenmek ister misiniz? WordPress tema dosyalarına kod kopyalayıp yapıştırmak deneyimli kullanıcılar için kolay görünse de yeni başlayanlar için göz korkutucu olabilir.
WPBeginner’da, kullanıcılardan WordPress ‘e kod parçacıkları eklemelerini isteyen çok sayıda WordPress eğitimi yayınlıyoruz. Bu nedenle, işleri karıştırmaktan endişe duyan yeni başlayanlardan çok sayıda soru alıyoruz.
Bu yüzden bu kılavuzu bir araya getirdik. Bu makalede, web’deki kod parçacıklarını sitenizi bozmadan WordPress’e nasıl kopyalayıp yapıştıracağınızı göstereceğiz.

WordPress Sitenize Neden Kod Parçacıkları Eklemelisiniz?
WordPress, sunduğu esneklik nedeniyle dünyanın en iyi web sitesi oluşturucusudur. Sitenize yeni özellikler ve işlevler eklemek son derece kolaydır ve neredeyse her tür web sitesinin oluşturulmasına yardımcı olabilir.
Web sitenizi daha iyi hale getirmek için kullanabileceğiniz her türlü ipucu ve püf noktasını paylaşıyoruz. Bu ipuçlarından bazıları WordPress’e kod eklemenizi isteyecektir.
Web sitenize özel kod parçacıkları eklemek isteğe bağlı olsa da ve genellikle aynı görevi yerine getirecek eklentiler bulabilseniz de, bazen basit bir kod parçacığı daha etkilidir.
Genellikle kod parçacıkları eklemek, birçok yaygın WordPress hatasını düzeltmenin, WordPress güvenliğinizi artırmanın ve web sitenize yeni özellikler eklemenin kolay bir yolu olabilir.
Bununla birlikte, WordPress web sitenize güvenli bir şekilde nasıl kod parçacıkları ekleyeceğinize bir göz atalım.
WordPress’te Kod Parçacıkları Eklemenin En İyi Yolları Nelerdir?
WordPress web sitenize kod parçacıkları eklemeye başlamadan önce, bir WordPress yedekleme eklentisi yüklemeniz ve kullanmanız gerektiğini belirtmek önemlidir.
Bu, WordPress sitenizi güvende tutar ve bir şeylerin ters gitmesi durumunda her zaman bir yedekten geri yükleyebilirsiniz.
WordPress’e snippet eklerken, bunları index.php, single.php ve daha fazlası gibi WordPress tema şablon dosyalarına eklemek için talimatlar bulabilirsiniz.
Bu parçacıklar yalnızca belirli tema dosyaları için kullanışlıdır, bu nedenle bunları doğrudan eklemeniz veya bir WordPress alt teması oluşturmanız gerekecektir.
Ancak, çoğu kod parçacığı WordPress temanızın functions.php dosyasına eklenecektir. Bazı eğitimler doğrudan dosyaya eklenmesini önerebilir, ancak değişikliklerinizi geleceğe hazırlamanıza olanak tanıyan çok daha iyi alternatifler vardır.
Bu şekilde, bir tema değiştirirseniz, özel işlevselliğiniz kaldırılmayacaktır.
WordPress blogunuza veya web sitenize özel kod parçacıkları eklemek için hangi yöntemi seçtiğinize bağlı olarak WordPress dosyalarını düzenlemenin farklı yolları vardır.
Bununla birlikte, WordPress’te özel kod parçacıkları eklemenin en acemi dostu yollarından bazılarına bir göz atalım.
Yöntem 1: WPCode Eklentisi ile Özel Kod Ekleme (Kolay)
Bir kod parçacıkları eklentisi kullanmak, WordPress’e kod eklemenin en güvenli ve en acemi dostu yoludur.

WPCode eklentisi, tema dosyalarınızı düzenlemek zorunda kalmadan web sitenize kolayca özel kod parçacıkları eklemenizi ve yönetmenizi sağlar.
Yaygın kod hatalarını önlemenize yardımcı olmak için akıllı kod parçacığı doğrulaması ile birlikte gelir. Bu, kod parçacıkları eklerken web sitenizi bozmaktan sizi korur.
WPCode ayrıca en popüler WordPress kod parçacıklarının tümünü bulmayı kolaylaştıran yerleşik bir kod kitaplığına sahiptir. Uzmanlar tarafından yazılmış bu kod parçacıklarını sadece birkaç tıklamayla ekleyebilirsiniz.
En iyi yanı, tüm kod parçacıklarını tek bir merkezi ekrandan yönetmenize izin vermesi ve hatta etiketleri kullanarak bunları düzenleyebilmenizdir.
WPCode’un ücretsiz sürümü WordPress’e özel kod eklemek için ihtiyacınız olan her şeyle birlikte gelir. WPCode Pro, özel bulut snippet kütüphanesi, dönüştürme pikselleri, zamanlanmış snippetler ve daha fazlası gibi gelişmiş özellikler sunar.
Not: WPCode yöntemi, functions.php dosyasına eklenmesi gereken kod parçacıkları için kullanışlıdır. Diğer tema dosyalarına bir kod parçacığı eklemeniz istenirse, bu yöntem çalışmayacaktır.
WPCode ile WordPress’e Kod Ekleme ve Düzenleme
WordPress’e kod eklemek için WPCode eklentisini kullanacaksanız, doğrudan WordPress yönetici panonuza kod ekleyeceksiniz.
Öncelikle ücretsiz WPCode eklentisini yüklemeniz ve etkinleştirmeniz gerekir. Daha fazla ayrıntı için WordPress eklentisi yükleme hakkındaki başlangıç kılavuzumuza bakın.
Etkinleştirdikten sonra, WordPress yönetici panonuzda Kod Parçacıkları ” + Parçacık Ekle bölümüne gitmeniz yeterlidir. Ardından, ‘Yeni Ekle’ düğmesine tıklayın.
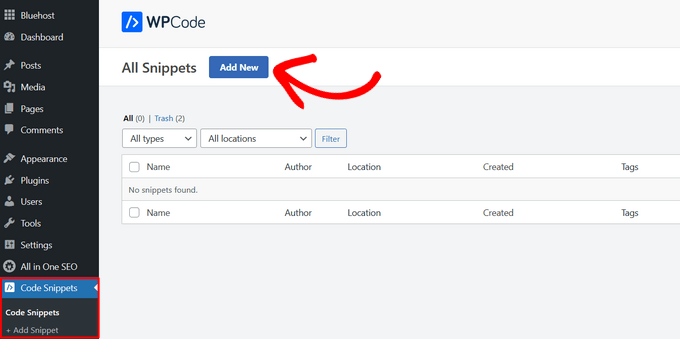
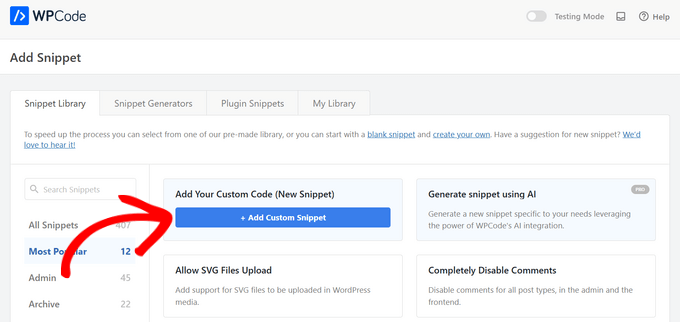
Bu sizi önceden hazırlanmış kütüphaneden bir snippet seçebileceğiniz veya özel kodunuzu ekleyebileceğiniz bir ekrana getirir.
Özel kod eklemek için, ‘Özel Kodunuzu Ekleyin (Yeni Snippet)’ seçeneğinin altındaki ‘+ Özel Snippet Ekle’ düğmesine tıklayın.
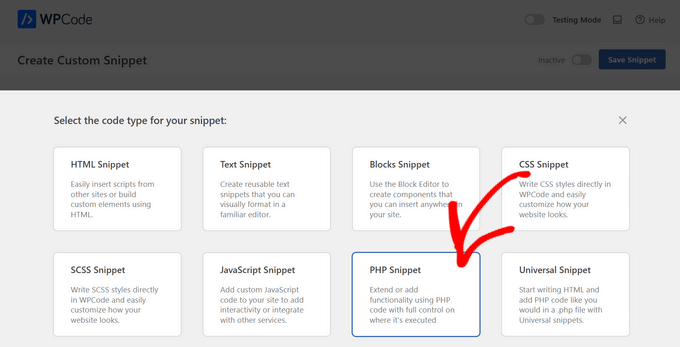
Ardından, ekranda beliren seçeneklerden istediğiniz kod türünü seçin.
Bu eğitim için ‘PHP Snippet’ seçeneğini seçeceğiz.
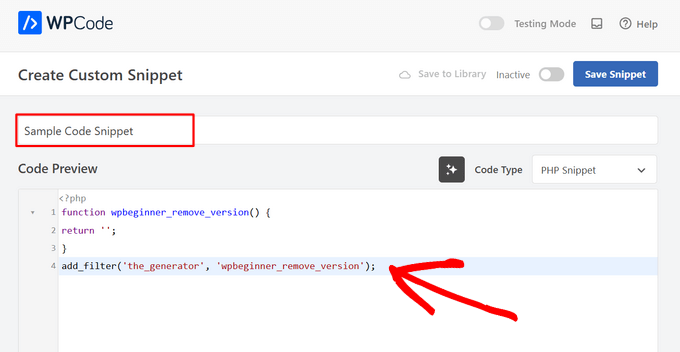
Bir sonraki ekranda, snippet’inize hatırlamanıza yardımcı olacak bir ad vererek başlayın.
Ardından, kodunuzu ‘Kod Önizleme’ kutusuna yapıştırın.
Ardından, ‘Ekleme’ bölümüne ilerleyin. Burada, kod parçacığını sitenizin herhangi bir yerine manuel olarak kopyalayıp yapıştırabileceğiniz bir kısa kod olarak kullanmayı seçebilirsiniz.
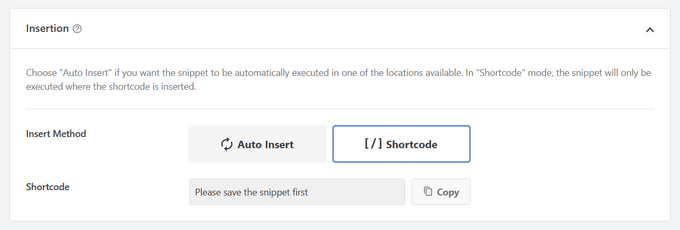
Veya kod parçacığının otomatik olarak ekleneceği bir konum (WordPress işlevi) seçmek için ‘Otomatik Ekle’ yöntemini seçebilirsiniz.
Her Yerde Çalıştır, Yalnızca Ön Uç, Yalnızca Yönetici, Site Genelinde Başlık, Gönderiden Sonra, Gönderiler Arasında, Paragraftan Önce ve daha fazlası gibi konumlar arasından seçim yapabilirsiniz.
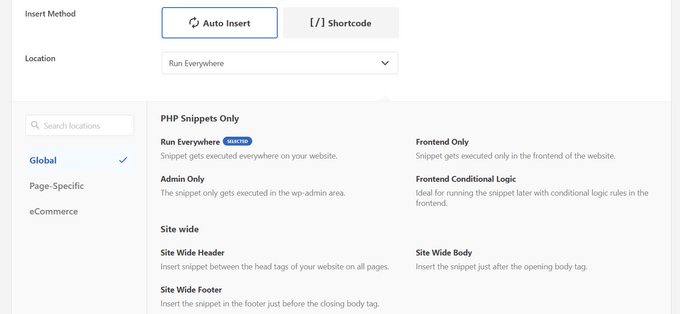
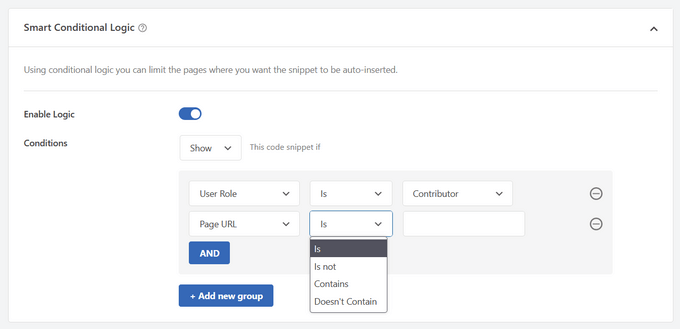
WPCode’un en iyi yanı, çeşitli Otomatik Ekleme seçeneklerinin yanı sıra, yeni başlayan dostu koşullu mantık seçenekleriyle birlikte gelmesidir. Bu, kodunuzun ne zaman yükleneceğini seçmenizi sağlar.
Kodu eklemeyi tamamladıktan sonra, sağ üst köşedeki anahtarı ‘Etkin Değil’den ‘Etkin’e getirin.
Ardından, ‘Snippet’i Kaydet’ düğmesine tıklayın.
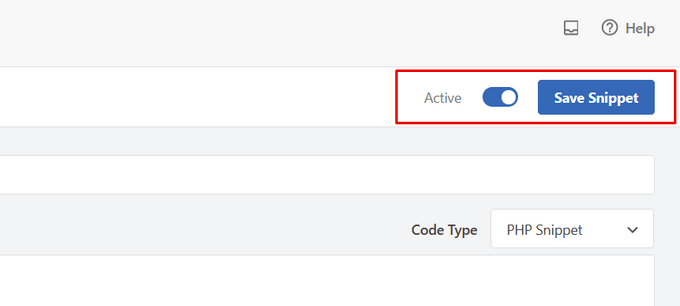
Snippet etkin olduğunda, seçtiğiniz ekleme yöntemine bağlı olarak otomatik olarak eklenecek veya kısa kod olarak görüntülenecektir.
Ayrıntılı talimatlar için WordPress’te özel kod parçacıklarının nasıl kolayca ekleneceğine ilişkin kılavuzumuza bakın.
WordPress Üstbilgi ve AltbilgisineNasıl Kod Eklenir?
Bazen sadece temanızın header.php veya footer.php dosyalarına kod eklemeniz gerekebilir. WPCode eklentisi de bunu kolayca yapmanıza yardımcı olabilir.
Bu, web sitenize Google Analytics, Google AdSense, Facebook Pixel, TikTok Pixel ve daha fazlası için bir izleme kodu eklemeniz gerektiğinde kullanışlıdır.
Ayrıca, tüm üstbilgi ve altbilgi kodlarınızı tek bir yerden yönetmenizi sağlar, herhangi bir manuel hatayı önler ve temanızı endişelenmeden yükseltmenizi veya değiştirmenizi sağlar.
Not: Bu yöntem en çok izleme komut dosyaları, özel CSS ve JavaScript kodu için işe yarar.
Kod Parçacıkları ” Üstbilgi ve Alt bilgi bölümüne gidin ve ardından kod parçacığınızı web sitenizin üstbilgi, gövde veya altbilgi bölümüne girin.
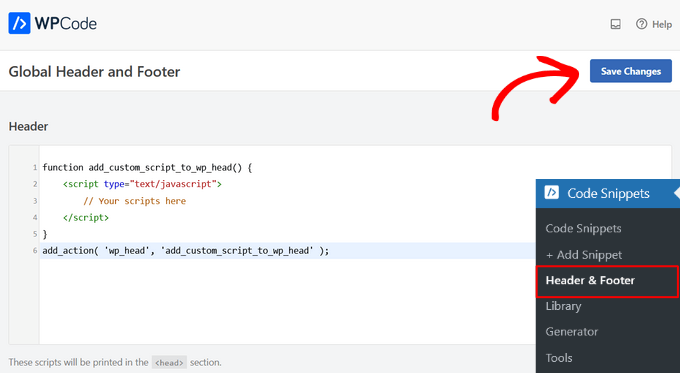
‘Değişiklikleri Kaydet’ düğmesine tıkladığınızdan emin olun ve kod parçacıklarınız web sitenizde yayınlanacaktır.
Daha fazla ayrıntı için WordPress’te üstbilgi ve altbilgi kodunun nasıl ekleneceğine ilişkin kılavuzumuza bakın.
Yöntem 2: Siteye Özel WordPress Eklentisine Özel Kod Ekleme
Bir başka esnek seçenek de siteye özel bir WordPress eklentisi kullanmaktır. Bu, kendi web siteniz için oluşturabileceğiniz ve tüm özel kodlarınızı kaydetmek için kullanabileceğiniz özel bir eklentidir.
Bu yöntemin avantajı, kodunuzun temanıza bağlı olmaması ve tema değiştirdiğinizde bile aktif kalmasıdır. Ayrıca web sitenizdeki WordPress güncellemelerinden de etkilenmez.
Not: Bu yöntem yalnızca functions.php dosyasına eklenmesi gereken kod parçacıkları için geçerlidir.
Siteye özgü bir eklenti kullanıyorsanız, özel kodunuzu eklemek için yerleşik WordPress eklenti düzenleyicisini kullanabilirsiniz.
İlk olarak, Eklentiler ” Eklenti Düzenleyici ‘ye gitmeniz ve ardından ‘Düzenlenecek eklentiyi seçin:’ etiketli açılır menüden eklentinizi seçmeniz gerekir.
Editör sitenize özel eklentinizi yükleyecektir. Ardından, sayfaya basitçe kod ekleyebilirsiniz.
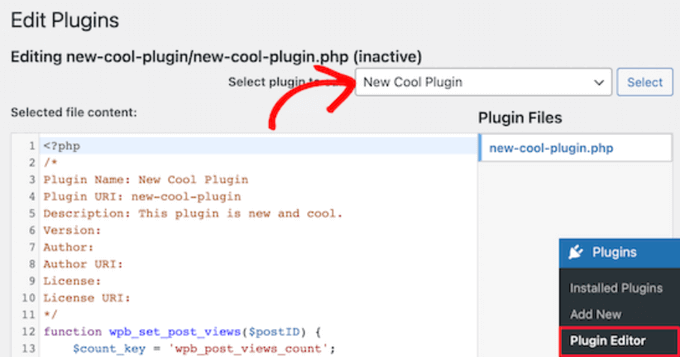
İşiniz bittiğinde, değişikliklerinizi kaydetmek için ‘Dosyayı Güncelle’ düğmesine tıkladığınızdan emin olun.
Kodunuzda bir şey eksikse veya web sitenizi bozabilirse, eklenti editörü değişikliklerinizi otomatik olarak geri alacaktır.
Siteye özgü bir eklentiye özel kod eklemenin bir başka yolu da FTP kullanmaktır. Daha fazla ayrıntı için WordPress’e dosya yüklemek için FTP’nin nasıl kullanılacağına ilişkin başlangıç kılavuzumuza bakın.
Tercih ettiğiniz FTP istemcisini kullanarak web sitenizi açmanız ve ardından eklenti dosyasına sağ tıklayıp ‘Görüntüle/Düzenle’ seçeneğini seçmeniz yeterlidir.
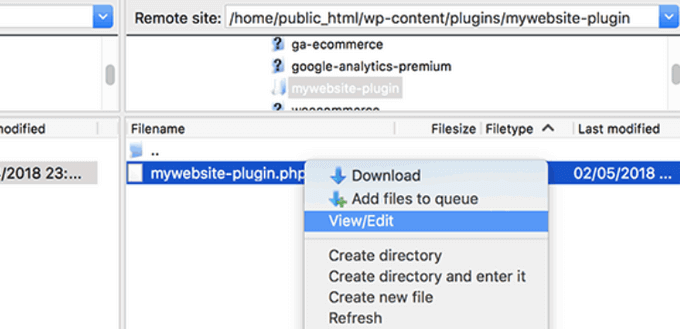
Bu, kod parçacıklarınızı ekleyebilmeniz için dosyayı açacaktır. Dosyayı kaydedip tekrar yüklediğinizde, değişiklikler otomatik olarak görünecektir.
Daha fazla ayrıntı için web siteniz için siteye özel bir eklentinin nasıl oluşturulacağına ilişkin kılavuzumuza bakın.
Yöntem 3: Functions.php veya Diğer Tema Şablonlarına Özel Kod Ekleme
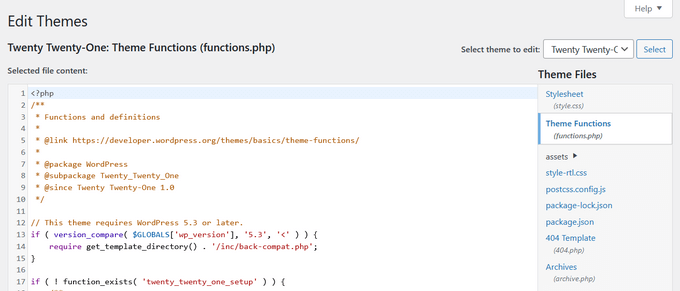
Son olarak, kod parçacıklarını doğrudan temanızın functions.php dosyasına ekleyebilirsiniz. Ancak, bazı dezavantajları olduğu için yukarıdaki diğer seçenekleri kullanmanızı öneririz.
İlk olarak, WordPress temanızı güncellerseniz, tüm değişiklikleriniz kaybolacaktır.
Ardından, eklediğiniz kod yalnızca söz konusu temayı kullanıyorsanız çalışacaktır.
Bununla birlikte, kod parçacıklarını nasıl düzgün bir şekilde kopyalayıp yapıştıracağınıza ve web sitenizi bozmaktan nasıl kaçınacağınıza bir göz atalım.
Kod parçacıklarını doğrudan temanızın functions.php dosyasına veya başka bir sayfa şablonuna ekliyorsanız, WordPress yönetici panelinizdeki Görünüm ” Tema Düzenleyici bölümüne giderek kodu ekleyebilirsiniz.
Ardından, sağ taraftaki sütundan dosyayı seçebilirsiniz ve dosya düzenleyicide açılacaktır.
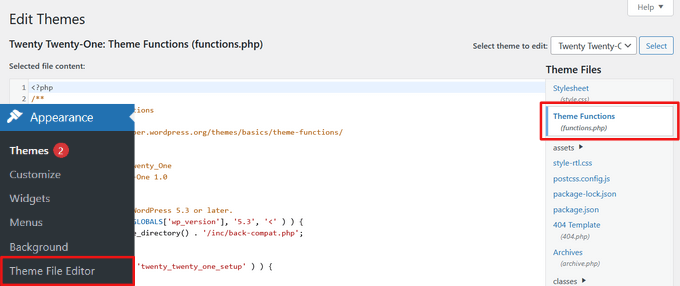
Takip ettiğiniz eğitim size kod parçacığını nereye ekleyebileceğinizi söyleyecektir, ancak söylemiyorsa, kodu dosyanın en altına, mevcut tüm kodların altına eklemeniz gerekir.
Diğer bir alternatif ise tema dosyalarınıza özel kod eklemek için WordPress barındırma dosya yöneticinizin FTP’sini kullanmaktır.
Basitçe FTP istemcinizi web sitenize bağlayın ve ardından wp-content ” themes ” your-theme-folder ‘a gidin ve düzenlenmesi gereken dosyaya sağ tıklayın.
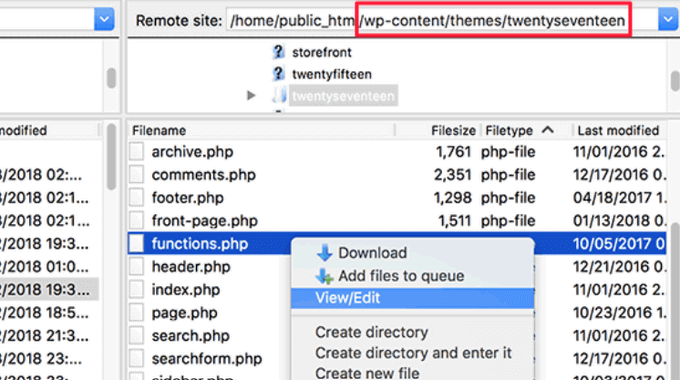
Ardından, dosyayı metin düzenleyicide açmak ve kod parçacığınızı eklemek için ‘Görüntüle/Düzenle’ seçeneğine tıklayın.
Özel Kod Eklerken Karşılaşılan PHP Hatalarını Giderme
Yeni başlayanların WordPress web sitelerine özel kod parçacıkları eklerken yaptıkları bazı yaygın hatalar vardır. Neyse ki, bu hataların çoğu önlenebilir ve kolayca düzeltilebilir.
Şimdi bu hatalara ve bunları düzeltmenin en iyi yollarına bir göz atalım.
1. PHP Begin ve End Etiketlerinin Yanlış Kullanımı
WordPress temel olarak PHP programlama dilinde yazılmıştır ve sunucunuza aşağıdaki kodun PHP tarafından işlenmesi gerektiğini söyleyen belirli bir sözdizimine sahiptir. İşte tipik bir PHP kod parçacığı böyle görünür:
1 2 3 4 5 6 7 | // PHP Begin Tag<?php // Rest of the code goes here // PHP End Tag?> |
Tüm PHP kodunuzun <?php ve ? > etiketleri içinde olması gerekir.
PHP end etiketi, PHP ve HTML arasında gidip gelen dosyalarda çok önemlidir. Bu, HTML ile birlikte PHP etiketlerini kullanan çoğu WordPress tema dosyasını içerir.
Kodunuzu PHP başlangıç etiketinin kapalı olmadığı bir yere yapıştırıyorsanız, kodunuzu başlangıç PHP etiketi olmadan eklemeniz gerektiğinden emin olmanız gerekir.
1 2 3 4 5 6 | <?php// Some pre-existing code // your custom code ?> |
Özel kodunuzu PHP bitiş etiketinin dışına veya sonrasına yapıştırıyorsanız, PHP başlangıç etiketini de eklemeniz gerekir.
1 2 3 4 5 6 7 8 | <?php// Some pre-existing code?> // Your custom code snippet<?php ?> |
Tüm hataların neredeyse %90’ı PHP başlangıç veya bitiş etiketlerinin yanlış yerleştirilmesinden kaynaklanmaktadır. Kodunuza bakmak, özel kod parçacığınıza PHP başlangıç veya bitiş etiketlerini eklemeniz gerekip gerekmediğini anlamanıza yardımcı olacaktır.
Ancak, functions.php gibi birçok WordPress tema dosyasında PHP bitiş etiketi bulunmayabilir. Bu, kodunuzu başlangıç veya bitiş etiketleri olmadan dosyanın en altına ekleyebileceğiniz anlamına gelir.
İşte bunun nasıl göründüğüne dair bir örnek.
1 2 3 4 5 6 7 8 9 10 11 | <?php// Lots of code in your theme's functions.php file////// Your custom codefunction custom_loginlogo() {echo '<style type="text/css">h1 a {background-image: url('.get_bloginfo('template_directory').'/images/login_logo.png) !important; }</style>';}add_action('login_head', 'custom_loginlogo'); |
Bazı eğitimlerin PHP başlangıç ve bitiş etiketlerini nasıl kullanacağınızı zaten bildiğinizi varsaydığını unutmayın. Bu nedenle, bu etiketler olmadan size basitçe bir kod parçacığı gösterebilirler.
1 2 3 4 5 6 | function custom_loginlogo() {echo '<style type="text/css">h1 a {background-image: url('.get_bloginfo('template_directory').'/images/login_logo.png) !important; }</style>';}add_action('login_head', 'custom_loginlogo'); |
Bazen kod parçacıkları verildiğinde birden fazla konuma eklenebilir, bu nedenle PHP bitiş ve başlangıç etiketleri dahil edilmeyecektir.
Tema dosyalarınıza böyle bir kod parçacığı eklerken, bunun PHP etiketlerinin içinde olduğundan emin olmanız gerekir.
2. Yanlış Yerleştirme Hataları
PHP’nin fonksiyonlar, koşullu mantık ve döngüler için özel bir sözdizimi vardır. Bu sözdizimi, bir fonksiyonun ne zaman başlayıp ne zaman bittiğini gösteren küme parantezlerine bağlıdır.
Örneğin, işte basit bir PHP işlevi:
1 2 3 4 5 | <?phpfunction wpbeginner_tutorial() {echo "Hello World!";}?> |
Şimdi, bu işlevle hiçbir ilgisi olmayan özel bir kod parçacığı eklemek istiyorsanız, bunu aşağıdaki gibi bu işlevin dışına koymanız gerekir:
1 2 3 4 5 6 7 8 9 10 11 12 | // Pre-existing code in your theme file<?phpfunction wpbeginner_tutorial() {echo "Hello World!";}// Your custom codefunction custom_loginlogo() {echo '<style type="text/css">h1 a {background-image: url('.get_bloginfo('template_directory').'/images/login_logo.png) !important; }</style>';}?> |
Başlangıç veya bitiş küme parantezlerini atlarsanız, bu durum kodu bozar ve bir hata sayfası ile karşılaşırsınız.
WordPress’te PHP Hatalarını Anlama
WordPress’e özel kod eklenmesinden kaynaklanan hatalar genellikle ayrıntılı bir hata mesajıyla sonuçlanır. Bunların çoğu sözdizimi hataları, ayrıştırma hataları veya beklenmeyen karakterlerden kaynaklanan ölümcül hatalardır.
İyi haber şu ki, bu hatalar size kodunuzdaki hangi satırın hataya neden olduğunu söyleyecektir.

Daha sonra, kodu gözden geçirmek ve neyi kaçırdığınızı anlamak için tam satıra gidebilirsiniz.
Bunun için, kod düzenleme için uygun bir metin editörü kullanmanızı öneririz, çünkü satır numaraları ve sözdizimi vurgulaması sorunu kolayca çözmenize yardımcı olabilir.
WPCode eklentisini kullanıyorsanız, bir hatanın meydana geldiği tam satırı size gösterecek hassas hata raporlaması ile birlikte gelir.
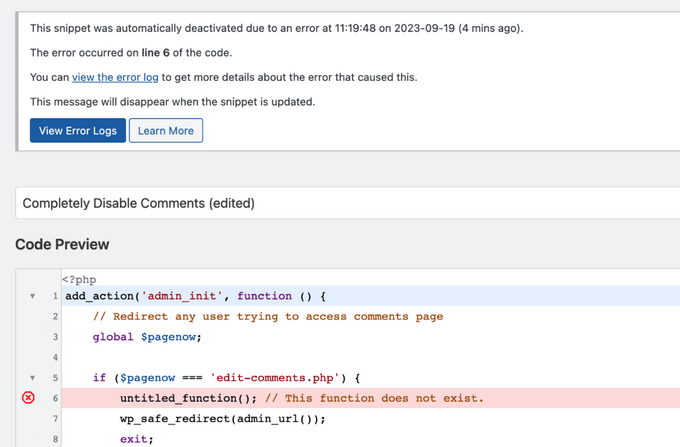
WPCode, web sitenizin yönetici alanına erişmenizi engelleyebilecek bir hata bulduğunda, sorunu güvenli bir şekilde çözebilmeniz için snippet’leri otomatik olarak devre dışı bırakacaktır.
WordPress Sitenize Erişilemediğinde Ne Yapmalısınız?
Öncelikle derin bir nefes alın ve panik yapmayın. Web sitenizin tüm dosyaları hala orada ve onlara erişebilirsiniz.
WordPress hosting hesabınızda bir FTP istemcisi veya cPanel’deki dosya yöneticisi uygulamasını kullanarak web sitenize bağlanmanız yeterlidir.
Daha fazla ayrıntı için WordPress’e dosya yüklemek için FTP’nin nasıl kullanılacağına ilişkin başlangıç kılavuzumuza bakın.
Ardından, hataya neden olan kodu eklediğiniz dosyayı bulun ve düzenlemek için açın.
Ardından, sorunları kod parçacığı ile düzeltmeyi deneyebilirsiniz. Bu sorunları çözemezseniz, eklediğiniz kod parçacığını kaldırın ve değişikliklerinizi kaydedin.
Şimdi, siteniz tekrar normale dönmüş olmalıdır. Hala bazı hatalar gösteriyorsa, WordPress temanızın yeni bir kopyasını indirin ve zip dosyasını bilgisayarınıza çıkarın.
Bundan sonra, daha önce değişiklik yaptığınız dosyayı bulun ve eski dosyanın üzerine yazarak sunucunuza yükleyin.
Bu sorunları çözmenin daha fazla yolu için, en yaygın WordPress hataları ve bunların nasıl düzeltileceği hakkındaki kılavuzumuza bakın. Bu işe yaramazsa, adım adım teşhis gerçekleştirmek için WordPress sorun giderme kılavuzumuzu izleyin.
Umarız bu makale web’deki kod parçacıklarını WordPress’e nasıl yapıştıracağınızı öğrenmenize yardımcı olmuştur. Ayrıca WordPress sitenizde kodu nasıl kolayca görüntüleyebileceğinize ilişkin kılavuzumuza ve en iyi WordPress geliştirme araçlarına göz atmak isteyebilirsiniz.
If you liked this article, then please subscribe to our YouTube Channel for WordPress video tutorials. You can also find us on Twitter and Facebook.


prabhat kumar biswal
why image uploading option was not mention
Max
Thanks for the article but it’s really thrown my understanding of the functions.php file. Is a closing tag really required on every theme’ s Functions file. For example, looking at a clean, untouched installation of the popular Divi theme, there is no closing php tag: ?>
Divi works perfectly without this closing tag so I am assuming that some themes’ Functions.php files don’t require it?
Another point – many people giving out snippets (yourself included) include line numbers as part of the code. When the code snippets are pasted into the functions.php file you then need to go through each line deleting the line numbers, and only the line numbers. If you don’t do this the code breaks and won’t work. I expect this is a very common mistake too. So it would be preferable to avoid these potential problems by posting the code in your tutorials without the line numbers so we don’t have to tediously edit the line numbers out after pasting and risk corrupting the code.
WPBeginner Support
Hey Max,
Good questions. You are right, it is not necessary to add the closing php tag at the end of the functions file.
As for line numbers in code snippets, you will notice a tiny menu when you take your mouse over to a code snippet on WPBeginner. This menu contains a view source or copy button. Clicking on it will open a popup window where you can copy the raw code without line numbers.
Hope this helps.
Admin
Mayaprakash Pant
I read this article and it is really nice. Just to know one thing, what are the sentences written in green in above tutorial? Are they comments or something else? Help me with this.
WPBeginner Support
Hey Mayaprakash,
Yes those are comments to help users understand whats happening in the code.
Admin
Charlesdeeds
Thank you my dear for your support. you have saved a brother from loosing he’s job appointment… Thanks and Best regards
Waqar Ahmed
A very easy to understand article and explained a great topic.
Dylan Cornelius
You’ve done a wonderful job describing a somewhat technical topic in an easy-to-understand, straightforward way. Your examples are simple and really help. Kudos!
WPBeginner Support
Thanks Dylan
Admin
Md. Mohiuddin Faisal Bhuiyan
Very common mistake also for me. We always have to aware of this.
Asanka Ranjeewa
It is really help full, even i am knowing a little codding. it is really help full and now i know it even better. thanks.
WPBeginner Support
Hey Asanka,
Glad you find it helpful You may also want to subscribe to our YouTube Channel for WordPress video tutorials.
Admin
Anna
I’m laughing out loud because it’s as if you’d written the article based on the mistakes I just made! Thank you so much for spelling out the little details as I was quickly back up and running thanks to this article.
wonntann
Thanks for this easy to follow article!
Aashi
Whenever i comment and uncomment the codes it creates an error sometimes of “;” or sometimes of “/”.
I again uploaded the file in which there were no changes but still the same error occurs.
Stuck badly.. What to do next.
Keli
Help! I just made one of the mistakes mentioned above and my site is broken. I saw your reply to Amy but can’t figure out how to change my function php. Please help!
Keli
I have a child theme installed and activated, and I added google analytics code to ‘Appearance> Editor> Theme Functions (functions.php) which was empty and now my site is broken? its a huge issue as there si currently facebook promo running driving people to a broken site.
Amy
Syed can you please help me!!
WPBeginner Support
Hi Amy,
You will need access to cPanel dashboard for your web hosting account or FTP credentials. Once you have those, you can connect to your WordPress site using FTP or you can use File Manager from your hosting account dashboard. Locate your theme’s functions.php file and edit it. You will need to go to line 14 to remove the unexpected code or remove the code that you entered earlier causing the issue.
Admin
isi
hi i tried to paste a font on php, im newbie on this below is the code can anyone see which is my mistake….
<html >
<link rel="Shortcut Icon" href="/images/favicon.ico ” type=”image/x-icon” />
<link rel="pingback" href="” />
<?php
wp_head();
Jessica
So using the example above, please could you advise which tags would be stripped from your code snippet below, if you were to paste the code into an existing functions.php file that already had an opening and closing tag?
// Paste your Google Analytics code from Step 4 here
Jeffrey
I pasted the code to update the date and time of when a post was updated rather than it displaying the “original” date of the post. I posted right after the Google authorship in my Genesis Child Theme. It’s displaying the updated date but it doesn’t say “Updated. . . “, it just shows the original date and underneath shows the updated date. The file starts with in the file, so my thinking is I have too many “php” in the code. I’m sure it is not placed inside another function. Any help would be greatly appreciated. Here is the code:
add_action(‘genesis_before_post_content’, ‘add_last_modified_date’);
function add_last_modified_date() {
if (is_single()) { ?>
<time datetime="”>
<?php }
}
This is the code BEFORE where I placed the above code:
960, ‘height’ => 80 ) ); ** commented out by payam 09-06-11 to add my own logo and header bg
/** Add support for 3-column footer widgets **/
add_theme_support( ‘genesis-footer-widgets’, 3 );
/* ACF Options page */
if(function_exists(‘acf_add_options_page’)) {
acf_add_options_page( ‘Site Options’ );
// acf_add_options_sub_page(‘Header’);
// acf_add_options_sub_page(‘Footer’);
}
/* payam add google publisher authorship info to home page only */
add_action(‘genesis_meta’, ‘child_google_publisher_authorship’);
function child_google_publisher_authorship() {
if ( is_front_page() ) {
$ED_google_publisher_authorship_link = ” ;
}
echo $ED_google_publisher_authorship_link;
}
James
Thanks so much!! Saved me from pulling my hair out!
Sinan İŞLER
Haha noob friendly article nice
Barbara
Am I the only one wondering if my google analitics information can be pasted into my WordPress.com site??? In the past I’ve come across things suggested to be added to WordPress only to find out it does not work for my .com. So tell me. Did I go through all of the analitics set up for nothing? I hope not. Where could you paste the information in WordPress.com? There no place to be found.
WPBeginner Support
Barbara, this guide is for self hosted WordPress.org sites. As for WordPress.com blogs, you can not add Google Analytics code or try to pass any unauthorized code into a free WordPress.com blog. Please see our guide on WordPress.com vs WordPress.org
Admin
Louis Sahagun
I was informed that I have to add script to the beggining of: /google_analytics_auto.js’/script/head> in order to change this from relative url to absolute url. This will fix many broken links since I recently changed the IDX to my site. After reading the above instructions, it sounds like I need to use a FTP client like Filezilla to perform this. Is this correct?
Anthony
Hello,
I found your tutorial unfortunately after I broke my site. I am getting this error:
Parse error: syntax error, unexpected T_IF in /home/content/45/7334345/html/wp-content/themes/Magazine110613/functions.php on line 31
But I cannot access the admin panel to fix the code. Any suggestions?
Thanks!
WPBeginner Support
You can fix this by accessing your site using an FTP client like Filezilla. Download a fresh copy of your theme and extract it on your computer, then you need to upload the new functions.php file from your computer to to your theme directory using the FTP client.
Admin
Dwight B
Hi I was referred to your article from this link:
http://cyberchimps.com/guide/make-responsive-unresponsive/
I have a question, since I have my child theme installed and activated, is adding the PHP code as simple as going to ‘Appearance> Editor> Theme Functions (functions.php) [which is empty]’ and pasting it?
Or are there other files that need to be edited?
Thanks, hope you can help.
Editorial Staff
It is that simple, but you have to be very careful with the proper syntax that we have highlighted in the article above. If you paste the code incorrectly, then you can potentially lock yourself out of your WordPress admin. This is why we highly recommend that you know how to use FTP before modifying code through WordPress admin.
Admin
Sean
Wow, this is the 1st ever article I have seen on the web which acknowledges the fact that newbies who want to get things done with adding code do not necessarily know the assumptions that tutorial writers often have.
This is a very thoughtful and great gesture on your part. Thank You.
I do not blame the experts since they are writing form another level, but seriously, it wouldn’t hurt them or take any extra time to just add the 1 or 2 lines to make sure their code is understood by everyone.
Right now I am looking around for the explanation of another basic thing that must be obvious to all the PHP pros but is totally lost on me, which is, what do they mean when they say “Paste the code below within the single.php within the loop” . . .
What’s “within the loop” here and where should I paste the code snippet in my single.php file ?
Any ideas please ?
WPBeginner Support
Sean, in WordPress terminology, the loop refers to the WordPress Loop. It is the code that runs a loop, generating HTML for posts fetched by the SQL query run by WordPress. It starts like this:
<?php if ( have_posts() ) : while ( have_posts() ) : the_post(); ?>and ends like this:
<?php endwhile; else: ?><p><?php _e('Sorry, no posts matched your criteria.'); ?></p>
<?php endif; ?>
When you are asked to paste a snippet inside the loop you need to paste it between the start and end of the loop.
Admin
Michael
Nice, thoughtful article. There are many little things a beginner must know, like these simple errors, that are quickly taken for granted once we learn them. It’s these little things that often cause people to just give up. But that keeps some of us in business :-).
Greg
Thanks for this – the one questions that I have is that often I have seen that there are ‘code snippets’ that are offered, but I have NO idea which file they are to be pasted into!
Others, like the one that talks about Displaying Custom Fields here:
http://codex.wordpress.org/Using_Custom_Fields#Displaying_Custom_Fields
The links to “The Loop” quickly get very unclear when they make statements like:
The Loop should be placed in index.php
and
……..in any other Templates used to display post information.<=== they must be kidding, right?
This is where I get very frustrated. How am I supposed to know what "Any of the OTHER Templates used to display post information" is supposed to mean.
Any guidance you could give on this would be greatly appreciated.
Editorial Staff
Hey Greg,
It is definitely a tough question as to where to paste the code because the answer varies based on the situation. If it is a theme based function, then you would use functions.php file (or another theme file). If it is a site based function, then you probably want to use a site-specific plugin.
The Loop is used by WordPress to display posts. Using The Loop, WordPress processes each post to be displayed on the current page, and formats it according to how it matches specified criteria within The Loop tags. Any HTML or PHP code contained in the Loop will be processed on each post. You read more about it here: http://codex.wordpress.org/The_Loop
As for template files, you can get a better overview here: http://codex.wordpress.org/Template_Hierarchy#Visual_Overview
Not all themes have all these template files. The most basic theme only needs style.css file and an index.php file. But the more customization you want, the more options you have available for you. The visual overview in the link above should explain that.
“The loop should be placed in index.php” is the very bare bone example. Some themes have separate loop files altogether (i.e loop.php or loop-content.php, loop-quote.php etc). Then the theme author would call those loop files into other template files like single.php where they can say get_template_part( ‘loop’, ‘single’ ); which will include the loop-single.php file. Theme authors have different practices to make things work. It also depends on whether you are using a parent theme or a child theme. Because in child themes, you are mainly just working with the functions.php file and hooks available in the theme framework. Yes it gets pretty tricky when it comes to the child themes.
Admin
Felipe
In your very first example:
//This is the opening tag of a PHP Code
<?php
the comment *before* the opening tag of a PHP Code won't run very well Not a big deal as few people will paste that anywhere but as the whole guide is about learning how to mix PHP code correctly with HTML and other PHP code …
Editorial Staff
Just using that for explanation purposes.
Admin
scottwyden
I used to make these mistakes and there was never an article like this to help me learn. Thanks for writing this up for newbies!