
Kendi web sitelerimizi ve markalarımızı yönettiğimiz son 16 yılda öğrendiğimiz en iyi uygulamalardan biri, web sitelerinizi düzenli olarak yedeklemenin önemidir. Yedeklemeler, siber saldırı, kazara veri silinmesi veya diğer planlanmamış olaylar gibi bir şeylerin ters gitmesi durumunda sitenizi geri yüklemenize yardımcı olur.
Ancak WordPress’i bir yedekleme dosyasından geri yüklemek yeni başlayanlar için kolay değildir. İster bir eklenti kullanın ister yedekleri manuel olarak geri yükleyin, hatalar olabilir. Neyse ki, WordPress ve yedeklemeler konusunda kullanıcılara yardımcı olma konusunda çok fazla deneyime sahibiz.
Bu nedenle, bu makalede size WordPress’i bir yedekten nasıl güvenli bir şekilde geri yükleyeceğinizi adım adım göstereceğiz.
Yedekleri Anlama ve WordPress’i Geri Yükleme
WordPress siteniz için yedekleme oluşturmanın farklı yolları vardır. Bize göre bunu yapmanın en iyi yolu bir WordPress yedekleme eklentisi kullanmaktır.
Bununla birlikte, WordPress veritabanınızın manuel bir yedeğini oluşturabilir ve WordPress dosyalarınızı bir FTP istemcisi kullanarak indirebilirsiniz.
WordPress’i yedeklerden geri yüklemek tamamen yedeği nasıl oluşturduğunuza bağlıdır. Örneğin, Duplicator Pro kullanılarak oluşturulan yedekler aynı eklenti kullanılarak geri yüklenebilir. Benzer şekilde, manuel yedeklemelerin manuel olarak geri yüklenmesi gerekir.
Birçok WordPress kullanıcısı web sitelerinin tamamını yedeklemez. Bunun yerine yalnızca WordPress temalarını, yükleme dizinlerini ve WordPress veritabanlarını yedeklerler. Bu, yedekleme boyutunu azaltır ancak siteyi geri yüklemek için gereken adımları artırır.
Yedeklemenizi nasıl oluşturursanız oluşturun, temel adımlar aynıdır.
Profesyonel İpucu: Bir siber saldırı olayından veya başka bir çevrimiçi güvenlik acil durumundan sonra WordPress sitenizi geri yüklemek için zamanınız veya teknik becerileriniz yoksa endişelenmeyin, size yardımcı olabiliriz.
Profesyonel Hacklenmiş Site Onarım Hizmetlerimizi aldığınızda, web sitenizi rekor sürede temizleyeceğiz. Bu şekilde, siteniz minimum kesinti süresi yaşar ve ziyaretçileriniz üzerindeki etkiyi azaltabilirsiniz. Hatta sitenizin 1 iş günü içinde geri yüklenmesini sağlayacak kolaylaştırılmış bir seçenek de sunuyoruz.
Şimdi, WordPress sitenizi yedekten nasıl geri yükleyeceğinize bir göz atalım. İşte bu makalede anlatacaklarımıza hızlı bir genel bakış:
- What to Do Before You Restore WordPress From Backup
- Restoring WordPress Using Duplicator Pro
- Restoring WordPress From UpdraftPlus Backup File
- Restoring WordPress Database From Backup Using phpMyAdmin
- Restoring WordPress Database Backup Using cPanel
- Manually Restoring WordPress Files Using FTP
- Troubleshooting WordPress Backup Restore Issues
- Things to Do After Restoring Your WordPress Site
- FAQs About Restoring WordPress Backups
Not: Bu kılavuz, bir WordPress sitesini yedekten geri yükleme hakkındadır. Web sitenizi yeni bir alan adına taşımaya çalışıyorsanız, WordPress’i SEO’yu kaybetmeden yeni bir alan adına taşıma kılavuzumuza göz atmalısınız.
Veya localhost’tan canlı bir web hosting hesabına geçmeye çalışıyorsanız, WordPress’i yerel bir sunucudan canlı bir siteye nasıl taşıyacağınıza ilişkin bu kılavuzu izleyin.
WordPress’i Yedekten Geri Yüklemeden Önce Yapmanız Gerekenler
WordPress’i bir yedekten geri yükleyebileceğiniz farklı yolların üzerinden geçmeden önce, ilk olarak atmanız gereken adımları tartışalım.
Doğal olarak, WordPress web sitenizin önceden var olan bir yedeğini hazır bulundurmanız gerekir. WordPress sitesinin nasıl yedekleneceğine ilişkin kılavuzumuzu takip ederek daha fazla bilgi edinebilirsiniz.
Yedekleriniz Dropbox, Google Drive veya OneDrive gibi uzak bir depolama konumunda saklanıyorsa, yedekleme dosyalarınızı bu konumlardan bilgisayarınıza indirebilirsiniz.
Bunun yanı sıra, eski WordPress dosyalarını silmeniz ve yeni bir yükleme yapmanız da gerekebilir. Bu şekilde, sitenize kötü amaçlı yazılım bulaşmışsa, bozuk dosyalar varsa veya bir şey eksikse, otomatik olarak kaldırılacak ve temizlenecektir.
Bunu yalnızca yedeklemenizin güncel olduğundan ve tüm özelleştirmelerinizin ve yüklemelerinizin kaydedildiğinden eminseniz yapmanız gerektiğini unutmayın.
Dosyaları cPanel veya FTP kullanarak silebilirsiniz. Seçeneğiniz varsa, daha hızlı olduğu için cPanel’i kullanmanızı öneririz.
Hosting panonuzun cPanel ‘ine giriş yapmanız yeterlidir. Ardından, ‘Dosyalar’ bölümünün altında, ‘Dosya Yöneticisi’ simgesine tıklayın.

Dosya yöneticisi arayüzü şimdi yeni bir tarayıcı sekmesinde açılacaktır.
Tüm WordPress dosyalarını seçmeniz ve silmeniz gerekecektir. Tüm dosyalar seçildikten sonra, ‘Sil’ seçeneğine tıklamanız yeterlidir.

Dosyaları FTP istemcilerini kullanarak da silebilirsiniz, ancak bu işlem çok daha yavaştır.
Daha önce FTP kullanmadıysanız, lütfen WordPress’e dosya yüklemek için FTP’nin nasıl kullanılacağına ilişkin kılavuzumuza bakın.
Bu yaklaşım için, bir FTP istemcisi kullanarak web sitenize bağlanmanız yeterlidir. Ardından, WordPress kök dizininizdeki tüm dosyaları seçin, ardından ekrana sağ tıklayın ve kaldırmak için ‘Sil’ seçeneğini seçin.

Dosyalarınız silindikten sonra WordPress’i tekrar yüklemeniz ve web sitenize giriş yapmanız gerekir. Yükleme işlemi barındırma sağlayıcınıza bağlıdır. Daha fazla ayrıntı için lütfen WordPress‘in doğru şekilde nasıl kurulacağına ilişkin kılavuzumuza bakın.
Yükleme işleminin hangi yöntemi kullandığınıza bağlı olacağını unutmayın, ancak manuel olmayan herhangi bir yaklaşım için çok basit olmalıdır. Yedeğinizi manuel olarak geri yüklerken WordPress’i yükleme adımlarını daha sonra kısaca gözden geçireceğiz.
Artık WordPress yedeklerini geri yüklemeye hazırsınız.
Duplicator Pro Kullanarak WordPress’i Geri Yükleme
Duplicator Pro en iyi WordPress yedekleme eklentilerinden biridir. Sitenizi taşımayı ve yedeklemeyi çok kolaylaştırır.
Öncelikle, WordPress sitenizin Duplicator tarafından oluşturulmuş tam bir yedeğine sahip olduğunuzdan emin olmanız gerekir.
Ardından, yedek arşiv dosyasını bilgisayarınıza indirmeniz gerekir. Bu, temaları, eklentileri, ayarları ve daha fazlasını içeren WordPress dosyalarınızın eksiksiz bir kopyası olacaktır.
Yedekleme dosyalarınız hazırolduğunda , yapmanız gereken bir sonraki şey Duplicator Pro eklentisini yüklemek ve etkinleştirmektir. Daha fazla ayrıntı için lütfen bir WordPress eklentisinin nasıl kurulacağına ilişkin kılavuzumuza bakın.
Önemli Not: Size ücretsiz olarak kullanışlı yedekleme ve taşıma özellikleri sunan daha temel bir Duplicator ek lentisi de vardır. Ancak, bu yedekleri geri yüklemek için eklentiyi kullanmak ve bu öğreticiyi takip etmek için premium Duplicator Pro planına ihtiyacınız vardır.
Etkinleştirmenin ardından, WordPress panonuzdan Duplicator Pro ” Yedekleri İçe Aktar seçeneğine gidebilirsiniz. Ardından, arşiv dosyasını sürükleyip bırakarak veya ‘Dosya Seç’ düğmesine tıklayarak yükleyebilirsiniz.

Eklenti şimdi arşiv dosyasını yükleyecek ve size ayrıntıları gösterecektir.
Ayrıntıları gözden geçirebilir ve ardından ‘Devam Et’ düğmesine tıklayabilirsiniz.

Ardından, sitenizi hızlı bir şekilde önceki bir tarihe geri yüklemek için bir kurtarma noktası ayarlamanız gerekir.
Bu işlem tamamlandıktan sonra ‘Ayarla’ düğmesine tıklayabilirsiniz.
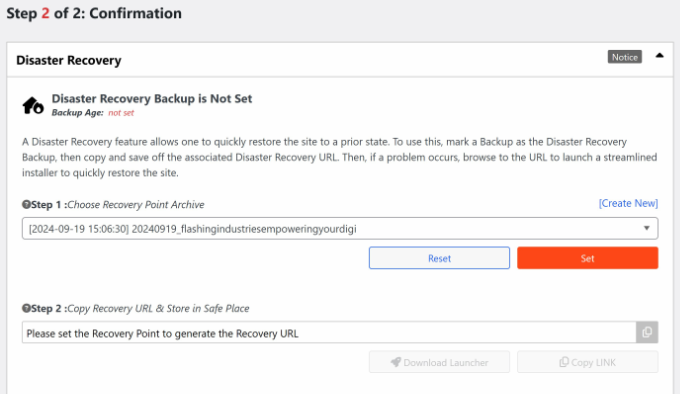
Bundan sonra, gelecekte istediğiniz zaman kullanmak üzere saklayabileceğiniz bir kurtarma URL’si alacaksınız.
Buradan aşağı kaydırabilir ve ‘Yükleyiciyi Başlat’ düğmesine tıklayabilirsiniz.
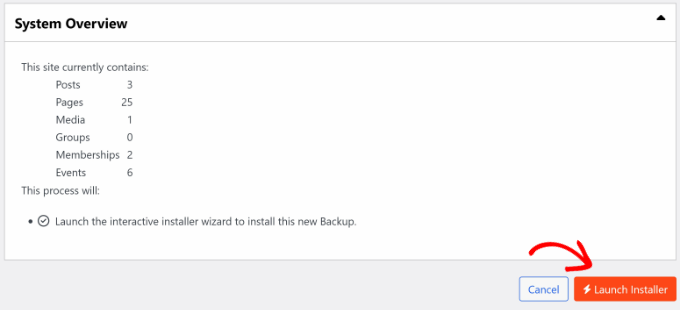
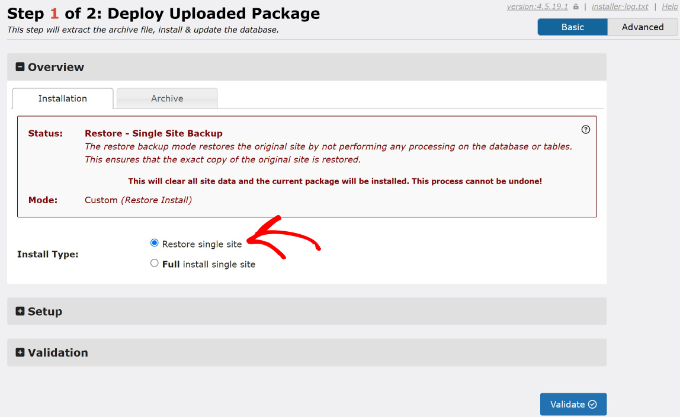
Ardından, paketi dağıtmanız gerekecektir. Eklenti, kurulum ayrıntılarına genel bir bakış sunacak ve‘ Tek siteyitam yükle’ ile ‘Tek siteyi geri yükle’ arasında seçim yapmanıza izin verecektir.
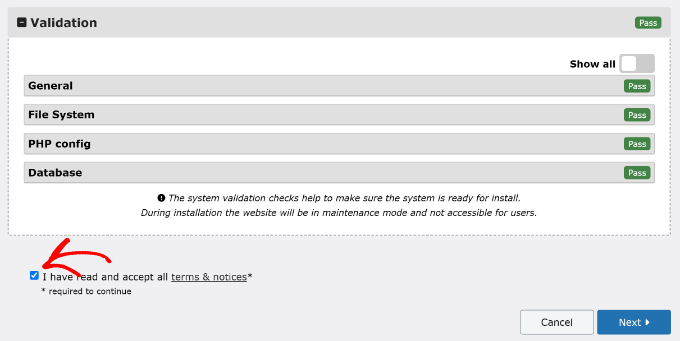
‘Tek siteyi geri yükle’ seçeneğini seçebilir ve aşağı kaydırarak ‘Doğrula’ düğmesine tıklayabilirsiniz.
Doğrulama tamamlandıktan sonra, şartlar ve bildirimleri kabul etmek için onay kutusunu tıklamanız gerekecektir.
Bundan sonra, ‘İleri’ düğmesine tıklamanız yeterlidir.
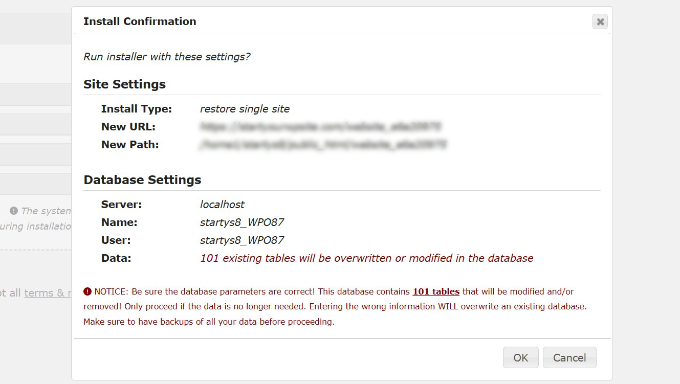
Şimdi kurulum onayını içeren yeni bir pencere açılacaktır.
Devam etmek için ‘Tamam’ düğmesine tıklayabilirsiniz.
Yükleyici şimdi yedek arşiv dosyalarınızı ayıklayacaktır. İşlem tamamlandığında, yükleme sonuçlarını görmelisiniz.
Yedeklemenizin kurulumunu tamamlamak için ‘Yönetici Girişi’ düğmesine tıklamanız yeterlidir.
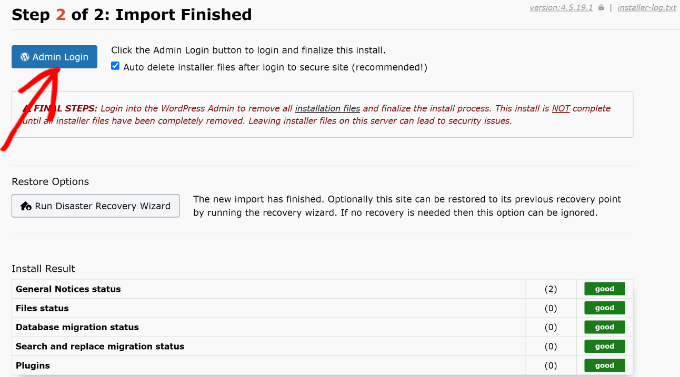
Devam edin ve WordPress kontrol panelinize giriş yapın.
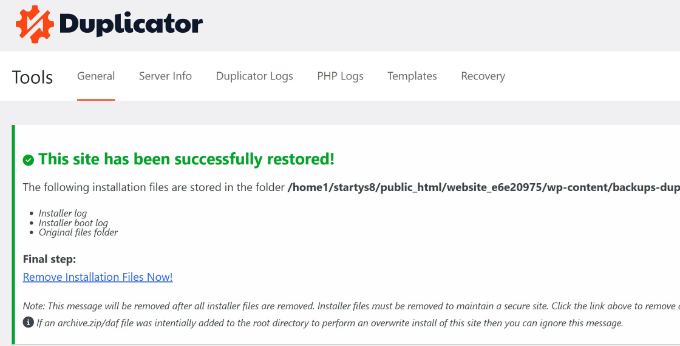
İşte bu kadar! Artık WordPress sitenizi bir Duplicator yedeğinden başarıyla geri yüklediniz.
WordPress’i UpdraftPlus Yedekleme Dosyasından Geri Yükleme
UpdraftPlus bir diğer popüler premium WordPress yedekleme eklentisidir. Yedekleme oluşturmak için UpdraftPlus kullandıysanız, bu bölüm tam size göre.
UpdraftPlus, WordPress’i bir yedekten geri yüklemek için çok uygun bir yol sunar. WordPress web sitenizde oturum açmanız ve Ayarlar ” UpdraftPlus Yedekleri sayfasına gitmeniz gerekir.
Buradan, eklenti ayarlarındaki ‘Yedekleme / Geri Yükleme’ sekmesine gidebilirsiniz.
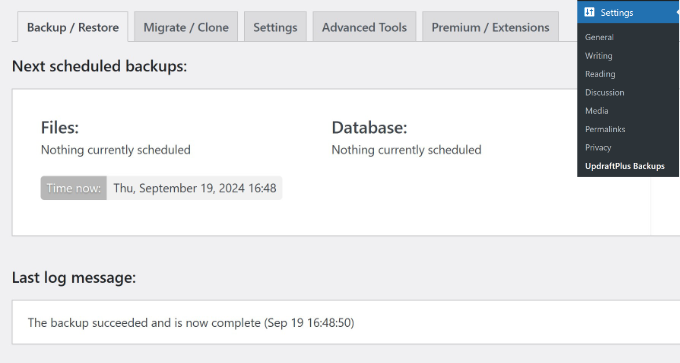
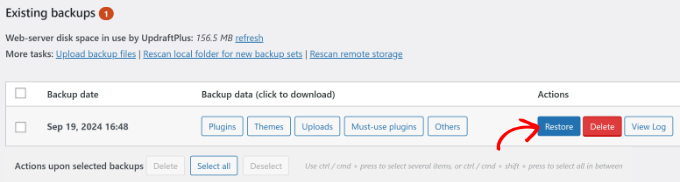
Ardından, ‘Mevcut yedeklemeler’ bölümüne ilerlemeniz gerekecektir.
UpdraftPlus’tan zaten bir yedekleme dosyanız varsa, bu bölümde onu görmelisiniz. Yüklemek istediğiniz yedekleme için ‘Geri Yükle’ düğmesine tıklamanız yeterlidir. Alternatif olarak, yedekleme dosyalarını bilgisayarınızdan veya bulut depolama alanından yüklemeyi de seçebilirsiniz.
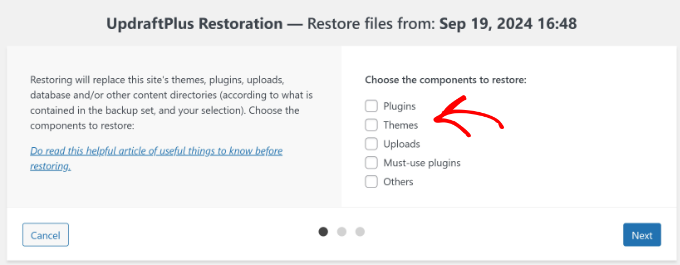
Bundan sonra, geri yüklemek istediğiniz bileşenleri seçmeniz gerekir. Bu seçenekler arasında eklentiler, temalar, yüklemeler, kullanılması gereken eklentiler ve diğerleri yer alır.
Seçimlerinizi yaptıktan sonra ‘İleri’ düğmesine tıklamanız yeterlidir.
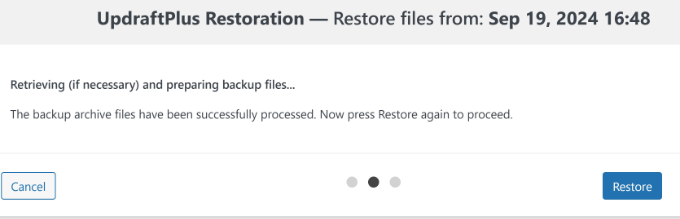
Eklenti daha sonra yedekleme dosyasını işleyecektir.
Hazır olduğunda, ‘Geri Yükle’ düğmesine tıklayabilirsiniz.
Eklenti daha sonra önceden seçtiğiniz bileşenleri geri yüklemeye başlayacaktır.
İşlem tamamlandığında bir “Geri yükleme başarılı!” mesajı göreceksiniz. Eklenti ayrıca geri yüklenen dosyaları takip edebilmeniz için bir etkinlik günlüğü de gösterecektir.
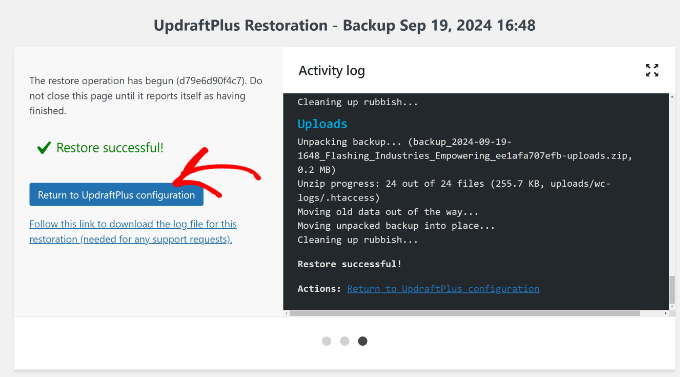
Devam etmek için ‘UpdraftPlus yapılandırmasına dön’ düğmesine tıklamanız yeterlidir.
WordPress kontrol panelindeki eklenti sayfasına döndüğünüzde, yedeklemenin geri yüklendiğini göreceksiniz.
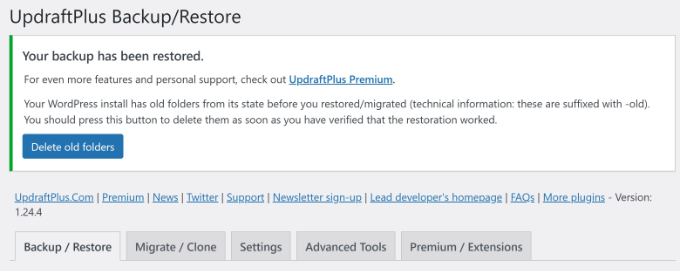
UpdraftPlus size önceki WordPress yüklemesinden eski klasörleri silme seçeneği de sunacaktır. Henüz yapmadıysanız ‘Eski klasörleri sil’ düğmesine tıklayarak bu klasörleri kaldırabilirsiniz.
İşte bu kadar. UpdraftPlus kullanarak bir yedeği başarıyla geri yüklediniz.
phpMyAdmin Kullanarak WordPress Veritabanını Yedekten Geri Yükleme
Manuel olarak oluşturduğunuz bir yedeği geri yüklerken, iki olası seçenekle karşılaşabilirsiniz. Ya yeni bir veritabanı oluşturup yedeğinizi içine aktarabilir ya da mevcut veritabanınızı boşaltıp yedeği içe aktarabilirsiniz.
Saldırıya uğramış bir WordPress web sitesini temizliyorsanız, yeni bir veritabanı oluşturmadan veya mevcut bir veritabanına aktarmadan önce MySQL kullanıcı adınızı ve şifrenizi değiştirmeniz çok önemlidir.
Yeni bir veritabanı oluşturmak için WordPress hosting hesabınızın cPanel panosuna giriş yapın ve ‘MySQL Veritabanları’ simgesine tıklayın.

Ardından, veritabanınız için bir ad girmeniz istenecektir.
Bu işlem tamamlandıktan sonra, ‘Veritabanı Oluştur’ düğmesine tıklayın.

Yeni veritabanını oluşturduktan sonra, bu yeni veritabanıyla ilişkili bir MySQL kullanıcısına ihtiyacınız vardır.
Basitçe ‘MySQL Kullanıcıları’ bölümüne gidin ve yeni bir kullanıcı ekleyin.

Ardından, bu kullanıcıyı MySQL veritabanına eklemeniz gerekir.
‘Veritabanına Kullanıcı Ekle’ bölümüne ilerleyin, açılır menülerden veritabanı ile birlikte kullanıcıyı seçin ve ardından ‘Ekle’ düğmesine tıklayın.

Artık yeni veritabanınız hazır. WordPress veritabanı yedeğinizi geri yüklemek için kullanabilirsiniz.
Tekrar cPanel panosuna gidin ve ardından ‘Veritabanları’ altındaki‘phpMyAdmin‘e tıklayın.

Ardından, phpMyAdmin ekranını göreceksiniz.
Devam edin ve ekranın üst kısmındaki ‘İçe Aktar’ sekmesine tıklayın.

Ardından, WordPress veritabanı yedekleme dosyanızı seçmek için ‘Dosya Seç’ düğmesine tıklamanız yeterlidir. Bundan sonra, devam etmek için sayfanın altındaki ‘Git’ düğmesine tıklayın.
phpMyAdmin şimdi yedeğinizi yükleyecek ve veritabanınıza aktaracaktır. Tamamlandığında bir başarı mesajı göreceksiniz.
İşte bu kadar! WordPress veritabanınızı başarıyla içe aktardınız.
Bir sonraki adım, yeni veritabanınızı kullanarak WordPress’i kurmaktır. WordPress’i zaten yüklediyseniz, yeni veritabanı ayarlarınızı wp-config.php dosyanıza eklemeniz yeterli olacaktır.
cPanel Kullanarak WordPress Veritabanı Yedeğini Geri Yükleme
Paylaşımlı barındırmanızdaki cPanel’i kullanarak manuel olarak bir WordPress veritabanı yedeği oluşturursanız, bu veritabanını cPanel’in kendisini kullanarak da geri yükleyebilirsiniz.
Başlamak için cPanel hesabınıza giriş yapın. ‘Dosyalar’ bölümünün altında ‘Yedekle’ye tıklayın.

Yedeklemeler sayfasında, ‘MySQL veritabanı yedeğini geri yükle’ seçeneğine ilerleyin.
Ardından, ‘Dosya Seç’ düğmesine tıklayın ve sabit sürücünüzden yedekleme dosyasını seçin. Tamamlandığında, ‘Yükle’ düğmesine tıklayın.

Bu kadar basit!
WordPress Dosyalarını FTP Kullanarak Manuel Olarak Geri Yükleme
WordPress’i FTP kullanarak manuel olarak geri yüklemek için WordPress.org’ dan WordPress’in yeni bir kopyasını indirmeniz ve sabit diskinize çıkarmanız gerekir.
Bundan sonra, FTP istemcinizi başlatabilir ve ardından tüm WordPress dosyalarını sunucunuza yükleyebilirsiniz.

WordPress dosyalarını yükledikten sonra, yedeğinizden bir wp-config.php dosyası yükleyebilirsiniz (yalnızca temiz olduğundan ve tehlikeye atılmadığından eminseniz).
Alternatif olarak, yeni yüklediğiniz WordPress dosyalarındaki wp-config-sample.php dosyasını wp-config.php dosyası olarak yeniden adlandırabilirsiniz. Bundan sonra, wp-config.php dosyasını düzenlemeniz ve veritabanı bilgilerinizi girmeniz gerekecektir.
Dosyayı kaydetmeyi ve web sitenize geri yüklemeyi unutmayın.
Ardından, yedeğinizdeki diğer dosyaları yüklemeniz gerekir. Resimlerinizi yalnızca /wp-content/uploads/ dizinine yüklemenizi öneririz.
Bunları yükledikten sonra, her şeyin yolunda gidip gitmediğini kontrol etmek için web sitenizi ziyaret edin.
Ardından, WordPress yönetici alanınıza giriş yapmanız ve sitenizde bulunan eklentileri yüklemeye başlamanız gerekir.
Şimdi temanızı yüklemeye geçebilirsiniz. WordPress temanızı özelleştirdiyseniz veya bir alt tema kullanıyorsanız, bir yedekten geri yükleyebilirsiniz. Ancak, bu dosyaların temiz olduğundan emin olun.
Son olarak, Ayarlar ” Kalıcı Bağlantılar bölümüne gidin ve kalıcı bağlantı ayarlarını sitenize uyacak şekilde ayarlayın ve ardından kalıcı bağlantıları güncelleyin.

WordPress Yedekleme Geri Yükleme Sorunlarını Giderme
Yukarıda özetlediğimiz talimatları dikkatle izlerseniz, WordPress yedeğinizi geri yüklerken herhangi bir sorun yaşamayacağınızı umuyoruz.
Ancak, WordPress web sitenizi geri yüklerken karşılaşabileceğiniz bazı yaygın sorunlar vardır. İşte bunlardan birkaçının nasıl düzeltileceğine dair kılavuzlarımız:
- WordPress’te Veritabanı Bağlantısı Kurulurken Oluşan Hata Nasıl Giderilir?
- WordPress Ölümün Beyaz Ekranı Nasıl Düzeltilir (Adım Adım)
- WordPress’te 500 Dahili Sunucu Hatası Nasıl Giderilir?
- WordPress Giriş Sayfası Yenileme ve Yeniden Yönlendirme Sorunu Nasıl Giderilir
- WordPress Yazılarının 404 Hatası Vermesi Nasıl Giderilir (Adım Adım)
Aksi takdirde, en yaygın WordPress hataları ve bunların nasıl düzeltileceğine ilişkin nihai kılavuzumuza göz atmak isteyebilirsiniz.
WordPress Sitenizi Geri Yükledikten Sonra Yapmanız Gerekenler
Web sitenizi başarıyla geri yükledikten sonra, web sitenizin güvenliğini artırmanızı şiddetle tavsiye ederiz.
Henüz yapmadıysanız, bu WordPress yedekleme eklentilerinden biriyle düzenli olarak bir yedekleme oluşturduğunuzdan emin olun.
Bir bilgisayar korsanlığı olayından sonra web sitenizi güvence altına almak için WordPress şifrenizi hemen değiştirmenizi de öneririz. Çok kullanıcılı bir web sitesi işletiyorsanız, tüm kullanıcılardan şifrelerini mümkün olan en kısa sürede güncellemelerini istemek de iyi bir fikirdir.
Sitenizi gelecekteki siber saldırılardan korumak için bir web sitesi güvenlik duvarı da kurabilirsiniz.
WPBeginner’da web sitemizi korumak için Cloudflare kullanıyoruz, ancak daha küçük bir site işletiyorsanız, Sucuri işinizi görebilir.

Daha fazla ayrıntı için Sucuri’den Cloudflare’e neden geçtiğimizi anlatan kılavuzumuza bakabilirsiniz.
Bonus İpucu: Sitenizin düzenli yedeklerini oluşturma konusunda yardıma ihtiyacınız varsa, WordPress uzmanlarımızla çalışabilirsiniz. WPBeginner WordPress Maintenance ile düzenli bulut yedeklemeleri, 7/24 destek, kötü amaçlı yazılım kaldırma, çalışma süresi izleme ve sitenizin sorunsuz çalışmasını sağlamak için tutarlı güncellemeler alırsınız.
WordPress Yedeklerini Geri Yükleme Hakkında SSS
İşte kullanıcıların WordPress yedeklerini geri yükleme hakkında sıkça sorduğu bazı sorular:
1. WordPress sitemi bir yedekten nasıl geri yüklerim?
Bu, WordPress yedeğinizi nasıl oluşturduğunuza bağlı olacaktır. Duplicator Pro gibi bir yedekleme eklentisi kullandıysanız ve WordPress yönetici panosuna erişiminiz varsa, sadece birkaç tıklamayla geri yükleyebilmeniz gerekir.
Ancak, yedeklemeyi manuel olarak oluşturduysanız veya sitenizin arka ucuna erişiminiz yoksa, barındırma sağlayıcınızın kontrol panelini veya dosya aktarım protokolünü (FTP) kullanarak manuel olarak geri yüklemeniz gerekecektir.
Bir bilgisayar korsanlığı olayı veya siber saldırı sonrasında web sitenizi geri yüklüyorsanız, temiz bir yedeği geri yüklemeden önce web sitenizin tüm bozuk dosyalarını silmeniz ve WordPress’i yeniden yüklemeniz de gerekebilir.
2. WordPress yedeklerim nerede saklanıyor?
Bir yedekleme eklentisi kullanıyorsanız, barındırma sunucunuzda dosyaların depolanacağı varsayılan bir konum oluşturacaktır. Bu genellikle wp-content klasöründe olur. Ancak yedekleme aracınıza bağlı olarak bazen yedeklerinizi kaydetmek için Google Cloud, Dropbox veya One Drive gibi farklı bulut depolama hizmetlerini seçebilirsiniz.
3. WordPress yedekleri kaydediyor mu?
Ne yazık ki WordPress otomatik yedekleme sunmuyor. WordPress yedeklerini barındırma sağlayıcınızın cPanel’ini veya bir FTP istemcisini kullanarak manuel olarak oluşturabilirsiniz. Ya da daha basit bir yaklaşım arıyorsanız, bir yedekleme eklentisi kullanabilirsiniz. Bazı barındırma sağlayıcıları otomatik olarak yedekleme oluşturma seçeneği de sunar.
4. Eski bir WordPress web sitesini kurtarabilir miyim?
Evet, WordPress sitenizin tek tek sayfalar veya veritabanı gibi belirli bölümlerini geri yükleyebilirsiniz. Bir eklenti kullanarak düzenli olarak eksiksiz web sitesi yedekleri oluşturuyorsanız, sitenizin tamamının eski bir sürümünü bile geri yükleyebilirsiniz. WordPress’i ne zaman geri yüklemek istediğinize dair belirli bir saat ve tarih seçmeniz yeterlidir.
Umarız bu makale WordPress’i yedekten nasıl geri yükleyeceğinizi öğrenmenize yardımcı olmuştur. Ayrıca bir WordPress sitesinin Dropbox’a nasıl yedekleneceğine ve Google Drive’ın WordPress medya kitaplığınıza nasıl bağlanacağına ilişkin adım adım nihai kılavuzumuzu da görmek isteyebilirsiniz.
If you liked this article, then please subscribe to our YouTube Channel for WordPress video tutorials. You can also find us on Twitter and Facebook.


")

Bajrang
Let’s suppose, I am restoring 2 days ago file backup, then is it mandatory to restore database backup of the same date also in order to sync both??
WPBeginner Support
It would depend on what file you’re restoring from and for what reason as some backup plugins include database information.
Admin
Daniela
Hello. If I install a backup, will I lose all the changes I made and plugins I installed after the backup? Thanks!
WPBeginner Support
It depends on the backup tool used but normally, yes you would lose any changes not backed up.
Admin
Neha
Hey. Can i restore my site backup if i have only sql file?
WPBeginner Support
You will be missing some things but you will have the ability to restore a good amount of your content.
Admin
KylieM
We’ve only just realised that a page was permanently deleted (not in trash) that we need to recover. We completely updated our website a few months back and believe the page was deleted then. We did do a full back up before changes. Only want to recover the one page and not do a full restore which would replace all of our new content.
How would we do this?
WPBeginner Support
It would depend on what you used to create the backup but the simplest method may be to create a local installation for your site, restore your site on to your local install, then export the page you want on your live site so you can import it.
Admin
Siraj
Very useful tips. Restoring wordpress site through Cpanel is illustrated well. Thanks for sharing.
WPBeginner Support
You’re welcome, glad you like our guide
Admin
bhanuka
I was referring to uploading via FTP method. But my old files did not load. Only a blank page came. With some nail biting hours I realised that the wp-config.php file includes following important settings to be set with old site values.
1. database prefix. I had a custom prefix. If you dont change, WP upgrade will recreate all tables with ‘wp’ prefix while your old data are in old prefix tables.
2. Authentication Unique Keys and Salts settings must match the old values
Then it worked
WPBeginner Support
Thank you for clarifying, glad you were able to find the root of your issue and resolve it.
Admin
Pawan Sharma
I was hosting my website through hostinger free hosting. Now i moved to another service provider. I took backup from hostinger and uploaded the same in new provider c panel under public_html. But my website not displayed. I’m getting below Error and Warning.
Warning: require(/home/test/public_html/wp-includes/rest-api/endpoints/class-wp-rest-autosaves-controller.php): failed to open stream: No such file or directory in /home/test/public_html/wp-settings.php on line 232
Fatal error: require(): Failed opening required ‘/home/test/public_html/wp-includes/rest-api/endpoints/class-wp-rest-autosaves-controller.php’ (include_path=’.:/usr/share/php’) in /home/test/public_html/wp-settings.php on line 232
And don’t find any wp-settings.php file under the root folder piblic_html.
Please help to solve this problem.
Thanks all
WPBeginner Support
For that, you would want to take a look at: https://www.wpbeginner.com/wp-tutorials/how-to-fix-the-wordpress-failed-to-open-stream-error/
if you are missing the file then you could try manually adding the WordPress files:
https://www.wpbeginner.com/wp-tutorials/how-to-manually-update-wordpress-using-ftp/
Admin
glenda
I’m not a beginner, but am desperately trying to find out how to get past the first screen if I can’t remember my importbuddy.php password. The last WP Core update broke one of my sites and the most recent backup had a fatal error so I had to go back to an old, old backup. iThemes support used to be good, but now it sucks.
Found your explanation for using BackupBuddy and it’s a good one.
ted
Thank you for the article.
I have a “different” problem:
I have only the httpdocs directory and the
wordpress_d database directory (located at var/lim/mysql)
How can I restore the site with these 2 directories?
Thank you!!
Kawsar Siddik
Backupbuddy is the best WordPress restore/migration tool while working on client’s website. It saves time. Thanks for sharing this tutorial.
Clever Peterson
Hello, I backed up my WordPress site with Drop box for WordPress but I’m still confused of where to upload the back up files I have downloaded. Would you please help me?
Eddy
I successfully restored my WordPress using phpmyadmin. However when I try to install WordPress using the new database info it says the db already exists, use another name. What do I do?
WPBeginner Support
Hi Eddy,
Make sure that you are using a different name for your new database.
Admin
Mudass Iftikhar
your article always helped me
Roxanne
I delete my wordpress site, but I made a back-up before I deleted it. Now I want to re-open the website. Is there a way to just upload the back-up and get everything back to the same way it was?
WPBeginner Support
Hey Roxannne,
Depends on how you made the backup. You will still have to setup database unpack WordPress files and upload them.
Admin
Nicolau Nicoleta Mihaela
I have the same question, backup created with cPanel. Thank you I advance for an answer
Vikas
Hi I am trying to restore my wordpress site from bck but after I click upload on restore MySQL database option….dead white screen comes up and nothing happens! Any suggestions? Thanks
Vikas
I have not taken any backup of my site. And my site is displaying “Access Denied”. And my hosting provider states that my files in that website have been attacked by malware. Is there any method to recover all the data from the hosting ?
WPBeginner Support
Hey Vikas,
You can download your data using FTP and your database using phpMyAdmin.
Admin
Vikas
After downloading the data, should i delete everything and should i put it again ? If so will the problem get solved ?
joseph
I am new to blogging. I want to say thanks for your simplified tutorials, it is helpful. I already bookmarked your site so I can always come back. Once again i say thank you.
nicolas blake
can you please tell me how i can access a backup i made with backwpup and I chose “folder” .I once was a programmer now I’m just a duffer
Nate
I just got a cpanel full backup from a client. They are now using Godaddy WordPress managed hosting. How in the heck do I restore the site and database to Godaddy from the TAR.zip file?
Thanks guys!
Hari Kumar
My blog is live and can login to admin dashboard. but none of my post is available, and I cannot update my previous post. Plus new post added are not found… while opening.. it says —- a 404 Not Found error was encountered while trying to use an ErrorDocument to handle the request.
Any Solution??
Jamie
Thanks for the information. Just a question: I have a SQL database backup for my blog saved as a .SQL file. What information does this contain? Does it have the theme customised layout? Blog articles? Pictures?
Many thanks
Soibibo
My site just crashed. I can’t access my wp admin dashboard. What do you suggest I do?
WPBeginner Support
Please see our beginners guide on troubleshooting WordPress errors.
Admin
Mr. Karmaker
My website has been hacked. I have made earlier backup zip file in cPanel FileManager. Zip file size is more than 99MB and it can not upload.
How to restore my site ?
Any suggestion please.
dana
Hi, We recently moved some but not of our blog content from a standalone site to the company website. The posts that we didn’t think we wanted are now in FTP — I’d like to import them to a new wordpress site. Trying to locate specific content within FTP Is a huge pain. Is there any way to export that content into a new wordpress site so I can access it? Thank you.
Prudhvi Raj
Good.
I’ve backed up Home Directory and restoring it, and also uploaded the whole website. it’s like 20 minutes it is saying “restoring files…” . How long does it takes? File is of 1.45GB . Thanks .
Mufaddal
Hi there, I want to change my hosting plan from hostgator(HG) to Digitalocean(DO). I have done the setup of DO successfully, how can I get my backup uploaded?
I have taken a backup of WP site(the file was around 32mb) I m not sure its the whole backup, now my HG plan has expired(not deleted, I can renew it to get my site back) but now what should I do to upload the data, on adminMyPhp it is showing some error while uploading data. I want my site back as it was, on DO server, I dont want to renew my HG plan again, Please guide me, Thank you in advance.
Keesjan
hi,
do you know how to restore a backup when the admin interface is broken?
Then its not possible to use the interface.
Is in that case only the phpadmin method the way to go. Or are there any cloud service out there that help me ‘push’ teh bakcyp back to my site, without loggin in mt wp admin?
WPBeginner Support
You will have to do it manually. You can also hire professionals to do that for you. They will also take the phpMyAdmin approach.
Admin
Mahriya
Thanks, what if I had backed up my whole WordPress site(tags, posts media etc…) but only wanted to restore the Media only. Is there any way to do this? I appreciate the help!
WPBeginner Support
It depends on what method you used to create a backup. Most WordPress backup plugins store all your WordPress files in a zip file. You can extract that file to your computer and then upload the wp-content/uploads folder.
Admin
Belinda
Hello,
Total beginner here.
Started building my first WordPress site for a client on my local drive. Used the theme Avada.
Long story short, I needed a new hard drive in my Mac.
– Backed up my failing hard drive with time machine.
– Starting fresh on my computer with a new hard drive.
– Reinstalled WordPress and MAMP.
– Moved the website files from time machine applications/MAMP/htdocs to the same place on my computer.
Reading above I need to do something with the database. But I am completely lost on this.
Please help as soon as possible!
Thank you in advance.
WPBeginner Support
Go to Applications/MAMP/db/mysql/ copy the contents and paste them in your new drive MAMP install on the same location.
Admin
tonythanh
The problem when we restore wordpress is all image will not display. I have already got this trouble and it made me 3 days for resolve. Here is the way I solve for my site
1. Install fresh copy of wordpress with new database
2. Drop all database in phpmyadmin
3. Import database that you back up lastime
4. Your site will not work and It need reinstall. Don’t worry.
5. Login Cpanel, find the wp-config.php file, open, change the prefix wp_ with your new prefix of your last database.
6. Import your images correct to the folder in uploads.
7. Done, your site will work well with full images.
I hope you will get no trouble like me.
Graceson
Can you please assist me to restore backedup files using “BACKUPWORDPRESS” in my local drive?
Thanks in advance.
Tushar
Is the method of using FTP to restore your website valid/useful if the main error in FTP is “552-Quota exceeded” . I contacted the host, he says that some malicious plugin has caused this sort of error to occur and complete restoration of the site will be required. I planning to begin from a clean slate by uploading new wordpress and redesigning the entire site: But will this work with above mentioned error?
Angel
Thanks a lot for the article! You saved my life helping me to restore a site, easy and simple!
All the best, Angel
Paul
Hi, just a (probably) silly question: can I Re-install now from the wordpress dashboard without losing any settings etc on my site?
WPBeginner Support
You can go to Dashboard -> Updated and click on reinstall now button. That will download a fresh copy of WordPress and replace your old files. It will not change your WordPress settings as those are stored separated in database.
Admin
Ben Dixon
Hi guys, very informative read, thanks for that!
I have a backup of my SQL database which was created with a plugin and emailed to me. Unfortunately I’ve lost all other files, I’ve contacted my host and they have no backup.
I’ve installed WordPress and will install the appropriate theme. I can’t recall all the plugins I used.
I’ve obviously lost all my images, but what else have I lost? Is a restore of my site feasible in your opinion?
Many thanks for any help at all.
WPBeginner Support
Yes a restore of your site is feasible.
Since you do not have backup of your files, so you will be unable to restore images. Some plugins may also misbehave.
Admin
Ben Dixon
Thanks for that, I’ll give it go. Maybe I can look at the database to help me remember what plugins were there before.
Cheers guys!
Ali Sajjad
Hi, i have done everything and my site is running fine. but i have problem with images all over the site. i don’t know why, because there is no error display during restore process.
Zamby
Somewhat complicated question. A few days ago, I updated the wordpress version my site was using. This then made the site fail, and I couldn’t even log in to wordpress due to a fatal error. I then replaced the site with my most recent backup from Feb. 2nd, and things were fixed. However, there is a lot of data from Feb. 2nd that I would like to access if possible.
This data must have been saved somewhere, but I’m wondering where? Or is it all completely lost and innaccessible in the Cpanel after a backup?
WPBeginner Staff
It actually depends on how you restored your backup. If you created a new database to restore your backup into and did not delete any files from your webserver then you can get access to your posts by opening the old database using phpmyadmin. You can also find the files you uploaded on your webserver by connecting to your site using an FTP client. These file uploads will be stored in /wp-content/uploads/ folder.
On the other hand, if your restoration process involved deleting old database by emptying it, and if you deleted old files from server as wel, then you cannot access those files on your own.
Another possibility to recover that data is by requesting your web host and ask them if they have a backup for your site on the specific date when you deleted all old data. If they have the backup, then they can send it to you.
WPBeginner Staff
Simply click on Appearance » Themes and click on the activate button on the theme that you had previously installed. In case you can’t figure out which theme you had previously installed, then you will need to activate them one by one and preview your website until you get the right theme.
Urgent help needed @ WPBEGINNER SUPPORT
Good day Wpbeginner,
This is my terrible situation. I made a mistake and i lost my site. and then i requested my Host gator India to give back file for which i paid. They send me in TAR.Zip file. I don’t know how to go about it. They told me to long CP panel and upload and extract. But it didn’t work. Then one rep who helped me and my site came alive. However, if i click any one of the posts it was throwing 403 error. She couldn’t solve it. and another rep said i need to contact my developer…what is this? Develper,!!!(lol)
and then i moved another host. I tried uploading my back up file. but no use and nothing working. So i had 3 months back up files which i downloaded from WordPress XML. Now it is working except images and the current template is different than the previous.
I have the back up file from Hostgator and if you could help me how to go with it…i really appreciate.
Best regards,
Ramesh.ramaiah
WPBeginner Support
You can extract the backup file on your own computer using a program that is able to extract .tar and .zip archives like 7zip. After that you can browse the files and upload them to your web server using an FTP client.
Admin
Timothy
I was wondering how to recover a WordPress theme, it wasn’t deleted I just hit active on a new on by accident
Gary
Hello, I just stumbled upon this post and was wondering if you could help. I switched hosting plans within godaddy and went from managed wordpress to cpanel. I used a plugin to backup the site before switching, which saved all files including the .sql file. Restoring the site via the plugin did not work so I am trying it the hard way. I have completely removed the site including all files. Then I created a new database and gave it the same name as database_name in the .sql file. Afterwards I uploaded the .sql file from the backup into this database. Then I reinstalled wordpress via cpanel and chose the new database I created. Then I uploaded the rest of the files(themes, plugins, uploads) via ftp. But for some reason this did not do anything. When I logged into wordpress nothing looks different. None of the pages I created or anything was there. The plugins were there and the theme I uploaded was there. However, I can’t access the images from the media button even though they are in the uploads folder. I can’t figure out where I went wrong. The database names match up, I can’t think of anything else. The only thing I can possibly think of is the hostname in my .sql backup file is not localhost. Could that be the issue? I can’t figure out what I am missing. Any help would be greatly appreciated.
DFPhoenix
If your database was correctly restored, you won’t even need to install wordpress again. Asking you to install means, your database isn’t correctly restored. Just my guess.
Dill
Hi… I was wondering how to restore my wordpress site if all I have is a complete download of everything that was there. I downloaded everything (everything!) from my host using FTP and didn’t do any fancy backups of databases. Can I just upload that entire backup as is and get the site back? I’m also switching hosts (but not domain names), so I do know I’ll have to edit a file or two also.
WPBeginner Support
If you only copied everything from FTP then you probably only have your WordPress files and not the database. Without the database backup you can not restore your site. If you have access to your host, then please create your database backup.
Admin
Kyle
Hi,
Thanks for all your tutorials, I find myself here often. I had a question, is there any way to retrieve the subscribers from a backed up .sql file? The plugin used to collect subscriptions was Subscriber 2.
Bruno
Your site is great. Can you write a guide how to restore a backup created with BackWPup? That would be great.
WPBeginner Support
Sure we will try to do that. Meanwhile, here is how to restore your backup created with BackWPUp plugin. Download your backup file and extract it. Inside it your will find a .sql file along with other files. .SQL file is your database backup and you can import it using phpMyAdmin. Upload rest of the files using FTP.
Admin
tuyen ran
how to show my password on file database backup from backupbuddy? It is encryption!. thanks you!
Raji
This post is extremely helpful as it has helped me (a newbie) to restore my site….or almost. When i try to login, it takes me to a page that says i should install wordpress again…. the famous 5minutes install. please help.
WPBeginner Support
It seems WordPress is unable to connect to the database. Or it connected to the database which is currently empty. You have restored your WordPress files but you probably didn’t restore your WordPress database backup successfully.
Admin
Md Jafrul Islam
Thank you very very much. By this info post detail. I can make my site again restore. Thanks Man. Just awesome update more amazing info.
Chris
When doing a backup, which backup do I need most frequently? I am offered three choices on the cPanel (full cPanel backup, home directory, database). Would you say it is more important to backup the database file, as long as I have a fairly recent backup of the home directory?
Thanks for your time!
WPBeginner Support
Depends on how often your site gets updates like comments, posts, media uploads, we would say that you should always set a high priority for database backups
Admin
Bas
Thanks for the great guide(s). I had to move 2 sites from 1 server to a new server, and using your manuals it went like clockwork.
Making the backup via BackWPup was quick and restoring it manually the same.
I was up and running again in 15 minutes.
BTW. The version of BackWPup I use (3.0.13) only showed the Dropbox feature after creating, saving and running the backup job.
I had to change something, when the sites where moved, and there it was.
Naik
Hi,
I recently shifted my blog from one hosting to another in Godaddy. I have the backup of my blog in .sql format. I am trying to import using MySQL, it shows an error “Script timeout passed, if you want to finish import, please resubmit same file and import will resume.” Please help
WPBeginner Support
Did you try resubmitting the same file again to resume import?
Admin
Brenda
I have been able to follow the instructions above for restoring my wordpress database using cpanel by dropping the tables in the current database and replacing them with the backedup database.
However I can’t work out how to do it if I create a new database – the article says to go into mysql within cpanel and set up a new database, password etc but how do I link the new database to the files that I have reinstalled?
Thank you
WPBeginner Support
Brenda, connect to your website using an FTP client like filezilla, download wp-config.php file from your website’s root directory create a backup of it by simply making a copy of it. Open it in a text editor like notepad. and enter your database name, database user name, database password, and host (usually localhost). Save the file and upload it back to your website.
Admin
Brenda
Thanks. I have done that but when I try to access the site I get “Error establishing a database connection”
I did what you said and replaced the original wp-config file with the new version.
What else do I need to do to be able to use the new version of the database, rather than the original one?
Brenda
Sorry, some more information that might clarify what is happening. When I try, as suggested in your article, to access the wp-admin url I get an error message that starts with the following:
We were able to connect to the database server (which means your username and password is okay) but not able to select the NAME database.
At the bottom it says: On some systems the name of your database is prefixed with your username, so it would be like username_webgyzec_replacewp1. Could that be the problem?
That is indeed the case. So what do I need to change please to get this to work?
Brenda
OK I can stop sending messages now. Silly error on my part but now everything is working.
Thank you SO much for such a helpful article.