Om du någonsin har scrollat längst ner i en av våra artiklar har du förmodligen lagt märke till vår widget “Populärt på WPBeginner just nu!”. Denna funktion har varit en hit bland våra läsare, och hjälper dem att upptäcka vårt mest värdefulla innehåll och uppmuntrar dem att utforska mer av vår webbplats.
Genom att lyfta fram dina mest populära WordPress-blogginlägg hjälper du inte bara läsarna att hitta ditt bästa innehåll – du ökar också webbplatsens engagemangsmätvärden. Det är en win-win: besökarna får bra innehåll och du håller dem kvar på din webbplats längre.
I den här artikeln visar vi hur du enkelt kan visa dina mest populära inlägg baserat på deras visningar i WordPress.

Varför visa populära posts efter views i WordPress?
När användare ser dina mest populära blogginlägg på WordPress kan de upptäcka vilket content som deras medläsare gillar mest. På så sätt kan de kontrollera dessa artiklar och delta i konversationen.
Dessutom kan du öka ditt sociala bevis genom att displayed ditt mest populära content i WordPress. Det gillar att berätta för nya användare att “Hej, andra människor har hittat dessa poster riktigt användbara, och du kanske också gör det!”
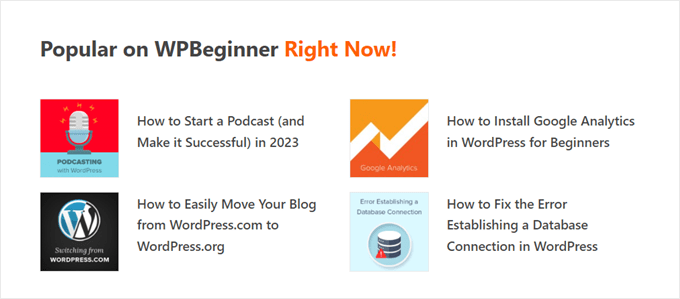
Slutligen kan visning av trendande blogginlägg få människor att stanna längre på din website, vilket ökar antalet sidvisningar och minskar avvisningsfrekvensen.
Ju mer engagemanget från användarna ökar, desto mer tycker Google att ditt content är bra och viktigt. I sin tur förbättras din WordPress sökmotorsoptimering och din site kan rankas högre.
Tyvärr har WordPress inte en built-in funktion eller block för att displayed your most popular posts by page views. I den här guiden visar vi dig hur du gör exakt det med ett plugin och med kod.
Klicka bara på en av de snabba links under för att hoppa direkt till din önskade metod:
Metod 1: Visa populära WordPress-inlägg efter visningar med MonsterInsights (rekommenderas)
Det enklaste sättet att displaya populära posts efter views i WordPress är med ett plugin. Det finns faktiskt många tillägg för populära posts i WordPress available, men enligt vår mening är MonsterInsights det bästa valet.

MonsterInsights används av 3 miljoner+ websites över hela världen och är det bästa Google Analytics-tillägget för WordPress. Även om dess huvudfunktion är analys, har det också en användarvänlig funktion för att visa dina mest populära posts.
Först och främst måste du installera pluginet MonsterInsights och ansluta det till ditt Google Analytics account. För mer detaljer, se vår Step-by-Step guide om hur man installerar Google Analytics i WordPress för nybörjare.
Note: Även om en gratis version av MonsterInsights är available, kommer vi att använda Pro-versionen eftersom den innehåller funktionen för populära inlägg.
Välj ett tema förwidgetar för populära poster
När du har aktiverat och konfigurerat pluginet går du till Insights ” Popular Posts från WordPress dashpanel. Klicka sedan på menu-item “Popular Posts Widget”.
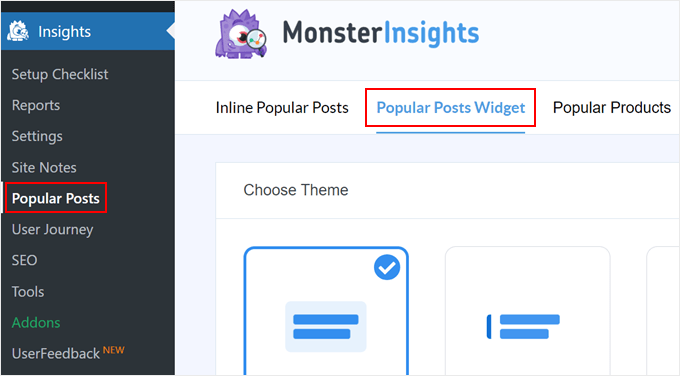
När du rullar ner måste du selecta ett theme för att visa widgeten för populära posts. Det finns olika alternativ.
Vissa inkluderar en featured image för inlägget, medan andra ser mer minimalistiska ut.
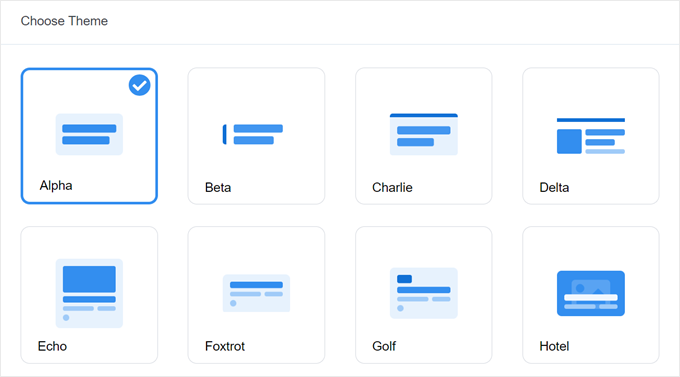
Om du vill se hur temat gillar att se ut innan du gör ditt val, flytta bara ner på sidan till Theme Preview section.
Du kan också previewa temat i ett brett eller smalt format. Med det breda formatet ser du dina inlägg listade under sidans eller inläggets content, medan det smala formatet visar inläggen på höger sida av det, gillar en sidebar.

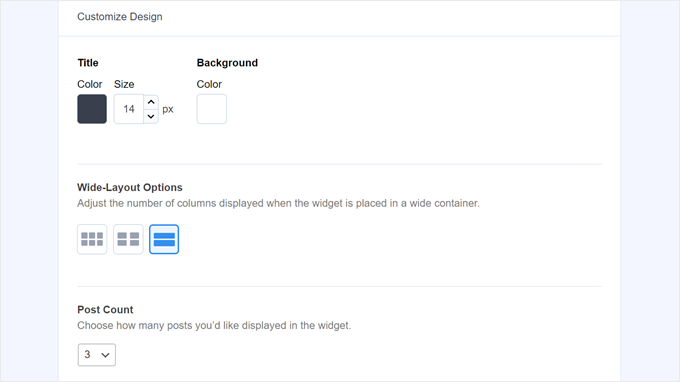
Låt oss sedan rulla ner till “Customize Design” -sektionen. Här kan du ändra temats färger, fontstorlek, layout och antal post som ska visas.
Alternativen för customize här kan variera beroende på vilket theme du använder. Så se till att utforska de olika temana för att se vilket som passar dig bäst.
Konfigurera beteendet för widgetar för populära poster
När du har konfigurerat temats design måste du gå till Behavior section. Det är här du kommer att kontrollera hur widgeten för populära posts kommer att visas på din WordPress website.
I inställningarna för Widget Styling kan du välja att använda den design som du har gjort ovan eller ej styla widgeten alls. Med det andra alternativet kommer widgeten att följa din WordPress site theme’s CSS.
Sedan kan du välja hur widgeten ska välja dina mest populära posts. För denna tutorial väljer du “Curated”, men du kan också visa de mest populära posterna baserat på antalet kommentarer.
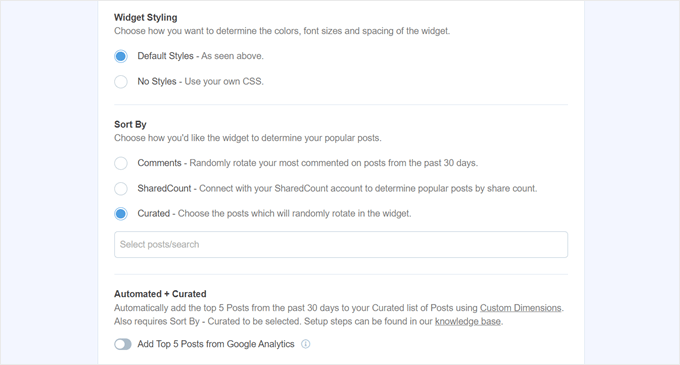
Vad du måste göra härnäst är att aktivera alternativet “Add Top 5 Posts from Google Analytics” under. Men innan du gör det behöver du MonsterInsights Dimensions Add-On och lägga till Post type som en new custom dimension.
Detta kommer att låta MonsterInsights välja de mest populära posterna baserat på Google Analytics-data.
För att göra detta måste du downloada MonsterInsights Dimensions-utökningen och installera den som ett plugin i WordPress. För Step-by-Step instruktioner, kontrollera vår guide om hur du installerar ett WordPress plugin.
Gå sedan till Insights “ Settings och växla till tabben “Conversions”. Efter det klickar du på “Add New Custom Dimensions.
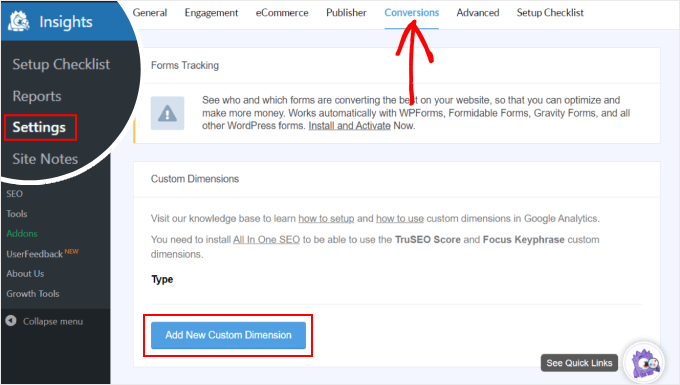
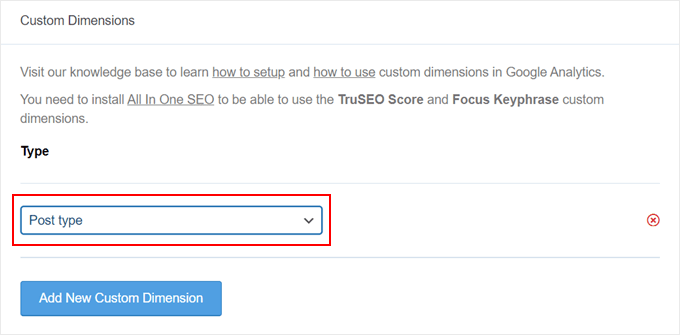
När du har gjort det väljer du “Post type” i dropdown-menyn.
Detta kommer att aktivera MonsterInsights för att spåra prestanda för dina blogginlägg och andra custom post types.
Nu är det bara att gå tillbaka till Insikter ” Populära inlägg och gå till “Widgetar för populära inlägg.
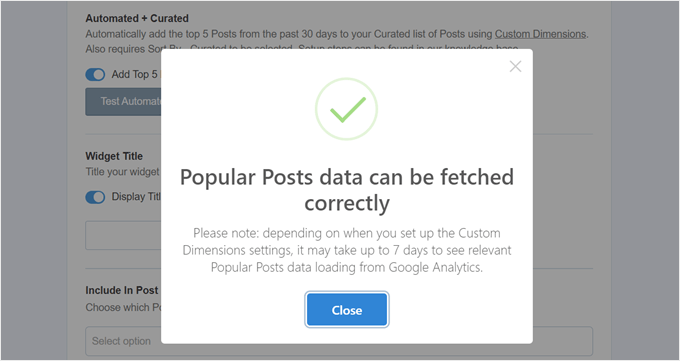
Aktivera helt enkelt knappen “Add Top 5 Posts from Google Analytics”. Klicka sedan på “Test Automated Posts” för att se om installationen var utan problem.

Om ja, kommer du att se ett success message popup.
Det ska stå: “Data för Popular Posts kan hämtas korrekt. Obs/observervera: beroende på när du konfigurerade inställningarna för Custom Dimensions kan det ta upp till 7 dagar innan relevanta data för Popular Posts hämtar från Google Analytics.
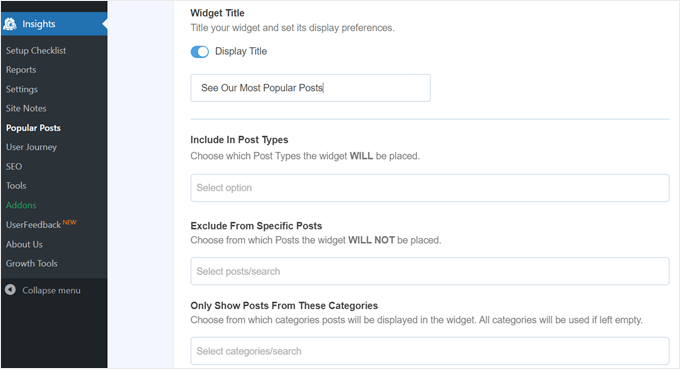
Om du går vidare till nästa steg kan du nu add to en rubrik som kommer att visas ovanför widgeten. Det kan vara något som gillar “Kolla in våra mest populära post” eller något liknande.
Under det kan du välja om widgeten ska visas i alla post typer, uteslutas från specifika inlägg och/eller endast visas i vissa inläggskategorier.
Dessa Settings är användbara om du har skapat andra custom post types än blogginlägg och tycker att widgetarna för populära inlägg gillar att se irrelevanta ut där.
Ett av de sista stegen är att embedda widgeten för populära posts. Det finns flera alternativ: placera den automatiskt, använda ett Gutenberg block, lägga till den som en sidebar widget eller använda en shortcode.
Låt oss gå igenom varje alternativ ett efter ett.
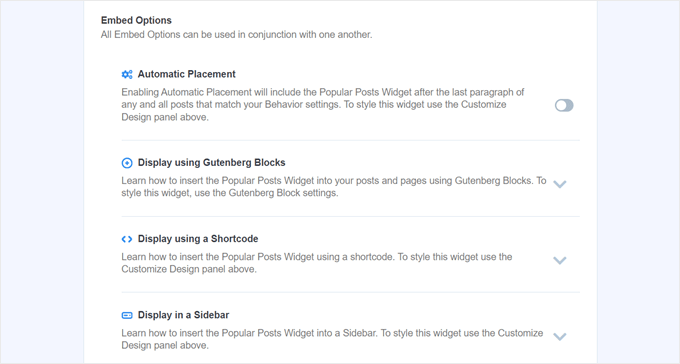
Embed widgeten Popular Posts automatiskt
Automatisk placering rekommenderas om du vill att widgeten ska visas på alla posts som matchar de beteendeinställningar som du har ställt in föregående inlägg.
För detta behöver du bara aktivera knappen Automatic Placement.

Nackdelen med det här alternativet är att du inte kan justera widgets design baserat på vad som ser bäst ut på posten eller sidan. Om du behöver den här typen av funktionalitet kan du prova nästa metod.
Embed the Popular Posts Block till en page eller post
Om du vill ha mer control över hur widgeten ser ut på en page eller post, då är den här metoden något för dig.
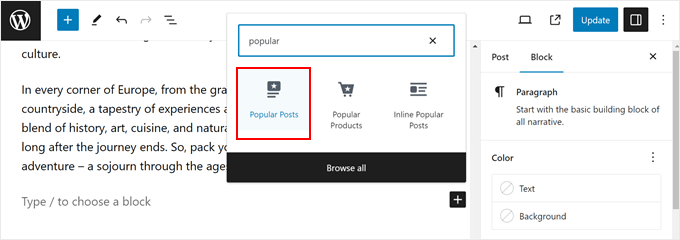
Gå först till block editor för det post eller den page där du vill att widgeten ska vara. Därefter klickar du på knappen “+” add block var som helst i editorn och letar efter blocket Popular Posts.
I panelen Block settings ser du att det finns alternativ för att ändra widgets tema, fontstorlek, färger, titel, layout och antal post.
Dessa settings liknar dem vi har sett i tillägget MonsterInsights.
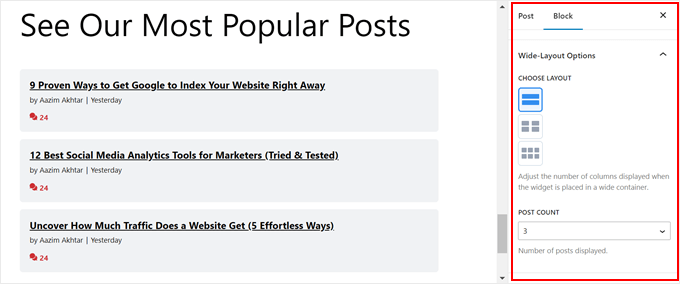
Den enda skillnaden är att du inte kan ändra vilka posts som väljs i widgeten.
Med det sagt är det i Behavior Settings möjligt att bara visa posts från vissa kategorier. På så sätt kan du göra de populära posterna mer skräddarsydda efter dina behov.
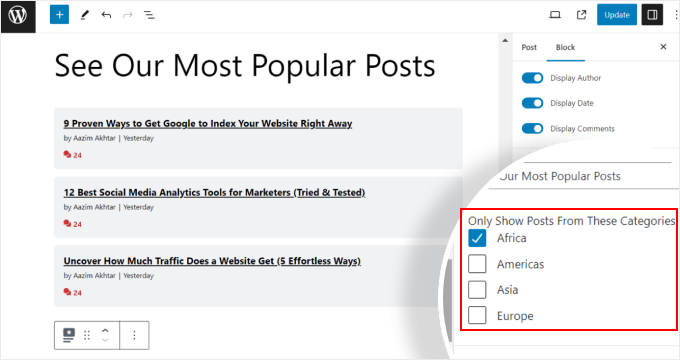
När du är nöjd med blockinställningarna klickar du bara på knappen “Update” i post och page editor.
Så här gillar blocket Popular Posts på vår testwebbplats:

Embed widgeten Popular Posts Widget i en sidebar
Om du använder ett icke-block WordPress theme som har ett widget-ready sidebar area, då kan du add to Popular Posts widget till det. Det här är vad vi gjorde i vår artikel om hur du lägger till utvalda inlägg i ditt sidebar i WordPress.
Allt du behöver göra är att gå till Appearance ” Widgets. Klicka sedan på knappen ‘+’ add widget i sidebar area och leta efter widgeten Popular Posts – MonsterInsights.
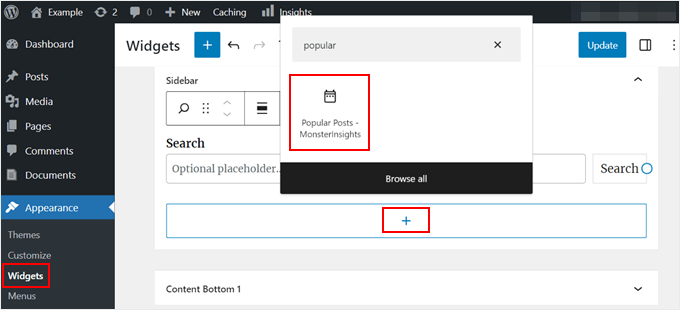
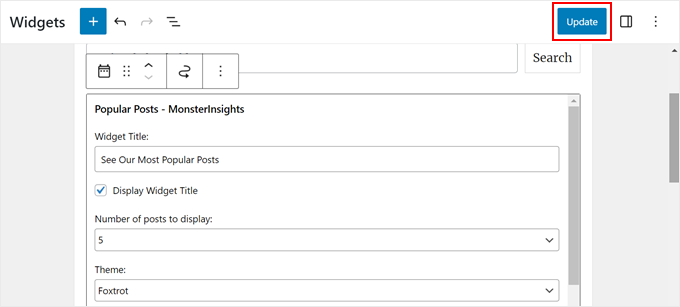
Likes i den tidigare metoden innehåller widgeten liknande inställningar för att customize ditt temas appearance.
Det som är annorlunda är att gränssnittet är lite svårare att använda. När du ändrar settings kan du inte se hur widgeten faktiskt gillar att se ut. Du måste clicka på en annan widget eller ett annat area för att få preview på den.
Om du är nöjd med hur widgeten ser ut klickar du bara på “Update” högst upp i högra hörnet.
Se till att gå till din website för att kontrollera om sidebaren ser rätt ut.
Så här gillar vi vår:

Om du vill att widgeten Popular Posts bara ska visas på vissa sidor kan du läsa vår guide om hur du visar eller döljer widgetar på vissa sidor i WordPress.
Embed den populära Posts Widget med en Shortcode
Det sista alternativet är att använda en shortcode. Denna metod rekommenderas om alternativen ovan inte fungerar för ditt specifika användningsfall.
I Popular Posts Widget tabs, rulla all the way down to the “Embed Options” section. Välj sedan “Display using a Shortcode” och klicka på knappen “Copy Shortcode”.
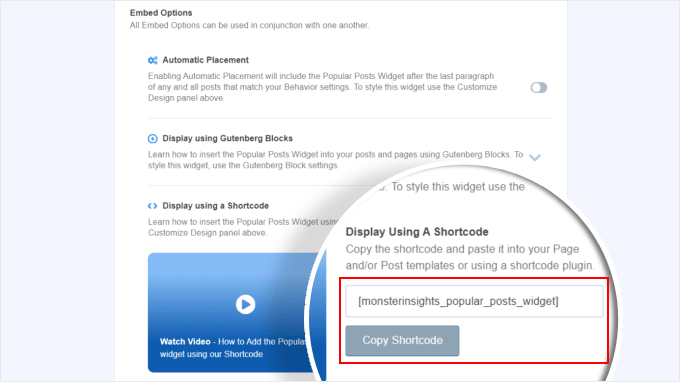
Efter det är det bara att placera shortcoden där du gillar den. För mer information, kontrollera vår guide om hur du lägger till shortcodes i WordPress.
Metod 2: Visa populära WordPress-inlägg efter visningar med kod (mer avancerad)
Metoden MonsterInsights är det enklaste sättet att displayed your mest populära och bästa content efter views i WordPress. Men om du är bekväm med kodning kan du också använda kod för att visa dina mest populära WordPress-poster.
För den här metoden rekommenderar vi att du använder ett code snippets plugin som WPCode, vilket är vad vi kommer att använda i den här guiden.

WPCode gör det säkert att infoga custom code utan att direkt interagera med dina WordPress-filer. Dessutom, eftersom denna metod är obligatorisk för att använda flera code snippets, kommer pluginet att göra hanteringen och trackingen av dem all mycket enklare.
Först måste du installera WPCode i WordPress. En gratis version av WPCode finns tillgänglig, men vi kommer att använda Pro-versionen, eftersom den innehåller de funktioner vi behöver för att insert koden på rätt locations.
För en Step-by-Step installationsguide, läs vår artikel om hur du installerar ett WordPress plugin.
Add to WordPress Post Views Counter-funktion
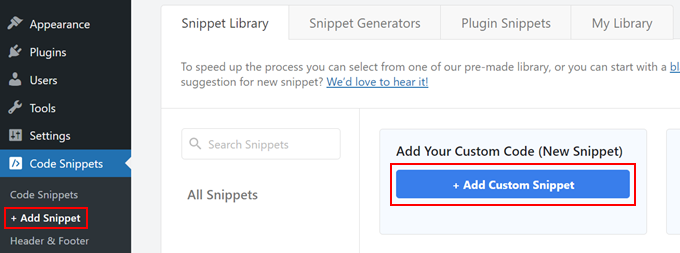
När pluginet har aktiverats måste du gå till Code Snippets ” + Add Snippet från kokpiten. Håll sedan muspekaren över “Lägg till din anpassade kod (nytt fragment kodu)” och klicka på “+ Lägg till anpassat fragment kodu.
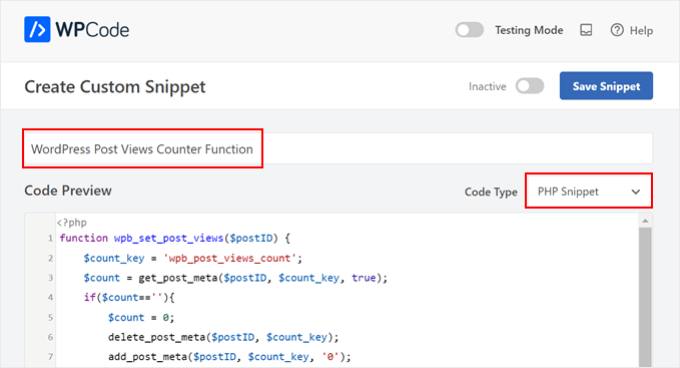
Nu är du inne i WPCode code snippet editor. Innan du infogar någon kod, gå vidare och lägg till en titel för snippet.
För den här första koden kan du namnge den något som gillar “WordPress Post Views Counter Function. Detta beror på att syftet med denna första kod är att skapa en funktion för att räkna post views i WordPress.
Ändra sedan Code Type till “PHP Snippet”. Obs/observera att alla code snippets som du kommer att behöva add to från den här artikeln är i PHP.
Följaktligen kan du kopiera och paste in följande kod under:
1 2 3 4 5 6 7 8 9 10 11 12 13 14 | function wpb_set_post_views($postID) { $count_key = 'wpb_post_views_count'; $count = get_post_meta($postID, $count_key, true); if($count==''){ $count = 0; delete_post_meta($postID, $count_key); add_post_meta($postID, $count_key, '0'); }else{ $count++; update_post_meta($postID, $count_key, $count); }}//Get rid of prefetching to keep the count accurateremove_action( 'wp_head', 'adjacent_posts_rel_link_wp_head', 10, 0); |
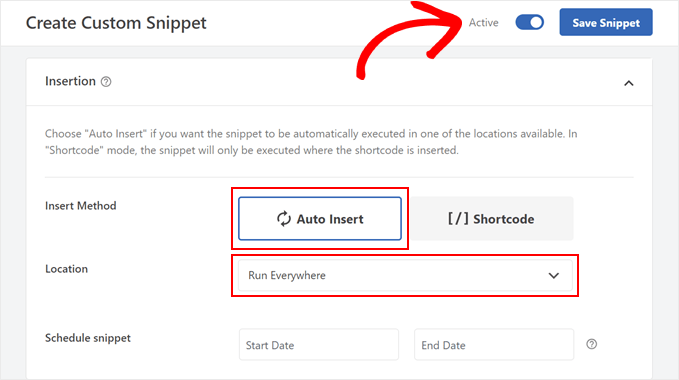
Nu rullar du bara ner till “Insertion” section och väljer “Auto Insert” för Insert Method och “Run Everywhere” för Location. Detta fungerar på samma sätt som att inserta koden i functions.php-filen i ditt theme.
Därefter navigerar du till den övre högra sidan av page och gör koden aktiv.
Klicka sedan på “Save Snippet”.
I detta skede måste du lägga till ett annat nytt anpassat code snippet. Du kan namnge den här “Track Post Views Function Call.
Denna kod kommer att anropa funktionen ovan och aktivera den på dina sidor med enskilda inlägg.
När du har gjort det kopierar och klistrar du in följande snippet:
1 | wpb_set_post_views(get_the_ID()); |
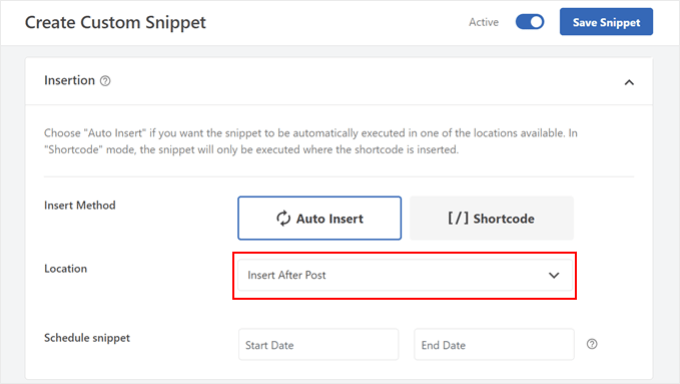
Det som är annorlunda med det här code snippet är att du väljer location “Insert After Post” eftersom det är tänkt att run på dina sidor med enskilda inlägg.
När du är klar är det bara att göra koden aktiv och save den.
Infoga WordPress Post Views åtgärds-hook för tracking
Nu måste du lägga till ett nytt code snippet som kontrollerar om den aktuella page är ett enskilt inlägg. Om så är fallet kommer den att anropa WordPress Post Views Counter-funktion för att spåra och updating postens view count.
På så sätt kommer antalet views att updates varje gång en användare besöker posten.
Låt oss namnge detta snippet “WordPress Post Views Tracking Hook. Infoga sedan följande rader med kod:
1 2 3 4 5 6 7 8 9 | function wpb_track_post_views ($post_id) { if ( !is_single() ) return; if ( empty ( $post_id) ) { global $post; $post_id = $post->ID; } wpb_set_post_views($post_id);}add_action( 'wp_head', 'wpb_track_post_views'); |
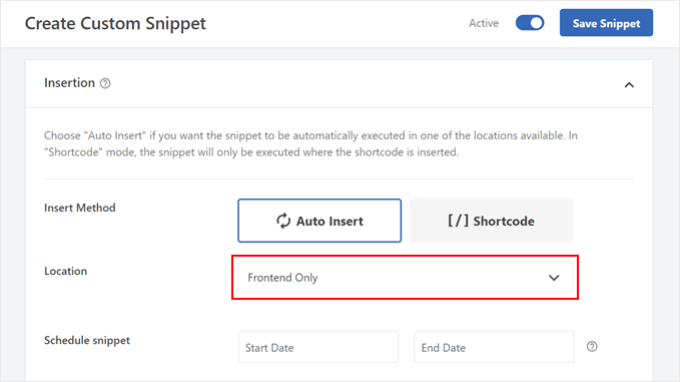
You can choose the insert method as ‘Auto Insert’ and the location as ‘Front-end Only’.
Samma sak som i föregående steg, bara gå vidare och aktivera koden och spara snippet.
Note: Om du använder ett plugin för caching kanske den här tekniken inte fungerar som standard. Du kan använda funktionen för fragmentcaching som erbjuds av vissa tillägg för caching som W3 Total Cache för att få det att fungera.
Add Functions to Retrieve Post Views Count och Display Most Popular Posts With View Counts
Vi är nu inne på de sista stegen i den här guiden. Du måste add a code snippet som hämtar och formaterar antalet views för ett visst WordPress post. Detta kommer att vara praktiskt senare när du visar listan över de mest visade posterna.
Du kan namnge den här koden som ‘Retrieve Post Views Count Function’ och ställa in platsen till ‘Run Everywhere’.
Här är code snippet:
1 2 3 4 5 6 7 8 9 10 | function wpb_get_post_views($postID){ $count_key = 'wpb_post_views_count'; $count = get_post_meta($postID, $count_key, true); if($count==''){ delete_post_meta($postID, $count_key); add_post_meta($postID, $count_key, '0'); return "0 View"; } return $count.' Views';} |
Återigen, se till att göra koden aktiv i WPCode och spara den efteråt.
När du har gjort det skapar du ett nytt code snippet igen och döper det till “Display Most Popular Posts with View Counts. Det här är koden som visar dina mest populära inlägg längst ner i dina blogginlägg.
I boxen Code Preview insertar du följande snippet:
1 2 3 4 5 6 7 8 9 10 11 12 13 14 15 16 17 18 19 20 21 22 23 24 | // Customize the query parameters as needed$popularpost = new WP_Query( array( 'posts_per_page' => 3, // Feel free to adjust the number of posts to display 'meta_key' => 'wpb_post_views_count', 'orderby' => 'meta_value_num', 'order' => 'DESC'));?><div class="popular-posts"> <h2>See Our Most Popular Posts</h2> <!-- Feel free to customize the title --> <ul> <?php while ( $popularpost->have_posts() ) : $popularpost->the_post(); ?> <li> <a href="<?php the_permalink(); ?>"><?php the_title(); ?></a> - <?php echo wpb_get_post_views(get_the_ID()); ?> </li> <?php endwhile; ?> </ul></div><?php wp_reset_postdata(); |
Som noterat i koden kan du gratis justera antalet posts som ska visas och customize titeln för denna section.
I WPCode Insertion section, se till att välja “Insert After Post” för Location. Sedan gör du bara koden aktiv och sparar snippet.
Allt som återstår att göra nu är att besöka ett av dina blogginlägg och se om koden fungerar. Så här gillar de mest populära posterna efter views section på vår test WordPress blogg:

Experttips: Om du vill anpassa koden ytterligare men du inte har någon kodningserfarenhet kan du använda WPCodes AI Code Generator för att hjälpa dig. Den här funktionen kan redigera din befintliga kod så att den passar dina exakta behov.
För mer information, kolla in vår fullständiga WPCode-recension.
Video Tutorial
Om du föredrar visuella instruktioner kan du titta på videoversionen av denna poradnik nedan:
Vi hoppas att denna poradnik för WordPress hjälpte dig att lära dig hur du visar populära inlägg efter visningar. Du kanske också vill kolla in vårt expertval av de bästa relaterade inlägg-pluginsen för WordPress och vår artikel om vad som gör en högkonverterande landningssida.
If you liked this article, then please subscribe to our YouTube Channel for WordPress video tutorials. You can also find us on Twitter and Facebook.


Bigdragon13th
Hello,
I’ve using this code for months and it’s work greats! That’s until I start using W3 Total Cache and this code stop count views for me.
I’m struck at where do I need to put the mfunc to let the code work with cache. Can you point that out?
FYI, I put all the code in a site-specific plugin.
AJ
Hell this is great! How would I display the view count outside of the post loop like in the sidebar?
leslie
hello, I have some problem on how setting up like when the login user won’t include on the count while viewing any pages?? how to do that.. please need some help on these. thanks
Sarah
Hey there, thanks for this. REALLY helpful!! Would you know how to apply a time range to this code? For example to show the most popular posts in the last day, week or month etc? I know there are plugins for this but I would like to do it without one
Dale Knight
Great!
Denis
Hello,
thanks for this nice tutorial. It works on my page!
– how can I exclude robots and spiders that hit my posts?
– May be I can set a timer of 10 seconds. after that the count should rise. So the people who only click thourgh the posts are not counted.
Cheers,
Denis
Sarah
You have no idea how much time you saved me. Thank you, works perfectly!
Clay Hickman
Thanks for the tip. Will use.
Jenni B
Hello – thanks so much for this! I noticed the question regarding the W3TC workaround, but have a slightly different question: does that still apply if I’m hooking into wp_head from functions.php, and if so, how exactly do I implement it there? Thank you!
rafi
this is really easy and very helpful! thanks man!
Kosmos
Hello, thanks for this snippet.
I have a problem, the orderby don’t work. I have five posts :
– Post 1 : 85 views
– Post 2 : 35 views
– Post 3 : 165 views
– Post 4 : 1 view
– Post 5 : 1 view
When i displayed it the order was : 1, 2, 4, 5 and 3
Do you have an idea please ?
Raj
It might be integer type issue ..
Iftekhar
following your article I am using post view count in my site since 6 months. It was working fine, but recently I am having problem with this. If a visitor view a post the count is increasing by 1 but the problem is the count is increasing in all other posts. I have w3 total installed and I m using mfunc according to your article. Please help me if you have any idea about this issue… Thanks.
WPBeginner Support
Iftekhar can you check what happens when you turn off w3 total cache?
Admin
Iftekhar
The problem seems to w3. Post view count is OK since deactivated. But I want to use both of them
ivan
Hello,
I am wanting to switch from using the plugin because it doesn’t support the polylang language (the author’s not getting back to me and I don’t really know if it’s possible to filter functions for the plugin..)
Two questions:
– I examined the code a bit and I’m not sure if this code starts counting posts from when it’s implemented? Or does it somehow retrieve where the post counts are currently?
– The current code on this website uses the get_posts() function so it creates an args array instead of using WP_Query(). Is this the same thing? I’m guessing not. And if it isn’t is the code below correct to get the array? I tried implementing this but it didn’t seem to work.
$args = array( ‘meta_key’ => ‘wpb_post_views_count’, ‘orderby’ => ‘meta_value_num’, ‘order’ => ‘DESC’,’numberposts’ => 6, ‘post_status’=>”publish”,’post_type’=>”post”,’lang’ => ‘en’);
thanks!
Tomas
This approach is very basic. If you want to count clicks from the same user (same IP) only every 5 minutes or 10 minutes etc. you need to have a separate table for that and before adding a new row in db you need to check the ip and time. If there is a record saved 3 minutes ago, the click is not added. Otherwise, it is added. Also this aproach allows you to create custom list of most viewed articles in 7 dyas, month, all time etc. Or even by category, user etc. (if you store appropriate values in appropriate table columns.
boson
i am trying .. when you say put code wpb_set_post_views(get_the_ID()); inside of single post loop, does that mean use this code inside of the theme single.php anywhere?
thank you for your help
WPBeginner Support
No it means paste the code inside the loop between
<?phpif( have_posts() ) :while( have_posts() ) : the_post(); ?>1-click Use in WordPress
and
<?phpendwhile;else: ?><p><?php _e('Sorry, no posts matched your criteria.'); ?></p><?phpendif; ?>1-click Use in WordPress
Admin
Cory Dobson
Is there a way of restricting when the post views are collected from? For example, I am looking to display the posts with the most views in the last 24 hours, how would you do something like that using this code?
Great post by the way, really helpful!
igor
how can I paginate the results.
10 results by page lets say
Mark
What if your single-xxxx.php doesn’t use the loop but custom fields. How can I use this code if I don’t use the loop?
WPBeginner Support
single-xyz.php means that file is used for a single post with xyz slug. You can still add the last code snippet in your template just where you think that the template ends displaying content.
Admin
quocminh86
comment policy,
Dusan
I’m confused as to where to put the mfunc code?
WPBeginner Support
If you are using W3 Total Cache then you can add this code just before wpb_get_post_views(get_the_ID()); in your templates where you want to display the popular posts. The purpose of this code is to allow W3 Total Cache to dynamically display popular posts and not cache it.
Admin
Waqas Munir
Dear, i am really confused about that… I am trying to add this to my blog, but I have no experience in all this.
WPBeginner Support
Then perhaps you should try using WordPress Popular Posts plugin instead.
Admin
Aleksander
What about using update_post_meta function instead of delete_post_meta and add_post_meta ?
George
Thanks for this post! Really really good.
I’ve two question:
1. Is there any possibility to count just one visit for each IP adress? How?.
2. Can i show the most popular posts by a specific period of time? For example, most visited posts this month, or the most popular posts from 1 of may to 1 of june…
Thank you!
Igor Gumush
thanks , working great
shishir umrao
Hi,
This code is working but whenever i reload the page , it is adding “2” to the total page count. For example if page count is 14 and after reloading total page count is 16 … can anyone guess where’s the problem ?
Shishir Umrao
Editorial Staff
Its happening because the function is loading twice somehow.
Admin
shishir umrao
Yeah. I figured out this piece of code was responsible for this.
Nick
Very useful post, I managed to make my Tag pages to order posts by a custom field value similar to post view count, however, I ave pagination on my tag pages and it keeps showing the same top ranking posts on all pages, even after I have removed this code:
‘posts_per_page’ => 4,
How do I fix the pagination so it show other posts on subsequent Tag pages?
Chris
How did you manage to make your Tag pages order posts by a custom field value similar to post view count?
It looks like the popular posts plugin only takes categories as a parameter.
Mike
Thanks for the very detailed instructions. Will using this to display the most popular posts cause a lot of additional server load if a site has significant traffic? Some of the WP plugins for this sort of thing tend to have this problem.
Editorial Staff
How much is significant traffic? We’re using it on WPBeginner.
Admin
Ryan Karpeles
Uh, awesome! Just awesome. THANK YOU for this!!! Works perfectly!
Lowell
I’m still learning this stuff so pardon my ignorance.
How do you allow the user to choose between queries like they do on codecanyon when they allow you to sort by price, sales, date etc.?
Thanks so much.
saeed
How can I change number of popular posts that display?
Editorial Staff
Change the posts_per_page to whatever number you like.
Admin
Adam Davies
Thank you so much for this. Life saver and a great tip that I definitely will be using more often.
Md. Ariful Islam
Hey, Really , Many Many thanks for this useful tips. I am highly glad to you.
Ar Ya
Hi , that’s great !
But ‘orderby’ => ‘wpb_post_views_count meta_value_num’ not working.
please use : ‘orderby’ => ‘meta_value_num’
thnx
nick
Thanks, it works for me, just with one important exception – popular posts are not as links, just their titles. How can I fix this, please?
Preston
I added this code in the manner described in the article and upon activation, I saw this….
The plugin generated 2 characters of unexpected output during activation. If you notice “headers already sent” messages, problems with syndication feeds or other issues, try deactivating or removing this plugin.
Preston
Fixed. I did two things:
1. Switched my permalink structure to a custom structure /%category%/%postname%/
2. Check through all of my pages for extra spaces.
One of them worked.
…go figure
Preston
Jose Vega
Hi, I think it´s necesary add – wp_reset_query(); – at the end of the query to destroys the previous query used on a custom Loop.
I hope It helps somebody.
Jon Edwards
I have this working to 95% using a custom WP Query to display popular posts from each category.
The only bit not working for me is the order – mine won’t display in descending order of views.
Cameron
Thanks for the post! This really helped.
I’m not sure if anyone else ran into this issue, but when you set up the arguments for WP_Query, you have orderby => ‘wpb_post_views_count’. This was a problem for me because I wasn’t sure how it was ordering my posts. In the codex it says that if your using numbers they will only sort by the first digit. To fix this, you can simply replace the ‘wpb_post_views_count’ with ‘meta_value_num’. This basically will tell the query to reach inside the post’s meta value and probably cast it to an integer before it sorts. Hope this helps anyone running into the same issues.
Overall, it works great! I have the 4 most popular posts in a slider on the home page. Thanks again!
Editorial Staff
Good suggestion. Updated the article with this.
Admin
efishinsea
Hi. Your code sample up top is *not * updated.
Instead of this:
‘orderby’ => ‘wpb_post_views_count meta_value_num’
you should have this as suggested :
‘orderby’ => ‘meta_value_num’
if you want to sort by “Most to Least”
Minh
Why it only shows posts which have count view < 100?
Editorial Staff
If you are using a caching plugin, then it doesn’t always update.
Admin
George
Thanks for the tutorial. How do you exclude current posts from displaying?
Kris
This looks great on my home page but it seem to want to display on my single.php or anywhere else on my site. I tried creating a sidebar-single.php and inserting the code but still no luck. Any idea why it wouldn’t work on other areas my theme?
Kris
i got it working. Thanks for this.
Anderson
Dont work, its show randomic posts :S and i use post_type = > ‘post-type-name’
Mody
This usually happens when meta key wpb_post_views_count is not available for posts, make sure you add the function that tracks views within wp while loop, otherwise it will keep showing random posts.
– Mody
Bent
Hello,
I’m using your code for track post view in the wordpress theme.
function wpb_get_post_views($postID){
$count_key = ‘wpb_post_views_count’;
$count = get_post_meta($postID, $count_key, true);
if($count==”){
delete_post_meta($postID, $count_key);
add_post_meta($postID, $count_key, ‘0’);
return “0 View”;
}
return $count.’ Views’;
}
The problem is that when I use W3 Total Cache the track view is not working right.
Is there a way in the W3 Total Cache’s Options to put ignore only on this function, but in the same time I want the code to work with W3 Total Cache?
Thank you!
Editorial Staff
Read the article again. We have already covered this “Fragmented Caching”.
Vaibhav
Hello
i followed your tutorials and have done exactly what u said.
i also added ur snippet
php query_posts(‘meta_key=post_views_count&orderby=meta_value_num&order=DESC’);
in index.php
i am facing a little error,
i am using infinite scrolling
when i put this snippet in index.php
the infinite scroll instead of loading next set of post
loads the same sets of post
For better Understanding u can check it live here
blog.newgags,com
Henry
For some reason my post views are incrementing by 2 on each page refresh. What could be happening there?
Henry
I do apologise. I had added the tracker to both the WP header and also to the single post body. Very stupid on my part :}
Nice tutorial, very easy to follow.
Brandon
First of all thanks for this post. Second I have been using this script for a few days now and for some reason it started out fine and now it is not displaying the most viewed posts, I don’t see any rhyme or reason to what posts are now being displayed. The last I checked the post that it is displaying at the top has 8 page views. I know there are posts with 25+ recorded page views. I would like to figure this out. Can you possibly point me in the right direction. I followed this post word for word. The post views are being recorded properly.
Editorial Staff
Not sure what could be going wrong. The WP_Query is suppose to list the posts with the highest counts first.
Admin
Einar Ólafsson
Hi. This works grade up until the view count gets over 999. All post with more view counts than 999 are not displayed, the query never post them. The latest post is the one with exactly 999 and the rest are under that. I have over 100 post that have more than thousand and are not being included.
Editorial Staff
Interesting. We have posts with over 10k views and it seems to be working just fine.
Admin
Martinbeasnunez
Guys you rockkk
Quick question:
If i have add a custom post type in your code ?
(popular post from especific custom post type)
Regards (:
Editorial Staff
This should work with CPTs as well.
Admin
Artem Russakovskii
This is a good basic tutorial, but be warned: it’s not going to work if you use caching strategies that bypass PHP (like wp-supercache, W3TC, nginx/varnish, etc). The only way to count those would be via Javascript or log parsing.
Editorial Staff
Hey Artem, Thanks for dropping by. Actually using W3 Total Cache, you can use fragment caching and it works just fine. Going to update the article for those who are using the caching plugin.
Admin
Artem Russakovskii
Interesting. However, I run nginx in front of W3TC, and it does a whole lot of its own caching, so it’s always safer/more reliable to use an AJAX approach. Nice info on the fragment caching though, I had no idea W3TC had it.
Ramon Fincken
Why use
//To keep the count accurate, lets get rid of prefetching
remove_action( ‘wp_head’, ‘adjacent_posts_rel_link_wp_head’, 10, 0); ?
if you can use the main loop or the footer ?
Editorial Staff
Some browsers prefetch the rel links with the next value. So technically when a user views one post, it can act as if they had viewed both posts. This will cause inaccurate count. If you like inflated views, then don’t take it off.
Admin
Nino Blasco
Great article! Explanation useful and easy to understand.
Thank you.
Connor Crosby
Yay! A tutorial that doesn’t require a plugin!
Editorial Staff
Yeah we try to balance things out for our audience. This was requested by the users, and we were using it on our own site.
Admin
Zach
Please stop saying stuff like this. Plugins aren’t bad, it’s articles like this that make them look bad. Enough articles have come out over the past few weeks to fully explain this – it’s getting a little embarrassing.
Editorial Staff
How would you suggest titling future posts instead? DIY prefix? These are different then just using a pre-made plugin. Also, if you read the article, there is no where in our article that we say “plugins are bad”. We clearly state that the only reason why coded this was to get more customization. It is up to a user to take either stance. Some can think that plugins are bad… whereas others like yourself can think that we are saying that plugins are bad…
Zach
I don’t think any type of prefix is needed. It’s one of the great/scary things about WordPress. You COULD put this code in your theme, but then begs the argument about needing to either, 1) Loose those customizations when you change your theme, or 2) have the knowledge to properly pull those over to another theme.
A lot of the users here are beginners (hence the point of this site), so many will just copy/paste what you give them. WP Beginner is obviously a fantastic resource (reason why I follow you on Twitter), but you have a responsibility to not put a false notion about how plugins/themes work.
Correct, you don’t flat out say, “Plugins are bad, put this in your theme instead!”, but the original commenter to the thread I replied to, said, “Yay! A tutorial that doesn’t require a plugin!” – so even though you didn’t say it, that’s how it was taken.
I’d suggest doing was Pippin does for his plugins – he has a simple starter plugin he uses for all of his tutorials. Why not create a blank “Starter Plugin” download, with just the basics, so others can download and put their customizations in there instead? Reference it in each article you do and it takes out some of the confusion. Thanks.
Editorial Staff
We have been following Otto’s advice on site-specific plugin for quite some time. It is probably similar to what Pippin does. If you read this article, site-specific plugin is hyperlinked. It is in most other articles as well. That article shows users the importance of site-specific plugin and advise users to not put everything in functions.php file. At the bottom of that article, the sample “starter plugin” is there for anyone to start with.
codekipple
In fairness this tutorial helped me out. I wanted a simple solution for popular posts after trying some of the plugins and not being able to fully control the markup. This tutorial helped me quickly implement some popular posts functionality into my own plugin.
So i agree that using pre-built plugins is not a bad thing, but at times tutorials like this are useful to take control and build out a plugin that works the way you need it to instead of fighting against an already built plugin.
Pippin
As Zach said, please stop using “without a plugin”. Sure, it’s cool to see how to code this yourself but there is literally no difference between this code and the code in a plugin. You could place this code into a plugin and it would function identically to placing it in your theme.
Ruben
If you say there’s no difference, you have no idea what you’re talking about. Lets say your are working on a site and don’t have access to the plugins directory, making a solution that works “without using a plugin” would be a viable alternative.
As for the title, semantically the title should reflect the content of the post and could be “How to Display Popular Posts by Views in WordPress with or without a Plugin”.
However, taking SEO in to consideration, lets say he would like this post to reach a specific audience, for example, people who don’t want to or can’t use a plugin, the title would probably be best as is.
Gautam Doddamani
i am using genesis child theme..can u tell me which all functions and codes to use..i am sorry i am a noob to genesis…
Editorial Staff
For child theme users, the wp_head solution would work to track post views. Not sure what else you meant.
Admin
Gautam Doddamani
is it true? as artim told, does this code become unresponsive when we use a caching plugin?? for example i currently use W3 total cache and i want to use this method to build my custom popular post by views widget…i read this kind of post on wpsnipp.com and the users suggested it does not work when we enable caching plugins…reply soon…
Editorial Staff
Read the comment reply to Artem. You can use fragment caching to make it work just fine.