
På WPBeginner använder vi Cloudflares stora, snabba CDN för att göra vår webbplats snabbare för användare över hela världen. Detta har hjälpt oss att avsevärt öka WordPress prestanda, vilket är anledningen till att vi ofta rekommenderar Cloudflare till våra läsare.
Cloudflare är en av de bästa WordPress CDN-tjänsterna som finns tillgängliga på marknaden. De erbjuder ett gratis CDN som snabbar upp din website och kraftfulla säkerhetsfunktioner för småföretagswebbplatser.
Cloudflares initiala installationsprocess kan dock vara svår för nya användare.
I den här guiden går vi igenom en komplett Cloudflare-installation i WordPress för att hjälpa dig att förbättra hastigheten på din website.
Vad är ett CDN?
Ett CDN eller content delivery network är ett system med distribuerade servrar som hjälper till att leverera filer från din website snabbare till användare baserat på deras location.
Vanligtvis betjänar ett webbhotell dina website besökare från en enda location. Alla användare har tillgång till samma server, oavsett var de befinner sig.
Detta kan orsaka en fördröjning i leveransen av content för användare som bor längre bort från din websites centrala server för webbhotell.
Det är därför CDN:er sätter upp flera edge-servrar på olika locations runt om i världen.
Dessa CDN-servrar sparar kopior av statiskt innehåll från webbplatsens ursprungsserver och presenterar det för användarna när de besöker din WordPress-webbplats.
")
När det finns en request från användaren kommer den CDN server som är close till användarens location att hantera den.
Om någon i USA till exempel vill komma åt en website som är hosted i Storbritannien, så kommer en CDN-server i USA att servera den requesten, ej huvudservern i Storbritannien.
Med ett CDN hanteras alla requests från användarna av de närmaste CDN-servrarna. Detta minskar det fysiska avståndet mellan besökarna och din websites server.
Som ett resultat förbättrar ett CDN din websites prestanda och hastighet för alla användare oavsett deras geografiska location.
En snabbare website förbättrar också upplevelsen för användarna och kan ge din website en liten skjuts uppåt i sökmotorsoptimeringens ranking. Att använda ett CDN minskar också belastningen på din primära server och skyddar den från att krascha under trafiktoppar.
Om du vill veta mer kan du läsa vår guide om varför du behöver ett CDN för din WordPress blogg.
Vad är Cloudflare CDN?

Cloudflare är en av de mest populära gratis CDN-leverantörerna på Internet. Det är ett stort nätverk av globalt distribuerade servrar som automatiskt cachelagrar statiskt innehåll och levererar dynamiskt innehåll snabbt.
Cloudflare är inte bara en CDN-tjänst utan även en molnbaserad brandvägg för webbplatser och en distribuerad proxyserver. Det innebär att den övervakar all inkommande trafik till din webbplats och blockerar misstänkt trafik redan innan den når din server.
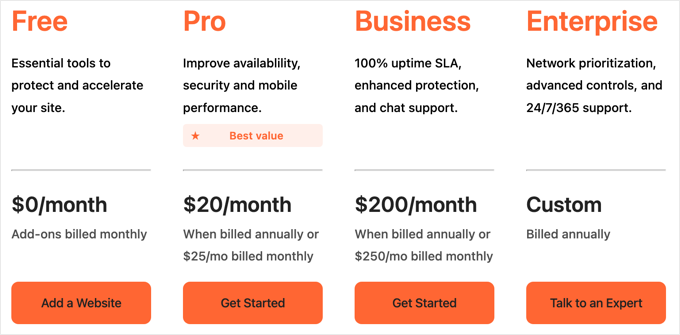
Det erbjuder en gratis grundplan som är lämplig för webbplatser och bloggar för småföretag och betalda planer från $ 20 per månad.
Cloudflare är ett utmärkt val för småföretag som letar efter ett gratis CDN. Men om du vill utnyttja alla Cloudflares funktioner fullt ut behöver du planen Business, som kostar $ 200 per månad.
Relaterat: Se vårt inlägg om varför WPBeginner bytte från Sucuri till Cloudflare.
Med det sagt, låt oss ta en titt på hur du ställer in Cloudflare gratis CDN i WordPress. Du kan använda snabblänkarna under för att hoppa till de olika delarna av tutorialen:
Konfigurera ditt Cloudflare-konto
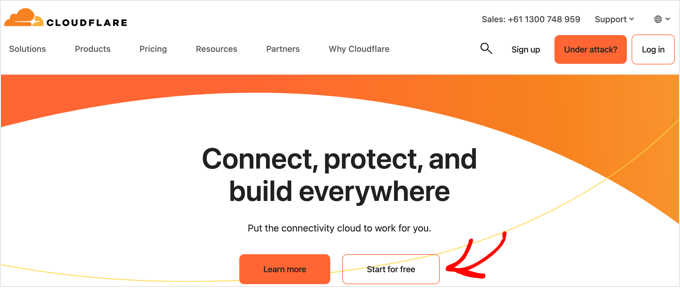
För att komma igång måste du besöka Cloudflares webbplats och klicka på knappen “Starta gratis”.
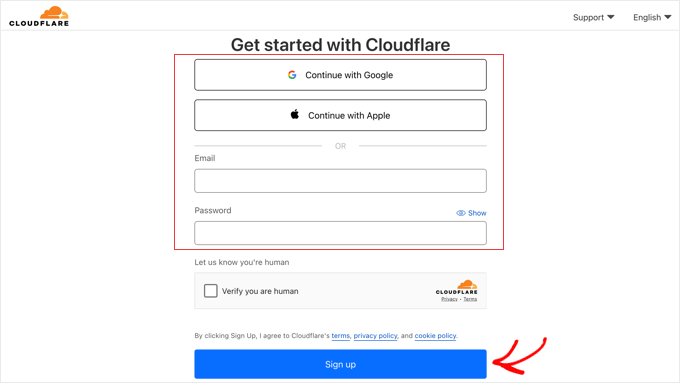
På nästa sida måste du ange din e-postadress och ditt lösenord för att skapa ett Cloudflare-konto. Alternativt kan du registrera dig med dina Google- eller Apple-referenser.
Du behöver bara enter den obligatoriska informationen och sedan clicka på knappen “Sign up”.
När du är klar med registreringen kan du ansluta din webbplats för att börja skicka din webbtrafik via Cloudflare. Du behöver bara ange din webbplats i fältet “Ange en befintlig domän”.
Se till att du bara skriver in din sites domain name, till exempel example.com. Du behöver inte skriva hela URL:en eller några extra tecken.
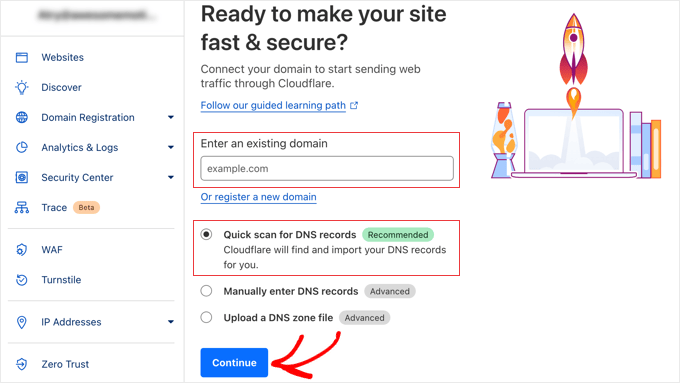
Kontrollera att alternativet “Snabbsökning efter DNS-poster” är markerat och klicka sedan på knappen “Fortsätt”.
På nästa skärm kommer du att bli ombedd att välja vilken typ av Cloudflare-plan du vill ha. För denna handledning kommer vi att välja den kostnadsfria Cloudflare-planen. Klicka sedan på knappen “Fortsätt”.

Därefter kommer Cloudflare att visa dig en lista över alla DNS-poster som deras system har hittat. Dessa kommer att inkludera dina underdomäner också.
De DNS-poster som du vill ska gå via Cloudflare ska ha en orange molnikon, medan de DNS-poster som ska gå förbi Cloudflare ska ha en grå molnikon.
Du måste reviewer listan för att se till att din primära domän är aktiv på Cloudflare med en orange moln icon. Klicka bara på “Proxy status” toggle för att ändra status.
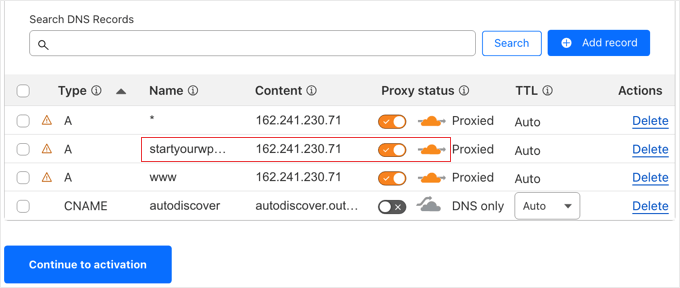
När du har verifierat dina DNS-poster klickar du bara på knappen “Fortsätt till aktivering”.
Under nästa steg i din installation kommer Cloudflare att be dig att uppdatera dina namnservrar. Du kommer att bli ombedd att ändra dina namnservrar till nya som tilldelats av Cloudflare.
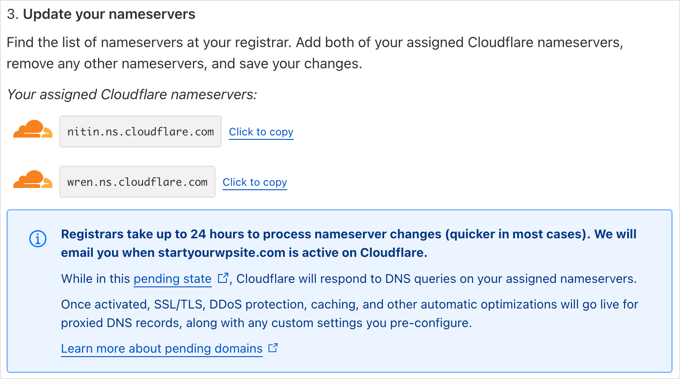
Note: Det kan ta en viss tid innan en ändring av namnservrar sprids över internet. Under den tiden kan din website bli otillgänglig för vissa användare.
Du kan ändra namnservrar från ditt konto hos domänregistratorn, som gillar Domain.com.
Eller om du har fått en gratis domän från din webbhotellleverantör måste du ändra namnservrarna genom att logga in på ditt webbhotellkonto.
I denna tutorial kommer vi att visa you hur man ändrar namnservrarna från Bluehosts kontrollpanel.
Processen är likartad på olika hostingföretag, men du kan alltid be din hosting provider om detaljerade instruktioner för deras kontrollpanel.
När du är inloggad på din Bluehost dashboard, gå till “Domains” section och click the “Settings” button next to your domain name.

Därefter måste du rulla ner till sektionen Advanced Settings och förstora den genom att clicka på pilen till höger på vyn. Detta kommer att visa din websites DNS settings, inklusive namnservrarna.
Bredvid “Nameservers (DNS)” ska du klicka på knappen “Hantera”.

Detta kommer att visa en varning om att endast avancerade användare bör uppdatera sina namnservrar.
Du måste klicka på knappen “Fortsätt” för att bekräfta detta och gå vidare till nästa steg.

Därefter måste du enter namnservrarna som tillhandahålls av Cloudflare.
Klicka sedan på knappen “Save”.

Efter det måste du gå tillbaka till Cloudflares installationssida och klicka på knappen “Kontrollera namnservrar nu”. Cloudflare kommer nu att kontrollera dina namnservrar regelbundet och skicka ett e-postmeddelande till dig när de är aktiva.
Under tiden kan du klicka på knappen “Fortsätt” för att slutföra installationen.
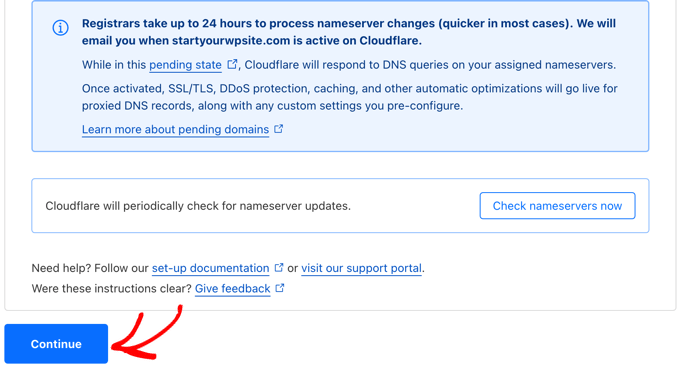
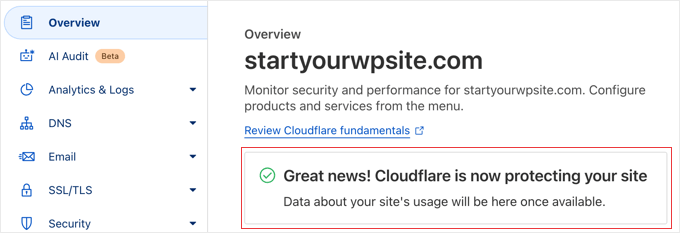
Nu är det klart! Det kommer att ta några minuter att updating dina domäners namnservrar och activate Cloudflare.
När du är aktiverad kommer du att se success message i din Cloudflare dashboard.
Note: Ovanstående screenshots visar Bluehosts kontrollpanel. Dina nameserver settings kan se annorlunda ut om du använder en annan hosting provider.
Konfigurera en viktig Cloudflare-inställning
Cloudflare skyddar nu din webbplats, men du måste konfigurera en viktig inställning medan du fortfarande befinner dig på Cloudflares webbplats. När detta är gjort kommer du att installera Cloudflare-pluginet på din WordPress-webbplats för att avsluta installationsprocessen.
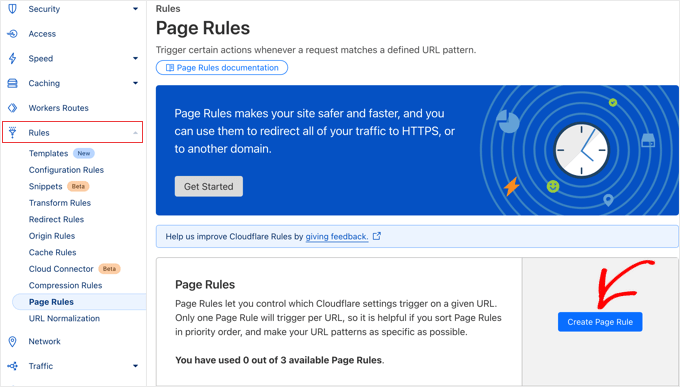
Vi rekommenderar att du konfigurerar Cloudflare med sidregler så att ditt WordPress-adminområde inte passerar genom det. Detta undviker potentiella cachningsproblem som kan påverka adminfunktionaliteten.
Cloudflare låter dig ställa in tre gratis sidregler. Om du vill lägga till fler sidregler måste du betala 5 USD per månad för 5 extra regler.
Först måste du klicka på alternativet Regler ” Sidregler i menyn till vänster på sidan. Därefter kan du klicka på knappen “Skapa sidregel”.
Nu måste du skriva in följande inställningar i regeln. Du kan klicka på knappen “+ Lägg till en inställning” för att lägga till nya rader för ytterligare inställningar:
- Page URL: exempel.com/wp-admin*
- Nivå för caching – Bypass
- Inaktivera prestanda
- Inaktivera appar
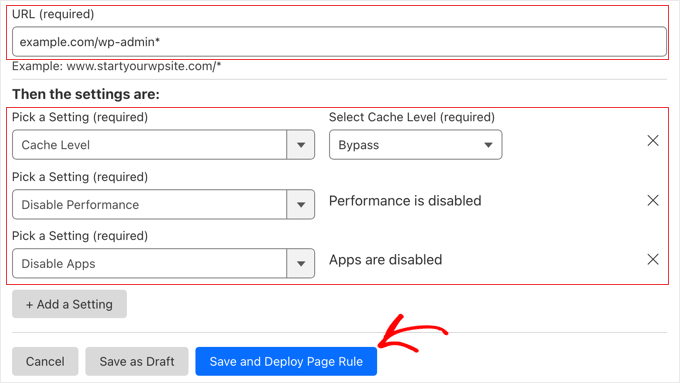
När du är klar, se till att du klickar på “Save and Deploy” för att lägga till den nya regeln.
När det har gjorts kommer du att slutföra Cloudflare-installationen med hjälp av det officiella Cloudflare WordPress-pluginet.
Optimera Cloudflare för WordPress med hjälp av ett tillägg
Cloudflare erbjuder ett dedikerat WordPress-plugin för WordPress-optimerade inställningar med ett klick. Det integrerar Cloudflare-funktioner smidigt med WordPress för att ge bästa möjliga kompatibilitet och funktionalitet.
Med pluginet kan du snabbt konfigurera Cloudflare på din WordPress site, lägga till WAF-regler (Web Application Firewall), automatiskt purge cachen och mycket mer.
För att komma igång installerar och aktiverar du Cloudflare plugin på din website. För mer detaljer, se vår Step-by-Step guide om hur du installerar ett plugin för WordPress.
Obs: Det här insticksprogrammet har inte uppdaterats på ett tag, men vi har testat det och det fungerar fortfarande korrekt. För mer information, se vår guide om huruvida det är säkert att använda föråldrade WordPress-plugins.
När du har gjort det måste du gå till Settings ” Cloudflare i din adminpanel för att konfigurera Cloudflare-inställningarna.
På sidan Settings ser du en knapp “Create Your Free Account” och ett alternativ för inloggning för befintliga konton. Klicka bara på länken “Sign in here”.

På nästa vy måste du enter din Cloudflare email och API key.
Klicka på länken “Get your API key from here” (hämta din API key härifrån).

Detta kommer att visa en popup för ditt account area på Cloudflare website.
Se till att du är på din “My Profile” page, och klicka sedan på “API Tokens” tabs i den vänstra sidebaren.
Därefter går du till sektionen “Global API Key” och klickar på knappen “View”.

Detta öppnar en popup och visar din API key.
Klicka bara på nyckeln för att kopiera den.

Därefter måste du komma tillbaka till din WordPress dashboard och ange din email address och API key.
Klicka sedan på knappen “Save API Credentials”.

Efter det kommer Cloudflare-inställningarna att visas på din dashboard.
Härifrån kan du tillämpa en WordPress optimering med ett enda click, purge cachen, aktivera automatisk cache och mycket mer.
För att optimera din WordPress-webbplats klickar du på knappen “Apply” bredvid “Apply Default Settings”. Detta kommer att utföra några konfigurationsändringar som Cloudflare rekommenderar för optimal WordPress-prestanda.

Klicka sedan på alternativet “Settings” i menyn.
Här hittar du fler inställningar för optimering av sites.

Du kan rulla ner på den här vyn för att hitta section “Security”.
Säkerhetsnivån är som standard medium. Om du vill förbättra säkerheten på din webbplats kan du välja “Hög” i rullgardinsmenyn.

Och så är det klart! Du är klar med allt.
Vi hoppas att den här artikeln hjälpte dig att lära dig hur du konfigurerar Cloudflares kostnadsfria CDN i WordPress. Du kanske också vill se vår ultimata guide om hur du ökar WordPress hastighet och prestanda och våra expertval för de bästa caching-pluginsen för WordPress.
If you liked this article, then please subscribe to our YouTube Channel for WordPress video tutorials. You can also find us on Twitter and Facebook.
 in 2024")
")


Nelson
My hosting provider connected my website over Cloudflare CDN.
But main problem is with website speed.
Speed with direct access 100% and when accessed via CDN 85%. How can it be fixed?
WPBeginner Support
It would depend on the reason why it says that the speed is lower, we would recommend taking a look at our guide below for understanding and using speed tests:
https://www.wpbeginner.com/beginners-guide/how-to-properly-run-a-website-speed-test-best-tools/
Admin
Andrew Hansen
My hosting plan through Host gator says it has cloudflare installed. Is that good, or should I uninstall it through the hosting plan and manually add it so i can customize my options?
WPBeginner Support
It would depend on how Cloudflare is set up on your account, if you have access to cloudflare’s settings then you can continue to use what is on your account without worrying.
Admin
Andrew Hansen
I do not have control over settings.
WPBeginner Support
Jus to be safe, check with your host as there may be a hidden settings area for Cloudflare in the hosting settings.
Andrew Hansen
I checked the information regarding cloudflare through Hostgator. you can manage what level caching (assets only, assets and web pages, or assets and web pages extended) and you can clear the cache, but hostgator says under the cons of using it “No option to customize – Currently, you cannot customize cache settings (for example, which content gets cached, the cache timing, etc.) for the CDN.”
Jiří Vaněk
I use Cloudflare DNS along with their CDN. The integration of Cloudflare CDN into the WP Rocket plugin, which I use for caching, is fantastic. The CDN can be linked with the caching plugin, allowing for the simultaneous clearing of both the website cache and the CDN cache with a single button in WP Rocket.
WPBeginner Support
Connections like that to help simplify the process are very helpful
Admin
Ralph
I plan on making website from europe server (cheaper) to US users and this guide is godsend! Even better it is possible to do it for free. Thank you for this detailed guide. It will definitely help me setting everything up as I never really understood how to do this. Every other guide was lacking details and was too general.
WPBeginner Support
Glad to hear our guide was helpful
Admin
Salman
Hi, I use the “WPS Hide Login” plugin. While creating a page rule for the login page should I use the default login URL or the new login URL which I am using with the help of the plugin?
WPBeginner Support
If the login page is on a different URL you would want to set the page rule for the active login page that users would visit.
Admin
Neal Umphred
Thanks for another useful how-to article!
Regarding the ‘Always Use HTTPS’ option, you wrote: “Some users have reported issues when using this setting with Cloudflare.”
What are those issues?
WPBeginner Support
The errors vary between sites so we don’t have a specific list of errors to point to at the moment.
Admin
Sohil Jain
If I setup comment on my main domain wil it will be setup automatically to subdomain too? Because I don’t want cloudflare setup to apply to subdomain as I only want on main domain. So where to click so that it will not apply to subdomain
Thanks
WPBeginner Support
There is an option in Cloudflare to exclude a subdomain so you wouldn’t need to worry about that.
Admin
Evindu Shavinda
I added Cloudflare to my website today. So, I had to remove my hosting’s nameservers & replace them with Cloudflare nameservers from my domain registrar.
This is the question – 1. So, how my hosting account still works? I have removed its nameservers from the domain registrar
Aftab
Don’t worry about hosting. Cloudflare doesn’t modify or change your hosting configuration. Your site will be hosted on your current host only. The reason why cloudflare asks you to change the nameserver because it passes your site through their DNS. It routes your web traffic through the Cloudflare network. So they can proxy your traffic through their network. Cloudflare offers security, ddos protection to all the sites that are configured with their nameservers. You don’t need to spend a single penny to configure your site through network. It’s a part of the free plan. No matter how many sites you have.
Nina Cen
When I tried to add the page rules for my wordpress login page, I got message “Not Acceptable! An appropriate representation of the requested resource could not be found on this server. This error was generated by Mod_Security.”
Is anything I did wrong? Or I just need to wait for a little while to try again?
WPBeginner Support
You would want to check with your hosting company for that specific error as that normally means they have a security rule set to prevent certain things on your site.
Admin
Shyam
I s there a way to turn off the second loading screen for security verification purposes and that CAPTCHA page which you have mentioned in the Cons of Cloudflare?
WPBeginner Support
You should be able to change the settings to remove that if you wanted but you would want to check with CloudFlare for the current method.
Admin
Lou
I’m setting up Cloudflare – thanks to your article! I’ve already got W3 super cache plugin – do I need both? Are they going to confuse each other? Total newb question I know!
WPBeginner Support
They have slightly different functions and there is an integration so the two can work with each other without an issue.
Admin
Faith Nte
Thank you for this guide. It helped me reduce the time my page loads
WPBeginner Support
Glad our guide was helpful
Admin
Muntaha
What if someone mistakenly adds the wrong parameters in page rules and then deployed it. Is there any way back to change page rules after deploying it?
WPBeginner Support
You can change your settings after setting them if you need to.
Admin
bali kratom
thanks for sharing this content
WPBeginner Support
You’re welcome
Admin
Will
Probably a noob question, but I have a lot of existing video and photo files on my site. Will they all be migrated to Cloudflare’s CDN or do I have to do that manually? I followed the setup steps, but my content still takes forever to load, and when I view its URL, it’s still showing my site’s URL and path.
WPBeginner Support
You shouldn’t need to transfer your content, for the slow loading you may want to reach out to CloudFlare for them to take a look
Admin
Brooke
Thanks so much for this, helps a lot!
Just to be clear, even though I’ve added my site to cloudflare, I still need to get an SSL cert separately? Cloudflare does not supply ssl cert?
Thanks again!
WPBeginner Support
You would want to take a look again under the Configuring Most Important Cloudflare Settings section for CloudFlare’s SSL
Admin
Ibraham Aali
Admin, kindly answer these question like
After changing the DNS, who is actually will my hosting provider? The hoster OR cloudflare and all editing can be done by same cpanel?
WPBeginner Support
Your hosting provider would still be your hosting provider.
Admin
Soumya
thank you very much, I was looking for a proper step-by-step Cloudflare set up! and TA DA!! you guys are savior.
It would be great if you publish about the best of cloudflare settings, from the plugin.
WPBeginner Support
Glad you found our article helpful
Admin
Alabura
Thank you for such a great publications, it really help me set up my cloud flare account easily. Keep the good work.
WPBeginner Support
You’re welcome, glad our guide was helpful
Admin
Bryan Wagar
Very helpful information and with the pictures for verification i could confirm everything instead of guessing, thankyou very much for compiling this! It is BRILLIANT
WPBeginner Support
You’re welcome, glad our guide could be helpful
Admin
PKV
superb guide, easy to follow thanks
WPBeginner Support
Glad our guide was helpful
Admin
randhir singh
I want to know which is the best CDN ? cloud Flare or max
WPBeginner Support
Hi Randhir,
At WPBeginner, we recommend MaxCDN. However, if you want to use the free CDN, then Cloudflare can be a good solution.
Admin
anurag saxena
If i will use cloudfare free version and will change the nameserver then it means my website will run on cloudfare server then how i can edit my website? through cloudfare or my present hosting provider? pls tell me detail.
andy
The only reason I use cloudflare because you can hide where you hosting the site.
Mehmet
i am wondering..
for cloudflare, we need to point the DNS to theirs..
so how we gonna use custom email set up using our own domain (which also need to point the DNS to the email provider) ?
as far as i know, we can’t use two DNS .. (actually we can, but it is expensive)
Aqib
I am using custom email and cloudflare. Cloudflare doesn’t affect my custom email working.
Abhi
If my domain is from go daddy and hostino is from inmotion hosting and I change my domain name server to my hosting now I want to join cloudfare to it then what can I do?
andy
I try to help answer. from godaddy change nameserver to cloudflare, and from cloudflare, set up your DNS and point to your in motion hosting ip address.
Syed Shan
After Setting Our Host DNS To Cloudfare DNS, Which bandwidth and storage will be used from our local hosting plan e.g godaddy, namecheap etc or Cloudfare ?
Haydrion Rayel
The reasons why I don’t use cloudflare is because of changing the nameservers and second like in this article : it blocks some of the legitime users and that is what I really hate.
I don’t use third party websites where I don’t have full control of it. I saw a couple of times there are you human google click on pictures and it takes forever.
MaxCDN is the only option because you only have to add a cname .. but still ..
Haydrion Rayel
The reasons why I don’t use cloudflare is because of changing the nameservers and second like in this article : it blocks some of the legitime users and that is what I really hate.
I don’t use third party websites where I don’t have full control of it. I saw a couple of times there are you human google click on pictures and it takes forever.
MaxCDN is the onlly option because you only have to add a cname .. but still ..
abhishek purohit
My site is on wordpress and running on godaddy vps server with ssl certificate but it has lots of page load time, now, should I go for cdn cloud flare free account if yes than what about all static IP given with vps account , they will not useable and is vps based site need cloud flare ?
Munna Hossain
Page loading time is an important issue to get good user experience. This LoudFlare helps us to increase the page loading. Can you tell me which one is better to improve page speed, plugin or CDN?
Iain
HI
Just to let you know
I have had a joomla website working on the Free plan and SSL
Not sure if your previous post is now outdated but it is possible.
Regards
Mircea Pop
You can use the provided Cloudflare SSL but you are unable to use your own SSL on free account
koushil
bro can we use this for blogspot blog ?
King Rayhan
of course why not
Ikechukwu
This was very helpful. Thanks.
munetsi
i am actually caught in between-
which provider should i choose for my site,
between cloudfare or maxcdn
Editorial Staff
We use MaxCDN for our sites.
Admin
SOTHEA
This is truly awesome tip. Anyways, I have a question. If my website contents and domain name are hosted in different hosting companies. In this case, I need to change Name Servers to CloundFlare for both. Am I correct?
Anubhav
Did you find the solution for this as i have different hosting provider and domain name provider is different .If you know the solution then please let me know
Ummi Mental
after changing the DNS, who is actually will my hosting provider? The hoster OR cloudflare and all editing can be done by same cpanel?
Captain Asif
Really very helpful article i have setup my wordpress site with cloudflare
Joe
What minification services do you recommend that work well with Cloudfare? This is for a WordPress site that may have potentially high traffic spikes out of the blue. Thanks
bobzyouruncle
I live at the bottom of Africa (Cape Town) with none of their servers close to me am I correct in thinking that Cloud Flare will slow down my website. Most of my traffic is local. I have the same issues with CDNs none of them are close to my location, Europe is the closest. Is my thinking correct?
Damon Billian
CloudFlare would add a little latency because we currently don’t have any data centers in SA just yet (being looked at). Visitors from SA would currently hit a data center in Europe.
On the other hand, if you have visitors from a lot of other locations (EU, America, Asia, etc.), then the site would be faster for them.
munetsi
was just checking ,looks like they have servers in johannesburg.
Adesanmi Adedotun
I have heard about cloudflare but have not tried to make use of it, bout talking about the fact that my site might be down during the propagation of my name server,how long could this take?
WPBeginner Support
It varies, it can take a few hours to a full day.
Admin
Einstein
You will not experience any downtime while you switch to Cloudflare if you do it correctly.
Damon Billian
You should not have any downtime at all switching to CloudFlare’s nameservers.
Robby McCullough
I am a huge fan of CloudFlare. At my shop, we do a lot of sites for professional photographers. CF does an amazing job at making image heavy pages load in a snap!
One tip, don’t forget about CF’s developer mode when you’re making changes. I’ve bashed my head against the wall for some time when my CSS changes weren’t showing up — CF was serving a cached page!
Boby
When my website has ‘heavy load’ CloudFlare will make the users access screenshot of the website.
Abhisek
Cloudflare breaks my site’s design. I have a off-canvas menu and Cloudflare’s rocketloader and minification breaks ,y site’s design. So, I have to stick with basic W3 Total cache. Besides Cloudflare actually speeds up your site.
Damon Billian
Those features are actually optional and easy to turn off. If you’re using a minify service already, then you don’t want to turn ours on as well (something eventually will break running two minify options at the same time). Rocket Loader would have the potential to impact JavaScript and jQuery & would generally impact something like widgets.
Joe
What WordPress theme were you using? That way we can know to avoid using that theme with Cloudfare.