
Många WordPress-användare föredrar att arbeta med sina webbplatser på en lokal server på datorn. På så sätt kan du arbeta privat med din webbplats innan du gör ändringarna tillgängliga online.
Så småningom måste du flytta den till en live-server för att göra den tillgänglig för onlinebesökare. Denna övergång är avgörande för att säkerställa att din webbplats fungerar korrekt på live-webbplatsen.
Vi har arbetat med många lokala webbplatser, så vi var tvungna att lära oss det enklaste sättet att överföra innehåll till levande webbplatser.
I den här artikeln ger vi dig steg-för-steg-instruktioner om hur du flyttar WordPress från en lokal server till en live-webbplats.
")
Varför flytta WordPress från en lokal server till en Live site?
Att bygga din WordPress blogg på en lokal server är ett säkert sätt att testa ändringar på din website utan att påverka besökarna.
När you har slutfört finslipningen av din website är nästa steg att flytta från din lokala server till en live site.
Låt oss visa dig två sätt att flytta din site från en lokal server till en live site.
Den första metoden använder ett plugin för att flytta WordPress och rekommenderas för Beginnare.
I den andra metoden visar vi dig hur du manuellt flyttar WordPress från en lokal server till en live site.
Du kan välja den metod som fungerar bäst för dig:
Innan du flyttar din WordPress webbplats
Du måste ha några saker på plats för att migrera WordPress från en lokal server till en live-server.
Först antar vi att du har en WordPress-webbplats som körs på en lokal server (även kallad localhost) på din dator och att du har full tillgång till den.
Därefter måste du ha ett domain name och ett webbhotell.
Vi har hört otaliga historier från nybörjare som började med dåliga eller gratis webbhotell och ångrade sig. Enligt vår erfarenhet är valet av rätt webbhotell avgörande för att en webbplats ska bli framgångsrik.
För att göra ditt beslut enklare rekommenderar vi att du använder Bluehost. De är ett officiellt rekommenderat webbhotell för WordPress, och de ger WPBeginners användare en exklusiv rabatt + gratis domän och SSL.
I grund och botten kan du komma igång för så lite som $ 1.99 per månad.
Om du vill ha ett bra Bluehost-alternativ kan du titta på Hostinger. De erbjuder också en exklusiv rabatt till WPBeginners användare med ett gratis domain name.
Om du har råd att betala lite mer, kontrollera då SiteGround. De har också ett specialerbjudande för WPBeginners läsare.
Om du behöver hjälp med att skapa din website kan du följa vår Step-by-Step guide om hur du skapar en website.
Slutligen behöver du ett FTP-program och veta hur du använder FTP för att uppladda din lokala server till live-sajten.
Är du redo? Låt oss börja flytta din WordPress site.
Video Tutorial
Om du föredrar skriftliga instruktioner är det bara att fortsätta läsa.
Metod 1: Överför WordPress från den lokala servern till Live Site med hjälp av ett tillägg för migrering (rekommenderas)
Den här metoden är enklare och rekommenderas för Beginnare. Vi kommer att använda ett plugin för WordPress-migrering för att flytta WordPress från localhost till en live site.
Step 1: Installera och konfigurera tillägget Duplicator
Först måste du installera och aktivera pluginet Duplicator på din lokala site. För mer detaljer, se vår Step-by-Step guide om hur du installerar ett plugin för WordPress.
Pro tips: Det finns också en Pro-version av Duplicator som erbjuder säkra backups, molnlagring, enkel återställning av webbplatser och mer.
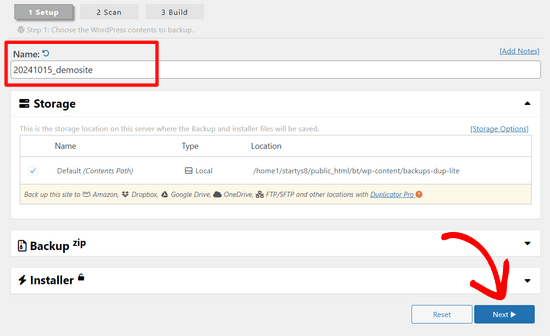
Vid aktivering måste du gå till sidan Duplicator ” Säkerhetskopior och klicka på knappen ” Skapa ny”.
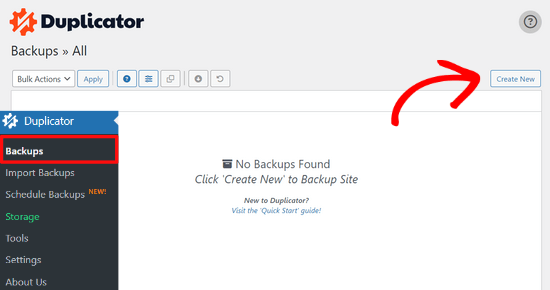
Då kommer du till en vy där du kan ge din backup ett namn.
Klicka sedan på knappen ”Next”.
Duplicator kommer nu att runna några tester för att se om allt är i order.
Om alla punkter är markerade med ”Bra” klickar du på knappen ”Bygg”.

Denna process kan ta några minuter, beroende på storleken på din webbplats. Du måste lämna den här fliken öppen tills den är klar.
När du är klar ser du nedladdningsalternativ för ”Installer”- och ”Archive”-paket. Du måste klicka på knappen ”Download Both Files” för att ladda ner båda filerna till din dator.

Filen ”Archive” är en komplett kopia av din WordPress site. Den innehåller alla WordPress core-filer samt dina images, uploads, themes, plugins och en backup av din WordPress database.
Filen ”Installer” är ett skript som kommer att automatisera hela migreringsprocessen genom att packa upp archive-filen som innehåller din website.
Step-by-Step 2: Skapa en Database för din Live WordPress website
Innan du kan runna installeraren eller uploada WordPress-webbplatsen från localhost till ditt webbhotell måste du skapa en MySQL-databas för din new live website.
Om du redan har skapat en MySQL-databas kan du hoppa över det här steget.
För att skapa en database måste you gå till cPanel dashboard på ditt webbhotell account. Leta sedan upp sektionen ”Databases” och klicka på ikonen ”MySQL Database Wizard”.

På nästa vy finns det ett fält för att skapa en new database.
Ange bara ett namn på din database och click på knappen ”Create Database”.

cPanel kommer nu att skapa en new database åt you.
Efter det måste du enter ett användarnamn och password för din nya användare och sedan click the ”Create User” button.

Nu måste du add to den användare som du just skapat till databasen.
Klicka först på checkboxen ”All Privileges”.

Sedan rullar du ner och klickar på knappen ”Make Changes” för att save your changes.
Din database är nu redo att användas med din site WordPress. Se till att du obs/observerar databasens namn, användarnamn och password. Du kommer att behöva denna information i nästa steg.
Steg 3: Ladda upp filer från den lokala servern till WordPress-webbplatsen i realtid
Nu måste du uploada archive- och installer-filerna från din lokala site till ditt webbhotell.
Anslut först till din Live site med hjälp av en FTP-klient. När du har anslutit, se till att rotkatalogen på din website är helt tom.
Normalt sett är root directory foldern /home/public_html/.
Vissa webbhotell för WordPress installerar WordPress automatiskt när du registrerar dig. Om du har WordPress-filer där måste du ta bort dem.
Efter det kan du uploada archive.zip och installer.php-filerna från Duplicator till din tomma root directory.

Steg 4: Run på migreringsskriptet
Följ efter att du har uppladdat migreringsfilerna, du måste besöka följande URL i din webbläsare:
http://example.com/installer.php
Glöm inte att ersätta ”example.com” med ditt eget domain name.
Detta kommer att starta migreringsguiden för Duplicator.
Installern kommer att runna några tester och initiera skriptet.

Under Setup section kommer du att bli ombedd att enter din MySQL server, databasnamn, användarnamn och password.
Din värd kommer troligen att vara en lokal värd. Därefter anger du uppgifterna för den databas som du skapade i det tidigare steget.
Klicka sedan på knappen ”Validate” för att kontrollera att de detaljer du har enter är korrekta.

Därefter klickar du på knappen ”Nästa” för att fortsätta.
Duplicator importerar nu din WordPress backup av databasen från archive till din new database.
Den kommer också att uppdatera webbadresser som pekar på den lokala webbplatsen och din nya live-webbplats.
You can now click on the ”Admin Login” button to enter the WordPress admin area of your live site.

När du loggar in på din live site kommer Duplicator automatiskt att städa upp installationsfilerna.
Nu är allt klart. Du har utan problem flyttat WordPress från den lokala servern till din live site.
Metod 2: Överför WordPress manuellt från den lokala servern till Live-webbplatsen
I den här metoden visar vi hur du manuellt flyttar WordPress från den lokala servern till din live site. Det är användbart om den första metoden inte fungerar eller om du föredrar att göra det manuellt.
Step-by-Step: Exportera lokal WordPress Database
Det första du behöver göra är att exportera din lokala WordPress database. Vi kommer att använda phpMyAdmin för att göra det.
Om du inte är bekant med det kan du läsa vår guide till hantering av WordPress Database med phpMyAdmin.
Gå till http://localhost/phpmyadmin/ och klicka på your WordPress database. Därefter klickar du på knappen ”Exportera” högst upp i menyn.

I alternativet ”Exportmetod:” kan du välja ”Snabb” eller ”Anpassad”. Custom ger dig fler alternativ för att exportera din databas.
Men vi rekommenderar att du väljer ”Quick” och sedan klickar på knappen ”Go” för att downloada din database.

Step 2: Uppladda WordPress-filer till Live Site
Nu måste vi flytta all your website-filer till live site.
För att komma igång öppnar du din FTP-klient och ansluter till ditt konto på webbhotellet.
När du är ansluten till din live-webbplats ska du se till att du laddar upp filerna i rätt katalog. Om du till exempel vill att webbplatsen ska hostas på ”dinsite.com” ska du ladda upp alla filer i din public_html-katalog.
Välj nu dina lokala WordPress-filer och uploada dem till din live server.

Step-by-Step 3: Skapa en MySQL Database på din Live site
Medan din FTP-klient uppladdar dina WordPress-filer kan du börja importera din database till live-servern.
De flesta WordPress-hostingleverantörer erbjuder cPanel för att hantera ditt hostingkonto, så vi kommer att visa dig hur du skapar en databas med hjälp av cPanel.
Först måste du logga in på din cPanel dashboard och click på ”MySQL Database Wizard” icon, som finns i ”Databases” section.

På nästa vy kan du skapa en new database.
Du måste ange ett namn för din databas och sedan klicka på ”Create Database”.

cPanel kommer nu automatiskt att skapa en new database åt you.
Därefter måste du ange ett användarnamn och lösenord för din nya användare och sedan klicka på ”Create User”.

Efter det måste du add to den användare du just skapat till databasen.
Kontrollera först checkboxen ”All Privileges”.

Sedan rullar du ner och klickar på ”Make Changes” för att save your changes.
Du har utan problem skapat en new database för din live WordPress site.
Step 4: Importera WordPress Database till Live Site
Nästa steg i processen är att importera din WordPress database.
Gå till din cPanel-instrumentpanel, bläddra ner till avsnittet ”Databaser” och klicka på ”phpMyAdmin”.

Detta tar dig till phpMyAdmin, där du vill klicka på databasen som du just skapade ovan. phpMyAdmin visar din nya databas utan tabeller.
Klicka sedan på tabben ”Import” högst upp i menyn. På sidan import klickar du på knappen ”Choose File” och väljer sedan database-filen från den lokala site som du saved i det första steget.

Därefter klickar du på knappen ”Go” längst ner på sidan. Din database kommer automatiskt att importeras till phpMyadmin.
Step 5: Ändra URL:en för webbplatsen
Nu måste du ändra webbplatsens URL i din database så att den ansluter till din live WordPress-webbplats.
I phpMyAdmin letar du efter wp_options-tabellen i din database som du just importerade ovan.
Om you changed your database prefix, then instead of wp_options, it might be {new_prefix}_options.
Klicka sedan på knappen ”Browse” bredvid wp_options. Eller klicka på länken i sidebaren för att öppna upp den page som innehåller en lista över fälten i tabellen wp_options.

Sedan, i options_name column, måste du leta efter alternativet siteurl.
Klicka sedan på ikonen ”Edit”.

Du får upp ett fönster där du kan edit:a fältet.
I inmatningsrutan option_value ser du webbadressen till din lokala installation, som kommer att vara något i stil med http://localhost/test.
Du måste infoga din nya site URL i detta fält, till exempel: https: //www.wpbeginner.com.
Sedan kan du save fältet genom att clicka på knappen ”Go”.

Därefter måste du följa samma steg som ovan för namnet på hemalternativet. Menyn wp_options kan vara några pages lång. Vanligtvis kommer home page-alternativet att finnas på den andra sidan.
Uppdatera sedan hem-URL:en så att den är densamma som URL:en för din live site.
Step-by-Step 6: Konfigurera din Live site
Nu när du har importerat databasen och uppladdat ditt content är det dags att konfigurera WordPress.
Just nu bör din site visa felmeddelandet”Error establishing a database connection”.
För att fixa detta ansluter du till din website med en FTP-klient och öppnar filen wp-config.php.
Du kommer att leta efter följande rader med kod:
1 2 3 4 5 6 7 8 9 | // ** MySQL settings - You can get this info from your web host ** ///** The name of the database for WordPress */define( 'DB_NAME', 'database_name_here' );/** MySQL database username */define( 'DB_USER', 'username_here' );/** MySQL database password */define( 'DB_PASSWORD', 'password_here' );/** MySQL hostname */define( 'DB_HOST', 'localhost' ); |
Du måste ange namnet på databasen, användarnamnet och passwordet som du skapade tidigare.
Save sedan filen wp-config.php och uploada den tillbaka till ditt WordPress webbhotell server.
Nu, när you besöker your website, ska den vara live.
Efter det måste du logga in på din WordPress adminpanel och gå till Settings ” Allmänt. Sedan, utan att ändra något, rullar du längst ner och klickar på knappen ”Save Changes”.

Detta kommer att se till att din sites URL är korrekt på alla andra ställen där den behöver vara.
När du har gjort det, gå till Settings ” Permalinks, rulla sedan ner och klicka på ”Save Changes” för att säkerställa att alla länkar till post fungerar bra.

Step-by-Step 7: Fixa Images och trasiga Links genom Updating Paths
När du flyttar en WordPress-webbplats från en domän till en annan eller från en lokal server till en live site, kommer du att stöta på brutna links och saknade images.
Vi visar dig två sätt att uppdatera webbadresser. Du kan välja det som fungerar bäst för dig.
1. Uppdatera webbadresser med hjälp av Search & Replace Everything Plugin (rekommenderas)
Det säkraste sättet att åtgärda detta är att använda Search & Replace Everything. Det är ett kraftfullt WordPress-plugin som gör att du enkelt kan utföra massuppdateringar på din webbplats utan att skriva komplexa databasfrågor.
Först måste du installera och aktivera pluginet Search & Replace Everything.
Efter aktiveringen går du till sidan Verktyg ” WP Search & Replace.

Därefter måste du ange webbadressen till din lokala webbplats i fältet ”Sök efter” och webbadressen till din live-webbplats i fältet ”Ersätt med”.
Bläddra lite och klicka på ”Välj alla” under tabellerna. Detta säkerställer att insticksprogrammet letar efter den gamla webbadressen överallt i databasen.

Klicka nu på knappen ”Förhandsgranska Sök & Ersätt” för att fortsätta.
Pluginet söker i din databas efter alla förekomster av den gamla URL:en och förhandsgranskar sedan resultaten.

Om allt ser bra ut klickar du på ”Replace All” för att spara ändringarna.
Du kommer att se en varning om de ändringar du gör. Klicka på ”Ja” för att fortsätta.
Pluginet kommer nu att uppdatera databasen och ersätta lokala webbadresser med din nuvarande webbadress.
2. Uppdatera webbadresser manuellt (Avancerat)
Ett annat sätt att uppdatera webbadresserna är att använda följande SQL-fråga:
1 | UPDATE wp_posts SET post_content = REPLACE(post_content, 'localhost/test/', 'www.yourlivesite.com/'); |
Gå bara till phpMyAdmin, klicka på din databas och klicka sedan på ”SQL” i toppmenyn och lägg till frågan ovan.
Se till att du ändrar URL:erna till din lokala webbplats och din live-webbplats och klicka på knappen ”Go”.

Nu är det klart. Nu har du utan problem flyttat WordPress från din lokala server till en live site.
Förhoppningsvis är din live-webbplats igång och fungerar smidigt. Om du upptäcker några fel kan du kolla in vår guide till vanliga WordPress-fel för att få hjälp med felsökning.
Vi hoppas att den här artikeln hjälpte dig att flytta WordPress från en lokal server till en live-webbplats. Du kanske också vill se vår guide om att flytta en live-webbplats till en lokal server eller titta på den ultimata checklistan för webbplatsmigrering för praktiska steg för WordPress-migrering.
If you liked this article, then please subscribe to our YouTube Channel for WordPress video tutorials. You can also find us on Twitter and Facebook.
")


 in 2024")
James
Hi!
Any tips on how I can fix a broken link that is still using localhost for a calendar plugin that I installed?
James
Karl
I’ve bookmarked this page in the past for future reference after I had migrated my own site about a year ago. I dragged my feet getting backupbuddy and now, wow! That plugin is a bit too much for my budget. Will most likely use duplicator to migrate their site redesign from MAMP to live.
Unfortunately, the client’s current WP install is a mess. I’m counting 6 db from previous and current site designs. I’m guessing it would be easier for me to just sweep clean all the old dbs (delete) and create a new one for my migration rather than trying to run duplicator and then have to wade through with phpmyadmin to fix any problems.
I’ll keep this page up in my browser, just in case during migration, but I wish there was a way just to overwrite the current db with my redesign db without a need to then jump back in and make changes (via phpmyadmin). Would make the migration smoother.
Too bad backupbuddy has raised their prices.
fatemeh
Hello \
I have followed all the steps but there is nothing shown on my website , I dont know whats wrong , I do appreciate your help.
Forbidden
You don’t have permission to access / on this server.
Additionally, a 403 Forbidden error was encountered while trying to use an ErrorDocument to handle the request.
This is an error I got,
Thank you
WPBeginner Support
Please see our guide on how to fix the 403 forbidden error in WordPress.
Admin
Ian
I really appreciated this tutorial – thanks. And following it to the letter has really helped solve most of my issues. However there is one that remains. The ”live” site appearance looks very much like the ”localhost” site, with one exception. When I go to the Dashboard and ”edit” a page live, none of the text normally visible is available for me to edit. When I go to ”Preview Changes” it shows a blank screen. Is there another flaw in the database structure I have missed in the conversion/upload process? Can you show me where I might have gone wrong for this to happen please? Ian
WPBeginner Support
Try updating your permalink structure. Simply visit Settings » Permalinks and then click on the save changes button without changing anything.
Admin
peter
After importing the local database to live server, my cpanel phpadmin is not working. cant access it anymore.please help
HTTP error 404
The requested page was not found.
Possible reasons why you are seeing this page:
A bookmarked URL may have changed since you last visited.
The URL was entered incorrectly.
The URL was entered with inaccurate capitalization (URLs are case sensitive).
Please re-check the URL you are trying to reach. (Go Back)
Copyright© 2016 cPanel, Inc.
WPBeginner Support
Please contact your WordPress host for support, they will be able to help you better.
Admin
Rajeev
Hi, this tutorial has worked very well and I have migrated a locally hosted wordpress site on to GoDaddy webhosting services however when I try to log in to my website (wp-admin) it redirects to a 404 error. Any suggestions on why this is happening and what to do to solve this?
Thanks
WPBeginner Support
Have you changed site URL? Remember http://www.example.com and example.com are considered two different domains. Also make sure that you haven’t installed WordPress in its own subdirectory. In that case, your wp-admin login url will be something like example.com/wordpress/wp-admin/
Admin
Vinish Chaudhary
Hello Rajeev,
Did you find the solution for this 404 error?
Gerald
Hi Syed,
I did all that was required and encountered a HTTP ERROR 500 with the notification ”…currently unable to handle this request”. I’m not sure if it’s the theme I’m using that has a problem. It’s worked fine for me on another web server.
Ant recommendations on how to fix this?
The server seems to be running on php 5.5 while my localhost ran version 5.6. Does this affect it in anyway?
WPBeginner Support
Try steps mentioned in our guide on how to fix the internl server error in WordPress.
Admin
vinay
after completing 5th step when i go to the link mysit/wp-admin for next step I get these error plz help
This either means that the username and password information in your wp-config.php file is incorrect or we can’t contact the database server at . This could mean your host’s database server is down.
i hv alredy udated my wp_config.php
Kasoma
thanks for the post but my log is not displaying and when i click the pages it shows internal server error. please help to fix that
Sharon
Your instructions were great, and love that you provided pictures as well.
However, I am having an issue. I can see my site, I can see the images for the logos and pictures I have added, but the themes are not loading. They are showing up as blank. I am not sure where to start?
When I ran your sql script through my database I get a an error #1146 – Table ’mcintyre_wp.wp_posts’ doesn’t exist.
Any help would be greatly appreciated!
Owen
This is a great tutorial, easy to follow and gets the job done!
JESH
Hi there, thank you heaps, I have sorted it out. My website domain is now stuck on mywebsitename.preview.services . How do I get rid of the preview.services? I am worried that if I change the URL on WordPress it will stuff everything up and I want to be sure I know what I’m doing. Appreciate the help.
Najeeb
Hi,
Very good tutorial.
I would like to know is it better to design a website on a local wordpress server then upload on a server like hostgator or it is also better to buy a domain on hostgator and create a wordpress website in live environment?
Please let me know i am new to this.
Jesh
Hi there,
absolute frustration has caused me comment for help. I have been trying to upload my site from local to live using MAMP and FileZilla. I have followed your steps as well as others MANY times but still to no avail. Your guide is very good and I have followed the whole thing to the end but every time I go to view my site it comes up with the domain then .preview.services . The page is an ”index of” page and it won’t let me go any further. I have tinkered around with the settings but really don’t know what to do except smash my computer. Can you recommend anything? …a sledgehammer?
WPBeginner Support
When uploading files from your computer to your website, make sure you are uploading them in the correct directory. If you are not sure, then ask your web hosting service provider. Typically its called /public_html/ but it varies from one web host to another.
Also make sure that you are uploading only your WordPress files and not including the MAMP files and directories in the upload.
Admin
Gale
Just wanna let you know, you guys are freaking awesome! This is such a great tutorial! I’d been stuck for days with the links not working and you’re the only ones mentioning saving the settings! Thank you so much!
Rajat
Hi,
I just started using Hostgator. I had created a website using WAMP. I have the .sql file and the wordpress files. I am still not able to get that website show up on my domain. Can you please tell me what can i do in this regard.
Thanks for your help.
Gary Pippin
Hi,
I have created a wordpress website and it is still not live. When i open the url in browser it says ”This url is under construction : Coming Soon”.. Could you please help me with this issue.
Thanks
Gary
WPBeginner Support
1. Your site may have a plugin installed that is used to display this page.
2. Your domain name may not be pointing to the directory where you have your WordPress site.
Please contact your web host, they will be able to help you better.
Admin
nick
i dont get it. like my site is live but it still have broken links and images. im trying to fix it with the my sql quary way but everything i fill in as local site and live site URLs it says 0 rows affected and theres nothing that changed. So can you explain which urls i have to fill in exactly
Julian
Hello Nick,
Are you using the query on the live phpmyadmin dashboard?
Make sure you do it on the live site through Cpanel and not on your local environment.
Kishokumar
Great word buddy, i didn’t know about this until now. Thank you so much.
Learner
Hi, I’m learnin wordpress, I’m trying to migrate my website to a new domain and new host. Should I need to activate wordpress on my new hosting account before I load from my backup website. Thanks for your help.
WPBeginner Support
Depends on what kind of backup you have. If it is an XML or RSS file, then you should first install WordPress and then import your content from those files. If the back contains database and complete WordPress files, then you need to extract and upload WordPress files to your new host and then import database from backup.
Admin
Priyangga
All works great!! but the theme doesn’t completely loaded, is the any issues? please help!!
Yuri
Thanks for the article, but ima kinda desperate here…
Lost 4 hours of working trying to figure out why in my webserver the index page keeps BLANK, even after connected the database. And my admin page gives me the error not found, i’ve been searching for a solution and nothing helps.
thanks in advance
Steve
Worked perfectly! Thanks.
Croiche Jim
thanks a lot
cheers!
precious osasumwen
pls help. i get this error when i try to access my phpadmin in my wamp server.
phpMyAdmin – Error
Cannot start session without errors, please check errors given in your PHP and/or webserver log file and configure your PHP installation properly. Also ensure that cookies are enabled in your browser.
what do i do sir
Sneha
Hi,
I have created my website on my local server and also I have used action method to navigate to different pages. But on these action methods I have given localhost permalinks only as destination address. So do I have to replace it with live address everywhere in the code or is there some method by which i can replace it at once.
Chris Cal
I’m not one to usually comment but this is an excellent post.
Great work Syed and team. Greatly appreciated.
Cheers, Chris.
WPBeginner Support
Thanks, we are glad you found it helpful.
Admin
Leslie
It was the .htaccess file!!! But I had to upload a completely new file. Thanks!!!
Courtney
Any tutorials for when you have forgotten your phpMyAdmin login info? I am stuck at the beginning! It has been a while since I have needed to login and cannot for the life of me remember. I used this site as a tutorial to set up but cannot figure out how to reset. I have seen some tutorials to reset but I am afraid it is going to mess things up as I am not an expert. Any suggestions or tutorials you can point me to? TIA
WPBeginner Support
You can login to phpMyAdmin from your hosting control panel as well.
Admin
Tyane
I’m stuck on step 6. I edited the wp-config. file and uploaded it. It gave me six errors, with most of them beginning with, ” unexpected beginning of statement” followed by the position each error is listed. I’m very new to this and my IT husband is out of town till Friday.
barshan hassan
Thanks… I love u
leon
works really well!
geeuy
great tutorial!
worked like a charm!
ashkan
hi there tnx for this article
i did all these steps and my site is up now but when i click on other pages or links i faced this eror
(Internal Server Error)
in fact I just can see the homepage
can You tell me about This?
Thatguy91
I had the same issue, go to the permalinks page and click the save button. I think it needs to ”resave” the permalinks again somewhere once migrated.
mtahirian
Hello,
I have uploaded my site live. but unfortunately i can’t go to wordpress admin. the wordpress admin is working fine on local server. it has problem keep telling that : Warning: Cannot modify header information – headers already sent by (output started at /home/………/public_html/wp-content/plugins/js_composer_theme/js_composer.php:1) in /home/porseshresearch/public_html/wp-includes/pluggable.php on line 1228
Please Help
WPBeginner Support
Seems that js_composer_theme plugin is not working. Connect to your website using FTP and then download the plugin to your computer. After that you can delete the plugin from your server. This should resolve the issue.
Admin
mtahirian
Thanks for responding.
I did, as told. but the whole site is smashed up and can’t get the design correct. I need the COMPOSER.
wpbeginner
Thank you very much for your wonderful tutorial.
I am having a problem where my website is only accessible through blog.example.com but not accessible through example.com/blog
May I know what can be done to solve this?
WPBeginner Support
Your blog is hosted as a subdomain. You will need to export it to your main domain.
Admin
wpbeginner
My subdomain folder is in public_html folder.
May I know where should I export it for it to be in my main domain?
Your help is greatly appreciated.
awoyemi ayomide
thanks it help me a lot
Lars Breum Hansen
I am stuck at step 6. My site is live, but instead of going to my main page, It show my themes default main page, at gives me an 404 (because it can’t find posts, but my main page is set to be static). And I can’t login as admin, becuase then it gives me the 500 internal error?
Kim Macc
Hi.
This article is great thank you!! I have done everything and the site is live but the pages are not linking/working i get an ’internal server error’
please help me fix this as soon as possible. have done the SQL query but to no avail.
AP
Make sure hidden files are copied over as well as part of Step 2
Ebune
i had a problem in the step where i am to change localhost/test. to my site name. i cant really see an edit but to change that stuff. also, when i try to upload my database, it gives me an error. please can anyone help??? am in a deep shit right now
Dang Ng
You could try writing an SQL statement to modify that cell and see what MySQL say
Mayur
My website is
I have changed my server , i took backup of wp files and mysql before my server service expired. Now i am on a new server, uploaded and extracted wp files in public_html, i am. Getting an error – error establishing database connection, hoe should i solve this error?
WPBeginner Support
Please take a look at how to fix the error establishing a database connection in WordPress.
Admin
Caitlin
Hi! I ran into a problem in step 6: ”To fix this, connect to your website using an FTP client and edit wp-config.php file. Provide the database name, user and password you created earlier in Step 3. Save the wp-config.php file and upload it back to your server. Visit your website, and it should be live now.”
I did that and it didn’t work, so I started to edit where it said ”localhost” and changed it to my domain.
I’m a totally newbie so any help would be appreciated!
WPBeginner Support
Try using localhost as your MySQL Host
define( ’DB_HOST’, ’localhost’ );
Admin
ananta
owh… maan… this is what i am looking for all day long… finally found your article. it’s very helpful. now, my site is live. thank you. good work by the way.
Raj jain
Hi,
How can I solve this error. Reply urgently.
Fatal error: Allowed memory size of 67108864 bytes exhausted (tried to allocate 32 bytes) in /home/sitename/public_html/wp-includes/pomo/mo.php on line 236
WPBeginner Support
See our guide on how to fix WordPress memory exhausted error.
Admin
Elise
Hello, I’ve been following all these steps but when I’m doing the export but when I’m importing in my OVH database I can only see wp_commentmeta and wp_comments instead I’ve selected all tab during the export and choose custom and the gzipped format
Do you know what’s happening here?
Amey mankar
Thank You so much. It help me alot.
Mboule A
I tried changing localhost to my domain name but it isn’t going. I need help. I’ve tried both methods. Both the plugins and using the SQL code
Bessong william
thanks you for you tutorial, but am still a beginner in web developping, i need you to teach me with a plugin like BackupBuddy or Duplicator or what ever!!!, how to migrate my website from local to live production site
cmunozro
Can’t access my website.
Error al establecer una conexión con la base de datos (unable to connect to data base)
I try accessing thorough the IP as the domain is not transfered yet. I’m not sure in the wp_options and in wp_config what data should I use.