
Många WordPress-användare föredrar att arbeta med sina webbplatser på en lokal server på datorn. På så sätt kan du arbeta privat med din webbplats innan du gör ändringarna tillgängliga online.
Så småningom måste du flytta den till en live-server för att göra den tillgänglig för onlinebesökare. Denna övergång är avgörande för att säkerställa att din webbplats fungerar korrekt på live-webbplatsen.
Vi har arbetat med många lokala webbplatser, så vi var tvungna att lära oss det enklaste sättet att överföra innehåll till levande webbplatser.
I den här artikeln ger vi dig steg-för-steg-instruktioner om hur du flyttar WordPress från en lokal server till en live-webbplats.
")
Varför flytta WordPress från en lokal server till en Live site?
Att bygga din WordPress blogg på en lokal server är ett säkert sätt att testa ändringar på din website utan att påverka besökarna.
När you har slutfört finslipningen av din website är nästa steg att flytta från din lokala server till en live site.
Låt oss visa dig två sätt att flytta din site från en lokal server till en live site.
Den första metoden använder ett plugin för att flytta WordPress och rekommenderas för Beginnare.
I den andra metoden visar vi dig hur du manuellt flyttar WordPress från en lokal server till en live site.
Du kan välja den metod som fungerar bäst för dig:
Innan du flyttar din WordPress webbplats
Du måste ha några saker på plats för att migrera WordPress från en lokal server till en live-server.
Först antar vi att du har en WordPress-webbplats som körs på en lokal server (även kallad localhost) på din dator och att du har full tillgång till den.
Därefter måste du ha ett domain name och ett webbhotell.
Vi har hört otaliga historier från nybörjare som började med dåliga eller gratis webbhotell och ångrade sig. Enligt vår erfarenhet är valet av rätt webbhotell avgörande för att en webbplats ska bli framgångsrik.
För att göra ditt beslut enklare rekommenderar vi att du använder Bluehost. De är ett officiellt rekommenderat webbhotell för WordPress, och de ger WPBeginners användare en exklusiv rabatt + gratis domän och SSL.
I grund och botten kan du komma igång för så lite som $ 1.99 per månad.
Om du vill ha ett bra Bluehost-alternativ kan du titta på Hostinger. De erbjuder också en exklusiv rabatt till WPBeginners användare med ett gratis domain name.
Om du har råd att betala lite mer, kontrollera då SiteGround. De har också ett specialerbjudande för WPBeginners läsare.
Om du behöver hjälp med att skapa din website kan du följa vår Step-by-Step guide om hur du skapar en website.
Slutligen behöver du ett FTP-program och veta hur du använder FTP för att uppladda din lokala server till live-sajten.
Är du redo? Låt oss börja flytta din WordPress site.
Video Tutorial
Om du föredrar skriftliga instruktioner är det bara att fortsätta läsa.
Metod 1: Överför WordPress från den lokala servern till Live Site med hjälp av ett tillägg för migrering (rekommenderas)
Den här metoden är enklare och rekommenderas för Beginnare. Vi kommer att använda ett plugin för WordPress-migrering för att flytta WordPress från localhost till en live site.
Step 1: Installera och konfigurera tillägget Duplicator
Först måste du installera och aktivera pluginet Duplicator på din lokala site. För mer detaljer, se vår Step-by-Step guide om hur du installerar ett plugin för WordPress.
Pro tips: Det finns också en Pro-version av Duplicator som erbjuder säkra backups, molnlagring, enkel återställning av webbplatser och mer.
Vid aktivering måste du gå till sidan Duplicator ” Säkerhetskopior och klicka på knappen “ Skapa ny”.
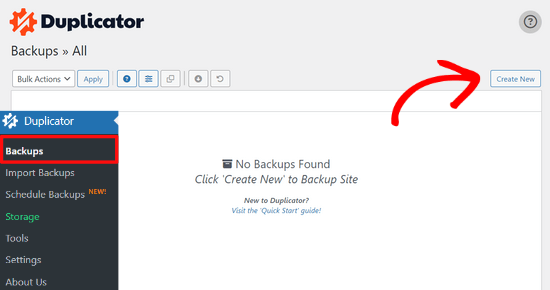
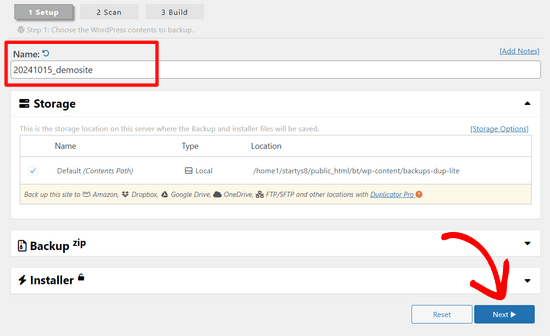
Då kommer du till en vy där du kan ge din backup ett namn.
Klicka sedan på knappen “Next”.
Duplicator kommer nu att runna några tester för att se om allt är i order.
Om alla punkter är markerade med “Bra” klickar du på knappen “Bygg”.

Denna process kan ta några minuter, beroende på storleken på din webbplats. Du måste lämna den här fliken öppen tills den är klar.
När du är klar ser du nedladdningsalternativ för “Installer”- och “Archive”-paket. Du måste klicka på knappen “Download Both Files” för att ladda ner båda filerna till din dator.

Filen “Archive” är en komplett kopia av din WordPress site. Den innehåller alla WordPress core-filer samt dina images, uploads, themes, plugins och en backup av din WordPress database.
Filen “Installer” är ett skript som kommer att automatisera hela migreringsprocessen genom att packa upp archive-filen som innehåller din website.
Step-by-Step 2: Skapa en Database för din Live WordPress website
Innan du kan runna installeraren eller uploada WordPress-webbplatsen från localhost till ditt webbhotell måste du skapa en MySQL-databas för din new live website.
Om du redan har skapat en MySQL-databas kan du hoppa över det här steget.
För att skapa en database måste you gå till cPanel dashboard på ditt webbhotell account. Leta sedan upp sektionen “Databases” och klicka på ikonen “MySQL Database Wizard”.

På nästa vy finns det ett fält för att skapa en new database.
Ange bara ett namn på din database och click på knappen “Create Database”.

cPanel kommer nu att skapa en new database åt you.
Efter det måste du enter ett användarnamn och password för din nya användare och sedan click the “Create User” button.

Nu måste du add to den användare som du just skapat till databasen.
Klicka först på checkboxen “All Privileges”.

Sedan rullar du ner och klickar på knappen “Make Changes” för att save your changes.
Din database är nu redo att användas med din site WordPress. Se till att du obs/observerar databasens namn, användarnamn och password. Du kommer att behöva denna information i nästa steg.
Steg 3: Ladda upp filer från den lokala servern till WordPress-webbplatsen i realtid
Nu måste du uploada archive- och installer-filerna från din lokala site till ditt webbhotell.
Anslut först till din Live site med hjälp av en FTP-klient. När du har anslutit, se till att rotkatalogen på din website är helt tom.
Normalt sett är root directory foldern /home/public_html/.
Vissa webbhotell för WordPress installerar WordPress automatiskt när du registrerar dig. Om du har WordPress-filer där måste du ta bort dem.
Efter det kan du uploada archive.zip och installer.php-filerna från Duplicator till din tomma root directory.

Steg 4: Run på migreringsskriptet
Följ efter att du har uppladdat migreringsfilerna, du måste besöka följande URL i din webbläsare:
http://example.com/installer.php
Glöm inte att ersätta “example.com” med ditt eget domain name.
Detta kommer att starta migreringsguiden för Duplicator.
Installern kommer att runna några tester och initiera skriptet.

Under Setup section kommer du att bli ombedd att enter din MySQL server, databasnamn, användarnamn och password.
Din värd kommer troligen att vara en lokal värd. Därefter anger du uppgifterna för den databas som du skapade i det tidigare steget.
Klicka sedan på knappen “Validate” för att kontrollera att de detaljer du har enter är korrekta.

Därefter klickar du på knappen “Nästa” för att fortsätta.
Duplicator importerar nu din WordPress backup av databasen från archive till din new database.
Den kommer också att uppdatera webbadresser som pekar på den lokala webbplatsen och din nya live-webbplats.
You can now click on the “Admin Login” button to enter the WordPress admin area of your live site.

När du loggar in på din live site kommer Duplicator automatiskt att städa upp installationsfilerna.
Nu är allt klart. Du har utan problem flyttat WordPress från den lokala servern till din live site.
Metod 2: Överför WordPress manuellt från den lokala servern till Live-webbplatsen
I den här metoden visar vi hur du manuellt flyttar WordPress från den lokala servern till din live site. Det är användbart om den första metoden inte fungerar eller om du föredrar att göra det manuellt.
Step-by-Step: Exportera lokal WordPress Database
Det första du behöver göra är att exportera din lokala WordPress database. Vi kommer att använda phpMyAdmin för att göra det.
Om du inte är bekant med det kan du läsa vår guide till hantering av WordPress Database med phpMyAdmin.
Gå till http://localhost/phpmyadmin/ och klicka på your WordPress database. Därefter klickar du på knappen “Exportera” högst upp i menyn.

I alternativet “Exportmetod:” kan du välja “Snabb” eller “Anpassad”. Custom ger dig fler alternativ för att exportera din databas.
Men vi rekommenderar att du väljer “Quick” och sedan klickar på knappen “Go” för att downloada din database.

Step 2: Uppladda WordPress-filer till Live Site
Nu måste vi flytta all your website-filer till live site.
För att komma igång öppnar du din FTP-klient och ansluter till ditt konto på webbhotellet.
När du är ansluten till din live-webbplats ska du se till att du laddar upp filerna i rätt katalog. Om du till exempel vill att webbplatsen ska hostas på “dinsite.com” ska du ladda upp alla filer i din public_html-katalog.
Välj nu dina lokala WordPress-filer och uploada dem till din live server.

Step-by-Step 3: Skapa en MySQL Database på din Live site
Medan din FTP-klient uppladdar dina WordPress-filer kan du börja importera din database till live-servern.
De flesta WordPress-hostingleverantörer erbjuder cPanel för att hantera ditt hostingkonto, så vi kommer att visa dig hur du skapar en databas med hjälp av cPanel.
Först måste du logga in på din cPanel dashboard och click på “MySQL Database Wizard” icon, som finns i “Databases” section.

På nästa vy kan du skapa en new database.
Du måste ange ett namn för din databas och sedan klicka på “Create Database”.

cPanel kommer nu automatiskt att skapa en new database åt you.
Därefter måste du ange ett användarnamn och lösenord för din nya användare och sedan klicka på “Create User”.

Efter det måste du add to den användare du just skapat till databasen.
Kontrollera först checkboxen “All Privileges”.

Sedan rullar du ner och klickar på “Make Changes” för att save your changes.
Du har utan problem skapat en new database för din live WordPress site.
Step 4: Importera WordPress Database till Live Site
Nästa steg i processen är att importera din WordPress database.
Gå till din cPanel-instrumentpanel, bläddra ner till avsnittet “Databaser” och klicka på “phpMyAdmin”.

Detta tar dig till phpMyAdmin, där du vill klicka på databasen som du just skapade ovan. phpMyAdmin visar din nya databas utan tabeller.
Klicka sedan på tabben “Import” högst upp i menyn. På sidan import klickar du på knappen “Choose File” och väljer sedan database-filen från den lokala site som du saved i det första steget.

Därefter klickar du på knappen “Go” längst ner på sidan. Din database kommer automatiskt att importeras till phpMyadmin.
Step 5: Ändra URL:en för webbplatsen
Nu måste du ändra webbplatsens URL i din database så att den ansluter till din live WordPress-webbplats.
I phpMyAdmin letar du efter wp_options-tabellen i din database som du just importerade ovan.
Om you changed your database prefix, then instead of wp_options, it might be {new_prefix}_options.
Klicka sedan på knappen “Browse” bredvid wp_options. Eller klicka på länken i sidebaren för att öppna upp den page som innehåller en lista över fälten i tabellen wp_options.

Sedan, i options_name column, måste du leta efter alternativet siteurl.
Klicka sedan på ikonen “Edit”.

Du får upp ett fönster där du kan edit:a fältet.
I inmatningsrutan option_value ser du webbadressen till din lokala installation, som kommer att vara något i stil med http://localhost/test.
Du måste infoga din nya site URL i detta fält, till exempel: https: //www.wpbeginner.com.
Sedan kan du save fältet genom att clicka på knappen “Go”.

Därefter måste du följa samma steg som ovan för namnet på hemalternativet. Menyn wp_options kan vara några pages lång. Vanligtvis kommer home page-alternativet att finnas på den andra sidan.
Uppdatera sedan hem-URL:en så att den är densamma som URL:en för din live site.
Step-by-Step 6: Konfigurera din Live site
Nu när du har importerat databasen och uppladdat ditt content är det dags att konfigurera WordPress.
Just nu bör din site visa felmeddelandet“Error establishing a database connection“.
För att fixa detta ansluter du till din website med en FTP-klient och öppnar filen wp-config.php.
Du kommer att leta efter följande rader med kod:
1 2 3 4 5 6 7 8 9 | // ** MySQL settings - You can get this info from your web host ** ///** The name of the database for WordPress */define( 'DB_NAME', 'database_name_here' );/** MySQL database username */define( 'DB_USER', 'username_here' );/** MySQL database password */define( 'DB_PASSWORD', 'password_here' );/** MySQL hostname */define( 'DB_HOST', 'localhost' ); |
Du måste ange namnet på databasen, användarnamnet och passwordet som du skapade tidigare.
Save sedan filen wp-config.php och uploada den tillbaka till ditt WordPress webbhotell server.
Nu, när you besöker your website, ska den vara live.
Efter det måste du logga in på din WordPress adminpanel och gå till Settings ” Allmänt. Sedan, utan att ändra något, rullar du längst ner och klickar på knappen “Save Changes”.

Detta kommer att se till att din sites URL är korrekt på alla andra ställen där den behöver vara.
När du har gjort det, gå till Settings ” Permalinks, rulla sedan ner och klicka på “Save Changes” för att säkerställa att alla länkar till post fungerar bra.

Step-by-Step 7: Fixa Images och trasiga Links genom Updating Paths
När du flyttar en WordPress-webbplats från en domän till en annan eller från en lokal server till en live site, kommer du att stöta på brutna links och saknade images.
Vi visar dig två sätt att uppdatera webbadresser. Du kan välja det som fungerar bäst för dig.
1. Uppdatera webbadresser med hjälp av Search & Replace Everything Plugin (rekommenderas)
Det säkraste sättet att åtgärda detta är att använda Search & Replace Everything. Det är ett kraftfullt WordPress-plugin som gör att du enkelt kan utföra massuppdateringar på din webbplats utan att skriva komplexa databasfrågor.
Först måste du installera och aktivera pluginet Search & Replace Everything.
Efter aktiveringen går du till sidan Verktyg ” WP Search & Replace.

Därefter måste du ange webbadressen till din lokala webbplats i fältet “Sök efter” och webbadressen till din live-webbplats i fältet “Ersätt med”.
Bläddra lite och klicka på “Välj alla” under tabellerna. Detta säkerställer att insticksprogrammet letar efter den gamla webbadressen överallt i databasen.

Klicka nu på knappen “Förhandsgranska Sök & Ersätt” för att fortsätta.
Pluginet söker i din databas efter alla förekomster av den gamla URL:en och förhandsgranskar sedan resultaten.

Om allt ser bra ut klickar du på “Replace All” för att spara ändringarna.
Du kommer att se en varning om de ändringar du gör. Klicka på “Ja” för att fortsätta.
Pluginet kommer nu att uppdatera databasen och ersätta lokala webbadresser med din nuvarande webbadress.
2. Uppdatera webbadresser manuellt (Avancerat)
Ett annat sätt att uppdatera webbadresserna är att använda följande SQL-fråga:
1 | UPDATE wp_posts SET post_content = REPLACE(post_content, 'localhost/test/', 'www.yourlivesite.com/'); |
Gå bara till phpMyAdmin, klicka på din databas och klicka sedan på “SQL” i toppmenyn och lägg till frågan ovan.
Se till att du ändrar URL:erna till din lokala webbplats och din live-webbplats och klicka på knappen “Go”.

Nu är det klart. Nu har du utan problem flyttat WordPress från din lokala server till en live site.
Förhoppningsvis är din live-webbplats igång och fungerar smidigt. Om du upptäcker några fel kan du kolla in vår guide till vanliga WordPress-fel för att få hjälp med felsökning.
Vi hoppas att den här artikeln hjälpte dig att flytta WordPress från en lokal server till en live-webbplats. Du kanske också vill se vår guide om att flytta en live-webbplats till en lokal server eller titta på den ultimata checklistan för webbplatsmigrering för praktiska steg för WordPress-migrering.
If you liked this article, then please subscribe to our YouTube Channel for WordPress video tutorials. You can also find us on Twitter and Facebook.

")

 in 2024")
david kule
thank you guys!!
i followed the steps it’s working for me
your save my life
WPBeginner Support
You’re welcome
Admin
Sunita
Really Thanks:)…It’s a great tutorial and it’s very helpful to me..
one thing i asked you..can you tell me how to open wp dashboard after this??
WPBeginner Support
You would want to add /wp-admin to the end of your domain and that should bring you to the login page where you would use the same login information as on your local install.
Admin
Sunita
Really Thanks:)…It’s a great tutorial and it’s very helpful to me..
WPBeginner Support
You’re welcome
Admin
gerardo
HI! i have a live site fully operational but on localhost i make a new site, mostly design. If i migrate it using some pluguin like duplicator, the info from the old site would be deleted?
WPBeginner Support
It would not remove your local site but if you’re trying to install it where a site is already installed then you would run into overwriting issues.
Admin
Grace Lee
After moving my website to a live site, will I still be able to edit and make changes to it? Thanks!
WPBeginner Support
Yes, you would be able to
Admin
Ifeanyi
Easy to follow guide. Even easier than some videos i have watched on youtube.
WPBeginner Support
Glad you’ve found our content helpful
Admin
Temidayo Marvel
Great solution to my Problem.
Thanks
is it safe and easy to use premium themes and plugins on the wampsever while testing and setting up the WordPress site locally, or do I need to deploy my themes and plugins after importing the site to a livehost.
WPBeginner Support
You would want to check with the support for the theme and plugins you’re wanting to use for if they work on local sites or not.
Admin
Israel
Thanks for the guide, it really helped!
WPBeginner Support
You’re welcome
Admin
Jason Bar
I got lost on the part “connect to your live site using an FTP client.”
That is completely different tutorial where there is no hyperlink to see it.
WPBeginner Support
We will be sure to work on improving clarity of this in the future, we linked to our guide on FTP at the start of our article, you can find the FTP guide below:
https://www.wpbeginner.com/beginners-guide/how-to-use-ftp-to-upload-files-to-wordpress-for-beginners/
Admin
Jason Bar
Thank you, I missed it.
Janith
Method 1 worked fine afrter few refreshes in the step 2. Thanks
WPBeginner Support
Glad our guide was able to help
Admin
Ashley Davies
Thanks for the article, I have run into a problem doing method 1. In step 4, when I visit the url at mysite/installer.php, I get an error from duplicator as follows:
‘Archive not found! The ‘Required File’ below should be present in the ‘Extraction Path’. The archive file name must be the exact name of the archive file placed in the extraction path character for character.’
Any help with this would be greatly appreciated
WPBeginner Support
You would want to check with your hosting provider that the file is located in the correct location in your files.
Admin
STEPHEN OFORI
Wow… I can believe my eyes. It worked perfectly with the first option. God bless you.
WPBeginner Support
Glad our guide was helpful
Admin
Temitope Durotoye
Thank you so much for this… Really helped me a lot.
WPBeginner Support
You’re welcome, glad our guide was helpful
Admin
Elías Sánchez
I suffer with this kind of stuff, in fact today i spent a lot of hours doing this migration from local to a server.
Reading and following this helped a lot.
Thanks for sharing!
WPBeginner Support
You’re welcome, glad our guide could help with this process
Admin
Yusuf Omotoso
The post is really helpful just like many other posts. Thank you
WPBeginner Support
You’re welcome
Admin
Luz Manalo-Cruz
Hi. I’ve successfully migrated from localhost to livesite! Yay! What now do I do with the localhost?
WPBeginner Support
That would be a personal preference question whether you would like to keep it or remove it.
Admin
Luz Manalo-Cruz
Hi! Using Method 1, all went well until Step 4 – the migration wizard doesn’t launch when I type in example.com/installer.php (I changed example.com to my domain). Instead I get a Page Not Found. I’ve tried this twice now and I get the same Page Not Found screen on Step 4. Am I missing a step?
WPBeginner Support
You may want to ensure you placed the file inside the correct folder, you can check with your hosting provider and they should be able to assist.
Admin
Habibul Islam
Thanks. I have done migration by 1st method.
WPBeginner Support
Glad our guide could assist
Admin
Milutin
If someone has problems on Method 1 Step 4 with cPanel host name (error text: No such file or directory), instead of localhost, try mysql. This step always bugs me off nad frustrates me.
Thanks for the great tutorial! Used it multiple times!
WPBeginner Support
Thanks for sharing what worked for you
Admin
Purushothaman Gempuraj
Thanks. The first Duplicator based method worked for AWS based AMI Linux server 2 which had external database connection as well.
WPBeginner Support
Glad our recommendation worked for you
Admin
Meredith Bashert
I’m still seeing “error establishing a database connection.” I don’t have a domain name set yet (waiting until the site is complete) so I used the domain name that I used to log in to the FTP client as my option value in my wp_options.
WPBeginner Support
For that error, the domain you set is likely correct but you would want to double-check your username and password for your wp-config file
Admin
Husain
Dear WpBeginner team,
In case i already have a website running on my live server (Hosting) and i want to upload a new site on it, so do i need to manually delete all the old files ?
Please advise.
WPBeginner Support
If you are using the manual method from this article you would overwrite the files currently on your hosting rather than deleting them.
Admin
Paul K
Thank you so much for the instructions. The manual way was way simpler and faster than any plugin I tried.
WPBeginner Support
Glad our guide could help
Admin
Rehman Ali
Thanks! Just followed and migrated my site using method 1. Thanks!
WPBeginner Support
You’re welcome, glad our recommended method was able to assist
Admin
Lia
Thank you for that great tutorial! It was really help
WPBeginner Support
You’re welcome, glad our guide was helpful
Admin
JLA
you forgot to include in method the wp-config.php file to edit database connection
WPBeginner Support
As the database is being copied from your local environment it means you will not need to edit the wp-config normally
Admin
Oni
Thank you very much for this update. I really appreciate.
WPBeginner Support
You’re welcome
Admin
Beth
I am completely stuck on Method 1 Step 3 – when i try to connect in FileZilla it keeps saying “Could not connect to server”. Please help!
WPBeginner Support
The most common reason would be your FTP information being incorrect, if you reach out to your hosting provider they should be able to assist.
Admin
Shubham
After exporting my website from local host i couldn’t import it to another wordpress which is live . This was because of file size limit. Any suggestion in this regard.
WPBeginner Support
For that error, you would want to take a look at our guide here:
https://www.wpbeginner.com/wp-tutorials/how-to-increase-the-maximum-file-upload-size-in-wordpress/
Admin
Peter
The Mamp guys have now a publish to live site function in the pro version.
WPBeginner Support
Thanks for sharing that information
Admin
Claudia
Thank you so much for your tutorial. I built the website on localhost, thanks to your tutorial about it. I have a question about this process of going from local to live though.
I currently have a page online and working. I wantred to change it, so that was the reason I developed the new site on localhost. What I would like to know is if I should do something else before using this tutorial to put the local site live.
Should I delete all data from the current page and then upload the local one? or what should I do.
Thank you so much!
WPBeginner Support
If you are wanting to replace the current page, then it would be best to create a backup of the live site and then remove it to replace it with the version you are moving from your local installation.
Admin
Claudia
Thank you very much for your answer!
By the way. I LOVE your page, it has been my go-to page to find reliable answers.
WPBeginner Support
Glad we can be helpful
Ola Philips
Thanks for the tutorial, it has helped me a lot , please, after uploading my WordPress file, how do I get to my WordPress dashboard
WPBeginner Support
You would log into your site to be brought to the admin area. We have a guide for finding your login url here: https://www.wpbeginner.com/beginners-guide/how-to-find-your-wordpress-login-url/
Admin
Sandie
Thanks for the tutorial. I followed the manual method and the only issue I had was an internal server error on anything but the front page.
This was because on my development server my WordPress was installed at localhost/SAF, so the Rewrite Base and Rewrite Rule in the .htaccess file had to be updated to remove the SAF/. Might be worth updating the instructions to check for this, based on the comments it looks like a couple of others have had a similar issue.
WPBeginner Support
We’ll certainly look at updating the article to include this information
Admin
liam Donoghue
I don’t know if i’ve missed something here but i don’t understand the jump in step 3. You’ve said
‘Now you need to upload the archive and installer files from your local site to your hosting account.
First, connect to your live site using an FTP client. Once connected, make sure that the root directory of your website is completely empty.’
How can I connect an FTP to a live site if it isn’t live yet. I have a c panel which has a database made for my site, a copy of my localhost site on my desktop and a filezilla. Am I connecting filezilla to my hosting account? how do I do that? Some clarity on this would be appreciated
WPBeginner Support
Apologies for the confusion, the methods involved in connecting to your host with FTP can vary depending on the host. If you reach out to your hosting provider they should be able to let you know how to connect filezilla to your root folder
Admin
Fabrice
Perfect! Thanks a lot, very useful. Worked perfectly.
WPBeginner Support
You’re welcome, glad our article could help
Admin
Alex Legard
I’m trying to host the WordPress them that I made from scratch. I followed the instructions in this article except for step 7. Now I’m getting the “Stylesheet is missing” error. Help?
WPBeginner Support
For a custom theme, you would want to make sure you have a style.css file in the main folder of the theme and ensure that your computer didn’t rename it style.css.txt
Admin
Joseph
I have a very important question as I never see any specific information about JavaScript in using these methods to upload your site to wordpress. My question is this; if I have javascript files and CSS included in my website files for displaying numbers and text, will they still function properly after I upload my website using this method? I need my javascript files. Please help as this is important to me. I want to use this method after I finish my website but Idk if the javascript files included will work as they should. Thanks in advance.
WPBeginner Support
Unless the file was hardcoded to use a file on your local computer then Javascript files should still work the same as some themes use Javascript files and they don’t have any issues.
Admin
Joseph
Thank you, I will try once my site is complete. I appreciate the help.
WPBeginner Support
Glad we could help
Abdelmadjid ZITANI
Very helpful, thanks a lot for your blog
WPBeginner Support
You’re welcome, glad our articles can help
Admin
Margie
Great tutorial – thank you so much! Got my site up and running (using your manual method) without just a couple small hiccups that were easily solved with a Google search. Overall, I’m very pleased!
WPBeginner Support
Thank you, glad our guide could help
Admin
TENASU MENSAH
please i found out that after everything,in the menus and submenus have localhost links like (localhost/test/category instead of http://www.yoursite/category
is there any solutions?
WPBeginner Support
Did you follow the steps in step 7? You could also recreate the menu links if you wanted.
Admin
Tenasu mensah
please how i can find my back-ends after i have transferred the site to live server
WPBeginner Support
For finding your login url, you would want to take a look at our article here: https://www.wpbeginner.com/beginners-guide/how-to-find-your-wordpress-login-url/
Admin
Tenasu mensah
what should i do if the database you are importing is larger than the required amount given?
WPBeginner Support
You can increase your max upload limit using the method in the article below or reach out to your hosting provider and they should be able to assist.
https://www.wpbeginner.com/wp-tutorials/how-to-increase-the-maximum-file-upload-size-in-wordpress/
Admin
TENASU MENSAH
I have solved the issue.thanks for your kindest answering back
WPBeginner Support
You’re welcome
Admin
Johannes
Thanks a lot for the instructiuons. I had the internal error problem. Luckily I had the htacces file from a previous installation on the server and could just replace the other one.
Everything running perfectly now.
WPBeginner Support
Thanks for sharing the error you ran into, glad our tutorial could be helpful
Admin
Gimhana Jayasekara
Awesome work. You helped me so much. I used 2nd method because I prefer manual handling. Works fine.
WPBeginner Support
Glad our guide could help
Admin
Milutin
Thanks a lot for your help. ALTHOUGH…
After a lot of effort, I understood the chaos of 2 domains on the job I’ve been given, so now website finally is live. But I cannot complete your tutorial because whatever I click or whatever else I type as URL besides just domain, it gives me error 500… I’ve tried all possible solutions mentioned in your other article, but nothing worked. Would you know the reason of the problem?
It’s my school’s website. It’s in Serbian, but click on any link and you will see the error in English.
Thank you again for this tutorial, it helped me A LOT.
WPBeginner Support
There are a few possible reasons and solutions for the 500 error, you would want to take a look at our article here: https://www.wpbeginner.com/wp-tutorials/how-to-fix-the-internal-server-error-in-wordpress/
Admin
Anne-Laure
Hi I’m having an issue when I try running installer.php I get a 403 Error message. Any ideas what is happenning?
WPBeginner Support
For that error and how to solve it, you would want to take a look at our article here: https://www.wpbeginner.com/wp-tutorials/how-to-fix-the-403-forbidden-error-in-wordpress/
Admin
AKG
Everything went correctly, but i ma not able to login to dashboard of my new copied website
WPBeginner Support
It would depend on if you’re running into an error or not, for a starting point you would want to take a look at our troubleshooting article here: https://www.wpbeginner.com/beginners-guide/beginners-guide-to-troubleshooting-wordpress-errors-step-by-step/
Admin
Eddie
Hi,
Everything was going smoothly. I was on step 4and uploaded my site. It gave me an “Error Establishing A Database Connection”. I realised my dtabase name was slightly diifferent from the one on my site. I went into phpmyadmin on WAMP and created a new database with the correct name and copied the old database data on the new database. Now the wordpress site on my PC says ” We were able to connect to the database server (which means your username and password is okay) but not able to select the xxxxxx database.
I restarted my PC and my WP site is blank. Is there anyway I can salvage this? I still have access to WAMP.
Regards
Eddie
WPBeginner Support
It could likely be due to how the content was copied, you would want to edit your wp-config file to point to the correct database for your content to be on your site again.
Admin
JOSHUA
Thanks it worked very well
WPBeginner Support
Glad our article could help
Admin
Donald
Things were going smoothly moving form local host to my domain until Step 1 of 4: Deployment
You are migrating site from the PHP 7.2.11 to the PHP 5.6.38.
If this servers PHP version is different to the PHP version of your package was created it might cause problems with proper functioning of your website and/or plugins and themes.
Note: This warning will still show if you choose option #2 and open_basedir is enabled, but should allow the installer to run properly. Please work with your hosting provider or server administrator to set this up correctly.
Wrote to host but wonder if I can ignore this and just go?
WPBeginner Support
We would recommend reaching out to your hosting provider as some of your plugins/themes may require the newer php and your host should have the ability to help you update the PHP being used for the server.
Admin