Vi har visat dig hur du installerar WordPress på Windows och Mac. Nyligen frågade dock en av våra användare om det var möjligt att använda samma lokala WordPress-installation både på jobbet och hemma. I den här artikeln visar vi dig hur du installerar WordPress på en USB-sticka med XAMPP, så att du kan använda din lokala WordPress-installation på vilken dator du vill.
XAMPP är en programvarupaket som innehåller Apache webbserver, PHP, MySQL och phpMyAdmin. Du kan installera det på dina Windows-, Linux- eller Mac-operativsystem. Vi kommer att visa dig hur du installerar det på en USB-enhet ansluten till en Windows-dator, men installationsmetoden är i stort sett densamma oavsett var du installerar det.
Det första du behöver göra är att ladda ner XAMPP lite. Gå till sidan XAMPP-nedladdning och klicka sedan på Fler nedladdningar.
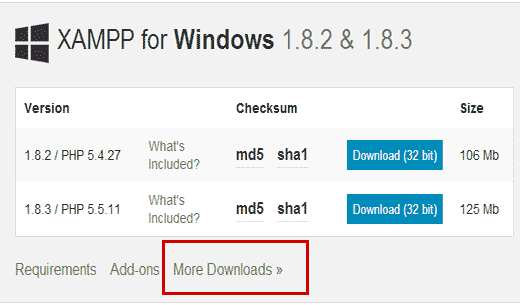
Du kommer att omdirigeras till SourceForge-webbplatsen där du först måste klicka på XAMPP för Windows och sedan klicka på den senaste versionen.
På nästa skärm kommer det att finnas en lista över filer som är tillgängliga för den versionen. Bläddra ner och hitta den portabla versionen i .exe-format. Klicka på filnamnet för att påbörja nedladdningen.
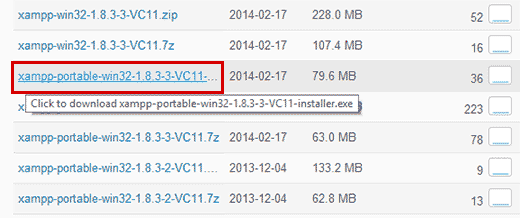
När du har laddat ner den bärbara XAMPP-filen måste du dubbelklicka på filen för att köra installationen. Under installationen kommer du att bli ombedd att välja den plats där du vill installera XAMPP. Du måste klicka på mappikonen och sedan välja din USB-enhet.
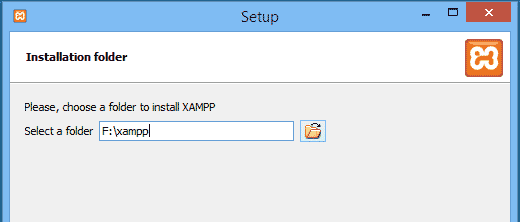
Klicka på nästa för att fortsätta installationen. Installationsprogrammet kommer nu att installera XAMPP på din USB-enhet. Efter installationen måste du gå till din USB-enhet och sedan öppna XAMPP-mappen.
För att starta XAMPP måste du köra xampp-control.exe från ditt USB-minne. Detta öppnar XAMPP Control Center som ser ut så här:
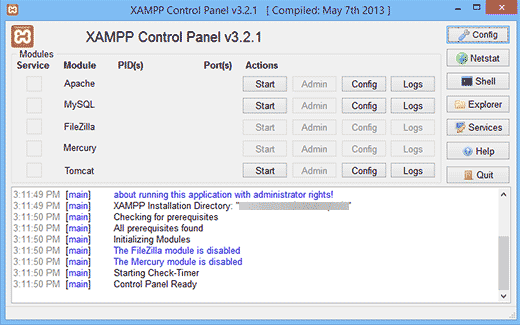
Du måste starta Apache webbserver och MySQL genom att klicka på startknappen bredvid dem. Du kommer att bli tillfrågad av Windows brandvägg, och du måste tillåta åtkomst till båda programmen.
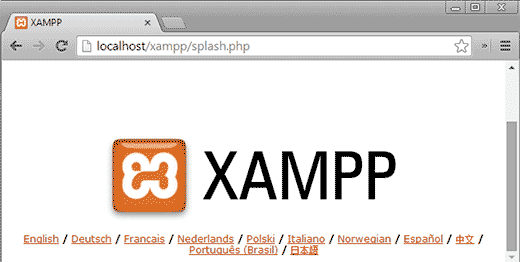
Öppna nu en webbläsare och skriv http://localhost/ i adressfältet. Du kommer att mötas av XAMPP:s startsida. Detta innebär att du har installerat XAMPP på ditt USB-minne.
Installera WordPress på USB-minne
Hittills har du framgångsrikt installerat Apache webbserver med MySQL och PHP på din USB-sticka. Nästa steg är att installera WordPress självt. Installationen av WordPress på en USB-sticka skiljer sig inte mycket från att installera det på din Windows- eller Mac-dator.
Först måste du öppna din USB-enhet och gå till mappen htdocs i din XAMPP-installationskatalog. Skapa en ny mapp i htdocs. Den här mappen blir din lokala WordPress-webbplats. Du kan namnge den vad du vill. För den här handledningens skull, låt oss namnge den site1.
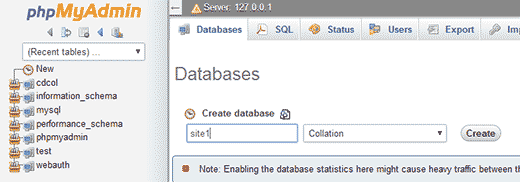
WordPress behöver en MySQL-databas för att fungera, så du måste skapa en databas före installationen. För att skapa en måste du öppna en webbläsare och ange http://localhost/phpmyadmin i adressfältet. Detta öppnar phpMyAdmin, som är en webbaserad programvara för databashantering. Klicka på Databases i den övre menyraden och ange sedan ett namn för din databas innan du klickar på knappen Create.
Nu behöver vi WordPress. Besök helt enkelt WordPress.org och ladda ner en ny kopia av WordPress till din dator. Packa upp den nedladdade .zip-filen på ditt skrivbord och öppna den.
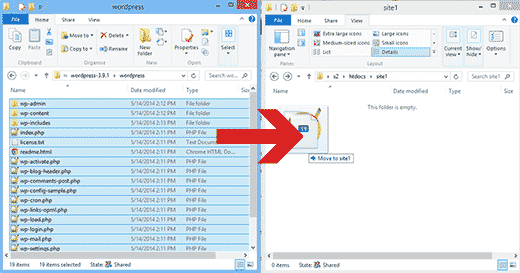
Nu behöver du kopiera innehållet i wordpress-mappen och klistra in det i mappen /htdocs/site1 på din USB-enhet.
När du har kopierat WordPress-filerna kan du köra WordPress-installationen genom att besöka din webbplats på http://localhost/site1 i en webbläsare.
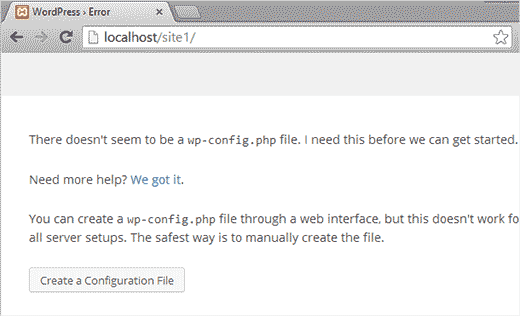
WordPress kommer att informera dig om att det inte hittade WordPress-konfigurationsfilen, så du måste skapa en genom att klicka på knappen Skapa en konfigurationsfil.
På nästa skärm anger du databasnamnet du skapade tidigare. I användarnamnsfältet måste du ange root, och lämna lösenordsfältet tomt. Klicka på skicka-knappen för att fortsätta.
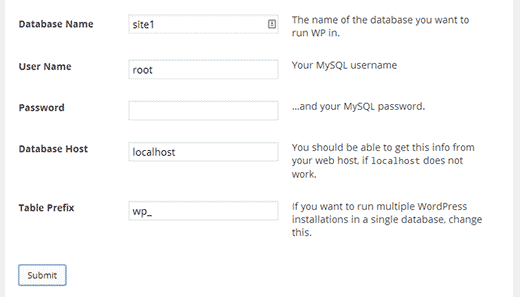
WordPress kommer nu att försöka ansluta till din databas. Vid lyckad anslutning visas ett framgångsmeddelande. Klicka på knappen Kör installation för att fortsätta.
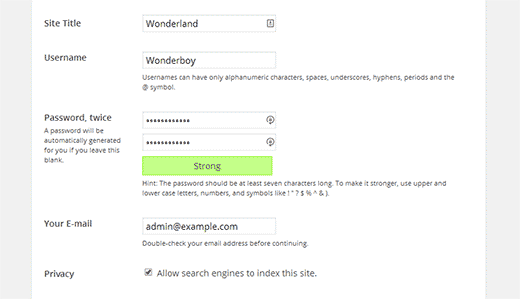
Du kommer att bli ombedd att ange din webbplatsinformation och skapa ett administratörsanvändarnamn och lösenord. Detta administratörsanvändarnamn och lösenord kommer att användas för att logga in på WordPress adminområde. Du kommer också att behöva ange en e-postadress. I avsnittet om integritet kan du avmarkera rutan som säger Tillåt sökmotorer att indexera denna webbplats. När du är klar, tryck på knappen Installera längst ner.
Det var allt, du har framgångsrikt installerat WordPress. Du kan nu logga in på din webbplats och göra vad du vill. För att skapa en annan WordPress-webbplats på samma USB, skapa helt enkelt en annan mapp i htdocs-katalogen och upprepa processen.
Vi hoppas att den här artikeln hjälpte dig att installera WordPress på ett USB-minne. Du kan nu ta med dig detta USB-minne. Observera att ditt USB-minne bara fungerar med Windows-datorer. Du kanske också vill se vår guide om hur du använder WordPress i din webbläsare med WordPress Playground eller våra experttips om bästa dra-och-släpp WordPress-sidbyggare.
Om du gillade den här artikeln, prenumerera då på vår YouTube-kanal för WordPress-videoguider. Du kan också hitta oss på Twitter och Facebook.


martine
Hej,
Allt installerat i god ordning. När jag försöker logga in i wordpress får jag följande felmeddelande: En eller flera databastabeller är otillgängliga. Databasen kan behöva repareras.
När jag klickar på länken för reparation får jag nedanstående och jag måste ta bort den sista raden som hänvisar till reparationen. Om jag gör detta får jag en annan popup som säger att jag behöver lägga till den igen och försöka igen. Det är en kontinuerlig cirkel utan slut.
Hur löser man detta?
wp_users-tabellen är okej.
wp_usermeta-tabellen är okej.
Tabellen wp_posts är okej.
wp_comments-tabellen är okej.
wp_links-tabellen är okej.
wp_options-tabellen är okej.
Tabellen wp_postmeta är okej.
Tabellen wp_terms är okej.
Tabellen wp_term_taxonomy är okej.
Tabellen wp_term_relationships är okej.
wp_termmeta-tabellen är okej.
wp_commentmeta-tabellen är okej.
Reparationer slutförda. Ta bort följande rad från wp-config.php för att förhindra att denna sida används av obehöriga användare.
define(‘WP_ALLOW_REPAIR’, true);
WPBeginner Support
Hej Martine,
Om detta är en ny WordPress-installation och du inte har något innehåll, kanske du vill installera om WordPress. Om det redan finns innehåll, kan du behöva reparera tabeller från PhpMyAdmin.
Admin
rajendra upadhyaya
herr
finns det något sätt att installera wordpress på usb med WAMP och hur mycket minne det använder
Miran Potocnik
Hej,
Vi använder WP på servern. Om jag installerar Apache webbserver med MySQL och PHP på mitt USB-minne och kopierar innehållet i wordpress-mappen från servern och klistrar in det i mappen /htdocs/site1 på mitt USB-minne. Betyder det att webbsidorna kommer att vara desamma? Hur kan jag synkronisera dem? Till exempel: Om jag ändrar något i WP på serversidan, kommer det att ändras på lokalsidan när nätverket är uppe.
Armando
Jag använde (Microsoft) DISKPART för att ändra mitt USB-minne till en startbar disk (FAT32) för användning med XAMPP. Tidigare gick det inte att installera.
Du kanske vill lägga till detta tips i handledningarna.
Tack för din handledning och vänliga hälsningar!
Jay
Jag är inte säker på om dessa steg fortfarande fungerar – jag har gjort processen tidigare (ungefär ett år sedan) och det fungerade. Nu när jag gör det igen på en ny enhet, och med alla uppdaterade komponenter, är steg två i WordPress-installationen alltid (nästan) blankt. Så något går fel. Jag har försökt två gånger och samma sak.
Några tips, baserat på uppdaterade komponenter?
Joshua Harman
Finns det något sätt du skulle vara villig att göra den här handledningen för Mac? Jag har funderat i timmar på hur jag ska få det att fungera men har inte så mycket erfarenhet
brainfreeze
hej joshua. jag undrar om du har hittat ett sätt för Mac? om ja, dela gärna. tack.
Mahendra
kan vi köra php-fil på en annan dator som inte har xampp med USB-minnen
Amonza
Jag är inte riktigt säker på vad du frågar, men om du har XAMPP installerat på ett USB-minne som beskrivet bör du kunna ta med dig det minnet till vilken dator som helst och köra Apache-servern och kunna servera PHP-sidor från htdocs-mappen på minnet.
Om du kör en IDE som behöver sökvägen till php.exe kan du peka den till php-mappen på minnet.
Lisa
För er som har gjort detta, vilken storlek på USB-minne rekommenderar ni?
Ahmad Fahrurroji
Bra idé, jag har aldrig använt det här alternativet för att installera xampp på ett USB-minne men det är bra att prova. Tack.
WPBeginner Staff
du kan överföra din webbplats med BackupBuddy (här är en handledning) eller med Duplicator.
Ian Delemare
Jag gillar idén med att ha en portabel version av WordPress och att kunna utveckla en webbplats på många platser. Men vad är proceduren för att överföra en utvecklad webbplats (inklusive bilder, inlägg, plugins etc.) från ett USB-minne till webben?
Bill Gibson
Jag hade installerat en multisite-version av WP på ett USB-minne för ett par år sedan. Jag lade till en portabel version av Firefox och inkluderade Mobile Barcoder-pluginet. De flera webbplatserna kunde användas för kurser, projekt eller presentationer, och det var ett bra organisationsverktyg. Lägg till text, länkar & bilder, och bädda in för videor eller större filer. Så länge du satte in ditt USB-minne i en internetansluten enhet hade du ett bra presentationsverktyg. "Mobile Barcoder"-appen skapade QR-koder i farten, så jag kunde komma åt en webbplats från flashdisken och sedan generera en QR-kod för att dela länkar med publiken.
WPBeginner Staff
Ja, det finns, men vi är inte säkra på om det fungerar som en portabel app eller inte
Zeeshan Asif
Vad sägs om Mac ???
WPBeginner Staff
Tyvärr kan MAMP, Mac-alternativet till XAMPP, inte köras från en extern enhet. Det finns ett alternativ som heter AMPPS men vi har inte provat det.
DigitizedSociety
XAMPP har en Mac-version.
James B.
Bra inlägg. Jag har använt "Instant WP" för mina lokala och USB-stick-installationer av Wordpress... men jag kanske provar XAMPP! Tack för det fina arbetet.