
Har du någonsin försökt att ladda upp en fil till din WordPress-webbplats och stött på patrull? Det är superfrustrerande när du inte kan ladda upp den bild, det plugin eller det tema du behöver. Våra läsare ber oss ofta om hjälp med filuppladdningsproblem eftersom de kan få ditt arbetsflöde att krypa.
Ibland kan dessa filuppladdningsgränser oväntat hindra dig från att lägga till innehåll i ditt mediebibliotek eller installera de större plugins och teman du behöver. Det är som att vara fast med händerna bundna. Och det är ännu mer irriterande när du inte vet hur du ska fixa det!
Men oroa dig inte, vi finns här för att hjälpa till. Vi älskar att WordPress är en så konfigurerbar plattform och att det ofta finns flera sätt att lösa samma problem.
I den här guiden visar vi dig de enklaste sätten att öka den maximala filuppladdningsstorleken i WordPress. Vi tar dig förbi dessa begränsningar så att du kan återgå till att göra det du älskar – att driva din webbplats!

Varför öka den maximala storleken för filuppladdning i WordPress?
Din hosting provider för WordPress kommer att ange en standard för maximal storlek för upload av filer när du registrerar dig och installerar WordPress. Din hosting provider definierar denna limit, och den varierar vanligtvis från 2 MB till 500 MB.
För de flesta WordPress website ägare kommer denna limit att vara mer än tillräckligt.
Det finns dock tillfällen då du måste höja denna limit så att du inte runar in i upload errors.
Till exempel:
- You run a photography website and need to upload large images.
- Din portfölj med design eller fotografier har stora images.
- Du vill installera ett större WordPress theme eller plugin.
- You want to sell digital products like eBooks, photos, videos, and more.
- You update content regelbundet och add to ljud, foton och annat som ligger utanför den nuvarande limiten.
Med detta sagt, låt oss visa dig hur du kan öka den maximala storleken på filuppladdare på din WordPress site.
Note: Tänk på att om du displayed många stora filer på din website kan det allvarligt sakta ner dess hastighet och prestanda. Därför rekommenderar vi normalt att du aldrig uppladdar videoklipp till WordPress.
Eftersom de flesta användare har olika WordPress inställningar för webbhotell, kommer vi att täcka följande:
- How to Check Your Maximum File Upload Size Limit in WordPress
- Method 1: Contact Your WordPress Hosting Provider
- Method 2: Create or Edit an Existing php.ini file
- Method 3: Add Code to Your WordPress Theme functions.php File
- Method 4: Add Code to Your .htaccess File
- Method 5: Use a WordPress Plugin to Increase File Upload Size
Så här kontrollerar du din limit för maximal storlek på filuppladdning i WordPress
WordPress visar automatiskt limiten för maximal filuppladdningsstorlek när du laddar upp images eller andra media.
För att kontrollera detta, gå bara till Media ” Add New i din WordPress adminpanel, och du kommer att se den maximala filuppladdningsstorlekslimiten för din WordPress site.

Nu när du vet hur du hittar storlekslimiten ska vi visa dig hur du ökar den maximala storleken för upload i WordPress.
Metod 1: Kontakta din hosting provider för WordPress
Ett av de enklaste sätten att öka den maximala storleken för upload av filer i WordPress är att kontakta din WordPress hosting provider.
Detta är en relativt enkel uppgift för deras kundtjänst och kan göras på ett par minuter.
För Beginner kan detta vara mycket enklare än att lägga till kod i WordPress och editera server-filer.
Helt enkelt head över till din hosting providers website, gillar Bluehost, och logga in.
Klicka sedan på ikonen “Chatt” längst ner på vyn. Du kan sedan be de anställda på supporten att öka storleken på filuppladdningen på din site i WordPress.

You can also reach out to support from inside your hosting account dashboard.
Metod 2: Skapa eller edit en befintlig php.ini-fil
Ett annat sätt att öka den maximala storleken på filuppladdningen är att skapa eller editera en fil som heter php.ini. Denna fil kontrollerar många settings för ditt WordPress webbhotell.
De flesta hosting providers för WordPress gillar Bluehost och har en nybörjarvänlig cPanel som hjälper dig att hantera din website.
Om din server har en cPanel dashboard kan du öka storleken på upload av filer med hjälp av de inbyggda tools.
Note: Följarna är från Bluehost cPanel. De flesta shared hosting providers kommer dock att ha liknande steg.
Du hittar en cPanel-knapp längst ner på tabben Webbhotell i Bluehost.

Om du klickar på den här knappen öppnas din cPanel dashboard.
Nu måste du rulla ner till Software section och klicka på “MultiPHP INI Editor”.

Därefter rullar du ner till sektionen märkt “upload_max_filesize” och enter en new maximal filstorlek i boxen.
Klicka sedan på knappen “Tillämpa”.

Alternativt kan du clicka på menu tabs “Editor Mode”, och då kan du ändra den maximala storleken för uppladdare direkt i editorn.
You need to edit the ‘upload_max_filesize’ section to increase your file upload size.
När du är slutförd klickar du bara på knappen “Save”.

Edit php.ini genom att lägga till kod
Om din nuvarande hosting provider inte erbjuder alternativet cPanel, måste du editera den här filen manuellt.
För att göra detta kan du använda en FTP-klient eller alternativet filhanterare i kontrollpanelen på ditt WordPress webbhotell.
Om du använder ett delat webbhotell kanske du ej ser php.ini-filen i din directory. Om du inte ser någon, skapar du helt enkelt en fil med namnet php.ini och uploadar den till din root folder.
Add sedan följande code snippet till filen:
1 2 3 | upload_max_filesize = 256Mpost_max_size = 256Mmax_execution_time = 300 |
Du kan ändra limiten “256M” till den filstorlek som du behöver för din WordPress blogg.
Metod 3: Add Code to Your WordPress Theme functions.php File
Denna metod innebär att du lägger till kod i din functions.php-fil i ditt WordPress theme.
Istället för att editera filen direkt rekommenderar vi att du använder WPCode. Det är det bästa code snippets plugin som allow you to add code to your website without breaking it.
Om du inte har gjort det tidigare kan du läsa vår guide för nybörjare om hur du lägger till customize-kod i WordPress.
Först måste du installera det gratis pluginet WPCode. För mer detaljer, se vår Step-by-Step guide om hur du installerar ett WordPress plugin.
Efter aktivering ska du navigera till Code Snippets ” + Add Snippet.
Du måste hålla muspekaren över alternativet “Add Your Custom Code (New Snippet)” och sedan klicka på knappen “+ Add Custom Snippet”.

Därefter måste du välja “PHP Snippet” som kodtyp från listan med alternativ som visas.
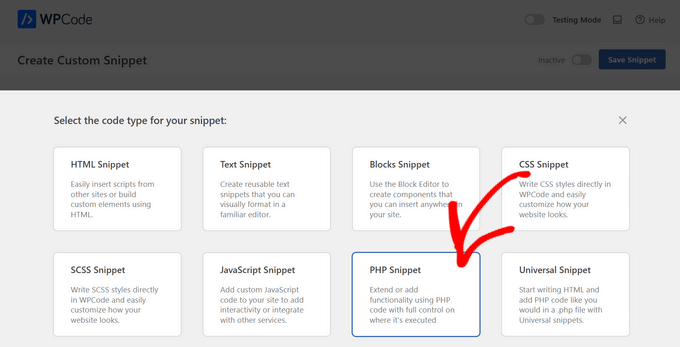
På följande skärm anger du ett namn för din nya snippet, som kan vara vad som helst för att hjälpa dig att komma ihåg vad koden är till för.
Sedan kan du kopiera och klistra in följande kodsnutt under “Code Preview”. Se till att du ändrar “256M” till den maximala filstorlek du behöver:
1 2 3 | @ini_set( 'upload_max_size' , '256M' );@ini_set( 'post_max_size', '256M');@ini_set( 'max_execution_time', '300' ); |

Till sist togglar du högst upp till “Active” och klickar sedan på knappen “Save Snippet”. Koden kommer nu att köras på din website.
Metod 4: Add Code till din .htaccess-fil
Ett annat sätt att öka den maximala filstorleken är att ändra .htaccess-filen. Denna fil kontrollerar konfigurationsinställningarna på hög nivå för din website.
För att göra detta måste du logga in på din website server via FTP. Om du inte har gjort det tidigare kan du läsa vår guide för nybörjare om hur man använder FTP för att uploada filer till WordPress.
Efter det måste du lokalisera din .htaccess-fil i din websites root folder.

Om du inte kan hitta din .htaccess-fil kan den vara dold av din filhanterare eller FTP-klient. För att lära dig mer, se vår guide om varför du inte kan hitta .htaccess-filen på din WordPress site.
Följer du detta måste du add to följande code snippet till din .htaccess fil:
1 2 3 4 | php_value upload_max_filesize 256Mphp_value post_max_size 256Mphp_value max_execution_time 300php_value max_input_time 300 |
Om du vill öka storleken på din maximala upload av filer ännu mer ändrar du bara “64M” till den storlek som du behöver.
Metod 5: Använd ett tillägg till WordPress för att öka storleken på filuppladdningen
Ett annat sätt du kan öka limiten för maximal upload av filer är genom att använda WP Increase Upload Filesize plugin. Om du inte är bekväm med att lägga till kod i WordPress, kan detta vara ett bra alternativ för dig.
Det första du behöver göra är att installera och aktivera pluginet. För mer detaljer, se vår guide om hur du installerar ett plugin för WordPress.
Efter aktivering, navigera till Media ” Increase Upload Limit i din WordPress adminpanel.
Detta leder dig till en vy där du kan selecta en new storlek för upload i rullgardinsmenyn “Choose Maximum Upload File Size”.
Klicka sedan på knappen “Save Changes”.

Note: Den maximala storleken för upload av filer ställs in av din hosting provider. Om du behöver en filstorleksgräns som är större än den som anges i rullgardinsmenyn måste du kontakta din hosting provider och be att få öka limiten.
Video Tutorial
Om du inte tycker om att följa skriftliga instruktioner kan du istället titta på vår videohandledning:
Vi hoppas att den här artikeln hjälpte dig att öka den maximala filuppladdningsstorleken i WordPress. Du kanske också vill se vår guide om hur du lägger till ytterligare filtyper som kan laddas upp i WordPress och våra expertval av plugins och tips för att förbättra WordPress adminområde.
If you liked this article, then please subscribe to our YouTube Channel for WordPress video tutorials. You can also find us on Twitter and Facebook.

")


Sushil Kumar
Thank you Yasir Imran it works for me via .htaccess
Pedro Viana
.htaccess rules! thanks.
Amit Kumar Gupta
Very useful Article for me . Thanks wpbeginner
Steve S
I figured out a work-around that does not involve messing with php.ini, .htaccess, functions.php, or any other systtem files. All I did was the following:
* FTP the file up to /wp-content/uploads/year/month/filename.mp4
* New Post –> Add Media –> Insert from URL
* Cut and paste the appropriate URL based on where you uploaded the file.
* Hit Insert Into Post. Done.
kenny
Perfect! ps if you are inserting an image for a slide background in slider Revolution, use option ‘External URL’
vic
the .htaccess worked fine for me. thanks alot
Anchal Singh
my website have got the same issue but thanks to this post its now work perfect
Matt
Thanks. I want to also know how to make a website portal using wordpress. Any information from you will be highly appreciated.
marta
Thanks. For me htaccess Method did his job
Rifqi Arief
Thanks Bro, Its Work On My Free Hosting via .htacess
RT
Please try below steps as well after creating the php.ini
(1) Go to My Sites -> Network Admin -> Settings from WordPress admin dashboard.
(2) Uncheck the checkbox for “Site upload space: Limit total size of files uploaded to 10 MB” and Save changes.
(3) Done.
Regards,
-RT
Suika
Thanks, I forgot there was a setting there for that.
Abhishek
I’m on goddady hosting, none of the 3 solutions worked for me.
But some users reported .user.ini file worked for them in goddady.
can anybody tell me where to put this file?
I have tried root folder and wp-admin folder nothing worked.
Raman Gutyan
htaccess Method is working great in my localhost.
Thanks for sharing.
DVR
If you are hitting a wall. Go to your host. Advance setting for PHP. Scan the code looking for max upload & file size. Change it to your required setting.
Done.
See NICOLAS’ reply above.
martin kendall
Hi DVR I had tried everything and nothing worked, with what had been posted here. I tried multi times in every why to get it to work. Nothing, but your post put me on the correct answer. Thanks very much for that.
Ok this is what i did, Signed into my host server, where my website is. the host server runs on cPanel and the theme is paper_lantern. It should not matter what your sever is or the theme. If you do not have access to this area you will have to get your host to make the changes y cotacting your technical help.
In the panel you will have categories like = files, database, domains, email etc and what you are looking for is software, under software / apps look for multiPHP INI Editor or something like that. Its going to be different on other platforms but should be in that area. What you are looking for is configure PHP INI basic settings or editor mode. I got offered home directory or my domain name. I picked the domain name but maybe need to change both but I did not need to. Scrolled down to upload_max_filesize and changed to 64M but this did not work as you have to also change the momory_limit to 64M also. They have to be the same figure. and then it will work.
Has I understand, when you make the changes in wordpress code. the instruction talk to your data base through the PHP files and instruct the server software to change the database settings. For some reason It would not work for me. So this route, bypass that and making the changes on the server software and not on the wordpress software. In future I will go this way as it was really quick. I hope this helps as a last resort. Martin p.s. this was WordPress 4.8.1 and I found that it did not have, after loading it any PHP.INI or .htaccess files. I did install them but made no difference and or where I put them.
Jeet Patel
THank you so much it’s working really
Silentnight
Thank u so much… I increased my uploading size.
Gopi krishnan
For me, this is not working, but i did this in htaccess file in this way,
php_value post_max_size 10M
php_value upload_max_filesize 40M
php_value memory_limit 500M
This works !
agnieszka00
Thank you!!!!!
Michael Serovey
I have my websites hosted with GoDaddy and so far, NONE of the above suggestions have worked! I have paid for this plugin and now I that I wasted my money!
Paul
Hi,
To avoid the plugin upload limit you can just upload the plugin with filezilla to your plugin directory. After uploading you can extract the zip file in the file manager and after you have done this the plugin is visible and ready to activate in your admin –> plugin panel
Hope this helped.
Cheers
Pooya
WOW! THANK YOU PAUL!!
This worked perfectly for me!
and it is MUCH easier and more reliable than any of those methods.
just go to File Directory under the cPanel -> Public-html -> [ you site folder] -> wp-content ->themes or plugins
Then upload the zip file here and extract it.
login to your wp-admin dashboard. and bam, you got yourself the theme or plugin.
Tom
Thank the Lord (paul) this took way too long.
Nicolas
Just go to your hosting control pannel -> Advanced -> PHP Settings -> upload_max_filesize ( it usually is on 2M you can change it up to 8M in my case… the point is that it shouldn’t be higher than your post_max_size)
You are welcome!
Jake
Best answer yet.
Steven Gliebe
functions.php is not the best place to put the code because raising the PHP max upload size limit is unrelated to a specific theme. Users shouldn’t be changing theme files directly anyway. wp-config.php is probably a better place. The .htaccess or php.ini method is even better (or just ask the host).
Stephanie
php.ini needs to be in wp-admin folder. This article states it needs to be in the root, which I tried but it made no difference. FYI
Thank you for the information!
Aaron
Thanks so much for your reply Stephanie. Your information was exactly what I needed.
Mike Serovey
So far, NONE of the above suggestions have worked. My control panel does NOT allow me to change the PHP Settings, modifying the .htaccess created an internal server error and modifying the theme failed to work as well. Have any other suggestions?
Mike Serovey
With GoDaddy hosting, I discovered that I needed to use the lines of code that someone posted for the .user.ini file and then refresh my browser and recheck the plugin about three times each before the thing FINALLY worked!
Robert
Thank you! ini file need to be uploaded in wp-admin folder.
Emmanuel Parbey
Thank you.
It worked perfectly.
Somnath
@Stephnie Thanks a Lot .It Workz
Sorin
In wp-admin put php.ini and work
Angel Rodriguez
This worked for me as well.
shemmy
thanks ..this works fine
Prabhat
yes this is helpfull
Matt
Worked Immediately! Thanks! By the way if anyone else wants to know, my host is BlueHost and I am using a Genesis Theme.
Panagiotis Sakalakis
Using the .htaccess I got an Internal Error, and then I just removed the code and it fixed. After that, I created a php.ini file in /public_html/wp-admin, pasted the code and saved it. Everything’s work like a charm now and I can upload my files just fine without any problem.
Umesh Shejole
Yes, Useful……
Subin Babukuttan
htaccess worked fine .thanks 4 d post
hol
Hi
Does anyone know why if the PHP.INI file is changed as mentioned why when the file has completed to 100% nothing happens and it displays http error.
I can upload small files and small videos.
I cant upload anything bigger than say 200mb
I had this working and accepting larger files then I had a restore done on website.
I have changed the PHP.INI…
Is there any reason why just large files don’t work ?
do I need to edit the hta.access file ?
thanks
Ian
.htaccess method worked for Media Temple grid hosting, others didnt affect it, just in case anyones wondering…
Jay
IF YOUR STILL FINDING NOTHING IS WORKING..
(In my case the problem was with WP MULTISITES)..,
FIRST CHECK THE FOLLOWING:
1. check your hosting limits (although this was not my problem) make sure your hosting allows the limit you are trying to set ie if on a shared hosting you might find the maximum is 64M.
NOTE: The following solution may also apply If in WordPress, Maximum upload file size will not change even when changed in the php.ini file etc.
The 1M max upload problem lies with WP MULTISITES default settings!!
To change this, do the following to change the Maximum upload file size within WP admin:
LOG INTO YOUR ADMIN DASHBOARD:
1. At the top, hover over My Sites and then click Network Admin.
2. At the left, hover over Settings and then click Network Settings.
3. Scroll to the bottom of the page and change the Max upload file size to whatever you would like in KB.
4. Click Save Changes.
Hope this helps
Gregg
YESSSS. Thank yo sir.
Milton
Thanks Jay you were right on point for WP multisites
Denis
Worked for me. The site used to work and I couldn’t understand why it didn’t anymore. It was my conversion to multisite which caused the ptoblem.
Sam
Amazing!!! This works!
Adam
Thanks!!!! Jeez there’s not much help on the changes mutli-site makes!
Bhanu uday
It worked like a charm. Thank you very much.
AmanDeep Singh
Working !.I use Create or Edit an existing PHP.INI file method and after applying the settings as mentioned in the article now i am able to upload themes and plugins which are large in size.Thanks for sharing solution.
Judy
I am new to WordPress, I usually use Joomla but I have a new client that wants a WordPress site. When trying to upload images the WordPress message was that the file limit was 3Mb. I spent hours searching websites for an answer. I am using WAMP and localhost to create the site. Through localhost phpinfo() I could verify which php.ini was active, the one in Apache. I had a file limit of 64Mb but still WordPress had a 3Mb limit. This site gave the instructions under #3 to edit the .htaccess file in the WordPress folder. I copied and pasted the text into this file and IT WORKED! Thank you wpbeginner.
KenSanDiego
forgot to mention, my WP site is in a subdirectory with a domain pointer. Powweb’s php applies to everything in all subdirectories. So if you have any installations in subdirectories the change applies to all installations.
Ugyen Zangmo
Create php.ini in wp-admin folder
In the file put the following 3 lines:
upload_max_filesize = 2048M
post_max_size = 2048M
max_execution_time = 3000
Goto to your website as admin and check the upload new media page, it should now display Maximum upload file size: 2 GB.
Thanks to Yasir Imran for sharing your tip!
This worked for me. Thank you James for sharing the Yasir Imran tip. Cheers
sadiq
it is not working i have done same
in godaddy server
Raton Miah
working!
Brendan
That was a great tip… it worked for me.. thanks!
Ben
Holy crap! Thanks so much man, after the last wordpress update to 4.3.1 my upload size reverted back to the default of 50 MB even though my php.ini, .htaccess, and wp-config.php files hadn’t changed and were still reflecting a max upload size of 512 MB! You’re a hero!
Alain
Thank you very much!
I tried ALL of the three methods with no results.
I asked the webhost and the raised the limit to 40 MB.
Then, finally, I tried yours and it worked fantastically!
dominio público
post_max_size should be larger than upload_max_filesize to allow room for other information. The defaults are 2MB max file size and 8MB max post size.
From PHP’s documentation:
post_max_size integer
Sets max size of post data allowed. This setting also affects file upload. To upload large files, this value must be larger than upload_max_filesize.
Nori
Thanks for this! Tried the php.ini and I am quite surprised it worked and was so easy
Dan
php.ini file worked perfectly for me. I simply changed the existing values to 100M. All good. Thanks for the advice.
James
Create php.ini in wp-admin folder
In the file put the following 3 lines:
upload_max_filesize = 2048M
post_max_size = 2048M
max_execution_time = 3000
Goto to your website as admin and check the upload new media page, it should now display Maximum upload file size: 2 GB.
Thanks to Yasir Imran for sharing your tip!
Zain
Hy,
Please tell me the names of best themes for softwares/download sites?
i am waiting.
Thanks,
Zain.
Markus Aurelius
Nothing of the above worked for me on GoDaddy so I had to use .user.ini instead of php.ini and that worked fine. Thanks for pointing me in the right direction!
Keith
Thank you so much. I am on GoDaddy and this worked whereas several other methods did not.
Raj Kothari
Hi Keith, can you tell me under which folder you have put this file? .user.ini
Need help
Oliver
Thanks .user.ini worked for me on Godaddy
sam
1:- open “C:wampbinapacheapache2.4.9bin” folder and find “php” which is a configuration file and open it in ur notepad and again find “upload_max_filesize” and “post_max_size” and change both and save.
2:- open “C:wampbinphpphp5.5.12” folder and find “php” and “phpforapache” which are configuration file and open both in ur notepad and again find “upload_max_filesize” and “post_max_size” and change both and save.
3:- finally restart all services of wamp and enjoy…lov u all
Decb
Hi Guys, I’m REALLY new to this but can you look at what I see when I click to edit the .htaccess file – where do i add the code? at the start? at the end? Do I put my cursor at the begining and click return (then put it in) ??? Please help
Gerard ONeill
Deb, it wouldn’t matter where you added it; but make sure its outside of a block. To be safe, just add it at the end.
However, the better way (as of php5.5) is to modify the .user.ini file in a per directory basis. If you did the top level directory, it would apply to all sub directories (unless overridden).
http://php.net/manual/en/configuration.file.per-user.php
And obviously the system wide php.ini works too.
BenPDX
+1 for Alex’s solution. Upload php.ini folder to wp-admin folder worked for me on Lithium Hosting. 30 second Google search and 1 min to create text file and upload to server!
Dede Erik
I choice the third method and this is worked to me, thanks so much
Hasan Tareq
.htaccess works for my wpenigne site
Vineesh
Hi alex, you are right. php.ini file should be added to wp-admin folder. It will work perfectly…. thanks alex
Rafael
Just adding the php.ini file into wp admin folder worked perfectly!!! thanks!
chandan
thnx alot Alex this worked for me to..
Tony_atf
I keep getting http error even with your suggestion. im on godaddy I have filesize 300m but anything over 150Mb chokes. it uploads, sits for a few seconds and then the http error displays. wordpress never shows the error.
SunnyK
same with me. did you found any solution yet?
WPBeginner Staff
You can connect to your website using an FTP client and undo the changes you made.
Nitesh Magan
Hey I added the 1st code to my theme function file, but now everything on my site went blank. I cant even access my wp-admin of my site !!
Please Help …
Chris
If you’re just trying to upload files yourself in the admin panel (media), make a new plain text document, save it as whatever name (including extension) of the large file you’re trying to upload. So if you’re trying to upload “files.zip,” save a blank text document as files.zip. Upload this blank text file you just created in WordPress. Then, go to FTP or file manager, go to wp-content/uploads/(whatever year it is)/(whatever month it is). You should fine files.zip there. Delete that file (which is just a plain text file) then upload the real files.zip, making sure the names match up. Then when you go back to media it will be the right file.
Yasir Imran
I tried htaccess method and found 500 internal server error, then placed php.ini with 3 given lines in root directory, again didn’t work. Then I placed it in wp-admin folder and it worked. I think the author should mention it.
Alexandre
This worked for me while everything else had failed. Thanks for sharing.
Mel
I had the exact same experience and this worked for me. Thanks Yasir!
Les B
Thank you Yasir Imran…your method works where all others, including .htaccess fails!
(The php.ini must be in the wp-admin folder.)
Les