
Har du någonsin försökt att ladda upp en fil till din WordPress-webbplats och stött på patrull? Det är superfrustrerande när du inte kan ladda upp den bild, det plugin eller det tema du behöver. Våra läsare ber oss ofta om hjälp med filuppladdningsproblem eftersom de kan få ditt arbetsflöde att krypa.
Ibland kan dessa filuppladdningsgränser oväntat hindra dig från att lägga till innehåll i ditt mediebibliotek eller installera de större plugins och teman du behöver. Det är som att vara fast med händerna bundna. Och det är ännu mer irriterande när du inte vet hur du ska fixa det!
Men oroa dig inte, vi finns här för att hjälpa till. Vi älskar att WordPress är en så konfigurerbar plattform och att det ofta finns flera sätt att lösa samma problem.
I den här guiden visar vi dig de enklaste sätten att öka den maximala filuppladdningsstorleken i WordPress. Vi tar dig förbi dessa begränsningar så att du kan återgå till att göra det du älskar – att driva din webbplats!

Varför öka den maximala storleken för filuppladdning i WordPress?
Din hosting provider för WordPress kommer att ange en standard för maximal storlek för upload av filer när du registrerar dig och installerar WordPress. Din hosting provider definierar denna limit, och den varierar vanligtvis från 2 MB till 500 MB.
För de flesta WordPress website ägare kommer denna limit att vara mer än tillräckligt.
Det finns dock tillfällen då du måste höja denna limit så att du inte runar in i upload errors.
Till exempel:
- You run a photography website and need to upload large images.
- Din portfölj med design eller fotografier har stora images.
- Du vill installera ett större WordPress theme eller plugin.
- You want to sell digital products like eBooks, photos, videos, and more.
- You update content regelbundet och add to ljud, foton och annat som ligger utanför den nuvarande limiten.
Med detta sagt, låt oss visa dig hur du kan öka den maximala storleken på filuppladdare på din WordPress site.
Note: Tänk på att om du displayed många stora filer på din website kan det allvarligt sakta ner dess hastighet och prestanda. Därför rekommenderar vi normalt att du aldrig uppladdar videoklipp till WordPress.
Eftersom de flesta användare har olika WordPress inställningar för webbhotell, kommer vi att täcka följande:
- How to Check Your Maximum File Upload Size Limit in WordPress
- Method 1: Contact Your WordPress Hosting Provider
- Method 2: Create or Edit an Existing php.ini file
- Method 3: Add Code to Your WordPress Theme functions.php File
- Method 4: Add Code to Your .htaccess File
- Method 5: Use a WordPress Plugin to Increase File Upload Size
Så här kontrollerar du din limit för maximal storlek på filuppladdning i WordPress
WordPress visar automatiskt limiten för maximal filuppladdningsstorlek när du laddar upp images eller andra media.
För att kontrollera detta, gå bara till Media ” Add New i din WordPress adminpanel, och du kommer att se den maximala filuppladdningsstorlekslimiten för din WordPress site.

Nu när du vet hur du hittar storlekslimiten ska vi visa dig hur du ökar den maximala storleken för upload i WordPress.
Metod 1: Kontakta din hosting provider för WordPress
Ett av de enklaste sätten att öka den maximala storleken för upload av filer i WordPress är att kontakta din WordPress hosting provider.
Detta är en relativt enkel uppgift för deras kundtjänst och kan göras på ett par minuter.
För Beginner kan detta vara mycket enklare än att lägga till kod i WordPress och editera server-filer.
Helt enkelt head över till din hosting providers website, gillar Bluehost, och logga in.
Klicka sedan på ikonen “Chatt” längst ner på vyn. Du kan sedan be de anställda på supporten att öka storleken på filuppladdningen på din site i WordPress.

You can also reach out to support from inside your hosting account dashboard.
Metod 2: Skapa eller edit en befintlig php.ini-fil
Ett annat sätt att öka den maximala storleken på filuppladdningen är att skapa eller editera en fil som heter php.ini. Denna fil kontrollerar många settings för ditt WordPress webbhotell.
De flesta hosting providers för WordPress gillar Bluehost och har en nybörjarvänlig cPanel som hjälper dig att hantera din website.
Om din server har en cPanel dashboard kan du öka storleken på upload av filer med hjälp av de inbyggda tools.
Note: Följarna är från Bluehost cPanel. De flesta shared hosting providers kommer dock att ha liknande steg.
Du hittar en cPanel-knapp längst ner på tabben Webbhotell i Bluehost.

Om du klickar på den här knappen öppnas din cPanel dashboard.
Nu måste du rulla ner till Software section och klicka på “MultiPHP INI Editor”.

Därefter rullar du ner till sektionen märkt “upload_max_filesize” och enter en new maximal filstorlek i boxen.
Klicka sedan på knappen “Tillämpa”.

Alternativt kan du clicka på menu tabs “Editor Mode”, och då kan du ändra den maximala storleken för uppladdare direkt i editorn.
You need to edit the ‘upload_max_filesize’ section to increase your file upload size.
När du är slutförd klickar du bara på knappen “Save”.

Edit php.ini genom att lägga till kod
Om din nuvarande hosting provider inte erbjuder alternativet cPanel, måste du editera den här filen manuellt.
För att göra detta kan du använda en FTP-klient eller alternativet filhanterare i kontrollpanelen på ditt WordPress webbhotell.
Om du använder ett delat webbhotell kanske du ej ser php.ini-filen i din directory. Om du inte ser någon, skapar du helt enkelt en fil med namnet php.ini och uploadar den till din root folder.
Add sedan följande code snippet till filen:
1 2 3 | upload_max_filesize = 256Mpost_max_size = 256Mmax_execution_time = 300 |
Du kan ändra limiten “256M” till den filstorlek som du behöver för din WordPress blogg.
Metod 3: Add Code to Your WordPress Theme functions.php File
Denna metod innebär att du lägger till kod i din functions.php-fil i ditt WordPress theme.
Istället för att editera filen direkt rekommenderar vi att du använder WPCode. Det är det bästa code snippets plugin som allow you to add code to your website without breaking it.
Om du inte har gjort det tidigare kan du läsa vår guide för nybörjare om hur du lägger till customize-kod i WordPress.
Först måste du installera det gratis pluginet WPCode. För mer detaljer, se vår Step-by-Step guide om hur du installerar ett WordPress plugin.
Efter aktivering ska du navigera till Code Snippets ” + Add Snippet.
Du måste hålla muspekaren över alternativet “Add Your Custom Code (New Snippet)” och sedan klicka på knappen “+ Add Custom Snippet”.

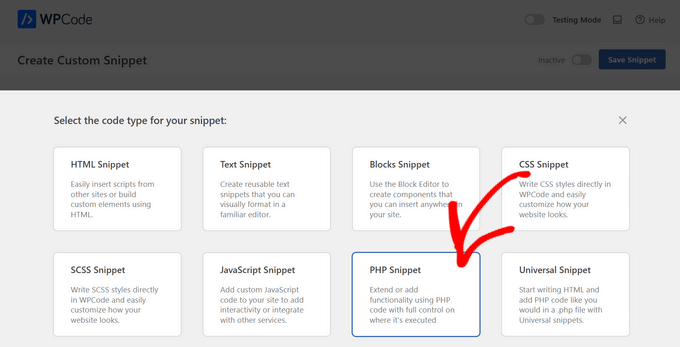
Därefter måste du välja “PHP Snippet” som kodtyp från listan med alternativ som visas.
På följande skärm anger du ett namn för din nya snippet, som kan vara vad som helst för att hjälpa dig att komma ihåg vad koden är till för.
Sedan kan du kopiera och klistra in följande kodsnutt under “Code Preview”. Se till att du ändrar “256M” till den maximala filstorlek du behöver:
1 2 3 | @ini_set( 'upload_max_size' , '256M' );@ini_set( 'post_max_size', '256M');@ini_set( 'max_execution_time', '300' ); |

Till sist togglar du högst upp till “Active” och klickar sedan på knappen “Save Snippet”. Koden kommer nu att köras på din website.
Metod 4: Add Code till din .htaccess-fil
Ett annat sätt att öka den maximala filstorleken är att ändra .htaccess-filen. Denna fil kontrollerar konfigurationsinställningarna på hög nivå för din website.
För att göra detta måste du logga in på din website server via FTP. Om du inte har gjort det tidigare kan du läsa vår guide för nybörjare om hur man använder FTP för att uploada filer till WordPress.
Efter det måste du lokalisera din .htaccess-fil i din websites root folder.

Om du inte kan hitta din .htaccess-fil kan den vara dold av din filhanterare eller FTP-klient. För att lära dig mer, se vår guide om varför du inte kan hitta .htaccess-filen på din WordPress site.
Följer du detta måste du add to följande code snippet till din .htaccess fil:
1 2 3 4 | php_value upload_max_filesize 256Mphp_value post_max_size 256Mphp_value max_execution_time 300php_value max_input_time 300 |
Om du vill öka storleken på din maximala upload av filer ännu mer ändrar du bara “64M” till den storlek som du behöver.
Metod 5: Använd ett tillägg till WordPress för att öka storleken på filuppladdningen
Ett annat sätt du kan öka limiten för maximal upload av filer är genom att använda WP Increase Upload Filesize plugin. Om du inte är bekväm med att lägga till kod i WordPress, kan detta vara ett bra alternativ för dig.
Det första du behöver göra är att installera och aktivera pluginet. För mer detaljer, se vår guide om hur du installerar ett plugin för WordPress.
Efter aktivering, navigera till Media ” Increase Upload Limit i din WordPress adminpanel.
Detta leder dig till en vy där du kan selecta en new storlek för upload i rullgardinsmenyn “Choose Maximum Upload File Size”.
Klicka sedan på knappen “Save Changes”.

Note: Den maximala storleken för upload av filer ställs in av din hosting provider. Om du behöver en filstorleksgräns som är större än den som anges i rullgardinsmenyn måste du kontakta din hosting provider och be att få öka limiten.
Video Tutorial
Om du inte tycker om att följa skriftliga instruktioner kan du istället titta på vår videohandledning:
Vi hoppas att den här artikeln hjälpte dig att öka den maximala filuppladdningsstorleken i WordPress. Du kanske också vill se vår guide om hur du lägger till ytterligare filtyper som kan laddas upp i WordPress och våra expertval av plugins och tips för att förbättra WordPress adminområde.
If you liked this article, then please subscribe to our YouTube Channel for WordPress video tutorials. You can also find us on Twitter and Facebook.


Being Stealth
Adding php.ini file in wp-admin folder worked for me. Yahoooo thanks.
Mouad Chafai
Thanks php.ini method worked perfectly.
i’ve created the php.ini
wp-adminphp.ini
add lines:
upload_max_filesize = 64M
post_max_size = 64M
max_execution_time = 300
thanks for the article.
Saleh Shaukat
Thanks .htaccess worked for me perfectly !!.
Dan Rosenberg
PHP.INI method worked perfectly. Thanks!
Ben Peacock
Sorry please find this instead Login to the root machine type the following command nano /usr/lib/php.ini
find ; Maximum size of POST data that PHP will accept.
post_max_size = 2M change this to 64
Save and exit and then you should be able to upload what you need hope this helps
QuangPham
Thanks for the instructions on how to fix.
Voicu Ioan Virgil
Thanks, great tutorial !
Maria McCarthy
Adding the php.ini file to my wp-admin folder SPECIFICALLY worked for me as well! Thanks everyone! Only took me almost 4 hours to find a page that had the info which would work for me – lifesavers!
pete
found the php.ini worked in wp-admin network php.ini
Tabassum Javaid
htaccess method works fine for me. thanks
Mike
with some host ( godaddy ) for example, there may be some additional steps.
And to what php you are running. For godaddy with php5, rename php.ini to php5.ini and remember if you have accuracies running, you will have to temp. end them before the file will even take over, or wait awhile for it.
System Processes / End all
jaymz
Many thanks for the article. For self-hosted there’s another way as methods 2 and 3 didn’t work for me as the .htaccess change had no effect and neither did adding a php.ini file in /wp-admin. It was simply a case of finding the existing php.ini file for Apache. On Ubuntu I ran;
sudo find / -name php.ini
This found my ini file in /etc/php5/apache2/
All that was needed was to locate the parameters and update the values for;
upload_max_filesize
post_max_size
max_execution_time
Thanks for getting me there!
D Winzell
Thanks for writing this. The php.ini does need to be in the wp-admin directory to function correctly. Just checked my host (Vaurent) and they allows up to 105M file uploads so I am going to find something that size and see if it makes it’s merry way up to my blog.
Matt
I just want to add, using godaddy you cannot use the htaccess method, it will throw you into a 500 internal service error.
You must use the php.ini method. Only difference will be you have to have a php.ini and a php5.ini and the lines must be added to both. The files need to be in the root directory of where the wordpress install is, not in the wp-admin folder, outside of it.
Also if you have multiple wordpress installations This has to be done and placed into each directory that each wordpress installation is located.
GSJha
Very Good Post.
sandeep
php_value upload_max_filesize 64M
php_value post_max_size 64M
php_value max_execution_time 1500
php_value max_input_time 1500
i use these values in .htaccess and it works !
thanks
Thyme
So I did all of those and changed the php.ini in the /etc folder (my site is on mediatemple’s grid-service) and nothing was working but then I vaguely remembered there was something I had to change in the network settings if my installation was multisite and there it was. Ugh.
So yeah, if you’ve got a WordPress network, go to your network settings and change the max file size upload near the bottom of the page.
Alex
This is the only thing that worked for me, I tried all the options, I’m on 1&1
memory_limit = 32M
upload_max_filesize = 32M
post_max_size = 32M
file_uploads = On
** Size can be anything
The key was the “file_uploads” line
Place this in the /wp-admin/ folder.
Kristina
Worked for me! I’m on Bluehost.
Thanks for your post
Brandon
this worked for me after everything else hadn’t. I’m so relieved!
I’m also on 1&1. Once I added the “file_uploads = On” line to my php.ini file it worked like a charm!!
thanks!
Hafeez Ansari
Thank you Alex, This works for me in /wp-admin/ folder. Problem solved.
Jordan Miller
Thank you so much
Mike
Awesome! thanks Alex. I was limited to 2mb…really useful.
Sam
Alex you are the great! Your solution worked for me! Many thanks!
Johnny T
Genius! This worked for me! Just to clarify. Create a php.ini file in the wp-admin folder and only add the lines of code in Alex’s post. FTP this to your server and you’re good to go. Thanks Alex. You are a genius!
Luan
Thanks you Johnny and Alex! It was really helpful.
vanniee
what is the name of the file?
Togi Tan
But, it’s not working on free hosting. All methods I’ve tried. I think this might depend on server.
Duncan
Wow wow wow wow! Thank you for that clear comment that helped me get it to work. You are a star.
Nomo
Alex – Your post continues to be helpful. Very much appreciated!
Noor
Worked by .htaccess method. Salute man.
Bogdan
Great advice. My upload limit was 8MB and I only tried the htaccess trick and it worked, it increased to 64MB. I tested it and it is owrking beautiful! Thank you so much for your great advice!
VoidnessMD
Important thing to note: Using the php.ini method requires that the file be located in the wp-admin folder, not the root of your WP installation.
DJ
THANKS!! This sorted it out for me on my end
David Connolly
Superb… clear and the final solution worked.
a big thank you
Bongo
This website is the coolest for learning WP! Keep up the good work guys…more please…more! lol
Editorial Staff
Thanks for the kind words
Admin
Ido Schacham
Finally, a post that clearly explains how to change the memory limit in WP. Thanks!
mostafa
hi.
i successfully did it with the third method. my upload size was 8 M, but now its 64 M. for me its more than enough.
Thanks a million.
by the way i’m from Iran.
Rowan Evenstar
The creating a php.ini file and popping it on the route sorted it straight away!
Cheers, much appreciated!
assassinateur
thnx, but i am in a shared hosting so nothing work, i did put the php.ini in wp-admin and in the blog folder and in the homefolder and dodnt work also .htaccess didnt work changed the theme and didnt work
Arvind Kukreti
Adding code in .htaccess file might throw you 500 Internal Error… the best way is create a php.ini file and upload it in wp-admin folder
Stephen Afije
Waooo that was brilliant one there all i did was to create php.ini and uploaded to the wp-admin folder it worked like no other thing thanks
leo
htaccess method works fine for me. thanks
Andrew Lilly
Hi,
I have done all of the above and still wont let me import an 11mb xml file. i need it as its got 1500 products on i need to import.
I have spoken to my virtual server provider 1and1 and they said all i need to do is add the code to the .htaccess file but it doesnt seem to work
Please someone help
Editorial Staff
If none of the above works, then the only person who can help you is your host.
Admin
Ali Amer
It may be related to MIME Type. In that case, resolve it from cpanel
Dominique
None of this worked for me. I tried them all. I am using WPEngine to host.
Any suggestions?
Editorial Staff
Ask WPEngine to increase the limit for you.
Admin
Thad
The htaccess method worked for me. Thanks for the post. Good info, well presented.
Richard
php.ini option worked for me but on the php.ini file in /wp-admin directory
Mike
perfect – worked a treat – set to 200MB and works fine.
Matheus M.
In localhost work the .htaccess. But in host only php.ini. Thanks for help.
dan
Yes, php.in works in /wp-admin. thanks
marin
Thanks htaccess worked for me appreciate it.
Makarand Mane
I have hosting on mediatemple. First two methods are not worked me. Only htaccess methos is worked for me.
Thanks.
Gavin
I found that php.ini was hidden in the cgi-bin folder which some shared servers have in their root directories. I amended this as above (AND added a php5.ini jut in case) but until I’d amended this, nothing else worked. Thanks for the VERY useful thread!
Cath
Thanks Gavin, none of the other methods worked for me then I saw your comment, there were php.ini and php4.ini files were in the cgi-bin folder. I found the relevant code in both files – post_max_size = , and upload_max_filesize = , amended these and now all works fine.
Jarod Billingslea
Thank you very much for this article!
Void lon iXaarii
thank you so much! had tried so many solution and your .htaccess finally worked
Anthony
The only thing that worked for me was to create/edit a php.ini file and add the following:
memory_limit = 100M upload_max_filesize = 100M post_max_size = 100M file_uploads = On
and uploading it to the wp-admin folder.
Alan
Option 2 worked perfectly fine, though I had to place the php.ini file into the wp-admin folder instead of the root directory.
phpinfo was detecting the php.ini file in the root, but not WordPress.
I currently have WP 3.2 installed…
RPaterson
Thanks for that extra tip, this is what finally worked for mine
arun
thanks anthony, your method saved me a lot.
Quest The Wordsmith
This is exactly what worked for me as well.
RamiAlloush
Thx
Snowboard
thx for this post , but what is the default limit ?
almb1111
64 MB
kat1111
It was 8MB, but I got it to 192 MB @almb1111
kat1111
Ty for responding, I finally got some help with it, I needed to change the PHP to PHP-5.
kat1111
I am evidently newer than most here, I don’t understand which is “root” directory, is it Editor under the Appearance tab? Also, I don’t undertand how to get to hcaccess. Any help is appreciated.
jameserie
htaccess method works for me. – cheers!
nycxs
If you are using PHP5 the file should be called php5.ini and be in the root of the shared folders.
MyDreamDinZ
What is the highest limit for upload
can i set it to 1024M ?
alexlee.cs
The .htaccess method works for me. Thanks.
rajkanuri
Thanks for the code.. it is really helpful for me..
pranjalgupta2009
Yes ! putting php.ini also in wp-admin works for me. thanks
Snipsley
Thanks, but neither of this worked for me.
But I found the solution!
I had to place that php.ini to /public_html AND /public_html/wp-admin and it works!
Biju Subhash
ya..the same thing works me too..
Thanks Snisley
Trond
Great! This worked for me as well I run WordPress on an MS Server 2008 with IIS 7.5 from my host provider, btw
kenseneff
Worked for me as well. Thanks!
Kiran
Thanks dude. It’s works for me.
Rollie Osayan
Yes. It is also working here. thanks
Kaushik Biswas
At the end of a post, I want to display recent posts from that specific category under that post – how can I do this?