Din WordPress-webbplats misslyckas med att skicka e-post. Inlämningar av kontaktformulär försvinner och viktiga meddelanden kommer aldrig fram. Låter det bekant?
Du är inte ensam, och så här är det – problemet är inte WordPress i sig. Det är hur webbplatser vanligtvis hanterar e-postleverans.
Vi har hanterat exakt detta problem på WPBeginner. Det är därför vi använder och litar på WP Mail SMTP för att hantera alla våra WordPress-e-postmeddelanden. Den använder SMTP (branschstandarden för tillförlitlig e-postleverans) för att se till att dina e-postmeddelanden faktiskt når sin destination.
I den här guiden visar vi dig exakt vad som orsakar dina e-postproblem och hur du löser dem med hjälp av SMTP, så att du aldrig mer missar ett viktigt meddelande.
Varför får du ej email från din site i WordPress
Den vanligaste orsaken till att email försvinner är att din server på webbhotellet WordPress inte är korrekt konfigurerad för att använda PHP:s mail()-funktion.
Även om ditt hosting provider är konfigurerat för att använda det, använder många leverantörer av e-posttjänster, som Gmail och andra, en mängd olika tools för att minska skräppost. Dessa tools försöker upptäcka att ett email kommer från den location som det utger sig för att komma från.
Emails som skickas från WordPress websites klarar ofta inte detta test.
Det innebär att när ett email skickas ut från din site WordPress (från ett plugin för ett kontaktformulär, en notification från admin etc.), kanske det inte ens hamnar i mottagarens skräppost folder, än mindre i inboxen.
Det är därför vi rekommenderar att du ej använder WordPress för att skicka ut ditt email-nyhetsbrev.
Detta är också anledningen till att vi rekommenderar alla att använda SMTP för att skicka e-post i WordPress.
Vad är SMTP?
SMTP (Simple Mail Transfer Protocol) är branschstandarden för sending av email.
Till skillnad från PHP:s mail()-funktion använder SMTP korrekt autentisering, vilket leder till hög email deliverability.
WordPress har ett WP Mail SMTP plugin som konfigurerar din WordPress site att skicka email med hjälp av SMTP istället för PHP mail() funktionen.
You can use it to connect with any popular SMTP services like SendLayer, Brevo (formerly Sendinblue), Gmail (Google Workspace), Amazon SES, and more.
Du kan läsa vår WP Mail SMTP-recension om du behöver mer information om pluginet.
Med det sagt, låt oss ta en titt på hur du åtgärdar problemet med att WordPress inte skickar e-post. Du kan använda snabblänkarna nedan för att navigera genom den här artikeln:
Alternativ: Om du använder WooCommerce och dina order-e-postmeddelanden inte levereras, läser du vår guide om hur du fixar WooCommerce som inte skickar order email issue istället.
Step-by-Step: Installera tillägget WP Mail SMTP
Oavsett vilken SMTP-tjänst du väljer, måste du ha WP Mail SMTP plugin installerat på din site. Detta låter dig byta WordPress från att använda den built-in PHP mail()-funktionen till att använda din SMTP-tjänst.
Först installerar och aktiverar du pluginet WP Mail SMTP. Om du ej är säker på hur du gör, se vår Step-by-Step guide om hur du installerar ett plugin för WordPress.
Klicka sedan på “WP Mail SMTP” i din WordPress dashboard för att konfigurera plugin-inställningarna.
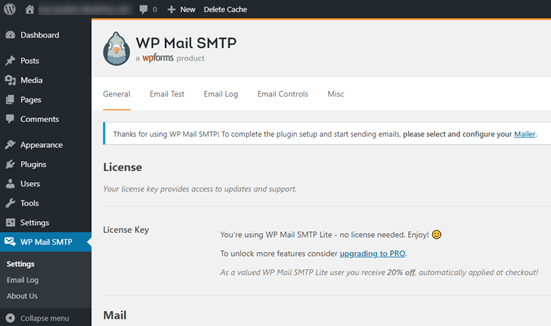
Du måste börja med att enter namnet och företagets email address som du vill att din sites emails ska komma ifrån.
Se till att du använder samma email address här som du kommer att använda för din SMTP-tjänst.
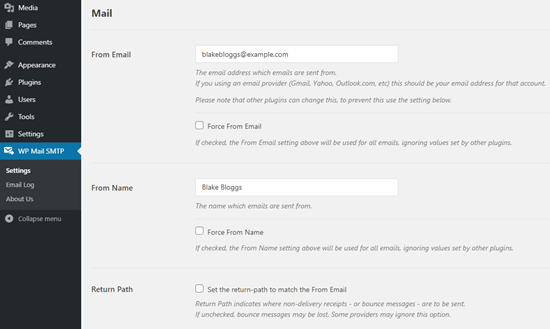
Du kan välja att tvinga e-postmeddelanden att använda detta namn och denna email address, även om andra tillägg, som WPForms, har andra inställningar. WP Mail SMTP kommer att åsidosätta de andra tilläggens inställningar.
Efter det måste du välja en SMTP-posttjänst för din webbplats. För denna tutorial kommer vi att ställa in SMTP med SendLayer.
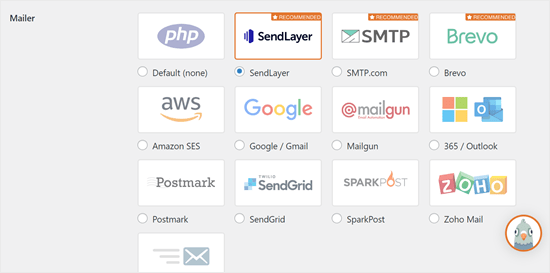
För att slutför konfigurationen av WP Mail SMTP måste du skapa ett account hos SendLayer. Vi kommer att gå vidare till det nästa och sedan komma tillbaka till att slutföra installationen på WP Mail SMTP, så se till att hålla den här tabben öppen.
Step-by-Step 2: Konfigurera din SMTP-tjänst för utskick
SendLayer är en tillförlitlig leverantör av e-posttjänster. De låter dig skicka ett stort antal email med hög deliverability.
Du kan använda SendLayer för att skicka upp till 200 email gratis, vilket är mer än tillräckligt för att de flesta små websites ska komma igång.
Det kan vara email från ditt kontaktformulär, details om nya användares accounts, password recovery emails eller andra emails som skickas via din WordPress site.
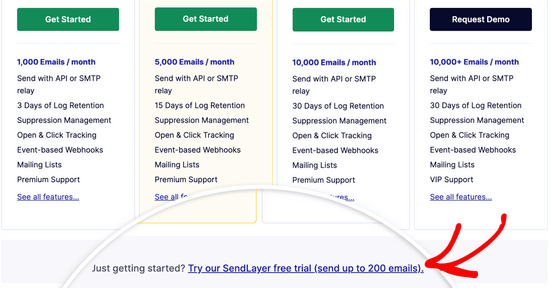
Först måste du gå till SendLayers website för att skapa ett account. På sidan Pricing klickar du på länken “Try our SendLayer free trial (send up to 200 emails)” för att skapa ditt account.
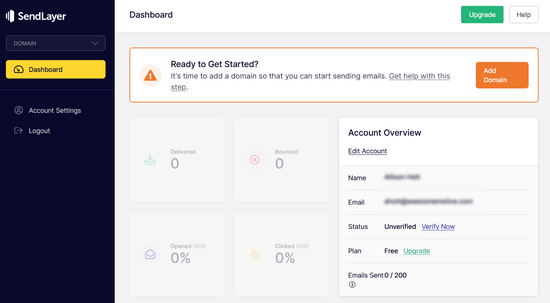
När du har skapat ett account kommer du att se din SendLayer dashboard.
Nu när du har ett SendLayer account, låt oss konfigurera din email provider med WordPress.
Step 3: Anslut din WordPress website till SendLayer
Innan du kan skicka email med SendLayer måste du auktorisera din domän.
Detta bevisar för email servrar att you är den bekräftade ägaren av din sending domain och att your emails skickas från en legitim källa.
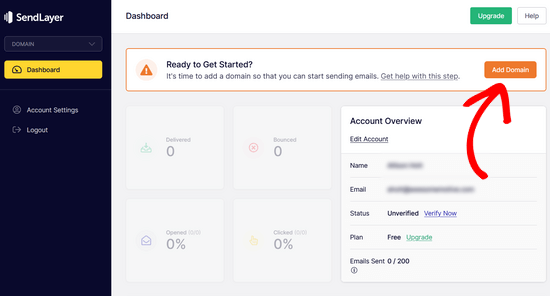
För att auktorisera din domän klickar du på den orangefärgade knappen “Add Domain” i SendLayers dashboard.
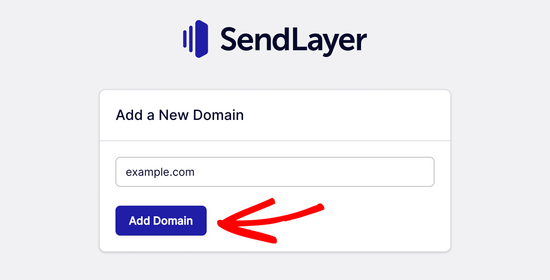
På nästa page skriver du bara in ditt domain name i fältet som finns.
Klicka sedan på knappen “Add Domain”.
Note: Med andra tjänster som gillar Brevo (tidigare Sendinblue) måste du först skapa en subdomain för din website. Men SendLayer kommer automatiskt att add subdomain till avsändardomänens DNS registrerade poster.
Så du behöver inte add to en extra subdomain när du registrerar domänen.
När du har lagt till din domän kommer SendLayer att visa dig 5 DNS-poster som du behöver add to din domäns DNS-postinställningar.
Dessa kodrader låter SendLayer auktorisera ditt domain name.
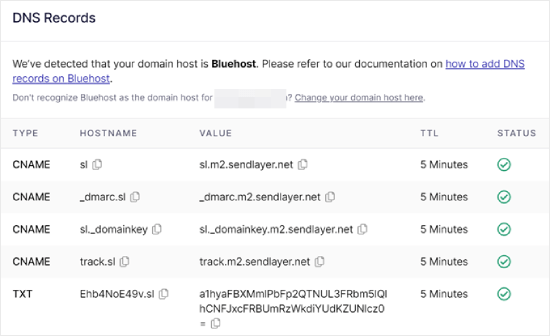
Du måste add dessa DNS-poster till din WordPress site. Detta kan verka komplicerat, men allt du behöver göra är att copy and paste dem på rätt plats.
I den här handledningen kommer vi att visa vårt exempel med hjälp av vårt värdkonto på Bluehost.
Om du använder andra webbhotell eller om din DNS hanteras av en domänregistrator som Domain.com, Network Solutions eller GoDaddy följer du deras respektive instruktioner.
Du kan också läsa vår guide om hur du konfigurerar WP Mail SMTP med valfri host.
Öppna först en new tabs i webbläsaren och logga in på ditt konto på ditt WordPress webbhotell. Leta sedan upp din domäns DNS-poster.
I Bluehost gör du detta genom att gå till “Domäner”. Klicka sedan på “Settings” bredvid den domän som du gillar att ansluta till SendLayer.
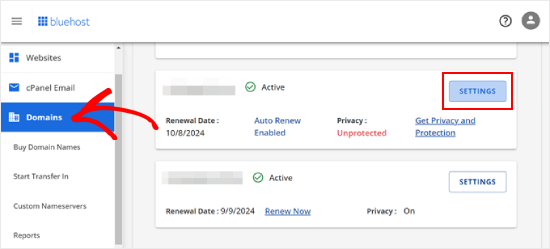
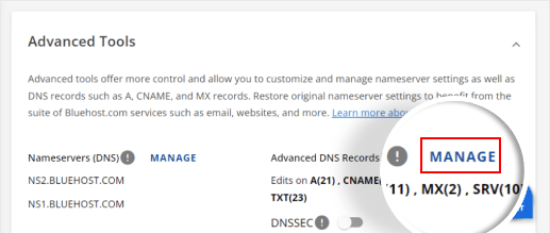
På nästa page rullar du ner till “Advanced Tools” section.
Därefter klickar du på knappen “Hantera” bredvid Avancerade DNS-poster.
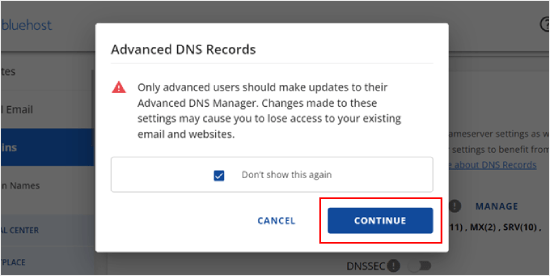
Du kommer att se ett varningsmeddelande som säger att DNS-poster bör redigeras av en avancerad användare. Oroa dig inte för det här message, eftersom processen för detta är ganska enkel.
Gå vidare och klicka på “Continue” för att fortsätta.
Du kommer nu till sidan Hantera avancerade DNS registrerade poster.
Börja med att clicka på knappen “+ Add Record”.
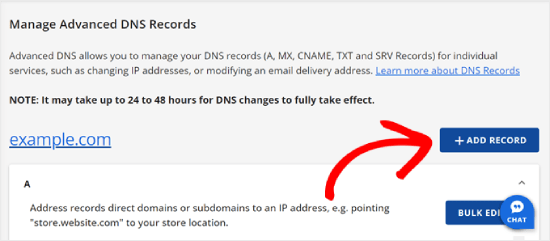
Låt oss nu börja lägga till de DNS-poster som SendLayer har tillhandahållit.
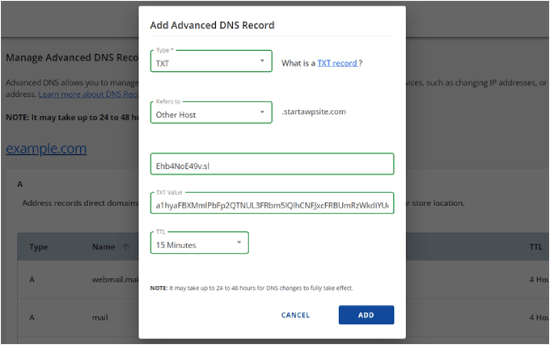
Först väljer du typ av DNS-post. I det här fallet kommer vi att använda CNAME för den första posten.
I sektionen “Refers to” klickar du på “Other Host”. You will pick this same alternative for all your DNS records later on.
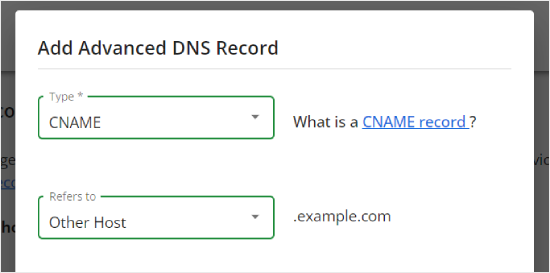
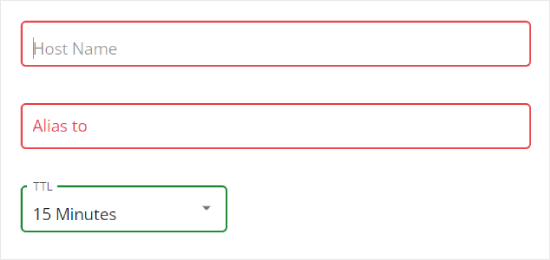
När du rullar ner ser du tre fält: Host Name, Alias och TTL.
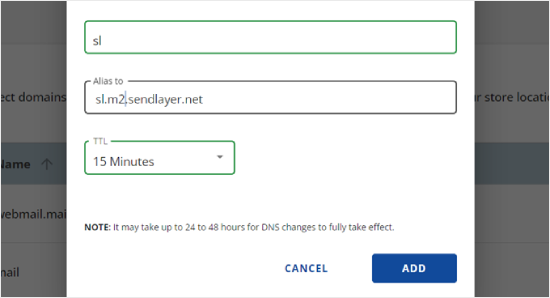
Host Name ska fyllas i med värdet i ‘Hostname’ som tillhandahålls av SendLayer. Alias ska fyllas i med värdet i “Value”. När det gäller TTL kan du lämna den kl. 15 minuter.
Screenshoten under visar hur vår vy gillade att se ut när vi adderade vår första CNAME post.
När du är klar klickar du bara på “Add”.
Du kan upprepa dessa steg för alla poster i DNS (både CNAME och TXT).
När du lägger till TXT-posten, se till att klistra in värdet ‘Hostname’ från SendLayer i fältet ‘Host Name’ och det från ‘Value’ i fältet ‘TXT Value’.
Så här gillar jag det:
När du har lagt till dina poster går du tillbaka till SendLayer och kontrollerar boxen bredvid “Jag har lagt till dessa DNS-poster och är redo att fortsätta”.
Tryck sedan på knappen “Verify DNS Records”.
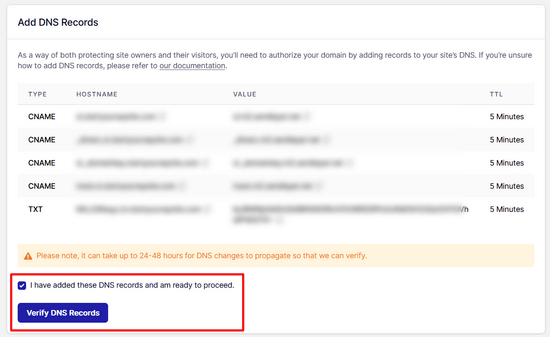
Det kan ta 24-48 timmar innan SendLayer kan kontrollera dina registrerade poster. Enligt vår erfarenhet tog det flera timmar.
Om inget händer när du klickar på den knappen kan posterna ännu inte kontrolleras. Du kan kontrollera igen senare för att se om de har kontrollerats genom att gå till “Settings” och navigera till tabben “DNS Records & Settings” från din SendLayer dashpanel.
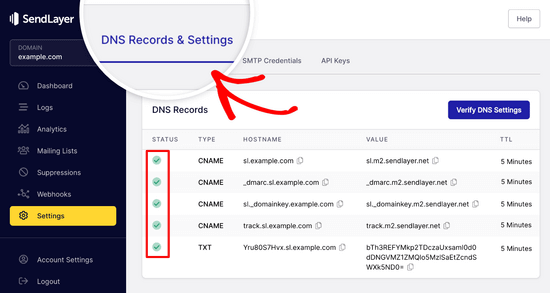
Här hittar du en lista över alla dina DNS-poster på ett ställe. När din domän har auktoriserats utan problem ser du gröna bockar bredvid varje DNS-post i kolumnen “Status”.
Du kan fortsätta med denna tutorial medan du väntar på att auktoriseringen ska äga rum.
Steg 4: Slutför Settings av WP Mail SMTP för att använda SendLayer
Låt oss nu slutför installationen. Gå först till ditt SendLayer account för att hitta din API key.
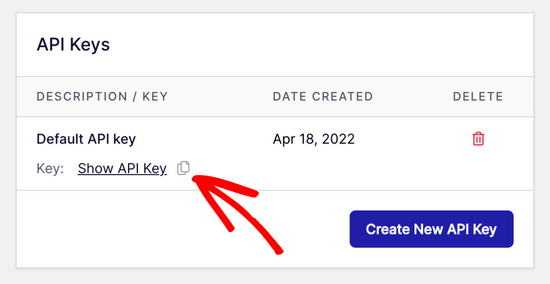
Från SendLayer dashboard går du helt enkelt till Settings “ API Keys page. Här ser du en standard API key som genererades när du auktoriserade din domän i SendLayer.
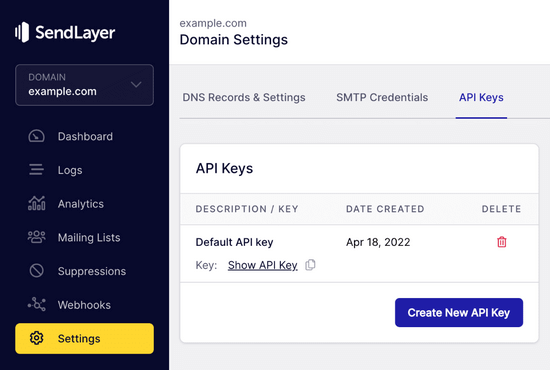
Du kan kopiera API key från denna page genom att clicka på copy iconen.
Like so:
När det är gjort kan du heada tillbaka till din WP Mail SMTP setup wizard tabs.
Klistra sedan in API key där det är lämpligt.

Gratulerar, jag är glad. Du har nu konfigurerat allt. Det sista steget är att skicka ett test email för att se till att allt fungerar.
Gå till WP Mail SMTP “ Tools. I tabben “Email Test”, enter en email address att skicka ett email till. Detta kommer som standard att vara site admins email. Click ‘Send Email’.
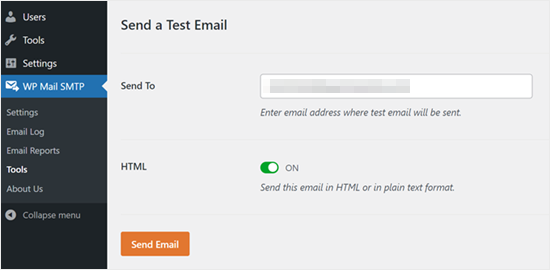
Du bör se message “Test HTML email was sent without problem!
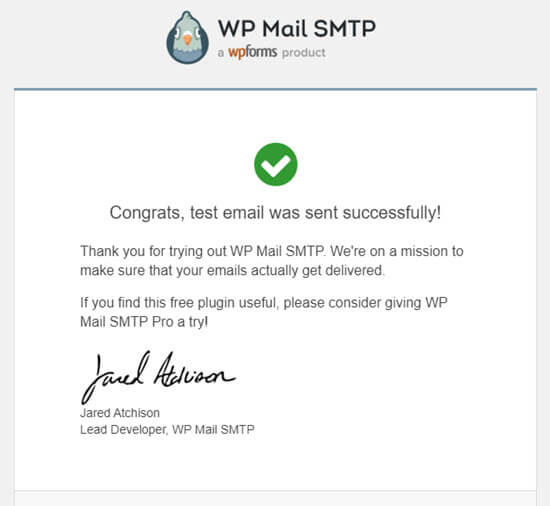
Kontrollera din inbox om den har kommit fram. Det kommer att se ut så här:
Obs/observera: Om ditt SendLayer account ännu inte är aktiverat kommer du att få ett message: [permission_denied]: Unable to send email. Your SMTP account is not yet activated.
Alternativa sätt att fixa problemet med att WordPress inte skickar email
Som du kan se från WP Mail SMTP-pluginets lista över alternativ för mailers, behöver du inte använda SendLayer. Även om det är vår högsta upp gratis rekommendation, finns det andra alternativ som du kan använda, inklusive Microsoft 365, Gmail (Google Workspace), Amazon SES, etc.
Använda Gmail eller Google Workspace med WP Mail SMTP för att Fixa WordPress Emails
Om du har Gmail kan du använda det för att skicka dina emails. Du behöver inte enter dina email login details i WordPress när du använder WP Mail SMTP plugin.
Om du vill använda Gmail eller Google Workspace konfigurerar du WP Mail SMTP enligt ovan och klickar sedan på alternativet “Google / Gmail” för din mailers.
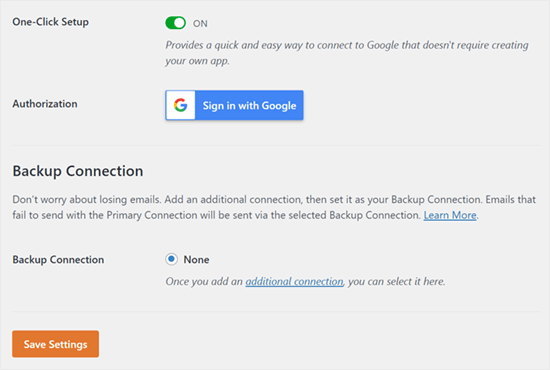
Därefter kan du konfigurera inställningarna för mailern med hjälp av WP Mail SMTP:s installation med ett klick.
Den här metoden kräver inte att du skapar din egen app, vilket är mycket enklare. Du behöver bara logga in på ditt Gmail account och click “Save Settings”.
Det finns dock ett par viktiga nackdelar med att använda din professionella Gmail eller Google Workspace.
En är att du kan behöva kontakta din server för att få dem att installera rätt certifikat för att få det att fungera.
En annan är att om du ändrar email address i framtiden måste du gå igenom hela processen igen. Detta kommer att inkludera att skapa en new webbapplikation.
Använda Microsoft 365 med WP Mail SMTP för att Fixa WordPress Emails
Om du använder Microsoft Office 365 eller Outlook för ditt vanliga email account, kan du också använda det för att skicka ut email via WordPress. Detta är dock inte ett rekommenderat alternativ, eftersom det är mindre säkert.
Du måste konfigurera WP Mail SMTP enligt ovan och sedan clicka på alternativet “365 / Outlook” när du väljer din SMTP mailers. Sedan måste du registrera en app på Microsoft Azure så att du kan fylla i fälten under.
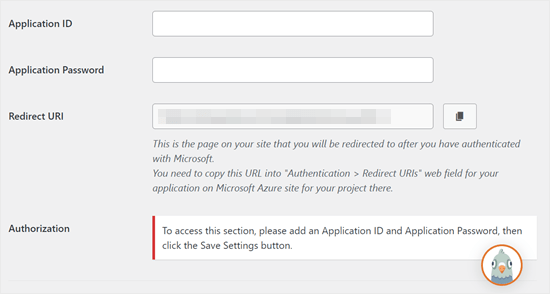
För mer detaljer, se den detaljerade guiden om hur du ställer in Outlook med WP Mail SMTP.
Använda Amazon SES med WP Mail SMTP för att Fixa WordPress Emails
Amazon AWS plattform har en Simple Email Service (SES) som du kan använda för att fixa WordPress email issue.
Det bästa med Amazon är att det låter dig skicka upp till 62 000 email varje månad gratis. Nackdelen är att installationen är lite mer utmanande för Beginnare, vilket är anledningen till att vi inte rekommenderar det som vårt föredragna alternativ.
Men som du kan föreställa dig använder många yrkesverksamma och experter Amazon SES för sin WordPress SMTP-tjänst för email, så vi kunde inte skriva en artikel utan att nämna det.
Om du är intresserad av att konfigurera Amazon SES med WordPress, se de fullständiga instruktionerna om hur du konfigurerar Amazon SES med WordPress.
Oavsett vilken mailer du väljer att använda, kom alltid ihåg att använda funktionen “Test Email” för att säkerställa att email skickas utan problem.
You must make sure to check your inbox, too, and confirm that you’ve received the test email.
Video Tutorial
Om du föredrar visuella instruktioner kan du kolla in den här videon:
Upplever du andra error i WordPress? Kontrollera dessa guider
WordPress är inte perfekt, och du kan stöta på några vanliga error då och då. Här är några tutorials som du kan kontrollera för att lösa dem:
- Hur man fixar Add Media-knappen som ej fungerar i WordPress
- Hur man fixar Image Upload Issue i WordPress (steg för steg)
- Så här fixar du error med blandat content i WordPress (Step-by-Step)
- Hur man Fixar WordPress Posts Returnerar 404 Error (Steg för Steg)
- Så här fixar du error “WordPress Database Error Disk Full”
- Så här fixar du error vid upprättande av en anslutning till en database i WordPress
- Så här fixar du error “Ledsen, den här filtypen är inte tillåten av säkerhetsskäl” i WordPress
- Så här fixar du 502 Bad Gateway Error i WordPress
- Så här fixar du WordPress Search som ej fungerar
- WordPress-formuläret fungerar inte: 7 felsökningstips
Vi hoppas att den här artikeln hjälpte dig att lära dig hur du åtgärdar problemet med att WordPress inte skickar e-post. Du kanske också vill se vår lista över de vanligaste problemen med WordPress blockredigerare eller våra val av de bästa WooCommerce e-postanpassningspluginsen.
If you liked this article, then please subscribe to our YouTube Channel for WordPress video tutorials. You can also find us on Twitter and Facebook.


Will
My problem is that wordpress won’t send emails to or from an address that is coming from my domain name. E.g. @domain.com. But it will send from any other email address type.
Md Sajid
i successfully setup my site, and it is working very well.
thanks for this nice and working tutorial..
i used gmail api first method..
SORRY FOR MY BAD ENGLISH
idayat
hello, please does anyone know how can stop WordPress from sending automatic emails to blog subscribers, i want to use MailChimp but it seems i have to first disable WordPress. thank you
Lyndsay
Great instructions! Clear, easy to follow and they work!
Iman
Thank you so much. You have tutorial helped me fix my email problem . this was one of the best tutorials I have ever seen. every step is very well explained.
alex
Hi, I have installed SMTP – I think right.. but I’m still not receiving emails from the contact form. I’m also not getting new order notifications. can someone please help me?
Sagar Awal
check spam mail.
Nifemi
I’ve completed all the steps using mailgun but when I try to send a test email to my other webmails in that same domain, they never get delivered. However it works pretty well with other emails such as gmail.
Any idea about what might be causing this issue?
WPBeginner Support
Hi Nifemi,
Please contact Mailgun support they would be able to help you troubleshoot this.
Admin
Ron
Is there a way to find the emails that were sent and you did not receive because of this issue?
WPBeginner Support
Hi Ron,
Default WordPress notification emails are not stored in the database. However, if you are using a plugin which stores entries in the database then you may be able to see them.
Admin
Daniel Koo
Instead of the Success! message, I get an error like this:
——–
Not Acceptable!
An appropriate representation of the requested resource could not be found on this server. This error was generated by Mod_Security.
——-
What is the problem?
Colin
I’m having the exact same problem. The answer appears to lie in complicated CSS maneuvers that I hate.
Abhishek Kumar
Thank you so much for useful tutorials.
Anthony
Thank a lot. i followed your method 1 and it worked perfectly!
Michael Zorko
So…this used to be my go to app. Found a similar help video from you guys a while back. Loved Mailgun – then they started changing their policy. Now, it only works for verified email addresses..unless…you put a credit card on file.
Jack Hernandez
I’ve been having problems with admin and users (and new users) not receiving automatic notifications.
Will this also solve that issue?
Thanks
WPBeginner Support
Hi Jack,
Yes, it would. Missing notifications are almost always caused by email issues in WordPress.
Admin
Chloe
Hi,
I’m confused in the step of opening the cPanel in the hosting account. What is the hosting account? Is it found in WordPress? Thanks
WPBeginner Support
Hi Chloe,
Seems like you are using WordPress.com. Please see our guide on the difference between self hosted WordPress.org vs free WordPress.com blog.
Admin
Owen
I was having the exact same problem with e-mails not sending and these instructions were v useful. I have now fully resolved the issue – thank you very much
WPBeginner Support
Hi Owen,
We are glad you found the instructions helpful You may also want to subscribe to our YouTube Channel for WordPress video tutorials.
Admin
Amol
Hello,
Thank you for the topic. It helped me a lot and fixed the issue I was struggling with for last 3 days.
Regards,
Amol
Fred
I started to use the video guide and the first step was to set up a mailgun account. I created a password and clicked the verification link in my email to complete the account. However they then wanted to text me a confirmation code to a cell phone as a second verification. I only own a landline not a cell phone and there was no workaround so it is impossible for me to use mailgun. I realize most people these days have cell phones but it seems stupid they would not allow signup via computer (or via a voice code over the phone).
Fernán
Thank you so much! I just had some changes regarding domain settings, and this pointed me in the right way.
Pankaj Kumar
Hi, If i am using Zoho mail for example.com for email.
Can i still use mail1.example.com and configure mx record?
Will it work or stops my email account created on zoho mail for example.com
Melinda Thome
This worked perfectly, and solved all my WordPress email sending issues. Thank you!!
Melinda
Leo
My wordpress send emails, but, this emails Go to Spam folder… I need a soluction. I try using codes from functions.php but does not work. My solution was install Mail Bank plugin but, I dont want this plugin. I want a simple soluction.
casey
hello! I am having issues with my Contact page, we are not receiving new contact information in our CRM site. Can you please guide me to fix the issue?
Doron
Hey
Thanks for the great tutorial. I’m getting
“Mailgun HTTP API Test Failure; status “Free accounts are for test purposes only. Please upgrade or add the address to authorized recipients in Account Settings.”
Do you know why or how to resolve?
(Added an “authorized user” to my acount)
Alex Cramer
I’m having the same problem. I also don’t understand how to get to the cPanel. What am I missing?
Lawrence Ip
Ah! When in doubt add this TXT Record. @ v=spf1 include:_spf.google.com ~all
That is, this works for Namecheap (and most likely others) when Gmail is enabled. Enjoy!
Aaron Williams
I am having the problem that the wp_mail() function is not showing up in our functions.php document. If I read the documentation correctly, that means Gmail SMTP plugin still won’t work because it uses that function still. Every time I have tried to add the wp_mail() function it has resulted in a fatal error that kills the website and I have to remote into our server to delete the code to get the page working again. Any ideas?
WPBeginner Support
Hey Aaron,
wp_mail function resides in the core WordPress files, so you will not find it in your theme’s functions.php file. Since it is already part of the core, you do not need to add it. Try installing Gmail SMTP plugin, and it should work.
Admin
Clare
Hi there, so happy to have found this tutorial! Can anyone tell me if you need to use a subdomain to setup Mailgun? We have set this up using our root domain and are having some issues and I am wondering if this could be why. Any advice would be appreciated! Thanks, Clare.
Michael Halbrook
It can cause problems if you set it up with out one from what I’ve been reading, because if you set up the MX records for MailGun with your current e-mail address it can be problematic.
Michael Tillman
Great tutorial. I have to say the narrator has a really nice voice, nice and pleasant.
Eric
Using Mailgun worked like a charm. Thanks!
John F
will this fix conformation email not sending?
Callan
Hi,
I think I found an easy workaround for this problem. When setting up form fields, instead of using the generic email field I just use a different type of field and mark it as a “required” field. That way people will know that it is a required field and still provide you with a valid email address.
I have just had the same problem with all of a sudden WordPress not sending me mail from anyone who has a gmail address. I’ve changed the field types and am again receiving emails from submitted forms.
I’d be interested to see if anyone else would try to see if this works.
Steve
First off…very informative article…including the YouTube video on setting up the Google Apps for Work. So thank you for that!
A couple questions:
I use Mad Mimi for my email marketing…and they sent the below article out a while ago telling Gmail users to not use Gmail addresses for sending out Mad Mimi email campaigns (which is what I used to do), but instead to use a custom domain. So that’s what I did. I set up a custom “name@domain.com” address and have been using that. If I want to use the exact same “name@domain.com” address for the Google Apps for Work setup to receive notifications from my WordPress site…will this mess up stuff with the Mad Mimi emails?
Additionally, I currently have my personal Gmail setup to be able to send and receive email from the “name@domain.com” address…so how is that effected as well? Do I need to delete that stuff out of there if I go with this Google Apps for Work option to fix my issue with not receiving my WordPress notification emails?
Thank you so much in advance for any clarification on this.
Sacha Doucet
The article and video were super helpful! Thank you!!
WPBeginner Support
Hey Sacha,
Glad you found it useful. You may also want to subscribe to our YouTube Channel for more WordPress video tutorials.
Admin
Amy
Just wanted to say – thank you so much for this article! Has helped me fix my forms not sure what the issue was before, if it was the server or what – but the mailgun solution worked perfectly for me.
Akinola King
Thanks for this article.
David
Great article! Thank you for sharing!
1) Why does the mailgun HTTP API not require a username and password like the SMTP solution does? Is it because mailgun is verifying at the DNS level (with its SPF and domain key records) and with the API — so this setup removed the need for the SMTP credentials?
2) Am I correct that these sending issues (being rejected by Google or Yahoo’s mail servers) are mostly because people are trying to send email from their WP installations but are using a personalAccount@aol.com to send email from a WP install at example.com?
3) Would mailgun allow someone to send email as personalAccount@aol.com even though the mail is coming from the WP install at example.com
Thanks for your help!
Shaun Lawson
Thank you so much for these great instructions.
Worked for me first time.
Shaun
Lucas Shepherd
Postman SMTP fixed my wordpress email after trying everything everyone told me to try.
Doug
Thanks for pointing me to Postman SMTP. I too had tried several setups to no avail.
Jerry
Thanks Lucas, Me too!
Postman SMTP solved all my email woes.. I’ve been trying to test mail function on WordPress installed on localhost under Xampp for a day or two.
I’m brand new to WordPress and I’m learning that the secret to a happy life is getting the right Plugin.. recommendations are invaluable.
meenakshi
My cpanel is not showing Advanced DNS Zone edittor in Domain section . Wha shoud I do?
WPBeginner Support
You can try DNS Zone Editor or ask your hosting provider for help.
Admin
Mabel
I need help. I have successfully installed mailgun using your videio How to Fix WordPress Not Sending Email Issue, but my email notifications still do not send. Do I have to enter some code into each email template? I have no idea what I am doing.
bobby
You should really warn people about changing the mx records. It ruined my incoming mail for 5 hours and i had to change them back.
Bobby
I set this all up and never got an activation email from Mailgun. Pretty pathetic that an email smtp service can’t even figure out their own account activation system through….ugh….email.
I sent a support ticket in. Now, because I changed the settings on my hosting, NONE OF MY EMAIL IS WORKING. I have tried three different emails to activate the account, and none have gotten the activation email.
Luke Cavanagh
SendGrid is the best option now, the free plan covers up to 12,000 emails a month.
https://wordpress.org/plugins/sendgrid-email-delivery-simplified/
Marco Floriano
Amazing video, amazing tutorial. Nice solution. Perfect! Mailgun is amazing, thanks a ton guys!
Ademide
Thank you for tutorials. I couldn’t proceed because I was having the following error “Your account is temporarily disabled. Business Verification Please contact support to resolve”. I have raised two tickets already, it doesn’t seem to be helping. Any idea what I need to do to get this resolved?
WPBeginner Support
Mailgun has internal checks in place which may sometimes flag an innocent account as suspicious. You simply need to contact their support, they will ask you a few questions about your email usage and will unlock your account.
Admin
Wout
Oh man thank you so much for this! You’re lifesavers! Mails from my wp-site used to end up in Spam, now they reach the inbox with no problems… One thing worth mentioning may be that the domain you set up in Mailgun doesn’t show up in WP mails to users/customers, so you don’t have to use a matching domain for your site. You can setup mail1.example.com in Mailgun for your WordPress site anotherexample.com and it works.
WPBeginner Support
It works, but to ensure maximum delivery in the long run, it is recommended to use the same domain as your website.
Admin
Wout
Actually I still had some issues after testing, and decided to install sendgrid plugin, and that was easier to setup and works like a charm…
Lavish
My domain name is attached to Google Apps emails, I don’t want to mess up things. Can I instead use .org version of my domain name. I have .org and it is just parked (redirecting to .com) unused.
Thanks
Luke Cavanagh
Just make it easy and use SendGrid. You just create a general API and then add it into the settings of the SendGrid plugin on the site you need to use it on.
Michael Story
Hi you mention needing the shortcode for later in the video, where do you use the shortcode? Does it replace gravity forms?
Bill Frankell
Oh man, where were you last week with this? I spent four days of vacation working all this out on my own.
However I do not see my problem listed, which was using Yahoo mail.
Been a yahoo user since 2000 so hated to give way but finally set up new gmail accounts on all my websites which changed everything. I now have those accounts all forwarding to Yahoo, each with a note in the from address telling me their source.
There may have been a way to make Yahoo work, but I didn’t find it and finally gave up. This is a better setup because it lets me set up separate mailing lists and work with mail chimp and sumo me. So far in the last week we have collected over a hundred new members on one site, the difference is that now I get to see each one as it comes in, can delete my yahoo notice and still have the record on Gmail archives.
Having said all this, this page is being bookmarked for future reference. Thanks, it was almost timely.
amit
Sending WordPress Emails Using Gmail SMTP Servers. is it free feature
WPBeginner Support
There are both free and paid options. The free option is less reliable than the paid option.
Admin