Det är otroligt frustrerande när du försöker ladda upp ett nytt tema eller plugin, bara för att stoppas av felet: 'Länken du följde har gått ut.' Meddelandet ger ingen ledtråd om vad som gick fel, vilket lämnar dig helt fast.
Oroa dig inte, detta är ett vanligt problem med en enkel lösning. Det orsakas vanligtvis av en serverinställning som begränsar storleken på filer du kan ladda upp, och det är lätt att ändra.
I den här guiden går vi igenom flera enkla metoder för att lösa detta problem permanent. Du kommer att kunna ladda upp dina filer igen på bara några minuter.
Vad orsakar felet 'Länken du följde har gått ut'?
Detta fel uppstår vanligtvis när du försöker ladda upp en tema- eller pluginfil som är större än vad WordPress tillåts hantera. Ditt WordPress-värdföretag sätter dessa gränser för att hålla din webbplats igång smidigt.
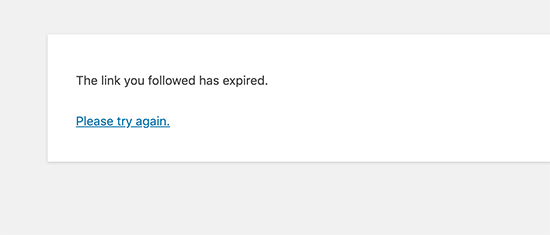
Om en fil är för stor kan det göra din webbplats långsam eller till och med instabil. Så här ser felmeddelandet vanligtvis ut på din skärm.
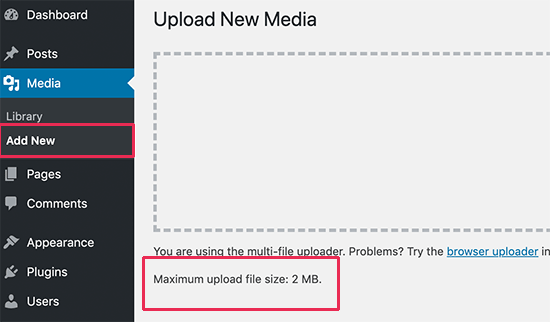
Du kan ibland se din webbplats nuvarande uppladdningsgräns på sidan Media » Lägg till ny. Ett bättre sätt att se alla relevanta serverinställningar är dock att använda det inbyggda verktyget Site Health.
Gå bara till Verktyg » Webbplats Hälsa, klicka på fliken 'Info' och öppna sektionen 'Server'. Här kan du se de exakta värdena för upload_max_filesize, post_max_size och andra gränser. Detta hjälper dig att bekräfta om servergränserna orsakar problemet.
När dessa gränser är för låga för filen du laddar upp kan WordPress få slut på resurser. Detta kan också utlösa andra problem, som minnesuttömningsfel eller felmeddelandet om maximal exekveringstid överskriden.
Nu ska vi titta på hur du enkelt kan lösa detta problem.
Hur du åtgärdar felet 'Länken du följde har gått ut'
För att åtgärda 'Länken du följde har gått ut' är huvudlösningen att öka din webbplats filuppladdningsstorlek och exekveringstidsgränser. Vi kommer också att täcka ökningen av PHP-minnesgränsen, vilket är ett separat steg som kan lösa relaterade fel.
De första metoderna vi kommer att gå igenom är olika sätt att åtgärda huvudproblemet med servergränser. Om de inte löser problemet, kommer de senare metoderna att hjälpa dig att kontrollera andra möjliga orsaker, som plugin-konflikter.
Tänk på att vissa webbhotell kan begränsa din möjlighet att ändra dessa inställningar. Om en metod inte fungerar, bli inte nedslagen. Gå bara vidare till nästa i listan.
- Metod 1: Öka gränserna med WPCode (Rekommenderas)
- Metod 2: Öka gränserna i .htaccess-filen
- Metod 3: Öka gränserna i filen php.ini
- Metod 4: Kontrollera efter plugin-konflikter
- Metod 5: Uppdatera din PHP-version
- Metod 6: Öka PHP-minnesgränsen i wp-config.php
- Metod 7: Kontakta din hosting-leverantör
- Vanliga frågor (FAQ)
Metod 1: Öka gränserna med WPCode (Rekommenderas)
Det säkraste och enklaste sättet att öka gränserna är att använda det kostnadsfria WPCode-pluginet. Det låter dig lägga till anpassad kod i WordPress utan att redigera din temas filer.
Detta är metoden vi rekommenderar eftersom den skyddar dina ändringar från att raderas när du uppdaterar ditt tema. Vi använder WPCode på våra egna webbplatser för att hantera viktiga kodavsnitt på ett säkert sätt.
Först måste du installera och aktivera WPCode. För detaljer, se vår steg-för-steg-guide om hur man installerar ett WordPress-plugin.
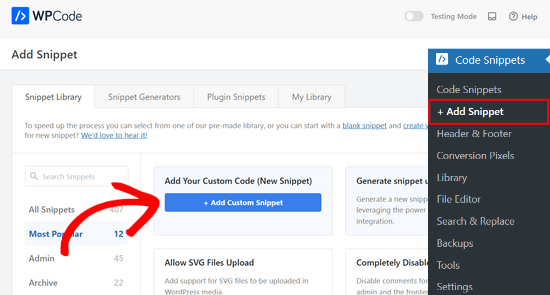
När den har aktiverats, gå till Kodavsnitt » Lägg till kodavsnitt från din WordPress adminpanel. Hitta sedan alternativet 'Lägg till din anpassade kod (nytt kodavsnitt)' och klicka på knappen 'Använd kodavsnitt'.
På nästa skärm, ge ditt utdrag en titel så att du enkelt kan identifiera det senare.
Från rullgardinsmenyn 'Kodtyp', se till att välja 'PHP-utdrag'.
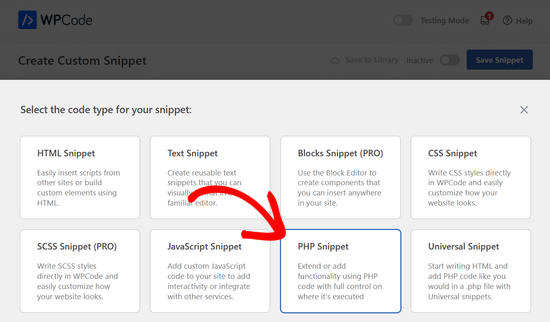
Kopiera och klistra nu in följande kod i rutan 'Kodförhandsgranskning':
@ini_set( 'upload_max_filesize' , '128M' );
@ini_set( 'post_max_size', '128M');
@ini_set( 'memory_limit', '256M' );
@ini_set( 'max_execution_time', '300' );
☝ Ett snabbt tips: värdet för post_max_size bör alltid vara detsamma som eller större än upload_max_filesize. Tänk på det som en låda (post_max_size) som måste vara tillräckligt stor för att rymma din fil (upload_max_filesize).
Den här koden använder funktionen ini_set, som är ett standard PHP-kommando för att ändra en serverinställning. Vi lägger till symbolen @ i början av varje rad för att förhindra att några fel visas på din webbplats om din värd har inaktiverat den här funktionen.
Denna kod ökar också filuppladdningsstorleken till 128 megabyte och exekveringstiden till 300 sekunder. Du kan justera dessa siffror till att vara större än filen du försöker ladda upp.
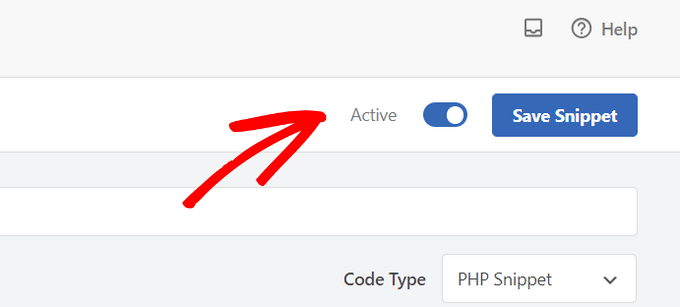
Slutligen, växla omkopplaren högst upp till 'Aktiv' och klicka på knappen 'Spara kodavsnitt'.
För mer information kan du se vår kompletta recension av WPCode och hur den hjälper dig att säkert lägga till anpassad kod i WordPress.
Metod 2: Öka gränserna i .htaccess-filen
🚨 Observera: Den här metoden är för avancerade användare och innebär att redigera en kärnserverfil. Vi rekommenderar starkt att du skapar en fullständig säkerhetskopia av din webbplats först, eftersom ett misstag kan orsaka ett internt serverfel.
Ett annat sätt att öka dina PHP-resursgränser är genom att redigera .htaccess-filen. Observera att denna metod endast fungerar för webbservrar som kör Apache.
Du kan hitta .htaccess-filen i din webbplats rotmapp med FTP eller en filhanterare. Öppna filen för att redigera den.
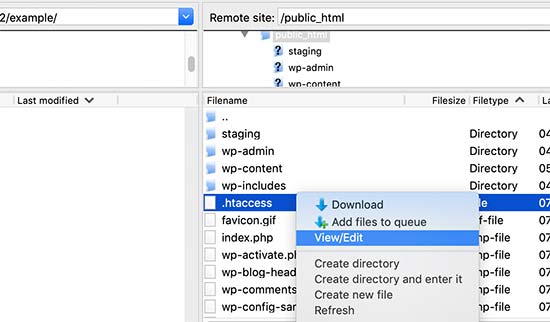
Lägg nu till följande kodrader längst ner i din .htaccess-fil:
php_value upload_max_filesize 128M
php_value post_max_size 128M
php_value max_execution_time 300
php_value max_input_time 300
Glöm inte att spara dina ändringar och ladda upp filen tillbaka till din server.
Observera att denna metod fungerar på webbservrar som kör Apache. Många värdar som använder LiteSpeed stöder också .htaccess-regler, men användare på Nginx-servrar kommer troligen att behöva kontakta sin hosting-leverantör för hjälp.
Metod 3: Öka gränserna i filen php.ini
🚨 Observera: Detta är en annan avancerad metod som involverar serverkonfigurationsfiler. Vänligen säkerhetskopiera din webbplats innan du gör några ändringar för att förhindra potentiella problem.
php.ini-filen är en speciell konfigurationsfil som används av PHP. Du kan leta efter den i din webbplats rotkatalog med en FTP-klient.
Om du har en delad hosting-plan, kanske du inte hittar den här filen. I så fall kan du skapa en tom fil som heter php.ini med en textredigerare och sedan ladda upp den till din webbplats rotmapp.
Nu, redigera php.ini-filen och lägg till följande kod i den:
upload_max_filesize = 128M
post_max_size = 128M
max_execution_time = 300
Spara dina ändringar och ladda upp filen tillbaka till din webbplats. Du kan nu försöka ladda upp din tema- eller plugin-fil igen. Felet bör vara borta.
Metod 4: Kontrollera efter plugin-konflikter
I vissa fall kan felet 'Länken du följde har gått ut' orsakas av en konflikt mellan dina WordPress-plugins. Ibland kan ett plugin störa filuppladdningsprocessen, vilket orsakar detta fel.
För att kontrollera om detta är problemet kan du tillfälligt inaktivera alla dina plugins och sedan återaktivera dem en efter en.
Gå först till sidan Plugins i din WordPress-instrumentpanel. Markera alla plugins, välj 'Inaktivera' från rullgardinsmenyn för massåtgärder och klicka sedan på 'Verkställ'.
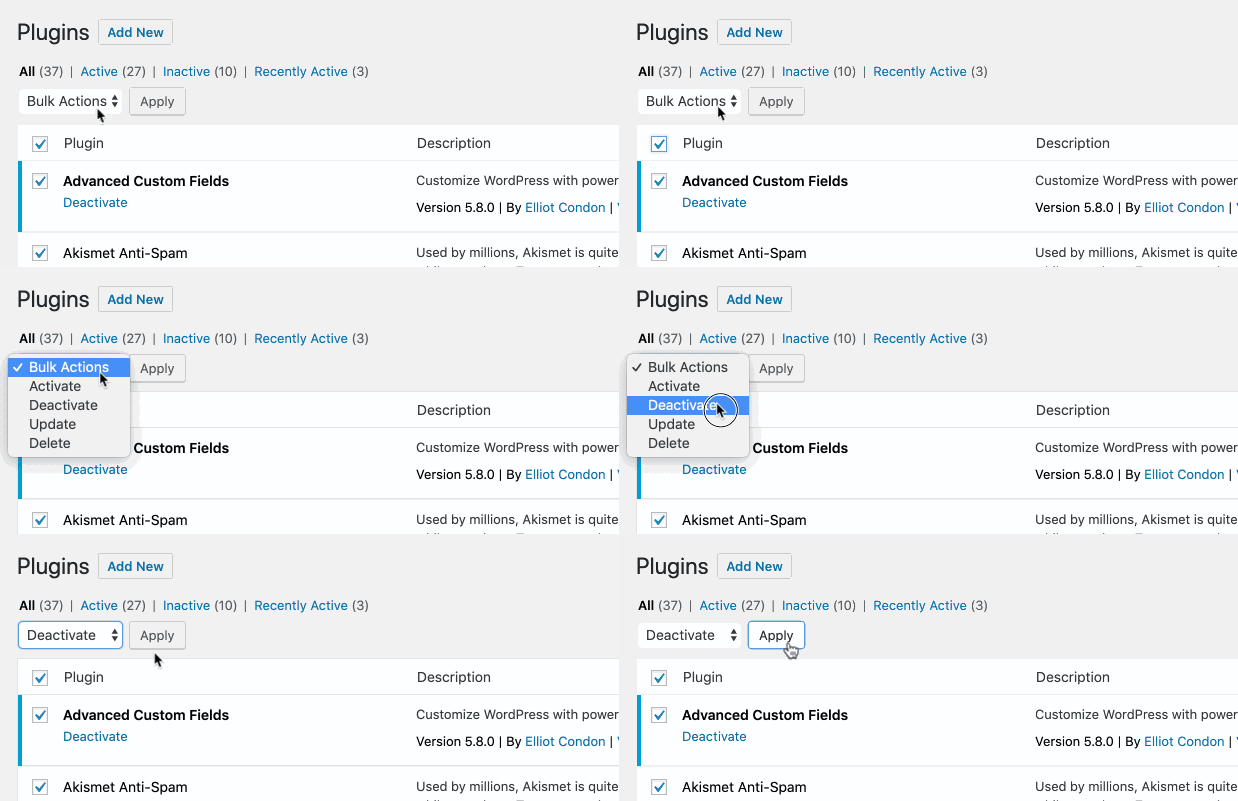
Försök sedan att ladda upp filen igen.
Om felet är borta vet du att ett plugin orsakade konflikten. Aktivera nu varje plugin ett i taget och försök ladda upp efter varje, tills felet kommer tillbaka.
Metod 5: Uppdatera din PHP-version
Ibland kan en föråldrad PHP-version orsaka kompatibilitetsproblem som leder till detta fel. Att uppdatera din webbplats till en nyare version av PHP kan ofta vara en snabb lösning.
För att göra detta på ett säkert sätt kan du följa vår kompletta guide om hur du uppdaterar din PHP-version i WordPress.
Metod 6: Öka PHP-minnesgränsen i wp-config.php
🚨 Observera: Denna metod involverar redigering av en kärnfil i WordPress. Vi rekommenderar starkt att du skapar en fullständig säkerhetskopia av din webbplats innan du fortsätter. Ett litet misstag kan förstöra din webbplats.
Denna metod löser inte direkt filstorleksgränsen, men den kan lösa relaterade minnesfel som ibland uppstår under stora uppladdningar. Om andra metoder inte fungerar är det ett bra nästa steg att öka PHP-minnesgränsen.
Du behöver redigera din wp-config.php-fil. Du kan komma åt den med en FTP-klient eller filhanteraren i din webbhotells kontrollpanel (cPanel).
För detaljerade instruktioner, se vår guide om hur du hittar och redigerar wp-config.php-filen.
När du har filen öppen, lägg till följande kodrad precis före raden som säger /* That's all, stop editing! Happy publishing. */.
define( 'WP_MEMORY_LIMIT', '256M' );
Den här koden ökar minnet som är tillgängligt för WordPress till 256 MB. Försök ladda upp igen efter att ha sparat filen för att se om felet är löst.
Metod 7: Kontakta din hosting-leverantör
Om du har provat alla ovanstående metoder och felet fortfarande inte försvinner kan det vara dags att kontakta din WordPress-värdleverantör. Problemet kan ligga hos dem, och deras supportteam kan undersöka det åt dig.
När du kontaktar oss, se till att tydligt förklara felet och de steg du redan har tagit för att åtgärda det. Om du är osäker på hur du ska be om hjälp, har vår guide om hur man korrekt ber om WordPress-support några bra tips.
Vanliga frågor (FAQ)
Varför säger WordPress att länken du följde har gått ut?
Detta fel betyder nästan alltid att filen för temat eller pluginet du försöker ladda upp är större än den maximala uppladdningsstorleken som tillåts av din servers inställningar. Det är en säkerhets- och prestandaåtgärd som ställts in av din webbhotell.
Vad är den rekommenderade filuppladdningsstorleken för WordPress?
Det finns ingen enskild rekommenderad storlek, men 64 MB eller 128 MB räcker vanligtvis för de flesta teman och plugins. Du kan kontrollera din nuvarande gräns under Media » Lägg till ny och öka den vid behov.
Är det säkert att redigera wp-config.php eller .htaccess-filer?
Att redigera dessa filer kan vara riskabelt för nybörjare. Ett litet misstag kan göra att din webbplats går ner. Därför rekommenderar vi att du använder ett plugin som WPCode (metod 1) eller gör en fullständig säkerhetskopia av din webbplats innan du försöker redigera dessa filer direkt.
Vad händer om ökning av gränserna inte löser felet?
Om det inte fungerar att öka gränserna, försök att kontrollera efter en plugin-konflikt eller uppdatera din PHP-version. Om problemet kvarstår är det bäst att kontakta din hosting-leverantör för hjälp.
Hur kan jag kontrollera mina nuvarande PHP-gränser?
Det enklaste sättet är att gå till Verktyg » Webbplatsens hälsa i din WordPress-instrumentpanel, klicka på fliken 'Info' och öppna rullgardinsmenyn 'Server'. Detta visar dig viktiga gränser som upload_max_filesize, post_max_size och memory_limit.
Vi hoppas att den här artikeln hjälpte dig att enkelt åtgärda 'Länken du följde har gått ut' i WordPress. Du kanske också vill bokmärka vår ultimata guide om hur du åtgärdar de vanligaste WordPress-felen och kolla in vår lista med lösningar för vanliga problem med blockredigeraren.
Om du gillade den här artikeln, prenumerera då på vår YouTube-kanal för WordPress-videoguider. Du kan också hitta oss på Twitter och Facebook.


Mohammed Sathik
För mig fungerade Metod 3... Tack kompis
WPBeginner Support
Glad our guide was helpful
Admin
Syed Shan Shah
Ingenting fungerade för mig.
WPBeginner Support
Om ingen av metoderna från vår guide kunde hjälpa dig, rekommenderar vi att du kontaktar din värdleverantör för att säkerställa att de inte har en inställning på sin sida som åsidosätter dina försök.
Admin
Kevin
Vad som fungerade för mig var att skapa en .user.ini-fil i public_html-mappen och lägga in koden som nämndes ovan för php.ini
WPBeginner Support
It would depend on how your server is set up as not all servers allow user.ini but that is good to know for servers that do
Admin
Jiří Vaněk
Att redigera gränser med filen .user.ini fungerar också på Linux. Direktiven är mycket lika. Vissa leverantörer föredrar också filen user.ini framför filen .htacess. Tack för den utmärkta videon. Till slut hjälpte den mig att höja gränserna enbart genom den nämnda .user.ini.
WPBeginner Support
You’re welcome
Admin
Steve
Fungerar inte. Jag har stött på detta tidigare och lyckats lösa det, men det var ett tag sedan. Sökte på Google och hittade dessa instruktioner men de fungerar inte för min webbplats.
WPBeginner Support
Om ingen av metoderna i vår guide kunde hjälpa dig, vänligen kontakta din värdleverantör så bör de kunna hjälpa dig.
Admin
Shane O'Sullivan
Jag kör WordPress på min iMac på localhost:8888 men att ändra storlekarna i wpcode gjorde ingen skillnad. Efter att ha redigerat htaccess-filen kunde jag ladda upp temat, så tack
WPBeginner Support
Kul att höra att du kunde lösa problemet!
Admin
Himesh
Jag följde varje steg som nämnts för att lösa problemet med att ladda upp ett tema till WordPress när uppladdningsgränsen var för låg. Använde WP Code Snippet för att öka gränserna och fortfarande samma meddelande: "länken har gått ut"
WPBeginner Support
Om våra rekommendationer inte fungerar för dig, vänligen kontakta din webbhotell och de bör kunna hjälpa till med detta problem.
Admin
Gabriel
Jag använder GCP.
Det fungerar bara efter att ha modifierat php.ini under fpm och startat om php-fpm
Att modifiera .htaccess leder till ett internt serverfel.
WPBeginner Support
Tack för att du delade med dig av vad som fungerade för dig!
Admin
Gary
Jag provade alla 3 metoder. Men gränsvärdet ändrades inte.
På sidan 'Lägg till ny' under 'Media' är den maximala uppladdningsfilstorleken fortfarande 2MB.
Måste jag starta om tjänsten eller något?
Vänligen hjälp mig.
WPBeginner Support
Din hosting-leverantör kan åsidosätta den maximala filstorleken, om du kontrollerar med din värd bör de kunna hjälpa till!
Admin
Michael Douglas
Tack för hjälpen. Detta löste problemet för mig.
WPBeginner Support
Kul att vår guide var till hjälp!
Admin
Bernard
Mycket hjälpsamt tack.
WPBeginner Support
Varsågod!
Admin
Ry
Tack!
Använde .htaccess-metoden.
WPBeginner Support
Varsågod, glad att våra rekommendationer kunde hjälpa!
Admin
Syed Nauman Sajid
Strålande och fungerade perfekt för mig.
WPBeginner Support
Kul att vår guide kunde hjälpa!
Admin
Bob
Folk borde kontrollera sina inställningar. Jag glömde M från 128M. Riktigt dumt men det var mitt problem.
WPBeginner Support
Everyone can make a typo like that but we’re glad you were able to find and solve the issue for you
Admin
Art Bejarano
Jag har ett problem: Jag har lagt till htaccess-texten sist och det fungerade inte. Jag tog bort all formatering på texten och det fungerade fortfarande inte. Jag behöver hjälp.
Ann
Jag har provat alla steg men jag har fortfarande problemet. Jag har problemet varje gång jag klickar på spara/skicka in. Till exempel, uppdatera WordPress-versionen. Aktivera felsökningsläge i Elementor. Inaktivera alla plugins.
Vänligen hjälp mig att veta hur jag kan fixa det, tack.
Anurodh Keshari
I min instrumentpanel är maximal filuppladdningsstorlek 512 MB. men ändå, jag har det här problemet men jag har det här problemet när jag inaktiverar pluginet... kan du hjälpa mig...
WPBeginner Support
Du bör kontrollera med din hosting-leverantör för att säkerställa att de inte åsidosätter några av dina ändringar.
Admin
Cesar Puente
Den här guiden hjälpte mig mycket. Jag hade det här problemet med lokal WordPress. Jag kunde inte ladda upp mitt anpassade tema för att testa det.
Tack så mycket.
WPBeginner Support
Glad our recommendations were able to help
Admin
Akin
Metod 2 fungerade för mig som en charm. Tack så mycket för detta.
WPBeginner Support
Glad our recommendation helped you
Admin
Carly
Fungerade perfekt – tack så mycket!
WPBeginner Support
Glad our guide was helpful
Admin
Tasmim
Riktigt bra förslag. fungerar riktigt bra nu
WPBeginner Support
Glad our recommendation helped
Admin
elijah
vilken plats ska jag posta metoden en vilken rad
WPBeginner Support
Vi rekommenderar att du tittar på vår guide nedan för att förstå hur du klistrar in kodavsnitt:
https://www.wpbeginner.com/beginners-guide/beginners-guide-to-pasting-snippets-from-the-web-into-wordpress/
Admin
Tudor
Det fungerade, tack!
WPBeginner Support
Glad our guide was helpful
Admin
Andri
Tack så mycket Metod 3 fungerade.
Men, serverfel när jag redigerar .htaccess-filen och att lägga till i functions.php fungerar inte.
WPBeginner Support
Kul att vår guide var till hjälp, om någon av metoderna inte fungerar så rekommenderar vi att du kontrollerar med din värd eftersom det är inställningar som kan ignoreras på grund av serverinställningar.
Admin
Rush
Tack för hjälpen!
WPBeginner Support
You’re welcome
Admin
Khan
METOD 2 fungerade perfekt.
Jag försökte installera det eleganta temat
Tack brorsan!
WPBeginner Support
Glad our guide could help
Admin
Theo
Tack, det var mycket hjälpsamt. Jag ändrade .htaccess.
WPBeginner Support
Glad our guide was able to help
Admin
Nathan
Jag får ett 500 Internal Server-fel när jag redigerar .htaccess-filen. Hur lägger jag till koden utan att få detta fel. Att lägga till i functions.php fungerar inte för mig
WPBeginner Support
Några lösningar för det specifika felmeddelandet finns i vår artikel nedan:
https://www.wpbeginner.com/wp-tutorials/how-to-fix-the-internal-server-error-in-wordpress/
Admin
Ravi
Tack så mycket, din metod 2 fungerade för mig den 2020-07-04. Jag har lagt till följande kod före taggen:
php_value upload_max_filesize 128M
php_value post_max_size 128M
php_value max_execution_time 300
php_value max_input_time 300
WPBeginner Support
Glad our recommendation was helpful
Admin
James Voufo Safor
Tack så mycket. Det här fungerade verkligen!
Jag följde den andra metoden och nu har jag installerat temat.
Fortsätt göra det ni gör.
WPBeginner Support
Glad our guide could help
Admin
kwaku Vesper
tack så mycket det fungerade
WPBeginner Support
You’re welcome, glad our guide could help
Admin
Waqar
Did all these methods but still getting the error
Don’t know what else to do
WPBeginner Support
Du kanske vill kontakta din hostingleverantör för att säkerställa att de inte åsidosätter ändringarna du gör och att de inte ser några fel från deras sida.
Admin
Steve
Tyvärr anger denna förklaring inte i vilken mapp php.ini bör placeras/ligga.
WPBeginner Support
Ursäkta om vår förklaring inte var tydlig, php.ini bör finnas i din webbplats rotmapp.
Admin
Mark Ferguson
Jag har en kund som har detta problem men bara på woocommerce-inloggningsformuläret. Om du klickar på länken för att försöka igen fungerar det. Några idéer?
WPBeginner Support
Om metoderna i den här artikeln och att spara om dina permalänkar inte löser problemet, bör du kontakta WooCommerce för hjälp.
Admin