Om du lägger till bildtexter till dina bilder kan du få värdefull bakgrundsinformation, vilket kan göra din webbplats mer engagerande.
Många WordPress-teman visar dock inte bildtexter. Så om du vill lägga till bildtexter till utvalda bilder är det viktigt att se till att de visas korrekt.
I den här guiden visar vi dig hur du enkelt lägger till bildtexter till dina utvalda bilder i WordPress.

Varför add Captions till Featured Images i WordPress?
Gillar du ibland att dina featured images saknar något? Utan caption kan de se tomma ut och misslyckas med att förmedla hela storyn eller sammanhanget bakom dem.
Många themes WordPress har inte support för captions för featured images, vilket innebär att din publik inte får den värdefulla bakgrundsinformation som captions ger. Detta kan vara frustrerande, särskilt när du har ett kraftfullt budskap eller viktiga detaljer att dela.
Att lägga till captions till din featured image är ett kraftfullt sätt att ge sammanhang till vad fotot på din WordPress blogg handlar om. Det finns några anledningar till varför du kan överväga att lägga till captions:
- Beskriva den utvalda bilden: Ibland är det oklart vad den utvalda bilden handlar om. Om du till exempel har en resewebbplats som arkiverar dina utomhusäventyr kanske du vill lägga till en bildtext om var din utvalda bild togs.
- Förbättrad tillgänglighet: Att lägga till captions kan förbättra användarupplevelsen för dem som har synnedsättningar.
- Datering av grafiken: Ibland är det en bra idé att datera bilden. Om din bild till exempel visar ett före-och-efter-foto kan det vara bra att ange ett datum så att läsarna vet när bilden togs.
- Ge kredit: Om du tar någon annans foto, särskilt en professionell fotografs, är det en bra idé att ange en länk till deras webbplats. Den här typen av bildtexter används ofta i tidningar, publikationer, tidskrifter och populära bloggar.
När du uploadar en featured image har du alternativet att add to en caption, tillsammans med annan information, som t.ex. bildens alt-text.
I allmänhet har nästan alla WordPress-teman inbyggt stöd för featured images och visar dem på många olika områden på din WordPress-webbplats.

Det är dock inte säkert att ditt theme visar denna caption för besökarna.
Med detta i åtanke, låt oss se hur du kan lägga till bildtexter till utvalda bilder i WordPress med hjälp av ett plugin.
Lägga till Captions till Featured Images i WordPress
Det bästa sättet att visa bildtexter för utvalda bilder är att använda det kostnadsfria pluginet Featured Image Caption.

Först måste du installera och aktivera pluginet. Om du behöver hjälp kan du vänligen läsa vår guide om hur du installerar ett plugin för WordPress.
Efter aktivering är allt du behöver göra att gå till det blogginlägg där du vill lägga till en bildtext till din utvalda bild. Du kan gå till Inlägg ” Alla inlägg och sedan hitta det blogginlägg du vill göra ändringar i.
Håll bara muspekaren över bloggnamnet, så visas några knappar under titeln. Gå vidare och klicka på “Redigera”.

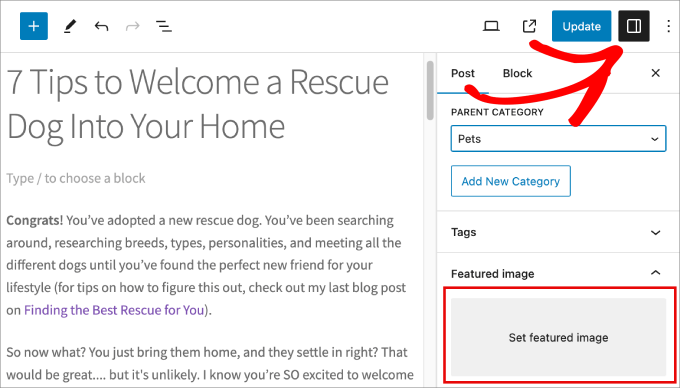
När du har landat på bloggartikeln vill du gå över till den högra panelen. För att få panelen att visas, låt oss klicka på panelknappen högst upp bredvid “Uppdatera” eller “Publicera”.
Sedan kan du bläddra ner till “Featured Image” och välja “Set featured image”.

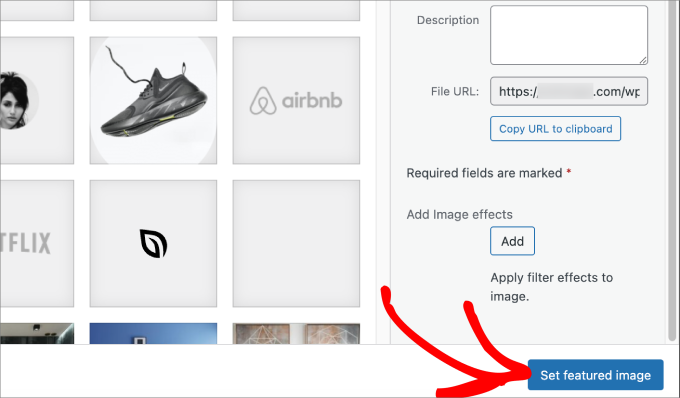
Ett nytt fönster visas där ditt befintliga mediebibliotek visas.
Gå vidare och välj det foto som du gillar att använda för din featured image.

Därefter ska du bläddra längst ner på skärmen och klicka på knappen “Set featured image” för att få fotot att visas som huvudfoto i ditt inlägg.
För en mer djupgående guide kan du kolla in vår artikel om hur du lägger till utvalda bilder eller inläggsminiatyrer i WordPress.

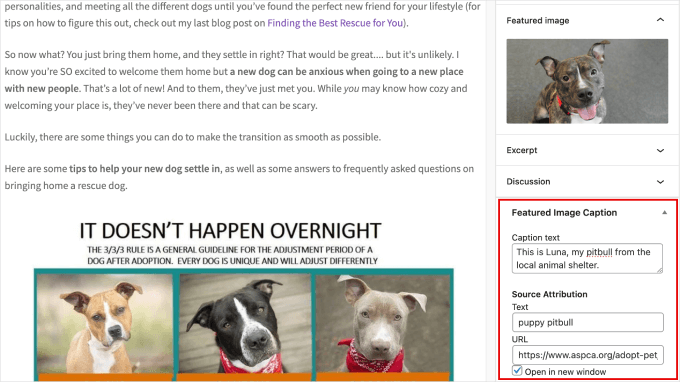
Eftersom du har laddat ner pluginet bör du se en “Featured Image Caption”-panel visas till höger, precis under det foto du har laddat upp.
Ge helt enkelt din featured image rätt caption under “Caption Text”.
Du får gärna add to källhänvisningen för den featured image för att ge kredit till ägaren av bilden.

När din caption är klar är allt som återstår att göra att trycka på knappen “Update” eller “Publicera”.
Detta säkerställer att du inte förlorar dina ändringar.

Om du besöker ditt blogginlägg kan du se bildtexten i aktion. Du bör lägga märke till hur den visas precis under den utvalda bilden.
Där har du det!
Nu kan du enkelt lägga till bildtexter till alla dina utvalda bilder så att läsarna bättre kan förstå vad bilden handlar om innan de fortsätter att läsa din blogg.

Bonus: Lägga till caption till images i WordPress
Nu när du vet hur du lägger till bildtexter till dina utvalda bilder vill du förmodligen också lägga till dem till alla bilder.
Det är ett bra sätt att lägga till sammanhang, särskilt om du vill beskriva olika bilder som används i ditt blogginlägg. Du kan förklara skärmdumpar, infografik eller till och med stockfoton, vilket ger användarna en bättre upplevelse.
Allt du behöver göra är att ladda upp din bild till mediebiblioteket. Du ser “Alt Text”, “Title”, “Caption” och “Description” i panelen till höger.
Under “Bildtext” skriver du helt enkelt in den mening eller fras som ger läsarna ytterligare sammanhang om bilden. Klicka sedan på “Välj” för att infoga bilden.

Om du vill ha en mer djupgående guide kan du kolla in vår fullständiga nybörjarhandledning om hur du lägger till bildtexter till bilder i WordPress.
Vi hoppas att denna handledning hjälpte dig att lära dig hur du lägger till bildtexter till dina utvalda bilder i WordPress. Du kanske också vill lära dig hur du kräver utvalda bilder för WordPress-inlägg eller se våra expertval av de bästa plugins och verktyg för utvalda bilder för WordPress.
If you liked this article, then please subscribe to our YouTube Channel for WordPress video tutorials. You can also find us on Twitter and Facebook.


Dennis Muthomi
Great tips on adding captions to featured images!
one question though:- while captions provide helpful context, I’ve noticed my site getting flagged by Google PageSpeed Insights for missing alt text on images.
from an accessibility standpoint, would you recommend prioritizing adding alt text descriptions over captions??
WPBeginner Comments
You will want to use at least the alt text.
Think of the alt text as a description for the image itself. The caption helps add context to that description.
Dennis Muthomi
ok…that makes total sense now, thanks for the clarification!
Jiří Vaněk
Alternative text is important not only for SEO. By using ALT, you are telling search engines (Google, Bing, etc.) and also visually impaired users, for whom this tag is primarily intended, what is depicted in the photo or image. Google, by itself, cannot recognize what is in the image, but with the help of alt text, you can explain it to them, and they will then index the image better for the given keywords. If you do not use alt texts, you will significantly affect your image SEO. Do not underestimate this :).
Mrteesurez
It is highly recommended to be using Alt text for all images, Unless there is a text on the image, Google can’t identify what is happening in the image or picture.
Also, Alt texts are showed to users with poor Network or when the image failed to load, this text will make them understand the type of images that supposed to showed there.
Anonimus
Thanks
WPBeginner Support
You’re welcome
Admin
Zlatev
Built-in in 4.6 –
Chris
How?
Frank
no alt text????
zaib azhar
in which file?
Moyen
Hello,
I tried to get the featured image by calling the specific post ID and get_post function but everything is okay except featured image. It does not show featured image.
is there problem to call by post ID and get_post(); ?
my code?
// custome template (community)
post_title; ?>
post_content; ?>
Please any idea?
WPBeginner Support
We are sorry we can not see the code. You can put your code in http://pastebin.com/ and then share the link in the comment.
Admin
Sabir
This is very great and very helpful. Thank you so much!
Trisha
Thank you for explaining this! I just needed to add the image captions and spent a lot of time searching for a solution…..I found a lot of other answers on the WP support forum, but none of them explained how featured images are stored……such a simple thing now that I understand.
Vali_REK
Hello, great post.
Please explain if I can do that in other website.
I d like to show article or category from wordpress blog on opencart website.
Thank you
WPBeginner Support
You can fetch WordPress content into OpenCart website using RSS Feed.
Admin
Aneas Nemorosus
Where can I buy you a coffee????
Editorial Staff
You can send us a donation using the forms here:
https://www.wpbeginner.com/wpbeginner-needs-your-help/
Admin
Mike
I still don’t know what or where the “loop” is. Sorry.
Yannick
Sry, I don´t rly get it…
In which loop exactly do i have to paste the code?
Maybe it´s just me being brain-afk, sry for that.
Editorial Staff
In the loop where you want to display thumbnails with captions. This could be your single.php file, or any other files.
Admin
Dejan
Thank you for this!!!
Jhon Edison Bueno Martinez
Thanks a lot, I have been looking for this and this is the best and simple explanation of how to add the image caption for featured images.
Thanks
Editorial Staff
Use this article:
https://www.wpbeginner.com/wp-themes/how-to-display-custom-fields-outside-the-loop-in-wordpress/
Admin
tonilehtimaki87
Short neat and to the point. Only critic goes for not providing example output for the short article. For other readers: Remember to read the related posts!
Gary
How can I style the caption?
It is rendering the caption line outside of the DIV class in the source code? What am I doing wrong.
Thanks in advance,
Gary
Editorial Staff
You can wrap the echo content in a div of its own.
Admin
t.diaz
I have been banging my head against a wall for about 4 hours trying to figure out how to wrap the echo content in its own div. (PHP noob here).
Can you give me an example of how it would look to wrap the div on that echo?
Editorial Staff
Do it like this:
echo ‘open div here’ . get_post(get_post_thumbnail_id())->post_excerpt . ‘close div here’;
karen
This is great. Very helpful. Thank you so much! But it would really be helpful to show a screenshot of the result.
Bronson
This little gem comes in handy when wanting to spruce up most of the free themes out there… nice, quick and easy.