
När det gäller att göra uppdateringar eller betydande ändringar på din WordPress-webbplats kan det vara riskabelt att göra det direkt. Det är här en staging-webbplats kommer in i bilden.
Det är en perfekt klon av din live-webbplats där du på ett säkert sätt kan testa ändringar, felsöka problem och förfina uppdateringar innan du distribuerar dem till din huvudwebbplats. Att skapa en staging-webbplats kan rädda dig från potentiella driftstopp, trasiga funktioner och andra komplikationer.
På WPBeginner använder vi staging-webbplatser för att testa webbplatsuppdateringar innan vi publicerar dem på våra live-webbplatser.
I den här Step-by-Step guiden visar vi hur du enkelt skapar en staging-miljö för din WordPress webbplats. Vi kommer att täcka flera olika metoder och de flesta av dem kräver bara några click.

Vad är en Staging Site?
En staging site är en klon av din live website som används för att testa ändringar innan de görs live. Staging sites hjälper dig att hitta error, så att du inte förstör din live website.
Förr i tiden var det mycket svårt att skapa en WordPress staging site, men nu har det ändrats så att även en icke-teknisk person kan göra det.
Många användare installerar WordPress lokalt på sina Windows- eller Mac-datorer för att testa ändringar. När de är klara med updatingen laddar de helt enkelt upp ändringarna från localhost till live-servern.
Det största problemet med detta tillvägagångssätt är vad som händer om något som fungerade på your localhost inte fungerar på live-servern?
Ofta körs de lokala webbplatserna och live WordPress webbhotell servrar inte i samma miljö.
Eftersom staging-webbplatsen lever på din webbhotell server, kan du enkelt förhindra alla dessa error eftersom den kör samma serverkonfiguration som din live site.
Med det sagt, låt oss ta en titt på hur du ställer in en staging site för WordPress.
Så här skapar du enkelt en WordPress Staging Site
Det finns flera sätt att skapa en staging site för WordPress. Det enklaste är att använda din hosting providers utvalda funktion för staging site.
Några av de bästa webbhotellen för WordPress erbjuder redan 1-click staging websites. Om din website är hosted hos ett av dem kan du enkelt skapa en staging site utan krångel.
Om du inte har någon av dessa populära hostinglösningar har vi också en lösning som hjälper dig att skapa en WordPress staging site med hjälp av ett plugin (och även manuellt).
För snabbare browsing kan du använda navigationen under för att hoppa till den section som är mest tillämplig för you:
Skapa en Staging Site på Bluehost
Bluehost är ett av de bästa företagen för webbhotell för WordPress. De erbjuder en snabb 1-click staging site-lösning med alla sina planer.
Först måste du gå över till din Bluehost-instrumentpanel och besöka avsnittet “My Sites”.
Därefter växlar du till tabben “Tillägg” och toggle omkopplaren bredvid alternativet “Bluehost Plugin”.

Efter det, head över till din WordPress dashboard och besök Bluehost ” Staging page.
Gå nu vidare och klicka på knappen “Create Staging Site”.

Bluehost kommer nu att förbereda staging-miljön för din website.
När det är gjort kommer det att visa en Staging Site ‘section där du måste kontrollera rutan “Ej för närvarande redigering”.

En prompt kommer nu att öppnas på din vy där du ombeds att byta till staging site.
Här klickar du på knappen “Switch”.

När du har kopplat om kommer du att se en knapp på vyn som visar att du arbetar på staging website.
You can go ahead and work on your website without worrying about it affecting your live site.

Distribuera ändringar från Staging till Live Site på Bluehost
När du är redo att flytta ändringar från staging till live site går du helt enkelt till Bluehost ” Staging page från sidebaren i WordPress admin.
Härifrån ser du rullgardinsmenyn med alternativ för driftsättning bredvid din staging website. You can deploy only the files, only the database, or deploy all changes.
Om du ej är säker kan du klicka på knappen “Deploy All Changes” för att fortsätta.

Därefter klickar du på knappen “Deploy Site” bredvid dropdown-menyn.
Detta kommer att visa en popup där du ombeds bekräfta att du vill distribuera staging site till produktionssiten. Klicka på knappen “Deploy” för att fortsätta.

Bluehost kommer nu att börja distribuera din staging site till live site. Beroende på storleken på din website kan detta ta en stund.
You can now switch back to your live website to see your changes in action by clicking on the Radio button under the Production site alternative.

Kloning av Production Site till Staging
Nu när you byter tillbaka till produktionswebbplatsen synkroniseras inte de ändringar som du gör där automatiskt till din staging website.
Om du i framtiden vill testa fler saker på din staging-webbplats måste du duplicera din website.
För att göra detta måste du besöka Bluehost ” Staging page och klicka på knappen ‘Clone to staging’.

Bluehost kommer sedan att klona de senaste ändringarna på din Live website till din Staging website. Efter det kan du byta till staging website för testning och utvecklare.
Skapa en Staging Site på SiteGround
SiteGround är ett annat högst upp WordPress webbhotell som erbjuder en 1-click staging funktion med deras GrowBig och GoGeek planer.
Om din website är hosted med SiteGround, då är det så här du skulle ställa in en staging-webbplats.
Först måste du logga in på din SiteGround dashboard och växla till fliken Websites. Härifrån måste du välja Site Tools under din website.

På nästa vy måste du klicka på WordPress ” Staging menyn från den vänstra kolumnen.
From Name väljer du din website och anger sedan ett namn för din staging-kopia.

Klicka på knappen “Create” för att fortsätta och Siteground kommer att skapa en staging-kopia av din website.
Efter det måste du klicka på knappen “Go to protected URLs” så att du kan skydda din staging website med password och hålla den privat.

På nästa vy kommer Siteground automatiskt att fylla i URL och sökväg för din staging website.
You have to enter the username and password that you want to use to protect your staging site.

Click on the “Protect” button to save your settings.
Du kan nu gå tillbaka till WordPress ” Staging page och klicka på knappen “ Logga in på adminpanelen” bredvid din staging website.

SiteGround kommer nu att öppna WordPress admin area på din staging website. Du kan testa dina ändringar på denna staging website.
Distribuera Changed tillbaka till din Live website
När du har provat dina ändringar på staging-webbplatsen kanske du vill slå samman dem med din live-webbplats.
SiteGround gör det också enkelt.
Klicka bara på menyn WordPress ” St aging i den vänstra columnen. Klicka sedan på menyn med tre punkter bredvid din staging site under sektionen “Manage Staging Copies”.

Menyn visar dig två alternativ för driftsättning. You can either choose the “Full Deploy” or “Custom Deploy” alternative.
Alternativet “Full Deploy” sammanfogar allt från staging-webbplatsen till din live website. “Customize deploy” allow you to select which files or data you want to merge.
Om du är osäker väljer du alternativet “Full Deploy”.
SiteGround kommer sedan att kopiera staging site till din live website.
Sammanfoga Live till din Staging website
Changeds som du gör på din live website kopieras inte automatiskt till din staging website.
Varje gång du behöver arbeta med din staging website upprepar du processen ovan för att skapa en ny staging website.
Skapa en Staging Site på WP Engine
WP Engine är det bästa webbhotellet i världen som hanterar WordPress. Hanterad WordPress-hosting är en conciergetjänst för din WordPress site där hosting provider tar hand om updates, backups, säkerhet och prestanda.
WP Engine erbjuder en one-click staging-lösning med alla sina planer. Om du använder WP Engine för att servera din website, då är det så här du skulle ställa in en staging-miljö för din site.
Först måste du logga in på din WP Engine dashboard. Gå sedan till sidan “Sites” och select your website genom att clicka på den.

Detta kommer att ta dig till din website dashboard.
Nu måste du klicka på länken “Add Staging” i den vänstra colonnen eller välja den under namnet på din site högst upp.

Då kommer du till vyn “Add Environment”.
You’ll be asked to choose how you wish to proceed with your staging environment.

Här är vad vart och ett av dessa alternativ gör:
- “Starta med en ny tom site” skapar en ny tom site.
- “Start with a guided experience” skapar en new site med en guidad upplevelse och demo-content.
- “Copy an existing environment to this site” kopierar din produktions- eller utvecklingsmiljö till den här webbplatsen (t.ex. kopierar din live-webbplats till den här miljön).
- “Flytta en befintlig miljö” flyttar en miljö till den här webbplatsen (t.ex. flytta utvecklingsmiljön till Staging)
- “Starta med en WooCommerce-webbplats” skapar en new WordPress site med WooCommerce förinstallerat.
Eftersom du vill skapa en staging-kopia av vår live-webbplats måste du klicka på alternativet “Kopiera en befintlig miljö till den här webbplatsen”.

När du har valt en miljö väljer du den senaste backupen som du vill kopiera från och klickar sedan på knappen “Next” för att fortsätta.
Nu måste du ange ett namn för din staging site. Detta namn kommer att användas i URL:en för din staging site. Därefter väljer du STG (staging) som din miljötyp.

Klicka på knappen “Skapa miljö” för att fortsätta.
WP Engine kommer nu att skapa en staging site åt dig. Efter det kommer du att redirectas till din dashboard för Staging-miljön.

Därefter måste du klicka på knappen Padlock för att aktivera skydd med password för din staging site.
Efter det måste du byta till tabben “Utilities” för att kopiera användarnamn och password för din staging site.

Du kan nu klicka på knappen “WP Admin” högst upp för att logga in på din staging website.
Du kan gratis göra ändringar och prova utvalda funktioner på staging-webbplatsen precis som du skulle göra på en vanlig WordPress-webbplats som du installerar någon annanstans.

Distribuera Changed från Staging till Live website på WP Engine
Vill du slå samman ändringar som du har gjort på staging-webbplatsen till din live website?
Klicka bara på knappen “Kopiera miljö” för att påbörja distributionen.

Då kommer du till sidan med valfria alternativ. From here, you need to choose your source and destination environments for the copy.
Här väljer du din staging website som källmiljö och din produktions- eller live website som destinationsmiljö.

Du kan välja vad du vill kopiera. Instance, you can copy all database tables and files, specific files and database tables, or only the file system.
Note: Om du kopierar allt kommer du att förlora alla data som finns lagrade på din live website efter att du har använt den för att skapa en staging-miljö. Detta kan inkludera viktiga data som new posts, pages, customers och orders. Så det är en bra idé att run en backup av din live site innan du distribuerar från staging.
Därefter klickar du på knappen “Review and Confirm” för att påbörja distributionen. Det kommer att ta ett tag att kopiera allt till din live website.
Du kommer att få ett email notification när processen är completed.
Skapa en Staging Site med hjälp av tillägget WordPress
Om ditt WordPress webbhotell inte tillhandahåller en funktion för staging site kan du fortfarande skapa en staging website med hjälp av ett WordPress plugin.
Det finns vissa nackdelar med att använda denna metod.
För det första kommer ett plugin att ha begränsad control över din server på webbhotellet. Det är därför det kanske inte alltid ger de bästa resultaten.
För det andra kommer det plugin vi kommer att använda att lagra din staging site på sina egna servrar. Om du är orolig för integritet och dataskydd kanske detta inte är idealiskt för dig.
Slutligen har pluginet flera kända inkompatibiliteter. Vänligen kontrollera deras inkompatibilitets page för att se till att din website är kompatibel.
Med detta sagt, låt oss se hur man skapar en staging WordPress site med hjälp av ett WordPress plugin.
Det första du behöver göra är att installera och aktivera WP Stagecoach plugin. För mer detaljer, se vår Step-by-Step guide om hur du installerar ett plugin för WordPress.
Vid aktivering kommer pluginet att lägga till ett nytt menu-item märkt WP Stagecoach till din admin bar. Om du klickar på det kommer du till plugins page för inställningar.

Du måste enter ditt WP Stagecoach användarnamn och API key, som du kan hitta i ditt account på plugin-webbplatsen.
Efter det måste du besöka WP Stagecoach ” WP St agecoach page och välja ett namn för din staging site. Detta namn kommer också att användas som subdomain för din WordPress staging website.

Glöm inte att kontrollera boxen bredvid alternativet “Password protect the staging site”. Det kommer att skydda din staging website från offentlig view och search engines.
Klicka på knappen “Ride the Stagecoach” för att fortsätta.

Pluginet kommer nu att skapa en backup av din WordPress filer och databas för att exportera dem till din staging site.
Det kan ta en stund beroende på storleken på din website i WordPress.
När du har slutfört kommer du att se länken till din staging site och dess admin area.

You can click the link to visit your staging site and start working on it.
You’ll notice a bright orange message in the admin bar at the top indicating that you are working on your staging site.

Distribuera Staging Site till Live med hjälp av WP Stagecoach
När du är redo att importera ändringar till din live site, head över till WP Stagecoach ” Import Changes page och klicka på knappen check for changes.

Pluginet kommer nu att kontrollera om det finns ändringar på din staging site och sedan visa dig alternativ för att importera dem.
You can choose from all changes, file changes, or database changes.

Pluginet visar hur importen fortskrider och meddelar you när den är klar.
You kan nu testa din live site för att se om alla ändringar importerades utan problem.
Skapa en Staging Site för WordPress manuellt
Med den här metoden lär du dig att manuellt skapa en staging site för din install av WordPress. Den är avsedd för avancerade användare och är obligatorisk jämfört med de metoder som beskrivs ovan.
En annan nackdel med den här metoden är att your website kommer att vara tillfälligt otillgänglig när ändringar distribueras tillbaka från staging till live-servern.
Med detta sagt, låt oss se hur du manuellt skapar en staging-miljö för din WordPress site.
Först måste du skapa en subdomain för din staging website. Om du använder Bluehost, gå till dashboarden för ditt webbhotell account och växla till tabben “Advanced”.
Klicka sedan på knappen “Hantera” bredvid alternativet “cPanel”.

Detta kommer att öppna cPanel i en new tab där du måste rulla ner till “Domain” section.
Härifrån klickar du på alternativet “Domäner”.

Detta öppnar en lista över alla domäner på ditt webbhotell konto. Här måste du klicka på knappen “Create a New Domain”.
Följaktligen kommer en new page att öppnas på vyn där du måste skriva din subdomain följt av domain name under fältet ‘Domain’ gillar detta:
subdomain.example.com
Efter det klickar du bara på knappen “Submit” för att store dina settings.

Note : Vi använder Bluehost i våra exempel screenshots, så din skärm kan se annorlunda ut.
Din webbhotell control panel kommer nu att add to din subdomain, som du kan använda för att importera din live WordPress site.
Därefter måste du installera och aktivera det kostnadsfria pluginet Duplicator på din live-webbplats. Om du behöver fullständiga funktioner kan du få premiumversionen av Duplicator här.
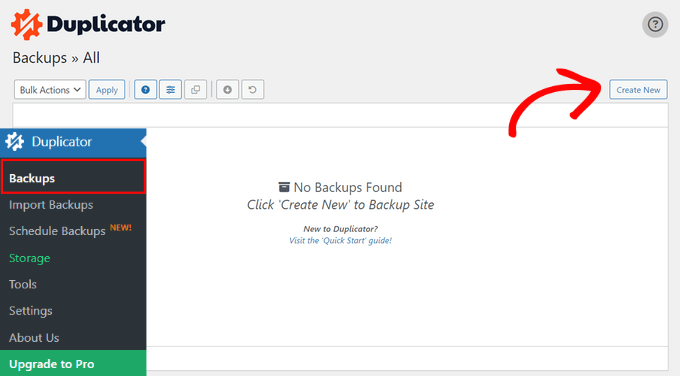
Efter aktivering måste du klicka på menyn Duplicator i din WordPress admin sidofält och klicka på knappen “Skapa ny” under Säkerhetskopior.
Därefter kan du ange ett namn för din säkerhetskopia och klicka på knappen “Next” för att fortsätta.
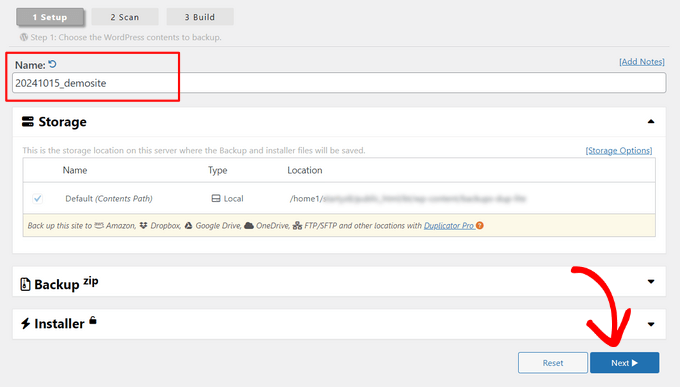
Efter det kommer Duplicator nu att köra guiden för webbplatsduplikator.
Först kommer den att runna några tester för att se om allt är i order. Om alla objekt är markerade med “Bra” klickar du på knappen “Bygg”.

Plugin kommer nu att börja skapa ett Duplicator-backuppaket för din WordPress-webbplats. Denna process kan ta några minuter beroende på storleken på din webbplats.
När du är slutförd ser du alternativ för download av Installer- och Archive-paketet. You need to click on the “Download Both Files” button to download both files on your computer.

Du måste uploada båda dessa filer till filkatalogen för den subdomain som du just har skapat. För detaljer, se vår guide om hur du använder FTP för att uploada filer till din WordPress website.
Därefter kommer din nya staging site WordPress att behöva en new database. Låt oss skapa en.
Head över till kontrollpanelen på ditt WordPress webbhotell account och växla till “Advanced” tabs.
Därefter rullar du ner till sektionen “Databases” och klickar på knappen “Manage” bredvid den.

Om du ej använder Bluehost kan din WordPress webbhotellmiljö se lite annorlunda ut. Oroa dig inte, utan leta bara efter Section Databases.
Detta tar dig till sidan “MySQL Databases” där du kan börja med att ange ett namn för din database.
Klicka sedan på knappen “Create Database” (Skapa databas).

Därefter måste du skapa en MySQL-användare för din database.
Rulla ner till MySQL Users section och ange ett användarnamn och password för din nya användare av databasen.

Nu måste du ge den här användaren behörighet att komma åt och ändra databasen som du skapade tidigare.
Rulla bara ner till “Add user to database” section och select your database och den användare you just skapat.

Därefter klickar du på knappen “Add” för att fortsätta.
You will be asked to select privileges for the user. Gå vidare och välj checkboxen “All Privileges” och klicka sedan på knappen “Make changes”.

Nu är din database redo att användas för din staging website.
Därefter måste du öppna en ny webbläsare tabs och enter subdomain av din staging site gillar detta:
https://yoursubdomain.example.com/installer.php
Glöm inte att ersätta yoursubdomain it med den faktiska subdomänen och example.com med ditt eget domain name.
Detta startar Wizard för installation av Duplicator.

Under “Setup” section kommer installatören att be you att enter your WordPress database information.
Din server kommer troligen att vara localhost. Efter det kommer du att enter details för den database som du skapade för ditt new domain name i det tidigare steget.
Klicka på knappen “Validate” för att se till att Duplicator kan ansluta till din database.

När du är klar klickar du på knappen “Next” för att fortsätta.
Duplicator kommer nu att packa upp din WordPress database och filer och importera dem till din staging site.
När den är slutförd kommer du att se ett success message.

Du kan clicka på knappen “Admin Login” för att enter WordPress admin area på din website på den new staging site.
Nu har du konfigurerat din staging site. You can protect it by adding password protection to the subdomain.
Head över till ditt webbhotell kontos dashboard och växla till fliken “Avancerat”.
Därefter rullar du ner till section “cPanel” och klickar på knappen “Hantera” bredvid den.

Detta öppnar cPanel i ett new fönster där du måste rulla ner till sectionen “Files”.
Klicka sedan på ikonen “Directory Privacy”.

Därefter måste du välja din subdomain folder och sedan välja alternativet till “password protect this directory” checkbox.
Du kommer att bli ombedd att ange ett namn för denna inställning och sedan klicka på knappen “Save”.

Din staging site kommer nu att vara dold bakom ett password, vilket håller den borta från search engines och Offentligs ögon.
You can now work on your staging site and make any changes to it.
Manuellt distribuera Staging Site till Live
När du är redo att distribuera ändringar från din staging site till live-servern följer du samma steg som beskrivs ovan.
Skapa helt enkelt ett new Duplicator-paket på din staging site och download install- och archive-filerna till din dator (se instruktionerna ovan).
Därefter måste du heada över till din live site och skapa en komplett WordPress backup (du kan använda Duplicator för att skapa en komplett backup också).
När du är klar måste du ta bort alla WordPress-filer och -folders från din live website. Detta innebär att din WordPress site kommer att vara nere ett tag.
Följ slutligen instruktionerna ovan för att runna installationsguiden för Duplicator för att importera staging site till live-servern.
Som du kan se är den sista metoden inte alls den bästa metoden. Det finns många saker under processen som kan skada din site.
Vi föreslår att du undviker den här metoden till varje pris om du inte har något annat val. Vi rekommenderar att du använder en tillförlitlig hosting provider som Bluehost, SiteGround eller WP Engine med built-in staging site funktioner.
Vi hoppas att den här artikeln hjälpte dig att lära dig hur du enkelt skapar en staging-miljö för din WordPress-webbplats. Om du runar på några issues, kontrollera vår ultimata guide till att fixa de vanligaste WordPress-felen. Du kanske också vill lära dig hur du använder WordPress Playground i din webbläsare för testning.
If you liked this article, then please subscribe to our YouTube Channel for WordPress video tutorials. You can also find us on Twitter and Facebook.
 in 2024")
")


Jiří Vaněk
I recomend WP Staging plugin. This is really awesome plugin, with all feature you need for live website and copy as staging website. I use it for this purpose all the time and I must say, it is “must have” plugin.
Dayo Olobayo
I appreciate the WP Staging recommendation. My website is quite large with a lot of media files. Have you used WP Staging with a similar setup, and if so, did you find the cloning process smooth?
Moinuddin Waheed
Staging site is a must have feature for anyone who is working for clients and .asking websites and blogs for clients.
it is really helpful as there is always requirements for some tweak at the time of development of the website.
Plugin option and the other doing manually is the only option for my client as I am using hostinger and there is not showing any staging website feature there.
Does any of the hostinger plan not have built in staging feature like that of bluehost and siteground?
WPBeginner Support
You would want to check with the hosting provider’s support for what they have currently available.
Admin
Jiří Vaněk
You can use any hosting you want, becouse for staging purpose exist awesome plugin. Look on plugin with name WP Staging. This is all you need.
Moinuddin Waheed
Thank you for the suggestion, This will be very useful as it is needed very often.
I will explore this plugin and see to it for the functionality it has at its end.
Chip Bearden
There IS a downside. I followed all the steps for BlueHost and made a number of changes to my home page. Worked perfectly on the staging site.
When I pushed it to production, my home page was a disaster. A few changes made it through but most did not. Worse, much of the content on the production site was trashed or even missing.
Panicky, I put the production site into maintenance mode to prevent users from seeing it. Then BlueHost’s tech support did a great job of moving the staging site to production for me and cleaning up a bunch of other problems that resulted. It took a long, tense 90 minutes before everything was back, mostly, to what I wanted. I just had to change some internal links and menu items that still pointed to the staging site.
Start to finish I was only down a couple of hours. The BlueHost customer support rep was wonderful but didn’t have a good explanation of what went wrong. Suffice it to say I’ll NEVER use staging again!
WPBeginner Support
Thank you for your feedback, we’ll look to make it more clear in the article but unless you sync changes like posts, they will not go to your staging site and if you overwrite your live site with your staging it won’t include your new content. For your design it would heavily depend on what you’re using on your site as that should normally include any design changes.
Admin
Audra
Is this something that can be used to test out a new theme? Can I keep my current website live and work on a new theme at the same time?
WPBeginner Support
Yes that is one of the more common reasons to use a staging site.
Admin
Jiří Vaněk
It’s one of the reasons why I use staging. When there’s a request to change the website’s design, a copy of the website is created where all the necessary adjustments are fine-tuned, and then the changes are easily transferred to the live version. It’s much more practical than copying the website to a subdomain and performing subsequent migration, which can be quite complicated.
Sharlene
HI there. Is there a way to test the speed on a staging site please?
WPBeginner Support
Our guide below gives a few options for testing the speed of your WordPress site. Depending on how your staging site is set up, there is only so much that can be tested for how helpful the speed test will be.
https://www.wpbeginner.com/beginners-guide/how-to-properly-run-a-website-speed-test-best-tools/
Admin
Carol Henrichs
Should I use the staging site just for plugin updates and such? Can I update pages and posts in staging then push to live? Otherwise I have to create a new staging site prior to every plugin/update test.
WPBeginner Support
You would want to use a staging site for major plugin and design updates for your site. Updating pages and posts is normally something you would do on your primary site and you can do minor updates safely as long as you have a backup of your site from before the update.
Admin
Kevin
Do the Staging URLs (for posts and pages) automatically change once you hit deploy? I am worried that I am going to have a ton of 404 errors and ruin my SEO.
WPBeginner Support
Unless we hear otherwise, the URLs should update so they are not 404s.
Admin
Philippe
I want to create a sandbox, I’m using WordPress on Bluehost, however I don’t have the Bluehost entries on my wordpress admin menu, and I can find no sandbox wizard directly on the Bluehost site. Where do I go from here?
WPBeginner Support
You may have removed the plugin that added that, if you reach out to your host they should be able to assist.
Admin
Jana Boswell
This worked like magic. I seriously could not live without wp beginner. My hosting service does not have a staging option, so I followed the instructions for manual set-up, no problems, everything went smoothly! Thanks for the great instructions!
WPBeginner Support
Glad our guide was able to help
Admin
Desmond Sim
after creating the staging site…how do you sync data between the staging and test site….the test site is used for updates and checking…whereas….the live site has new inputs from its users….
Is there a plugin you can recommend syncing databases when each database has two different pieces of new info,
WPBeginner Support
We do not have a recommendation for that at the moment as it is very difficult for a tool to know what specifically to sync or not.
Admin
Brandon
How does a person just delete a staging site? I believe I backed up the staging site with updraftplus, but if I back up the staging site with updraftplus, does it also back up the regular website too or vice versa?
WPBeginner Support
If you used a hosting provider’s method to create it then you would want to check with the host to see if there is a built-in method first, otherwise, you can follow step 2 in our guide below:
https://www.wpbeginner.com/wp-tutorials/how-to-permanently-delete-a-wordpress-site-from-internet/
You would only be backing up your staging unless you’ve also set up your backup service for your primary site.
Admin
S
so this manual staging does not work?
so how do users target ‘installer.php’ if the subdom URL is ‘staging.blahwebsite.com’, then.
WPBeginner Support
The method should still work, you would target the installer in the staging site’s subdomain. If you are having trouble with setting up or targeting the subdomain you may want to reach out to your hosting provider for their assistance.
Admin
Brandon
I used the manual method to set up a staging site for testing out updating plugins before they break something. Well, something broke in the staging site. How do I go back to the original configuration of the staging site?
WPBeginner Support
If you did not create a backup for the staging site then you would delete the staging site and recreate it as one option.
Admin
Ben
Looks like there’s a chunk missing for the manual staging site creation. No upload of files for Duplicator.
WPBeginner Support
Thank you for sharing that, we will look into updating the article when we are able
Admin
Ankur
I use bluehost hosting and they say they don’t recommend the beta version. So, the local host is the best option for me. Isn’t it?
WPBeginner Support
If they do not recommend beta for your site, you can use local as an alternative.
Admin
Jay
If I have new blog posts on the original production site, what will happen I push the staging site to the production site later in the future?
WPBeginner Support
The new content would be removed, we would recommend importing all new content to the staging site before overwriting the live site.
Admin
KIZITO
Hello friend.
Just today, I mistakenly activated the staging mode (I’m a newbie tho) and there wasn’t any more option.
Later I came on, I couldn’t login to my wordpress. It returns an error message that I can’t login to a site that’s on staging mode.
I contacted bluehost, that did all they can, yet my site still says it’s on staging mode and I can’t login my wordpress.
What do I do please?
WPBeginner Support
It sounds like you’re using a plugin to have that page appear when viewing your site, you would want to disable the plugin using the method in our guide below:
https://www.wpbeginner.com/plugins/how-to-deactivate-all-plugins-when-not-able-to-access-wp-admin/
Admin
Alice
Hi,
Thanks for this. I have WP engine and my WordPress theme got d-registered because I am using it on the stage environment and dev.
What’s the workaround that?
thank you
WPBeginner Support
You would need to reach out to your specific theme’s support for their workaround for this situation
Admin
Jim Jones
Hi I made changes in my WP Production site but not in the staging area. I want to reset my staging area to look like my Production site, or failing that delete my Staging area and start again. How can i do this?
WPBeginner Support
It would depend on the method you used but if you made changes to the live site’s design then the simplest method would be to remove the current staging site and create it again.
Admin
Jeff
Great article. I really learned a lot.
I have a question, please, about the manual method:
Is it required to password protect the directory of the subdomain in cPanel, since the admin access to the website is already protected by a password?
Thank you very much.
WPBeginner Support
While not required, it helps prevent your users from trying to access the staging site
Admin
Mujeeb
In that staging site
I want to give someone details to do something on my staging site, but I don’t want him to know my live site password, but is the Same thing with my live site. How can I do that
WPBeginner Support
You would create a new user for them on your staging site for what it sounds like you want to do and you can remove that staging user later.
Admin
Beulah Wellington
If I download WAMP on my computer and use the localhost, couldn’t install the UpdraftPlus plugin and let that be my staging site? Isn’t this another alternative?
WPBeginner Support
Rather than UpdraftPlus, we would recommend taking a look at our guide here for using local for staging: https://www.wpbeginner.com/wp-tutorials/how-to-move-wordpress-from-local-server-to-live-site/
Admin
Jan Stetson
I’m trying to set up a staging environment on my WordPress site hosted by Bluehost. I’m stopped at step one! when I go to the WordPress admin area, I don’t see bluehost at the top of the page. The topmost option in the nav menu on the left is “Dashboard”. No sign of “Staging” anywhere. Help?
WPBeginner Support
You likely removed the BlueHost plugin, if you reach out to BlueHost’s support they should be able to let you know their current methods available
Admin
Shashank Sachan
Hello
I tried but did not succeed. Getting error ” this site can’t be reached”.
I am on Godaddy and using Cloudflare. And I have not created a separate FTP account.
WPBeginner Support
To start troubleshooting that you could try the steps in our article here: https://www.wpbeginner.com/wp-tutorials/how-to-fix-the-403-forbidden-error-in-wordpress/
or reach out to your hosting provider for them to take a look.
Admin
simona
thank you for the article. one question: If I update WordPress ONLY on the staging site, will it affect also my live-site?
thank you for your answer. regards, s.
WPBeginner Support
No, if you update one site it should not affect the other.
Admin
oshibiko
Thank you for this article.
Do you know of a way to test membership (loginlogoff ) functionality without going live on the actual site. In the staging environment or developing. TIA
WPBeginner Support
You would likely need to create a test user for you to log in with to test that.
Admin
Mark E
Great article, with one step missing for the manual instructions.
After downloading the duplicator files to your computer, you then have to upload the installer file and archive file to your newly created subdomain directory.
Otherwise when you try to run the installer you get a 404 page.
Otherwise great guide!
Thanks….
WPBeginner Support
Thank you for pointing that out
Admin
Charlene Marsh
No option to try the staging feature on Bluehost yet. Message says “Please contact support to find out how to enable staging.” I was just on the phone with Bluehost about another issue and the rep I was speaking with never heard of this new feature.
WPBeginner Support
It would depend on what rep you were talking to as it is a new feature so not all reps may be knowledgeable yet
Admin
Matt Stephen
To be able to use the staging feature provided by Bluehost, you must install and activate the Blushost plugin.
Sean
Thank you for this great info, as always. Now is this something I could use to play around with a new page builder? I want to test out Thrive Architect but want to do so without messing anything up. Or, suppose I wanted to play around with a new theme. These may be 2 different questions.
WPBeginner Support
You could certainly test those changes with a staging environment without having to worry about what people see on the site.
Admin
Vanessa
Thanks for the info. I currently use Bluehost but don’t have the staging site option I would love to test it out for a new theme I’d like to try before purchasing it. I contacted BH tech support the rep told me the feature is in development. Thanks again for the info.
WPBeginner Support
Glad we could bring this feature to your attention even if it is currently being developed
Admin
Vanessa
I was able to access the feature today. I’m excited to use it. Thanks again for the info. I’m excited to try out the staging feature.
Ani Chijioke
this is a great information, I have two websites, but I don’t feel like having both look the same.
pls, I need help.
is there any code I can add on >dashboard >customize >additional css,,, for the font color of my site to be pure black in color..
I have this theme that I am using, it gives me everything I want. but the font color of my blog posts are light black. I will like to change the color to pure black
any solution?
thank you.
WPBeginner Support
For finding the CSS you need to change, you would want to take a look at our article on how to use inspect element here: https://www.wpbeginner.com/wp-tutorials/basics-of-inspect-element-with-your-wordpress-site/
Admin
alykhan
Great article but the push back to live is a little brief. I have a WooCommerce site that needs a theme change. I used Duplicator Pro to make a copy on a staging server. I’ve made all the changes to the site including adding a couple of new plugins.
Now I want to push the site back but I can’t do the same thing as there are new orders on the live site. How do I copy the site back without affecting the orders etc..?
WPBeginner Support
Sadly, the safest method for that would be to prevent orders while updating from staging.
Admin
Jennifer Verdin
I haven’t read the comments yet, but I’ve been at this all day. The reason why is because this page does not tell you how to create a database user and assign privileges to the said user.
Thankfully, I was able to figure it out, but that’s a KEY step that is missing to connect the site and database.
WPBeginner Support
Apologies about the confusion, we will certainly look into clarifying that. If you reach out to your hosting provider they normally have a user already created.
Admin
Max
Hi guys,
Thanks for your awesome post. I like the idea that the provider has the staging, productive and a test environment out of box.
But I have two questions:
1. Can write a little bit how it works by your suggested providers?
2. Have you also providers which are located in the EU or better in Germany? And offer staging environment out of box?
Kind regard
Chris
Thank you so much for this information! And if anyone’s wondering, yes, it’s still relevant 4.5 years later.
Jess
Hi there
I am in the process of setting up a new WordPress site but I was planning to start building everything in my staging environment because I would like my live site to have a “under construction” landing page.
What I am not sure of is how to push my changes from the staging site to my live site when I am ready. Would you mind describing this process please?
Thank you
Jess
Johnny
If it’s simply a matter of wanting a “Under Construction” page while keeping the rest of the sight off limits to the public, there are plugins that will do that. Search “under construction.”
Russell
How does this process compare to using a plugin like wp-staging.
Fernando Lisboa
Hi, my question is, i created a staging environment, work there make some updates on structure of pages, layouts, new categories, new pluig-in.
Ok, but in real live, my site is growing with new posts, comments, images, videos, etc…
When i push stage back to life, i will lost thes new itens that were create in real live ??? I test this in sitegroud, and i loose ever with advanved “push to live”
tks
WPBeginner Support
Hi Fernando,
The solution described above only syncs your website files not the database.
Admin
Ravindra
Hi,
Thank you very much. This article was very helpful.
Chris
Hi, thanks for such a useful article,
I’m having a small issue when I give it a go,
I have got as far down as
“Once WordPress has connected to your staging database, it should detect that WordPress has been installed, and prompt you to login” and I am stuck – it autoredirected to the wp-login and gave me a blank page. Not a 404, just a clean white screen.
On the main page the login has been renamed so I try to navigate to that instead and again just a clean white screen.
Can anyone give me any pointers on where I’m going wrong?
WPBeginner Support
Please see our guide on how to fix white screen of death in WordPress.
Admin
Smitha
Hi,
Thanks for this article!
I followed all the steps but I think I have missed one
I created a staging environment and checked site url in wp-options and updated wp-config file but the staging site is being redirected to the primary site.
Do I need to change any other setting?
Ruth
Hi! Thanks for the useful article!
Question, is it necessary to create a new database for your subdomain? Can’t you just use your root domain’s database?
Same for the FTP account, is it necessary to create a new one? I can now access my subdomain easily through my main FTP.
Thanks!
Best,
Ruth
WPBeginner Support
Hi Ruth,
Yes, it is necessary to create a separate database and a separate FTP account.
Admin
Courtney
Hello!
Perhaps this was already covered. Do I need a child theme on my sub-domain serving as my staging site? I am adding custom code and modifications to the new theme on my subdomain with the intention of switching all of this over to the live site when finally ready. Would this complicate things when switching from the staging site to replacing what is currently the live site?
Thank You!
Lee Perry
Hi, this article is super helpful. I have encountered one problem though, when I go to visit my staging URL, I have the following message appear ‘server DNS address could not be found’. I have also cleared my cache and browser history as someone wrote this might help, but it hasn’t worked. I’m wondering what I am doing wrong. Any help would be great.
Lee
Georgia
I’m having the same problem – did you manage to resolve this issue?
Thanks, Georgia
Adrien
While I appreciate the detailed instructions (I don’t like installing plugins to accomplish such tasks), I don’t see any advice concerning keeping the staging and live sites in sync. WordPress sites are generally edited live with respect to content—posts, products, media, etc. Once you follow these directions, the two content sets will diverge as users add content to the live site while the developer’s staging version remains an old copy. I don’t see a good solution for this save a cron rsync job. Any tips?
Jason
After you create the staging subdomain and ftp account.
Skip all the other copying and database junk.
Install duplicator on your live site. Make a duplicate backup, which includes a zipped copy and an install. Php file.
Upload both to your staging area. (Maybe go in and create a database and user for the staging site in cpanel while you wait for the two fingers to upload)
Point your browser to staging.domain.com/install.php and follow the prompts.
Then go back to the rest of this tutorial for locking it down.
Gus Reyes
Hi, I followed another tutorial before I found this one and I installed WordPress BEFORE copying files over and running the SQL queries. My staging site does not populate with live site’s data. Any help you can offer about what to do at this point would be appreciated…
Martin
The staging site does not look exactly like my primary site. The default banner is there instead of my uploaded media (even though that file has transfered) and rather than a nav bar with drop down menus, I have a list of all of my site’s webpages. Is this normal? If not, could you point me where to sort it out?
Thanks for this article!
BLZ
I keep getting this error when I try to run SQL queries ” #2013 – Lost connection to MySQL server during query”
Stefan
Thank you for the great tutorial! I followed it thourgh and created a staging site. However, the staging site seems to be missing some settings from the original site (where I am working with a template), e.g. the font is different, the menu and logo is missing and some other settings are just off. Are there additional files I need to copy?
Thanks a lot!