Kämpar du med att organisera olika typer av innehåll på din WordPress-webbplats?
Om du försöker använda vanliga blogginlägg för allt – produktlistningar, vittnesmål, portföljobjekt – har du förmodligen märkt hur snabbt saker och ting blir en förvirrande röra. 🤦
Vi förstår helt hur frustrerande det kan vara. Lyckligtvis finns det ett enkelt sätt att skapa ordning i kaoset: anpassade inläggstyper.
Anpassade inläggstyper låter dig skapa dedikerade sektioner för allt ditt innehåll. Det betyder att produkter, vittnesmål eller portföljer var och en kan ha sin egen layout och struktur, helt separat från dina vanliga blogginlägg och sidor.
I den här guiden visar vi dig två olika metoder för att skapa anpassade inläggstyper. På så sätt kan du välja den som passar din bekvämlighetsnivå och få ditt innehåll snyggt organiserat idag.

Vad är en anpassad inläggstyp i WordPress?
En anpassad inläggstyp är en innehållstyp du kan skapa i WordPress som skiljer sig från vanliga inlägg och sidor. Den låter dig organisera och visa unika typer av innehåll, som portföljer, produkter eller filmrecensioner, på ett mer strukturerat sätt.
Tänk på det som att ha organiserade arkivskåp för olika typer av innehåll istället för att slänga allt i en enda låda!
Innan vi går djupare in på det, använder WordPress inläggstyper för att skilja olika innehåll åt. Medan "inlägg" och "sida" är de vanligaste typerna, inkluderar WordPress faktiskt några andra som standard:
- Inlägg – för blogginlägg
- Sida – för statiskt innehåll som en Om-sida
- Bilaga – för mediefiler
- Revidering – för innehållsutkast och redigeringar
- Navigering – för menyalternativ
Anpassade inläggstyper låter dig skapa dedikerade sektioner på din WordPress-webbplats för specifika typer av innehåll.
Låt oss säga att du driver en webbplats för filmrecensioner. Då vill du förmodligen skapa en inläggstyp för ‘filmrecensioner’. På en portföljwebbplats kanske du skapar en inläggstyp för Projekt. Medan en eCommerce-webbplats skulle gynnas av en inläggstyp för Produkter.
📝 Insideranteckning: På WPBeginner använder vi faktiskt anpassade inläggstyper också. Vi använder det för våra erbjudanden och ordlistor för att hålla dem separerade från våra bloggartiklar.
Sedan kan varje anpassad inläggstyp ha sin egen layout, anpassade fält, och till och med sin egen anpassade kategorier eller taggstrukturer. Detta gör din webbplats mer organiserad och användarvänlig!
Dessutom använder många populära WordPress-plugins anpassade inläggstyper för att lagra data på din WordPress-webbplats. Följande är några topp-plugins som använder anpassade inläggstyper:
- WooCommerce lägger till en 'produkt'-posttyp till din webbutik
- WPForms skapar en 'wpforms'-inläggstyp för att lagra alla dina formulär
- MemberPress lägger till en anpassad inläggstyp 'memberpressproduct'
Behöver jag skapa anpassade inläggstyper?
Innan du börjar skapa anpassade inläggstyper på din WordPress-webbplats är det viktigt att utvärdera dina behov. Ofta kan du uppnå samma resultat med ett vanligt inlägg eller en sida.
Om du är osäker på om din webbplats behöver anpassade inläggstyper, se vår guide om när du behöver en anpassad inläggstyp eller taxonomi i WordPress.
Med det i åtanke, låt oss titta på hur man enkelt skapar anpassade inläggstyper i WordPress för eget bruk. Vi visar dig två metoder och täcker även några sätt att visa anpassade inläggstyper på din WordPress-webbplats:
- Metod 1: Skapa en anpassad inläggstyp manuellt med WPCode (mer flexibel)
- Metod 2: Skapa en anpassad inläggstyp med ett plugin (ingen kodning krävs)
- Bonustips: Visa anpassade inläggstyper på din webbplats
- Vanliga frågor (FAQ): Anpassade inläggstyper i WordPress
- Videoguide – Så här skapar du egna inläggstyper i WordPress
- Fler guider om WordPress inläggs- och sidhantering
Redo? Låt oss börja.
Metod 1: Skapa en anpassad inläggstyp manuellt med WPCode
Att skapa en anpassad inläggstyp kräver att du lägger till kod i ditt temas functions.php-fil. Vi rekommenderar dock inte detta till någon annan än avancerade användare eftersom även en liten miss kan förstöra din webbplats. Dessutom, om du uppdaterar ditt tema, kommer koden att raderas.
Istället kommer vi att använda WPCode, det bästa pluginet för att lägga till anpassad kod på din WordPress-webbplats.
Med WPCode kan du lägga till anpassade kodavsnitt och aktivera många funktioner från dess inbyggda, förkonfigurerade kodbibliotek. Med andra ord kan det ersätta många dedikerade eller engångspluginer du kan ha installerat.
Utforska alla funktioner vi har testat i vår detaljerade WPCode-recension.
Först måste du installera och aktivera det kostnadsfria WPCode-pluginet. För detaljerade instruktioner, se vår steg-för-steg-guide om hur man installerar ett WordPress-plugin.
📝 Notera: Den kostnadsfria versionen av WPCode fungerar bra för den här handledningen. Att uppgradera till WPCode Pro låser dock upp avancerade funktioner som anpassad kodschemaläggning och fullständig revisionshistorik.
När den har aktiverats, navigera till Kodavsnitt » Lägg till avsnitt från din WordPress-instrumentpanel.
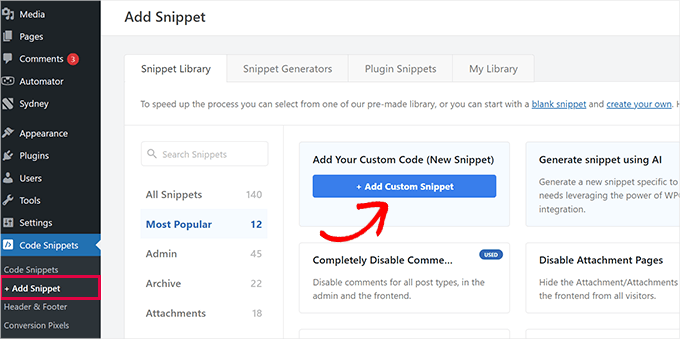
Håll sedan muspekaren över 'Lägg till din anpassade kod (nytt snippet)' och klicka sedan på '+ Lägg till anpassat snippet'.
I popup-fönstret som visas, välj 'PHP Snippet' som kodtyp från listan med alternativ.
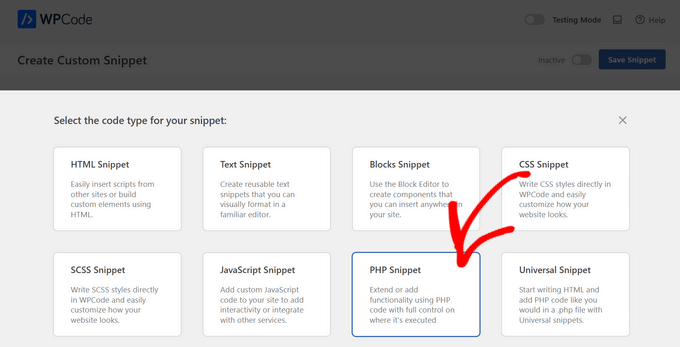
Detta öppnar sidan 'Skapa anpassat utdrag'.
Nu kan du lägga till en titel för kodsnutten, som kan vara vad som helst för att hjälpa dig att komma ihåg vad koden är till för.
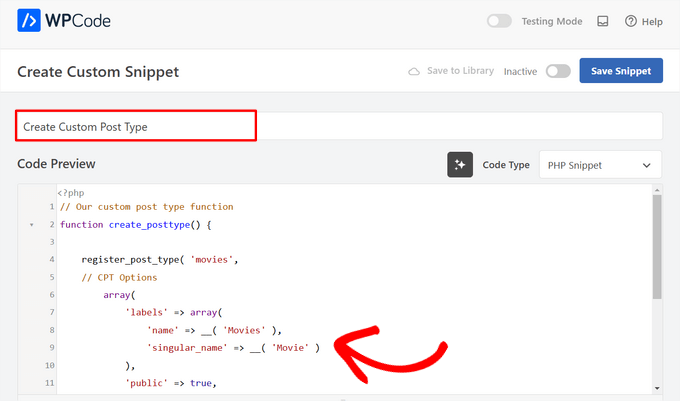
Klistra sedan helt enkelt in följande kod i området 'Kodförhandsgranskning'.
Den här koden skapar en grundläggande anpassad inläggstyp som heter 'Filmer' som kommer att visas i din admin-sidomeny och fungera med vilket WordPress-tema som helst.
// Our custom post type function
function create_posttype() {

    register_post_type( 'movies',
    // CPT Options
        array(
            'labels' => array(
                'name' => __( 'Movies' ),
                'singular_name' => __( 'Movie' )
            ),
            'public' => true,
            'has_archive' => true,
            'rewrite' => array('slug' => 'movies'),
            'show_in_rest' => true,

        )
    );
}
// Hooking up our function to theme setup
add_action( 'init', 'create_posttype' );
Om du bara vill ha en grundläggande anpassad inläggstyp, ersätt bara movies och Movies med din egen CPT-slug och namn och klicka på knappen 'Uppdatera'.
Men om du vill ha ännu fler alternativ för din anpassade inläggstyp bör du använda följande kod istället för den ovanstående.
Koden nedan lägger till många fler alternativ till den anpassade posttypen ‘Movies’, såsom stöd för revisioner, utvalda bilder och anpassade fält, samt att associera den anpassade posttypen med en anpassad taxonomi kallad ‘genres.’
☝ Viktigt: Kombinera inte dessa två kodavsnitt, annars kommer WordPress att ge dig ett fel eftersom båda kodavsnitten registrerar samma anpassade inläggstyp. Vi rekommenderar att du skapar ett helt nytt kodavsnitt med WPCode för varje ytterligare inläggstyp du vill registrera.
/*
* Creating a function to create our CPT
*/

function custom_post_type() {

// Set UI labels for Custom Post Type
    $labels = array(
        'name'                => _x( 'Movies', 'Post Type General Name', 'twentytwentyone' ),
        'singular_name'       => _x( 'Movie', 'Post Type Singular Name', 'twentytwentyone' ),
        'menu_name'           => __( 'Movies', 'twentytwentyone' ),
        'parent_item_colon'   => __( 'Parent Movie', 'twentytwentyone' ),
        'all_items'           => __( 'All Movies', 'twentytwentyone' ),
        'view_item'           => __( 'View Movie', 'twentytwentyone' ),
        'add_new_item'        => __( 'Add New Movie', 'twentytwentyone' ),
        'add_new'             => __( 'Add New', 'twentytwentyone' ),
        'edit_item'           => __( 'Edit Movie', 'twentytwentyone' ),
        'update_item'         => __( 'Update Movie', 'twentytwentyone' ),
        'search_items'        => __( 'Search Movie', 'twentytwentyone' ),
        'not_found'           => __( 'Not Found', 'twentytwentyone' ),
        'not_found_in_trash'  => __( 'Not found in Trash', 'twentytwentyone' ),
    );

// Set other options for Custom Post Type

    $args = array(
        'label'               => __( 'movies', 'twentytwentyone' ),
        'description'         => __( 'Movie news and reviews', 'twentytwentyone' ),
        'labels'              => $labels,
        // Features this CPT supports in Post Editor
        'supports'            => array( 'title', 'editor', 'excerpt', 'author', 'thumbnail', 'comments', 'revisions', 'custom-fields', ),
        // You can associate this CPT with a taxonomy or custom taxonomy.
        'taxonomies'          => array( 'genres' ),
        /* A hierarchical CPT is like Pages and can have
        * Parent and child items. A non-hierarchical CPT
        * is like Posts.
        */
        'hierarchical'        => false,
        'public'              => true,
        'show_ui'             => true,
        'show_in_menu'        => true,
        'show_in_nav_menus'   => true,
        'show_in_admin_bar'   => true,
        'menu_position'       => 5,
        'can_export'          => true,
        'has_archive'         => true,
        'exclude_from_search' => false,
        'publicly_queryable'  => true,
        'capability_type'     => 'post',
        'show_in_rest' => true,

    );

    // Registering your Custom Post Type
    register_post_type( 'movies', $args );

}

/* Hook into the 'init' action so that the function
* Containing our post type registration is not
* unnecessarily executed.
*/

add_action( 'init', 'custom_post_type', 0 );
Du kanske märker delen där vi har satt det hierarkiska värdet till false. Om du vill att din anpassade inläggstyp ska bete sig som sidor snarare än inlägg, kan du sätta detta värde till true.
En annan sak att notera är den upprepade användningen av strängen twentytwentyone, detta kallas 'Text Domain'. Om ditt tema är redo för översättning och du vill att dina anpassade inläggstyper ska kunna översättas, då måste du ange textdomänen som används av ditt tema.
Du kan hitta ditt temas textdomän inuti filen style.css i din temakatalog eller genom att gå till Utseende » Temaredigerare i din adminpanel. Textdomänen kommer att nämnas i filens header.
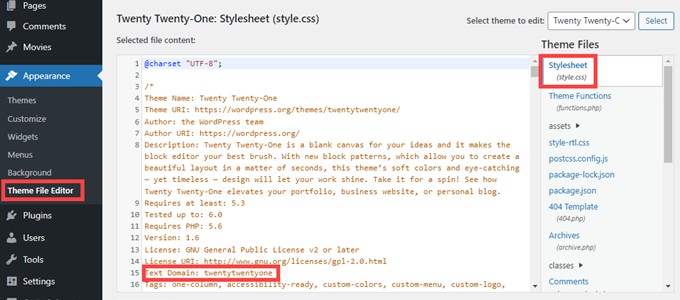
Ersätt helt enkelt twentytwentyone med ditt eget temas ‘Text Domain.’
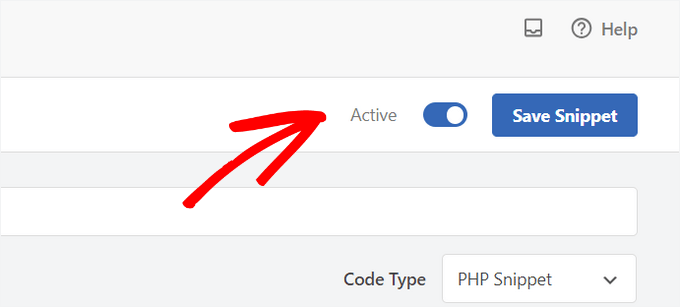
När du är nöjd med ändringarna, byt helt enkelt reglaget från ‘Inaktiv’ till ‘Aktiv’ högst upp på sidan.
Slutligen, klicka på knappen ‘Spara kodsnutt’, så sköter WPCode resten.
Metod 2: Skapa en anpassad inläggstyp med ett plugin
Ett annat enkelt sätt att skapa en anpassad inläggstyp i WordPress är att använda ett plugin. Denna metod rekommenderas för nybörjare eftersom den är säker och superenkel.
Det första du behöver göra är att installera och aktivera pluginet Custom Post Type UI. För mer detaljer, se vår steg-för-steg-guide om hur man installerar ett WordPress-plugin.
Efter aktivering måste du gå till CPT UI » Lägg till / Redigera inläggstyper för att skapa en ny anpassad inläggstyp. Du bör vara på fliken ‘Lägg till ny inläggstyp’.
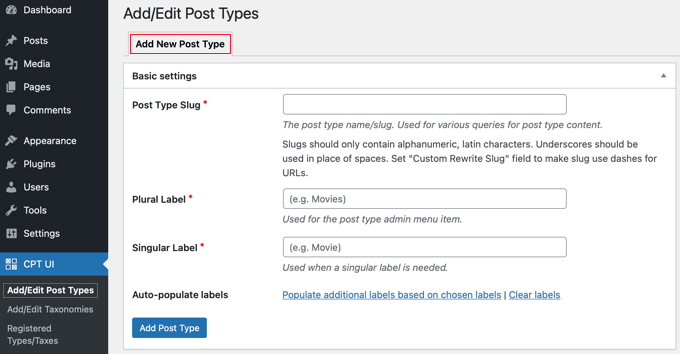
I det här området måste du ange en slug för din anpassade inläggstyp, till exempel 'filmer'. Denna slug kommer att användas i URL:en och i WordPress-frågor, så den kan bara innehålla bokstäver och siffror.
Under fältet för slug behöver du ange plural- och singularnamnen för din anpassade inläggstyp.
Om du vill kan du klicka på länken som säger, ‘Fyll i ytterligare etiketter baserat på valda etiketter.’ Detta fyller automatiskt i de ytterligare etikettfälten nedan och sparar dig vanligtvis tid.
Du kan nu skrolla ner till avsnittet 'Ytterligare etiketter'. Om du inte klickade på länken vi nämnde, måste du ange en beskrivning för din inläggstyp och ändra etiketter.
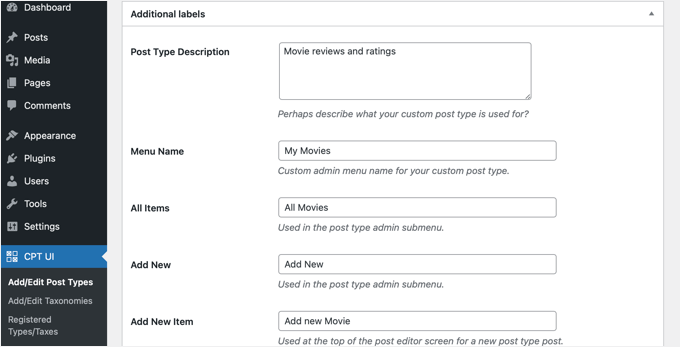
Dessa etiketter kommer att användas i hela WordPress användargränssnitt när du hanterar innehåll i den specifika inläggstypen.
Därefter kommer inställningarna för inläggstypen.
Härifrån kan du ställa in olika attribut för din inläggstyp. Varje alternativ kommer med en kort beskrivning som förklarar vad det gör.
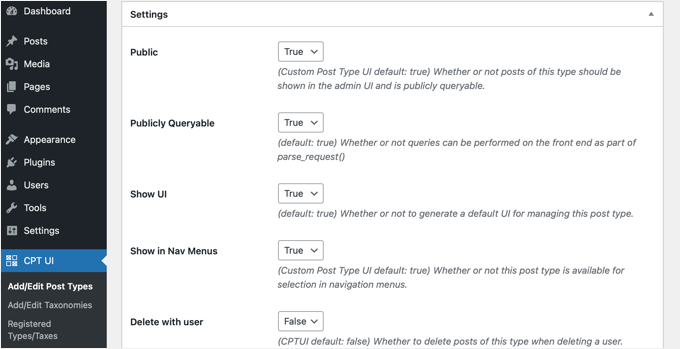
Du kan till exempel välja att inte göra en inläggstyp hierarkisk som sidor eller sortera kronologiska inlägg i omvänd ordning.
Under de allmänna inställningarna ser du alternativet att välja vilka redigeringsfunktioner den här inläggstypen ska stödja. Markera helt enkelt de alternativ du vill inkludera.
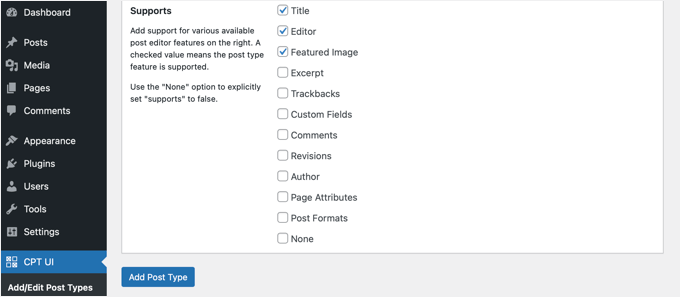
Slutligen, klicka på knappen 'Lägg till inläggstyp' för att spara och skapa din anpassade inläggstyp.
Det var allt, du har nu skapat din anpassade inläggstyp! Du kan nu fortsätta och börja lägga till innehåll.
Bonustips: Visa anpassade inläggstyper på din webbplats
WordPress levereras med inbyggt stöd för att visa dina anpassade inläggstyper. När du har lagt till några objekt i din nya anpassade inläggstyp är det dags att visa dem på din webbplats.
Det finns ett par metoder du kan använda, och var och en har sina egna fördelar.
Visa anpassade inläggstyper med standardarkivmallen
Först kan du helt enkelt gå till Utseende » Menyer och lägga till en anpassad länk i din meny. Denna anpassade länk är länken till din anpassade posttyp.
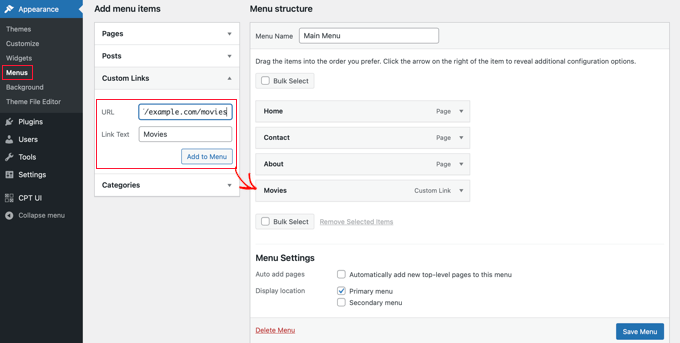
Om du använder SEO-vänliga permalänkar, kommer din anpassade inläggstypens URL troligen att se ut ungefär så här:
http://example.com/movies
Om du inte använder SEO-vänliga permalänkar, då kommer din URL för anpassad inläggstyp att se ut ungefär så här:
http://example.com/?post_type=movies
Glöm inte att ersätta 'example.com' med din egen domän och 'movies' med namnet på din anpassade inläggstyp.
Du kan sedan spara din meny och besöka webbplatsens frontend. Du kommer att se det nya menyalternativet du lade till, och när du klickar på det kommer det att visa arkivsidan för din anpassade inläggstyp med hjälp av mallfilen archive.php i ditt tema. mallfil

Skapa mallar för anpassade inläggstyper
Om du inte gillar utseendet på arkivsidan för din anpassade posttyp, kan du använda en dedikerad mall för arkiv för anpassade posttyper.
Allt du behöver göra är att skapa en ny fil i din temakatalog och namnge den archive-movies.php. Se till att du ersätter 'movies' med namnet på din anpassade inläggstyp.
För att komma igång kan du kopiera innehållet i ditt temas archive.php-fil till mallen archive-movies.php och sedan modifiera den för att uppfylla dina behov.
Nu, när arkivsidan för din anpassade inläggstyp nås, kommer den här mallen att användas för att visa den.
På samma sätt kan du skapa en anpassad mall för enskild visning av din inläggstyp. För att göra det behöver du skapa single-movies.php i din temakatalog. Glöm inte att ersätta 'movies' med namnet på din anpassade inläggstyp.
Du kan komma igång genom att kopiera innehållet i ditt temas single.php-mall till single-movies.php-mallen och sedan modifiera den för att uppfylla dina behov.
För att lära dig mer, se vår guide om hur man skapar anpassade mallar för enskilda inlägg i WordPress.
Visa anpassade inläggstyper på startsidan
En fördel med att använda anpassade inläggstyper är att de håller dina anpassade innehållstyper separerade från dina vanliga inlägg. Du kan dock visa anpassade inläggstyper på din webbplats förstasida om du vill.
Lägg helt enkelt till denna kod som ett nytt avsnitt med hjälp av gratis WPCode-plugin.
Se avsnittet i den här artikeln om att manuellt lägga till kod för detaljerade instruktioner.
add_action( 'pre_get_posts', 'add_my_post_types_to_query' );

function add_my_post_types_to_query( $query ) {
    if ( is_home() && $query->is_main_query() )
        $query->set( 'post_type', array( 'post', 'movies' ) );
    return $query;
}
Glöm inte att ersätta 'movies' med din anpassade inläggstyp.
Fråga efter anpassade inläggstyper
Om du är bekant med kodning och vill köra loop-frågor i dina mallar, så här gör du det. Genom att fråga databasen kan du hämta objekt från en anpassad inläggstyp.
Du måste kopiera följande kodavsnitt till mallen där du vill visa den anpassade inläggstypen.
<?php
$args = array( 'post_type' => 'movies', 'posts_per_page' => 10 );
$the_query = new WP_Query( $args );
?>
<?php if ( $the_query->have_posts() ) : ?>
<?php while ( $the_query->have_posts() ) : $the_query->the_post(); ?>
<h2><?php the_title(); ?></h2>
<div class="entry-content">
<?php the_content(); ?>
</div>
<?php endwhile;
wp_reset_postdata(); ?>
<?php else:  ?>
<p><?php _e( 'Sorry, no posts matched your criteria.' ); ?></p>
<?php endif; ?>
Den här koden definierar inläggstypen och antalet inlägg per sida i argumenten för vår nya WP_Query-klass. Den kör sedan frågan, hämtar inläggen och visar dem inom loopen.
Visa anpassade inläggstyper i widgets
Du kommer att märka att WordPress har en standardwidget för att visa de senaste inläggen, men den tillåter dig inte att välja en anpassad inläggstyp.
Tänk om du ville visa de senaste inläggen från din nyinrättade inläggstyp i en widget? Lyckligtvis finns det ett enkelt sätt att göra detta.
Det första du behöver göra är att installera och aktivera pluginet Custom Post Type Widgets. För mer information, se vår steg-för-steg-guide om hur man installerar en WordPress-plugin.
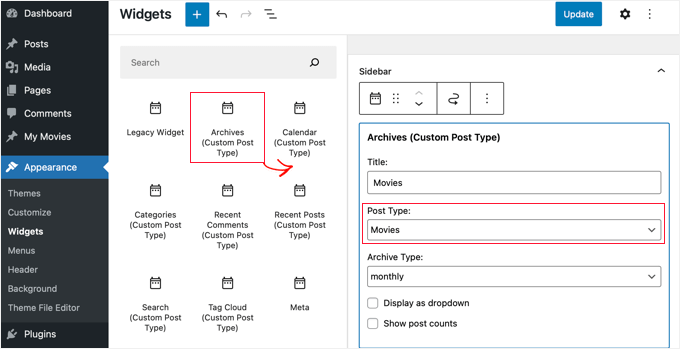
Efter aktivering, gå helt enkelt till Utseende » Widgets och dra och släpp widgeten 'Senaste inlägg (anpassad inläggstyp)' till en sidofält.
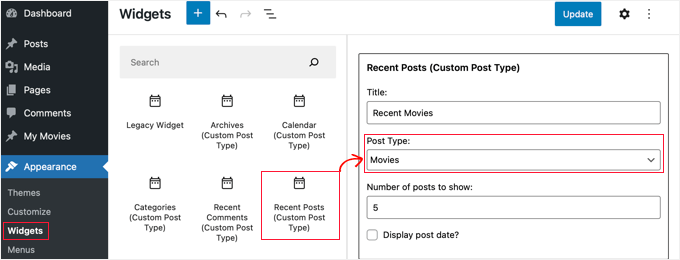
Den här widgeten låter dig visa de senaste inläggen från vilken inläggstyp som helst. Du måste välja din anpassade inläggstyp från rullgardinsmenyn 'Inläggstyp' och välja de alternativ du vill ha.
Klicka sedan på knappen 'Uppdatera' högst upp på skärmen och besök sedan din webbplats för att se widgeten i aktion.

Pluginet tillhandahåller också anpassade inläggstyp-widgets som visar arkiv, en kalender, kategorier, senaste kommentarer, sökning och en taggmoln.
Så utforska gärna och välj den du behöver.
Vanliga frågor (FAQ): Anpassade inläggstyper i WordPress
Här är några av de vanligaste frågorna vi får om att skapa anpassade inläggstyper i WordPress.
Vad är skillnaden mellan en anpassad inläggstyp och en kategori?
En anpassad inläggstyp är för att skapa en helt ny typ av innehåll, medan en kategori är för att gruppera befintligt innehåll. Till exempel skulle 'Bokrecensioner' vara en anpassad inläggstyp. 'Skönlitteratur' och 'Facklitteratur' skulle vara kategorier för att organisera dessa bokrecensioner.
Kommer borttagning av en anpassad inläggstyp också att ta bort allt dess innehåll?
Nej, innehållet raderas inte från din databas, men det blir dolt och otillgängligt. För att göra inläggen synliga igen, skulle du behöva registrera den anpassade inläggstypen igen med exakt samma namn.
Vi rekommenderar alltid att göra en fullständig WordPress-säkerhetskopia innan du tar bort inläggstyper.
Hur lägger jag till anpassade fält till min anpassade inläggstyp?
Du kan enkelt lägga till anpassade fält för att lägga till mer strukturerad information till dina inläggstyper, som att lägga till ett fält för ‘Regissör’ till en inläggstyp för ‘Filmer’. Du kan göra detta med kod eller använda ett populärt plugin som Advanced Custom Fields (ACF) för ett användarvänligt gränssnitt.
Videoguide – Så här skapar du egna inläggstyper i WordPress
Innan du går, se till att kolla in vår videoguide om hur du skapar anpassade inläggstyper i WordPress.
Fler guider om WordPress inläggs- och sidhantering
Vi hoppas att den här handledningen hjälpte dig att lära dig hur du skapar anpassade inläggstyper i WordPress. Därefter kanske du också vill lära dig:
- Hur man lägger till anpassad inläggsstatus för blogginlägg i WordPress
- Hur man inkluderar anpassade inläggstyper i WordPress-sökresultat
- Hur man visar eller döljer widgets på specifika WordPress-sidor
- Hur man skapar en underordnad sida i WordPress
- Hur man skapar en anpassad arkivsida i WordPress
- Viktiga sidor som varje WordPress-blogg bör ha
- Mest användbara handledningar för anpassade WordPress-inläggstyper
Om du gillade den här artikeln, prenumerera då på vår YouTube-kanal för WordPress-videoguider. Du kan också hitta oss på Twitter och Facebook.


R Davies
Du har ett syntaxfel i ditt andra (mer detaljerade) exempel, koden fungerar inte i senaste Wordpress 7.4.3
) Varning: call_user_func_array() förväntar sig parameter 1 att vara en giltig återanrop, funktion 'custom_post_type' hittades inte eller ogiltigt funktionsnamn
Någon chans till en uppdatering / korrigering?
WPBeginner Support
Hej R Davies,
Vi kontrollerade och det fungerade perfekt.
Admin
Archit
Är kommatecknet i slutet av stödfältet (i alternativen för den anpassade inläggstypen) avsiktligt?
Robert Stuart
På rad 31? Ja, det är normal PHP-kod.
“Kommatecknet efter det sista elementet i en array är valfritt och kan utelämnas. Detta görs vanligtvis för enradiga arrayer, dvs. array(1, 2) föredras framför array(1, 2, ). För flerradiga arrayer å andra sidan används det avslutande kommatecknet ofta, eftersom det underlättar tillägg av nya element i slutet.”
saurabh
Hur aktiverar man ‘Inläggsinställningar’ i Custom_Post_type (med hjälp av Custom Post Type UI Plugin)?
Arias
Hej, jag har haft problem med det här pluginet.
Det har inaktiverat möjligheten att skapa kategorier och taggar,
Jag har letat efter ett exempel för att placera dem manuellt men jag har fortfarande inte hittat något.
Jag försöker ångra om jag med den här metoden kan lösa problemet, men jag skulle verkligen uppskatta din hjälp.
stormonster
I din $args-array, på indexet 'taxonomies', lägg till 'category' och 'post_tag'.
Det borde lösa det.
John D
Alldeles för mycket kodning. Wordpress behöver hålla saker enklare.
Ilija
Det är därför jag använder mitt eget CMS där jag kan skapa nya inläggstyper på en bråkdel av en sekund direkt via CMS:et. Utan någon kodning, tyvärr vill stora byråer ha Wordpress-utvecklare och måste lära sig det, verkar så komplicerat..
Sarah A
Hej, jag har lyckats visa en grupp av CPT med en specifik design i ett popup-fönster när du klickar på en bild som den första. Men det öppnar en ny sida och när du klickar utanför popup-fönstret för att stänga det, återgår du inte till startsidan, och det vill jag inte. Jag vill ha allt på startsidan.
Jag har lagt koden för CPT för att visas som popup på "single-chg_projet.php" och öppnar och stänger popupen med javascript. Jag har redan försökt att lägga all kod från single-chg_projet.php på index, men det visas ingenting. Eller så har jag misslyckats någonstans. Snälla hjälp mig. Tack
Ghulam Mustafa
Hej,
Tack för den fina koden. Bara en mindre korrigering av koden. Uttalandet endwhile; saknas före else: uttalandet i avsnittet Querying Custom Post Types =)
Tony Peterson
DETTA! Uppdatera din kod för att återspegla detta syntaxfel eftersom det orsakade mig en del hjärtesorg tills jag hittade Ghuams kommentar. Det fungerar nu.
Arkanum
Yes! True. It’s miss befire wp_reset_postdate();
The cycle while does not end
Azamat
Stavfel: "När behöver jag en anpassad inläggstyp?"
WPBeginner Support
Thanks for notifying us We have updated the article.
Admin
Jhon
Hej, kan du guida mig i processen att skapa en anpassad ordlista som du har på din webbplats?
WPBeginner Support
Vi använder anpassade fält och en anpassad mall för att visa ordlistetermer.
Admin
Anil Reddy
Jag vill skapa en listtyp för inlägg på kategorisidan för min webbplats
david ben oren
hur klonar jag en inläggstyp som har en specifik tabell i sig, jag behöver skapa en separat inläggstyp för andra tabeller.
betty
Hur lägger jag till ett anpassat fält till en inläggstyp?
WPBeginner Support
Se vår guide WordPress Custom Fields 101.
Admin
Megan
Jag har laddat ner pluginet och vill lägga till två anpassade inläggstyper. 1. Fanfiction för alla mina texter och 2. Fanart för all min konst.
För fanfiction – Jag vill ha möjligheten att länka samman kapitel till en berättelse och kunna ladda upp kapitel till en berättelse medan jag skriver dem.
För fanart – Jag skulle vilja att fokus ligger på en bild (uppenbarligen) med en beskrivning under den
Är den här artikeln vad jag behöver eller är det något helt annat?
Tack,
Megan
Zubair Abbas
Hej,
Jag kopierade helt enkelt koden till mitt webbplatsens functions.php. Den nya inläggstypen är synlig i instrumentpanelen men när jag försöker se ett inlägg efter publicering, visas en tom sida. Senare insåg jag att inte ens standardinläggen öppnas.
När jag tar bort koden från functions.php fungerar allt bra igen.
Please help
Tack,
Zubair Abbas
Jouke Nienhuis
Om du ser en tom sida betyder det ofta att du har glömt ett tecken. Det faktum att du ser inläggen om du tar bort din anpassade kod bekräftar att du har ett skrivfel. Kontrollera semikolon " ; " och öppnings- och slutparenteser.
För att se exakt var du gjorde ett misstag kan du redigera wp-config-filen. Leta efter ERROR REPORTING och ställ in detta värde till true. Testa sedan igen och där får du ett fel och en rad med det som saknas.
Alex
Jag har skapat CPT och det fungerar vackert, men Google kan inte hitta det ens efter att ha uppdaterat sitemaps, använt SEO-plugins eller hämtat i Google Webmaster Tools. Några tankar om varför det händer?
WPBeginner Support
Det tar tid för Google att börja visa nytt innehåll i sökresultaten. För säkerhets skull, kontrollera dina SEO-plugininställningar för att säkerställa att du inte blockerar indexering av dina CPT:er eller CPT-arkivsidor.
Admin
Amunet
Att skapa anpassade inläggstyper kan vara enkelt, särskilt med ett plugin. Den verkliga knepet är att visa dem på sidan. Vanligtvis behöver du ganska avancerad anpassad utveckling eller temaskräddarsydda plugins som det för Avada.
Tyvärr finns det inget universellt sätt att visa CPT i WordPress.
WPBeginner Support
Faktum är att det finns enkla och standardiserade sätt att visa CPT:er i WordPress. Vi har nämnt en i artikeln ovan.
Admin
Jouke Nienhuis
Som författaren sa, men jag kommer att upprepa svaret.
I ett nötskal, skapa en länk i din navigeringsmeny
Avancerat svar i ett nötskal: skapa en arkivsida och en enskild sida
Chuck
Bra artikel. Hur kan man modifiera informationen för enskilda inlägg i CPT baserat på den anpassade taxonomin? Till exempel:
Datum | Författare | Serie | Bok | Ämne
Detta är lätt att skriva men jag vill ta reda på hur man visar modifierad inläggsinformation om en av de saknade taxonomierna för Serier, som:
Datum | Författare | Bok | Ämne
Annars visas standardinläggsinformationen som:
Datum | Författare | | Bok | Ämne
borahan
Jag vill visa specifika kategorin inlägg för aktuell användare på sidan. Hur kan jag göra det?
Moazam Ali
Kära,
Tack för inlägget. Jag vill skapa ett bibliotek med e-böcker och vill använda anpassade inläggstyper och portföljer för att visa miniatyrbilder av böcker på framsidan. Kan du guida mig hur jag kan göra det?
Sharon Wallace
Hej alla,
Det här är ett utmärkt plugin. Jag försöker få taxonomin att visas på sidan. Jag skapade en som heter Presenters. Du kan se den här.
Hur kan jag få det att hända?
Tack
WPBeginner Support
Ta en titt på hur man skapar anpassade taxonomier i WordPress. Hoppas detta besvarar din fråga.
Admin
Sharon Wallace
Hej,
Tack för ditt svar. Det fungerar fortfarande inte men du har pekat mig i rätt riktning. Jag kommer att fortsätta att experimentera med det.
Ha en underbar dag.
Dave S.
Hej,
Jag har skapat ett formulär (med ArForms-plugin) som jag vill att det ska omvandlas till en Post-Type. Har du några förslag på hur jag kan uppnå detta, tack?
Tack.
Mark Greenway
Tack för detta, precis vad jag behövde veta för att komma igång med anpassade inläggstyper.
Mark.
shashik
Tack kära du..det är väldigt användbart..
Graham
Tack! Precis vad jag letade efter. Det är otroligt hur många gånger jag hittar wordpress-lösningar och sedan glömmer hur jag gör dem och måste komma tillbaka.
Mycket uppskattat!
Ram
Mycket användbart! Tack....
MELAS
Kära,
Jag har inte mycket kunskap om kodning. Hur kan jag se dessa anpassade inläggstyper och taxonomier på den specifika sidan?
Tack på förhand!
MELAS
Mike Ritter
Finns det ett fel? Bör inte funktionen vara `create_post_type`?
WPBeginner Support
Nej Mike, det är inte en kärnfunktion. Du kan definiera den här funktionen hur du vill.
Admin
Vera
Hej,
Tack för den här vackra handledningen.
Jag har gått igenom och gjort allt som du sa.
Två saker förstår jag inte:
1.
Du har angett taxonomin "genre". Var ställs det in? Vad händer om jag vill skapa de faktiska genrerna under den? Hur skapar jag dem? Var ser jag dem?
2.
Jag skulle vilja skapa menyalternativen för "Filmer" och under dem – undermenyer för "Genrer". Jag kan se "Filmer" i menyavsnittet, varje inlägg, som sidor. Behöver egentligen inte det, men det gör inget. Hur ser jag "Genrer" där?
Tack,
Vera
WPBeginner Support
Det verkar som att du framgångsrikt har skapat din anpassade inläggstyp, dvs. Filmer. Nästa steg är att skapa en anpassad taxonomi, Genrer. En taxonomi är ett sätt att sortera innehåll i WordPress. Kategorier och taggar är två standardtaxonomier som kommer inbyggda med WordPress och som som standard är associerade med 'Inlägg'. Se vår handledning om hur man skapar anpassade taxonomier i WordPress. Följ instruktionerna i den handledningen för att skapa din anpassade taxonomi Genrer och associera den med inläggstypen filmer. Din anpassade taxonomi kommer att visas under menyn Filmer i WordPress adminområde.
Admin
Hamed 3daJoo
Jag gör allt detta men när jag vill publicera ett inlägg av den här inläggstypen omdirigeras mina inläggstyper till huvudsidan (jag kopierade bara din kod utan några ändringar)
till exempel skriver jag det här inlägget med inläggstypen Filmer
snälla hjälp mig jag älskar post type men jag kan inte använda det korrekt
Ciprian
Har du provat att spara om permalänkstrukturen?
Skål!
Aaron
Utmärkt inlägg! Tack för innehållet.. hjälpte mycket.
antonio
hej jag försöker lägga till kodavsnittet för filmtypen... jag kopierade det till functions.php men när jag uppdaterar sidan visas ingenting. jag använder twenty fourteen-temat... vad kan vara fel?
ashish shestha
Hur visar man anpassad inläggstyp på front-end??
Fahd
Hej, egna inläggstyper på min WordPress-webbplats har fungerat bra i 2 år. Men vad som hände är att när jag ändrar titeln på ett inlägg och klickar på uppdatera sparas även andra ändringar. Men om jag behåller samma inläggstitel och gör ändringar i inlägget, sparas det inte. Några rekommendationer tack?
WPBeginner Staff
Vänligen kolla in den här handledningen om hur du visar/döljer text i WordPress-inlägg med växlingseffekt.
Arup Ghosh
Tack för informationen.
Arup Ghosh
Jag vill skapa en anpassad inläggstyp kuponger med alternativet för att visa kupongen och koden kommer att länka till butikens URL, kan du berätta hur jag kan göra det. Jag har inte mycket kunskap om kodning.
Isaías Subero
Bra artikel. Hur kan jag lägga till ikoner till anpassade inläggstyper i WordPress backend precis som det visas på bilden?
Jouke Nienhuis
det är ett av argumenten ($args) när du definierar den anpassade inläggstypen.
Lägg till ‘menu-icon’ => ‘dashicons-cart’ i $args-listan.
WordPress använder inbyggda dashicons, men du kan också använda dina egna ikoner.
Mer information på denna länk:
Johan
Hej, utdraget och data från anpassade fält visas inte på startsidan... någon idé om varför detta händer?
Bill Querry
Jag glömde att nämna, helst via kod för min functions.php-fil eftersom det är där curernet CPT definieras.
Bill Querry
Jag tittar på ett sätt att lägga till kategorier till några befintliga anpassade inläggstyper. Kan någon peka mig i rätt riktning?
Jouke Nienhuis
Du kan lägga till nya taxonomier till en befintlig Post Type (anpassad eller inte) genom att bara ange rätt post-typ när du skriver funktionen för att skapa den. Kategori är bara ett taxonominamn som inkluderar alla inlägg med en kategori.
Om du vill skapa en ny kategori, klickar du bara på kategori i menyn och skapar en ny.
Exempel på kategorier är Båtar om ditt inlägg handlar om båtar eller flygplan om ditt inlägg handlar om flygplan. Fler kategorier är också möjliga, välj eller lägg bara till dem i sidokolumnen till höger när du skriver ditt nya inlägg eller redigerar ett.
En posttyp är inte kopplad eller länkad till en specifik kategori, ett inlägg är det.
Robey Lawrence
Jag försökte precis använda kodavsnittet under
Querying Custom Post Types,
och insåg att det behövdes en före reset.
YassinZ
Tack för den rena och praktiska artikeln
Jag vill bara använda textredigeraren i anpassat inlägg
så att jag kan använda html-taggar,
Yassin
tack för en så fantastisk tydlig handledning
men jag har problem med att visa CPT jag använder SEO-vänliga permalänkar när jag går direkt till min webbplats/filmer dupliceras CPT:erna
Aris Giavris
Mycket användbart! Tack.
Jag skulle vilja lägga till ett av följande tecken till varje tagg i mina inlägg: +, -, +/-. Kan jag det?
Om så är fallet, skulle jag vilja ha möjlighet att representera de signerade taggarna som följer: alla +taggar, alla -taggar, alla +/-taggar.
Jag tror att jag ifrågasätter många saker.
Placid
Hej,
Jag har svårt att implementera en anpassad inläggstyp korrekt. Jag har letat efter en lösning länge men kunde inte hitta någon. Här är vad jag gjorde:
1. Nyinstallerad WordPress på min lokala wamp-server (aktivera apache rewrite_module först).
2. Använder standardtema (twenty fourteen). Inga plugins installerade.
3. Ändrade permalänkar till "Inläggsnamn"
4. I plugins-mappen skapade jag en mapp som heter pr_custom_posts och inuti den skapade jag en fil som heter pr_custom_posts.php. I filen skapade jag en anpassad inläggstyp. Koden är som följer:
register_post_type();
//flush_rewrite_rules();
}
public function register_post_type () {
$args = array(
‘labels’ => array (
‘name’ => ‘Filmer’,
‘singular_name’ => ‘Film’,
‘add_new’ => ‘Lägg till ny film’,
‘add_new_item’ => ‘Lägg till ny film’,
‘edit_item’ => ‘Redigera film’,
‘new_item’ => ‘Lägg till ny film’,
‘view_item’ => ‘Visa film’,
‘search_items’ => ‘Sök filmer’,
‘not_found’ => ‘Inga filmer hittades’,
‘not_found_in_trash’ => ‘Inga filmer hittades i papperskorgen’
),
‘query_var’ => ‘movies’,
'rewrite' => array (
‘slug’ => ‘filmer/’,
‘with_front’=> false
),
‘public’ => true,
'publicly_queryable' => true,
‘has_archive’ => true,
‘menu_position’ => 10,
‘menu_icon’ => admin_url().’/images/media-button-video.gif’,
‘supports’ => array (
‘title’,
‘thumbnail’,
‘redaktör’
)
);
register_post_type(‘jw_movie’, $args);
//flush_rewrite_rules();
}
}
add_action(‘init’, function() {
new PR_Movies_Custom_Post();
//flush_rewrite_rules();
});
?>
Det bra: CPT visas i mitt adminpanel och jag kan lägga till och se filmer där.
PROBLEMET: Jag kan inte förhandsgranska filmerna på frontend (genom att klicka på "visa" i CPT i adminpanelen). Det visas på frontend endast när jag ställer in permalänken till standard (http://localhost/wp02/?p=123).
Vad jag har försökt:
1. Gå till permalänk, behåll inställningarna för permalänk till "Inläggsnamn" och spara ändringar.
2. Använd flush_rewrite_rules() på flera ställen (en i taget) i min kod. Se de utkommenterade delarna i koden ovan.
3. Skapade en menyalternativ som:
URL: http://localhost/wp02/movies
Navigationsetikett: Filmer
Detta skapar en menyalternativ på framsidan men visar “Hittades inte” när länken “Filmer” klickas på.
Detta driver mig till vansinne. Kan någon snälla hjälpa till med detta? Jag skulle verkligen uppskatta det.
kikilin
Jag höll också på att bli galen med samma "Hittades inte"-problem, tills jag provade detta: gå till Inställningar > Permalinks och spara sedan dina inställningar igen. Jag hade ändrat min inställning till Standard och sedan ändrat den till Postnamn (för mitt projekts behov). Efter det fungerade länkarna som förväntat.
WPBeginner Staff
Ja visst, vi ska försöka göra en videoguide snart. Prenumerera gärna på vår YouTube-kanal för att hålla dig uppdaterad.
rehan
Helpfull tutorials and posts thanks
ceslava
Ett annat enkelt sätt är att bara duplicera archive.php och döpa om den till archive-movies.php och samma för single.php -> single-movies.php
Sedan kan du göra justeringar i php-filerna för ditt tema.
Bästa hälsningar
Mladen Gradev
lol pluginet ser super användbart ut, tack.
Achilles Khalil
Mycket svårt att visa. Kan du göra en videoguide?
Mik
Hej, jag har läst och följt dina inlägg så länge nu, du är fantastisk och riktar dig till de saker som nybörjare saknar... Tack.
Davide De Maestri
This plugin should be okay, but after every upgrade they’ve got some bug. Due to exporting field, or while migrating from local to remote etc… So It’s better to hand-write the code and put into functions.php