
Varje gång du laddar upp en bild genererar WordPress automatiskt flera kopior i olika storlekar. Teman och insticksprogram kan lägga till ännu fler.
Men dessa standardstorlekar fungerar inte alltid för dina behov. Kanske är de för stora och saktar ner din webbplats, eller för små och tappar sin effekt.
På WPBeginner vet vi hur viktigt det är att ha bilder i perfekt storlek som förbättrar din hemsidas design. Så, ingen panik – vi hjälper dig att lösa dessa problem.
I den här artikeln visar vi dig hur du skapar ytterligare bildstorlekar i WordPress och använder dem på din webbplats. I slutet av artikeln kommer du att ha anpassade bildstorlekar för att matcha dina exakta behov – oavsett om det är för miniatyrer, utvalda bilder eller en unik layout. 🎨

Varför skapa ytterligare storlekar på images i WordPress?
Populära WordPress-teman och plugins skapar vanligtvis ytterligare bildstorlekar automatiskt. Ditt tema kan t.ex. skapa olika storlekar för att använda som miniatyrer på dina arkivsidor eller anpassade startsidor.
Men ibland kanske dessa bilder inte helt uppfyller dina krav. Du kanske till exempel vill använda olika bildstorlekar i ett barntema eller en grid-layout.
För att göra detta måste du skapa ytterligare bildstorlekar i WordPress och sedan anropa rätt bild när det behövs.
Med detta i åtanke kommer vi att visa dig hur du skapar ytterligare bildstorlekar i WordPress. Här är en snabb översikt över alla tips som vi kommer att ta upp i den här artikeln:
Är du redo? Låt oss komma igång!
Registrering av ytterligare storlekar på images för your Theme
De flesta WordPress-teman stöder featured images, även kända som post thumbnails.
Men om du skapar ett anpassat WordPress-tema måste du lägga till stöd för utvalda bilder.
De flesta WordPress-experter rekommenderar att du lägger till följande anpassade kodavsnitt i ditt temas functions.php-fil.
1 | add_theme_support( 'post-thumbnails' ); |
Det är dock inte riktigt nybörjarvänligt, eftersom du riskerar att bryta din webbplats från bara ett litet misstag. Istället rekommenderar vi att du lägger till de anpassade utdragen med hjälp av WPCode istället.

WPCode är ett kraftfullt plugin för kodsnuttar som förenklar att lägga till anpassad kod i WordPress, och som används av över 2 miljoner webbplatsägare. Det kör kodsnuttar som om de vore i dina temafiler, vilket gör anpassningar framtidssäkra och enkla att hantera, även för nybörjare.
✏️ Notera: Många av våra varumärkespartners förlitar sig på WPCode för att lägga till anpassade kodsnuttar på sina webbplatser. Vi har själva sett hur enkelt men ändå kraftfullt det är, vilket är anledningen till att vi rekommenderar det starkt. Vill du lära dig mer? Kolla in vår fullständiga recension av WPCode!
Den goda nyheten är att gratisversionen av WPCode låter dig lägga till dina egna kodsnuttar. Så nu installerar och aktiverar vi insticksprogrammet. Om du behöver hjälp kan du se steg-för-steg-instruktionerna i vår guide om hur du installerar ett WordPress-plugin.
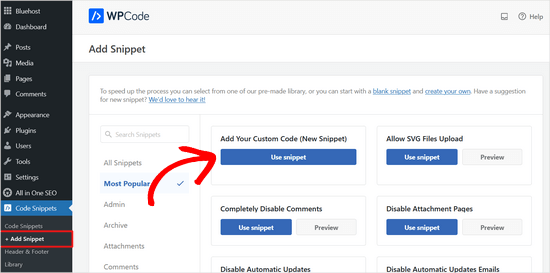
Efter aktivering kan du navigera till Code Snippet ” + Add Snippet från din WordPress-panel. Gå sedan vidare och klicka på knappen “Lägg till din anpassade kod (nytt utdrag)”.
På nästa skärm ska du namnge din anpassade kodsnutt. Du kan till exempel namnge den här “Stöd för miniatyrbilder i inlägg”.
Sedan kan du kopiera och klistra in den här koden i området “Code Preview”:
1 | add_theme_support( 'post-thumbnails' ); |
Så här kan det se ut på redaktionen:
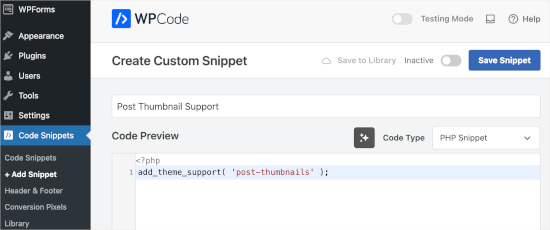
Efter det ser vi till att du ändrar kodtypen till “PHP Snippet”.
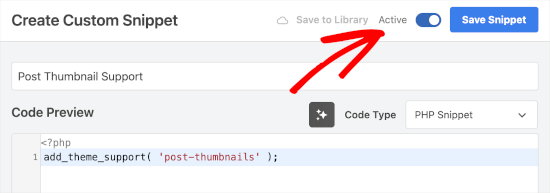
Därefter kan du växla från “Inaktiv” till “Aktiv” och klicka på “Spara snippet”.
När du har lagt till stödet för anpassade kodsnuttar för miniatyrbilder av inlägg kan du registrera ytterligare bildstorlekar med funktionen add_image_size().
Återigen, låt oss öppna WPCode anpassade kodutdragsredigerare genom att gå över till Code Snippet ” + Lägg till snippet. Efter det, låt oss välja knappen “Lägg till din anpassade kod (nytt utdrag)”.
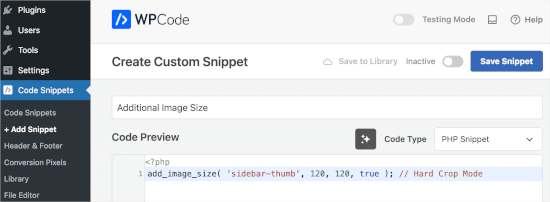
Härnäst kan du namnge det här kodavsnittet “Additional Image Sizes”.
I kodredigeraren använder du sedan funktionen add_image_size i följande format:
1 | add_image_size( 'name-of-size', width, height, crop mode ); |
Här är några exempel på hur den fullständiga funktionen kan se ut:
1 2 3 | add_image_size( 'sidebar-thumb', 120, 120, true ); // Hard Crop Modeadd_image_size( 'homepage-thumb', 220, 180 ); // Soft Crop Modeadd_image_size( 'singlepost-thumb', 590, 9999 ); // Unlimited Height Mode |
Vi har angett 3 olika WordPress-bildstorlekar. Var och en har olika lägen, t.ex. hård beskärning, mjuk beskärning och obegränsad höjd. Du kan välja en beroende på dina behov.
Här är förhandsgranskningen i kodredigeraren:
Glöm inte att ändra kodtypen till “PHP”, växla från “Inaktiv” till “Aktiv” och klicka på knappen “Spara”.
Med detta i åtanke ska vi titta på hur du kan använda varje läge på din egen WordPress-blogg eller webbplats.
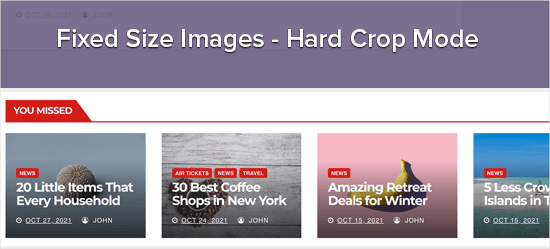
1. Hårt läge för crop
I exemplet ovan använde vi ett “true”-värde efter höjden. Detta säger till WordPress att cropa imagen till den exakta storlek vi definierade, vilket är 120px x 120px i det här fallet.
Denna funktion beskär automatiskt bilden antingen från sidorna eller uppifrån och ner, beroende på dess storlek. På så sätt kan du se till att alla dina bilder är i rätt proportioner och ser bra ut på din WordPress-webbplats.
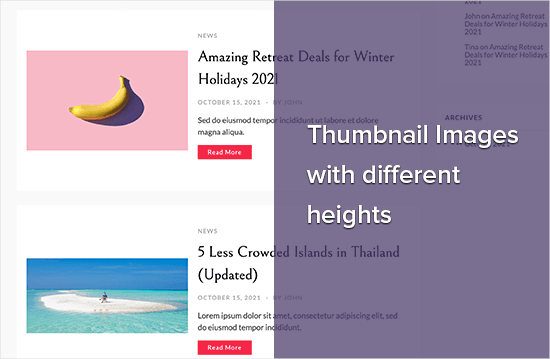
2. Mjukt läge för crop
Som you kan se i vårt exempel med mjuk crop har vi inte add to ett “sant” värde efter höjden:
1 | add_image_size( 'homepage-thumb', 220, 180 ); |
Detta beror på att soft cropping-läget är aktiverat som standard.
Mjuk beskärning ändrar bildens storlek proportionellt utan att förvränga den, så det är inte säkert att du får exakt de mått du vill ha. Vanligtvis matchar soft crop breddmåtten, men höjdmåtten kan vara olika beroende på varje bilds proportion.
Här är ett exempel på hur det kan se ut:
3. Obegränsad höjdläge
Ibland kan du ha långa bilder som du vill använda på din webbplats samtidigt som du begränsar deras bredd. Du kan t.ex. ha skapat en infografik för ditt företags webbplats. Infografik tenderar att vara mycket lång och oftast bredare än innehållsbredden.
I läget för obegränsad höjd kan du ange en bredd som inte bryter din layout utan att begränsa höjden.

Displaying additional image sizes in your WordPress theme
När du har addat fler storlekar på images till din website är det dags att visa dem i ditt WordPress theme.
Öppna helt enkelt temafilen där du vill använda en annan bildstorlek och lägg sedan till följande kod inuti inläggsloopen:
1 | <?php the_post_thumbnail( 'your-specified-image-size' ); ?> |
You may want to add some styling so the image perfectly fits with the rest of your site. Detta är dock all du behöver för att visa ytterligare storlekar på images i ditt theme.
Återskapa ytterligare storlekar på images
Funktionen add_image_size() skapar bara extra storlekar när du laddar upp en ny bild. Detta innebär att alla bilder som du laddar upp innan du skapar funktionen add_image_size() inte kommer att ha de nya storlekarna.
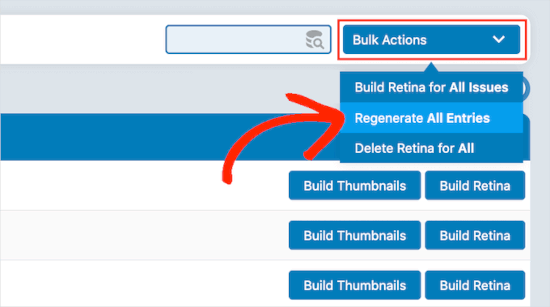
För att åtgärda detta problem måste du regenerera miniatyrbilderna på din WordPress-webbplats med hjälp av Perfect Images. Detta plugin kommer också att regenerera dina utvalda bilder och retina-bilder och uppdatera dina mediemetadata.
Först måste du installera och aktivera pluginet. Om du behöver hjälp kan du vänligen läsa vår guide om hur du installerar ett plugin för WordPress.
Efter aktivering kan du gå till Media “ Perfect Images.
Perfect Images kommer nu att skanna ditt WordPress-mediebibliotek, så du kan behöva vänta en stund innan det är klart.

När det är klart vill du öppna rullgardinsmenyn som visar “Bulk Actions” som standard och sedan välja “Regenerate All Entries”.
Perfect Images kommer nu att återskapa alla dina thumbnails.
Mer information om detta ämne finns i vår artikel om hur man genererar nya bildstorlekar.
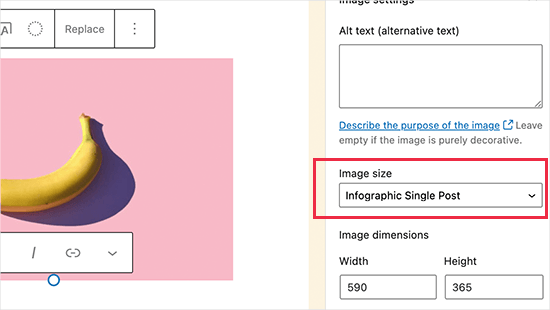
Aktivera ytterligare storlekar på images för innehållet i dina posts
Även om du har lagt till några nya bildstorlekar kan du bara använda dem i WordPress-temat och inte i inläggsinnehållet.
För att göra dessa nya storlekar tillgängliga i WordPress innehållsredigerare måste du registrera följande kod till WPCode:
1 2 3 4 5 6 7 8 | function wpb_custom_image_sizes( $size_names ) { $new_sizes = array( 'homepage-thumb' => 'Homepage Thumbmail', 'singlepost-thumb' => 'Infographic Single Post' ); return array_merge( $size_names, $new_sizes );}add_filter( 'image_size_names_choose', 'wpb_custom_image_sizes' ); |
Upprepa helt enkelt samma process för att lägga till en anpassad snippet-kod som vi delade. Glöm sedan inte att aktivera och spara utdraget efter att du har lagt till koden.
När du nu laddar upp en bild till WordPress ser du alla anpassade storlekar under “Image size”. Du kan nu ändra bildstorleken när du arbetar på en sida eller ett inlägg.
Bonus Tips: Åtgärda problem med uppladdning av bilder i WordPress
Om du har problem med att ladda upp bilder kanske du vill veta vad som orsakar det. Med WordPress kan detta hända av några olika skäl.
För det första hanterar olika webbläsare uppladdningar på sitt eget sätt, så det som fungerar i en webbläsare kanske inte fungerar i en annan.
Din webbplats cache kan också orsaka problem. Om den är föråldrad kan den störa uppladdningen, så det kan hjälpa att rensa den.
Ibland kan det också vara plugins och teman som är problemet.
Vissa plugins kan störa uppladdningsprocessen utan att du vet om det. Vissa teman är inte välkodade och kan orsaka konflikter när du försöker ladda upp bilder.
För felsökningstips kan du läsa vår guide om hur du åtgärdar problem med bilduppladdning i WordPress.
Vi hoppas att den här artikeln hjälpte dig att lära dig hur du skapar ytterligare bildstorlekar i WordPress. Du kanske också vill se våra expertval av de bästa WordPress-pluginsen för att hantera bilder eller se vår guide om hur du bulkändrar storleken på stora bilder.
If you liked this article, then please subscribe to our YouTube Channel for WordPress video tutorials. You can also find us on Twitter and Facebook.


Jiří Vaněk
Thanks for the tutorial, I’m trying to do the same thing using another tutorial but it didn’t work. This works perfectly.
axel
That was easy, thanx.
Something harder:
How do i get rid of old, unused thumbnail sizes?
(best without a plugin)
Kind regards
axel
WPBeginner Support
We cover how you can remove the unused image sizes in our article below:
https://www.wpbeginner.com/wp-tutorials/how-to-prevent-wordpress-from-generating-image-sizes/
We recommend plugins to simplify the process, if you’re worried about the number of plugins on your site, we would recommend taking a look at our article below:
https://wpbeginner.com/opinion/how-many-wordpress-plugins-should-you-install-on-your-site/
Admin
B Toro
Very simple and helpfull
WPBeginner Support
Glad our guide was helpful
Admin
JKLYN
Quite helpful tutorial. But how to set class for image??
Kim
Thanks WPBeginner, this worked a treat!
Thiago
Hi,
Great article! However, I still do not understand the usefulness of hard crop tool; I uploaded an image with 306×165, and after that I created two custom sizes: 256×148 (Soft Crop) and 256×148 (Hard Crop), however, as you can see in this print taken from the post: [http://prnt.sc/eromp3] both Options remain the same. I created a file in Photoshop containing 256×148 and I dragged the original image without resizing anything, and the result you can see in example 4 of the image above. So, my question is this: should image 2 not look like the image generated by Photoshop?
Follows below the code used on functions.php:
//Soft Crop used in example 2
if ( function_exists( ‘add_image_size’ ) ) {
add_image_size( ‘new-size8’, 256, 148 );
}
add_filter(‘image_size_names_choose’, ‘my_image_sizes8’);
function my_image_sizes8($sizes) {
$addsizes = array(
“new-size8” => __( “New Size8”)
);
$newsizes = array_merge($sizes, $addsizes);
return $newsizes;
}
////Hard Crop used in example 3
if ( function_exists( ‘add_image_size’ ) ) {
add_image_size( ‘new-size9’, 256, 148, true, array( ‘center’, ‘center’ ) ); //(cropped)
}
add_filter(‘image_size_names_choose’, ‘my_image_sizes9’);
function my_image_sizes9($sizes) {
$addsizes = array(
“new-size9” => __( “New Size9”)
);
$newsizes = array_merge($sizes, $addsizes);
return $newsizes;
}
Thanks in advance!
Kevin
This works great, but on thing that always bothers me is that if someone uploads an image that is smaller than one of your cropped sized then that image will not be created, which ruins the layout if you wanted equal height images
Matt Rock
Struggling with the same issue, Kevin (uploading smaller image does not create cropped size). I understand why this might make sense (system will not produce unnecessary images), but a low/poor resolution would look better than an ill-cropped one…
gonza
Thanks for the info
you help me so much!
Sakshi
I write this code can.
Actually i want to set the post thumbnail size for the banner image.Which i was uploading through featured image in the background please suggest me.
Aakash
Hi,
I m new in wordpress,and accept i have many problems,and the first is,i created lot of post in wordpress,suppose A B C D,and when i update this in my website they look like first is D and then c and then b and then a means when i upload first they are show in last.if any solution that first they look in series not DCBA like ABCD…plz help
Daniel Knoflicek
awsome… so helpfull for a lot of gallery plugins…
Lavinia Manzanarez
Excellent! I read the use of this function on the Codex of WordPress but sometimes I need a step by step thing, thank you!
WPBeginner Staff
Yes it is possible.
Farmer John
I too want to do the same as Ali Rohan wants to do. can you kindly elaborate pleas.. ‘coz i tried to implement the method explained by you but could not succeed. I can’t understand where I am doing wrong. How do I link the text of resolution to image file?
Ali Rohan
Thanks for nice article.
I wanna start a wallpapers website in wordpress so is it possible that when i upload one big wallpaper then it auto resized to many resolutions for users. For example when i upload 1920×1280 wallpaper then it must be resized to 1024×768, 800×600 etc resolution … so users can easily view and download desired size wallpaper ?
Aayush
Hi Dear. i need your urgent help. i have a problem with the images size. actually i am using a plugin WP Gallery Custom Links. i have uploaded lot of images in a post but every images has a different height and width so they are appearing with different different sizes. i want to set them with the same size which i want to set. please tell me any idea to solve this problem.
Here
I just needed to say thanks for saying this. You’re right on.|
Shoaib
Excellent explanation
Andrew
I’ve set this up and it’s working splendidly minus the suggestion MIKE LITTLE made above – the thumbnail is changed and it shows up that way in the backend in the media gallery – but on the frontend where my loop is – the image thumb is still what WP defaults to – i’ve even run REGEN THUMBS and it still doesn’t fix the issue – anyone else having this problem or know the fix???
WPBeginner Support
Look at your loop and use
<?php the_post_thumbnail('your-specified-image-size'); ?>instead ofthe_post_thumbnail()Admin
Tomasz
Nice tutorial!
Please check out the plugin which allows to manually crop the registered image sizes:
http://wordpress.org/plugins/manual-image-crop
WPBeginner Support
Thanks, looks like a nice plugin. We will look into it.
Admin
Marc C
Good tutorial – many thanks WPBEGINNER.
I too was having the problem of not being able to crop the new registered image sizes but the plugin posted by TOMASZ does the job nicely – thanks TOMASZ!
Robbe Clerckx
Still helpfull after all this time :). Thank you.
Danny
Thank you for this very clear and helpful tutorial. It saved me a lot of time since the WP documentation is very cryptic.
lydia karanja
I have a wordpress account but I did not know how to manage it but now I know all thanks to this tutorial, thank you very much for helping people understand more on how to create and manage their websites.
andy19at
@jezThomp Great if your images work
jezThomp
@andy19at Link…?
andy19at
@jezThomp A link? I didn’t post it cos it didn’t work.
jezThomp
@andy19at http://t.co/YvmiX9hR
mikelittle
You say: “The downside of hard cropping is that you cannot control which part of the image is displayed.” Not true.
When you have uploaded an image and before you insert into post, you can click on ‘edit image’ and from there change the thumbnail or the whole image, scale, rotate, or flip the image , and for the thumbnail select the exact portion of the image you want.
wpbeginner
@mikelittle Thanks for the correction Mike. Just edited the article
clelandillustration
I can’s seem to get the custom crop to work for new image sizes. The custom crop will work for the default “thumbnail” size version, but that crop won’t apply to new image sizes. It seems the crop is still uncontrollable for custom image sizes.
Brent Norris
good insight into the edit flow…
TdGon
Good article ..and photos to go along with it too…nice. I saw in a few places how to do this but they did not explain it as well as you do here. I am off to try it out.
Thanks a lot ! (0.o)
PaulDeWoutersd'Oplinter
excellent explanation for a confusing topic. and very useful plugin
mssbee
Great tutorial! Thanks for explaining the different crop options. It really helped me to understand how they work.
tjhakan
Nice tutorial. good job
defries
Nice round up of what can be done with just the default featured image feature. One extra tip: you can also set the width of your content area as a featured image and define that same width in Settings > Media. This way you can select a featured image to use in your theme and it will be automatically the maximum size of the content area.
Also great having those values in there for <a href=”http://codex.wordpress.org/Embeds”>oEmbed</a>.
Ordinary Randomness
Thanks for this tutorial, I was wondering why sometimes I had images that were not cropping to the size I had coded.