Att hantera teamkommunikation och filer för ett litet företag kan bli rörigt. E-postmeddelanden samlas på hög, viktiga dokument går förlorade och projekt faller mellan stolarna.
Jag har varit där, och jag hittade en enkel lösning: att bygga ett intranät för småföretag med WordPress.
Det är i princip en privat arbetsyta där ditt team kan kommunicera, dela filer, hantera projekt och hålla sig organiserat – allt på ett ställe.
I den här guiden visar jag dig mitt beprövade sätt att sätta upp ett säkert och lättskött intranät.
I slutet kommer du att ha en intern hubb som håller allt sammankopplat utan att förlita dig på dyra intranätsverktyg.
![Sluta betala för intranätverktyg: Bygg ett eget med WordPress [Duplicated]Sluta betala för intranätsverktyg: Bygg ett eget med WordPress](https://www.wpbeginner.com/wp-content/uploads/2017/08/create-an-intranet-for-small-businesses-with-wordpress-in-post.png)
💡Snabb sammanfattning: Hur man skapar ett WordPress-intranät
Om du har bråttom och bara vill ha huvudstegen, här är en enkel färdplan för att få ditt intranät igång:
- Installera WordPress på en privat domän eller underdomän.
- Lägg till BuddyPress för profiler, grupper, meddelanden och aktivitetsflöden.
- Installera All-in-One Intranet för att göra din webbplats privat.
- Lägg till ett kodavsnitt för att säkra filuppladdningar så att endast inloggade användare kan se dem.
Detta är bara huvudstegen. Jag kommer att gå in på mer detaljer för var och en, så att du vet exakt hur du sätter upp allt.
Vad är ett WordPress-intranät och varför behöver ditt lilla företag ett?
Ett WordPress-intranät är en privat intern webbplats som ditt team kan använda för att kommunicera, dela filer och hantera projekt, allt på ett säkert ställe.
Tänk på det som ditt företags eget miniversum eller arbetsyta, byggt direkt i WordPress. Istället för att jonglera med oändliga e-posttrådar eller växla mellan flera verktyg, samlar ett intranät allt på ett ställe.
Här är varför det är värt att sätta upp:
- Centraliserad kommunikation: Håll alla teamuppdateringar och diskussioner på en plats.
- Minskade e-postkaos: Inget mer grävande i inkorgar för att hitta information.
- Säker fildelning: Kontrollera vem som kan komma åt känsliga dokument.
- Enkel introduktion: Nya medarbetare kan snabbt hitta resurser och företagsinformation.
- Prisvärd lösning: Bygg ett intranät med gratis eller billiga plugins istället för dyra företagslösningar.
Det bästa av allt? Du behöver ingen specialprogramvara för att få det att hända.
Med gratis WordPress-plugins som BuddyPress (för teamkommunikation) och All in One Intranet (för integritet) kan du förvandla din befintliga webbplats till en fullt fungerande teamarbetsyta.
Vad du behöver innan du sätter upp ditt intranät
Innan du börjar bygga ditt WordPress-intranät är det viktigt att förbereda några saker. Oroa dig inte, för dessa är enkla, och jag kommer att förklara vad var och en betyder så att du vet exakt vad du ska göra.
Här är din snabba checklista:
- WordPress-hosting: Här bor din webbplats online. För ett intranät är en VPS (Virtual Private Server) eller en hanterad WordPress-hostingplan ett utmärkt val för tillförlitlighet när ditt team växer. Men om du precis har börjat med ett litet team är en högkvalitativ delad hostingplan ofta ett mer prisvärt alternativ som fungerar alldeles utmärkt.
- Domännamn eller underdomän: Du kan skapa ditt intranät på en underdomän som intranet.dittföretag.com eller använda en separat domän som dittföretagsintranät.com.
- SSL-certifikat: Detta lägger till ett säkert hänglås på din webbplats och håller inloggningar och delade filer privata. De flesta bra hosting-leverantörer inkluderar detta gratis.
- Tillräckliga serverresurser: Om du kommer att använda plugins som lägger till sociala funktioner eller fildelningsfunktioner, se till att din hostingplan erbjuder bra minne och bandbredd.
- Plan för användarroller: Bestäm vem som kan komma åt vad innan du bjuder in användare. Till exempel administratörer, chefer, anställda eller entreprenörer.
- BuddyPress-plugin: Lägger till funktioner för teamkommunikation som profiler och meddelanden.
- All in One Intranet-plugin: Håller din webbplats privat och hjälper till att hantera anställdas åtkomst.
Nu när du vet vad som krävs, låt oss titta på hur mycket det kan kosta att sätta upp ditt eget intranät:
| Artikel | Typisk kostnad |
|---|---|
| WordPress-hosting (VPS eller Managed) | 25–40 USD/månad |
| Domän eller subdomän | Gratis–15 USD/år |
| SSL-certifikat | Gratis (vanligtvis inkluderat) |
| BuddyPress-plugin | Gratis |
| All in One Intranet-plugin | Gratis |
💡 Hur mycket kommer det att kosta?
Sammantaget kan du förvänta dig att spendera cirka 30–50 USD per månad för att hålla ditt intranät igång smidigt. De flesta nödvändiga verktyg är gratis, så din huvudsakliga kostnad blir hosting.
När allt är inställt har du en säker, privat arbetsyta för ditt team, utan några återkommande programvarukostnader eller dolda avgifter.
Med det sagt, låt oss titta på hur man sätter upp ett intranät med WordPress. Du kan använda länkarna nedan för att hoppa till det steg du vill ha:
- Steg 1: Installera WordPress och konfigurera grundläggande inställningar
- Step 2: Turn Your Site Into an Intranet with BuddyPress
- Step 3: Make Your Intranet Private with All-in-One Intranet
- Steg 4: Säkra medieuppladdningar på ditt intranät
- Steg 5: Skapa meddelanden & anmälningar
- Step 6: Secure Your Intranet
- Steg 7: Konfigurera användarroller & behörigheter
- Hur du håller ditt WordPress-intranät igång smidigt
- Vanliga frågor om att skapa ett intranät i WordPress
Steg 1: Installera WordPress och konfigurera grundläggande inställningar
WordPress är det bästa valet för att bygga ett intranät eftersom det är prisvärt, flexibelt och nybörjarvänligt. Du kan anpassa det för att passa ditt teams behov, lägga till nya funktioner med plugins och hålla allt privat utan att betala för dyra företagsverktyg.
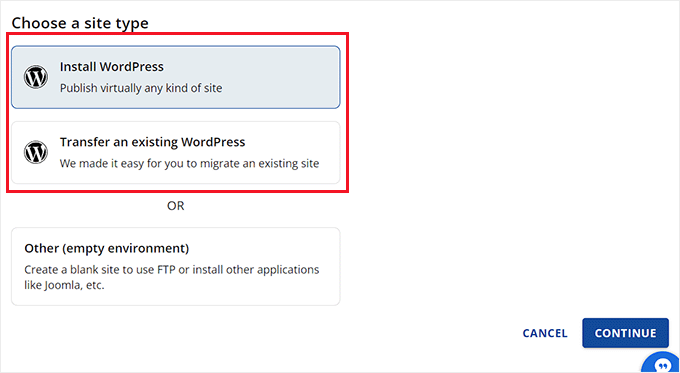
Först måste du installera WordPress på din valda domän eller underdomän (till exempel intranet.dittföretag.com).
De flesta hosting-leverantörer låter dig göra detta med en ett-klicks-installationsprogram från din hosting-kontrollpanel. För mer information kan du se vår handledning om hur man installerar WordPress.
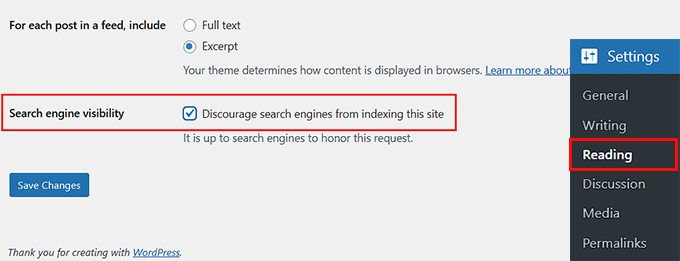
När WordPress är installerat, gå till sidan Inställningar » Läsa från administratörspanelen och markera rutan 'Avskräck sökmotorer från att indexera denna webbplats'.
Detta håller ditt intranät privat och dolt från Google och andra sökmotorer.
Därefter rekommenderar jag att installera några viktiga plugins för att förbättra funktionaliteten och kommunikationen i ditt intranät:
- WP Mail SMTP – säkerställer att alla e-postmeddelanden (som lösenordsåterställningar och privata meddelanden) levereras.
- WPForms – låter dig skapa enkla interna formulär som feedback, ledighetsansökningar eller filuppladdningar.
- Duplicator – säkerhetskopierar automatiskt ditt intranät så att du aldrig förlorar viktig data.
Om du är ny på WordPress rekommenderar jag också att du tittar på dessa hjälpsamma guider innan du går vidare:
- Hur man skapar en WordPress-webbplats (ultimat guide)
- Hur man installerar ett WordPress-plugin – steg för steg för nybörjare
- Nybörjarguide för att skapa en undersökning i WordPress
- Hur du korrekt konfigurerar dina e-postinställningar i WordPress
- Hur du säkerhetskopierar din WordPress-webbplats
Dessa resurser hjälper dig att sätta upp hela din webbplats på bara ett par timmar.
Steg 2: Gör din webbplats till ett intranät med BuddyPress
BuddyPress är ett gratis plugin som förvandlar din enkla WordPress-webbplats till en helt interaktiv arbetsyta.
Det lägger till sociala funktioner som användarprofiler, aktivitetsflöden, privata meddelanden och teamgrupper. Allt dina anställda behöver för att kommunicera och samarbeta på ett ställe.
Istället för att hantera oändliga e-posttrådar eller spridda chattappar hjälper BuddyPress dig att skapa ett privat socialt nätverk för ditt företag.
Installera och aktivera BuddyPress
BuddyPress är ett helt gratis plugin. Det innebär att du enkelt kan installera och aktivera det från ditt WordPress-adminområde eller WordPress.org plugin-katalog.
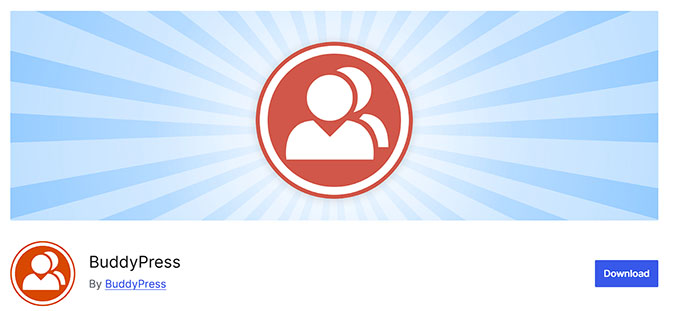
Om du behöver steg-för-steg-instruktioner, se vår handledning om hur man installerar ett WordPress-plugin.
Välj och aktivera BuddyPress-komponenter
Efter aktivering tar pluginet dig till sidan Inställningar » BuddyPress. Här kan du välja vilka komponenter du vill aktivera för ditt intranät.
En komponent är i grunden en funktion eller modul som lägger till specifik funktionalitet. Till exempel användarprofiler, gruppdiskussioner eller aktivitetsflöden. Du kan slå på eller av komponenter baserat på ditt teams behov.

För att göra detta, markera rutorna bredvid de funktioner du vill aktivera. Jag rekommenderar att du väljer:
- Utökade profiler: Låt användare skapa detaljerade profiler med sitt namn, avdelning och roll.
- Aktivitetsflöden: Visar teamuppdateringar, meddelanden och fildelningar på ett ställe.
- Användargrupper: Låter dig skapa privata utrymmen för avdelningar eller projekt.
- Privata meddelanden: Möjliggör direkta meddelanden mellan teammedlemmar.
- Aviseringar: Skickar varningar för nya meddelanden eller aktivitetsuppdateringar.
När du har valt dina komponenter, klicka på 'Spara ändringar' längst ner på sidan.
👉 Tips: Detta är bara mina föreslagna komponenter att börja med, men varje intranät är annorlunda. De verktyg du behöver kan variera beroende på din storlek, arbetsflöde och mål.
Jag rekommenderar att du bara aktiverar de komponenter du faktiskt använder för att hålla ditt intranät lättviktigt, snabbt och enkelt att hantera.
Konfigurera användarprofiler
När du aktiverar BuddyPress lägger det automatiskt till ett nytt menyalternativ som heter Profilfält under sektionen Användare i din WordPress-instrumentpanel.
Den här funktionen låter dig bestämma vilken information som visas på varje teammedlems profil – vilket gör ditt intranät mer personligt och organiserat.
Till exempel, istället för att bara visa användarnamn, kan du inkludera användbara detaljer som Jobbtitel, Avdelning, Telefonnummer och E-postadress.
För att göra det, gå till sidan Användare » Profilfält och klicka på knappen ‘Lägg till nytt fält’.
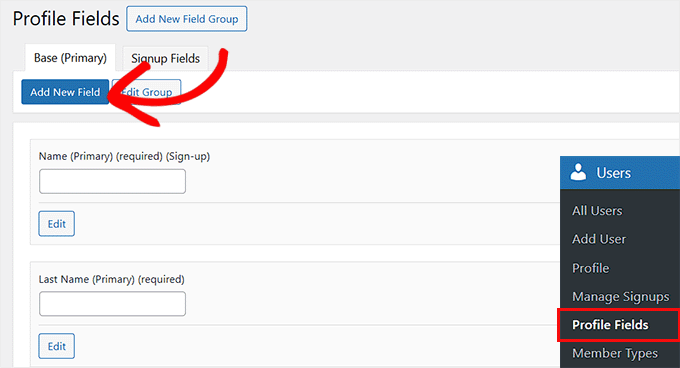
Detta tar dig till en ny skärm där du kan ange ett namn och en kort beskrivning för det fält som du vill att dina teammedlemmar ska fylla i.
Välj i rullgardinsmenyn till höger om fältet är obligatoriskt eller valfritt. Du kan också markera rutan 'Registreringar' om du vill att nya teammedlemmar ska ange denna information när de registrerar sig för ditt intranät.
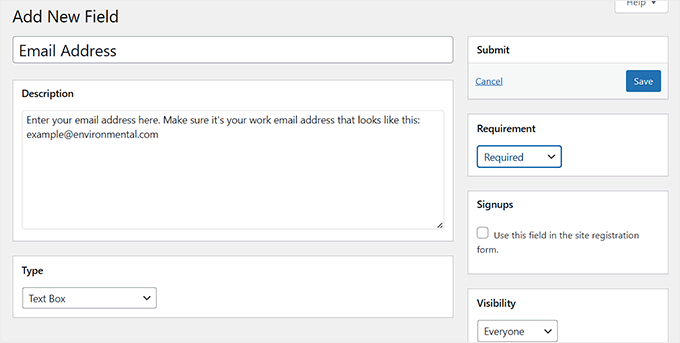
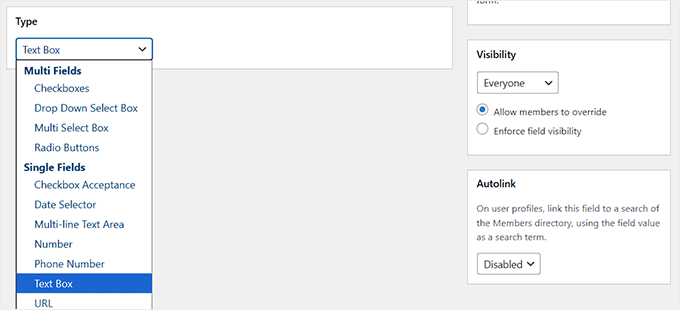
Sedan kan du konfigurera fälttypen genom att skrolla ner till avsnittet 'Typ'.
Du kanske till exempel vill använda en kryssruta för ja/nej-alternativ som 'Fjärranställd medarbetare' eller en rullgardinsmeny för avdelningar.
Dessutom låter BuddyPress dig styra vem som kan se varje profilfält. Du kan göra ett fält synligt för alla, endast för inloggade medlemmar, eller bara för webbplatsadministratörer.
Jag rekommenderar att välja inloggade medlemmar för de flesta fält så att ditt intranät förblir privat, samtidigt som ditt team kan lära sig mer om varandra.
När du är klar klickar du bara på knappen 'Spara' högst upp. Dessa fält kommer nu att visas på varje användares profil, vilket hjälper alla att snabbt identifiera vem som är vem och hur man kontaktar dem.
Skapa och organisera grupper
Grupper i BuddyPress är perfekta för att organisera ditt team i avdelningar eller projektbaserade utrymmen, som Marknadsföring, Försäljning eller Produktutveckling.
Varje grupp får sitt eget privata aktivitetsflöde, diskussionsområde och medlemslista, vilket hjälper alla att hålla sig fokuserade på sina specifika uppgifter.
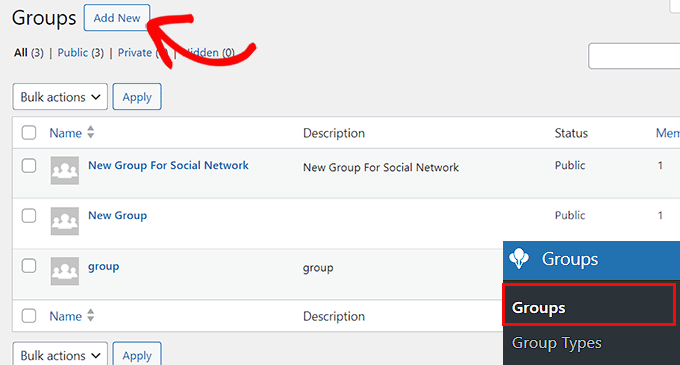
För att skapa din första grupp, gå till sidan Grupper från sidofältet i WordPress-administrationen och klicka på knappen 'Lägg till ny'.
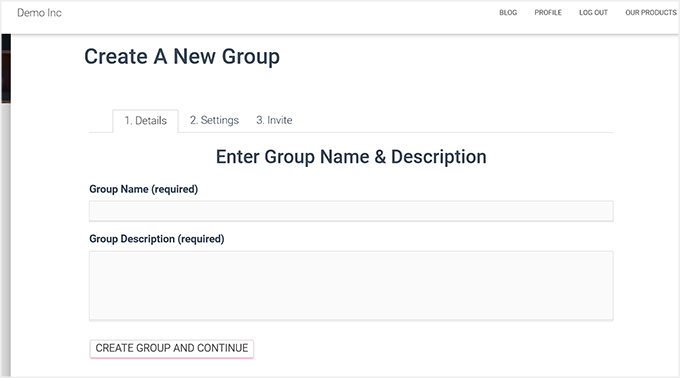
Detta kommer att dirigera dig till din webbplats frontend, där du behöver ange ett namn och en beskrivning för din grupp. Till exempel, 'Marknadsföringsteam' med en kort notering som 'För att dela kampanjidéer och innehållsuppdateringar'.
När du är klar klickar du på knappen 'Skapa grupp och fortsätt'.
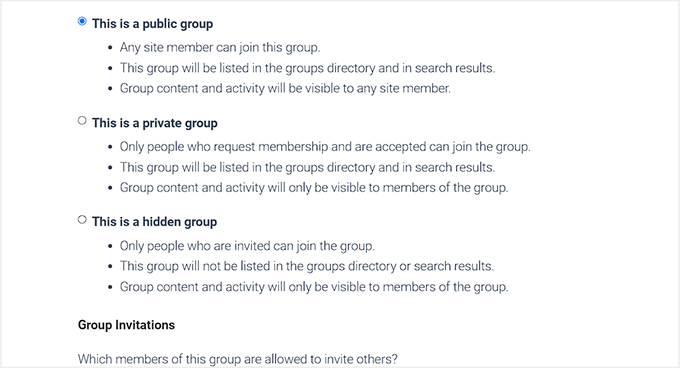
Därefter blir du ombedd att välja en integritetsnivå för din grupp.
Om du väljer 'Offentlig' kan vem som helst på ditt intranät se och gå med i gruppen för att delta i diskussioner. Om du väljer 'Privat' kommer gruppen fortfarande att visas i ditt intranäts katalog, men användare behöver godkännande för att gå med eller se dess innehåll.
Slutligen håller alternativet 'Dold' gruppen helt osynlig för icke-medlemmar, vilket gör den idealisk för diskussioner inom ledning eller HR.
Efter att ha valt det alternativ som bäst passar dina behov, klicka på 'Nästa steg' för att fortsätta.
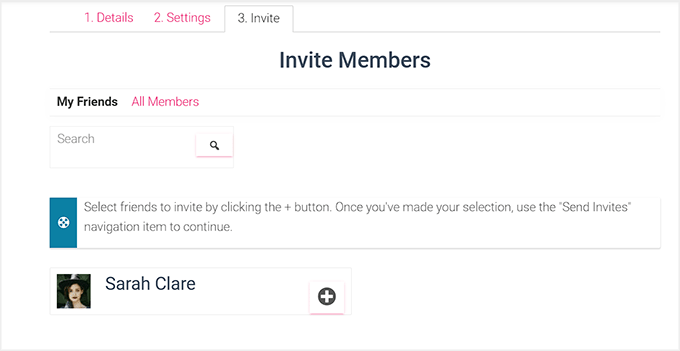
Du kommer sedan att se ett alternativ att bjuda in medlemmar till din grupp, så att den inte är tom. Du kan bjuda in teammedlemmar som du har lagt till på ditt intranät (eller hoppa över det här steget och lägga till dem senare).
När du är redo, klicka på knappen 'Slutför' för att skapa din grupp.
Du kan nu upprepa processen för att skapa så många grupper på ditt intranät som du vill.
Konfigurera aktivitetsflöden och aviseringar
Eftersom du redan har aktiverat aktivitetsflöden och aviseringar under installationen, skapar BuddyPress automatiskt dedikerade sidor för dem.
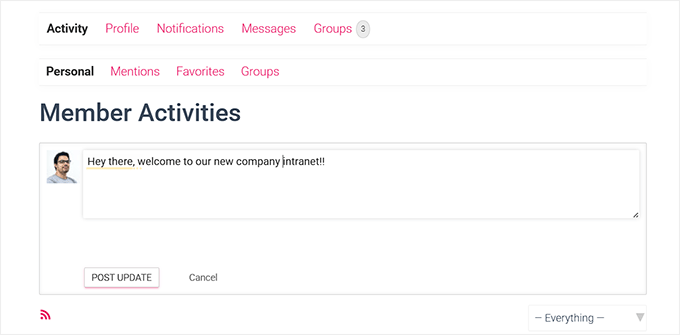
Aktivitetsidan fungerar som ett live-nyhetsflöde där ditt team kan posta uppdateringar, dela framsteg och kommentera varandras aktiviteter – liknande ett privat socialt nätverk.
För att testa det, besök Aktivitetsidan från din webbplats framsida och posta en kort uppdatering (som "Välkommen till vårt nya intranät!").
Be sedan en lagkamrat att svara eller reagera på ditt inlägg. Du bör omedelbart få en avisering inuti ditt intranät som visar att systemet fungerar korrekt.
Den här snabba testningen hjälper till att bekräfta att ditt team kommer att hålla sig anslutet och informerat utan att behöva oändliga e-postkedjor.

Testa privat meddelandefunktion
Privat meddelandefunktion är en av de bästa delarna med att använda BuddyPress eftersom den låter dina teammedlemmar kommunicera direkt utan att lämna intranätet.
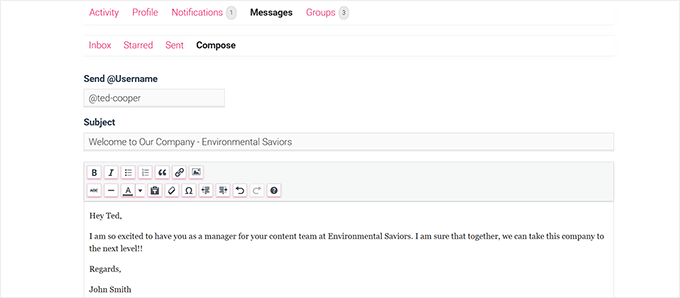
För att testa det, logga in med ett testanvändarkonto och gå till avsnittet Meddelanden » Skriv från din Aktivitetsida.
Skriv sedan in användarnamnet för en annan användare, skriv ett kort meddelande och klicka på knappen ‘Skicka meddelande’.
Logga sedan in som mottagaren (eller be en lagkamrat om hjälp) och kontrollera att meddelandet visas i deras inkorg.
De bör också se en liten notifieringsvarning som bekräftar att privata meddelanden fungerar korrekt.
Den här funktionen gör det enkelt för ditt team att dela snabba uppdateringar, ställa frågor eller skicka filer privat – allt inom ert säkra WordPress-intranät.
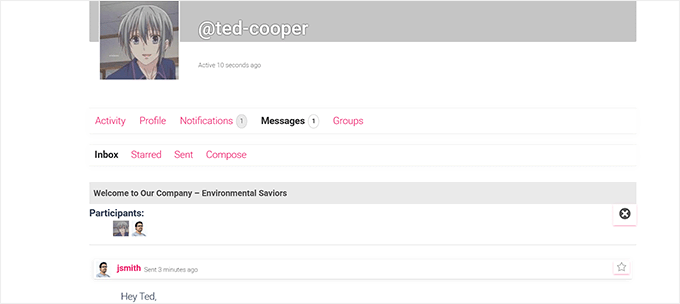
I den här handledningen har jag gått igenom de mest väsentliga funktionerna du behöver för att sätta upp ett funktionellt intranät med BuddyPress, inklusive profiler, grupper, meddelanden och aktivitetsflöden.
Dessa räcker för att ditt team ska kunna kommunicera och samarbeta smidigt.
BuddyPress kan dock göra mycket mer. Du kan utöka ditt intranät genom att lägga till forum, avancerade medlemskataloger, fildelningsverktyg eller till och med anpassade instrumentpaneler allt eftersom dina behov växer.
Om du vill utforska dessa avancerade funktioner, kolla in vår fullständiga guide om hur man skapar ett socialt nätverk i WordPress.
Steg 3: Gör ditt intranät privat med All-in-One Intranet
Nu när ditt teamområde är inställt med BuddyPress är nästa steg att låsa det och se till att endast auktoriserade användare kan komma åt det. Det är där pluginet All-in-One Intranet kommer in.
Som standard är WordPress byggt för publika webbplatser, vilket innebär att vem som helst kan se dina sidor om du inte säkrar dem. All-in-One Intranet löser detta genom att lägga till integritetskontroller, omdirigeringar till inloggning och funktioner för automatisk utloggning som håller ditt interna innehåll säkert.
Det är en allt-i-ett-lösning som är väsentlig för att skydda ditt teams kommunikation, dokument och data.
Installera och aktivera All-In-One Intranet
All-in-One Intranet är ett gratis plugin, så du kan installera det direkt från din WordPress-instrumentpanel.
Gå bara till Plugins » Lägg till nytt och skriv in ‘All-in-One Intranet‘ i sökfältet. När du ser pluginet i resultaten, klicka på ‘Installera nu’, och tryck sedan på ‘Aktivera’.
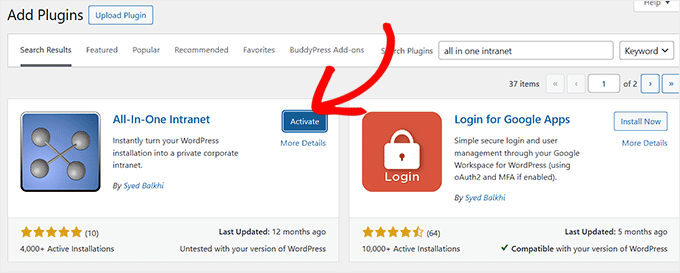
Om du är osäker på detta steg, ta gärna en titt på vår detaljerade guide om hur man installerar ett WordPress-plugin.
Konfigurera integritetsinställningar
När pluginet har aktiverats, gå till sidan Inställningar » All-in-One Intranet från din WordPress-instrumentpanel.
Här ser du ett alternativ som heter ‘Tvinga webbplatsen att vara helt privat.’ Markera denna ruta för att säkerställa att endast inloggade användare kan komma åt ditt intranät.
Detta innebär att om någon försöker besöka ditt intranät utan att logga in, kommer de automatiskt att omdirigeras till inloggningssidan istället för att se ditt privata innehåll.
Dessutom kan du ställa in ‘Automatisk utloggning’ för att automatiskt logga ut inaktiva användare efter ett visst antal minuter. Ange helt enkelt antalet minuter i fältet.

Om du lämnar det tomt, kommer automatisk utloggning att vara avstängd. Detta hjälper till att skydda din känsliga företagsinformation om någon glömmer att logga ut.
När du är klar, glöm inte att klicka på knappen 'Save Changes' för att spara dina inställningar.
⚠️ Varning: Om du hoppar över detta steg kommer ditt intranät att vara synligt för allmänheten. Aktivera alltid integritet innan du lägger till interna filer eller teamdiskussioner.
Ställ in omdirigeringar vid inloggning
Som standard loggar WordPress in användare på deras profilsida efter inloggning, vilket inte alltid är användbart för ett intranät.
All-in-One Intranet låter dig dock ställa in en anpassad landningssida för alla som loggar in. Detta ger ditt team en central startpunkt för att komma åt viktig information, verktyg och länkar.
Den här landningssidan bör inkludera ett välkomstmeddelande, snabblänkar till grupper eller projekt, meddelanden och alla nödvändiga resurser som ditt team behöver dagligen.
🎁 Bonustips: Skapa en anpassad landningssida först

Innan du konfigurerar din inloggningsomdirigering måste du skapa en dedikerad landningssida för ditt intranät.
Ett verktyg som SeedProd, en av de bästa sidbyggarna för WordPress, gör det enkelt att designa en professionell och användarvänlig sida.
Du kan till exempel lägga till widgets för de senaste meddelandena, snabblänkar till viktiga teamgrupper och ett välkomstmeddelande.
För att komma igång, kolla vår guide om hur du skapar en anpassad landningssida i WordPress.
När din landningssida är klar, kopiera dess URL och gå till sidan Inställningar » Allt-i-ett intranät från administratörsmenyn.
Därefter, scrolla ner till sektionen 'Inloggningsomdirigering' och ange länken. Klicka sedan på knappen 'Spara ändringar'.
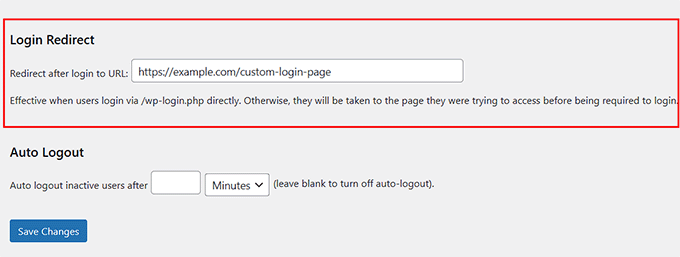
Nu kommer varje teammedlem att landa på sidan du designade omedelbart efter inloggning, vilket gör det enklare att hitta viktig information och verktyg.
Steg 4: Säkra medieuppladdningar på ditt intranät
Även om ditt intranät är privat, kan filerna du laddar upp, som PDF:er, bilder eller dokument, fortfarande öppnas av vem som helst som känner till den direkta länken.
Detta kan vara ett problem om filerna innehåller känslig företagsinformation.
För att åtgärda detta föreslår jag att du använder ett litet PHP-skript. Detta skript fungerar som en säkerhetsvakt genom att kontrollera om en användare är inloggad innan filen visas.
Om användaren är inloggad kan de se filen. Om inte, skickas de till inloggningssidan först. På så sätt kan endast dina teammedlemmar komma åt dina filer.
För att göra dina filer säkra, öppna en enkel textredigerare på din dator, som Anteckningar. Kopiera sedan PHP-koden nedan och spara filen som download-file.php på ditt skrivbord:
<?php
require_once(__DIR__ . '/wp-load.php');

is_user_logged_in() ||  auth_redirect();

list($basedir) = array_values(array_intersect_key(wp_upload_dir(), array('basedir' => 1)))+array(NULL);

$file =  rtrim($basedir,'/').'/'.str_replace('..', '', isset($_GET[ 'file' ])?$_GET[ 'file' ]:'');
if (!$basedir || !is_file($file)) {
    status_header(404);
    die('404 — File not found.');
}

$mime = wp_check_filetype($file);
if( false === $mime[ 'type' ] && function_exists( 'mime_content_type' ) )
    $mime[ 'type' ] = mime_content_type( $file );

if( $mime[ 'type' ] )
    $mimetype = $mime[ 'type' ];
else
    $mimetype = 'image/' . substr( $file, strrpos( $file, '.' ) + 1 );

header( 'Content-Type: ' . $mimetype ); // always send this
if ( false === strpos( $_SERVER['SERVER_SOFTWARE'], 'Microsoft-IIS' ) )
    header( 'Content-Length: ' . filesize( $file ) );

$last_modified = gmdate( 'D, d M Y H:i:s', filemtime( $file ) );
$etag = '"' . md5( $last_modified ) . '"';
header( "Last-Modified: $last_modified GMT" );
header( 'ETag: ' . $etag );
header( 'Expires: ' . gmdate( 'D, d M Y H:i:s', time() + 100000000 ) . ' GMT' );

// Support for Conditional GET
$client_etag = isset( $_SERVER['HTTP_IF_NONE_MATCH'] ) ? stripslashes( $_SERVER['HTTP_IF_NONE_MATCH'] ) : false;

if( ! isset( $_SERVER['HTTP_IF_MODIFIED_SINCE'] ) )
    $_SERVER['HTTP_IF_MODIFIED_SINCE'] = false;

$client_last_modified = trim( $_SERVER['HTTP_IF_MODIFIED_SINCE'] );
// If string is empty, return 0. If not, attempt to parse into a timestamp
$client_modified_timestamp = $client_last_modified ? strtotime( $client_last_modified ) : 0;

// Make a timestamp for our most recent modification...
$modified_timestamp = strtotime($last_modified);

if ( ( $client_last_modified && $client_etag )
    ? ( ( $client_modified_timestamp >= $modified_timestamp) && ( $client_etag == $etag ) )
    : ( ( $client_modified_timestamp >= $modified_timestamp) || ( $client_etag == $etag ) )
    ) {
    status_header( 304 );
    exit;
}

readfile( $file );
Anslut nu till din webbplats med en FTP-klient och ladda upp filen download-file.php som du just skapade till rotkatalogen på din WordPress-webbplats (samma mapp som innehåller wp-config.php).
Om du inte vet hur du gör det, följ vår nybörjarguide om att använda FTP för att ladda upp filer till WordPress.
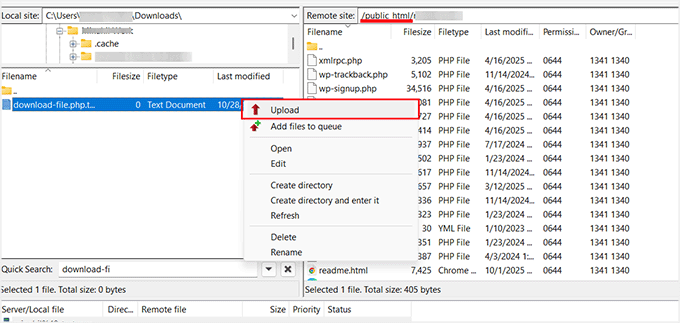
Öppna sedan filen .htaccess i din webbplats rotmapp. Detta är en speciell fil som talar om för din webbserver hur den ska hantera förfrågningar, som vilka sidor som ska laddas eller hur användare ska omdirigeras.
Var försiktig, eftersom detta är en mycket känslig fil, och ett litet misstag kan göra din webbplats otillgänglig. Innan du gör några ändringar rekommenderar jag starkt att du laddar ner en kopia av filen till din dator som en säkerhetskopia.
Bläddra till slutet av filen och lägg till följande kodrader:
RewriteCond %{REQUEST_FILENAME} -s
RewriteRule ^wp-content/uploads/(.*)$ /download-file.php?file=$1 [QSA,L]
Spara sedan .htaccess-filen och ladda upp den tillbaka till din server.
Nu, när någon försöker komma åt en mediefil direkt, kontrollerar PHP-skriptet om de är inloggade. Om de inte är det, kommer de att omdirigeras till inloggningssidan.
Detta säkerställer att endast dina teammedlemmar kan se filerna på ditt intranät.
Steg 5: Skapa meddelanden & anmälningar
Ett intranät är en utmärkt plats att dela företagets nyheter, påminnelser och uppdateringar med ditt team. Du kan enkelt göra detta i WordPress genom att skapa ett inlägg.
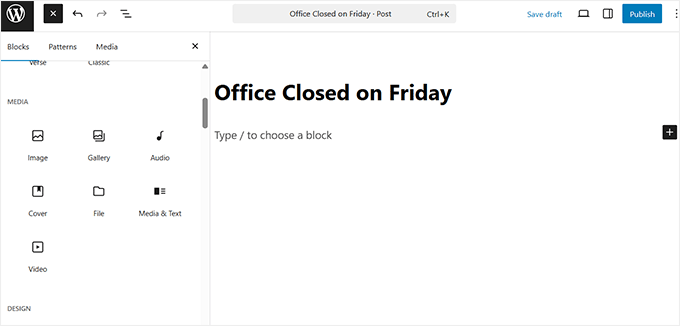
För att skapa ett meddelande, gå till din WordPress-instrumentpanel och navigera till Inlägg » Lägg till nytt. Detta öppnar blockredigeraren, där du kan ange en titel (till exempel 'Kontoret stängt på fredag') och skriva ditt meddelande i innehållsområdet.
Du kan också bifoga filer, som PDF-filer eller bilder, för mer detaljer med hjälp av olika block.
Proffstips: Om du vill hålla meddelanden separerade från dina vanliga inlägg, rekommenderar jag att du skapar en anpassad inläggstyp.
En anpassad inläggstyp är en speciell typ av innehåll som fungerar precis som vanliga inlägg men organiseras separat. Du kan till exempel skapa en som heter 'Meddelanden' som endast används för företagsuppdateringar.
Detta gör det enklare för anställda att hitta de senaste meddelandena utan att blanda ihop dem med bloggartiklar eller interna sidor.
För att komma igång, se vår handledning om hur man skapar en anpassad inläggstyp i WordPress.
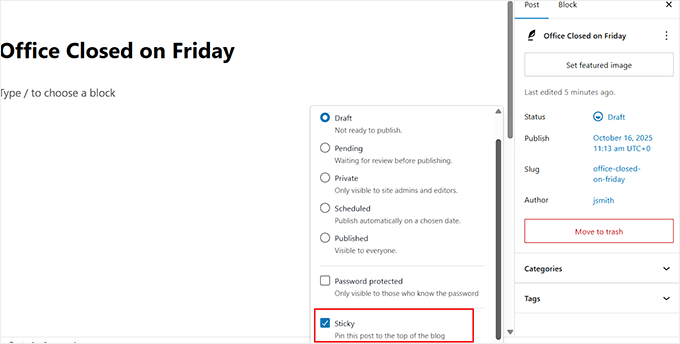
Du kan också hålla ditt meddelande fäst överst i din blogg genom att markera det som klistrigt. För att göra detta, öppna inläggsinställningarna i redigeraren, klicka på 'Status' och markera sedan rutan märkt 'Klistrigt' i rullgardinsmenyn.
Detta säkerställer att dina viktigaste uppdateringar — som nya policyer, påminnelser om evenemang eller teammeddelanden — alltid visas först, så att anställda inte missar dem.
För att hantera tidpunkten kan du schemalägga dina meddelanden att publiceras automatiskt vid ett specifikt datum och tid. Detta är användbart för kommande evenemang eller planerade kommunikationer.
Klicka helt enkelt på ‘Omedelbart’ bredvid alternativet ‘Publicera’ i inläggsredigeraren och välj ett specifikt datum eller tid för ditt meddelande att publiceras.

📘 Behöver du hjälp? Kolla in våra handledningar om:
- Hur man använder WordPress blockredigerare (Gutenberg-handledning)
- Hur du automatiskt schemalägger dina WordPress-blogginlägg
- Nybörjarguide för att lägga till kategorier och underkategorier i WordPress
- Kategorier vs. Taggar – Bästa SEO-metoder för att sortera ditt innehåll
Steg 6: Säkra ditt intranät
Ditt WordPress-intranät kommer sannolikt att lagra känsliga företagsdata – som anställdas detaljer, projektfiler och interna uppdateringar. Därför är det viktigt att säkra det från början.
Låt oss titta på några enkla men kraftfulla sätt att skydda ditt intranät och hålla din information privat.
1. Begränsa inloggningsförsök
Som standard tillåter WordPress obegränsade inloggningsförsök. Det innebär att hackare kan prova tusentals användarnamn och lösenordskombinationer tills de kommer in. Denna metod kallas ett brute-force-angrepp.
För att förhindra detta rekommenderar jag att installera och aktivera ett plugin som Limit Login Attempts Reloaded. Detta verktyg blockerar tillfälligt användare som anger fel lösenord för många gånger.

Det är mycket viktigt för intranät, där varje konto ger tillgång till privat företagsdata. Att begränsa inloggningsförsök gör det mycket svårare för obehöriga användare att bryta sig in.
För detaljerade instruktioner, se vår handledning om hur och varför du bör begränsa inloggningsförsök i WordPress.
2. Inaktivera användarregistrering
De flesta publika WordPress-webbplatser tillåter vem som helst att registrera sig, men ett intranät bör alltid vara endast för inbjudna. Om publik registrering är påslagen kan främlingar fortfarande skapa konton och komma åt din webbplats.
Allt-i-ett Intranet-plugin hjälper redan genom att göra din webbplats privat för inloggade användare. Det stoppar dock inte automatiskt nya användarregistreringar.
Det betyder att om någon hittar din registreringssida, kan de fortfarande registrera sig om du inte stänger av det här alternativet.
För att åtgärda detta, gå till Inställningar » Allmänt i din WordPress-instrumentpanel och avmarkera rutan som säger 'Vem som helst kan registrera sig'.

Detta säkerställer att endast administratörer manuellt kan lägga till teammedlemmar, vilket håller ditt intranät helt säkert och begränsat till endast godkända användare.
3. Håll plugins och teman uppdaterade
Föråldrade plugins, teman, eller till och med WordPress självt kan skapa säkerhetsrisker. Hackare letar ofta efter kända sårbarheter i äldre versioner för att få tillgång.
Genom att hålla allt uppdaterat ser du till att dessa säkerhetshål stängs så snart korrigeringar släpps.
För att göra detta, besök sidan Instrumentpanel » Uppdateringar regelbundet, eller aktivera automatiska uppdateringar så att ditt intranät förblir skyddat utan manuellt arbete.
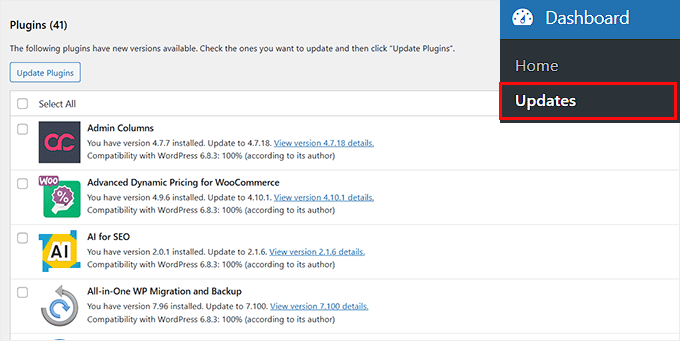
Detta steg kan verka litet, men det är ett av de enklaste och mest effektiva sätten att säkra din webbplats på lång sikt.
4. Installera ett säkerhetsplugin
Jag rekommenderar att använda ett dedikerat säkerhetsplugin för att skydda ditt intranät från obehörig åtkomst.
Till exempel kan Sucuri automatiskt skanna din webbplats efter skadlig kod, blockera misstänkta besökare och skicka varningar om något ser fel ut.
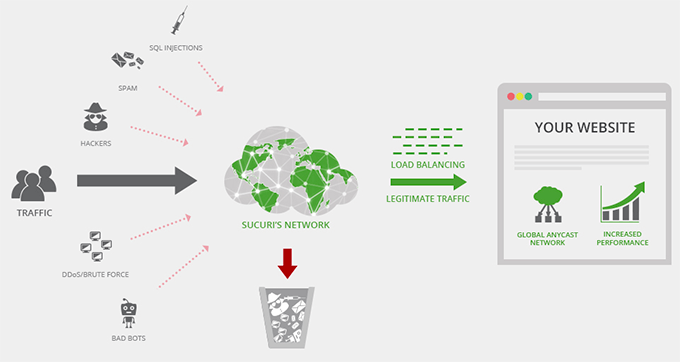
För intranätsidor där du lagrar företagsfiler eller interna meddelanden är denna typ av övervakning avgörande. Även gratisversionerna erbjuder ett gediget skydd, medan premiumplaner inkluderar realtidsskanning och starkare brandväggar.
Du kan också använda Cloudflare för att lägga till ett extra säkerhetslager. Det skyddar din webbplats från botar och DDoS-attacker, döljer din verkliga server-IP och filtrerar bort oönskad trafik innan den ens når ditt intranät.
För fler tips och tricks kan du kolla in vår ultimata WordPress-säkerhetsguide.
Steg 7: Konfigurera användarroller & behörigheter
När du driver ett intranät bör inte alla ha samma åtkomstnivå. Vissa teammedlemmar kanske bara behöver läsa meddelanden, medan andra behöver ladda upp filer, skapa inlägg eller hantera inställningar.
Att ställa in korrekta användarroller och behörigheter hjälper dig att kontrollera vem som kan se och göra vad på ditt intranät, vilket håller ditt innehåll säkert och organiserat.
Här är en föreslagen struktur för ett intranät för småföretag:
| Roll | Behörigheter |
|---|---|
| Administratör | Full kontroll över intranätet: hantera användare, plugins, inställningar och innehåll. |
| Chef/Redaktör | Kan hantera och publicera meddelanden, inlägg och visst internt innehåll. |
| Författare | Kan skapa egna inlägg eller projektuppdateringar men kan inte publicera andras innehåll. |
| Bidragsgivare | Kan skriva inlägg eller uppdateringar, men de behöver godkännande för att publiceras. |
| Prenumerant | Kan se innehåll, delta i grupper och kommentera, men kan inte redigera eller publicera. |
För att lägga till eller redigera en användare i WordPress, gå till sidan Användare » Lägg till användare från din instrumentpanel.
När den nya skärmen öppnas, ange användarens namn, e-postadress och lösenord, välj sedan lämplig roll från rullgardinsmenyn.
Klicka sedan på knappen 'Lägg till användare' för att spara dina ändringar.

Om du vill ha en djupare förståelse för varje användarroll och hur du anpassar dem för ditt intranät, kolla in vår guide om WordPress användarroller och behörigheter.
Hur du håller ditt WordPress-intranät igång smidigt
Att driva ett intranät för ett litet företag är enklare när du har en enkel rutin. Jag rekommenderar att göra en månatlig kontroll för att säkerställa att allt är snabbt, säkert och organiserat.
Det hjälper dig också att upptäcka små problem innan de blir stora problem.
Här är en checklista som jag följer:
- Kontrollera uppdateringar av BuddyPress-komponenter: BuddyPress driver intranätets sociala och samarbetsfunktioner. Att regelbundet kontrollera efter uppdateringar säkerställer att aktivitetsflöden, meddelanden och grupper fortsätter att fungera smidigt.
- Granska användarroller och behörigheter: Dubbelkolla att teammedlemmar har rätt åtkomst. Detta förhindrar misstag som att praktikanter får åtkomst till känsliga HR-dokument eller att konsulter ser privata projekt.
- Rensa inaktiva användare eller gamla grupper: Gamla konton och oanvända grupper skräpar ner intranätet. Att ta bort dem håller din arbetsyta organiserad och minskar säkerhetsrisker.
- Optimera databasen: Jag använder ett plugin som WP-Optimize för att ta bort gamla revisioner, skräppostkommentarer och overhead. Detta håller webbplatsen snabbare och förhindrar långsamma laddningstider när intranätet växer.
- Rensa cache (särskilt för aktivitetsflöden): Aktivitetsflöden visar de senaste uppdateringarna, så att rensa cachen säkerställer att alla ser information i realtid utan fördröjningar.
Genom att följa denna rutin kan du hålla ditt intranät igång smidigt och undvika problem.
Vanliga frågor om att skapa ett intranät i WordPress
Att driva ett privat intranät för ditt småföretag medför många frågor. I det här avsnittet kommer jag att besvara de vanligaste och förklara varför dessa saker är viktiga för ditt team.
Kan jag bygga ett intranät gratis?
Ja. I grunden är WordPress gratis, och du kan använda gratis plugins som BuddyPress och All-in-One Intranet för att lägga till viktiga funktioner. Detta gör att du kan skapa ett fullt fungerande intranät utan att betala för dyr företagsmjukvara.
Du kan välja premium-plugins för extra hastighet, designalternativ eller avancerad säkerhet, men den grundläggande installationen kostar inget utöver hosting.
Kan jag anpassa intranätet för olika avdelningar eller team?
Absolut. Med BuddyPress kan du skapa grupper för avdelningar, projekt eller specialteam. Varje grupp kan ha sina egna diskussioner, aktivitetsflöden och filåtkomst.
Anpassade inläggstyper och rollbaserade behörigheter låter dig visa specifikt innehåll för rätt personer, vilket håller allt organiserat och relevant.
Vad är det bästa sättet att introducera nyanställda till intranätet?
Det bästa sättet är att skapa tydliga användarroller, profilfält och en central landningssida. En landningssida guidar nyanställda till viktiga resurser, medan profilfält och grupper hjälper dem att hitta lagkamrater och relevanta projekt.
Du kan också skapa "Välkomst"-meddelanden eller handledningar direkt på intranätet, så att nyanställda kan börja använda det omedelbart utan förvirring.
Hur kan jag säkert dela filer och dokument inom ett intranät?
Som standard tillämpar WordPress inga strikta åtkomstkontroller på mediefiler. För att säkra filer kan du använda en kombination av användarbehörigheter och ett PHP-skript som kontrollerar om användare är inloggade innan de laddar ner filer.
Vilka är säkerhetsriskerna med ett intranät?
Även privata intranät kan exponeras om säkerheten inte är korrekt konfigurerad. Risker inkluderar obehörig användarregistrering, svaga lösenord, skadlig kod och oskyddad filåtkomst.
Att använda säkerhetsplugins som Sucuri, begränsa registrering till endast inbjudna användare och övervaka inaktiva användare är viktiga steg för att minska riskerna.
Du kan också lägga till Cloudflare för att filtrera bort bottar och DDoS-attacker, vilket ger ditt intranät ett extra skyddslager.
Jag hoppas att den här artikeln hjälpte dig att lära dig hur du skapar ett intranät för ditt lilla företag. Du kanske också vill se vår guide om hur man lägger till dokumentation i WordPress och våra experters val för de bästa kommunikationsverktygen för småföretag.
Om du gillade den här artikeln, prenumerera då på vår YouTube-kanal för WordPress-videoguider. Du kan också hitta oss på Twitter och Facebook.


John Akpama
Artikeln är mycket hjälpsam. Snabb fråga, för ett intranät, hur får andra datorer på mitt interna nätverk tillgång till WordPress-intranätet? Om det finns en tidigare artikel om detta, dela gärna länken så att jag kan gå igenom den. TIA
WPBeginner Support
Det skulle bero på hur ditt intranät är konfigurerat eftersom varje intranät kan ha sina egna verktyg för att anpassa vilken URL som går vart. Om verktyget du använder för ditt nätverk har dokumentation rekommenderar vi att du kontrollerar det och det bör finnas möjlighet att ställa in var en specifik URL leder.
Admin
Megan
Hur skulle du uppdatera WP om du inte har tillgång till internet? Måste det göras manuellt via FTP?
WPBeginner Support
Korrekt, vi täcker hur man gör detta som alternativ två i vår artikel här: https://www.wpbeginner.com/beginners-guide/ultimate-guide-to-upgrade-wordpress-for-beginners-infograph/
Admin
AdamGreenberg
Jag är en volontär från USA:s Peace Corps i Zambia och överväger möjligheterna att göra detta i den lantliga by där jag bor. Med början med de två skolorna som har några få, äldre datorer. Det finns inget internet här, så detta kan vara fantastiskt för att dela offline-inlärning som Khan Academy Lite och liknande. Jag förstår localhost WordPress-komponenten av detta, men hur börjar jag ens med att ansluta två datorer i ett LAN? Är det med cat 5-kablar eller kan det ens göras med trådlösa routrar? Tack. Jag tror att ett intranät kan vara till stor hjälp här.
WPBeginner Support
Den frågan ligger lite utanför den här artikeln, det skulle bero på vilka verktyg du har tillgängliga men normalt sett skulle en dator behöva vara webbservern medan de andra datorerna behöver kunna ansluta till den datorn
Admin
Hjason
Kommer mitt media eller mitt innehåll att indexeras av Google eller är det 100% säkert?
WPBeginner Support
Om du installerar det på ett lokalt nätverk kan Google inte genomsöka webbplatsen. Om du publicerar webbplatsen online med hosting kan du göra webbplatsen privat med metoden i vår artikel här: https://www.wpbeginner.com/beginners-guide/how-to-make-your-wordpress-blog-completely-private/
Admin
Blair Hewitt
Varför skickar mina användare inga kommentarer?
WPBeginner Support
Det finns flera möjliga anledningar, du kanske vill gå igenom stegen i den här artikeln för att få användare att vilja kommentera mer: https://www.wpbeginner.com/beginners-guide/how-to-increase-your-blog-traffic/
Admin
Ken
Jag försökte implementera skriptet för att säkra medieuppladdningar och konfigurerade det i .htaccess, men när jag försökte kopiera den exakta bildlänken och komma åt den i en webbläsare som inte har intranätsessionen kunde den fortfarande komma åt den! Missade jag några PHP-moduler?
Michael
Jag har använt metoden som beskrivs i den här artikeln för att skydda mina medier i ett par dagar nu när allt plötsligt slutade fungera – osäker på om det beror på en ändring i serverkonfigurationen eller något annat. Medier skulle inte visas för registrerade användare, när man direkt begärde en fil inloggad skulle ett 404-fel visas.
Löste det genom att ändra två saker:
.htaccess:
RewriteCond %{REQUEST_FILENAME} -s
RewriteRule ^wp-content/uploads/(.*)$ wp-content/uploads/download-file.php?file=$1 [QSA,L]
ladda-ner-fil:
<?php
$parse_uri = explode( 'wp-content', $_SERVER['SCRIPT_FILENAME'] ); require_once( $parse_uri[0] . 'wp-load.php' );
is_user_logged_in() || auth_redirect();
Bara för att vara säker om någon har samma problem...
Stephen
Tack Michael, hade samma problem, lade till detta och det fungerar för mig nu.
Sean
Det här inlägget var precis vad jag letade efter, så tack för att du postade det!
Men något är inte riktigt.
Jag kanske är helt ny på det här, men antingen förhindrar tillägget av skriptet för att säkra mediefiler och/eller de 2 raderna som lagts till i .htaccess-filen att bilder visas i mediebiblioteket.
Jag tror att det är ett behörighetsproblem av något slag, men jag är inte riktigt säker på hur jag ska gå vidare.
Sean
Det verkar som att det är .htaccess-filen (2 rader kod) som gör att bilderna inte laddas i mediebiblioteket. Jag satte tillbaka den gamla och bilderna laddas. All rådgivning skulle uppskattas.
Michael
Sean, jag har samma problem här. Jag gjorde en liten lösning i .htaccess:
RewriteCond %{REMOTE_ADDR} !123.456.789.000
RewriteCond %{REQUEST_FILENAME} -s
RewriteRule ^wp-content/uploads/(.*)$ download-file.php?file=$1 [QSA,L]
Den första raden gör ett undantag för min hem-IP, jag kanske lägger till kontors-IP:er också. Verkar fungera ganska bra.
Jonathon
Din kod för att begränsa uppladdningsmappen verkar inte fungera längre eller så kan jag ha en plugin-konflikt.
WPBeginner Support
Hej Jonathan,
Are you seeing an error message? If not, then you probably missed something. Please follow the instructions again. Let’s us know how it went. Good Luck
Admin
LFreitas
Hej, tack för artikeln!
Jag planerar att använda WP i ett extranät och detta kommer att vara mycket hjälpsamt.
För att uppfylla kraven behöver jag också en unik kalender för personalen.
Det bör tillåta schemaläggning av möten med flera personer och dessa personer bör få ett e-postmeddelande med inbjudan; detta e-postmeddelande bör också innehålla metadata som lägger till händelsen i Outlook-kalendern, eftersom det används för att påminna folk om mötet. (Alla använder Outlook som e-post här).
Vet ni några plugins eller metoder för att göra detta?
Jag har provat flera kalender- och bokningsplugins, men ingen uppfyller detta krav. Speciellt eftersom det är möjligt att ha flera möten samtidigt, med olika personer.
Tack på förhand!
WPBeginner Support
Hej LFreitas,
Har du tittat på Google Kalender? Den synkroniseras bra med Outlook och du kan bädda in kalendern i WordPress.
Admin
Thomas
Tja – vad händer om jag inte vill mata Google med mina data? Är någon CalDAV/CardDAV-integration möjlig?