Med widgetar kan du lägga till element som inte är innehåll i ett sidofält eller något annat widget-klart område på din WordPress-webbplats. Du kan använda dem för att lägga till banners, annonser, anmälningsformulär för nyhetsbrev och andra element på din webbplats.
Du kan också skapa en anpassad widget för att bädda in unika funktioner med en personlig touch, t.ex. flöden från sociala medier, senaste inlägg eller HTML-taggar.
På WPBeginner använder vi anpassade widgetar för att visa olika typer av innehåll i sidofältet på vår webbplats. Och i den här artikeln visar vi dig hur du skapar en anpassad WordPress-widget, steg för steg.

Obs/observera: Denna tutorial är för DIY WordPress användare som håller på att lära sig WordPress utveckling och kodning.
Vad är en WordPress Widgetar?
WordPress widgetar innehåller bitar av kod som du kan add to din website’s sidebar eller widget-ready areas.
Tänk på dem som moduler som du kan använda för att add to olika element och funktioner till din site.
Som standard levereras WordPress med en standarduppsättning widgetar som du kan använda med alla WordPress-teman. Mer detaljer finns i vår guide för nybörjare om hur du lägger till och använder widgetar i WordPress.
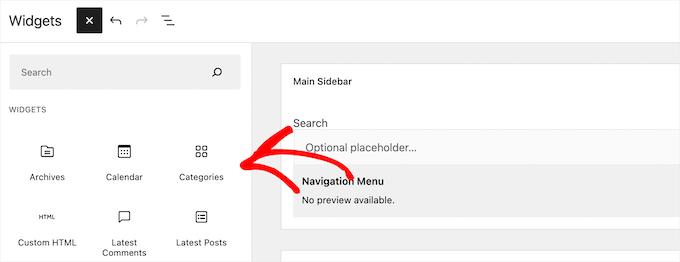
WordPress allow också utvecklare att skapa sina egna customize widgets.
Många premium WordPress teman och tillägg kommer med sina egna custom widgets som du kan add to your sidebars.
Du kan till exempel lägga till ett kontaktformulär, ett anpassat inloggningsformulär, ett fotogalleri, ett formulär för att registrera sig på en e-postlista med mera i ett sidofält utan att skriva någon kod.
Med detta sagt, låt oss se hur du enkelt kan skapa dina egna customize widgets i WordPress.
Innan du skapar en customize widget i WordPress
Om du lär dig WordPress-kodning behöver du en lokal miljö för utvecklare. Det ger dig friheten att lära dig och testa saker utan att behöva oroa dig för att din site ska vara live.
Du kan installera WordPress lokalt på Mac med hjälp av MAMP eller Windows med hjälp av WAMP.
Om du redan har en live site kan du flytta den till en lokal server. För mer detaljer, se vår guide om hur du flyttar en live WordPress site till en lokal server.
Efter det finns det flera sätt att add to din custom widget code i WordPress.
I bästa fall kan du skapa ett webbplatsspecifikt plugin och klistra in din widgetkod där. På så sätt kan du lägga till kod i WordPress som inte är beroende av ditt WordPress-tema.
You can also paste the code into your theme’s functions.php file. Den kommer dock endast att vara tillgänglig när det vissa temat är aktivt.
Ett annat verktyg du kan använda är plugin-programmet WPCode som gör att du enkelt kan lägga till anpassad kod på din webbplats.
I denna tutorial skapar vi en enkel widget som bara hälsar besökarna välkomna. Målet här är att bekanta dig med klassen WordPress widgetar.
Är du redo? Låt oss komma igång.
Skapa en grundläggande widget i WordPress
WordPress levereras med en built-in WordPress Widgetar-klass. Varje new WordPress-widget utökar WordPress-widgetklassen.
Det finns 19 metoder som nämns i handboken för utvecklare av WordPress som kan användas med WP Widgetar-klassen.
I den här tutorialen kommer vi dock att fokusera på följande metoder.
- __construct() : Det här är den del där vi skapar widgetens ID:n, titel och description.
- widget : Här definierar vi den utdata som genereras av widgeten.
- formulär : Den här delen av koden är där vi skapar formuläret med widgetar alternativ för back-end.
- update: Detta är den del där vi sparar alternativen för widgetar i databasen.
För att skapa en anpassad widget kan du kopiera och klistra in följande kodsnutt i din functions.php-fil eller i WPCode (rekommenderas):
1 2 3 4 5 6 7 8 9 10 11 12 13 14 15 16 17 18 19 20 21 22 23 24 25 26 27 28 29 30 31 32 33 34 35 36 37 38 39 40 41 42 43 44 45 46 47 48 49 50 51 52 53 54 55 56 57 58 59 60 61 62 63 64 65 66 67 68 69 70 71 72 73 74 75 | <?php// Creating the widgetclass wpb_widget extends WP_Widget { function __construct() { parent::__construct( // Base ID of your widget 'wpb_widget', // Widget name will appear in UI __( 'WPBeginner Widget', 'textdomain' ), // Widget description [ 'description' => __( 'Sample widget based on WPBeginner Tutorial', 'textdomain' ), ] ); } // Creating widget front-end public function widget( $args, $instance ) { $title = apply_filters( 'widget_title', $instance['title'] ); // before and after widget arguments are defined by themes echo $args['before_widget']; if ( ! empty( $title ) ) { echo $args['before_title'] . $title . $args['after_title']; } // This is where you run the code and display the output echo __( 'Hello, World!', 'textdomain' ); echo $args['after_widget']; } // Widget Settings Form public function form( $instance ) { if ( isset( $instance['title'] ) ) { $title = $instance['title']; } else { $title = __( 'New title', 'textdomain' ); } // Widget admin form ?> <p> <label for="<?php echo $this->get_field_id( 'title' ); ?>"> <?php _e( 'Title:', 'textdomain' ); ?> </label> <input class="widefat" id="<?php echo $this->get_field_id( 'title' ); ?>" name="<?php echo $this->get_field_name( 'title' ); ?>" type="text" value="<?php echo esc_attr( $title ); ?>" /> </p> <?php } // Updating widget replacing old instances with new public function update( $new_instance, $old_instance ) { $instance = array(); $instance['title'] = ( ! empty( $new_instance['title'] ) ) ? strip_tags( $new_instance['title'] ) : ''; return $instance; } // Class wpb_widget ends here}// Register and load the widgetfunction wpb_load_widget() { register_widget( 'wpb_widget' );}add_action( 'widgets_init', 'wpb_load_widget' ); |
Det enklaste sättet att lägga till anpassad kod på din WordPress-webbplats är genom att använda WPCode. Det är det bästa kodsnippet-pluginet som hjälper till att hantera och infoga kodsnippets på din webbplats utan att riskera att bryta något.
Först måste du installera och aktivera plugin-programmet WPCode på din webbplats. Om du behöver hjälp kan du läsa vår guide om hur du installerar ett WordPress-plugin.
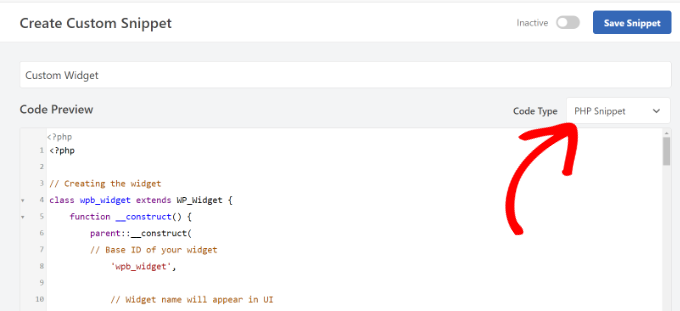
Efter aktivering kan du heada till Code Snippets ” + Add Snippet från WordPress adminpanel. Härifrån väljer du alternativet “Add Your Custom Code (New Snippet)”.

Efter det kan du klistra in koden för customize widgetar i Code Preview area.
Du måste också clicka på dropdown-menyn “Code Type” och välja alternativet “PHP Snippet”.
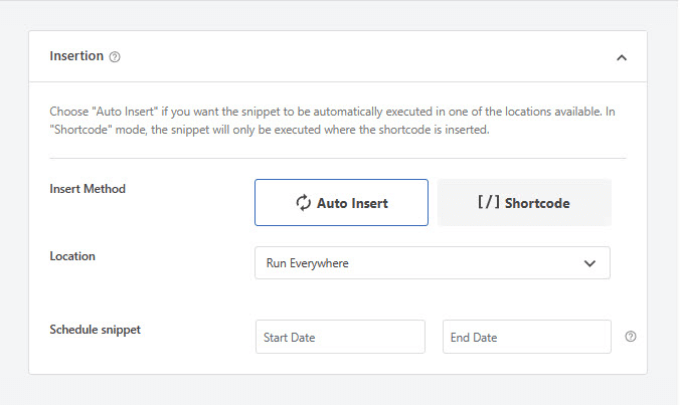
Därefter kan du rulla ner och välja metod för infogning av din kod.
WPCode låter dig välja var du vill runna koden. För den här tutorialen kan du använda standardalternativen och köra den överallt.
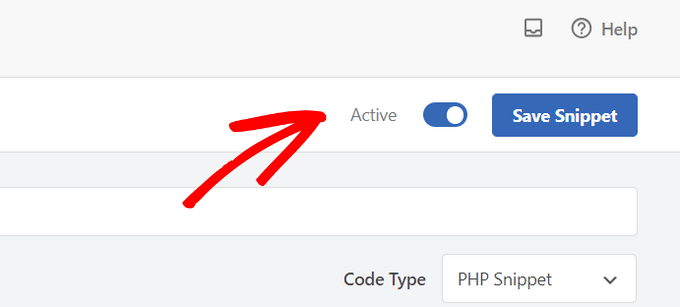
När det är gjort kan du rulla tillbaka högst upp för att Save snippet.
För att aktivera snippet klickar du bara på reglaget till “Aktiv”.
Mer information finns i vår guide om hur du lägger till anpassad kod på din WordPress-webbplats.
När du har lagt till koden i WordPress måste du heada över till sidan Appearance ” Widgets i din WordPress adminpanel.
Klicka sedan på ikonen “Plus” för att lägga till block, search efter “WPBeginner Widget” och välj det nya widgetet.

Detta widget har bara ett fält att fylla i.
Du kan lägga till din text och klicka på knappen “Update” för att lagra dina ändringar.
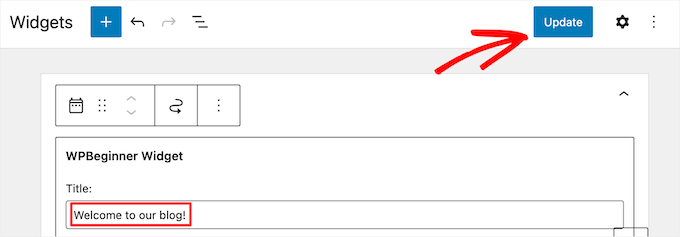
Nu kan du besöka din WordPress website för att se customize widget i action.
Här är ett exempel på hur det ser ut på vår demosajt.

Lägga till Customize Widget i WordPress Classic Editor
Om du använder den klassiska widget editorn för att add new widgetar till din site, så kommer processen att vara liknande.
Det kommer att finnas en new widget som heter “WPBeginner Widget” i listan över available widgets. You need to drag and drop this widget into your sidebar.
Sedan enter du en rubrik och clickar “Save” för att spara dina inställningar för widgetar.
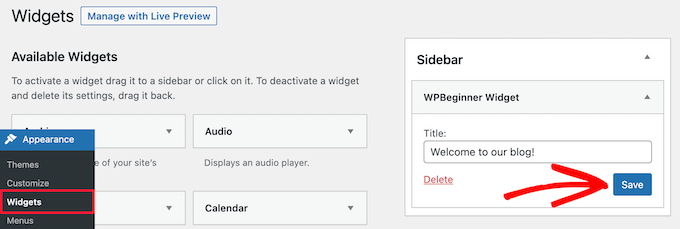
Din new customize widget kommer nu att vara live på din website.
Låt oss nu studera koden igen.
Först registrerade vi “wpb_widget” och hämtade vår customize-widget. Därefter definierade vi vad widgeten gör och hur man visar widgetens back-end.
Slutligen definierade vi hur ändringar i widgetar ska hanteras.
Det finns några saker som du kanske vill fråga. Till exempel, vad är syftet med textdomän?
WordPress använder ‘gettext’ för att hantera översättning och lokalisering. Denna textdomän och _e säger till ‘gettext’ att göra en sträng tillgänglig för översättning. Om du vill veta mer kan du läsa vår guide om hur du hittar översättningsklara WordPress-teman.
Om du skapar en custom widget för ditt theme kan du ersätta textdomain med ditt temas textdomän.
Alternativt kan du använda ett översättningsplugin för WordPress för att enkelt översätta WordPress och skapa en flerspråkig WordPress-webbplats.
Bonus: Lägg till anpassade stilar i dina WordPress-widgets
När du har skapat en WordPress-widget kan du också lägga till egna stilar. På så sätt kan du förbättra webbplatsens utseende, upprätthålla enhetlighet och rikta uppmärksamheten på viktig information.
För att göra detta, besök sidan Utseende ” Widgets och lägg till den widget som du vill anpassa. Du kommer nu att se några alternativ för att ändra dess färger och typografi i blockpanelen till höger.
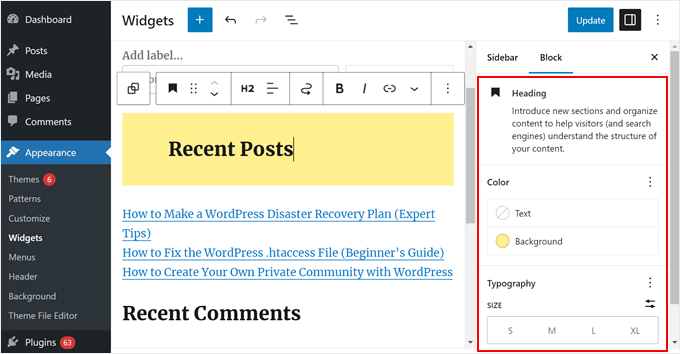
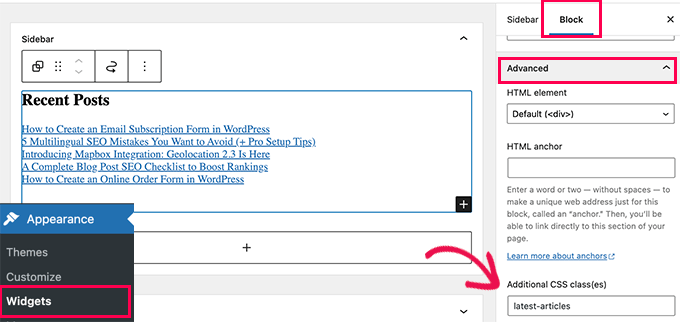
Men om widgeten inte visar det alternativet kan du anpassa den genom att lägga till CSS-klasser efter att du har expanderat fliken “Avancerat”.
Nu kan du lägga till anpassad CSS till ditt WordPress-tema med inriktning på den specifika CSS-klassen.
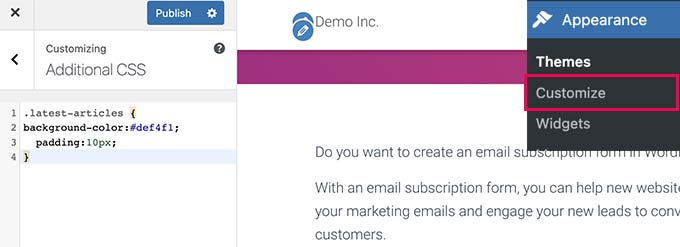
För det, gå över till sidan Utseende ” Anpassa och växla till fliken Ytterligare CSS. Här kommer du att se en förhandsgranskning av din webbplats med en ruta för att lägga till dina CSS-regler.
Du kan nu använda anpassad CSS för att anpassa din widgets utseende. Mer information finns i vår handledning om hur du lägger till anpassade stilar i dina WordPress-widgetar.
Vi hoppas att den här artikeln hjälpte dig att lära dig hur du enkelt skapar en anpassad WordPress-widget. Du kanske också vill läsa vår guide om hur du inaktiverar widgetblock i WordPress och vår handledning om hur du tar bort inaktiva widgetar i WordPress.
If you liked this article, then please subscribe to our YouTube Channel for WordPress video tutorials. You can also find us on Twitter and Facebook.


Dan
The ‘wpb_text_domain’ string is not found in the example code. I’m guessing the example code was updated and the article verbiage was not?
Also to confirm, is ‘wpb_text_domain’ actually ‘web_widget_domain’ from the sample code?
Thanks in advance for any feedback.
WPBeginner Support
Thank you for pointing this out, we’ll update this article and clarify this better and make it clear.
Admin
marwan
hi,
can I put the code as separate class.php and not in the functions.php
Karel Hanton
Thank you for great tutorial. I add code to my test plugin and It works perfectly as described – I see the Widget in Appearance » Widgets list and I can add it to Sidebar.
But I do not see the new Widget on page editor list. Do I miss something, is there need another registration or settings?
Thanks again for help.
Aldo
This is now displayed as a “Legacy Widget” in WordPress. Is there a new way to create widgets?
JP
this is great, simple cut and paste example was exactly what I was looking for. Thanks!
WPBeginner Support
You’re welcome
Admin
Banu
I have created a CRUD Plugin and i need to use it in one page could you please guide me how to use that plugin in page ?
WPBeginner Support
It would depend on how you set up the plugin, for having it on one page you could either look to use a shortcode for front-end display or look into the options API if you wanted to display it on the admin side of a site.
Admin
Kishan
How can I create more than 1 custom widget?
And also, how can I set other fields like radio, checkbox, dropdown, text in widget?
WPBeginner Support
You would need to replace the wpb_widget with what you want your new widget to be called and then the code would depend on what specifically you would like to add. If you take a look at the WordPress codex you can see the different codes available.
Admin
Carmen
Hello!
Currently, I am developing a plugin and I need to create a widget to let the user add a specific functionality to his/her site.
I copied the code for your widget in a file and saved the file in my plugin’s directory. I used add_action and do_action in my plugin’s main file to load it but it still doesn’t work. Can you help me, please?
Thank you!
WPBeginner Support
Sadly, that would depend heavily on how your plugin is set up, you may want to ensure both sections of this code are being loaded for the widget to be added and displayed
Admin
Maximilian K.
A short question, what if i want to create widgets in where i also can place other widgets? Like empty bootstrap columns 6-3-3 e.g. and in each column i can place then widgets like image, text, latest posts etc.
Is there a command / keyword to signalize that there is place for other widgets in this widget…
because im kind of confused about my own created theme and how WP is working… you see im a beginner ^^
I already placed general information like page title, make widget areas in my footer so ich can place menus, related links etc. on it. It worked.
But now im confused how i can realize my content in wordpress as i designed it before. Maybe some keywords are helpful to read more about them.
WPBeginner Support
That would require more customization than we go into in this article, you may need to look into how to create a sidebar for code you can use: https://www.wpbeginner.com/wp-themes/how-to-add-dynamic-widget-ready-sidebars-in-wordpress/
Admin
Lars
Great tutorial! Worked perfectly.
WPBeginner Support
Glad our tutorial could help
Admin
Watson Anikwai
How do you get a custom post type field from wp database and use a widget to display on front end?
vicky
i can’t add two custom widgets .. the second widget is not showing up….
what should i do???.. pls help
Ahad Bhatti
Really understandable and helpful. Thank you.
Belitza Gomez
hello, i would like to know where i can find in available widgets the “custom menu”. it doesn’t show and i haven’t been able to add a page to the footer through this widget.
thank you for your help!!!!
Samdoxer
hi, how would i show a logo in place of text. would replacing logo url with the text suffice.
Thanks in advance.
WPBeginner Support
Please see your theme settings or visit Appearance » Customizer page in admin area. There you will find an option to upload your logo image.
Admin
Gary Foster
Which came first the widget or the app?
Does a widget have to be registered if so how Please?
How do you best protect your idea of a widget or app?
Thanks all
shelley
These instructions worked beautifully for creating my custom widget. I cannot, however, figure out how to change the font size to 60px. I did manage to add CSS to Divi theme options that centered the text and added a line border. But how do I change the styling of the font please? Adding “font-size:60px” does not work. I want the font to be large, like a tagline running across the page. Thanks.
Ahmad Farhan
Very helpfull. tankyou
Eyad
Thanks so much for your tutorials
Luigi Briganti
Hi! I hope you can help me.
I’ve created a custom post type that show the timetable for a shop. Of course, you can create as much timetables as you want, but my necessity is to show a given timetable in the sidebar of the website.
For this purpose I made a widget that loop the timetable posts showing only 1 (namely the first one, since I ordered in ASC order). This is a temporary solution, just to see if the widget works and it does, actually.
What I really want to do is to show in the backend a dropdown list of all posts belonging to “timetable” post type so that I can choose the one I need when I need it and show it in the frontend. How can I do this?
Thanks if you may/want to help.
Anees Ijaz
Thanks Man for saving my time ..
Kevin
I love this post, helped me often a lot! Thanks!