
En av de första sakerna vi gör när vi vill förnya en webbplats är att klona den webbplatsen till en staging- eller lokal miljö. På så sätt kan vi skapa en exakt kopia av den webbplats vi arbetar med utan att påverka liveversionen.
Om du är en webbplatsägare med liten eller ingen teknisk kompetens är du förmodligen trött på att se de ändringar du gör leda till oväntade fel. Du vill försöka klona din WordPress-webbplats för teständamål, men du är rädd att processen är för svår.
Det är faktiskt precis tvärtom. Med pluginet Duplicator är det superenkelt att klona en WordPress-webbplats, och vi kommer att visa dig hur i den här artikeln.

Vad är kloning av WordPress website, och varför använda det?
Tanken med att klona en WordPress-webbplats är att du gör en exakt kopia av en webbplats och tillämpar den på en annan site.
Det finns många anledningar till att you kan behöva klona en website. Du kanske till exempel ska flytta en site till en ny server eller ett nytt domain name. Genom att klona en website kan du save massor av tid och ansträngning och slutföra migreringsprocessen mycket snabbare.
Ett annat exempel är att du utvecklar en website åt en kund på din egen localhost. När arbetet är completed kan you helt enkelt klona webbplatsen och flytta den till kundens live server.
Du kan också klona en live WordPress-webbplats och skapa en staging-webbplats för att testa ändringar innan du gör dem live.
Med det sagt, låt oss visa dig hur du kan klona en WordPress site i några enkla steg. Du kan använda snabblänkarna under för att navigera genom tutorialen:
- Step 1: Set Up the Duplicator WordPress Plugin for Easy Cloning
- Step 2: Create a Duplicator Package of Your WordPress Site
- Step 3: Upload Your WordPress Site Archive and Installer to a New Location
- Step 4: Create a New WordPress Database for Your Website
- Step 5: Run the WordPress Website Importer Script
- Step 6: Test Your Cloned Website and Delete Temporary Files
Step 1: Ställ in WordPress-tillägget Duplicator för enkel kloning
Det bästa sättet att klona en WordPress website är genom att använda Duplicator plugin. Det är ett kraftfullt plugin för kloning och duplicering av WordPress som fortfarande är mycket användarvänligt.
Pluginet säkerhetskopierar allt från din website till en enda fil, som du helt enkelt kan flytta till den nya locationen.
Det första du behöver göra är att aktivera och installera pluginet på den website som du vill klona. För mer detaljer, se vår Step-by-Step guide om hur du installerar ett WordPress plugin.
Obs/observera : Det finns en Pro-version av Duplicator som har ytterligare funktioner som gillar tidsinställda backups, flytta multisite, och mer. Vi kommer dock att använda den gratis versionen för den här guiden eftersom den har allt du behöver för att klona en WordPress website.
Step-by-Step 2: Skapa ett Duplicator-paket av din WordPress-webbplats
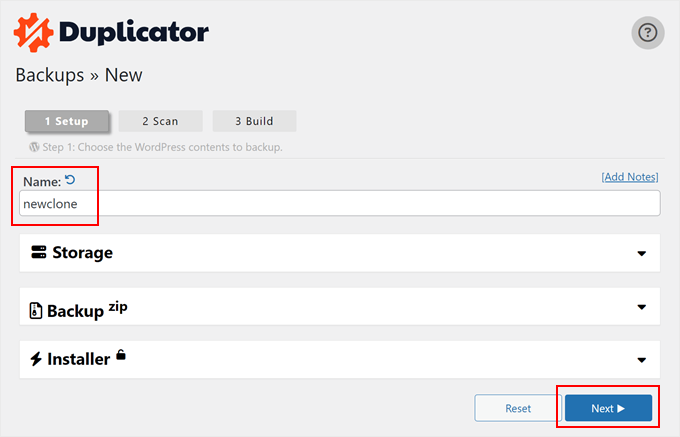
Efter aktivering går du till Duplicator ” Säkerhetskopior och klickar sedan på knappen “ Skapa ny” högst upp på sidan.

Efter det kommer du till en vy där du kan skriva in ett namn för den duplicerade filen. Detta är bara för din referens, så du kan använda vad du vill.
Klicka sedan på knappen “Fortsätt”.
Duplicator kommer nu att skanna din webbplats.
Om den hittar ett problem med någon del av din WordPress-webbplats visas en varning med information om hur du åtgärdar problemet. Annars står det helt enkelt “Bra”.

Bläddra nu ner på sidan.
Klicka sedan på “Bygg” för att skapa säkerhetskopian.

Plugin kommer nu att säkerhetskopiera din WordPress database, images, templates, plugins och alla andra filer i ett enda downloadbart paket.
Beroende på hur stor din website är kan processen ta ett par minuter.
När backup-processen är slutförd är det dags att downloada dina filer.
You need to download both the archive file, which contains your backup, and the installer that will unpack the archive.

För att göra detta, gå vidare och klicka på knappen “Ladda ner båda filerna”.
Proffstips: Tekniskt sett kan du hoppa över resten av dessa steg och bara följa vår handledning om hur du återställer en säkerhetskopia av en WordPress-webbplats, där vi visar dig hur du importerar din säkerhetskopia med Duplicator.
Med detta sagt kan du följa resten av dessa steg om du vill återställa den klonade webbplatsen i en tom miljö.
Steg 3: Ladda upp ditt WordPress-webbplatsarkiv och installationsprogrammet till en ny plats
Nu har du en komplett backup av din site och filen installer, nästa steg är att uppladare dem till den nya location.
Denna new location kan vara en live WordPress blogg eller en site på din lokala server. Om webbplatsen finns på en lokal server måste du skapa en new folder i din lokala servers rotmapp. Det är den fil där din lokala server lagrar alla websites.
Om du till exempel använder MAMP kommer det att vara foldern “/Applications/MAMP/htdocs/”.
Alternativt, om du använder WAMP, skulle det vara mappen “C:\wamp\www \”.
Efter det måste du öppna den folder som du skapade för din klonade website och kopiera både archive-filen och installeraren till den foldern.

Om du vill klona din webbplats till en annan WordPress hosting provider, kan du först skapa en tom website och uploada filerna till den med hjälp av providerns filhanterare.
Om du använder Bluehost loggar du bara in i adminpanelen på ditt webbhotell och navigerar till tabben “Websites”. Efter det klickar du på “Add Site”.

På nästa vy ser du några alternativ för typ av site.
Välj bara “Other (empty environment)” och click “Continue”.

Därefter infogar du rubriken på din website.
Du kan också hoppa över detta steg om det behövs och bara clicka på “Continue”.

I det här skedet kan du ansluta din website till ett domain name.
Eller så kan du använda en tillfällig domän under tiden om du inte har ett domain name ännu.
Klicka på “Continue” för att fortsätta.

När din tomma website är klar går du tillbaka till tabben “Websites”.
På din nyskapade website klickar du på knappen “Settings”.

Nu rullar du ner till sektionen “Quick Links”.
Väl där klickar du bara på knappen “File Manager”.

Bluehost kommer nu att ta dig till filhanteraren på din website.
Gå vidare och klicka på knappen “Upload” för att uploada dina filer.

Nu väljer du de filer som du vill uploada till den tomma website.
När du är klar klickar du bara på “Gå tillbaka till …

You should now see your archive and installer files in the file manager.
Gå vidare och ta bort de andra filerna som finns i den här directory för att se till att installationen går bra senare.

Alternativt kan du uploada installeraren och archive till root directory med hjälp av en FTP-klient.
Om du inte har gjort det tidigare kan du läsa vår guide för nybörjare om hur du använder FTP för att uploada filer till WordPress.
Oavsett var du uppladdar filerna måste du se till att foldern endast innehåller dina installer.php- och archive zip-filer.

Steg 4: Skapa en ny WordPress-databas för din webbplats
Därefter måste du skapa en new WordPress database för att packa upp din klonade version av WordPress. Om du redan har skapat en database kan du hoppa över det här steget.
Det finns några olika sätt att skapa en database, beroende på om den nya location är en live site eller en site på din lokala server.
Om du använder en live site, logga in på din WordPress dashpanel på webbhotellet.
För Bluehost-användare måste du gå till din tomma webbplats ‘Settings’ tabs gillar innan. Byt sedan till fliken “Avancerat” och klicka på “Hantera” bredvid cPanel.

I cPanel rullar du till sectionen “Databases”.
Därefter väljer du “MySQL Databases”.

Du kommer då till en vy där du kan skriva in ett namn på din database.
Klicka sedan på knappen “Create Database” (Skapa databas).

Därefter måste du lägga till en ny användare i MySQL-databasen.
Rulla bara till “MySQL Users” section. Skriv sedan in ett användarnamn och password för den nya användaren och click på knappen “Create a user”.

När du har gjort det är nästa steg att lägga till användaren i din database.
Rulla bara till “Add User to a Database” section och öppna “User” dropdown. Här väljer du den användare i databasen som du skapade i föregående steg.
Därefter öppnar du dropdown ‘Database’ och väljer den databas som du skapade tidigare.

Se till att du obs/observerar databasens namn, användarnamn och password, eftersom du kommer att behöva denna information i nästa steg.
När du har gjort det klickar du på knappen “Add”.
Om du använder en lokalhostinstallation med XAMPP eller andra verktyg, besök bara “http://localhost/phpmyadmin/” eller “http://localhost:8080/phpmyadmin/” i din webbläsare för att starta phpMyAdmin.
Därefter klickar du på tabben “Menu” och väljer sedan alternativet “Database”.

Därefter måste du enter ett new namn för databasen.
Sedan klickar du bara på knappen “Skapa”.

Du kommer att använda namnet på databasen i nästa steg. För de flesta installationer med lokalt webbhotell kommer din server att vara localhost och användarnamnet kommer att vara root med ett tomt password.
Steg 5: Kör skriptet för WordPress Website Importer
Nu när alla dina filer är på plats är det dags att runka skriptet för att installera Duplicator. Detta skript packar upp din archive-fil med några clicks.
Först skriver du in din website URL i web browser och add installer.php till slutet av den. Detta kommer att se ut ungefär som “https://example.com/installer.php”. Se till att du ersätter “example.com” med ditt eget domain name eller din sites localhost-adress.
Därefter visas installationsskriptet för Duplicator på skärmen. Först måste du ange din WordPress-databasinformation.
Detta är den information om databasen som du kopierade ovan.
När du har gjort det klickar du på “Validera”.

Om det inte finns några fel, markera kryssrutan för villkor och meddelanden längst ned.
Klicka sedan på “Nästa” för att fortsätta.

Därefter visas en popup för att bekräfta installationen.
Fortsätt och klicka på “OK”-knappen.

Om installationen lyckas kan du omedelbart logga in på din nya WordPress-webbplats.
För att göra detta, se till att kryssa i “Auto delete installer files after login to secure site (recommended!)” och klicka på knappen “Admin Login”.

Om du kryssar i den rutan tas installationsfilerna automatiskt bort för att undanröja eventuella säkerhetsproblem och slutföra installationen.
Steg 6: Testa din klonade webbplats och ta bort temporära filer
You can now go ahead and test your cloned website.
Vi rekommenderar att du testar både WordPress admin area och din websites offentliga front-end för att säkerställa att all din data finns där och att din website fungerar som förväntat.
Om du får några WordPress error, kontrollera vår guide för nybörjare om felsökning av WordPress-fel.
Du måste också kontrollera om dina installationsfiler fortfarande finns. För säkerhets skull rekommenderar vi att du går till Duplicator ” Verktyg och sedan klickar på knappen ‘Ta bort installationsfiler’.

Nu har du klonat en WordPress site utan problem.
Jag har klonat min website i WordPress, vad händer nu?
Om du har klonat din WordPress website utan problem, kan det vara bra att göra några saker härnäst:
- Kontrollera om du har flyttat din website på rätt sätt med hjälp av den här ultimata checklistan för migrering.
- Kontrollera inställningarna för permalänken på din klonade website.
- Installera WordPress tillägg som du måste ha för att utveckla din website.
- Inaktivera bloggfunktioner om du planerar att köra en webbplats som inte är en blogg.
- Använd denna checklista för lansering av website innan du publicerar din website.
- Preview your website för att se om allt fungerar.
- Aktivera WordPress felsökningsläge för att snabbt kunna åtgärda eventuella fel.
- Lär dig hur du frigör diskutrymme och minskar inodeanvändningen för att hålla din webbserver frisk.
- Gör ett hastighetstest för att se om webbplatsens prestanda behöver förbättras.
Vi hoppas att den här artikeln hjälpte dig att lära dig hur du enkelt klonar din WordPress-webbplats. Du kanske också vill se vår guide om hur du hanterar flera WordPress-webbplatser från en instrumentpanel och våra expertval av de bästa aktivitetslogg- och spårningspluginsen för WordPress.
If you liked this article, then please subscribe to our YouTube Channel for WordPress video tutorials. You can also find us on Twitter and Facebook.


 in 2024")
Felicia Sandler
I have a wordpress site that is currently on a dedicated server with a different URL that points toward the domain we wish to use. If I clone the site to move it to a hosting service, is it possible to do that with a new IP address as well? I welcome any support. Thanks.
WPBeginner Support
If you move to a new hosting provider the IP would normally change by default without any extra steps needed.
Admin
Jiří Vaněk
The Duplicator is an absolutely fantastic plugin that I personally enjoy using for duplicating websites from development environment to server. The only issue I’ve encountered with it is that it creates a .htaccess file in the backup folder, where not all directives may be allowed. Fortunately, this behavior can be resolved in the settings, and .htaccess can be disabled. Otherwise, the plugin always works great and without any problems. Additionally, with a guide like yours, anyone can handle it really well. And as a bonus, it works quite well even in the free version.
Dennis Muthomi
This step-by-step guide was extremely helpful! I followed the tutorial to clone my existing WordPress site to a new server with a different host. Everything went smoothly except I ran into an SSL issue initially on the cloned site. However, after contacting my new host’s support team, they were able to resolve the SSL problem quickly. Thanks so much for providing such a clear and valuable walkthrough
WPBeginner Support
Glad our guide could help you
Admin
Dan
Hi, I have done this however upon completing the Install and clicking the admin button, it takes me back to the original domain page prior to a WordPress Install. I’ve double checked the process and I don’t think I’ve missed any steps?
It just appears that everything was wiped (just an original WP install) but the duplicate file hasn’t been installed?
WPBeginner Support
Your domain is pointing to your original host. You can either change your hosts file to see the cloned site or point your domain to the new host location. For moving your site to a new domain, we would recommend taking a look at our article below:
https://www.wpbeginner.com/wp-tutorials/how-to-properly-move-wordpress-to-a-new-domain-without-losing-seo/
Admin
Martin Page
I have followed your instructions and uploaded the 2 files to an otherwise empty file but when i go to the site/installer.php I get a 404 page.
My FileZilla screen loos exactly like your example.
Any suggestions?
Thanks
WPBeginner Support
You would want to visit the duplicator plugin’s FAQ page and they cover the different troubleshooting steps for that error.
Admin
Rene Young
Thanks. I did that and I have successfully completed creating the clone. I have a question about the step to install the database in the new location (Step 2 of 4 – Install Database): The screen shot shows a choice between “Basic” and “cPanel” but you don’t discuss this.
WPBeginner Support
In this tutorial, we went with Basic
Admin
Rene Young
I could not complete Step 2. I do get warnings in Duplicator, under Paths:
“If the root WordPress path is not writable by PHP on some systems this can cause issues.
If Duplicator does not have enough permissions then you will need to manually create the paths above.”
WPBeginner Support
You would want to either follow our guide below for updating your file permissions:
https://www.wpbeginner.com/beginners-guide/how-to-fix-file-and-folder-permissions-error-in-wordpress/
Or you can reach out to your hosting provider for assistance with the folder permissions.
Admin
Sue
I’m trying to clone a demo site I’m making for people to use as a template. Using Duplicator I’ve created the package, gone into File Manager of CPanel and navigated to the root directory for the subdomain I’m testing it on, and uploaded the zip file and installer file. There is nothing else in the folder.
When I follow the instructions and go to the website address with installer.php added to the end, I do not get the Duplicator import info. I get a Page Not Found….though it does have the header, footer and top menu of the site I’m cloning. What did I do wrong?
WPBeginner Support
If you are using the same domain then you are likely still looking at the old site and not the new one, if you reach out to your hosting provider, they can normally assist with setting up a temporary domain that you can use.
Admin
Tarık Hacıalioğulları
Thank you very much, this saved me so much time. It worked very good!!!
WPBeginner Support
You’re welcome
Admin
saad
Everything s clear thank you but what about login and password to WordPress dashboard can we duplicate ?
WPBeginner Support
It copies your users table so it would transfer your user and password over for you.
Admin
Kara
I’m having a bit of trouble with step 4. With my Hostgator account I don’t have access to my server panel but when I try to add the file via an FTP client, I’m under able to find the folder containing the installer.php. Am I missing something? Could the file name be different or could someone tell me where exactly to put the zip file?
WPBeginner Support
You would want to reach out to your hosting provider and they would be able to assist
Admin
ed
HI there, what if i have paid plugins and themes specific for 1 wordpress site
Will it still work ? Thanks alot, your tutorial so far is the easiest to follow
WPBeginner Support
You would want to reach out to the support for those tools for how they handle that.
Admin
Emma
What do you do when there is a size check notice? Limit is 500mb and my site is 1.32gb uncompressed. Not sure how to compress. It is recommending a 2 part install manually from c panel which is sadly beyond my tech abilities.
WPBeginner Support
You would want to reach out to your hosting provider’s support and they should be able to assist
Admin
Dominique
uploaded zip and installer script to root and i am getting this message when i enter domain.com/installer.php
403 Forbidden
Request forbidden by administrative rules.
What next?
WPBeginner Support
There are a few different options you can try, for a starting point, you would want to take a look at our article below:
https://www.wpbeginner.com/wp-tutorials/how-to-fix-the-403-forbidden-error-in-wordpress/
Admin
Loz Bigrave
Great article, worked like a charm.
WPBeginner Support
Thank you, glad our article was helpful
Admin
Derek
I’ve successfully copied across to a new URL and the cloned website seems to be working. However, when I go into wordpress it’s a reduced version with quite a few tabs missing such as: users/plugins/settings to name a few. How can I get a full version of wordpress the same as the site I copied from?
WPBeginner Support
You may want to ensure you are logged in as an admin user on your cloned site as the most likely reason for that issue.
Admin
Adi
How do you change the name of the website, the url and also the database when installing the cloned site using Duplicator?
WPBeginner Support
To do that, you would want to take a look at our article here:
https://www.wpbeginner.com/wp-tutorials/how-to-properly-move-wordpress-to-a-new-domain-without-losing-seo/
Admin
diana
Hi, I have a question , can a clone my site without erased the other one , i mean the original website ?
WPBeginner Support
Yes, cloning your site does not remove the original
Admin
Todd Murray
This is a great post. Just one clarification before I run the import…on STEP 4, these are the instructions:
No matter where you are copying the files, you need to make sure that the folder is completely empty and has no other files or folders inside it except installer.php file and your backup zip file.
If I already have a theme and started building a site before finding this article, do I need to delete everything from the destination? “folder completely empty” refers to which folder?
Thanks!
Todd
WPBeginner Support
If you want to duplicate a site from elsewhere then you would need to remove what is currently there for your site.
Admin
Christie Bellah
Been using this article for years. Thanks so much!
WPBeginner Support
You’re welcome, glad our guide has been so helpful
Admin
Alexandre
You were right, I didn’t put in the root folder :/
So I tried again, but in the end, I got an error 404 result.
I’ve fixed the wp_config (name, user, pw & host) and made the changes to the htaccess (copied the NEW .htaccess).
All files are deleted, besides the now unzipped folder which contain all the files. *what about the __MACOSX folder? I tried with and without, but get the same result.
Even after this, in Step 4, I still get the 2 warnings in the General Notices:
wp-config not found
wp-config.php not found.
I found the wp-config.php, but seem like I don’t have the wp-config. Are they the same?
Anything else missing?
Thank you
WPBeginner Support
The macosx you don’t need, the wp-config files should be the same. For moving from the subfolder if the original site is still available you would likely want to go through the steps in: https://www.wpbeginner.com/wp-tutorials/how-to-get-rid-of-wordpress-from-your-wordpress-site-url/
Admin
Alexandre
I end up on a “Index of” page showing the file in my sub folder. Anyone know why?
Thanks
WPBeginner Support
You likely installed your WordPress site in the subfolder rather than the root folder for your site.
Admin
Alexandre
Sorry, forgot to say. If I type in the full path on my web browser, I have a loading time, but end up on a white page.
Thanks
WPBeginner Support
If you are getting that white screen you may want to try the recommendations in our article here: https://www.wpbeginner.com/wp-tutorials/how-to-fix-the-wordpress-white-screen-of-death/
JanysF
Does anyone know why the Packages option under Duplicator » Packages isn’t showing for me? I only see under Duplicator: Tools, Settings, and Go Pro.
WPBeginner Support
You may want to try reinstalling the plugin and if that doesn’t work you would want to reach out to the plugin’s support and let them know about that not appearing properly
Admin
ouiouiphoto
Cloning works well with duplicator but having a clone site online seems not to be liked by jetpack
During my tests Jetpack have put himselt in failure on the original site even if jetpack was not active one the cloned site telling me the original was a copy of the clone
If google find your clone you have also some possible issues
WPBeginner Support
While there is a problem with simply cloning a site without any new content, the primary goal would normally be to use this when transferring your site from one location to another and then removing the old site or using the copied site as a template and adding new content to your new site.
Admin
Bidmead
For some inexplicable reason, when I save this useful page to Pocket, what actually arrives there is the old 11 May 2015 version, which discusses a completely different method based on a plugin called BackupBuddy which costs $52 for the 1-site version.
—
Chris
WPBeginner Support
We’ll certainly take a look if it is something on our end. You may want to check with Pocket if there is a cache that needs to be cleared on their end as well
Admin
Chris Bidmead
I’ve been in touch with Pocket. They suggest it might be a problem with their Parser, which checks the content and determines the best way to display it. They’ve managed to reproduce the bug and are investigating.
—
Chris
Gary Andrews
I wand to upgrade my production site to WP 5 and change themes. I thought it might be a good idea to clone my site on my local windows machine under Desktop Server.
I’ve been trying for 2 days to clone my site.
Let me just add that your tuto is perfectly straightforward as long as things go well. It doesn’t go into what might not work correctly.
Firstly Duplicator package creation times out (despite having filtered out the big files). Of course my hosting company doesn’t support Duplicator because it tries to change the time limit, can’t really blame the host company.
I also tried the Duparchive option which doesn’t time out and generates a .daf archive instead of a .zip.
On the Desktop Server local side I tried to run installer.php from my browser but got messages saying I needed to enable ziparchive and/or shell exec. I contacted Desktop Server support about that and have had no answer.
I thought I’d try to extract the data from the daf archive manually but the software that is needed to do this no longer seems to be available.
I imagine that the Duplicator Pro version would work better but I don’t have the budget (association website).
Oh woe is me, looks like I’ll have to do it all by hand.
WPBeginner Support
From the sound of it you sadly may need to manually import/export the data, the other option would be if you have a backup of your site that you could restore to your local installation.
Admin
Adam
Awesome article!!!
Followed your steps and it worked perfectly.
I did make one error though, I extracted the zip file and uploaded the files in ftp which did create errors. Much easier to simply upload the zip instead.
Thanks heaps!
WPBeginner Support
You would likely need to extract the zip once it is on your hosting provider but glad you found a solution for your error
Admin
Donna Lutheran
I copy sites all the time.
The plugins actually look more complicated than doing it manually.
Just download your files, back up your database, ftp to the new server, restore your database to your new database, edit the wp-config file to point to the new database, edit the url in your database to point to the new url.
I also download velvet blue to correct any url problems.
I had a site not pass our security scan that used the plugin. Also, the database back up was stored in the root of your site.
James Cook
I used a much simpler way. My WP installation is with Godaddy…so logged in the cPanel of the site I wanted to cloned…went to subdomains and created the domain for the site destination…then I went to applications and the top of cPanel and clicked the little check box next the primary site I wanted to clone…then hit the clone button…and voila…and exact copy of our site was created in less than 10 minutes…
Indusekar S K
Is there any plugin or other software that could clone a wordpress website to another wordpress on the live?
Mark C
The price for this is riduculous. Even the cheapest option is $80 PER YEAR! What an absolute rippoff!
Better off just going to Control Panel, zipping up your files and download them … then go to PHPMyAdmin and downloading a copy of your database. Then upload your zipped files to the new location…edit the config file, then import the database.
If that’s too hard for website retards … just install the free version of “Duplicate” (similar to Backup Buddy … but FREE).
Carlos A. B. S.
You’re right man, no need to spend a dime on such a a simple task…
Felisha
Either of you have a step by step guide? I am trying to copy my site to a subdomain to target a different city from the main site.
The only thing I understand so far is that I have to:
1. create a subdomain
2. create a new database
3. copy the public html folder of the main site over to the subdomain pubic html folder
After that, every tutorial I’ve seen on the internet gets too confusing
Jerri
What are you talking about? Duplicator is free. I mean, there’s a pro version, but I use the free version all the time to duplicate websites.
The only thing these instructions didn’t add is that you need to first create a new database and add a user to it on the new site before running the installer.
But it’s all easy and free.
Lipa
thx a lot !!! ;]
Mack
Can i copy someone’s site page to my site??
Allan Seabrook
Hi,
I really appreciate all the posts you share with us! Please keep them coming!
My question regarding this post is…
This technique using BackupBuddy works flawlessly.
However, I now have a problem:
When I type in the URL of my original site (where I took the backup), I get directed to the site I cloned from that backup. It’s as if my original site now has a redirect to the cloned site.
What on earth have I broken?
Any advice would be much appreciated!
Thanks,
Allan
Stephen
Check your DNS record. That would be one of the only ways this would happen.
Jonathan
Thanks! Worked perfect!
Mamun sarkar
Hi,
I would like to know how to clone any wordpress website have no hosting access information as well. I mean, suppose a buyer order your wpbeginner like website. Then, How to do it sir. Do you have any tutorials plz.
Hanna
not possible anymore to use backup buddy unless you want to pay. Is their a different method?
Nelson
Duplicator is perfect.
sandeep
i want to copy the theme of running website to another website…
Moses
Hi Sandeep,
Did you get solution to this. I also want to copy a theme to another website(subdomain)
Chris
I’ve used another service to clone WordPress sites and have discovered a problem with residual tables, and I was curious whether this was an issue with BackupBuddy as well.
In the scenario I recently encountered, I create WP Site A with table prefix wp1_.
Then I have to create a new environment to clone to, so I install WordPress at WP Site B with table prefix wp2_.
Now I use my [unnamed] tool to clone site A to site B, which appears good on the admin and public side but when I look in the database I have both wp1_ and wp2_ sets of tables, and all of the GUIDs in the functioning tables for the new cloned site have WP Site A’s URL, not WP Site B’s as I would have expected.
These have to be cleaned up manually. So I wonder, does BackupBuddy do the same thing? Is this to be expected?
WPBeginner Support
BackupBuddy’s sales/support team can probably answer this better.
Admin
Andrew Lopez
I’d be curious to know how to manually perform this task without a plugin or is a plugin recommended for backing up and migrating over to a new website?
Dave Navarro
BackupBuddy fails on large WordPress installs. I can’t get it to back up our site which between database all files is over 400GB in size.
I had to manually download all of the files, then re-upload them to the new site and use importbuddy with just the database. Even that fails if the raw database is too large (failed around 200MB in size).
Nitin
wonderful technique but there is use of another plugin
Gf
I recently moved a small simple blog with all-in-one wordpress migration and it worked great. But when I attempted a larger site on wp4.1 it failed. I think I would like back up buddy but the price is staggering. It would be my biggest wordpress expense, almost twice as much as my hosting!
Jean
I love using BackupBuddy for backups and migrations.
All you need is access to install the plugin and your set to move.
Great article!
johnraf
I used to have similar problems too, but after using
“long path tool” You can use to solve this problem.
yaser
How about if we want to clone a website that we have no backend access? Is there an easy way?
fletch
Do you have ftp access? Do you have access to the database? You would need those two things to backup a website if you don’t have access to wp-admin.