Att göra ditt innehåll delbart på Twitter är inte bara en nice-to-have. Det är ett måste nuförtiden. Du har jobbat hårt med ditt innehåll, så varför inte göra det enkelt för användarna att dela det?
Det handlar inte bara om fler ögonbollar på ditt arbete. Twitterdelningar är också bra SEO-signaler. Sökmotorer ser dessa delningar som förtroenderöster för ditt innehåll.
Det är därför vi är aktiva på Twitter och ser till att vårt innehåll är lätt att dela. Och om du vill göra detsamma, visar vi dig två enkla metoder för att lägga till Twitter Share- och Retweet-knappar i WordPress.

Varför lägga till Twitter-delningsknappar och retweet-knappar i WordPress?
Enligt vår undersökning av marknadsföringsstatistik har Twitter över 217 miljoner aktiva användare varje månad. Det gör det till en utmärkt plats att främja din website.
Men genom att dela ditt content på social media når du bara användare som redan följer ditt account. Om du vill nå en new publik måste du få folk att dela och retweeta ditt content.
Detta kan öka trafiken på din blogg genom att introducera ditt varumärke för människor som kanske inte har varit medvetna om din website. Reposting your content är också en kraftfull form av socialt bevis. När någon delar en post eller tweet med sina följare ses det ofta som ett stöd.
Med detta sagt, låt oss titta på hur enkelt det är att add to Twitter dela och retweet knappar i WordPress. Använd bara snabblänkarna under för att hoppa direkt till den metod du vill använda:
Proffstips: Letar du efter ett sätt att göra ditt inläggsinnehåll tweetbart i WordPress? Kolla in vår guide om hur du lägger till “Klicka för att tweeta”-rutor i WordPress.
Så här lägger du till en Twitter-delningsknapp i WordPress med Shared Counts
Det enklaste sättet att add to en Twitter delningsknapp till WordPress är genom att använda Shared Counts plugin. Shared Counts är ett av de bästa tilläggen för sociala medier för WordPress som låter dig add to all slags delningsknappar till din site.
Till skillnad från vissa andra tillägg för social delning använder Shared Counts en unik metod för caching, så det kommer inte att ha någon stor inverkan på din websites hastighet och prestanda.
Först måste du installera och aktivera pluginet. Om du behöver hjälp kan du vänligen läsa vår guide om hur du installerar ett plugin för WordPress.
Efter aktivering, gå till Settings ” Shared Counts för att konfigurera plugin-inställningarna.
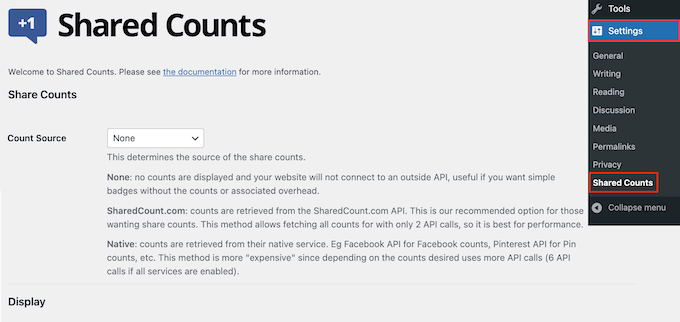
Börja med att rulla till “Delningsknappar som ska visas”.
Som standard lägger Shared Counts till delningsknappar för Facebook, Pinterest och Twitter.
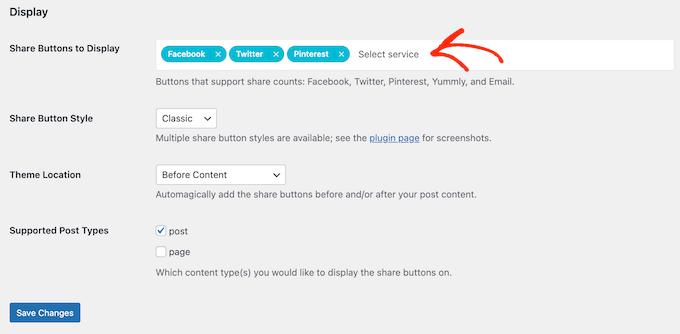
Om du vill ta bort delningsknappen för Facebook eller Pinterest klickar du bara på ikonen “x”.
Du kan också add to sociala delningsknappar för andra plattformar genom att skriva i fältet. För steg-för-steg-instruktioner, vänligen se vår guide om hur du lägger till sociala delningsknappar i WordPress.

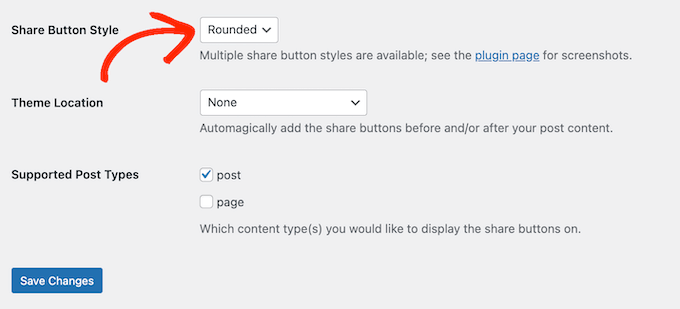
När det är gjort måste du välja vilken typ av knapp du vill använda på din WordPress blogg. Det finns 8 stilar att välja mellan, och du kan se exempel på varje knapp över på Shared Counts plugin page.
När du har bestämt dig öppnar du bara dropdown-rutan “Delningsknappens stil” och väljer den stil du vill använda.
Därefter måste du välja var du vill visa Twitter-knappen i ditt WordPress-tema genom att öppna dropdown-menyn “Theme Location”.
Här kan du välja Before Content, After Content eller Before and After Content.
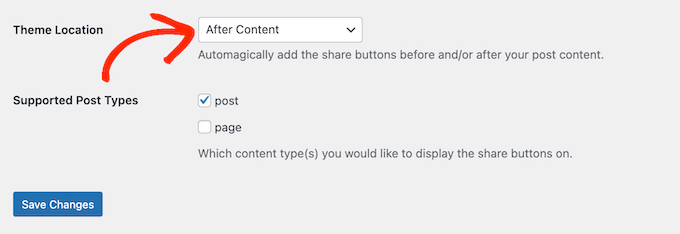
Om du addar knappen högst upp på page så kommer fler besökare att se den. De flesta människor vill dock läsa en post innan de delar den. Med det sagt kanske du vill välja “After Content” eller “Before and After Content”.
Slutligen måste du bestämma om du vill add to Twitter-knappen till dina pages eller posts.
Som standard lägger Shared Counts bara till knappen i dina inlägg. Du kanske dock vill lägga till den på dina sidor också, särskilt om du skapar många målsidor.
I så fall kan du kontrollera boxen bredvid “Page”.

När du är nöjd med hur delningsknappen för Twitter är konfigurerad klickar du på “Save Changes”.
Om du nu besöker din WordPress website kommer du att se delningsknappen i action.
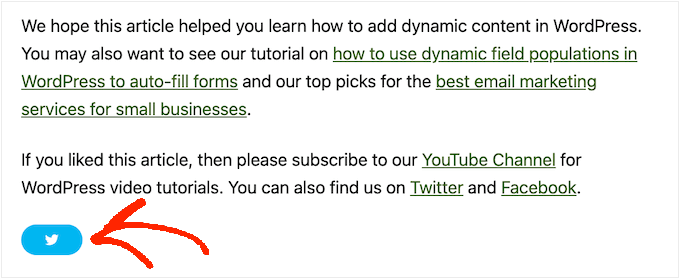
Så här låter du användare retweeta dina tweets i WordPress med Smash Balloon
Om du vill add to en enkel delningsknapp till en page eller post är Shared Counts ett bra alternativ. Men du kanske också vill uppmuntra besökarna att retweeta dina senaste tweets. Detta kan ge dig mer engagement och sprida ditt content ännu längre.
Det bästa sättet att få fler retweets är genom att använda Smash Balloon Twitter Feed Pro. Detta plugin för Twitter Feed allow you to add your entire Twitter feed to any page, post, or widget-ready area.
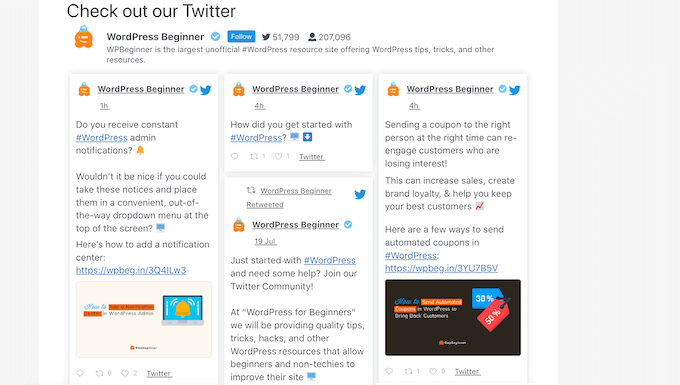
Varje tweet har sin egen row av Twitter actions.
Detta innebär att visitorerna helt enkelt kan reposta en tweet genom att clicka på dess knapp “retweet”.
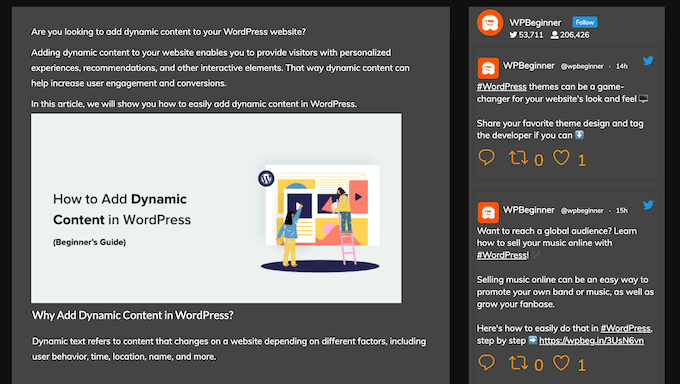
Ännu bättre är att feeden uppdateras automatiskt, så att det alltid finns new tweets för besökarna att engagera sig i. Detta kan hjälpa till att hålla din site fräsch och intressant, även för vanliga besökare.
För mer information om tillägget, kontrollera vår fullständiga Smash Balloon review.
Observera: Det finns faktiskt ett gratis Smash Balloon Twitter Feed-plugin tillgängligt. Vi kommer dock att använda Pro-versionen eftersom den kommer med fler funktioner, som fler flödesmallar och möjligheten att visa hashtag-flöden.
Ställ in Twitter Feed Pro
Först måste du installera och aktivera Smash Balloon’s Twitter Feed Pro. Om du behöver hjälp kan du vänligen läsa vår guide om hur du installerar ett plugin för WordPress.
När du har installerat plugin, head över till Twitter Feed ” Settings. Du kan nu enter din Smash Balloon license key i fältet “License Key”.
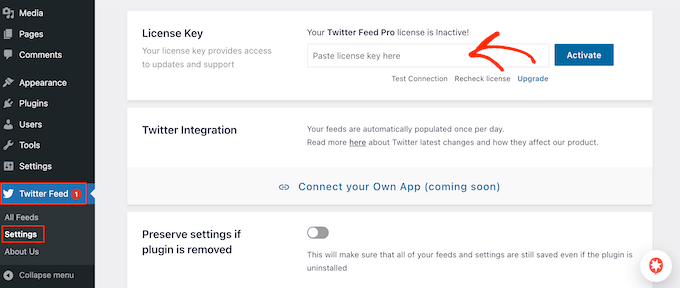
Du hittar den här informationen i det bekräftelsemail du fick när du köpte Smash Balloon och i ditt Smash Balloon account.
När du har lagt till din license key, fortsätt och klicka på knappen “Activate”.
Skapa ett Live Twitter Feed för WordPress
När du har gjort det är du redo att skapa ett custom Twitter feed. För att komma igång går du till Twitter Feed ” All Feeds och klickar sedan på knappen “Add New”.
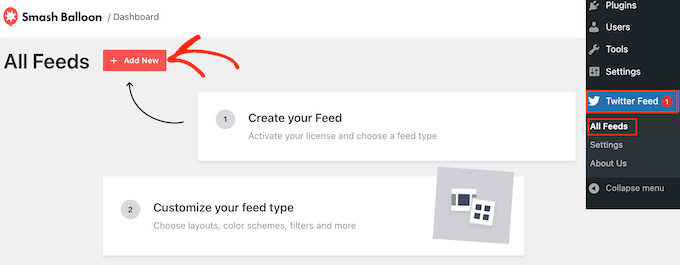
Om detta är första gången du lägger till ett Twitter feed med Smash Balloon, kommer du att bli ombedd att kontrollera din email address.
Klicka bara på knappen “Anslut” för att göra det och completed instruktionerna på vyn.

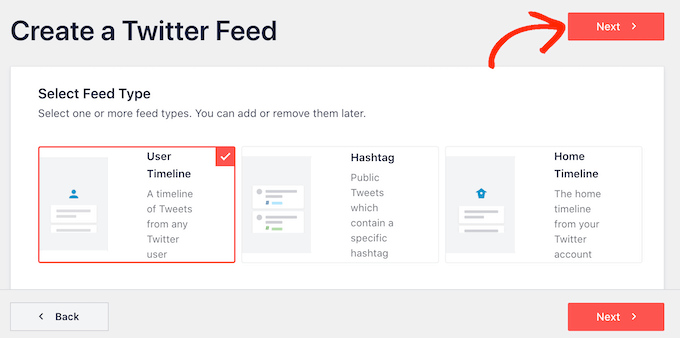
När du har gjort det kommer du tillbaka till plugin-sidan. Smash Balloon kommer nu att visa alla de olika typer av Twitter Feeds du kan skapa.
Eftersom du vill ha fler retweets, välj bara “User Timeline” och klicka på “Next”.
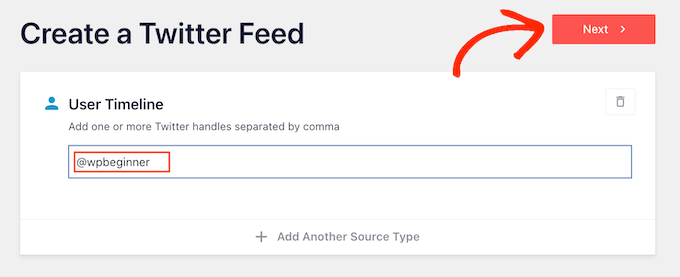
På nästa vy måste du skriva in @ -symbolen följt av namnet på ditt Twitter-konto.
När du är klar klickar du på “Next” för att öppna huvuddelen av Smash Balloon Editor.
Därefter kan du välja vilken template du vill använda i your feed.
Du kan till exempel visa dina tweets i en responsiv slider genom att välja “Simple Carousel”. Om du bara vill marknadsföra din senaste tweet kan du välja mallen “Senaste tweet” istället.
Vi kommer att använda “Standard”-mallen i alla våra images, men you kan välja vilken template du vill.
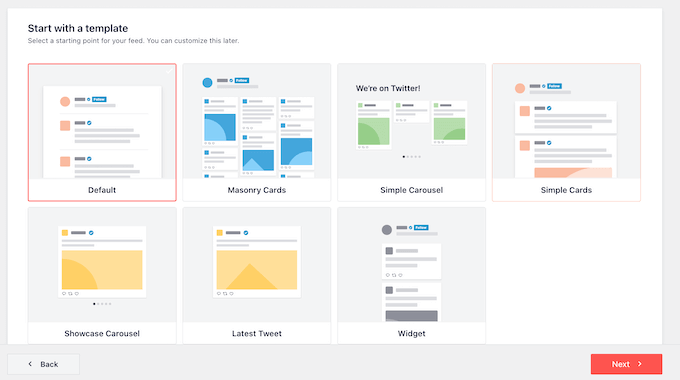
När du har fattat ditt beslut klickar du på “Next”.
Smash Balloon kommer nu att visa en preview av social media feed, redo för dig att customize.
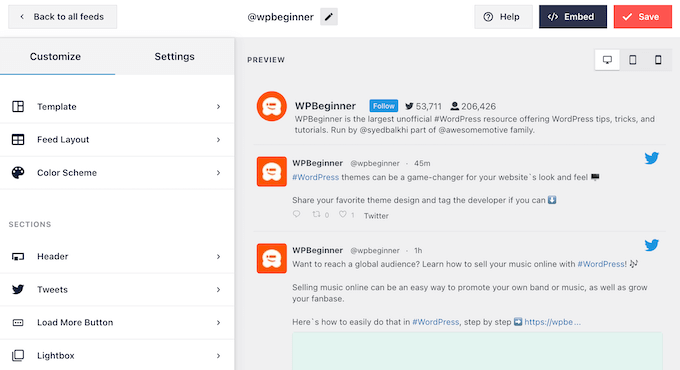
Customize din WordPress Twitter Feed
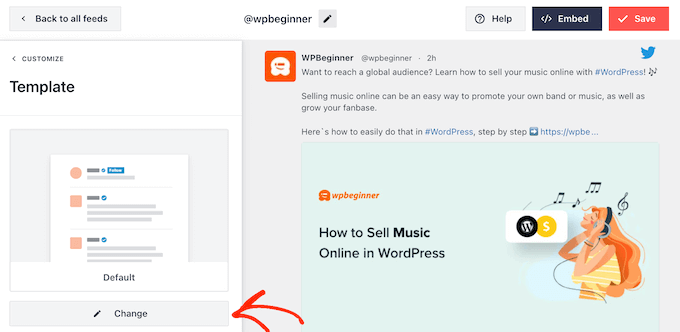
Är du inte nöjd med hur templates ser ut? För att ändra den, välj bara “Template” i menyn till vänster.
You can then click on the “Change” button.
Detta öppnar en popup där du kan välja en new layout.
Välj bara en ny template och klicka sedan på “Update”.
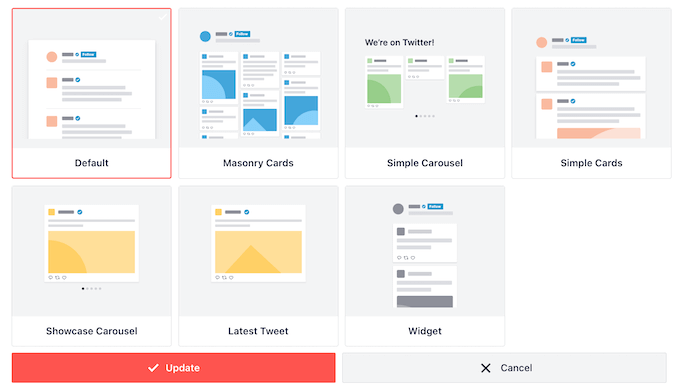
När det är gjort måste du klicka på länken “Customize”.
Då kommer du tillbaka till huvudinställningarna för Smash Balloon.
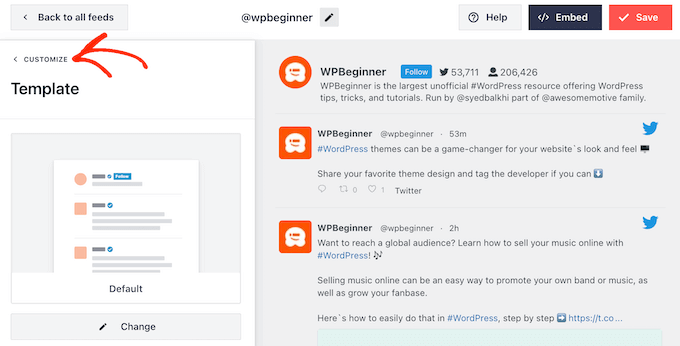
Nästa alternativ i den vänstra menyn är “Feed Layout”, så ge det ett click.
Här kan du ändra höjden på Twitter feed och antalet tweets som besökaren ser från början. Du kan också växla mellan en Grid-, Masonry- eller Carousel-layout.
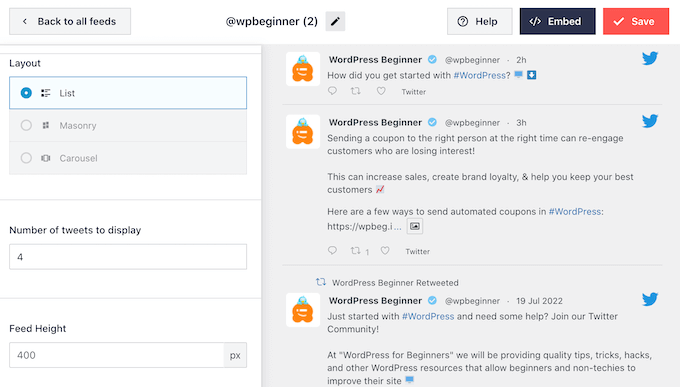
När du gör ändringar uppdateras preview automatiskt, så att du kan prova olika inställningar för att se vad som ser bäst ut.
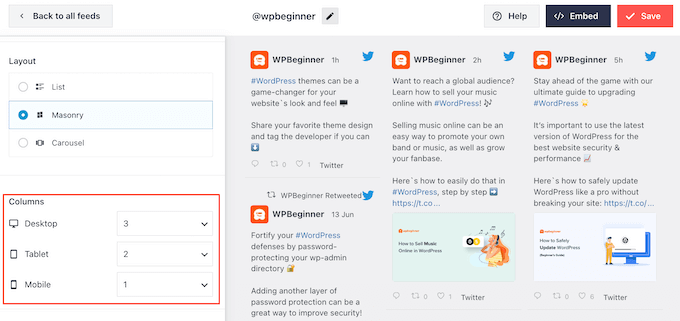
Beroende på vilken layout du använder kanske du kan ändra hur många columns Smash Balloon visas på skrivbord, surfplattor och mobila enheter.
Smartphones och surfplattor har vanligtvis mindre vyer och mindre processorkraft, så du kanske vill visa färre Column på mobila devices.
För att göra detta använder du helt enkelt dropdown-menyerna i section “Columns”.
När du är nöjd med hur layouten för feed är inställd klickar du på länken “Customize” igen för att återgå till vyn med huvudinställningarna.
Här kan du klicka på “Färgschema”.
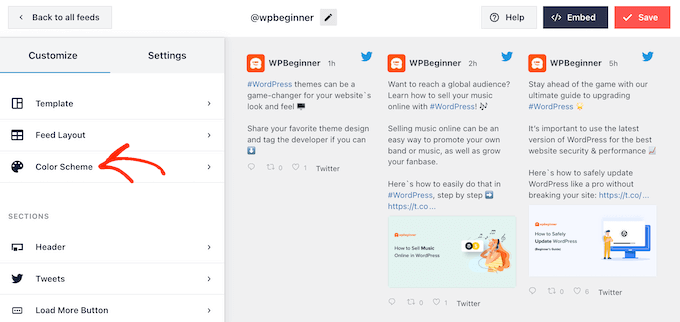
Som standard använder Smash Balloon de färger som ärvts från ditt WordPress-tema, men du kan byta till ett “Light” eller “Dark” färgschema istället.
Ett annat alternativ är att skapa ett eget färgschema genom att välja “Custom” och sedan använda kontrollerna för att ändra bakgrundsfärg, ändra textfärg med mera.
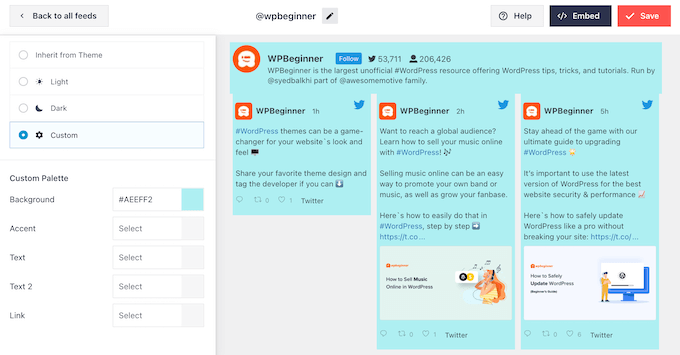
När du är nöjd med dina ändringar klickar du på länken “Customize” igen. När du är tillbaka på vyn med huvudinställningarna måste du klicka på “Header”.
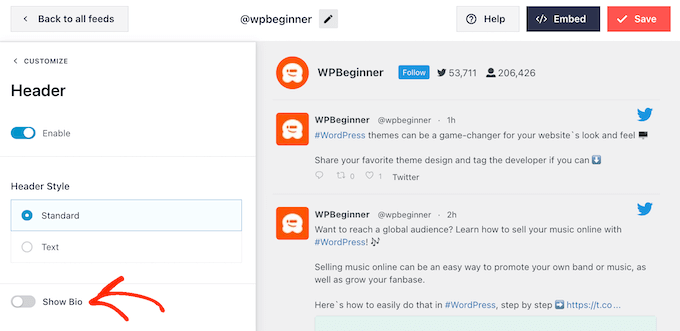
Som standard lägger Smash Balloon till en “Standard”-rubrik i flödet, som visar en “Följ”-knapp och din Twitter-biografi, om den finns tillgänglig.
Om du vill dölja Twitters bio klickar du på för att inaktivera “Show Bio”-togglen.
Ett annat alternativ är att selecta “Text”, vilket addar en “We are on Twitter”-header till feeden.
You can replace this with your own message by typing it into the “Text” box.
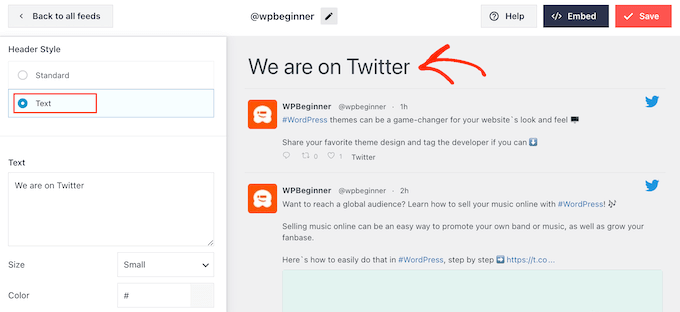
När du är nöjd med budskapet kan du ändra storlek och färg på headern.
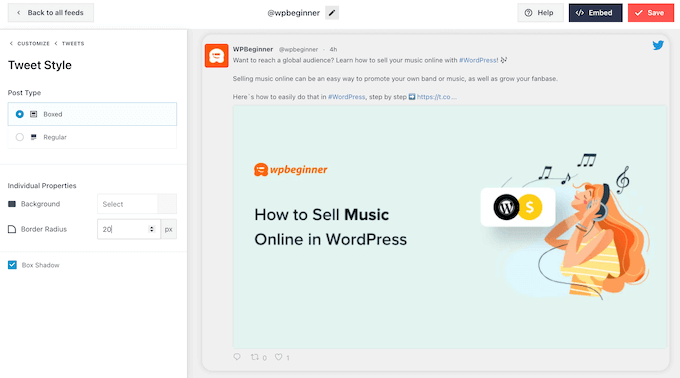
Gå sedan tillbaka till huvudvyn för Smash Balloon och välj “Tweets”. Här kan du välja mellan “Tweet Style” och “Edit Individual Elements”.
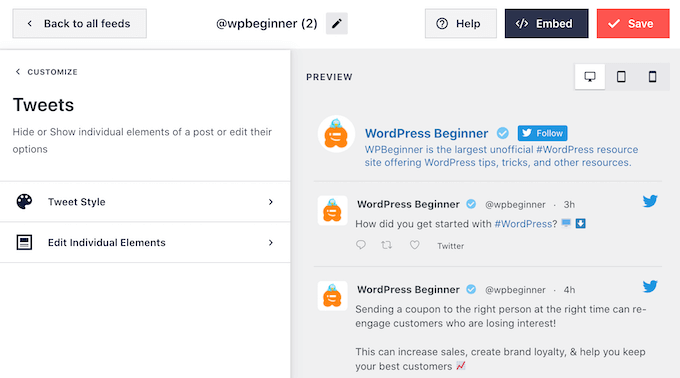
Om du selectar “Tweet Style” kan du välja mellan boxad och vanlig layouts.
Om du väljer “Boxed” kan du skapa en bakgrundsfärg för varje tweet. You can also make the border radius larger to create curved corners or add to a box shadow.
Om du väljer “Regular” kan du ändra tjockleken och färgen på den linje som skiljer dina olika inlägg på sociala medier åt.
När du är nöjd med dina ändringar klickar du på “Tweets”.
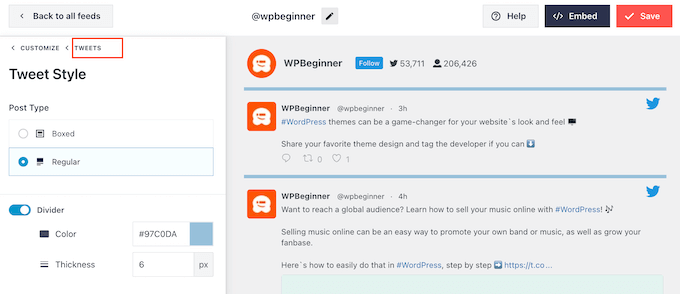
Då kommer du tillbaka till föregående vy.
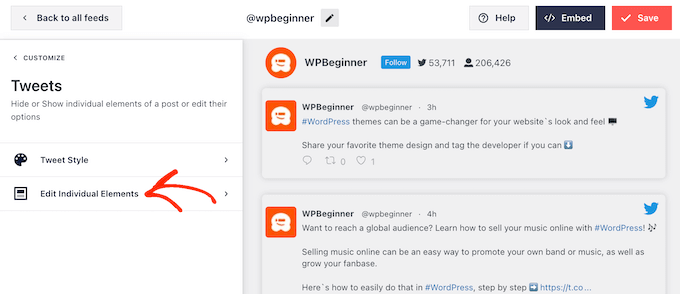
Den här gången kan du klicka på “Edit Individual Elements”.
Du kommer nu att se allt content som Twitter Feed Pro inkluderar i varje tweet, till exempel författaren, tweettexten, Twitter-logotypen och mer.
För att få så många retweets som möjligt är det en bra idé att få ikonen för retweet att sticka ut. Detta gör du genom att clicka på pilen bredvid “Tweet Actions”.
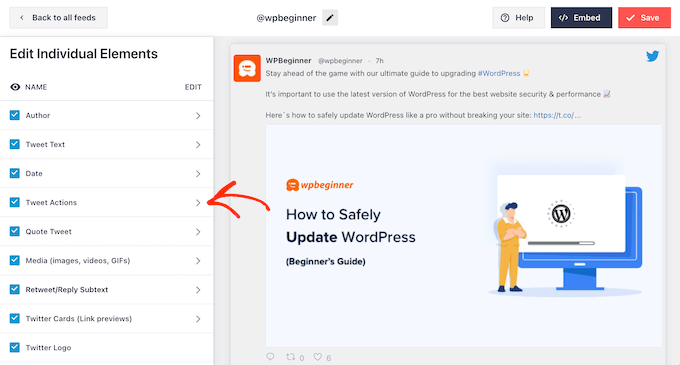
Här kan du göra tweets actions större med hjälp av dropdown ‘Size’ och ändra färg.
Var bara medveten om att Smash Balloon kommer att tillämpa dessa ändringar på alla tweet actions och inte bara “retweet” icon.
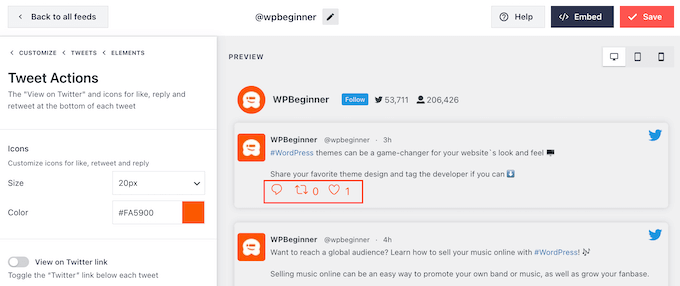
När du är nöjd med hur actionen för tweet ser ut klickar du bara på texten “Elements”.
Då kommer du tillbaka till föregående vy.
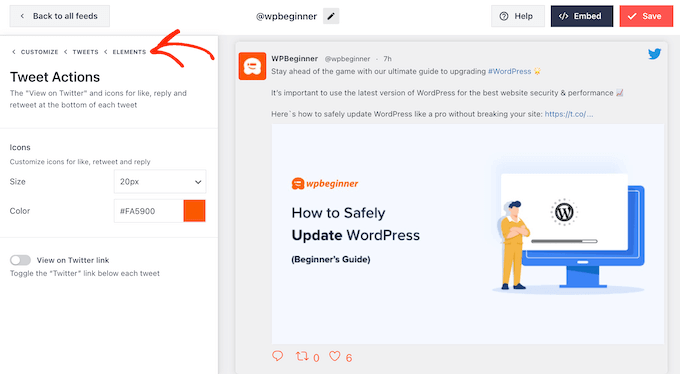
Upprepa bara denna process för att customize något av de andra enskilda elementen.
Du kan också dölja ett element genom att avmarkera dess box.
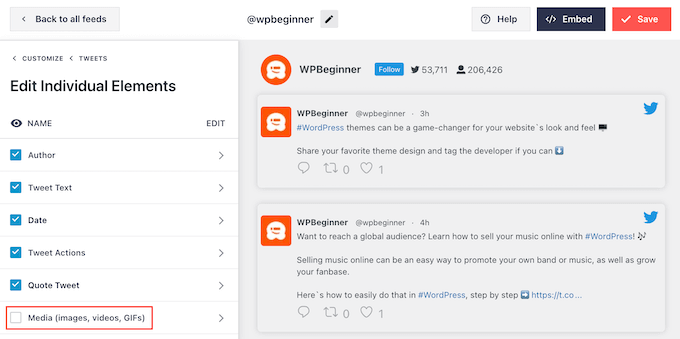
Att dölja onödigt content är ett annat trick som kan hjälpa retweet action att sticka ut.
När du är nöjd med hur tweetsen ser ut kan du gå tillbaka till huvudvyn för Smash Balloon Settings och välja “Load More Button”.
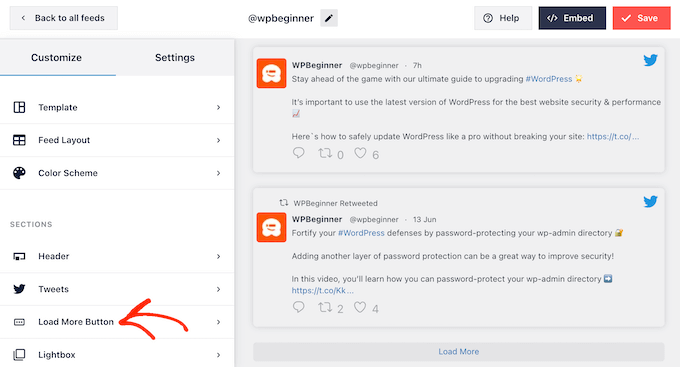
Eftersom det är en så viktig knapp kanske du vill customize den genom att ändra bakgrundsfärg, hovering, etikett med mera för att matcha designen på din site.
You can also replace the standard “Load More” text with your own message by typing it into the “Text” field.
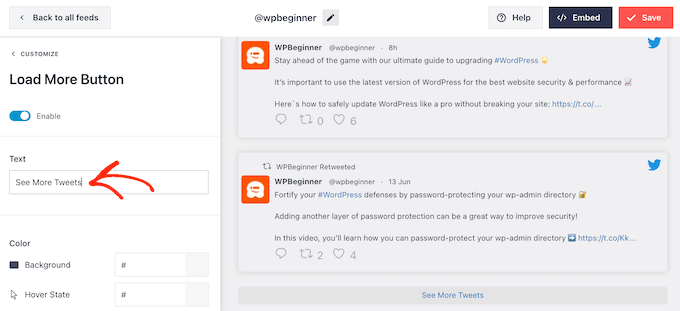
Ett annat alternativ är att aktivera infinite scroll så att nya tweets visas automatiskt när besökarna når slutet av flödet. Detta uppmuntrar besökarna att utforska fler av dina tweets och kan ge dig några extra retweets.
För att aktivera den här funktionen klickar du helt enkelt på slidern “Infinite scroll” så att den går från grå (inaktiverad) till blå (aktiverad).
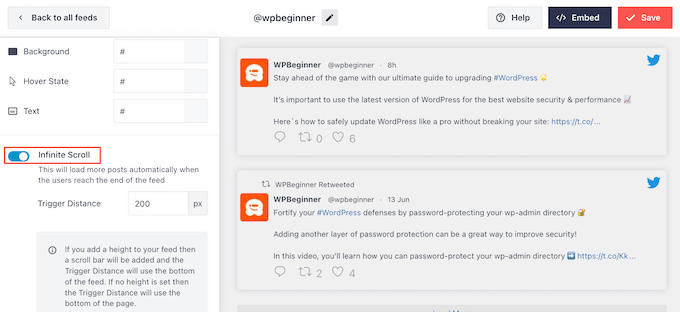
Du kan också ändra “Trigger Distance”, som talar om för Smash Balloon när den ska hämta nya tweets. Standardinställningarna bör dock fungera bra för de flesta WordPress-webbplatser.
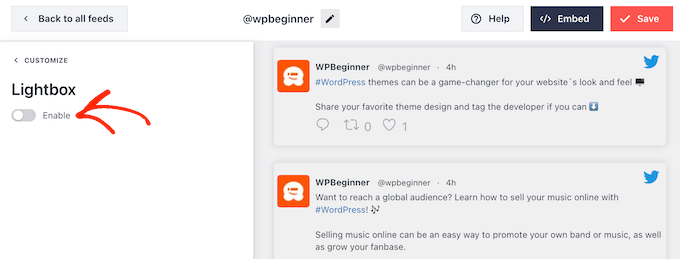
Efter det är det sista alternativet på huvudinställningsskärmen Smash Balloon “Lightbox”.
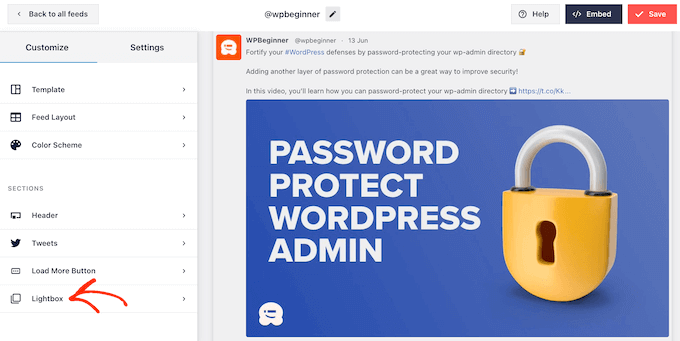
Som standard tillåter Twitter Feed Pro besökare att rulla genom feedens images och videos i en lightbox popup.
Detta kan ge dig lite extra retweets, eftersom visitorerna kan titta närmare på feedens images och se dina videoklipp utan att lämna webbplatsen.
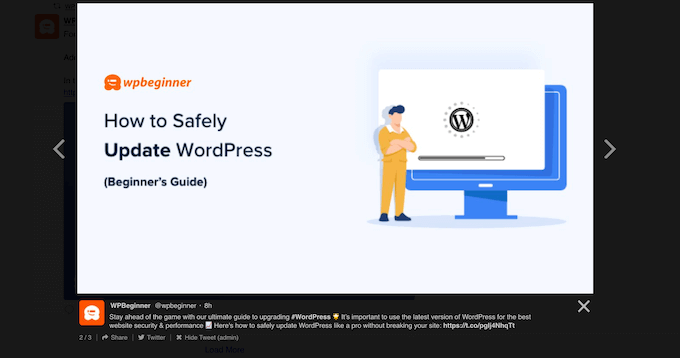
Med detta i åtanke rekommenderar vi att du låter lightboxen vara aktiverad.
Men om du vill inaktivera den här funktionen klickar du bara på den blå “Enable” toggle så att den blir grå.
När du är nöjd med hur Twitter-feeden ser ut, glöm inte att clicka på “Save”. Efter det är du redo att embeda Twitter feed och retweet knapparna på din WordPress website.
Add your Twitter Feed till WordPress
Du kan lägga till Twitter-flödet på din webbplats med hjälp av antingen en kortkod eller Twitter Feed-blocket. Eftersom det är den enklaste metoden, låt oss först se hur du kan lägga till flödet på en sida eller ett inlägg med hjälp av Smash Balloon-blocket.
Om du har skapat mer än ett feed måste du hitta koden för det feed du vill embedda.
För att få denna information, gå till Twitter Feeds ” All Feeds och kopiera koden i kolumnen ‘Shortcode’. Du kommer att behöva add to denna kod till din site, så obs/observera den.
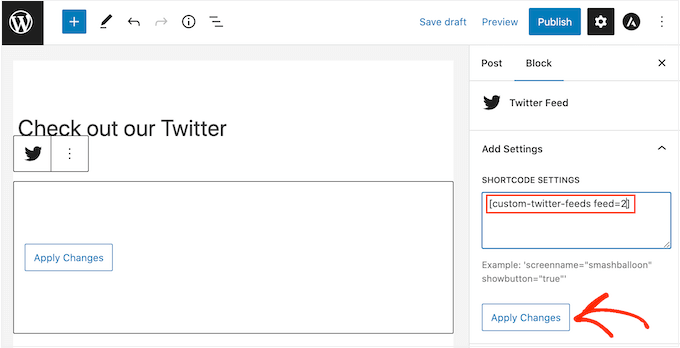
I följande image måste vi använda [custom-twitter-feeds feed=2]

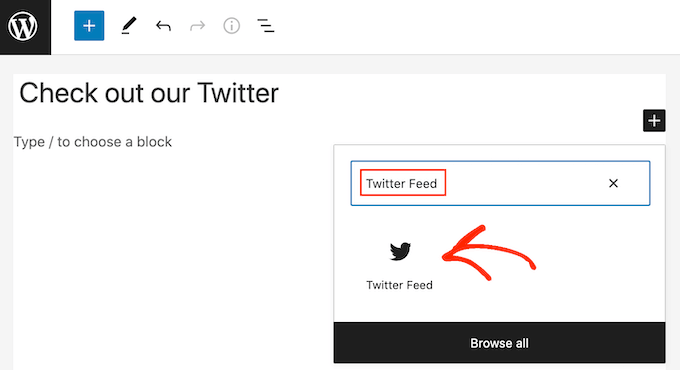
Efter det öppnar du helt enkelt den page eller post där du vill embedda Twitter feed. Klicka sedan på ikonen “+” för att lägga till ett nytt block och börja skriva “Twitter Feed”.
När rätt block visas klickar du för att add to det till blogginlägget.
Blocket visar ett av dina Twitter feeds som standard. Om du vill använda ett annat feed hittar du “Shortcode Settings” i menyn till höger.
Här lägger du bara till shortcode och klickar sedan på “Tillämpa Changes”.
Blocket kommer nu att visa din Twitter feed, och du kan helt enkelt publicera eller updating posten för att göra den live på din website.
Ett annat alternativ är att add the feed to any widget-ready area, such as the sidebar or similar section. Detta allow visitors to retweet your latest posts from any page of your website.
Gå bara till Appearance ” Widgets i WordPress dashboard och klicka sedan på den blå “+” -knappen.
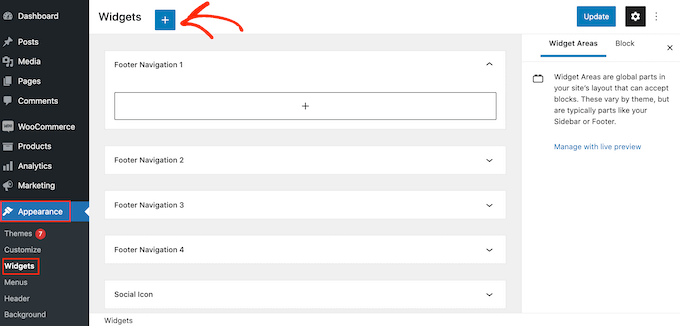
När du har gjort det måste du skriva in “Twitter Feed” för att hitta rätt widget.
Sedan drar du den bara till det area där du vill visa knapparna för feed och retweet.
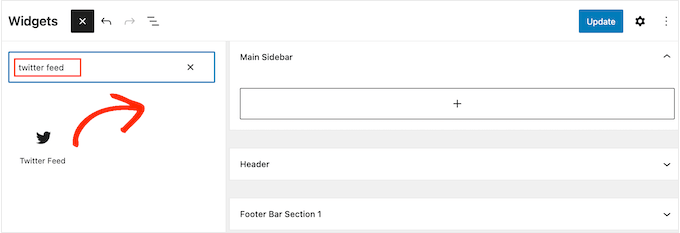
Widgeten visar ett av de feeds som du skapade med Smash Balloon.
Om du vill visa ett annat Twitter Feed i stället skriver du in feedens kod i boxen “Shortcode Settings” och klickar sedan på “Tillämpa Changes”.
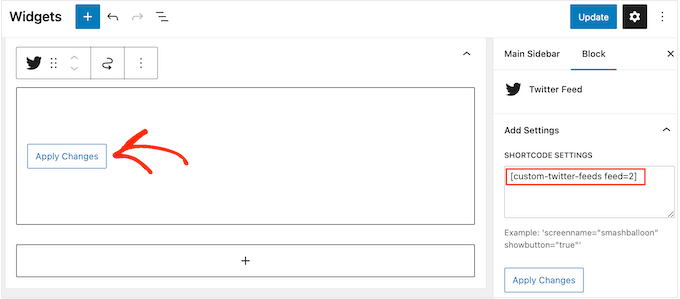
Du kan nu clicka på knappen “Update” för att göra widgeten live. För mer information, vänligen se vår Step-by-Step guide om hur man lägger till och använder widgetar i WordPress.
Slutligen kan du bädda in knapparna för feed och retweet på valfri page, post eller widgetfärdigt area med hjälp av en shortcode.
Gå bara till Twitter Feed “ All Feeds och kopiera koden i kolumnen ‘Shortcode’. Du kan nu add to shortcoden till alla widget-klara area på din site.
För mer information, vänligen se vår detaljerade guide om hur du lägger till en shortcode i WordPress.
Learn More sätt att använda Twitter i WordPress
Vill du få ut mesta möjliga av din Twitter-profil för att främja din WordPress website? Eller kanske du vill add to mer Twitter content till din site? Kontrollera dessa guider under:
- Guide för Beginnare om hur man lägger till Twitter Cards i WordPress
- Hur man fixar trasiga Twitter Cards Images i WordPress
- Så här marknadsför du din Twitter-sida i WordPress med en popup
- Så här visar du antalet Twitter-följare och mycket mer i WordPress
- Så här lägger du till en betala med en tweet-knapp för filnedladdningar i WordPress
Vi hoppas att den här artikeln hjälpte dig att lägga till Twitter-delning och retweet-knappar i WordPress. Du kanske också vill kolla in vår artikel om den senaste statistiken för sociala medier som bloggare måste känna till och vår nybörjarguide om hur du startar en YouTube-kanal för ditt företag.
If you liked this article, then please subscribe to our YouTube Channel for WordPress video tutorials. You can also find us on Twitter and Facebook.


Jiří Vaněk
I can only recommend buttons for Twitter and Facebook. They will increase your reach and possibly backlinks. Additionally, creating profiles for your website where people can find you and where you can provide more information is a great way to make yourself known. I have it implemented on my website as well; I would just appreciate some statistics. How many times has someone clicked on the button and made a tweet, and for which article, so I can have a better overview.
WPBeginner Support
To help track that we would recommend taking a look at our guide for how to track button and link clicks with MonsterInsights below:
https://www.wpbeginner.com/wp-tutorials/how-to-track-link-clicks-and-button-clicks-in-wordpress/
Admin
Jiří Vaněk
So, I understand it well that a similar thing cannot be done using Google Analytics, for example, and an external plugin such as Monster Sight is required for this? I ask because I try to use as few plugins as possible and use them for as many things as possible. That’s why I thought if I could solve a similar thing, for example, using Google Analytics.
WPBeginner Support
It is possible but you would need to manually set up the markup in Google Analytics to add to your button which is why we recommend the plugin
Konrad
Adding Twitter share and retweet buttons can indeed boost your social media presence. One thing to consider is the placement of these buttons for maximum engagement. It’s beneficial to conduct A/B testing to determine the most effective positions on your site. Additionally, make sure the buttons are clearly visible but not intrusive to the user experience.
THANKGOD JONATHAN
This post has opened my eyes.
I was reluctant to create a twitter account because I think I will not have the time to engage compared to other social sites I love using.
But now I thing I will give it a try after reading this article.
jafar
thank man
RandyDueck
Thanks for the quick response. I’m not a programmer, do you know where I can get a peice of code and paste it in? Re: Count, I’m thinking then that when testing, If I use the tweet button to post to post to my own page, then twitter doesn’t tink it’s legit? However, I have another twitter acc’t that I tried tweeting to and it didn’t increase. Is there a way I can test it to see that it’s working? How do I know it’s a legit tweet or not? I’m surpirsed that Twitter seems difficult compared to FB @wpbeginner
wpbeginner
@RandyDueck Twitter uses the new t.co shortner which only shorten links for their algorithm to make sure it is not SPAM… then it pastes the unshortened version… You have to utilize another API and write a bit of custom code to get the custom short URLs to work there…As far as the count, twitter button only shows count that it thinks are legit.
RandyDueck
Thanks for this great little code snippet. I want the twitter button to be in the post excerpt and below the title of the single-post page. the code works fine. gives the correct title etc. however, it does not shorten the link, and after tweeting, the tweet count doesn’t go up. the site is thinkactloveloseweight.com Thank your response
KatrinaMoody
Gretchen – all links should trace back to your permalink – so your permalink should be the source URL, not your short link … make sense? YOu can’t yet change the URL shortener if you use the official Tweet button ( I looked into it because I wanted to do a shortlink).
Adding this so long after the original was posted because others might have that question!
KatrinaMoody
I thought I would note that some themes change the value for the title and post url – meaning that the code will tweet with your code in quotes. I got a couple questions on Twitter over that one. I just found the different variables that worked for my site and replaced them. So …
Line three: data-url=””
was changed to %permalink% – which was my theme’s replacement
Line five: data-text=””
was changed to %post-title% – again my theme’s replacement
I wouldn’t have been able to do this without your tutorial! Thanks SOOOO much! You are now my go-to resource!
idowebmarketing
@wpbeginner @idowebmarketing Okay, there are two locations of this code, and I had only updated one!
wpbeginner
@idowebmarketing @wpbeginner data-via is the only thing that needs to be modified in order to make the change.
idowebmarketing
@wpbeginner @idowebmarketing Thanks – I added new blog posts to two of my blogs yesterday after implementing the updated code, however it still recommended wpbeginner on both. Is there any section of code that also needs to be updated?
wpbeginner
@idowebmarketing On old posts it takes twitter while to figure it out. On new posts it should be fine.
idowebmarketing
My blog is still recommending wpbeginner and I have updated the code. Here is the edited code:
<script src=”http://platform.twitter.com/widgets.js” type=”text/javascript”></script> <a href=”http://twitter.com/share” data-url=”<?php the_permalink(); ?>” data-via=”idowebmarketing” data-text=”<?php the_title(); ?>” data-related=”imnewsdaily:Daily updates from the internet marketing industry” data-count=”vertical”>Tweet</a>Any idea what I am doing wrong?
Richard
Thank you for posting this!! I have been trying to slove this problem for about three days now…
do you have the same code for the facebook like button?
Gretchen
I use the WP-generated shortlinks when tweeting about my posts, and have had troubles with those always showing in my Tweet count. The final bit of code on this site seems to work, though if you click to view the search results in Twitter it only shows the links to the actual permalink, not the links to the shortlink as well: http://bavotasan.com/tutorials/adding-tweet-button-wordpress/ It’s too bad WordPress and Twitter don’t count those as the same link somehow…
Zakir
I can add javascript in header but it will degrade YSlow rating, currently it is B rating. I really work hard to make B from D. I opened a ticket to twitter technical team, they just sent me email providing some links which may help me to get my answer or open a new ticket if not. Thats so stupid. Twitter people think we didn’t see other answers! thats so frustating. Linkedin doing quite well , their share button updates within a minute.
Deepanshu
hello sir sir how do i use this for pages ? i was able to do it for posts
Zakir
In my above mentioned website, i used your code, index.php, single.php and other php file within loop.
I can click the twitter tweet button and it shows count number, but if i refresh the page, that value goes away. Now after may be 1 hour if i check that article page, i can see the new count value. e.g. before i clicked the button it was 0, after almost 1 hour it shows 1. My question is why it took 1 hour to update. it should be updated immediately isn’t it?
Now in front page which index.php, i used the code and again i used in single.php. User clicks an article from index.php and comes article page which is in single.php. The problem: count value is not synchronising the count from the index.php to single.php. I check it later it is but after almost 1 hour. so it is synchronising after almost 1 hour.
Why? any idea.
Recently I changed the .htaccess file to add expire headers to get some speed. i am getting that but today i removed that line and back to default .htaccess file. Do you think its something with .htaccess where caching is controlled by hour, minutes, seconds, months or even year. Even though if I enable caching, the twitter java script which is twitter server can’t force to use caching.
Now I am not sure where I should look for to get immediate count value. client wants to see immediate count and synchronise with article page.
Please check the http://www.bizgene.com to get an idea.
Any clue or idea will be a great favour.
I used following code for tweet count button:
<a href="http://twitter.com/share" class="twitter-share-button"
data-url="”
data-via=”bizgene”
data-text=””
data-count=”horizontal”>Tweet
Zakir
Editorial Staff
Zakir, We think this is a common bug going on with twitter API. We have been noticing a similar thing with our tweetmeme button regarding the count. It synchornizes the count almost after 20 – 30 minutes. Perhaps try adding the script part in your head codes and then display the a href part where you want the button to display might help.
Admin
Simon
I don’t get it. Using the data url link/button above gives just a t.co link and nothing else. Has something changed there or why doesn’t it output the values?
Editorial Staff
Note, to get the_title(); or the_permalink(); you have to place this code inside the loop. If you place it outside a loop, then it will not give you a desired value.
Admin
coz
ARGH. This is what I tried but im replacing the greater-than/less-than symbols with brackets so it will hopefully show:
[?php the_title(); ?] #[?php the_category(‘,’); ?]
coz
um… last comment isn’t displaying the php… sorry. This is what i tried: (hopefully this will work)
#
coz
For DataText, im looking to add the title and category of the post as a hashtag. I can’t seem to figure out how to do it, being that I’m not too familiar with php.
I tried: >>> data-text=” #”
but that didn’t work. Any idea of how to do this?
S.Pradeep Kumar
Nice tutorial. Finally I implemented that button on my blog. It will be nice if you can make a tutorial on how to customize it. I hate the default color. : |
Calítoe.:. (Cristina MJ)
I’ve noticed that the count displays horizontally even if one specifies data-count=”vertical”. Does anyone know what’s wrong with that?
NG
I’m having the exact same problem. Any idea how to fix it?
Editorial Staff
Refresh the page… This usually happens when the twitter script is not loading fine. Try placing the twitter script part in the head section.
Admin
CharityHisle
I think I’ll stick to the tweetmeme version until the plugin is completely developed with all of the options for placement.
Rarst
There isn’t much sense in filling out every setting, most of them work just fine without being set and will pick things like current URL and page title by default.
Non-standard tag attributes will not validate (at least not as XHTML Transitional in my experience so far). Query arguments may not look as tidy, but they are more established and reliable.
Konstantin
Alternatively, you could use WordPress’ very own add_query_arg() function, to create the url.
Nice post though, and quick, too.
Editorial Staff
Yup, we had to put it out quick because a lot of our twitter users said they wanted it.
Admin
Amie
Is there any chance I don’t have “The Loop” because I keep looking for this (or even a part of it) in my index file and it’s not there. Gah, I was hoping this would be easy!
Editorial Staff
That really depends on what theme you are using. Every theme must have the loop to show the recent posts. You can try Otto’s plugin.
Admin
DJ NightLife
I used to have Topsy buttons… was about to switch for the official button but… It seems this version have a problem recognizing the real count of tweets. I had a post of 52 tweets and now it shows 8.
Otto
They’re only counting tweets since July.
BTW, the new tweet button is fully supported by my Simple Twitter Connect plugin for WordPress. Just so you know.
http://ottopress.com/wordpress-plugins/simple-twitter-connect/
Editorial Staff
Thanks Otto for updating your plugin. Your work is truly awesome Jut added the link in the post.
Admin
Ted Thompson
Helpful article, many thanks!
josemv
Excellent, thanx !
Any chance to include custom url shorteners, such as cli.gs or bit.ly ?
Editorial Staff
No, twitter is using their very own service to verify the quality of link that is being tweeted.
Admin