
Att uppmuntra människor att dela ditt innehåll på sociala medier är ett utmärkt sätt att öka din publik och få människor att bli intresserade av ditt företag.
Men faktum är att människor bara kommer att dela ditt innehåll om du gör det enkelt för dem.
Vi använder sociala delningsknappar på WPBeginners blogg så att våra läsare kan dela vårt innehåll med ett enkelt klick, så vi vet vad vi pratar om. 🤓
Enligt vår erfarenhet är Pinterest en fantastisk plattform för att driva trafik till din WordPress-webbplats, särskilt om du publicerar visuellt innehåll som foton, infografik och digitala konstverk.
Genom att lägga till en “Pin It”-knapp på din WordPress-webbplats kan dina besökare snabbt dela bilder eller annat visuellt innehåll på sina Pinterest-tavlor. Dessutom kan det ha många fördelar! Tänk: fler besökare, fler kommentarer och mer försäljning. 💥
I den här artikeln visar vi dig hur du addar Pinterest “Pin It” knappen till WordPress.
Varför lägga till Pinterest “Pin It”-knapp i WordPress?
Pinterest är en populär plattform för sociala medier som gör det möjligt för användare att samla webbplatslänkar och annat visuellt innehåll genom att skapa tavlor.
När användare lägger till ditt innehåll på sin Pinterest-tavla hjälper det andra människor att upptäcka din webbplats. Pinterest är en särskilt viktig trafikkälla om du driver en webbplats för fotografering, en modeblogg eller någon annan typ av blogg som har många bilder och videor.
Genom att lägga till en “Pin It”-knapp på din webbplats kan du uppmuntra besökare att dela ditt innehåll på Pinterest.
Obs: Pinterest ändrade officiellt namnet på knappen “Pin It” till “Save” 2016. Men många guider och WordPress-plugins använder fortfarande “Pin It”, vilket är anledningen till att vi använder det ursprungliga namnet i den här guiden. Plus, det låter bara mer fängslande!
Med det sagt, låt oss se hur du kan add to en Pinterest “Pin It” knapp i WordPress. Använd bara snabblänkarna under för att hoppa direkt till den metod du vill använda:
Metod 1: Lägg till Pinterest ‘Pin It’ -knappen till inlägg (enkelt sätt)
Det enklaste sättet att lägga till en Pinterest-knapp på din WordPress-webbplats är att använda Novashare. Enligt vår mening är det ett av de bästa plugin-programmen för sociala medier för WordPress.
Det gör att du enkelt kan lägga till en Pinterest-knapp på din webbplats, tillsammans med knappar för alla andra stora sociala nätverk. Vi har testat Novashare för massor av olika användningsfall, och vi gillar verkligen hur lätt det är att använda. För mer information om pluginet, se vår fullständiga Novashare-recension.
Till att börja med måste du besöka Novashares webbplats och välja en plan. Därefter måste du installera och aktivera insticksprogrammet. Om du behöver hjälp kan du läsa vår guide om hur du installerar ett WordPress-tillägg.

Efter aktivering ska du navigera till sidan Inställningar ” Novashare i din WordPress-panel för att aktivera din licens.
Klicka bara på fliken “Licens”, klistra in den licensnyckel som du fick när du köpte plugin-programmet och klicka sedan på knappen “Spara licens”.

När du har aktiverat din licens kan du lägga till en Pinterest-ikon på din webbplats och alla andra sociala delningsikoner du vill ha. Du kan lägga till dessa ikoner i linje med ditt innehåll eller som ett flytande fält.
Vi använder det första alternativet här (men fortsätt läsa för mer information om flytande staplar).
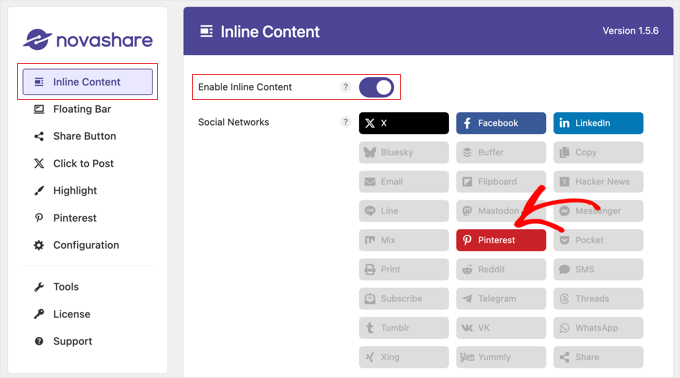
Navigera bara till fliken “Inline Content” i Novashare och slå på “Aktivera Inline Content”. Klicka sedan på Pinterest-knappen så att den blir röd.
Här kan du också aktivera andra sociala nätverk som du vill lägga till i knappfältet för social delning.
Därefter kan du bläddra nedåt och använda de tillgängliga alternativen för att konfigurera knappfältet.
Det finns inställningar för att visa knappfältet på inlägg, sidor med mera. Du kan också anpassa knapparnas färg och design.
Du kan även lägga till etiketter till knapparna och visa en räkning av hur många gånger det aktuella inlägget har delats på sociala medier.
Vi går igenom alla dessa alternativ och floating bars i detalj i vår guide om hur du lägger till sociala delningsknappar i WordPress.
När du är klar med att anpassa din “Pin It”-knapp bläddrar du längst ner på sidan. Här klickar du på knappen “Spara ändringar” för att spara de nya inställningarna.
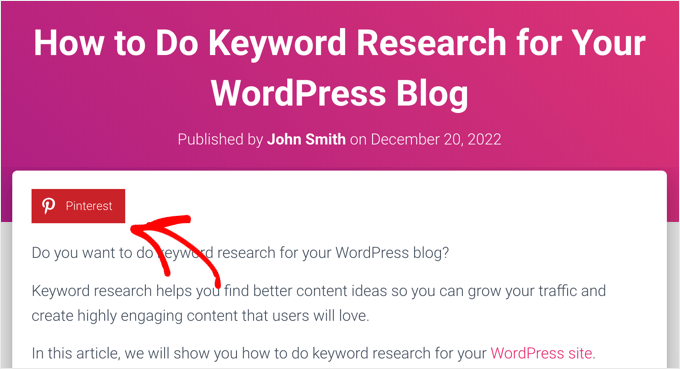
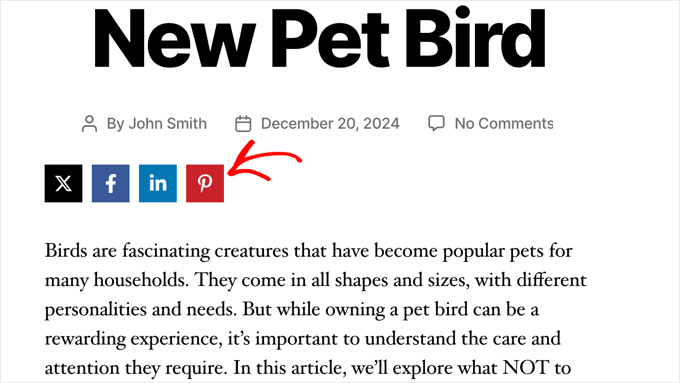
Du kan nu besöka din WordPress-webbplats för att se Pinterest-knappen i aktion.
Metod 2: Lägg till Pinterest ‘Pin It’ -knappen till bilder (enkelt sätt)
Driver du en mode-, foto- eller matblogg? Då kanske du vill lägga till en Pinterest-knapp över dessa bilder. Detta gör det möjligt för besökare att dela ditt innehåll genom att helt enkelt hålla muspekaren över den bild de vill pinna.
Novashare-pluginet som vi använde i metod 1 kan också lägga till en Pinterest “Pin”-knapp när du håller muspekaren över en bild på din webbplats.
När du har köpt en licens och installerat plugin-programmet, som vi förklarade i metod 1 ovan, gå över till Inställningar ” Novashare och klicka på fliken ‘Pinterest’.
Slå nu på “Enable Image Pins” och välj de “Post Types” där du vill visa knappen.

Därefter kan du anpassa knappens position, form och färg. De andra standardinställningarna fungerar bra för de flesta webbplatser.
Om du vill kan du visa Pinterest-knappen över bilder hela tiden, inte bara när du för muspekaren över en bild. För att göra det måste du aktivera alternativet “Visa alltid”.

Vissa webbplatsägare har några bilder som de inte vill ska delas. I så fall kan du skriva in filnamnen i fältet “Excluded Images”.
När du är nöjd med inställningarna, se till att du klickar på knappen “Spara ändringar”. Därefter kommer Novashare att börja visa Pin-knappen på bilder.

Metod 3: Lägg till Pinterest ‘Pin It’ -knappen med anpassad kortkod
Ibland kanske du vill kontrollera exakt var “Pin It”-knappen visas på din webbplats. Du kanske till exempel vill visa Pinterest-knappen på en specifik landningssida för annonser eller i inläggets innehåll.
I så fall är ett alternativ att skapa knappen med hjälp av kod och sedan placera den på varje sida eller inlägg med hjälp av en anpassad kortkod. Detta ger dig friheten att visa “Pin It”-knappen på olika platser, men du måste lägga till den på varje sida eller inlägg manuellt.
Det enklaste sättet att lägga till anpassad kod till WordPress är genom att använda WPCode. Det gör att du kan lägga till anpassad PHP, CSS, JavaScript och mer på din webbplats.
Flera av våra partnervarumärken använder detta plugin för att hantera kodsnuttar på sina webbplatser, och de har alla rapporterat tillbaka till oss om hur mycket de älskar det. För mer information, se vår fullständiga WPCode-recension.
Du kan också använda WPCode för att skapa anpassade kortkoder, så det är perfekt för att lägga till en “Pin It”-knapp på din webbplats.
Först måste du installera och aktivera det gratis WPCode-pluginet. För mer information, se vår Step-by-Step guide om hur du installerar ett WordPress plugin.
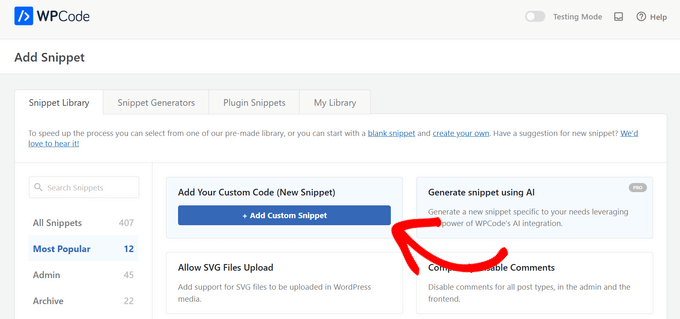
När plugin är aktiverat, gå till Code Snippets ” Add Snippet.

Här ser du alla de färdiga snippets som WPCode kan lägga till på din webbplats. Dessa inkluderar snippets som låter dig lägga till sociala delningsknappar till WordPress och visa dina sociala ikoner i ett sidofält.
Nu måste du hålla muspekaren över alternativet “Add Your Custom Code (New Snippet)” och klicka på knappen “+ Add Custom Snippet” när den visas.
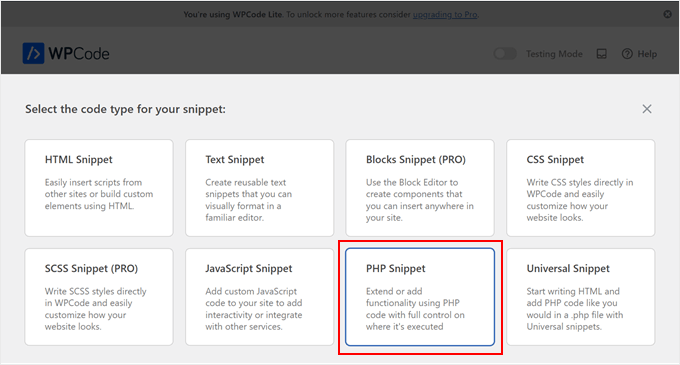
Sedan ska du lägga till PHP i WordPress, så du måste välja “PHP Snippet” som kodtyp.
På nästa skärm skriver du in en titel för kodavsnittet.
Detta är bara för din referens, så du kan använda vad du vill. För denna handledning kommer vi att skriva “Pinterest Pin It Button.
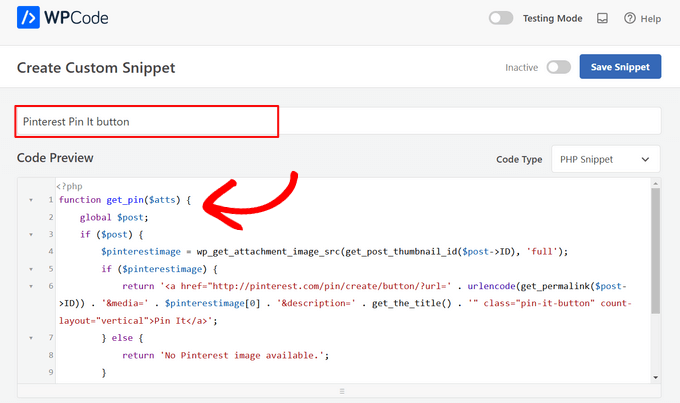
När det är gjort klistrar du bara in följande i kod editor:
1 2 3 4 5 6 7 8 9 10 11 12 13 14 | function get_pin($atts) { global $post; if ($post) { $pinterestimage = wp_get_attachment_image_src(get_post_thumbnail_id($post->ID), 'full'); if ($pinterestimage) { return '<a href="http://pinterest.com/pin/create/button/?url=' . urlencode(get_permalink($post->ID)) . '&media=' . $pinterestimage[0] . '&description=' . get_the_title() . '" class="pin-it-button" count-layout="vertical">Pin It</a>'; } else { return 'No Pinterest image available.'; } } else { return 'No post found.'; }}add_shortcode('pin', 'get_pin'); |
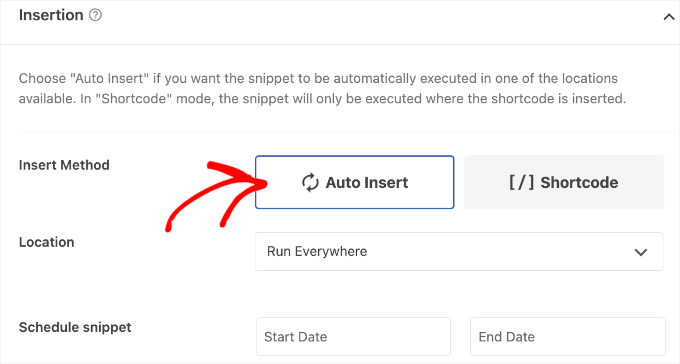
Därefter rullar du ner på sidan till section “Insertion”. Här kan du behålla standardmetoden “Auto Insert” för att se till att koden körs överallt.
Om det inte redan är valt, välj “Run Everywhere” (Run överallt)
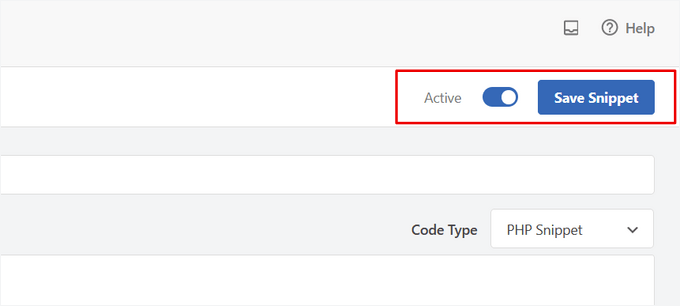
Slutligen rullar du till högst upp på vyn och clickar på slidern “Inaktiverad” så att den visar “Aktiv”.
Klicka sedan bara på knappen “Spara snippet” eller “Uppdatera” för att aktivera kodsnippet.
Nu kan du add a “Pin It” knapp to any WordPress page, post, or widget-ready area using the [pin] shortcode.
För Step-by-Step instruktioner om hur du placerar shortcode, vänligen se vår guide om hur du lägger till en shortcode i WordPress.
![use the [pin] shortcode in your WordPress posts](https://www.wpbeginner.com/wp-content/uploads/2019/06/pinterest-add-shortcode.png)
När du har lagt till den här koden kommer besökarna att se en “Pin It”-knapp på alla sidor eller inlägg som har en utvald bild.
Om sidan inte har en featured image, kommer de att se ett “No Pinterest image available” error message istället.
Hur man add to Pinterest ‘Pin It’ knapp med hjälp av Full-Site Editor
Om du använder ett av de nyare teman som aktiverar block kan du add to en “Pin It”-knapp var som helst i ditt WordPress-tema med hjälp av en customize shortcode.
Det här är ett enkelt sätt att add to knappen på alla pages och posts. Du kan också add to “Pin It”-knappen till area som du inte kan edit med WordPress standard content editor, till exempel din sites 404 page template.
För att komma igång går du bara till Themes ” Editor i WordPress dashboard.
")
Som standard kommer hela Site Editor att visa ditt temas hemmamall.
Om du vill add to en “Pin It”-knapp till en annan page väljer du antingen “Template” eller “Template Parts” i menyn till vänster.

Du kan nu selecta den template som du vill edit.
I det här exemplet visar vi hur du addar en “Pin It”-knapp till din sites Single page template. Stegen kommer dock att vara liknande oavsett vilken template du väljer.

WordPress visar nu en preview av templates eller template-delar.
För att edit denna template, gå vidare och click på den lilla penna iconen.

När du har gjort det klickar du på den blå “+” icon i det övre vänstra hörnet.
I sökfältet som visas skriver du in “Shortcode”.

När det rätta blocket appear, drag and drop det på template layouten.
Du kan nu skriva in Pin shortcode i blocket.

Efter det klickar du bara på “Save” för att göra den nya shortcoden live.
Om du nu besöker din WordPress-webbplats kommer du att se “Pin it”-knappen i aktion.
Metod 4: Lägg till Pinterest ‘Pin It’ -knappen med kod och FTP
Ett annat sätt att lägga till en Pinterest-knapp på din webbplats utan ett plugin är att lägga till kod direkt i dina temafiler. Denna metod är dock endast lämplig för tekniska användare.
Att redigera temafilerna direkt kan orsaka många vanliga WordPress-fel, och du kommer att förlora all anpassad kod när du uppdaterar WordPress-temat. Med detta i åtanke rekommenderar vi alltid att du använder WPCode istället.
Men om du använder den här metoden måste du börja med att göra en fullständig WordPress-säkerhetskopia av din webbplats. Detta hjälper dig att återställa din webbplats om något skulle gå sönder av misstag.
När du har gjort det ansluter du till din WordPress-hosting med en FTP-klient och går sedan till mappen /wp-content/themes/.
Härifrån måste du öppna din aktuella temamapp och sedan hitta filen footer.php.
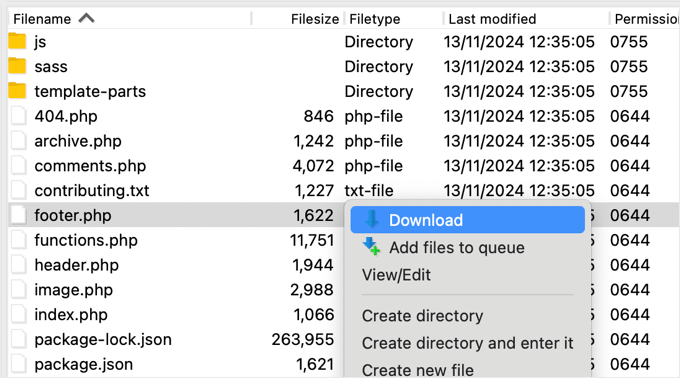
Högerklicka sedan på filen och välj sedan “Download” i menyn. Detta kommer att downloada filen footer.php till din dator.
Nu måste du öppna filen footer.php med en vanlig textredigerare som Notepad och klistra in följande skript precis före taggen </ body>.
1 2 3 4 5 6 7 8 9 10 11 12 13 14 15 16 17 18 19 | <script type="text/javascript">(function() { window.PinIt = window.PinIt || { loaded:false }; if (window.PinIt.loaded) return; window.PinIt.loaded = true; function async_load(){ var s = document.createElement("script"); s.type = "text/javascript"; s.async = true; s.src = "https://assets.pinterest.com/js/pinit.js"; var x = document.getElementsByTagName("script")[0]; x.parentNode.insertBefore(s, x); } if (window.attachEvent) window.attachEvent("onload", async_load); else window.addEventListener("load", async_load, false);})();</script> |
När du har gjort det måste du save filen och sedan uploada den tillbaka till den aktuella theme foldern.
Därefter lokaliserar du template-filen i ditt theme där du vill add to knappen. Vanligtvis kommer detta att vara filen single.php, men det kan variera beroende på ditt WordPress-tema. Om du är osäker kan du läsa vår guide för nybörjare om mall-hierarkin i WordPress.
För att editera template-filen behöver du bara downloada den från din theme folder och öppna den för redigering.
Du måste välja den location där du vill visa “Pin It”-knappen. Många webbplatser visar sociala delningsknappar direkt under rubriken på posten, men du kan använda vilken location du vill.
Följ detta för att välja en location och add to följande kod:
1 2 | <?php $pinterestimage = wp_get_attachment_image_src( get_post_thumbnail_id( $post->ID ), 'full' ); ?><a href="http://pinterest.com/pin/create/button/?url=<?php echo urlencode(get_permalink($post->ID)); ?>&media=<?php echo $pinterestimage[0]; ?>&description=<?php the_title(); ?>" class="pin-it-button" count-layout="vertical">Pin It</a> |
Ovanstående code snippet lägger till inläggets featured image, rubrik, description och URL i parametern share URL.
Den här kodsnutten lägger också till en vertikal delningsknapp i alla dina inlägg. Om du vill visa en horisontell delningsknapp istället ändrar du helt enkelt avsnittet count-layout="vertical"> till count-layout="horizontal">.
När du är klar sparar du filen och laddar upp den tillbaka till ditt tema direkt med FTP.
Bonus: Ytterligare guider om WordPress och sociala medier
Är du intresserad av att lära dig mer om hur du använder WordPress med sociala medier? Kolla in dessa nybörjarvänliga guider:
- Är Pinterest död? Hur man laddar Pinterest-trafik till din blogg
- Så här verifierar du din WordPress-webbplats på Pinterest (steg för steg)
- Så här publicerar du automatiskt från WordPress till Instagram
- Bästa Facebook-pluginsen för WordPress för att få din blogg att växa
- Statistik för sociala medier (ultimat lista för bloggare)
If you liked this article, then please subscribe to our YouTube Channel for WordPress video tutorials. You can also find us on Twitter and Facebook.


")
Dennis Muthomi
Thabks for the PHP code snippet.
I copied and pasted the code into my website’s footer.php file, but the button did not initially appear after uploading.
I realized I needed to clear my cache before the new button would display properly.
Jiří Vaněk
Thanks for the php snippet. I tried it on one of the sites and it works like a charm. You have saved me some space between plugins. Good job.
Alison
Hi. I just added shared counts and the Pinterest add-on plugins recently. They seem to work fine, but I notice they haven’t been updated in several years nor have they been tested with my version of WordPress. Should I be looking for a new plugin or are they still ok to use?
WPBeginner Support
The shared count plugin was updated 2 months ago and it should still be working well, for the warnings we would recommend taking a look at our article below for why you shouldn’t be very concerned
https://www.wpbeginner.com/opinion/should-you-install-plugins-not-tested-with-your-wordpress-version/
Admin
Julie
I’m looking to add an individual graphic pin that I’ve custom designed to the travel blog post it belongs to (like the best things to do in Jaipur). Is that what this article is covering or is it just the literal Pinterst “Button” that looks like the Pinterst logo? Sorry to be co fixed with this technicality, but an image or two would make this much clearer what specifically the “button” you are referring to is….thank you in advance…
WPBeginner Support
This is for the Pinterest pin it button, the second screenshot in the article should be what you are looking for as an example.
Admin
Ellen
It works!! thankyou
WPBeginner Support
Glad our guide could help
Admin
Kara
After I installed the plugin, it never showed up in the settings.
WPBeginner Support
You would want to ensure you activate the plugin as well.
Admin
Jais
Thanks. It works.
WPBeginner Support
You’re welcome, glad it worked for you
Admin
laira
hi wpbeginner, I follow your codes, may i know if i will still pin the images on my pinterest boards? or it will automatically pin there? Im still a beginner in this platform. thank you
WPBeginner Support
The button when used would add it to your board.
Admin
Lorraine Reguly
Thanks for the code. I just added it to my author site. (I have no idea how the Pinterest button shows up on my images on my business site, but it does.)
Now my author site is all set up!
Thanks, Syed.
P.S. I just followed you on Pinterest.
WPBeginner Support
Hey Lorraine,
Thanks for following us on Pinterest. You can also find us on Twitter and Facebook.
Admin
RB
this is work !! thanks
and
I wonder…
how can I change icon? Icon is still same when change code
Thales
I did the last option, adding the short code to my theme’s functions.php file. It worked, but I couldn’t save my posts as draft anymore. Then I removed the code and it is not working. My site is still online, but I cannot log in into my site anymore. The following message appear:
Warning: Cannot modify header information – headers already sent by (output started at /home/peque107/public_html/wp-content/themes/himmelen/functions.php:2) in /home/peque107/public_html/wp-includes/pluggable.php on line 1224
Please help!
Emma steave
Thanks. Its great
Carissa
Does this only apply for wordpress.org blogs? I have a wordpress.com blog and I am not sure if I can add this plugin to it?
Thank you!
WPBeginner Support
Yes it is for WordPress.org. Please see our guide on the difference between self hosted WordPress.org vs free WordPress.com blog.
Admin
Ruth
I have a problem. I followed the instructions and came up with this error:
Parse error: syntax error, unexpected ‘<' in /home/cmomb/butfirstwehavecoffee.com/wp-content/themes/notepad/functions.php on line 18
Now I cannot get rid of it. Could someone advise. My site is now down.
WPBeginner Support
Open the functions.php file in a text editor like notepad. Go to line 18. You probably have <?php tag there that you don’t need. Delete it and also delete the ?> closing tag
Admin
Ian Harris
Thanks for this firstly
I am struggling to position the element. It is seeming to always sit in the top left of the div.
Is it possible to position it and also change the bg image to own custom one.
Thanks
Paradise Found Around
Great tutorial, as usual. I was wondering though if there was a way to modify it to use a custom button in place of the starboard one that automatically comes up.
Thanks,
Mark
mark taylor
Good tutorial, i have put it on my site without any problems, i then tested it and it worked, but it still says 0 after i pinned.
Mark
vrinda
I tried so many plugins… they don’t work with infinite scroll and nextgen gallery…. but with some changes this script solved my issue.. thanks
Michael
Hello,
I just want to ask if I could change the size of the “pin it” button? Because it seems that it was a little bit small.
Regards,
Michael
Editorial Staff
You could use the pin count layout vertical or horizontal. Other than that, no you cannot change the size.
Admin
Jenny
This code just recently stopped working. I had it on my site and it was working great and recently images appear to be working but then when you go view the pinboard there is no image set. Other times when trying to pin it 502 error that comes from the Pinterest site. Any ideas?
Editorial Staff
Probably server errors on Pinterest’s end. We have this code running on our other sites.
Admin
Ido Schacham
There’s a bug in the code. The generated href for the pin it button should include ‘url=’, currently it’s missing the equals sign.
Editorial Staff
Fixed the shortcode code for that. Thanks for reporting it
Admin
jess
For wordpress users..adding the pin it or any other social media is easy! Under dashboard, go to setting, click on sharing and they all appear- click on what you want to add!
Editorial Staff
You are referring to WP.com sites. This tutorial is for self-hosted WordPress sites. Two different things.
Admin
Jen M
THANK YOU! I have been searching for how to do this for 2 days & downloaded something & that didn’t work, I was about to give up & then THANKFULLY read your comment. I appreciate someone making it as EASY as it really is, how come wordpress can’t do that?
Jenn K
Ooh, thanks for the tip! Exactly what I was looking for
Nick
Is there a way to customize this so you can select a custom image for the pin-it button ?
Editorial Staff
If you mean a custom image for your article, then yes you can. Look at the &media tag in the second code.
Admin
Husein Yuseinov
Hi,
I need to implement this code but in header file, but postthumbnail returns error?!
wpbeginner
@Husein Yuseinov You have to call the thumbnail code within your post loop. In order to call it in your header.php file, you must utilize the global variable.
https://www.wpbeginner.com/wp-themes/how-to-display-custom-fields-outside-the-loop-in-wordpress/
Husein Yuseinov
@wpbeginner Thanks for the fast respond, but I’m not a coder, and it’s hard for me to understand you.
wpbeginner
@Husein Yuseinov Ok… so here is what you do. Add the following line above $pinterestimage line inside the PHP tags:
global $wp_query;
$postid = $wp_query->post->ID;
Then replace $post->ID with $postid and it will work. Also after the code, you may want to end wp_reset_query();
This is the best we can do. What you are asking for requires coding. If you are unable to do this, then shoot us an email. We can help you out for a small fee.
robthecomputerguy
What in the world is going on with the “animhut blog” button on thee next 3 comments?
wpbeginner
@robthecomputerguy I think they just liked our comments, and livefyre is showing their profile.
robthecomputerguy
@wpbeginner Oh that’s fascinating – that didn’t even occur to me – thanks for the follow up!
FuturePocket
I tried adding this… it worked but when you click on “Pin it” and it opens the window in a new browser and you actually submit the pin, it just reloads the newly opened window and the pin isn’t submitted. Decided not to implement it until they’ve fixed their bugs.
Phil Derksen
If you don’t want to mess with adding code, I created a Pin It button plugin you can try out.
http://wordpress.org/extend/plugins/pinterest-pin-it-button/
(or just search for “pinterest pin it” under plugins)
Jean Oram
I used the ‘follow me’ code on the Pinterest Goodies page and pasted it into the ‘text’ widget on my WordPress blog. The button now appears right after my mini bio. It works quite well.
Editorial Staff
For any advanced theme framework like Thesis, Genesis, Headway etc, you have to add these codes via functions.php file using the framework appropriate hooks. We cannot possibly cover all the theme frameworks out there. Most theme framework blogs have instructions on how to do customize the themes.
Admin
wpbeginner
Your method seems a bit tedious because you would have to do it for each image.
Ruby
@wpbeginner It’s not ideal, but it’s really not much more than you have to do to post the image anyway. I’m still looking for a great option (plugin ideally) that a) works on my theme and b) is easy. Luckily, due to the popularity of Pinterest, I’m confident someone will have one up and running soon!
wpbeginner
Make sure you set $pinterestimage[0] otherwise it will return an array. Other than that not sure why you are getting the error.
merrittsgret
@wpbeginner It’s working now, thanks to the shortcode code you gave us. Thank you so much!
Now to get it to align with everything else via CSS… (http://ylcf.org/2012/01/tomorrow-2/) Ah, the joys.
wpbeginner
@merrittsgret Yeah, you might have to utilize the !important tag in some cases.
dave2
Any idea on how to change it from featured image to first image?
wpbeginner
@dave2 Use a variation of this snippet:https://www.wpbeginner.com/wp-themes/how-to-set-a-default-fallback-image-for-wordpress-post-thumbnails/
animhut blog
@wpbeginner @dave2 Thank you for the tutorial ! i need that for my another photography site
Gretchen
It works, but it shows the text “array” before the Pin It button. I’m calling it via my functions.php, like so “echo $pinterestimag…..<?php;" Could that be why?
Heidi at CrockPotLadies
I cannot seem to get it to work. I put the first code in my footer.php before the closing body tag and then added the other code into my single php after my other sharing buttons provided by po.st. Yet when I look at a post on my site (http://crockpotladies.com/recipe-categories/entrees/crockpot-chicken-enchiladas/) I do not see a Pin It Button. Any suggestions?
wpbeginner
@Heidi at CrockPotLadies We can see the button in the next line after the Subscribe to feed etc links.
wmwebdes
Only just started to hear about Pinterest – looks as though it is really taking off.
Thanks for the tut.
Ruby
Thanks for this. I recently tried a similar method but it doesn’t seem to work with my WordPress.org theme, so I came up with my own work-around and posted it here: http://www.tomaytotomaaahto.com/tools-and-tutorials/how-to-turn-your-images-into-pinterest-pin-it-buttons-wordpress
YeahThatsKosher
How do you get this to integrate with an existing WP plugin like Digg Digg or Sociable?
wpbeginner
@YeahThatsKosher You would have to ask the developers to do so for you.