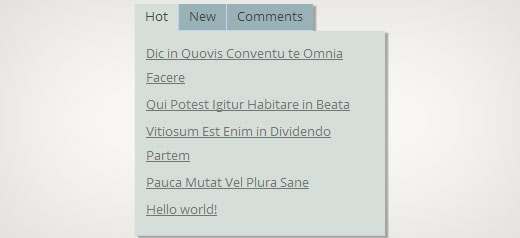
Har du sett ett flikområde på populära webbplatser som låter dig se populära, senaste och utvalda inlägg med bara ett klick? Detta kallas jQuery-flikwidgeten, och den låter dig spara utrymme på användarens skärm genom att kombinera olika widgets till en. I den här artikeln visar vi hur du lägger till en jQuery-flikwidget i WordPress.

Varför du bör lägga till en jQuery-flikwidget?
När du kör en WordPress-webbplats kan du enkelt lägga till objekt i dina sidofält med hjälp av dra-och-släpp-widgets. När din webbplats växer kanske du känner att du inte har tillräckligt med utrymme i sidofältet för att visa allt användbart innehåll. Det är precis då en flikwidget kommer till nytta. Den låter dig visa olika objekt i samma område. Användare kan klicka på varje flik och se det innehåll de är mest intresserade av. Många stora webbplatser använder den för att visa populära artiklar idag, den här veckan och den här månaden. I den här handledningen visar vi hur du skapar en flikwidget. Vi visar dock inte vad du ska lägga i dina flikar. Du kan i princip lägga till vad du vill.
Notera: den här handledningen är för användare på mellannivå och kräver kunskaper i HTML och CSS. För nybörjare, se istället den här artikeln.
Skapa jQuery-flik-widget i WordPress
Låt oss börja. Det första du behöver göra är att skapa en mapp på ditt skrivbord och döpa den till wpbeginner-tabber-widget. Därefter behöver du skapa tre filer inuti den här mappen med en enkel textredigerare som Anteckningar.
Den första filen vi kommer att skapa är wpb-tabber-widget.php. Den kommer att innehålla HTML- och PHP-kod för att skapa flikar och en anpassad WordPress-widget. Den andra filen vi kommer att skapa är wpb-tabber-style.css, och den kommer att innehålla CSS-styling för flikbehållaren. Den tredje och sista filen vi kommer att skapa är wpb-tabber.js, som kommer att innehålla jQuery-skriptet för att byta flikar och lägga till animation.
Låt oss börja med filen wpb-tabber-widget.php. Syftet med den här filen är att skapa ett plugin som registrerar en widget. Om det här är första gången du skapar en WordPress-widget, rekommenderar vi att du tittar på vår guide om hur du skapar en anpassad WordPress-widget eller helt enkelt kopierar och klistrar in den här koden i filen wpb-tabber-widget.php:
<?php
/* Plugin Name: WPBeginner jQuery Tabber Widget
Plugin URI: https://www.wpbeginner.com
Description: A simple jquery tabber widget.
Version: 1.0
Author: WPBeginner
Author URI: https://www.wpbeginner.com
License: GPL2
*/

// creating a widget
class WPBTabberWidget extends WP_Widget {

function WPBTabberWidget() {
		$widget_ops = array(
		'classname' => 'WPBTabberWidget',
		'description' => 'Simple jQuery Tabber Widget'
);
$this->WP_Widget(
		'WPBTabberWidget',
		'WPBeginner Tabber Widget',
		$widget_ops
);
}
function widget($args, $instance) { // widget sidebar output

function wpb_tabber() {

// Now we enqueue our stylesheet and jQuery script

wp_register_style('wpb-tabber-style', plugins_url('wpb-tabber-style.css', __FILE__));
wp_register_script('wpb-tabber-widget-js', plugins_url('wpb-tabber.js', __FILE__), array('jquery'));
wp_enqueue_style('wpb-tabber-style');
wp_enqueue_script('wpb-tabber-widget-js');

// Creating tabs you will be adding you own code inside each tab
?>

<ul class="tabs">
<li class="active"><a href="#tab1">Tab 1</a></li>
<li><a href="#tab2">Tab 2</a></li>
<li><a href="#tab3">Tab 3</a></li>
</ul>

<div class="tab_container">

<div id="tab1" class="tab_content">
<?php
// Enter code for tab 1 here.
?>
</div>

<div id="tab2" class="tab_content" style="display:none;">
<?php
// Enter code for tab 2 here.
?>
</div>

<div id="tab3" class="tab_content" style="display:none;">
<?php
// Enter code for tab 3 here.
?>
</div>

</div>

<div class="tab-clear"></div>

<?php

}

extract($args, EXTR_SKIP);
// pre-widget code from theme
echo $before_widget;
$tabs = wpb_tabber();
// output tabs HTML
echo $tabs;
// post-widget code from theme
echo $after_widget;
}
}

// registering and loading widget
add_action(
'widgets_init',
create_function('','return register_widget("WPBTabberWidget");')
);
?>
I koden ovan skapade vi först ett plugin och sedan skapade vi en widget inuti det pluginet. I widgetens utdatasektion lade vi till skript och stilmallar och sedan genererade vi HTML-utdata för våra flikar. Slutligen registrerade vi widgeten. Kom ihåg att du måste lägga till innehållet som du vill visa på varje flik.
Nu när vi har skapat widgeten med PHP- och HTML-kod som behövs för våra flikar, är nästa steg att lägga till jQuery för att visa dem som flikar i flikbehållaren. För att göra det behöver du kopiera och klistra in denna kod i filen wp-tabber.js.
(function($)  {
$(".tab_content").hide();
$("ul.tabs li:first").addClass("active").show();
$(".tab_content:first").show();
$("ul.tabs li").click(function() {
$("ul.tabs li").removeClass("active");
$(this).addClass("active");
$(".tab_content").hide();
var activeTab = $(this).find("a").attr("href");
//$(activeTab).fadeIn();
if ($.browser.msie) {$(activeTab).show();}
else {$(activeTab).fadeIn();}
return false;
});
})(jQuery);
Nu är vår widget redo med jQuery, det sista steget är att lägga till stil för flikarna. Vi har skapat en exempelstilmall som du kan kopiera och klistra in i filen wpb-tabber-style.css:
ul.tabs {
position: relative;
z-index: 1000;
float: left;
border-left: 1px solid #C3D4EA;
}
ul.tabs li {
position: relative;
overflow: hidden;
height: 26px;
float: left;
margin: 0;
padding: 0;
line-height: 26px;
background-color: #99B2B7;
border: 1px solid #C3D4EA;
border-left: none;
}
ul.tabs li  a{
display: block;
padding: 0 10px;
outline: none;
text-decoration: none;
}
html ul.tabs li.active,
html ul.tabs li.active a:hover {
background-color: #D5DED9;
border-bottom: 1px solid #D5DED9;
}
.widget-area .widget .tabs a  {
color: #FFFFFF;
}
.tab_container {
position: relative;
top: -1px;
z-index: 999;
width: 100%;
float: left;
font-size: 11px;
background-color: #D5DED9;
border: 1px solid #C3D4EA;
}
.tab_content {
padding: 7px 11px 11px 11px;
line-height: 1.5;
}
.tab_content ul {
margin: 0;
padding: 0;
list-style: none;
}
.tab_content li {
margin: 3px 0;
 }
.tab-clear {
clear:both;
}
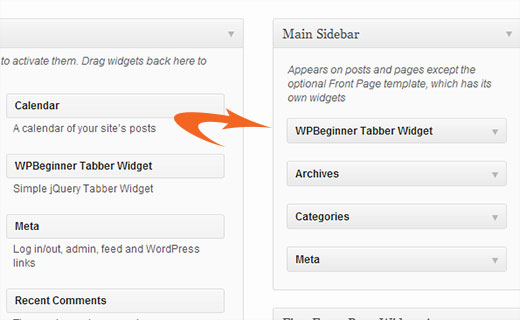
Det var allt. Ladda nu bara upp mappen wpbeginner-tabber-widget till din WordPress-webbplats katalog /wp-content/plugins/ via FTP. Alternativt kan du också lägga till mappen i ett zip-arkiv och gå till Plugins » Lägg till nytt i ditt WordPress-adminområde. Klicka på uppladdningsfliken för att installera pluginet. När pluginet är aktiverat, gå till Utseende » Widgets, dra och släpp WPBeginner Tabber Widget till din sidopanel och det är allt.

Vi hoppas att den här handledningen hjälpte dig att skapa en jQuery-flik för din WordPress-webbplats. För frågor och feedback kan du lämna en kommentar nedan eller ansluta dig till oss på Twitter eller Google+.


Nitish Chauhan
Hej,
Min plugin är aktiverad men i widget-sektionen visas meddelandet "Det finns inga alternativ för denna widget.". Vänligen berätta hur jag aktiverar alla funktioner och jag vill skapa en plugin som
“jQuery(document).ready(function() { var wrapper = jQuery(“.input_fields_wrap”); //Fields wrapper var add_button = jQuery(“.add_field_button”); //Add button ID
//initial text box count
jQuery(add_button).click(function(e){ //vid klick på lägg till-knappen
e.preventDefault();
//max antal textrutor tillåtna
//textruta inkrementering
jQuery(wrapper).prepend(‘×’); //lägg till textruta
jQuery(‘.input_fields_wrap’).sortable();
jQuery(‘.input_fields_wrap’).disableSelection();
});
jQuery(wrapper).on(“click”,”.remove_field”, function(e){ //användaren klickar på ta bort text
e.preventDefault(); jQuery(this).parent(‘div’).remove();
});
});”
Min kod i JavaScript. Vänligen ge förslag om du har någon lösning.
Tack
Nabam Rikam
Jag har infogat plugins i sidopanelen, men när jag försöker klicka säger den att det inte finns något alternativ för detta plugin. Och efter att vi har sökt igenom det på webbplatsen ser vi tre tomma flikar. Vägled mig lite här, brorsan.
goutham
Jag får inga flikar eller widgets på min webbplats. Jag har kopierat och klistrat in samma kod. Det fungerar inte.
Kunle
jag vill placera pluginet som precis skapats på en plats på min sida, och inte i sidofälten eller sidfoten.
hur gör jag det, för att placera det var som helst på min webbsida
Zadius
Detta är den andra handledningen jag har provat och av någon anledning visas inte plugin-filen under plugin-katalogen på min webbplats. Jag laddar upp filen direkt med FTP men när jag loggar in i mitt WordPress-adminområde visas ingenting under fliken för plugins. Vänligen ge råd. Tack.
Uppdatering: Jag zippade filen och laddade upp den via WordPress plugin-gränssnittet. Filen visas inte i min plugins mapp på mitt FTP-gränssnitt så jag har ingen aning om var den visas. Men jag fick den installerad så tack!
John
Tack för handledningen. Jag märkte dock att titeln saknas när jag lägger till widgeten i widgetområdet. Hur kan jag lägga till ett fält för titeln?
Drazen
Hej
Tack för detta. Jag undrade bara hur man lägger till ett alternativ så att när jag tittar på widgeten kan jag helt enkelt klistra in länkar i den, i varje flik?
Till exempel:
Flik 1 (möjlighet att döpa om den i widgetinställningarna)
– Textruta under den i widgetinställningarna (så att jag kan lägga till text, länkar etc.)
Flik 2 (möjlighet att döpa om den i widget-inställningar)
– Textruta under den i widget-inställningar (så att jag kan lägga till text, länkar etc.)
Flik 3 (möjlighet att döpa om den i widget-alternativen)
– Textruta nedanför i widget-alternativen (så att jag kan lägga till text, länkar etc.)
Tack
Gavin Wilshen
Strålande handledning. Tack grabbar!
Grant
Det ger mig fortfarande detta fel:
Plugin kunde inte aktiveras eftersom det utlöste ett kritiskt fel.
Parse error: syntax error, unexpected T_NS_SEPARATOR, expecting T_STRING in /home/content/11/10826211/html/wp-content/plugins/wpbeginner-tabber-widget/wpb-tabber-widget.php on line 16
WPBeginner Support
Grant, vi har precis kontrollerat koden igen. Pluginet aktiverades utan problem hos oss.
Admin
Rahul
Tack mannen, du är ett geni. Jag skulle precis köpa ett premium-plugin från CodeCanyon och hittade sedan den här guiden.
Jonathan
Varför säger den att den behöver uppdateras när jag installerar den här pluginen, och uppdateringen är från en annan utvecklare & är över 3 år gammal?
WPBeginner Support
Det borde den inte göra. Om du har ändrat pluginens namn och det matchar en annan plugin, skulle WordPress förväxla den med den andra pluginen.
Admin
Jonathan
Jag ändrade ingenting; jag gjorde bara precis som du visade ovan.
Jonathan
Detta är pluginet som WordPress tror att det är & försöker uppdatera det till. http://wordpress.org/plugins/tabber-widget/
Jag uppdaterade precis pluginet till version 2.0 & det (av någon anledning) fick det att sluta be om att uppdatera det till det andra pluginet. Jag skulle försöka byta namn på & ändra informationen för det andra pluginet, men det var det enda som verkade fungera.
WPBeginner Support
The only reason we can think of is that you probably named the plugin file or folder to tabber-widget.php instead of wpb-tabber-widget.php which caused WordPress to confuse the plugin with this other one. The version trick is ok too until this other plugin releases 2.0+ so its bed to clear the confusion.
WPBeginner Support
Vi kunde inte reproducera detta. Har du tillgång till en annan WordPress-webbplats där du kan prova detta, bara för att testa att det inte är något fel från din sida?
Doris
Detta motverkar ju syftet med att WordPress är dynamiskt, eller hur? Hårdkodad text i en widget? Finns det ett sätt att hämta dynamiskt innehåll från databasen? Vi nybörjare har inte mycket kodningserfarenhet, vet du... Man skulle kunna tro att det finns en plugin som gör detta...
WPBeginner Support
Den här handledningen riktar sig till användare på mellannivå och målet här är att visa dem hur man skapar en flik-widget. För nybörjare finns det flera inbyggda malltaggar som dynamiskt kan generera innehåll inuti varje flik. Till exempel:
Visa en lista över dina WordPress-sidor:
<ul> <?php wp_list_pages('title_li='); ?> </ul>1-click Use in WordPress
Visa slumpmässiga inlägg:
<ul> <?php $posts = get_posts('orderby=rand&numberposts=5'); foreach($posts as $post) { ?> <li><a href="<?php the_permalink(); ?>" title="<?php the_title(); ?>"><?php the_title(); ?></a> </li> <?php } ?> </ul>1-click Use in WordPress
Visa senaste kommentarer:
1-click Use in WordPress
Och många fler.
Admin
manoj sakhwar
Fin artikel. tack...
Grant
Vad jag inte förstår är var jag ska klistra in koden. Vilken typ av dokument ska jag lägga koden i? (Jag har Mac).
WPBeginner Support
Använd TextEdit för att skapa dessa filer.
Admin
Keith Davis
Älskar den här, grabbar.
Letar alltid efter sätt att använda begränsat utrymme bättre.
Jim Davis
Installerat filerna och aktiverat widgeten. Den visas som förväntat, men att klicka på flikarna Flik 2 och Flik 3 ändrar inte innehållet. Innehållet förblir detsamma som under Flik 1. Har jag missat något? Se min testsida på http://jimdavis.org/blog/
Jim
WPBeginner Support
Jim, du har inte missat något. Detta är en exempelwidget och du kan redigera den. Ange din egen kod och innehåll inuti varje flik genom att redigera pluginfilen wpb-tabber-widget.php
Admin