Har du någonsin önskat att du kunde skapa dina egna formateringsknappar i WordPress, som en speciell notisstil eller ett varumärkescitatformat? Det är precis vad anpassade stilar gör.
Jag har ägnat betydande tid åt att testa olika metoder för anpassade stilar i WordPress, från enkla CSS-tillägg till mer avancerade lösningar.
Denna erfarenhet har hjälpt mig att identifiera de mest praktiska sätten att förbättra din redigerare med anpassade formateringsalternativ som vem som helst i ditt team kan använda.
Idag kommer jag att guida dig genom hur du lägger till anpassade stilar i din visuella WordPress-redigerare. Du kommer att lära dig vad anpassade stilar är, varför de är användbara och steg-för-steg-instruktioner för att lägga till dem på din webbplats, allt baserat på min verkliga testupplevelse.✨
💡 Snabb sammanfattning: Bästa sättet att lägga till anpassade stilar
Det mest effektiva sättet att lägga till anpassade stilar i WordPress blockredigerare är genom att lägga till ett PHP-kodavsnitt på din webbplats. Detta gör att du kan registrera nya stilvariationer för block som knappar, rubriker och citat.
För den säkraste och enklaste metoden rekommenderar jag att använda pluginet WPCode för att infoga koden. Detta undviker risken att redigera din temas functions.php-fil direkt.
Här är en snabb översikt över vad jag kommer att täcka i den här artikeln:
- Vad är anpassade stilar och hur kan de ändra hur du använder WordPress
- Hur man lägger till anpassade stilar i WordPress visuella redigerare (Blockredigerare)
- Bonus: Hur man lägger till anpassade stilar till WordPress-widgetar
- Vanliga frågor om anpassade stilar
Nu dyker vi rakt in!
Vad är anpassade stilar och hur kan de ändra hur du använder WordPress
Enkelt uttryckt är en anpassad stil en fördesignad formateringsgenväg i WordPress-redigeraren.
Det löser problemet med att manuellt justera typsnitt, färger och layouter varje gång du skapar innehåll, vilket kan vara tidskrävande och leda till inkonsekvenser.
Till exempel kan du skapa en anpassad teckensnitt för rubriker, välja en bakgrundsfärg för utdragsrutor eller tillämpa en konsekvent stil för kundomdömen.
Tänk på det som en mall för designelement. Istället för att manuellt justera stoppning, typsnitt eller färger varje gång, väljer du din egna stil och den tillämpar omedelbart din föredragna design.
Låt oss till exempel säga att du driver en företagsblogg och alltid inkluderar en produktrekommendation eller friskrivning i slutet av dina inlägg. Istället för att styla det varje gång kan du skapa en anpassad stil som heter 'Produkttips' eller 'Viktig anmärkning' och tillämpa den omedelbart.
Detta sparar tid och säkerställer att allt förblir polerat, särskilt om du arbetar med ett team eller publicerar mycket innehåll.
Med det sagt, låt oss titta på hur man enkelt lägger till anpassade stilar till WordPress visuella redigerare.
Hur man lägger till anpassade stilar i WordPress visuella redigerare (Blockredigerare)
Om du vill lägga till anpassade stilar i blockredigeraren är det mest effektiva sättet att använda PHP-kod. Men tänk på att detta tillvägagångssätt är bäst lämpat för mellanliggande WordPress-användare.
Det beror på att du måste redigera ditt temas functions.php-fil, och även det minsta fel kan förstöra din webbplats. Med det sagt kan du använda ett nybörjarvänligt plugin för att förenkla processen.
Jag rekommenderar alltid WPCode för den här typen av anpassning. Enligt min mening är det den bästa pluginen för WordPress-kodavsnitt på marknaden. Jag har testat den grundligt och funnit att den är det enklaste och säkraste sättet att lägga till anpassad kod utan risk för fel.
För att lära dig mer, se mitt teams fullständiga WPCode-recension.
📌 Viktig anmärkning: Oavsett din kunskapsnivå rekommenderar jag alltid att skapa en fullständig säkerhetskopia av din webbplats innan du pillar med viktig kod. Se vår guide om hur du säkerhetskopierar din WordPress-webbplats för instruktioner om hur du gör detta.
Tänk på att kodavsnittet jag kommer att använda är inställt som standard för att lägga till anpassade stilar för Knappblocket. Men med bara några mindre justeringar kan du enkelt använda det för att stödja andra block som:
- 🔷 Rubriker med fina eller konturade stilar
- 💬 Citat-, Pullquote- och Versblock
- 🗂️ Arkiv- eller kategoriblock
- ➕ Och mer
Detta ger dig stor flexibilitet att designa återanvändbara stilar över hela din webbplats.
Först måste du installera och aktivera pluginet WPCode. Om du behöver hjälp, se vår nybörjarguide om hur man installerar ett WordPress-plugin.
📌 Notera: WPCode har också en gratis plan som du kan använda. Att uppgradera till pro-versionen ger dig dock tillgång till funktioner som ett molnbibliotek med kodavsnitt, block för kodavsnitt, smart villkorlig logik och mer.
När du har aktiverat pluginet, gå till sidan Code Snippets » +Add Snippet från instrumentpanelen. Klicka här på knappen ‘Use Snippet’ under alternativet ‘Add Your Custom Code (New Snippet)’.

Detta kommer att leda dig till sidan 'Skapa anpassat kodavsnitt', där du måste namnge ditt kodavsnitt. Detta namn kommer endast att vara för din identifiering och kommer inte att visas för några användare.
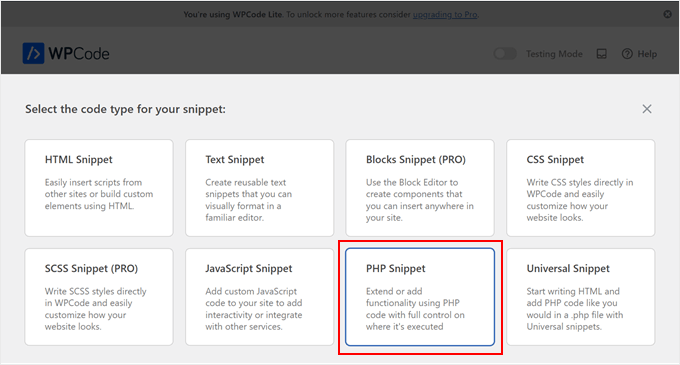
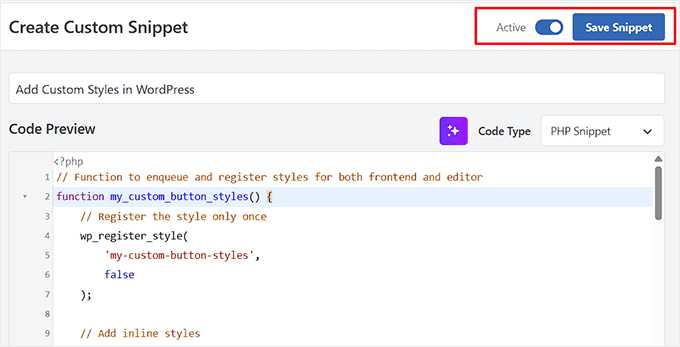
Välj sedan PHP-utdrag från prompten som visas efter att du har klickat på alternativet 'Kodtyp' i det övre högra hörnet.
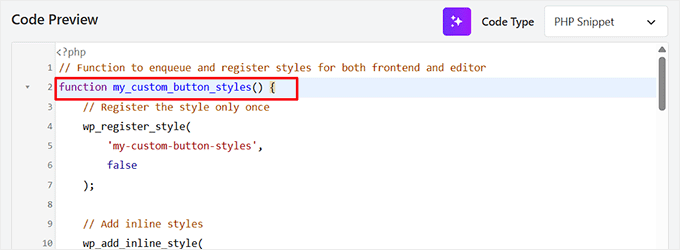
Därefter, om du vill skapa en anpassad stil för en knapp, lägg till följande anpassade kod i rutan 'Kodförhandsgranskning'.
// Function to enqueue and register styles for both frontend and editor
function my_custom_button_styles() {
    // Register the style only once
    wp_register_style(
        'my-custom-button-styles',
        false
    );

    // Add inline styles
    wp_add_inline_style(
        'my-custom-button-styles',
        <<<CSS
        .is-style-fancy-button .wp-block-button__link {
            background-color: #f0c040;
            color: #fff;
            border: none;
            border-radius: 15px;
            padding: 10px 20px;
        }
        .is-style-outline-button .wp-block-button__link {
            background-color: transparent;
            color: #333;
            border: 2px solid #333;
            border-radius: 5px;
            padding: 10px 20px;
        }
        CSS
    );

    // Enqueue the style for both frontend and editor
    wp_enqueue_style('my-custom-button-styles');
}

// Function to add custom styles for Gutenberg editor
function my_custom_gutenberg_button_styles() {
    // Call the general styles function for the editor
    my_custom_button_styles();

    // Enqueue inline script for the editor to register block styles
    wp_add_inline_script(
        'wp-blocks',
        <<<JS
        wp.domReady(function() {
            wp.blocks.registerBlockStyle('core/button', {
                name: 'fancy-button',
                label: 'Fancy Button'
            });

            wp.blocks.registerBlockStyle('core/button', {
                name: 'outline-button',
                label: 'Outline Button'
            });
        });
        JS
    );
}

// Hook the styles function to frontend
add_action('wp_enqueue_scripts', 'my_custom_button_styles');

// Hook the custom block style registration
add_action('enqueue_block_editor_assets', 'my_custom_gutenberg_button_styles');
Detta kodavsnitt lägger till två anpassade stilar till Block-blocket i WordPress.
Det bästa är att du kan anpassa den här koden för att skapa stilar för andra block också. Det kräver dock lite mer än att bara byta ut ordet 'knapp'. För att det ska fungera korrekt måste du uppdatera två nyckeldelar av koden:
- Blockets namn (Slug): I JavaScript-delen av koden hittar du
'core/button'. Detta är det officiella namnet för WordPress Knapp-blocket. Du måste ersätta detta med sluggen för det block du vill styla (till exempel'core/heading'). - CSS-väljarna: CSS-koden (som
.is-style-fancy-button .wp-block-button__link) är skriven specifikt för Knapp-blockets HTML. Andra block har en annan struktur, så du måste skriva nya CSS-regler för att rikta in dig på dem korrekt.
Du kan också justera CSS för att ändra bakgrundsfärgen, justera radien på kanterna och göra andra stiländringar för att passa dina behov.
💡 Experttips: Om du är tveksam till att anpassa koden själv kan en AI-assistent som ChatGPT vara en bra utgångspunkt. Att få rätt kod kräver dock att du ger den en mycket tydlig och detaljerad prompt.
Till exempel, istället för en enkel begäran, kan du ge en prompt som denna:
Here is a PHP, CSS, and JS snippet that adds custom styles to the 'core/button' block in WordPress. Please adapt it to target the 'core/heading' block instead. The new style should be named 'Green Highlight' and it should add a light green background color.
Dock rekommenderar jag alltid att testa koden som genereras av AI på en staging site innan du lägger till den på din live-webbplats. Detta gör att du kan upptäcka eventuella fel utan risk.
Gå nu vidare och växla omkopplaren 'Inaktiv' till 'Aktiv'.
Klicka slutligen på knappen 'Spara kodavsnitt' för att spara dina ändringar.
Öppna sedan ett inlägg i blockredigeraren och lägg till det block som du har lagt till anpassade stilar för.
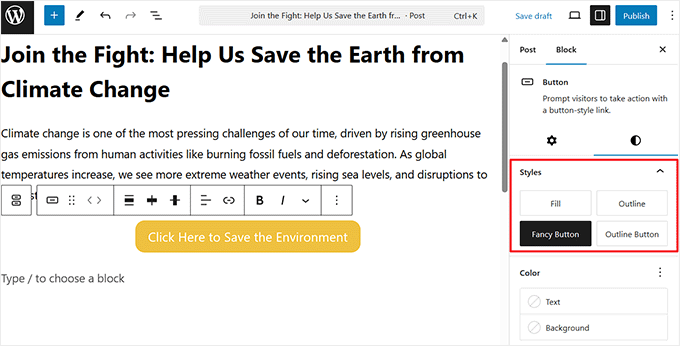
Om du till exempel har lagt till anpassade stilar för Blockknappen, infoga den i ditt inlägg.
När du har gjort det ser du de anpassade stilarna tillgängliga i avsnittet 'Stilar' i blockpanelen.
Efter det klickar du på knappen 'Update' eller 'Publish' för att spara dina ändringar.
Besök sedan din WordPress-webbplats för att se de anpassade stilarna i aktion.

Bonus: Hur man lägger till anpassade stilar till WordPress-widgetar
Nu när du har lärt dig hur du lägger till anpassade stilar i WordPress visuella redigerare, låt oss titta på en annan användbar anpassning: att lägga till anpassade stilar till WordPress-widgets.
Att anpassa widgets med unika färger, typsnitt eller layouter hjälper till att säkerställa att de matchar din webbplats övergripande design, vilket förbättrar användarupplevelsen.
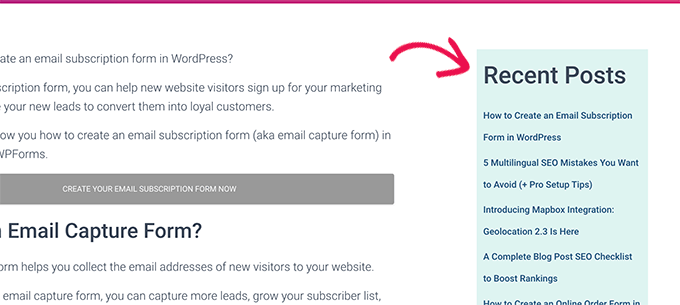
Det enklaste sättet att lägga till anpassade stilar till WordPress-widgets är att använda ett CSS-kodavsnitt, som du kan lägga till med ett plugin som WPCode.
Du kan helt enkelt lägga till anpassad CSS som riktar sig mot specifika widgetar och justera saker som teckenstorlekar, bakgrundsfärger, stoppning och till och med ramar.
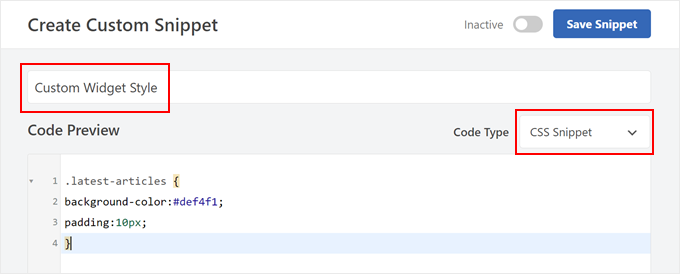
Detta är perfekt för att säkerställa att dina widgets matchar din övergripande design utan att behöva bli alltför teknisk.
För att komma igång, se vår handledning om hur man lägger till anpassade stilar till WordPress-widgetar.
Vanliga frågor om anpassade stilar
Här är några frågor som våra läsare ofta har ställt om att lägga till anpassade stilar i WordPress visuella redigerare:
Kan jag lägga till anpassade stilar utan att använda ett plugin?
Ja, det är möjligt att lägga till koden direkt i ditt temas functions.php-fil. Jag avråder dock starkt från denna metod för nybörjare.
Ett litet misstag i den filen kan förstöra din webbplats, och dina anpassningar kommer att gå förlorade när du uppdaterar ditt tema. Att använda WPCode är det säkraste och mest pålitliga tillvägagångssättet.
Kommer dessa anpassade stilar att fungera med vilket WordPress-tema som helst?
Generellt sett, ja. Koden som används i den här handledningen registrerar stilar med WordPress kärnredigerare, så den bör vara kompatibel med alla moderna, välskrivna teman.
I sällsynta fall kan ett tema med mycket aggressiv eller dåligt skriven CSS åsidosätta dina anpassade stilar, men detta är inte vanligt.
Hur hittar jag det korrekta namnet (slug) för andra block som jag vill styla?
Ett enkelt sätt att hitta ett blocks slug är att gå in i WordPress-redigeraren, välja det block du är intresserad av och sedan klicka på menyn med tre punkter i blockets verktygsfält.
Längst ner i den menyn, klicka på 'Kopiera blocktyp'. Detta kommer att kopiera blockets slug (t.ex. core/image, core/quote) till ditt urklipp, som du sedan kan klistra in i kodavsnittet.
Kan jag skapa mer än två anpassade stilar för samma block?
Absolut. I JavaScript-delen av kodavsnittet kan du helt enkelt duplicera funktionen wp.blocks.registerBlockStyle(...) för varje ny stil du vill lägga till.
Se bara till att ge var och en ett unikt namn och en unik etikett. Du måste också lägga till motsvarande CSS-regler för varje ny stil du registrerar.
Jag hoppas att den här artikeln hjälpte dig att lära dig hur du lägger till anpassade stilar i WordPress visuella redigerare. Du kanske också vill se vår nybörjarguide om hur man skapar ett anpassat WordPress-block och vår jämförelse av stoppning kontra marginal i WordPress.
Om du gillade den här artikeln, prenumerera då på vår YouTube-kanal för WordPress-videoguider. Du kan också hitta oss på Twitter och Facebook.


Toufic Ahemmed
De här killarna är fantastiska. De hjälper mig mest hela tiden. Tack så jättemycket.
WPBeginner Support
Glad we could help
Admin
Aslan French
Den här artikeln bör uppdateras med Gutenberg i åtanke, eftersom den här typen av funktionalitet nyligen har lagts till i Rich Text API.
WPBeginner Support
Hej Aslan,
Tack för förslaget. Vi kommer definitivt att titta på äldre artiklar när Gutenberg är ute.
Admin
Mehrdad
Tack så mycket.
Den här artikeln hjälpte mig verkligen.
sabbi
Det här lägger till klasser till en p-tagg, eller hur?
Finns det något sätt att ens skapa egna taggar?
Eller en annan sak: kommer ett valt anpassat format att skriva över en tidigare vald h-tagg med en p? Det skulle vara nödvändigt för att förhindra att en klient hamnar i problem när han klickar runt i standard- OCH anpassade stilar.
Britany
Tyvärr hjälpte detta mig inte alls. Finns det en artikel som förklarar vad varje fält du måste fylla i betyder?
Allt jag behöver är ett sätt att tillämpa samma formatering på citat på mina sidor med poddavsnitt. Varje citat är samma teckensnitt (som jag har ställt in som en rubrikstil), fetstilt och centrerat.
Jag blir trött på att manuellt tillämpa varje del av formatet på varje citat och bara ett sätt att klicka på en knapp och vara klar.
Syams
Snälla, berätta hur jag lägger till ett nytt typsnitt i WP visuella redigerare.
Moya Nicholson
Tack. Verkligen hjälpsamt.
stanley
Jag behöver modifiera mitt tema WP
hjälp mig snälla
Sandy Connolly
TACK FÖR DETTA!!! OMG!!!! Hur hjälpsamt vid överlämnande av en webbplats till en kund som vill kunna lägga till sitt eget innehåll baserat på vår design!
Marcin
Hej, jag utvecklar WordPress varje dag och gör allt med WP, men den här kodbiten är en av de mest användbara jag har sett på länge... Det är precis vad standard WYSIWYG saknar (nu kan jag säga: saknade)! Det möjliggör att göra några fantastiska saker inuti innehållsfältet. Tack för att du delar med dig!
Foxglove
Jag har använt det här pluginet ett tag nu, men det är inte längre tillgängligt från wordpress.org — tydligen inte längre uppdaterat eller understödd. Är någon medveten om några alternativ utöver den manuella metoden du beskriver?
Lisa McMahon
Här är en uppdaterad/förgrenad version av det ursprungliga pluginet som nämns i artikeln: TinyMCE Custom Styles
WPBeginner Support
Hej Lisa, tack för att du uppmärksammade detta. Vi har uppdaterat artikeln med den uppdaterade/förgrenade versionen.
Admin
Shubha Das
Jag vill lägga till p istället för span. Men när jag ändrar blocknamnet span till p fungerar det inte.
‘title’ => ‘Notering’,
‘block’ => ‘p’,
‘classes’ => ‘notering’,
‘wrapper’ => true,
MacKenzie
Jag tyckte att detta var riktigt hjälpsamt och jag känner att jag nästan har det men det fungerar inte riktigt än. Min text taggas korrekt med span- och klass-taggar i redigeraren när den väljs – men ingen av stilarna jag lagt in i stilmallen tillämpas på den publicerade noten.
Frank
Jag blir alltid nervös och känner mig som om jag ska kräkas om någon kund behöver wordpress-justeringar. Bra, den här stil-neddragningen MEN, som någon sa tidigare, helt värdelös om stilar inte kan dras tillbaka efteråt och bara läggs till, läggs till, läggs till...
Jag är van vid dessa halvfärdiga lösningar i WordPress – normalt finns det också en kompletterande halvfärdig lösning för att delvis reparera den första. Men här?
Hur skulle du nu föreslå att MAN TAR BORT ANPASSADE STILAR som lagts till via stilrullgardinsmenyn. Kodvyn är på inget sätt acceptabel för min klient?
Jag skulle vara otroligt lycklig om någon har hittat ett sätt att göra det och skulle dela denna kunskap (och för att sätta katastrofen som kallas wordpress utom räckhåll för mig (jag hoppas) under mycket lång tid).
Tack så mycket på förhand!
Frank
Chris
Klicka på stilen i rullgardinsmenyn igen. Klart.
Shafi ken
Tack för den hjälpsamma handledningen. Tack
K Shazzad
Whole tutorial worked flawlessly for me. Thanks a bunch
Stef
Jag provade den här pluginen men insåg att när du ändrar en anpassad stil, uppdateras inte de du redan har infogat. Du måste gå tillbaka och infoga dem igen, eftersom funktionen lägger till stilen inline och inte via stylesheet.
Phil
Tack för den hjälpsamma handledningen. Finns det någon prestandaförlust vid användning av pluginet snarare än att koda det manuellt? Tack,
WPBeginner Support
Nej, men för att återanvända element är den här metoden ganska praktisk. Den är också användbar om du bygger en webbplats för en kund och vill att de ska kunna lägga till saker från den visuella redigeraren.
Admin
Sei
Tack för handledningen!
Finns det ett sätt att lägga till två markeringar samtidigt? Till exempel, att få något som text
Sei
Okej, dina kommentarer konverterar HTML. Jag menar, jag skulle vilja få både 'h1' och 'span' markeringar runt min text genom att klicka på bara en stil.
Lily
Jag har lyckats med de anpassade klasserna och elementen visas med rätt klasser i textredigeraren och på sidan, men klassen tillämpas inte i den visuella redigeraren vilket gör det mycket oklart om det har fungerat eller inte för användaren. Finns det något sätt att fixa det?
Bonnie Dasher-Andersen
Jag har lagt till två anpassade stilar. När jag går för att redigera en sida har jag två Format-menyer, var och en med samma poster (de två stilarna jag skapade). När jag försöker tillämpa dessa stilar händer ingenting. Jag kan se taggen i Textvyn, men när jag visar sidan – stilen har inte tillämpats.
Några förslag? Behöver lösa detta för en kund som ska uppdatera denna WP-sida och inte är så kunnig.
Marcello
Jag hade samma problem, där taggarna inte tillämpades på koden. Fixade det genom att ställa in 'wrapper' till 'false'. Jag vet inte de tekniska orsakerna, testade bara och det fungerade. Hoppas det hjälper!
hugotom
Jag hade samma problem att stilmallen inte sparas.
Lösning
Om du redan har dessa inspelningsstilmallar i filen functions.php bör du lägga till stylesheet custom-editor-style.css där.
Exempel:
function styles_theme(){ wp_enqueue_style(‘bootstrap_css’, get_template_directory_uri() . ‘/sources/bootstrap/bootstrap.min.css’); wp_enqueue_style(‘main_css’, get_template_directory_uri() . ‘/style.css’); wp_enqueue_style(‘theme_css’, get_template_directory_uri() . ‘/custom/css/theme.css’); wp_enqueue_style(‘editor_css’, get_template_directory_uri() . ‘/custom-editor-style.css’); // HÄR };
Raphael Landau
Jag har använt detta och hade också problemet där stilen/klassen implementeras för hela stycket. Detta beror på att du ställer in stilformatet som "block". (‘block’ => ‘span’,).
Besöker snabbt den officiella Wordpress-codexen, upptäcker mycket fler alternativ för stilformatering.
http://codex.wordpress.org/TinyMCE_Custom_Styles
Eftersom span som standard är en inline-stil bör du ersätta 'block' med 'inline', och vips! Din styling bör fungera som förväntat.
så i korthet:
array( ‘titel’ => ‘Din Titel’, ‘inline’ => ‘span’, ‘klasser’ => ‘din-klass’, ‘wrapper’ => true, ),
nemaha
Hej,
bra handledning, tack för den! Jag har också problemet att stilen (en span) appliceras på hela stycket. Vad jag tänker göra: Skriva en rubrik och formatera den som rubrik 1, sedan markera bara ett specifikt ord i den rubriken för att lägga till en anpassad stil. Någon uppdatering om hur man löser detta? Tack!
bekee
Jag har också problemet att stilen tillämpas på hela stycket, inte bara det markerade elementet. Någon uppdatering om detta? Tack!
Debbie
Har samma problem. Markerar ett ord, men det påverkar hela stycket.
James
Jag hittar ett par problem. Det verkar fungera, men inte som förväntat. Fungerar inte för någon som inte kan kod.
1. Markera ett enskilt ord i ett stycke för att lägga till en men det läggs till hela stycket, inte bara det markerade ordet.
2. Inget sätt att ta bort css utan att redigera kod. Min klient gör inte kod! Försökte till och med skapa en klass med .ingenting men den nya klassen läggs bara till andra, ersätter inte befintlig klass.
WPBeginner Staff
Se vår guide om hur du åtgärdar vanliga bildproblem i WordPress.
Sheikh Zuhaib Siddiqui
Hej, jag har ett fel i "lägg till media". När jag försöker ladda upp media, fortsätter den bara att ladda och visar ingen media och kan inte ladda upp media... Låt mig veta vad felet är här???
Men detta fungerar bra …………bara fel i mediauppladdaren. vänligen ge mig denna lösning.
Marlice
Hej. Tack för den här utmärkta handledningen. Jag har ett problem med innehåll som redan finns i redigeraren. Om jag markerar ett ord eller en del av text och väljer en stil (till exempel "blå knapp" – från din kod) så omsluts inte bara det markerade ordet eller textdelen. Istället markeras hela innehållet och en span med klassen .blue button läggs till. Jag har provat det flera gånger med andra sidor och inlägg – alltid samma sak: om innehållet redan fanns där och jag markerade det, så får hela innehållet span-klassen. Detta händer inte om jag omsluter nyredigerad text på sidan/inlägget – då fungerar allt bra. Har någon annan också detta fenomen?
Tack,
Ute
John-Henry Ross
Hej. Jag provade den här metoden och den fungerar som en charm, precis vad jag letade efter, tack. Jag vill bara ta reda på om det finns ett sätt att lägga till stilar i en undermapp istället för att bara lägga till den under en formatknapp. T.ex. lägg till en rubrikundermapp med alla rubrikstilar, lägg till en div-undermeny med div-stilar, etc.
dave
Tack!
Det är också bra att visa 2 metoder... mina klienter viker sig av skräck vid hantering av kod.
I will sometimes use custom fields to “force” safe additional styles, but the TinyMCE can be handled by some people, so I’ll kee that in mind.
Ciao, Dave
WPBeginner Staff
du behöver inte lägga till punkten i
klasser’ => ‘.alert-blue’,
Det borde vara
klasser' => 'alert-blue',
Jeff Gaudette
Tyvärr fungerade inte detta. Jag tog bort punkten, men inget appliceras fortfarande i redigeraren. Jag vet att du inte är en helpdesk, men här är en skärmdump om du är intresserad: http://screencast.com/t/JI0zMvcH
Tack för allt det bra material du lägger ut!
WPBeginner Staff
Kan du klistra in koden du lade till i din functions.php-fil. Klistra även in CSS du använder för dessa knappar.
Jeff Gaudette
Visst. Funktioner:
/*
* Callback-funktion för att filtrera MCE-inställningarna
*/
function my_mce_before_init_insert_formats( $init_array ) {
// Definiera style_formats-arrayen
$style_formats = array( // Each array child is a format with it’s own settings array( ‘title’ => ‘Alert’, ‘block’ => ‘span’, ‘classes’ => ‘entry p.alert-blue’, ‘wrapper’ => true,
),
array(
‘title’ => ‘Alert Blue’,
‘block’ => ‘p’,
‘classes’ => ‘alert-blue’,
‘wrapper’ => true,
),
array(
‘title’ => ‘Blue Button’,
‘block’ => ‘span’,
‘classes’ => ‘alert-blue-button’,
‘wrapper’ => true,
),
);
// Infoga arrayen, JSON-KODAD, i ‘style_formats’
$init_array[‘style_formats’] = json_encode( $style_formats );
return $init_array;
}
// Bifoga återanrop till ‘tiny_mce_before_init’
add_filter( ‘tiny_mce_before_init’, ‘my_mce_before_init_insert_formats’ );
CSS
.alert-blue{ background: none repeat scroll 0 0 #E7F4FD; border: 1px solid #C5D7E3; color: #3A5971; font-size: 18px; line-height: 24px; text-align: center; margin: 0 0 15px !important; padding: 15px 25px; width: auto; }
WPBeginner Staff
Har du lagt till CSS i ditt stylesheet?
Se till att stilreglerna du lägger till i din CSS matchar de klasser du lägger till i Callback-funktionen för att filtrera MCE-inställningarna.
Kemi O
TinyMCE Advanced Professsional Formats and Styles stöds endast upp till WP-version 3.6.1
Keely Worth
Jag undviker den visuella redigeraren som pesten! Använder den bara om jag måste byta till den för att använda en temas inbyggda kortkodknapp. Annars – använd den aldrig.
Blair2004
Jag har provat den första metoden, nya stilar är tillgängliga men när jag väljer en händer ingenting...
Jeff Gaudette
Jag försöker göra detta med ett block och har ingen lycka. Koden är:
array(
‘title’ => ‘Alert Blue’,
‘block’ => ‘p’,
‘classes’ => ‘.alert-blue’,
‘wrapper’ => true,
),
Det fungerar när jag använder span, men detta kräver en span-klass, som jag inte kan använda.
När jag använder koden ovan händer ingenting i wp-redigeraren. Jag markerar texten, klickar på formateringsalternativet Alert Blue och ingenting händer: http://screencast.com/t/dijujZ2ZdqBy
Några råd?