
Att automatiskt skapa anpassade fält när du publicerar WordPress-inlägg kan vara ett kraftfullt verktyg i alla utvecklares verktygslåda.
Tänk på det: istället för att manuellt ställa in samma anpassade fält varje gång du publicerar vissa typer av innehåll, kan du automatisera hela processen.
Vi tycker att detta enkla trick kan hjälpa dig att spara tid och effektivisera arbetsflöden när du lägger till nya funktioner på din WordPress-webbplats.
I den här artikeln visar vi dig hur du lägger till customize-fält automatiskt när du publicerar post i WordPress.
Varför lägga till Custom Fields automatiskt?
MedCustomize-fält kan du lägga till ytterligare information i dina posts. Denna information kan visas på din website, hållas privat eller användas av teman och tillägg för att utöka funktionaliteten på din WordPress website.
Det finns många sätt att använda customize-fält. Du hittar en lista med användbara idéer i vår guide med tips, tricks och hacks för customize-fält.
Ibland vill du att ett customze-fält ska skapas automatiskt när du publicerar ett post. Detta gäller särskilt när du lägger till funktionalitet i WordPress så att du kan använda det som mer än en enkel blogg.
Vi använde den här metoden när vi skapade en website för ett gallery. Vi ville lagra korta URL:er för varje objekt som skickades in till galleriet. Så vi skapade automatiskt ett custom field för att lagra den korta URL:en när varje post publicerades.
Detta trick kan vara mycket användbart för utvecklare som vill ta WordPress till nästa nivå.
Lägga till Customize-fält automatiskt vid publicering av post
Den här metoden innebär att du lägger till ett custom code snippet i ditt temas functions.php-fil. Vi rekommenderar inte att oerfarna användare editerar dina theme-filer, eftersom även ett litet misstag kan förstöra din website.
Istället visar vi dig hur du använder WPCode-tillägget i den här tutorialen.

WPCode gör det enkelt att add to code snippets i WordPress utan att behöva editera functions.php-filen i ditt theme. Du kan också hantera alla dina code snippets från en central vy.
Om det här är första gången du lägger till kod i WordPress bör du kontrollera vår guide om hur du copy and paste code snippets i WordPress för mer details.
För att komma igång måste du installera och aktivera det gratis pluginet WPCode. Om du behöver hjälp kan du läsa vår tutorial om hur du installerar ett plugin för WordPress.
Note: Den gratis versionen av WPCode har allt du behöver för att add custom code i WordPress. För mer avancerade funktioner som gillar tidsinställda snippets, Conversion Pixels, och mer, kan du uppgradera till WPCode Pro.
När pluginet har aktiverats kommer ett nytt menu item med namnet “Code Snippets” att addas till din WordPress admin bar. Klicka på det och tryck sedan på knappen “Add New” på nästa vy.

Detta kommer att ta dig till WPCodes Snippet Library.
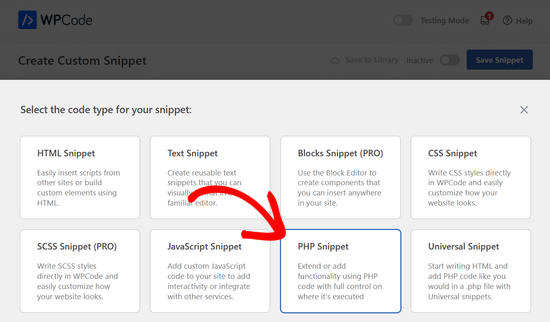
Navigera sedan till alternativet “Add Your Custom Code (New Snippet)” och klicka på knappen “+ Add Custom Snippet” under det.

Välj sedan “PHP Snippet” som kodtyp från listan med alternativ som dyker upp på skärmen.
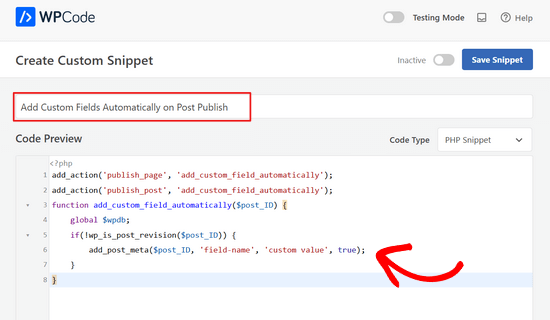
Därefter måste du ge snippet en titel och sedan kopiera följande kod och klistra in den i rutan “Code Preview”.
1 2 3 4 5 6 7 8 | add_action('publish_page', 'add_custom_field_automatically');add_action('publish_post', 'add_custom_field_automatically');function add_custom_field_automatically($post_ID) { global $wpdb; if(!wp_is_post_revision($post_ID)) { add_post_meta($post_ID, 'field-name', 'custom value', true); }} |
Du måste ersätta “field-name” och “custom value” med det faktiska namn och värde som du vill använda för det anpassade fältet.
Därefter rullar du ner till “Insertion” section. Här måste du låta metoden “Auto Insert” vara vald.

Med metoden Auto Insert kommer snippet automatiskt att infogas och exekveras på rätt location.
När du är klar måste du toggle omkopplaren från “Inaktiverad” till “Aktiv” och sedan clicka på knappen “Save Snippet”.

När snippet är aktiverat skapas det anpassade fältet när du publicerar ett post.
Vi hoppas att denna handledning hjälpte dig att lära dig hur du lägger till anpassade fält automatiskt vid publicering av inlägg i WordPress. Du kanske också vill lära dig hur du visar anpassade fält utanför loopen i WordPress eller kolla in vår lista över WordPress-plugins som du måste ha för att få din webbplats att växa.
If you liked this article, then please subscribe to our YouTube Channel for WordPress video tutorials. You can also find us on Twitter and Facebook.
")


Sateesh Raghuwanshi
I need to add this action for custom post type named ‘ad_system’
nayan
I want to add category Id for the post in the post_meta table. How can be the function function add_custom_field_automatically($post_ID) be twicked to accomodate that?
Thanks
chris
Instead of adding the custom field at the time of creating the post, how do I display a custom field by default on the admin page?
puanthanh
it’s not adding to custom post type
Editorial Staff
If you notice, the code above doesn’t have anything related to the custom post types. It only adds to Post and Page “content type”. So you would have to specify the hook for your custom post type.
Admin
puanthanh
Thanks for the reply. Can you help me out on this code.
add_action(‘publish_page’, ‘add_custom_field_automatically’);
add_action(‘publish_post’, ‘add_custom_field_automatically’);
add_action( ‘save_post’, ‘add_custom_field_automatically’ );
function add_custom_field_automatically($post_ID) {
global $post;
if(!wp_is_post_revision($post_ID)) {
global $wpdb;
$user_id = $wpdb->get_var("SELECT post_author FROM $wpdb->posts WHERE ID = $post_ID");
$themename = $wpdb->get_var("SELECT meta_value FROM $wpdb->usermeta WHERE meta_key = ‘themeperauthor’ AND user_id = $user_id");
add_post_meta($post_ID, ‘themeperauthor’, $themename, true);
}
}
When the user meta field is changed, I want to automatically delete the custom field value and update with the new one
brian
I’ve been working on adding some hidden custom fields on post publish/update (by preceding the field name with “_”) but for some reason I have to update the post twice before the wp_postmeta entries are written to the database.
I’ve tried messing with the priority and experimenting with other action hooks (draft_to_publish, edit_post, etc) but it doesn’t seem to make a difference.
Any ideas?
Editorial Staff
are you using Otto’s trick with the transient API?
Admin
Boba
Thanks for including the source link
Editorial Staff
Thanks for providing an amazing tip
Admin
Daniel Suarez
Thanks Otto another great tip!
Piet
will this work too for custom post types?
sth like add_action(‘publish_custom-post-typ-name’, ‘add_custom_field_automatically’);
Otto
Yes, it will.
One downside to this technique that people should be aware of is that if somebody edits a published post, this hook WILL get fired again on the edit. Therefore, you need to check for the meta before adding it, or to update it, or to do whatever makes the most sense for your use-case.
If you only want to get your code fired off on the initial publish only, then you can use the transition_post_status hook. This hook works like this:
add_action('transition_post_status','example',10,3);

function example($new, $old, $post) {

// $new is the new post status ('publish')

// $old is the old post status ('draft')

// $post is the complete Post Object (so use $post->ID for the ID, etc)

}
Then, in here you can do a check for something like this:
if ($new == 'publish' && $old != 'publish')
To have your code only used when the post status actually transitions to publish from whatever it was before. This hook is fired at the same time as the {$status}_{$post-type} hooks are, so the operation of them is basically the same.
Piet
Thanks Otto, will play around with that a bit!
Editorial Staff
Thanks Otto for the clarification.
Admin
Vivek Parmar
thanks for this handy tip. previously while using custom fields i have to work manually. now this will do it automatically. thanks for saving precious time of me