
Genom att visa upp dina författares expertis kan du bygga upp ett förtroende hos din publik. Du kan visa information om författarna i deras inlägg i ett särskilt biogram som presenterar ditt team för läsarna, lyfter fram deras referenser och ger information om kontakter på sociala medier.
Vi har funnit att rutor med biogram för författare kan stärka webbplatsens E-E-A-T-signaler (Experience, Expertise, Authoritativeness, and Trustworthiness) för att avsevärt förbättra SEO.
Vissa WordPress-teman erbjuder inbyggda funktioner för författarens biogram, men andra kanske inte gör det. Du kan enkelt lägga till författarinfoboxar på din WordPress-webbplats med hjälp av ett plugin eller anpassad kod.
I den här artikeln kommer vi att visa dig hur du skriver en författar bio som ökar dina Google E-E-A-T signaler och enkelt add to en författare info box till din WordPress blogg.

Skriva en författarbio som ökar Google E-E-A-T.
Att visa den faktiska personen bakom ditt WordPress content hjälper till att bygga trovärdighet hos läsarna och kan stärka din webbplats behörighet.
Det beror på att Googles E-E-A-T-riktlinjer letar efter expertis, erfarenhet, auktoritet och pålitlighet när de väljer tillförlitliga informationskällor. De rankar sedan detta content högst upp i sökresultaten.

Så här skriver du en författares bio som bidrar till varje E-E-A-T-faktor:
Expertis
I en bio kan du visa författarens djupa förståelse för ämnet, inklusive deras utbildning och kvalifikationer inom området.
Se till att du listar relevanta examina, certifieringar eller professionella affiliates som visar deras kunskap och kvalifikationer inom sitt område.
Du bör också kort nämna eventuella utmärkelser och erkännanden som visar eller kontrollerar författarens expertis.
Erfarenhet
En bio allow you att sammanfatta författarens förstahandserfarenhet av de ämnen som de vanligtvis skriver om, inklusive deras betydande prestationer och roller. Målet är att måla upp en bild av hur deras erfarenhet har gett dem möjlighet att skriva auktoritativt content om det ämne de valt:
- Använd ett visst antal år för att visa upp författarens erfarenhet.
- Istället för att bara nämna deras bransch, lista specifika area av erfarenhet inom det området där de har förbättrat sina färdigheter.
- Nämn kortfattat relevant arbetslivserfarenhet, projekt eller volontärarbete som visar hur du har förvärvat din kompetens.
Auktoritet
I en bio kan du lyfta fram författarens erkännande av experter inom området, till exempel priser de har fått och publikationer de har utvalts i.
Nämn alla publikationer som de har bidragit till, gästposter som de har skrivit för ansedda webbplatser eller talande engagemang som de har deltagit i. Detta visar deras ställning inom sin nisch.
You will also also briefly touch on their involvement in industry organizations or communities. Detta indikerar att de är aktivt engagerade i fältet.
Trovärdighet
Med en bio kan du vara transparent med vem som skriver ditt content. Här är några tips:
- Behåll en professionell och informativ skrivstil i dina författares bio.
- Förklara kortfattat hur din författares content, insikter och perspektiv kommer läsarna till godo.
- Överväg att inkludera links till deras profiler på social media där de engagerar sig i publiken för att etablera dem som verkliga personer.
Högst upp tips: Din bio ska vara informativ men kortfattad, helst 3-5 meningar. Se till att du skriver i tredje person för att få en mer professionell ton. Slutligen, inkludera en professionell huvudbild för att add to en personlig touch och göra biografin visuellt tilltalande.
Notice hur vi har optimerat denna WPBeginner författar bio för Google E-E-A-T:

Här är en template för en författares bio som du kan anpassa till din egen website:
[Name] is a [Job Title/Area of Expertise] with over [Number] years of experience in [Industry]. [He/She/They] has a strong background in [specific areas of experience] gained through [relevant work experience, projects, or volunteer work]. [He/She/They] holds a [Degree] in [Field of Study] from [University Name] and is a certified [Certification] professional. [He/She/They] has [briefly mention achievements or publications]. [Name] is passionate about [area of interest] and enjoys helping readers by [explain how your content benefits them]. |
Nu när du har skrivit din författares bio måste du visa den på din WordPress website.
Display av författarens bio i WordPress
Som standard kommer de flesta WordPress-teman att visa författarens namn på ett blogginlägg men ingen annan information om dem.
Även om du kan presentera dina författare på din sites “About” page, kommer ej alla läsare att besöka den.
Vi rekommenderar att du visar en författarinfo box på varje blogginlägg som författaren har skrivit. Detta kommer att låta dina läsare veta mer om personen bakom varje post på en multi-author WordPress site.
Det är också ett bra sätt att locka new skribenter och uppmuntra dem att submitte content till your site.
Låt oss ta en titt på ett antal metoder som du kan använda för att add to en författar bio eller info box i WordPress. Använd bara snabblänkarna under för att hoppa direkt till den metod du vill använda:
- Adding Author Info Box Using Your WordPress Theme Settings
- Adding Author Info Box in WordPress Using a Free WordPress Plugin
- Display Author Info Box in WordPress Sidebar Widget Area
- Adding Author Info Box by Adding Code to WordPress
- Adding Author Info Box in WordPress With AIOSEO's Author SEO (Recommended)
- Displaying Author Info Box With a WordPress Page Builder
1. Lägga till Info Box för Författare med hjälp av dina temainställningar för WordPress
Några av de bästa WordPress teman kommer med en författare info box som automatiskt visas under varje artikel.
Först vill du se om ditt nuvarande theme har inbyggt support för en författar-info box.
För att göra detta går du till Användare ” Alla användare i din WordPress adminpanel.
Sedan hoverar du över den profil för användaren som du vill ändra och klickar på länken “Edit”.

Då kommer du till vyn för edit av profilen.
Du kommer att vilja rulla ner på sidan till “Biographical Info” section för att add to författarens bio. Du kan också använda HTML i det här fältet för att manuellt add to links till författarens social media profiler.

Författarens profilfoto hämtas automatiskt från tjänsten Gravatar. Om författaren redan har skapat ett account visas detta automatiskt.
När du har slutfört, se till att du klickar på knappen “Update Profile” längst ner på sidan för att spara dina ändringar.
Nu kan du se alla artiklar på din webbplats som skrivits av den författaren, och din författares bio box kommer att vara live.

2. Lägga till Info Box för Författare i WordPress med hjälp av ett gratis plugin för WordPress
Om ditt theme inte har alternativet att visa en författare bio box eller om du vill customize hur det ser ut, då är den här metoden för dig.
För att göra detta kommer vi att använda Simple Author Box plugin. Det är ett av de bästa author bio box -tilläggen för WordPress som låter dig helt enkelt lägga till en anpassningsbar author bio box på din site.
Obs/observera: Det finns också en Pro-version som erbjuder ytterligare funktioner som att visa en författarbox före eller efter content, lägga till webbplatslänkar, inkludera gäst- och medförfattare, ytterligare sociala icons och mycket mer.
Det första du behöver göra är att installera och aktivera pluginet. För mer detaljer, se vår guide för nybörjare om hur du installerar ett plugin för WordPress.
Efter aktivering måste du besöka Appearance ” Simple Author Box för att konfigurera plugin-inställningarna.
Här kan du välja synlighet, färger, typografi, Gravatar-stil för författarens foto med mera.

När du är klar, se till att klicka på knappen “Save Settings” för att spara dina ändringar.
Därefter måste du besöka Användare ” Alla användare och klicka på länken ‘Edit’ under den användare du vill lägga till en bio för.
Nu kan du add to användarens bio till deras profil.
Du rullar bara ner till “About the user” section och klistrar in biografin i fältet “Biographical Info”.
Du kan också använda HTML i det här fältet för att manuellt lägga till links eller använda grundläggande alternativ för HTML-format.
Leta sedan efter “Social Media Links (Simple Author Box)” -sektionen längst ner på sidan.
Här kan du add to links till sociala medier för din författares profiler på sociala medier. Pluginet visar bara icons för sociala nätverk där du enter en URL.
You need to select the social media profile you wish to add from the dropdown menu and then add the correct URL.

Du kan lägga till ytterligare sociala länkar genom att clicka på knappen “+ Add new social platform”.
När du är slutförd, se till att klicka på knappen “Update Profile” för att save dina ändringar i användarens profil.
You can now visit any article written by that user to see the author info box in action.

3. Display Author Info Box in WordPress Sidebar Widget Area
Vill du visa författarens information i sidebar- eller widgetområdet istället för under artikeln? Om ja, den här metoden är för dig eftersom den tillåter dig att visa författarens info box i en sidebar widget.
För den här metoden måste du installera och aktivera pluginet Simple Author Box som vi använde i den föregående metoden. För mer detaljer, se vår Step-by-Step guide om hur du installerar ett plugin för WordPress.
Tips: Pluginet Simple Author Box tillhandahåller en widget för klassiska teman och ett block för blockteman i WordPress block editor och hela site editor.
I denna tutorial kommer vi att visa you hur man snabbt addar widgeten Simple Author Block till ett klassiskt temas widget area.
Efter aktivering måste du besöka Appearance ” Widgets i din WordPress dashpanel.
Klicka sedan på ikonen ‘+’ add block icon i widgetområdet ‘Sidebar’.
Note: Om du inte ser alternativet Widgets i menyn använder din website ett block theme. Du kan läsa vår tutorial om hur du använder WordPress fullständiga Site Editor för mer detaljer.


Efter det måste du söka efter “Simple Author Box”. Du kommer att se två icons: widgeten Simple Author Box och blocket.
Klicka sedan på den första iconen för att välja widgeten Simple Author Block.

Widgeten kommer med ett antal alternativ för att du ska kunna customize hur den visas.
Det är viktigt att se till att alternativet “Autodetect” är valt från rullgardinsmenyn “Choose author/user”. Detta är standardalternativet, och det kommer att säkerställa att postens författares bio automatiskt visas.

Klicka sedan på knappen “Update” högst upp på vyn för att store dina inställningar för widgetar.
You can now visit your website to see the author bio widget in action.

Detta plugin hämtar information om användare från deras WordPress profil. You eller your authors need to fill in their bio information by editing their profiles, as we showed above.
Om du vill veta mer om hur du redigerar användarprofiler, se vår guide om hur du lägger till nya användare och auktoriseringar till din WordPress-blogg.
4. Lägga till Info Box för Författare genom att lägga till kod i WordPress
Ett annat sätt att lägga till information om författarrutan i WordPress är genom att lägga till kod i ditt temas functions.php-fil.
Vi rekommenderar dock inte att du redigerar själva filen functions.php om du inte är en avancerad användare eftersom även det minsta misstaget kan förstöra din webbplats.
Istället kan du använda WPCode, som är det bästa kodsnippets-pluginet för WordPress. Det gör det säkert och enkelt att lägga till anpassad kod i WordPress utan att redigera ditt temas functions.php-fil.
WPCode levereras också med 393+ förgjorda kodavsnitt som du kan lägga till på din webbplats med bara ett par klick, inklusive ett “Author Bio After Post”-avsnitt.
För att komma igång behöver du installera och aktivera det kostnadsfria insticksprogrammet WPCode. Om du behöver hjälp kan du läsa den här guiden om hur du installerar ett WordPress-plugin.
Obs: Gratisversionen av WPCode har allt du behöver för att lägga till kod i WordPress. Men om du vill ha mer avancerade funktioner som AI-snippetgenerering, schemalagda snippets, kodrevisioner med mera kan du uppgradera till WPCode Pro.
Efter aktivering går du till sidan Code Snippets ” Library från din WordPress instrumentpanel.
Här kan du se alla de olika snippets som du kan lägga till på din webbplats.
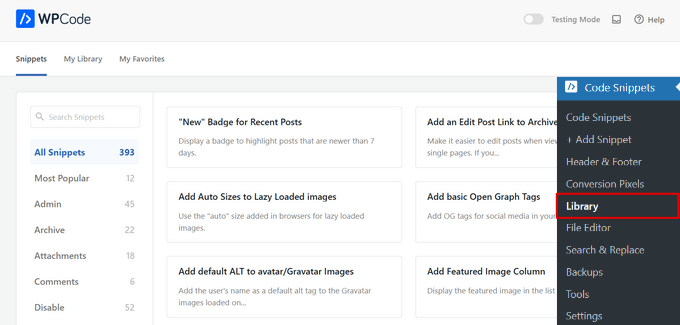
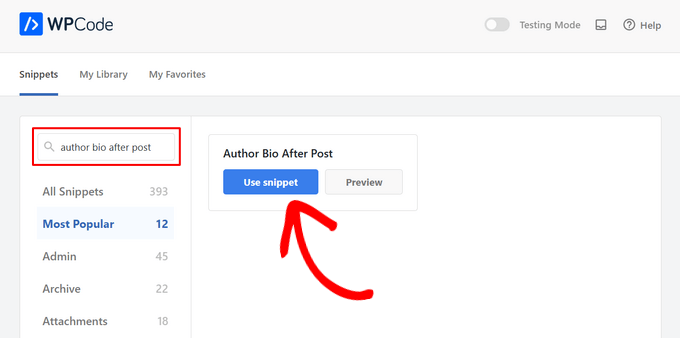
Sök sedan efter utdraget “Author Bio After Post”.
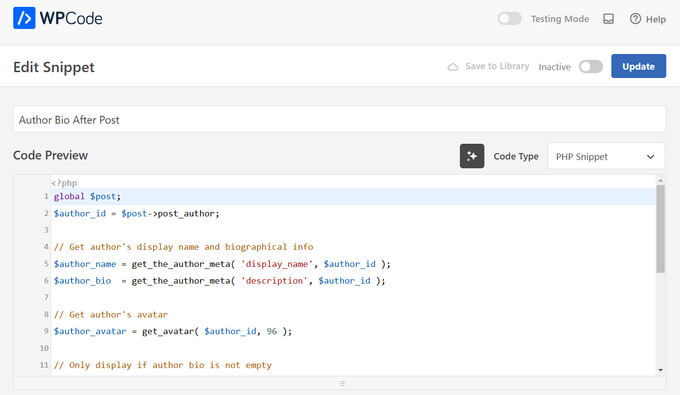
När du hittar snippet håller du muspekaren över det och klickar på knappen “Använd snippet”.
Därefter kommer WPCode automatiskt att lägga till koden åt dig samt välja rätt insättningsmetod.
Nu behöver du bara växla från “Inaktiv” till “Aktiv” och sedan trycka på knappen “Uppdatera”.
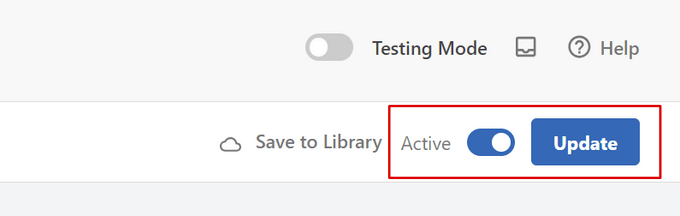
Nu är det klart. När du nu besöker din webbplats kommer du att se din nya författarinfobox visas i slutet av dina WordPress-blogginlägg.
Så här såg det ut på vår testsida:
Avancerad kodmetod
Om du är en avancerad användare kan du fortfarande kopiera och klistra in den här koden i din egen functions.php-fil.
1 2 3 4 5 6 7 8 9 10 11 12 13 14 15 16 17 18 19 20 21 22 23 24 25 26 27 28 29 30 31 32 33 34 35 36 37 38 39 40 41 42 43 44 45 46 47 48 49 50 51 52 53 54 55 56 | function wpb_author_info_box( $content ) { global $post; // Detect if it is a single post with a post authorif ( is_single() && isset( $post->post_author ) ) { // Get author's display name$display_name = get_the_author_meta( 'display_name', $post->post_author ); // If display name is not available then use nickname as display nameif ( empty( $display_name ) )$display_name = get_the_author_meta( 'nickname', $post->post_author ); // Get author's biographical information or description$user_description = get_the_author_meta( 'user_description', $post->post_author ); // Get author's website URL$user_website = get_the_author_meta('url', $post->post_author); // Get link to the author archive page$user_posts = get_author_posts_url( get_the_author_meta( 'ID' , $post->post_author)); if ( ! empty( $display_name ) ) $author_details = '<p class="author_name">About ' . $display_name . '</p>'; if ( ! empty( $user_description ) )// Author avatar and bio $author_details .= '<p class="author_details">' . get_avatar( get_the_author_meta('user_email') , 90 ) . nl2br( $user_description ). '</p>'; $author_details .= '<p class="author_links"><a href="'. $user_posts .'">View all posts by ' . $display_name . '</a>'; // Check if author has a website in their profileif ( ! empty( $user_website ) ) { // Display author website link$author_details .= ' | <a href="' . $user_website .'" target="_blank" rel="nofollow">Website</a></p>'; } else {// if there is no author website then just close the paragraph$author_details .= '</p>';} // Pass all this info to post content$content = $content . '<footer class="author_bio_section" >' . $author_details . '</footer>';}return $content;} // Add our function to the post content filteradd_action( 'the_content', 'wpb_author_info_box' ); // Allow HTML in author bio sectionremove_filter('pre_user_description', 'wp_filter_kses'); |
Den här koden hämtar helt enkelt författarens information och visar den under WordPress posts.
Du måste sedan utforma denna författarinfo-box så att den ser snygg ut och matchar ditt WordPress-tema. Om du inte kan CSS, se vår guide om hur du enkelt lägger till anpassad CSS på din WordPress-webbplats.
Navigera först till Utseende ” Anpassa i din WordPress-adminpanel.
Detta ger upp WordPress tema customize panel. Du måste klicka på tabben “Additional CSS”.
Om du inte kan hitta theme customizer, vänligen se vår tutorial om hur du fixar den saknade theme customizer i WordPress.

Detta låter dig add to custom CSS kod direkt till din WordPress tema och se live förändringar.
Här är några exempel på CSS-kod som hjälper dig att komma igång:
1 2 3 4 5 6 7 8 9 10 11 12 13 14 15 16 17 | .author_bio_section{background-color: #F5F5F5;padding: 15px;border: 1px solid #ccc;} .author_name{font-size:16px;font-weight: bold;} .author_details img {border: 1px solid #D8D8D8;border-radius: 50%;float: left;margin: 0 10px 10px 0;} |
Lägg sedan till koden direkt i boxen “Additional CSS”.
Sedan klickar du på knappen “Publicera” för att göra dina ändringar live.

Så här ser författarens biografiruta ut i vårt tema:

5. Lägga till författarinfo box i WordPress med AIOSEO’s Author SEO Addon
All in One SEO (AIOSEO) är det bästa WordPress SEO plugin på marknaden, med över 3 miljoner användare. Du kan också använda det för att lägga till detaljerade författarinfo-boxar på alla WordPress-poster eller pages.
Den här metoden använder AIOSEOs kraftfulla Author SEO addon och kan förbättra din SEO mer än de andra metoderna.
För att komma igång måste du installera och aktivera pluginet All in One SEO. Om du behöver hjälp kan du läsa vår tutorial om hur du installerar ett plugin för WordPress.
Note: Det finns en gratis version av All in One SEO som du kan använda. Men för att få tillgång till Author SEO-funktionerna behöver du AIOSEO Pro-planen.
När pluginet är aktiverat och konfigurerat går du till Användare ” Alla användare från WordPress dashboard.
Klicka sedan på författarens namn eller på länken “Edit” under det.

Detta kommer att öppna upp “Edit User” page för den författaren.
På den här sidan måste du klicka på fliken “Author SEO”.

Från sökmotorsoptimeringens sektion kan du add to information som gillar utbildning, arbetsgivare och jobbtitel.
Denna information kommer att hjälpa till att bekräfta dina E-E-A-T-signaler.

You can also add to topic categories.
Dessa kommer att visa författarens kompetensområden för search engines och läsare.

Note: Dessa kategorier av ämnen måste först enteras genom att gå till panelen Search Appearance “ Advanced “ Author Experience Topics settings i All in One SEO.
Därefter kan du rulla ner för att add to en författar image, ett författar excerpt och en fullständig författar bio.

Du kan också visa sociala profiler i din författares informationsbox.
Det är bara att enter URL:erna till profilerna för Facebook, Instagram, Twitter, YouTube med mera.

Det finns också en “Append Author Bio to Posts” -inställning som du kan toggle för att aktivera eller inaktivera.
Om den här inställningen är aktiverad kommer All in One SEO automatiskt att visa en kompakt författarbio längst ner i dina poster.

Du kan inaktivera inställningen om du manuellt vill lägga till kompakta eller fullständiga författarbiografier längst ner i poster med hjälp av AIOSEOs författarbio block. För mer detaljer, se den här guiden om hur du lägger till författarblock i dina poster.
I den här tutorialen låter vi inställningen vara aktiverad för att automatiskt attachment författarens bio till poster.
När du är klar med att fylla i din författarinformation, glöm inte att klicka på knappen “Update User” för att lagra dina ändringar.
Nu kan du besöka en av dina WordPress posts för att se din nya författarinfo box i action.

Bonus: Displaying Author Info Box med en page builder för WordPress
Om du vill skapa ett helt customized WordPress-tema och enkelt visa en författarinfo box var som helst på din site, rekommenderar vi att du använder SeedProd.
SeedProd är den bästa drag-and-drop page buildern för WordPress. Det låter dig enkelt skapa custom WordPress teman och page layouts, ingen kodning obligatorisk.
Det levereras med över 320+ teman och pages templates som du kan importera med ett click. Templates inkluderar alla delar av en website, inklusive en homepage, en enskild sida, ett enskilt inlägg, blogginlägg, kontaktsida och mycket mer.

Du kan customize ditt theme hur du vill med hjälp av den visual builder.
SeedProd gör det enkelt genom att erbjuda 90+ färdiga block, inklusive ett “Author Box” -block, som du kan dra och släppa på vilken page som helst.

När du har lagt till blocket Author Box på din page klickar du bara på det för att editera detaljerna.
Du kan ändra typografi, fontstorlek, justering, bakgrundsfärg och kant, aktivera eller inaktivera profilbilden och mycket mer.

När du har slutfört customize aktiverar du helt enkelt ditt nya SeedProd theme.
För att göra detta, flytta “Aktivera SeedProd Theme” toggle högst upp på sidan till positionen On.

Grattis, du har addat författarens info box till ditt theme.
Nu kan du besöka din WordPress site och se din custom author info box.

För mer details, se vår tutorial om hur du skapar ett customize WordPress theme med SeedProd.
VANLIGA FRÅGOR Vanliga frågor om Google E-E-A-T
Nu när vi har täckt hur man skriver en författares bio och add to your WordPress website, låt oss svara på några vanliga frågor om Google E-E-A-T.
Vad är Google E-E-A-T?
E-E-A-T står för Experience (erfarenhet), Expertise (expertis), Authoritativeness (auktoritet) och Trustworthiness (trovärdighet). Det är ett ramverk som Google använder för att bedöma kvaliteten och trovärdigheten hos webbinnehåll.
Ju mer E-E-A-T en page visar, desto mer sannolikt är det att den ses som en tillförlitlig källa och rankas högre i sökresultaten.
Faktorn “Experience” i E-E-A-T infördes 2022. Innan dess var ramverket känt som E-E-A-T.
Varför betonar Google upplevelsen nu?
Updating lyfter fram vikten av förstahandskunskap och erfarenhet för specifikt content. Google vill se till att användare hittar information som är skriven av personer med praktisk erfarenhet av ämnet.
Hur mycket erfarenhet behöver jag för att ha bra E-E-A-T?
Du behöver inte nödvändigtvis ha många års erfarenhet. Om du inte har det, fokusera på de andra aspekterna av expertis, auktoritet och pålitlighet.
Vad händer om min website är new?
Att bygga E-E-A-T tar tid. You should focus on creating valuable content, showcase your authors’ relevant experience, and establishing your site as a reliable source of information. Med tiden kommer du att bygga upp ett förtroende hos Google och din publik.
Finns det ett garanterat sätt att förbättra min E-E-A-T-poäng?
Nej, det finns ingen magisk formel. E-E-A-T kommer att variera beroende på din webbplats content och syfte.
However, creating informative content, demonstrating experience, and building trust with your audience will keep you on track.
Vi hoppas att den här artikeln hjälpte dig att lära dig hur du addar en författar-info box till WordPress-poster. Du kanske också vill se vår detaljerade guide som förklarar Google E-E-A-T och vårt expertval av de bästa tilläggen för att effektivt hantera WordPress-bloggar med flera författare.
If you liked this article, then please subscribe to our YouTube Channel for WordPress video tutorials. You can also find us on Twitter and Facebook.

 in 2024")
")

Dennis Muthomi
thank you for this incredibly helpful guide!!!
my WordPress theme had a basic author bio box, but it doesn’t allow me to include links to the author’s social media profiles.
I was about to hire a developer to add that feature but I have tried out Author Info Box as you have highlighted and it has fixed this issue.
You saved me some bucks there…haha!
WPBeginner Support
Glad we could help!
Admin
Michael
Simple and perfect, thank yo!
WPBeginner Support
You’re welcome
Admin
Jiří Vaněk
Thanks for providing the complete php code. In Elementor, I solve it with a widget, but outside of Elementor, I would very much like to use a ready-made solution from you.
Gleni
This only works for posts. I usually post everything from pages, not posts. How can I get this sorted?
WPBeginner Support
We don’t have a specific method we would recommend for pages at the moment but we will look into the possibilities in the future.
Admin
Bojan
Please, replace this code with this if you want to show only on blog posts:
// Detect if it is a single post with a post author
if ( is_single() && isset( $post->post_author ) ) {
with:
// Detect if it is a single post with a post author
if ( is_singular(‘post’) && isset( $post->post_author ) ) {
WPBeginner Support
Thanks for sharing this for those looking for that customization
Admin
Mark Beese
I would like to add something like the option of related stories to the author box, but show a random selection of others posts/stories from that author. Is that possible?
WPBeginner Support
For something like that, we would recommend taking a look at our guide below for showing related posts by the same author:
https://www.wpbeginner.com/wp-tutorials/how-to-display-related-posts-by-same-author-in-wordpress/
Admin
Ramon
This is excellent, works out of the box.
Keep in mind that you might want to add a “title” attribute to a href links ..
WPBeginner Support
Thanks for sharing your recommendation.
Admin
Kelly
I came here for your opinion because my SEO teacher (paid class) says that even though my website/URL is my name, Google needs to know who wrote the posts. I write them (with the exception of guest writers from time to time). You said, “For a single-author WordPress blog, you can just add an about me page.” Do you mean just have an about me page on your blog? Or link to the about me page within the author box at the end of posts?
WPBeginner Support
That would be a personal preference decision but having an about page publicly visible was what we recommended. It is not required in every article.
Admin
Rozard
I added the code in Theme function.php. It’s working better than a plugin. I just need little bit help if that is possible. My website is not in English, which is right to left. I added a css code that start paragraph from right to left, now the problem is that most of the author bios are in English, is there way to modify the alignment of bios to make left to right?
I really appreciate your help. Thank you
WPBeginner Support
You would need to add in the CSS for the author box:
direction: ltr;
Admin
Jerry
I have an author info box that shows at the end of every blog post. I want it to be shown on my About me static page as well apart from the blog post. How can I enable this?
WPBeginner Support
It would depend on what is adding the author box, if your theme is adding it you would want to reach out to your theme’s support for having it appear on a page.
Admin
usef
Hi. I used the method 4. It worked like a charm. Thank you for sharing this.
WPBeginner Support
You’re welcome, glad you found our guide helpful
Admin
Lauren Colquhoun
Hello
Could you please tell me how to only display the author bio box for certain categories? Thank you
WPBeginner Support
If you are using the widget method you can conditionally display the widget using the method from our guide here: https://www.wpbeginner.com/plugins/how-to-show-or-hide-widgets-on-specific-wordpress-pages/
Admin
Gustavo Razzetti
Hi I used the plugin and now it’s showing two bios–the one generated by the plugin and the one created by WordPress (which looks uglier and I don’t want to use). How I avoid having two bios?.
WPBeginner Support
If your theme included its own author bio, you would need to reach out to the theme’s support for how to remove it
Admin
Prajyot Kumbharjuvekar
Looks like the Guerrilla’s Author Box plugin is no longer available… Do you can you suggest any alternatives? thank you
WPBeginner Support
While we don’t have a recommended plugin at the moment, we will certainly look to update this article with an alternative
Admin
Louis Chaussé
Hi,
I have a problem with method #3
I added the php code to the functions.php file and the css to additonal css section in WP
Everything is working except that the bio is displaying twice on the page…
Once at the proper place at the bottom of the post, and it is also displaying at the top of the page (before header)
Any thoughts?
Warwick Levey
Is there anyway to disable to author box for profiles which don’t have any info in the author bio?
We use a custom field to add authorship to guest posts, and we don’t have a bio for most of our guests, and the blank box at the bottom of the page is z bit of an eyesore for these posts.
Thanks in advance for any help
Elizabeth Thompson
Does this mean I have to give them user access????
This doesn’t make sense for me? THey’re random people?
Thanks
re: Each author on your site will need to add their biographical information and links to their user profiles. They can do this by logging in to their WordPress account on your website and then click on the Profile link from the WordPress admin menu.
WPBeginner Support
Hi Elizabeth,
Random people should not have access to your WordPress site. Please see our beginner’s guide about WordPress user roles and permissions.
Admin
Morteza
Hi to all!
How to add EDD vendor name in EDD receipt?
I add this to my downloads page by adding:
echo get_the_author_meta( ‘name_of_store’, $post->post_author );
and
echo get_the_author_meta( ‘display_name’, $post->post_author );
,
It seems in this case I need to hook this, BUT HOW?
thanks
Mick
Thanks for this which is what I was looking for. Although now I see it with the bio in 2 places, what I would like is that the bio at the end of each post different to the bio down the side.
Is this possible or do I have to remove Meks and replace it with some other plugin?
Thanks
Wilson Lee
Hey,
This was just what I was looking for. I think I will stick with installing a plug-in though.
Coding makes my head hurt.
Thanks for the great wordpress content!
Wilson
Matt Stephens
hahaha! I thought exactly the same thing while reading through the post. Why go through the stress of coding, when there’s a plugin to get the job done?
Manjit Kumar
It’s great and so much helpful…
ingresos pasivos
Hi, I was wondering how I can add a margin higher than my box using the code that you left us.
My box shows very close to the letters of my post, I hope your answer.
A big greeting.
Vishal Rana
very helpful thanks a lot
Hina Ilyas
I have added the Guerrilla’s author box, but author details still don’t show on my posts. I can only see these three lines:
Author: Hina Ilyas
Filed Under: Weekly Rundown
Tags:
i don’t understand what is the issue!
Magnus
If I use method 3, it only shows the author info box when viewing a post.
The post itself doesn´t show at all.
Any suggestions?
Thank you in advance.
Kingsford
Please how can I add the author box to specific categories only?
Pls help.
Andy W.
You may have found the answer for this already (it’s kind of disappointing someone makes this posts and doesn’t respond to the questions), but I used this to display the box on only certain categories.
If you want to display the author box only on single posts that are assigned to any category, change:
// Detect if it is a single post with a post author
if ( is_single() && isset( $post->post_author ) ) {
to
// Detect if it is a single post with a post author
if ( is_single() && isset( $post->post_author ) && has_category() ) {
If you want to display the box ONLY in a certain category, then change the above to:
// Detect if it is a single post with a post author
if ( is_single() && isset( $post->post_author ) && in_category(‘X’) ) {
Change “X” to the category ID.
To include more than one category, simply replay “X” with an array() of category IDs:
// Detect if it is a single post with a post author
if ( is_single() && isset( $post->post_author ) && in_category( array(‘X’, ‘X’) ) ) {
Joseph
Hi andy can you help me, i-followed the method #3, how can i hide it to my wocommerce product page description here’s the site
Joseph
i just solved it, i used this code of yours:
// Detect if it is a single post with a post author
if ( is_single() && isset( $post->post_author ) && has_category() ) {
thanks for this
Shraddha Kapoor
Hi. I am facing a problem while adding hyperlink in the author bio. I tried add hyper link using anchor text at edumovlive.com but failed. Can anyone help me to get hyperlink in author bio.
Gabrielle
Hi, i added custom admin column: thumbnail to all users table
, how can i print each user gravatar, by user id, inside this column?
I added sucessfully featured image column inside all post table,
that links each image to each post via edit link, is there a way to add gravatar column in all users that links to edit user?
Anis Chity
How can I add links to my posts within the author box?
Nishat
Thanks for the post, great help. Is it possible to make the author box interactive? Like the bottom of this page?
I would like something similar to the ‘as well as’ feature but I know nothing about CSS.
Agus Tamanuri
Nice Post ..
Thanks for Your Article,
gagan
I added author box using method 3 but it showing author box above sharing icons how to move this down near comment section??
Annie
Do I need add links to social media profiles to the author, any idea?
Amir
For method #3 which is really the simplest and the fastest (involves some php coding skills) I added a break tag on the line where it shows picture and text as follows. Because it looks odd when only the first line of the bio shows up next to the picture and the rest of the bio separately.
$author_details .= ” . get_avatar( get_the_author_meta(‘user_email’) , 90 ) . ” . nl2br( $user_description ). ”;
Deyo
The hard coding worked perfectly with a little style tweaking, many thanks!
under the // Get author’s biographical information or description is the some kind of way to control the word or character count without having to edit the user bio itself? Maybe similar to controlling the excerpt length on a post page in functions?
King
I dont know how to add codes via my functions.php i might get an error. Any plugin to add codes into functions.php?
Wajiha Rizvi
You have to add it after the closing php tag that looks like this ( ?> ) in you child theme’s functions.php file.
Lorraine Reguly
Hi. I have three sites. For some reason, my author box automatically shows up on one of them. I had to install the Guerilla plugin to get it to show up on the others.
Why would one site show it and not the other two???
Shafi Khan
Hey There, Great article. The video attached to the post is not for instructions on “how to install a plugin” as written above it.
It it is a mistake, please correct it
sonja
Hi there, having trouble with the picture for the author box. I’ve moved the author widget to the sidebar for it to appear and it has along with the text but scratching my head on what to do to get the picture to show up also. I’m using a WordPress theme. Thanks for all your help!
Christopher Simmons
Heya… dealing with this today. Theme has a nice author box, but missing the socials at bottom.
Love your roll your own example, which we’re messing with “right now” — any chance you might expand on the example to include pulling in the “if socials” from the user meta, below the author’s website link ?
TIA ! Thanks for another great article
(12 year WP user — so not just for beginners! )
Peter Brown
Did you ever figure this out Christopher? I’m having the same issue with my theme.
Natanael David
Hi, thanks for this! I’m having a lot of help from you guys! For this and other functions.
One question: How can I set the max lenght in the Author description. Also, can I use a custom text for the box description in the single page and a full description in the Author page?
moon
Hi,
Thanks for your helpful information.
I have a problem, but I don’t know how to describe it. I added a picture into article, and set it style=”float: right; margin-left: 20px;”
It can show the web page well upon browsed on desktop computer, left hand side is content, and right hand side show picture.
but it cannot show the web page well upon browsed on mobile phone, please refer below URL:
Is it possible to show text first, and the picture under the text not around the picture?
If so, how?
Please try to help me out.
Thanks in advance.
Best regards,
Mario
Hi guys,
Do you know a way of inserting the author’s widget next to the post entry, but not in a sidebar? just as here:
thanks!
WPBeginner Support
You may want to add a widget area right next to the content.
Admin