
Det är enkelt att organisera ditt WordPress-innehåll med kategorier och taggar. Men genom att bygga WordPress-webbplatser i många år har vi lärt oss att standardkategorierna och taggarna inte alltid räcker för att skapa den perfekta innehållsstrukturen.
Det är där anpassade taxonomier kommer in i bilden. Med anpassade taxonomier kan du skapa dina egna sätt att sortera och gruppera innehåll.
Vi har använt dem för att organisera allt från ingredienser i recept till fastighetsannonser, och de ger en otrolig kontroll och flexibilitet över hur dina inlägg, produkter eller annat innehåll kategoriseras.
I den här guiden går vi igenom hur du skapar anpassade taxonomier i WordPress, oavsett om du använder ett plugin eller föredrar att göra det manuellt.

Vad är en taxonomi i WordPress?
En WordPress-taxonomi är ett sätt att organisera grupper av inlägg och anpassade inläggstyper.
Som standard levereras WordPress med 2 taxonomier som kallas kategorier och taggar. Du kan använda dem för att organisera dina blogginlägg.
Men om du använder en anpassad inläggstyp kanske kategorier och taggar inte passar för allt innehåll.
Du kan till exempel skapa en anpassad inläggstyp som heter “Böcker” och sortera den med hjälp av en anpassad taxonomi som heter “Ämnen”. Sedan kan du lägga till ämnestermer som “Äventyr”, “Romantik”, “Skräck” och andra bokämnen du vill ha.
På så sätt kan du och dina läsare enkelt sortera och filtrera böcker efter varje ämne.
Taxonomier kan också vara hierarkiska, vilket innebär att du kan ha huvudämnen eller överordnade ämnen som “Fiktion” och “Facklitteratur”. Sedan kan du ha underämnen, eller barn, under varje kategori.
Till exempel kan den överordnade kategorin “Fiction” ha “Adventure”, “Romance” och “Horror” som underkategorier.
Nu när du vet vad en custom taxonomi är, ska vi lära oss hur man skapar custom taxonomies i WordPress.
Att skapa anpassade taxonomier är kraftfullt, men det är mycket att ta hänsyn till. För att hjälpa dig att sätta upp detta på rätt sätt har vi skapat en enkel innehållsförteckning nedan:
Är du redo? Låt oss komma igång!
Skapa customize taxonomier med ett plugin (det enkla sättet)
Det första du behöver göra är att installera och aktivera UI-pluginet Custom Post Type. För detaljer, se vår guide om hur du installerar ett plugin för WordPress.
I den här tutorialen har vi redan skapat en custom post type och antagit namnet “Books”. Så se till att du har skapat en custom post type innan du börjar skapa dina taxonomier.
Låt oss sedan gå över till CPT UI ” Lägg till/redigera taxonomier i WordPress adminområde för att skapa din första taxonomi.

På den här vyn måste du göra följande:
- Skapa din taxonomi-slug (den här kommer att finnas i din URL)
- Skapa pluraletiketten
- Skapa den singulära etiketten
- Automatisk ifyllning av etiketter
Ditt första steg är att skapa en slug för taxonomin som ska användas i webbadressen och i WordPress sökfrågor. Observera att en slug endast kan innehålla bokstäver och siffror och att den automatiskt konverteras till gemener.
Därefter fyller du i plural- och singularnamnen för din customize taxonomi.
Därifrån har du alternativet att klicka på länken “Populate additional labels based on chosen labels. Om du gör detta kommer pluginet automatiskt att fylla i resten av etikettfälten åt dig.
Nu kan du bläddra ner till avsnittet “Additional Labels”.
I det här området kan du ge en beskrivning av din inläggstyp.

Dessa etiketter används i din WordPress-panel när du redigerar och hanterar innehåll för just den anpassade taxonomin.
Härnäst har vi alternativet Settings. I det här area kan du ställa in olika attribut för varje taxonomi som du skapar. Varje alternativ har en description som ger detaljer om vad det gör.

I skärmdumpen ovan ser du att vi valde att göra denna taxonomi hierarkisk.
Detta innebär att vår taxonomi “Ämnen” kan ha underämnen. Till exempel kan ett ämne som heter “Fiktion” ha underämnen som “Fantasy”, “Thriller”, “Mystery” med mera.
Det finns många andra Settings längre ner på vyn i din WordPress dashboard, men du kan låta dem vara som de är i den här tutorialen.
You can now click on the “Add Taxonomy” button at the bottom to save your custom taxonomi.
Därefter kan du redigera den inläggstyp som är associerad med denna taxonomi i WordPress innehållsredigerare för att börja använda den.

Skapa Custom Taxonomies manuellt (med kod)
Den här metoden är obligatorisk för att du ska kunna add to kod på din website i WordPress. Om du ej har gjort det tidigare rekommenderar vi att du läser vår guide om hur du enkelt lägger till code snippets i WordPress.
Vi rekommenderar inte att du direkt editerar dina WordPress-filer eftersom minsta lilla misstag kan förstöra hela din site. Det är därför vi rekommenderar att alla använder WPCode, det enklaste och säkraste code snippet plugin available.
För att börja måste du installera och aktivera det gratis pluginet WPCode. För detaljerade instruktioner, se vår Step-by-Step guide om hur du installerar ett WordPress plugin.
1. Skapa en hierarkisk taxonomi
Låt oss börja med en hierarkisk taxonomi som gillar kategorier och kan ha parent- och child-termer.
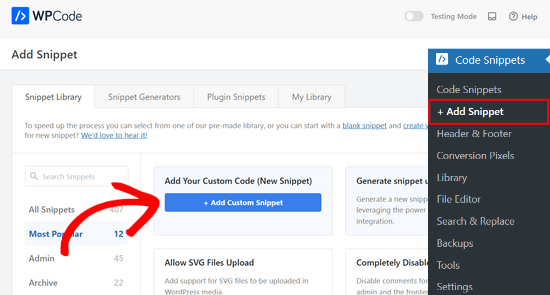
När du har installerat och aktiverat WPCode kan du navigera till Code Snippets ” + Add Snippet i din WordPress instrumentpanel.
Härifrån kan du hålla muspekaren över “Add Your Custom Code (New Snippet)” och klicka på knappen “+ Add Custom Snippet”.
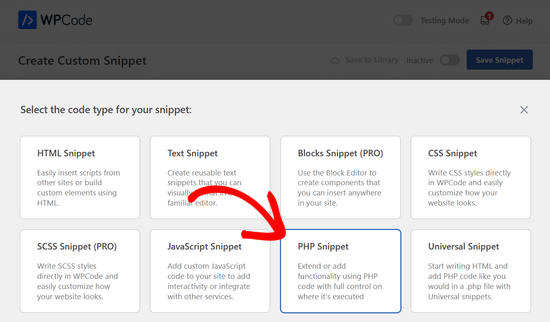
Därefter måste du välja en kodtyp från listan med alternativ som visas på skärmen.
För denna handledning väljer du “PHP Snippet”.
Därefter kommer du till sidan “Create Custom Snippet”.
Börja med att ange ett namn på din nya kodsnutt, som kan vara vad som helst för att hjälpa dig att komma ihåg vad koden är till för.
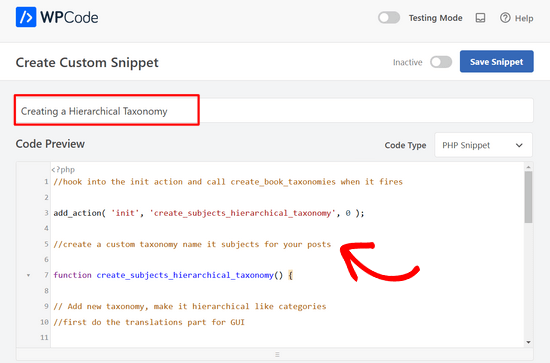
Därefter klistrar du bara in följande kod i området “Code Preview”:
1 2 3 4 5 6 7 8 9 10 11 12 13 14 15 16 17 18 19 20 21 22 23 24 25 26 27 28 29 30 31 32 33 34 35 36 37 | //hook into the init action and call create_book_taxonomies when it fires add_action( 'init', 'create_subjects_hierarchical_taxonomy', 0 ); //create a custom taxonomy name it subjects for your posts function create_subjects_hierarchical_taxonomy() { // Add new taxonomy, make it hierarchical like categories//first do the translations part for GUI $labels = array( 'name' => _x( 'Subjects', 'taxonomy general name' ), 'singular_name' => _x( 'Subject', 'taxonomy singular name' ), 'search_items' => __( 'Search Subjects' ), 'all_items' => __( 'All Subjects' ), 'parent_item' => __( 'Parent Subject' ), 'parent_item_colon' => __( 'Parent Subject:' ), 'edit_item' => __( 'Edit Subject' ), 'update_item' => __( 'Update Subject' ), 'add_new_item' => __( 'Add New Subject' ), 'new_item_name' => __( 'New Subject Name' ), 'menu_name' => __( 'Subjects' ), ); // Now register the taxonomy register_taxonomy('subjects',array('books'), array( 'hierarchical' => true, 'labels' => $labels, 'show_ui' => true, 'show_in_rest' => true, 'show_admin_column' => true, 'query_var' => true, 'rewrite' => array( 'slug' => 'subject' ), )); } |
Glöm inte att ersätta taxonominamnet och etiketterna i snippet med dina egna taxonomietiketter. Du kommer också att märka att denna taxonomi är associerad med inläggstypen Books. Du måste ändra det till vilken inläggstyp du vill använda den med.
Därefter ska du rulla ner och se till att “Auto Insert” och “Run Everywhere” är markerade i rutan Insertion.

Nu kan du bläddra tillbaka upp till toppen av sidan och växla från “Inaktiv” till “Aktiv”.
Slutligen klickar du på knappen “Save Snippet” för att aktivera dina ändringar.

2. Skapa en icke-hierarkisk taxonomi
För att skapa en icke-hierarkisk anpassad taxonomi som taggar använder du WPCode och följer exakt samma steg som ovan.
Endast, du kommer att använda den här koden istället:
1 2 3 4 5 6 7 8 9 10 11 12 13 14 15 16 17 18 19 20 21 22 23 24 25 26 27 28 29 30 31 32 33 34 35 36 37 38 39 | //hook into the init action and call create_topics_nonhierarchical_taxonomy when it fires add_action( 'init', 'create_topics_nonhierarchical_taxonomy', 0 ); function create_topics_nonhierarchical_taxonomy() { // Labels part for the GUI $labels = array( 'name' => _x( 'Topics', 'taxonomy general name' ), 'singular_name' => _x( 'Topic', 'taxonomy singular name' ), 'search_items' => __( 'Search Topics' ), 'popular_items' => __( 'Popular Topics' ), 'all_items' => __( 'All Topics' ), 'parent_item' => null, 'parent_item_colon' => null, 'edit_item' => __( 'Edit Topic' ), 'update_item' => __( 'Update Topic' ), 'add_new_item' => __( 'Add New Topic' ), 'new_item_name' => __( 'New Topic Name' ), 'separate_items_with_commas' => __( 'Separate topics with commas' ), 'add_or_remove_items' => __( 'Add or remove topics' ), 'choose_from_most_used' => __( 'Choose from the most used topics' ), 'menu_name' => __( 'Topics' ), ); // Now register the non-hierarchical taxonomy like tag register_taxonomy('topics','books',array( 'hierarchical' => false, 'labels' => $labels, 'show_ui' => true, 'show_in_rest' => true, 'show_admin_column' => true, 'update_count_callback' => '_update_post_term_count', 'query_var' => true, 'rewrite' => array( 'slug' => 'topic' ), ));} |
Notice the difference between the 2 code snippets. Under register_taxonomy() -funktionen sätts värdet för det hierarkiska argumentet till true för kategoriliknande taxonomier och false för tagg/tagged-liknande taxonomier.
I etikettmatrisen för icke-hierarkiska taxonomier har vi också lagt till null för argumenten parent_item och parent_item_colon, vilket innebär att inget kommer att visas i användargränssnittet för att skapa ett överordnat objekt eller en taxonomi som kan ha underrubriker.

Återigen, var noga med att edit koden för att inkludera dina egna custom taxonomi etiketter.
Displaying Custom Taxonomies (visa custom taxonomier)
Nu när vi har skapat custom taxonomies och har add to några termer kommer your WordPress theme fortfarande inte att visa dem.
För att visa dem måste du lägga till kod i ditt WordPress-tema eller barntema. Denna kod måste särskilt läggas till i mallfiler där du vill visa villkoren.
Du kan manuellt lägga till detta snippet i dina temafiler, t.ex. single.php, content. php, archive.php eller index.php. För att ta reda på vilken fil du behöver redigera kan du se vår guide till WordPress mallhierarki för steg-för-steg-instruktioner .
Men om det inte görs korrekt kan detta förstöra din webbplats, så vi rekommenderar återigen att du använder det kostnadsfria WPCode-pluginet.
Du måste lägga till följande kod där du vill visa villkoren:
1 | <?php the_terms( $post->ID, 'topics', 'Topics: ', ', ', ' ' ); ?> |
Sedan kan du helt enkelt följa stegen ovan för att klistra in snippet i WPCode.
Men under Insertion vill du klicka på dropdown bredvid “Location” och välja var du vill visa taxonomin, till exempel före posten, efter den eller till och med mellan stycken.
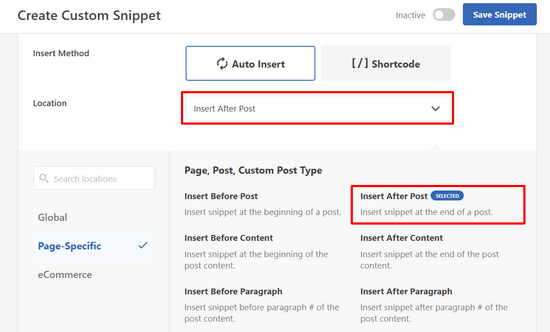
För denna tutorial kommer vi att select “Insert After Post”.
Du kan se på bilden under hur det kommer att se ut på din site.

Lägga till taxonomier för Custom Posts
Nu när du vet hur man skapar customize taxonomies, låt oss använda dem med ett exempel.
Vi kommer att skapa en taxonomi och kalla den “Facklitteratur”. Eftersom vi har en anpassad inläggstyp som heter “Books”, liknar det hur du skulle skapa ett vanligt blogginlägg.
I din WordPress-panel kan du navigera till Böcker ” Ämnen för att lägga till en term eller ett ämne.

På den här vyn ser du 4 area:
- From Name
- Snigel
- Förälder
- Beskrivning
I namnfältet skriver du ut den term som du vill lägga till. Du kan hoppa över slug-delen och ge en beskrivning för just den här termen.
Slutligen klickar du på knappen “Add New Subject” för att skapa din nya taxonomi.
Den nytillagda termen bör då visas i den högra kolumnen.

Nu har du en ny term som du kan använda i dina blogginlägg. Du kan också lägga till termer direkt när du redigerar eller skriver innehåll under den specifika inläggstypen.
Gå bara till Böcker ” Lägg till nytt för att skapa ett inlägg.
I inläggsredigeraren hittar du möjligheten att välja eller skapa nya termer i den högra kolumnen.

När du har lagt till termer kan du gå vidare och publicera det innehållet.
Alla dina inlägg som arkiveras under den termen kommer att vara tillgängliga på din webbplats med hjälp av sin egen URL. Till exempel kommer inlägg som arkiveras under ämnet “Fiction” att visas på följande URL:
https://example.com/subject/fiction/

Lägga till anpassade taxonomier i navigeringsmenyn
Nu när du har skapat customize taxonomies kanske du vill visa dem i navigation menu på din website.
Du vill gå till Utseende ” Menyer och välja de termer du vill lägga till under din anpassade taxonomiflik som visas på vänster sida av skärmen.

Glöm inte att klicka på knappen “Save Menu” för att spara dina Settings.
You kan nu besöka din website för att se din menu in action.

För mer information kan du läsa vår steg-för-steg-guide om hur du skapar en rullgardinsmeny i WordPress.
Videohandledning
Om du föredrar att titta på och lära dig hur du skapar anpassade taxonomier kan du kolla in vår videohandledning:
Bonus: Gå vidare med taxonomier i WordPress
Med anpassade taxonomier kan du göra massor av saker. Du kan till exempel visa dem i en widget i sidofältet eller lägga till bildikoner för varje term.
Du kan också skapa anpassade taxonomier och låta användarna prenumerera på enskilda termer. På så sätt får dina läsare bara uppdateringar om det specifika innehåll som är viktigt för dem.
Om du vill anpassa layouten på dina anpassade taxonomisidor kan du kolla in SeedProd. Det är den bästa dra-och-släpp WordPress-sidbyggaren och temabyggaren som låter dig skapa anpassade layouter utan någon kodning.

Om du vill veta mer kan du läsa vår artikel om hur du skapar en anpassad sida i WordPress.
Vi hoppas att den här artikeln hjälpte dig att lära dig hur du skapar anpassade taxonomier i WordPress. Du kanske också vill läsa våra guider om hur du lägger till taxonomibilder (kategoriikoner) i WordPress och hur du på rätt sätt ändrar, flyttar och tar bort WordPress-kategorier.
If you liked this article, then please subscribe to our YouTube Channel for WordPress video tutorials. You can also find us on Twitter and Facebook.

")

 in 2024")
Jiří Vaněk
Thank you for the clear instructions. I would like to make my own taxonomy for tutorials on the site. This tutorial is great and clear, thanks.
WPBeginner Support
Glad it was helpful
Admin
Kira
Hello.
I don’t understand this part:
ID, ‘topics’, ‘Topics: ‘, ‘, ‘, ‘ ‘ ); ?>
I mean, should I paste exactly that part into my loop-single.php?
I’m using a taxonomy called “writer”
WPBeginner Support
It would depend on where you want to display the terms, normally it would be added to the single.php.
Admin
Wolfgang
Hi,
I used your article to create a CPT with a hierarchical and a non-hierarchical taxonomy attached to it. I created a few entries and it all seems to be working fine. Both taxonomies display fine in their respective archive pages. One thing I noticed though when I tried to add the taxonomies to the menu was that the non-hierarchical taxonomy was available in the “Add menu item” column but the hierarchical taxonomy was NOT.
Is that an expected behavior? If not what could be going wrong?
Thanks
WPBeginner Support
The most common issues you could check would be that you have published content in the taxonomy and you may want to test adding a different content type to test if it is an issue with the taxonomy or something else.
Admin
mb
what does this line do
‘menu_name’ => __( ‘Subjects’ ),
is this in order to add taxonomies to the menu
aditya
hii i try everything but i taxonomy not showing in product. please help me.
WPBeginner Support
You would want to check under your preferences to ensure it is not hidden for your user.
Admin
Gina Wilson
This tutorial and specifically the part of how to display the custom taxonomy was a lifesaver! I’m very much a beginner and this was very helpful in understanding where I went wrong in my coding.
Thank you!!!
WPBeginner Support
Glad our guide was helpful
Admin
fengquanli
this is very confident with the custom post ui, thanks very much ,it’s very useful for get them.
WPBeginner Support
Glad our guide was helpful
Admin
Bruno Oliveira
Awesome tutorial! i have one question. how do i use my new taxonomy slug as permalink like category (/%category%/%year%/%monthnum%/%day%/%postname%/)
I want something like /%custom_taxonomy%/%year%/%monthnum%/%day%/%postname%/
i keep getting 404 error
WPBeginner Support
That is not something WordPress would allow by default and would require some custom coding to set up.
Admin
vikas
i tried the plugin method , it sucessfully created a new category in custom post type but it is not showing on my posts like tags and other categoties. can you help me with that?
WPBeginner Support
You would want to reach out to the support for your specific theme for customizing the display to include your taxonomy.
Admin
Richard
I am creating a podcast network where I have multiple podcasts on a single site with episodes under each individual podcast. Would something like this work for that? I really don’t want to go the multi site route.
WPBeginner Support
You can certainly use this should you want or another option would be to create a custom post type depending on your preference.
Admin
Maria
Hello is possible add the custom taxonomies to a custom product type?
I create a custom product call drinks and i have several taxonomies like country, material and etc
I want when the user click in drinks then only apperas those taxonomies, is this posiible?
WPBeginner Support
You should be able to using the plugin method.
Admin
Parveen Kaushik
Hi,
Thanks for this article, I am getting 404 page after using this code, can you help me
WPBeginner Support
If you haven’t done so yet, resave your permalinks for the most common solution
Admin
Mike Smith
this code works great on my site for work. Can you tell me how to add the custom taxonomy into the site’s rss feed?
WPBeginner Support
It would depend on what you are looking for, for a starting point you would want to take a look at our article below:
https://www.wpbeginner.com/wp-tutorials/how-to-make-a-separate-rss-feed-for-each-custom-post-type-in-wordpress/
Admin
angela
thank you for taking the time to post this, this was the first site that actually explained this and it made sense, haha. im a happy camper now
WPBeginner Support
You’re welcome, glad our guide could help simplify the process
Admin
Jem
How to show custom taxonomy (checkbox list) in Post editor page like category and tag?
WPBeginner Support
It would depend on which method you used to create the custom taxonomy, if you’re using the plugin you would want to reach out to the plugin’s support to make sure they have show_in_rest set to true for seeing it in the block editor.
Admin
Jem
No, I am not using any plugin. I have just copy paste your snippet. Its create new taxonomy. But it is not display in post editor page like category, tags display on rightside panel.
Can you please guide me how can I show custom taxonomy in post editor page?
WPBeginner Support
In the register_taxonomy array, you would want to first try adding a new line with the code below:
‘show_in_rest’ => true,
Jim Gersetich
The first half of this post is completely useless. the Simple Taxonomy plugin doesn’t work with the current WordPress version, and it hasn’t been updated in four years.
Please try to find another plugin and change that section to go with the new one.
WPBeginner Support
Thank you for letting us know, we’ll certainly take a look at updating this article.
Admin